Yamaha R-S201 Silver: INTRODUCTION
INTRODUCTION: Yamaha R-S201 Silver
INTRODUCTION
CONTROLS AND FUNCTIONS
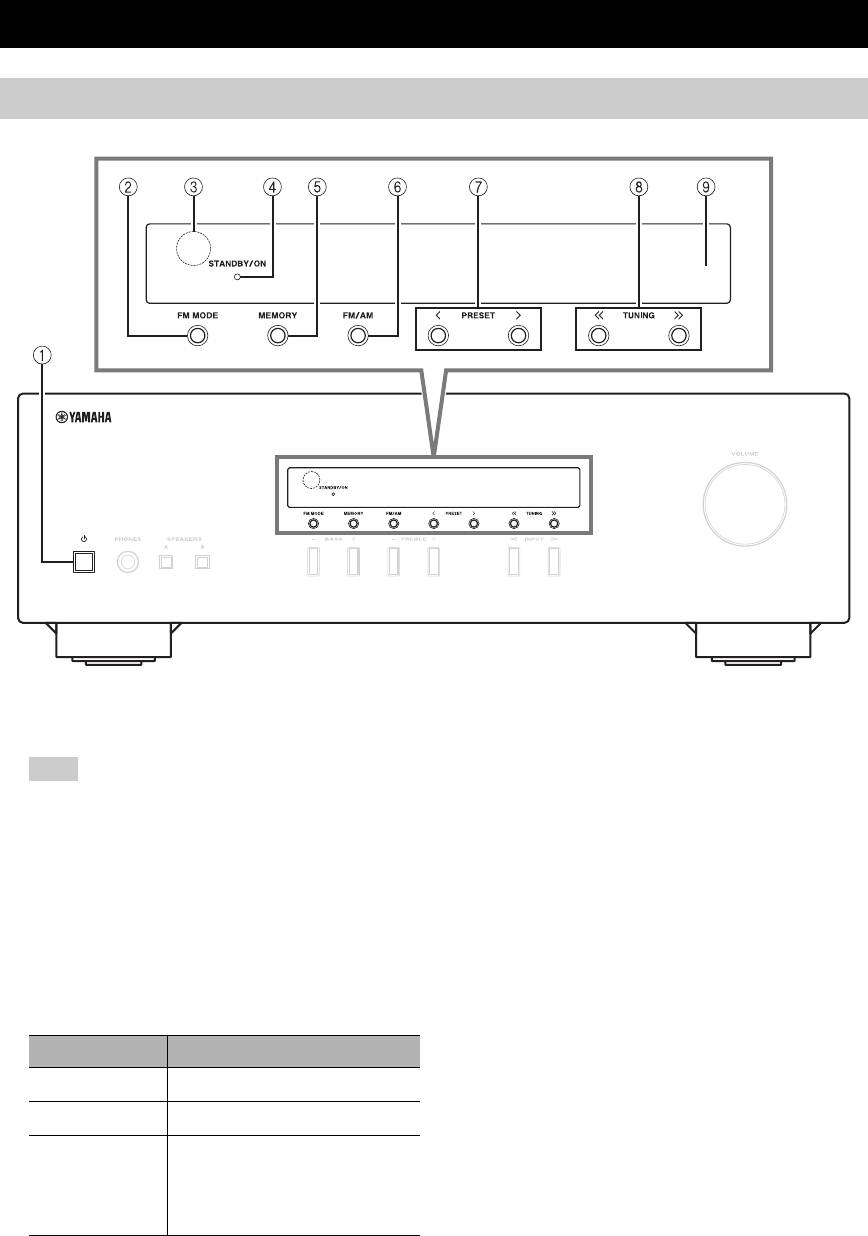
Front panel
1 A (power)
5 MEMORY
Turns this unit on, or sets it to standby mode.
Stores the current FM/AM station as a preset when
TUNER is selected as the input source (see page 15).
Note
6 FM/AM
This unit consumes a small amount of power even when in
Sets the FM/AM tuner band to FM or AM when
standby mode.
TUNER is selected as the input source (see page 14).
2 FM MODE
7 PRESET j / i
Changes the FM radio wave reception mode (stereo or
Selects a preset FM/AM station when TUNER is
monaural) when TUNER is selected as the input
selected as the input source (see page 16).
source (see page 14).
8 TUNING jj / ii
3 Remote control sensor
Selects the tuning frequency when TUNER is selected
Receives infrared signals from the remote control.
as the input source (see page 14).
4 STANDBY/ON indicator
9 Front panel display
Indicator Status
Shows information about the operational status of this
unit.
Brightly lit
The power of this unit is “on”.
Dimly lit
This unit is in “standby” mode.
Off
The power of this unit is “off”.
To turn off this unit, disconnect
the power cable from an AC
wall outlet.
2 En
CONTROLS AND FUNCTIONS
INTRODUCTION
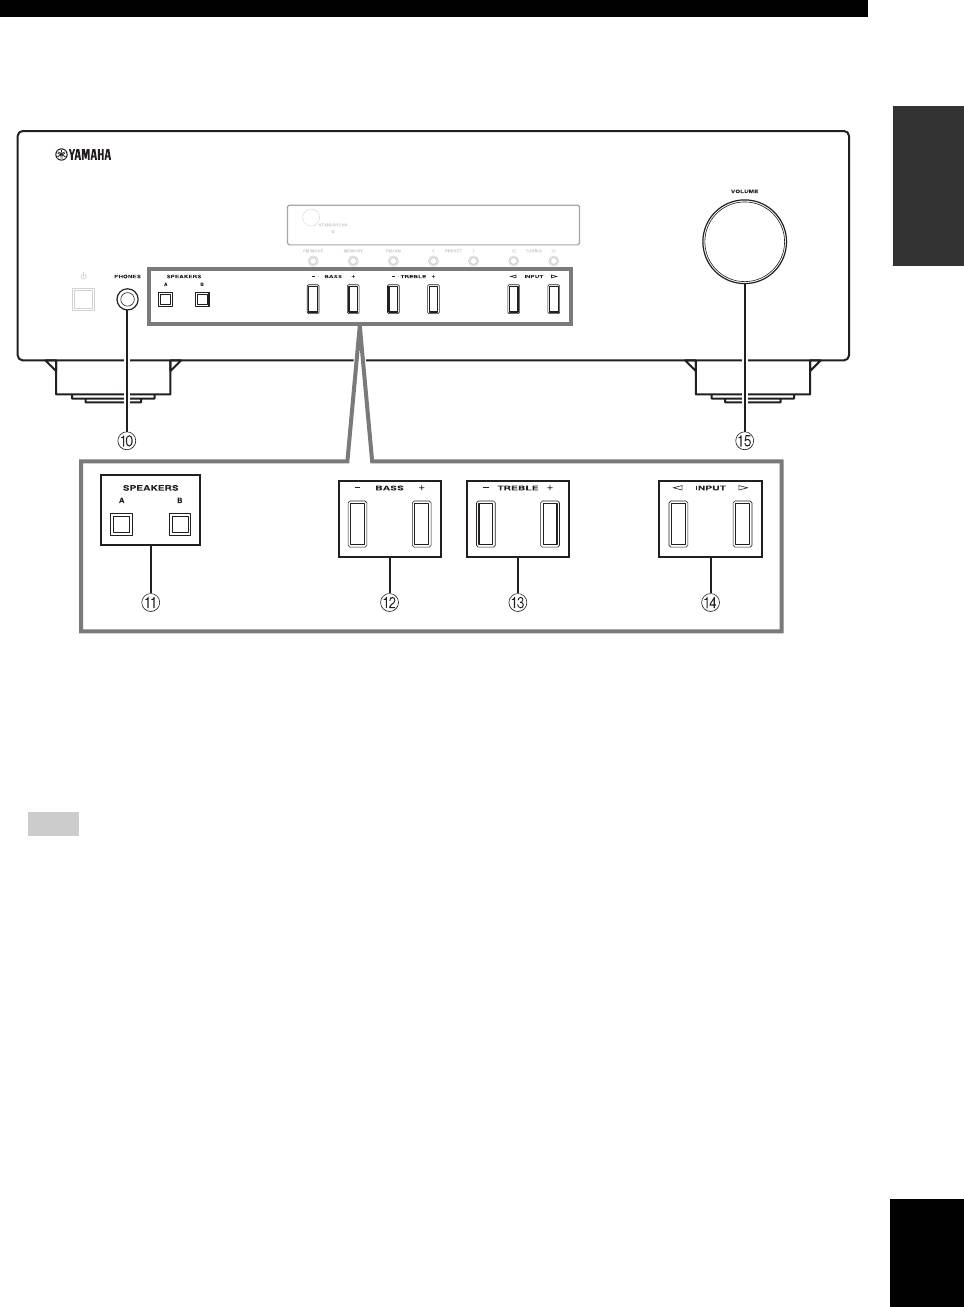
0 PHONES jack
B BASS –/+
Outputs audio to your headphones for private
Increases or decreases the low frequency response.
listening.
Control range: –10 dB to +10 dB
Note
C TREBLE –/+
Press SPEAKERS A/B so that the SP A/B indicators (see
Increases or decreases the high frequency response.
page 4) turn off before you connect your headphones to the
Control range: –10 dB to +10 dB
PHONES jack.
D INPUT l / h
A SPEAKERS A/B
Selects the input source you want to listen to.
Turns on or off the speaker set connected to the
E VOLUME control
SPEAKERS A and/or SPEAKERS B terminals on the
Increases or decreases the sound output level.
rear panel each time the corresponding button is
pressed (see page
12
).
English
3 En
CONTROLS AND FUNCTIONS
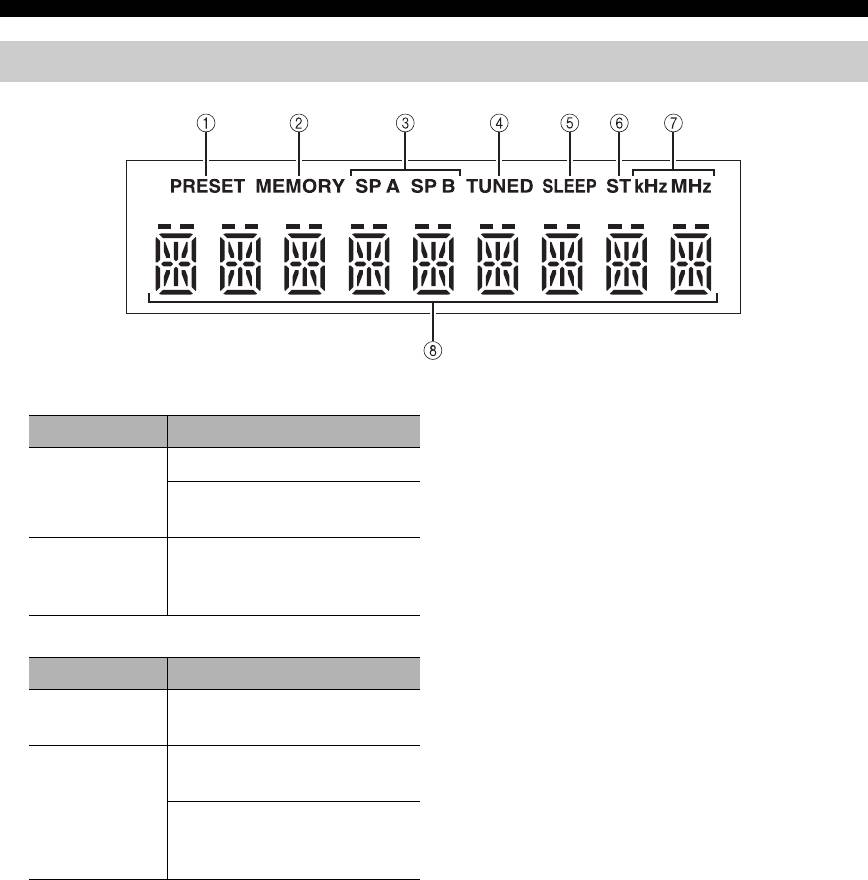
Front panel display
1 PRESET indicator
4 TUNED indicator
Lights up when this unit is tuned in to an FM or AM
Indicator Status
station with a strong signal.
lights up
Recalling a preset radio station.
5 SLEEP indicator
Searching an FM/AM station
Lights up when the sleep timer is turned on (see
manually to register as a preset.
page 13).
blinks
Scanning for FM stations
6 ST indicator
automatically to register as
Lights up when this unit is in stereo mode and tuning
presets.
in an FM station with a stereo broadcast.
2 MEMORY indicator
7 kHz/MHz indicators
Lights up according to the current broadcast
Indicator Status
frequency.
lights up
Registering an FM/AM station
kHz: AM
as a preset has been completed.
MHz: FM
blinks
Searching an FM/AM station
8 Multi-information display
manually to register as a preset.
Shows information when adjusting or changing
settings.
Scanning for FM stations
automatically to register as
presets.
3 SP (SPEAKERS) A/B indicators
Light up according to the set of speakers selected.
Both indicators light up when both sets of speakers are
selected.
4 En

CONTROLS AND FUNCTIONS
Rear panel
INTRODUCTION
1 ANTENNA terminals
5 LINE 3 jacks
Used to connect FM and AM antennas (see page 11).
PB (Playback) jacks
Used to connect to audio output jacks of an audio
2 Power cable
component.
For connecting this unit to an AC wall outlet (see
REC (Recording) jacks
page 11).
Used to connect to audio input jacks of an audio
3 CD jacks
component.
Used to connect a CD player (see page 9).
6 SPEAKERS terminals
4 LINE 1-2 jacks
Used to connect speakers (see page 9).
Used to connect audio components (see page 9).
7 VOLTAGE SELECTOR (Only for General
model)
English
5 En
CONTROLS AND FUNCTIONS
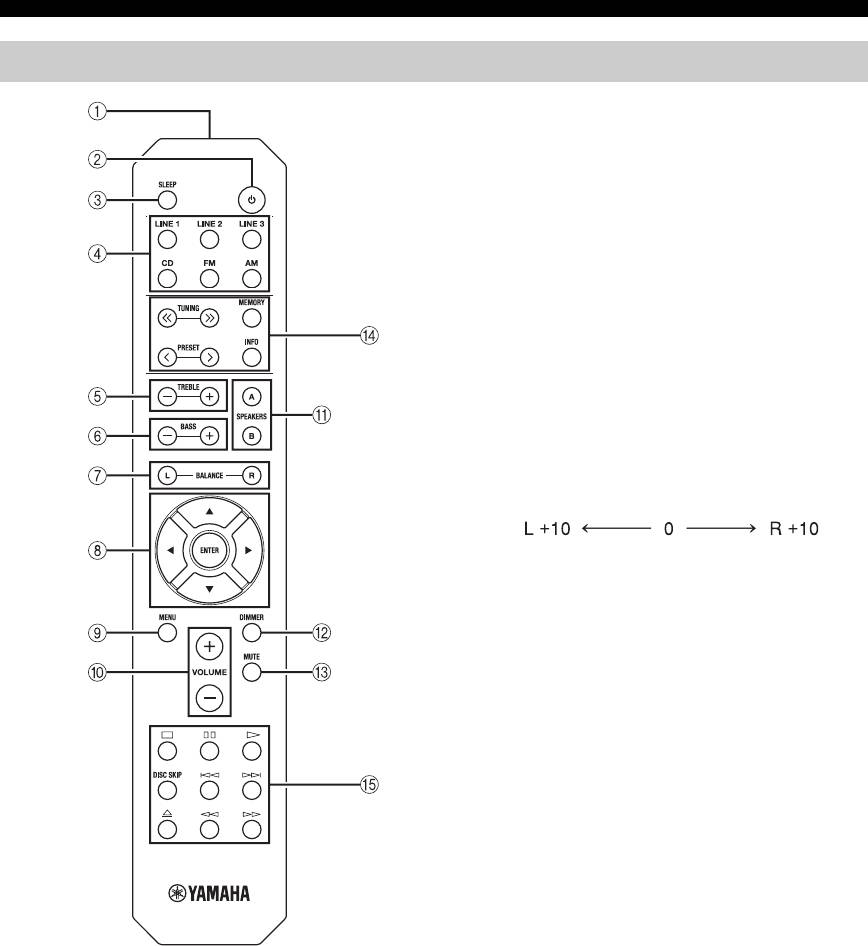
Remote control
4 Input selector buttons
Select the input source you want to listen to.
y
• The input source names correspond to the names of the
connection jacks on the rear panel.
• To select TUNER as the input source using the remote
control, press FM or AM.
5 TREBLE –/+
Increases or decreases the high frequency response.
Control range: –10 dB to +10 dB
6 BASS –/+
Increases or decreases the low frequency response.
Control range: –10 dB to +10 dB
7 BALANCE L/R
Adjusts the sound output balance of the left and right
speakers to compensate for sound imbalances.
Control range:
(+20 dB) (center) (+20 dB)
The opposite side of
The opposite side of
channel is muted.
channel is muted.
8 B / C / D / E / ENTER
Selects and confirms items in the Option menu (see
page 19).
9 MENU
Turns the Option menu on and off (see page 19).
0 VOLUME +/–
Increases or decreases the sound output level.
A SPEAKERS A/B
Turns on or off the speaker set connected to the
SPEAKERS A and/or SPEAKERS B terminals on the
rear panel each time the corresponding button is
pressed (see page
12
).
B DIMMER
■ Common controls
Select the brightness level of the front panel display
The following parts and controls can be used no matter
from 3 levels by pressing this button repeatedly.
which input source is selected.
y
1 Infrared signal transmitter
• This setting is retained even if you turn off this unit.
• The default setting is the brightest.
Sends infrared signals.
C MUTE
2
A (power)
Mutes the sound output. Press again to restore the
Turns this unit on, or sets it to standby mode.
sound output to the previous volume level.
3 SLEEP
Sets the sleep timer (see page 13).
6 En

CONTROLS AND FUNCTIONS
■ FM/AM controls
■ Yamaha CD player controls
The following buttons can be used when TUNER is
The following buttons can be used to control a Yamaha
selected as the input source.
CD player.
INTRODUCTION
D TUNING jj / ii
E Yamaha CD player control buttons
Selects the tuning frequency (see page 14).
s Stops playback
e Pauses playback
PRESET j / i
p Starts playback
Selects a preset FM/AM station (see page 16).
DISC SKIP Skips to the next disc in a CD changer
MEMORY
b Skips backward
Stores the current FM/AM station as a preset (see
a Skips forward
page 15).
Ejects the disc
w Rewinds playback
INFO
f Fast-forwards playback
Only for Europe model:
Switches information shown on the front panel display
Note
(see page 18).
Even when using a Yamaha CD player, certain components and
features may not be available. Refer to your component’s owner’s
manual for more information.
English
7 En
CONTROLS AND FUNCTIONS
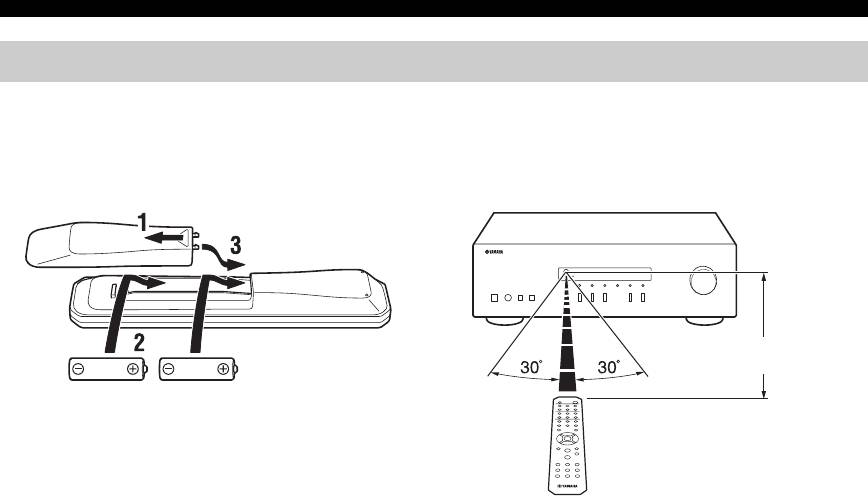
Using the remote control
■ Installing batteries ■ Operation range
Point the remote control at the remote control sensor on
this unit and remain within the operating range shown
below.
Approximately
6 m (20 ft)
AA, R6, UM-3 batteries
Remote control
■ Notes on remote control and batteries
• The area between the remote control and this unit must be clear of large obstacles.
• Be careful not to spill water or other liquids on the remote control.
• Be careful not to drop the remote control.
• Do not leave or store the remote control in the following conditions:
– places of high humidity, such as near a bathroom
– places of high temperatures, such as near a heater or stove
– places of extremely low temperatures
– dusty places
• Change all batteries if you notice the operation range of the remote control narrows.
• If the batteries run out, immediately remove them from the remote control to prevent an explosion or acid leak.
• If you find leaking batteries, discard the batteries immediately, taking care not to touch the leaked material. If the leaked material
comes into contact with your skin or gets into your eyes or mouth, rinse it away immediately and consult a doctor. Clean the battery
compartment thoroughly before installing new batteries.
• Do not use old batteries together with new ones. This may shorten the life of the new batteries or cause old batteries to leak.
• Do not use different types of batteries (such as alkaline and manganese batteries) together. Batteries that look the same may have a
different specification.
• Before inserting new batteries, wipe the battery compartment clean.
• Dispose of batteries according to your regional regulations.
• Keep the batteries in a location out of reach of children.
Batteries can be dangerous if a child were to put in his or her mouth.
• If you plan not to use this unit for a long period of time, remove the batteries from this unit. Otherwise, the batteries will wear out,
possibly resulting in a leakage of battery liquid that may damage this unit.
8 En
Оглавление
- Integrated Amplifier Receiver Amplificateur Intégré Ampli-Tuner
- INTRODUCTION
- PREPARATION
- BASIC OPERATION
- ADVANCED OPERATION
- ADDITIONAL INFORMATION
- INTRODUCTION
- PRÉPARATION
- OPÉRATIONS DE BASE
- OPÉRATIONS AVANCÉES
- INFORMATIONS COMPLÉMENTAIRES
- EINFÜHRUNG
- VORBEREITUNG
- BEDIENUNG DER GRUNDFUNKTIONEN
- ERWEITERTE BEDIENUNG
- ZUSÄTZLICHE INFORMATIONEN
- INTRODUKTION
- FÖRBEREDELSE
- GRUNDLÄGGANDE ANVÄNDNING
- AVANCERAD ANVÄNDNING
- YTTERLIGARE INFORMATION
- INTRODUZIONE
- PREPARATIVI
- FUNZIONAMENTO DI BASE
- FUNZIONAMENTO AVANZATO
- INFORMAZIONI AGGIUNTIVE
- INTRODUCCIÓN
- PREPARACIÓN
- MANEJO BÁSICO
- MANEJO AVANZADO
- INFORMACIÓN ADICIONAL
- INLEIDING
- VOORBEREIDINGEN
- BASISBEDIENING
- GEAVANCEERDE BEDIENING
- AANVULLENDE INFORMATIE
- ВВЕДЕНИЕ
- ПОДГОТОВКА
- ОСНОВНЫЕ ФУНКЦИИ
- ДОПОЛНИТЕЛЬНЫЕ ФУНКЦИИ
- ДОПОЛНИТЕЛЬНАЯ ИНФОРМАЦИЯ


