Yamaha CD-S300 Silver: CONTROLS AND FUNCTIONS
CONTROLS AND FUNCTIONS: Yamaha CD-S300 Silver
INTRODUCTION
CONTROLS AND FUNCTIONS
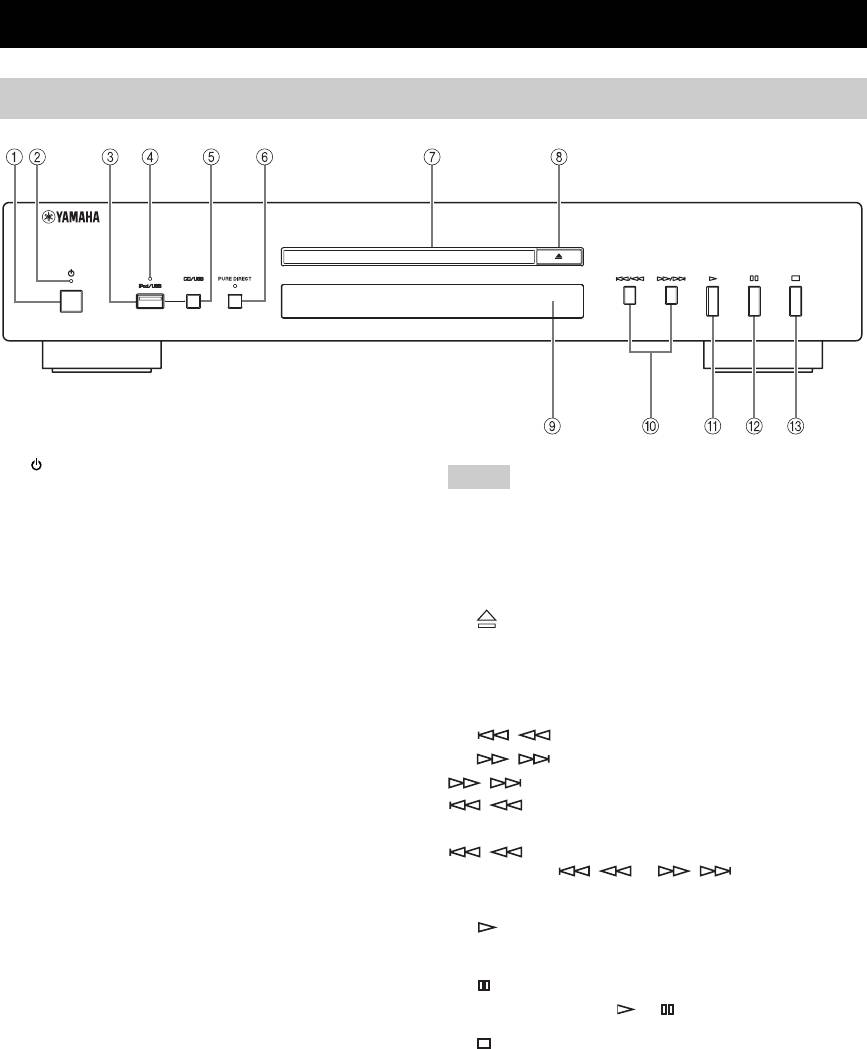
Front panel
1 (Power)
Note
Press to turn the power on/off.
Connect using the ANALOG OUT terminals when you use
y
PURE DIRECT mode (refer to page 3).
• The power indicator above lights up when this unit is turned on.
• Playback starts automatically if the power is turned on while a
7 Disc tray
disc is set in the disc tray.
Loads a disc.
2 Power indicator
8 (Open/Close)
Lights up as follows:
Opens or closes the disc tray.
ON: Bright
OFF: Off
9 Remote control sensor
Receives signals from the remote control.
3 iPod/USB port
Connect your iPod or USB device. See page 6 for details.
0 / (Skip/Search backward),
/ (Skip/Search forward)
4 iPod/USB indicator
/ : Skips to the next track.
Off: CD mode is selected.
/ : Skips back to the beginning of the current
Orange: Connection ready.
track.
Green: iPod/USB is connected and playable files have
/ (twice): Skips to the previous track.
been detected (playback ready).
Press and hold / or / to search
5 CD/USB
backward/forward.
Swithes between CD mode and iPod/USB mode (see
A (Play)
page 6).
Starts playback.
y
B (Pause)
When the iPod/USB indicator is not lit, this unit is in the CD
mode.
Pauses playback. Press or to resume playback.
6 PURE DIRECT
C (Stop)
Turns on or off the PURE DIRECT mode to improve
Stops playback.
audio quality.
y
• The PURE DIRECT indicator lights up.
• The digital output is turned off.
• The front panel display is turned off during playback and only
the minimum required indicators and messages are displayed
during in the operation.
2 En
CONTROLS AND FUNCTIONS
INTRODUCTION
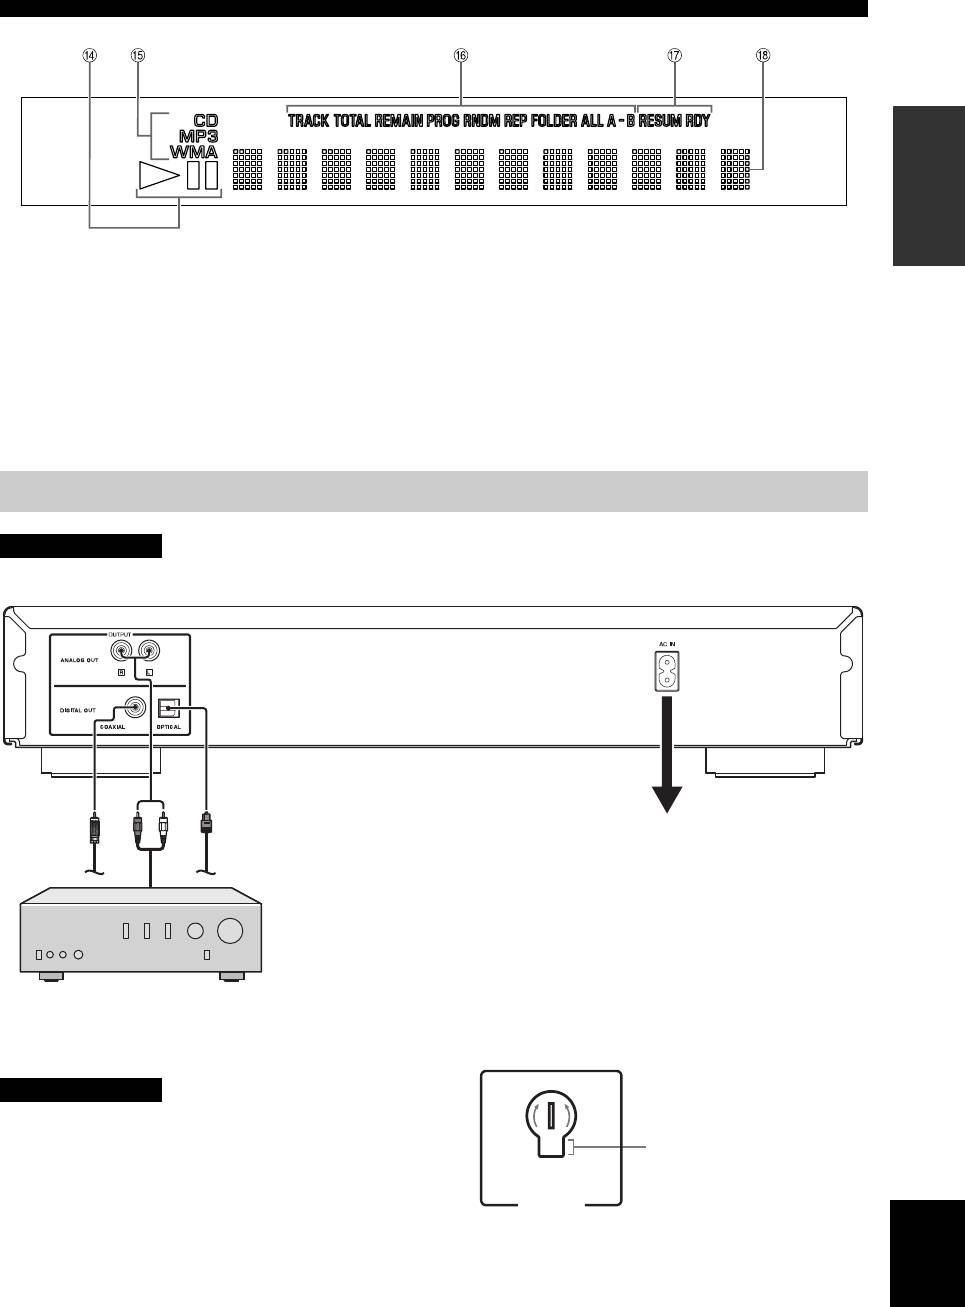
D Playback Status Indicator
G Advanced setup indicator
Lights up when this unit is in the play or pause mode.
Indicates the enabled special modes. See “USING THE
ADVANCED SETUP” (page 9) for details.
E Source type indicator
Indicates the type of content being played back.
H Multi-information display
F Time and playback mode indicator
Indicates the current playback mode and the status of the
time display (see pages 5 and 5 for playback modes, and
page 5 for time display).
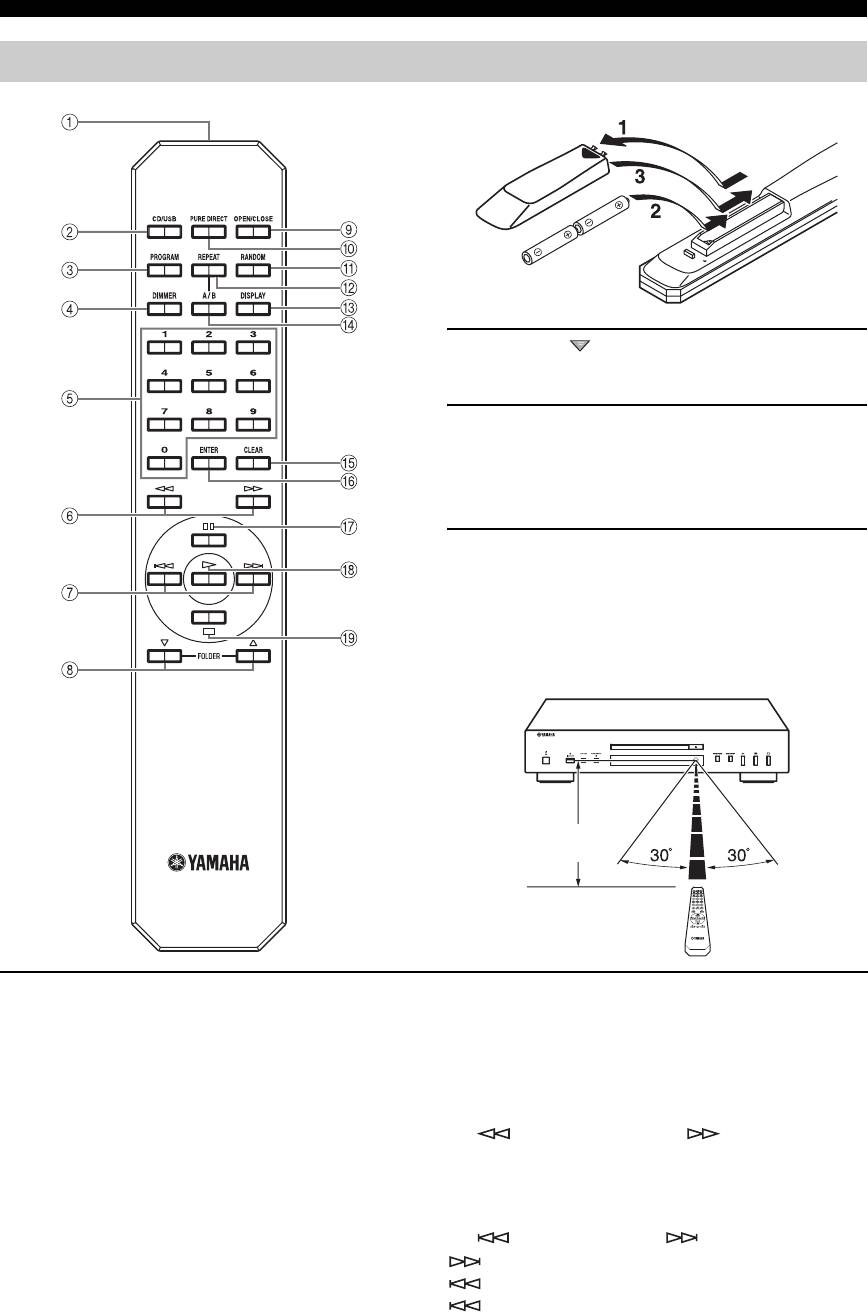
Rear panel connections
CAUTION
Before making any connection, switch OFF the power to the unit, the amplifier and any other component.
Audio cable (supplied)
Optical digital cable
cable
Coaxial digital
Connect the supplied power cable into
the AC IN inlet on the rear panel when
all connections are complete, and then
plug in the power cable to the AC outlet.
The audio signals are only output from the ANALOG OUT jacks
when the PURE DIRECT mode is on.
Amplifier
■ VOLTAGE SELECTOR
Voltages are as follows:
(Asia and General models only)
...............AC 110/120/220/230-240 V, 50/60 Hz
CAUTION
The VOLTAGE SELECTOR on the rear panel of this unit
230-
must be set for your local voltage BEFORE plugging the
Voltage indication
240V
power cable into the AC wall outlet. Improper setting of
the VOLTAGE SELECTOR may cause damage to this
VO LTAGE
SELECTOR
unit and create a potential fire hazard.
English
Rotate the VOLTAGE SELECTOR clockwise or
counterclockwise to the correct position using a straight
slot screwdriver.
3 En
CONTROLS AND FUNCTIONS
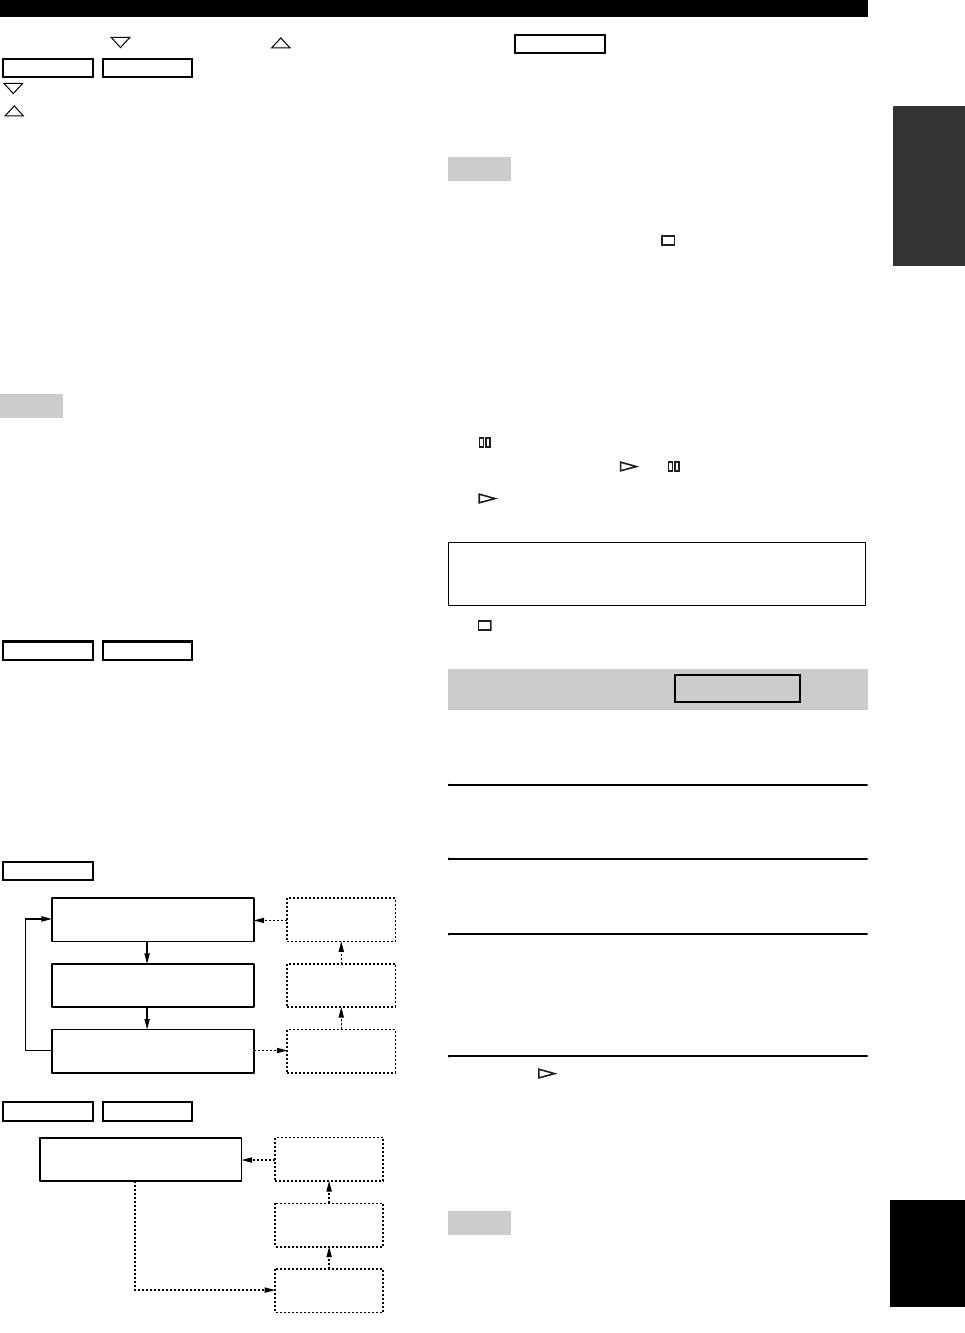
Remote control
■ Installing batteries in the remote control
1 Press the part and slide the battery
compartment cover off.
2 Insert the two supplied batteries (AA, R6,
UM-3) according to the polarity markings (+
and –) on the inside of the battery
compartment.
3 Slide the cover back until it snaps into place.
■ Using the remote control
The remote control transmits a directional infrared beam.
Be sure to aim the remote control directly at the remote
control sensor on the front panel of this unit during
operation.
Within 6 m
(20 ft)
1 Infrared signal transmitter
y
This setting is retained even if you turn off this unit.
Sends infrared signals to this unit.
5 Numeric buttons
2 CD/USB
Use to select directly a track on the disc or a file in the
Switches between CD mode and iPod/USB mode (see
current folder.
page 6).
y
6 (Search backward), (Search
This setting is retained even if you turn off this unit.
forward)
Searches tracks backward/forward while the key is
3 PROGRAM
pressed.
Turns on or off the program playback mode. See
“Program playback” on the next page.
7 (Skip backward), (Skip forward)
: Skips to the next track.
4 DIMMER
: Skips back to the beginning of the current track.
Each time you press DIMMER, the brightness level
(twice): Skips to the previous track.
changes by 4 levels.
4 En
CONTROLS AND FUNCTIONS
8 FOLDER (Folder down), (Folder up)
D A/B
Audio CD
Data Disc USB
Repeats playback of a specified section of a track. To set
: Skips to the previous folder.
the starting and end points (A and B), press A/B twice
: Skips to the next folder.
during playback.
INTRODUCTION
Refer to page 6 for details.
To cancel repeat A-B, press A/B again.
9 OPEN/CLOSE
Notes
Opens or closes the disc tray.
• You cannot set repeat A-B from one track to another track.
0 PURE DIRECT
• You cannot set repeat A-B for Data Disc and USB.
• If you stop playback by pressing (Stop), repeat A-B is canceled.
Turns on or off the PURE DIRECT mode to improve
• You cannot use repeat A-B when this unit is in the PURE
audio quality. See page 2 for details.
DIRECT mode.
y
E CLEAR
This setting is retained even if you turn off this unit.
Erases the programmed track.
A RANDOM
F ENTER
Turns on or off the random sequence playback mode.
Confirms a track number entered when you are
Note
programming tracks.
The random playback mode is canceled when the disc is ejected.
G (Pause)
B REPEAT
Pauses playback. Press or to resume playback.
Repeats playback of a single track or all tracks. Each time
H (Play)
you press REPEAT during playback, the repeat playback
Starts playback.
mode changes as follows:
• REP TRACK (single repeat playback): A single track
See pages 8 for more information on MP3/WMA
is played back repeatedly.
playback.
• REP ALL (all repeat playback): All tracks (the entire
disc) are played back repeatedly.
I (Stop)
Data Disc USB
Stops playback.
• REP FOLDER (folder repeat playback): All files (the
entire folder) are played back repeatedly.
Program playback
Audio CD
y
In the program playback mode, you can play back tracks
Repeat play also works with program play and random-sequence
in a programmed sequence.
play.
C DISPLAY
1 Press PROGRAM while playback is stopped.
Switches the time display. Each time you press DISPLAY
This unit is set to the program editing mode.
during playback, the time display changes as follows:
Audio CD
2 Select a track by using the numeric buttons
and ENTER.
Elapsed time of the current
Album name
track (default)
3 Repeat step 2 to program the next track.
Remaining time of the current
Artist name
You can program up to 24 tracks.
track
y
To cancel the programmed track, press CLEAR.
Total remaining time of the
Track name
disc
4 Press .
(CD TEXT disc only)
Playback starts from the beginning of the
Data Disc USB
programmed sequence.
Elapsed time of the current
Album name
y
file (default)
To erase all programmed tracks, press CLEAR when the
playback is stopped.
Artist name
English
Note
The programmed tracks are erased when the disc is ejected or this
unit is turned off.
Title
(Files including tag
information only)
5 En
Оглавление
- CAUTION: READ THIS BEFORE OPERATING YOUR UNIT.
- CONTENTS
- CONTROLS AND FUNCTIONS
- PLAYING BACK iPod/USB DEVICE
- PLAYABLE DISC AND FILE FORMAT
- USING THE ADVANCED SETUP
- TROUBLESHOOTING
- SPECIFICATIONS
- ATTENTION : VEUILLEZ LIRE CE QUI SUIT AVANT D’UTILISER L’APPAREIL.
- SOMMAIRE
- COMMANDES ET FONCTIONS
- LECTURE iPod/PÉRIPHÉRIQUE USB
- FORMAT DE DISQUE ET FICHIER LISIBLES
- UTILISER LE RÉGLAGE AVANCÉ
- GUIDE DE DÉPANNAGE
- CARACTÉRISTIQUES TECHNIQUES
- VORSICHT: VOR DER BEDIENUNG DIESES GERÄTES DURCHLESEN.
- INHALT
- BEDIENELEMENTE UND IHRE FUNKTIONEN
- WIEDERGABE VON iPod/USB-GERÄTEN
- ABSPIELBARE DISC- UND DATEIFORMATE
- VERWENDEN DER ERWEITERTEN EINSTELLUNGEN
- STÖRUNGSBEHEBUNG
- TECHNISCHE DATEN
- OBSERVERA: LÄS DETTA INNAN ENHETEN TAS I BRUK.
- INNEHÅLL
- REGLAGE OCH FUNKTIONER
- UPPSPELNING FRÅN iPod/USB-ENHET
- SPELBARA SKIV- OCH FILFORMAT
- ANVÄNDNING AV AVANCERADE INSTÄLLNINGAR
- FELSÖKNING
- SPECIFIKATIONER
- ATTENZIONE: PRIMA DI USARE QUEST’UNITÀ.
- SOMMARIO
- COMANDI E FUNZIONI
- LETTURA DI iPod/DISPOSITIVI USB
- DISCHI E FORMATI DI FILE RIPRODUCIBILI
- UTILIZZO DELLE IMPOSTAZIONI AVANZATE
- RISOLUZIONE DEI PROBLEMI
- SPECIFICHE TECNICHE
- PRECAUCIÓN: LEA LAS INDICACIONES SIGUIENTES ANTES DE UTILIZAR ESTE APARATO
- CONTENIDO
- CONTROLES Y FUNCIONES
- REPRODUCIR UN iPod/DISPOSITIVO USB
- FORMATO DE ARCHIVOS Y DISCOS REPRODUCIBLES
- UTILIZAR LA CONFIGURACIÓN AVANZADA
- SOLUCIÓN DE PROBLEMAS
- ESPECIFICACIONES
- LET OP: LEES HET VOLGENDE VOOR U DIT TOESTEL IN GEBRUIK NEEMT.
- INHOUD
- REGELAARS EN HUN FUNCTIES
- iPod/USB-APPARATEN AFSPELEN
- AFSPEELBARE SCHIJF- EN BESTANDSINDELINGEN
- GEAVANCEERDE INSTELLINGEN GEBRUIKEN
- PROBLEMEN OPLOSSEN
- SPECIFICATIES
- ПРЕДУПРЕЖДЕНИЕ: ВНИМАТЕЛЬНО ПРОЧИТАЙТЕ ЭТО ПЕРЕД ИСПОЛЬЗОВАНИЕМ АППАРАТА.
- СОДЕРЖАНИЕ
- ЭЛЕМЕНТЫ УПРАВЛЕНИЯ И ФУНКЦИИ
- ВОСПРОИЗВЕДЕНИЕ КОМПОЗИЦИЙ С iPod/УСТРОЙСТВ USB
- ВОСПРОИЗВОДИМЫЙ ФОРМАТ ДИСКОВ И ФАЙЛОВ
- ИСПОЛЬЗОВАНИЕ УСОВЕРШЕНСТВОВАННОЙ УСТАНОВКИ
- УСТРАНЕНИЕ НЕПОЛАДОК
- ТЕХНИЧЕСКИЕ ХАРАКТЕРИСТИКИ


