JVC KD-BT1: General settings — PSM
General settings — PSM: JVC KD-BT1
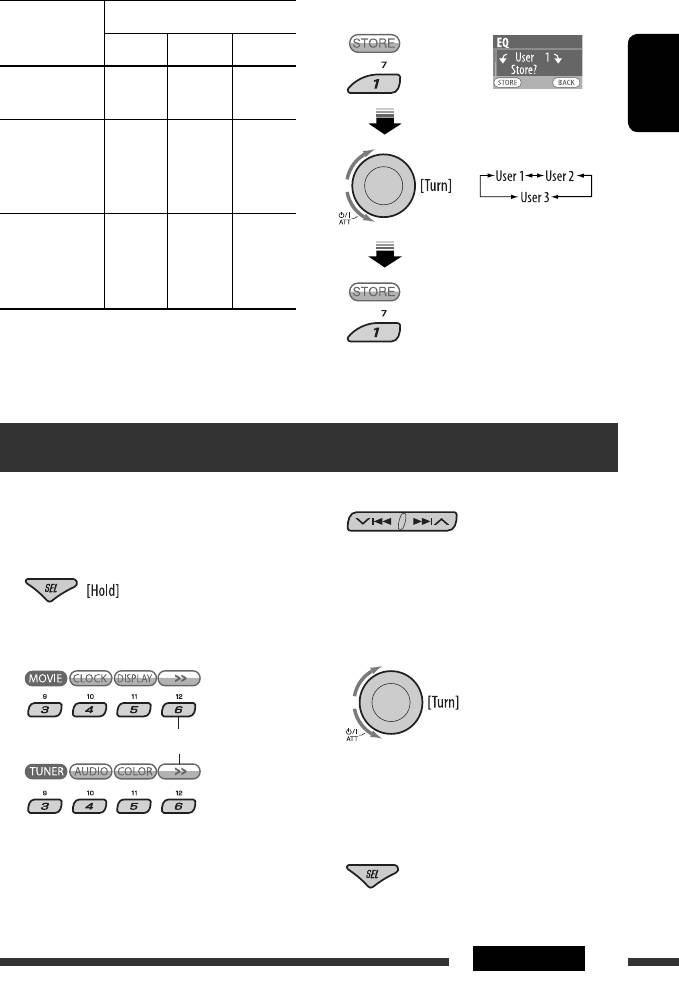
6 Store the adjustments.
Range/selectable items
Sound
elements
Low Mid High
Level –06 to
–06 to
–06 to
+06
+06
+06
ENGLISH
FREQ
60 Hz
500 Hz
10 kHz
(Frequency)
80 Hz
1 kHz
12.5kHz
100 Hz
1.5kHz
15 kHz
200 Hz
2.5kHz
17.5kHz
Q (Band width) Q1.0
Q0.5
Fix
Q1.25
Q0.75
Q1.5
Q1.0
Q2.0
Q1.25
5 Repeat steps 3 and 4 to adjust other
frequency ranges.
General settings — PSM
You can change PSM (Preferred Setting Mode) items
3 Select a PSM item.
listed in the table on pages 36 – 38.
1 Enter the PSM settings.
By pressing either one of the buttons repeatedly,
you can also move to the item of the other
categories.
2 Select a PSM category.
4 Select or adjust the selected PSM item.
To display the rest
5 Repeat steps 2 to 4 to adjust other PSM
items if necessary.
6 Exit from the setting.
Continued on the next page
35SETTINGS
EN34-43_KD-BT1_001A_2.indd 35EN34-43_KD-BT1_001A_2.indd 35 2/7/07 11:35:18 AM2/7/07 11:35:18 AM
Category Indication Item
Setting, [reference page]
( : Initial)
Demo
• On
: Display demonstration will be activated automatically if no
Display
operation is done for about 20 seconds, [6].
demonstration
• Off
: Cancels.
ENGLISH
MOVIE
LevelMeter
• Meter 1
: Select the different level meter patterns.
Audio level meter
• Meter 2
• Press D DISP to show the selected level meter.
• Meter 3
1
Clock Disp *
• On
: Clock time is shown on the display at all times when the
Clock display
power is turned off.
• Off
: Cancels; pressing D DISP will show the clock time for about
5 seconds when the power is turned off, [6].
Clock Hr
0 – 23
: Initial: 0 (0:00AM), [6].
Hour adjustment
(1 – 12AM/
1 – 12PM)
CLOCK
Clock Min
00 – 59 : Initial: 00 (0:00AM), [6].
Minute adjustment
24H/12H
• 12Hours
: See also page 6 for setting.
Time display mode
• 24Hours
Clock Adj
• Auto
: The built-in clock is automatically adjusted using the CT
Clock adjustment
(clock time) data in the RDS signal.
• Off
: Cancels.
2
Scroll *
• Once
: For track information: scrolls the track information only
Scroll
once.
For DAB text: scrolls the detailed DAB text.
• Auto
: For track information: repeats the scroll (in 5-second
intervals).
For DAB text: scrolls the detailed DAB text.
• Off
: For track information: cancels.
For DAB text: shows only headline if any.
• Pressing D DISP for more than one second can scroll the
DISPLAY
display regardless of the setting.
Dimmer
• Auto
: Dims the display when you turn on the headlights.
Dimmer
• Off
: Cancels.
• On
: Dims the display and button illumination.
• Time Set
: Set the timer for dimmer, [39].
Any hour – Any hour
3
From – To *
— : Initial: 18 – 7.
1
*
If the power supply is not interrupted by turning off the ignition key of your car, it is recommended to select “Off” to
save the car’s battery.
2
*
Some characters or symbols will not be shown correctly (or will be blanked) on the display.
3
*
Adjustable only when “Dimmer” is set to “Time Set.”
36
EN34-43_KD-BT1_001A_2.indd 36EN34-43_KD-BT1_001A_2.indd 36 2/7/07 11:35:19 AM2/7/07 11:35:19 AM
Category Indication Item
Setting, [reference page]
( : Initial)
Contrast
1 – 10
: Adjust the display contrast to make the display indications
Contrast
Initial: 5
clear and legible.
4
LCD Type
• Auto
: Positive pattern will be selected during the day time *
;
ENGLISH
4
Display type
while negative pattern will be used during the night time *
.
• Positive
: Positive pattern of the display.
• Negative
: Negative pattern of the display.
DISPLAY
Font Type
• 1
: Select the font type used on the display.
Font type
• 2
Tag
• On
: Shows the tag while playing MP3/WMA/AAC/WAV tracks.
Tag display
• Off
: Cancels.
AF-Regn‘l
• AF
: When the currently received signals become weak, the unit
Alternative
switches to another station or service (the programme may
frequency/
differ from the one currently received), [13].
regionalization
• AF REG
: When the currently received signals become weak, the
reception
unit switches to another station broadcasting the same
programme.
• Off
: Cancels (not selectable when “DAB AF” is set to “On”).
TA Volume
• 0 – 30
: Initial: 15
5
Traffic
• 0 – 50 *
announcement
volume
TUNER
P-Search
• On
: Activates Programme Search, [13].
Programme search
• Off
: Cancels.
IF Band
• Auto
: Increases the tuner selectivity to reduce interference noises
Intermediate
between adjacent stations. (Stereo effect may be lost.)
frequency band
• Wide
: Subject to interference noises from adjacent stations, but
sound quality will not be degraded and the stereo effect will
remain.
6
DAB AF *
• On
: Traces the programme among DAB services and FM RDS
Alternative
stations, [28].
frequency reception
• Off
: Cancels.
4
*
Depends on the “Dimmer” setting.
5
*
Depends on the amplifier gain control.
6
*
Displayed only when DAB tuner is connected.
Continued on the next page
37SETTINGS
EN34-43_KD-BT1_001A_2.indd 37EN34-43_KD-BT1_001A_2.indd 37 2/12/07 12:12:18 PM2/12/07 12:12:18 PM

Category Indication Item
Setting, [reference page]
( : Initial)
7
Ext Input *
• Changer
: To use a JVC CD changer, [24], or an Apple iPod/a JVC
External input
D. player, [29].
• Ext In
: To use any other external component, [31].
ENGLISH
Beep
• On
: Activates the key-touch tone.
Key-touch tone
• Off
: Deactivates the key-touch tone.
Telephone
• Muting1/
: Select either one which mutes the sounds while using a
Telephone muting
Muting2
cellular phone.
AUDIO
• Off
: Cancels.
• Playback pauses/mutes while telephone muting is working.
Amp Gain
• High PWR
: Volume 00 – Volume 50
Amplifier gain
• Low PWR
: Volume 00 – Volume 30 (Select if the maximum power of
control
each speaker is less than 50 W to prevent damaging the
speaker.)
Color Sel
Initial: All
: Select your favorite display color for each source (or for all
Color selection
Source
sources), [39].
Color Set
—
: Create your own colors, and select them for the display
Color setting
color, [40].
8
Day Color
: User color during the day time *
.
COLOR
8
NightColor
: User color during the night time *
.
Red
00 – 11
: Initial: Day Color: +07, NightColor: +05
Green
00 – 11
: Initial: Day Color: +07, NightColor: +05
Blue
00 – 11
: Initial: Day Color: +07, NightColor: +05
7
*
Displayed only when one of the following sources is selected—TUNER, DAB, CD, USB, Bluetooth Phone, or Bluetooth
Audio.
8
*
Depends on the “Dimmer” setting.
38
EN34-43_KD-BT1_001A_2.indd 38EN34-43_KD-BT1_001A_2.indd 38 2/7/07 11:35:20 AM2/7/07 11:35:20 AM
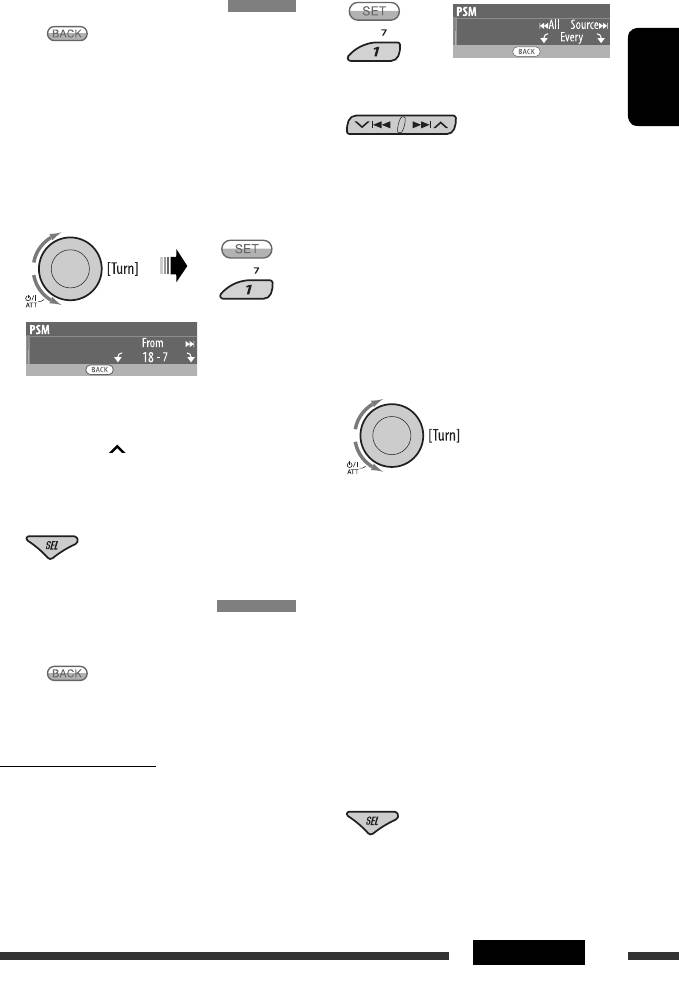
Setting the time for dimmer
2
• When appears on the display, you can move
back to the previous display by pressing number
button 3.
3 Select a source.
ENGLISH
1 Follow steps 1 to 3 on page 35.
• In step 2, select “DISPLAY.”
1
2
All Source *
Ô CD Ô Changer (or Ext In *
)
• In step 3, select “Dimmer.”
3
3
Ô USB *
Ô FM Ô AM Ô DAB *
Ô
3
3
iPod *
/D.PLAYER *
Ô BT Phone Ô
2 Select “Time Set.”
BT Audio Ô (back to the beginning)
1
*
When you select “All Source,” you can use the
same color for all the sources.
2
*
Depends on the “Ext Input” setting, see page 38.
3
*
Displayed only when the target component is
connected.
4 Select a color.
3 Adjust the dimmer time.
1 Turn the control dial to set the dimmer time.
2 Press ¢ to select “To.” Then, turn the
control dial to set the dimmer end time.
4
Every *
Ô Aqua Ô Sky Ô Sea Ô Leaves
4 Exit from the setting.
Ô Grass Ô Apple Ô Rose Ô Amber Ô
Honey Ô Violet Ô Grape Ô Pale Ô
5
User *
Ô (back to the beginning)
4
*
The color changes every 2 seconds.
Changing the display color
5
*
The user-edited colors—“Day Color” and
You can select your favorite display color for each source
“NightColor” will be applied (see page 40 for
(or all sources).
details).
• When appears on the display, you can move
back to the previous display by pressing number
5 Repeat steps 3 and 4 to select the color
button 3.
for each source (except when selecting
“All Source” in step 3).
Setting the display color
1 Follow steps 1 to 3 on page 35.
6 Exit from the setting.
• In step 2, select “COLOR.”
• In step 3, select “Color Sel.”
Continued on the next page
39SETTINGS
EN34-43_KD-BT1_001A_2.indd 39EN34-43_KD-BT1_001A_2.indd 39 3/2/07 12:36:15 PM3/2/07 12:36:15 PM
Оглавление
- CONTENTS
- Preparation
- Basic operations
- Listening to the radio
- Disc operations
- Using the Bluetooth ® devices
- Listening to the USB device
- Listening to the CD changer
- Listening to the DAB tuner
- Listening to the iPod / D. player
- Listening to the other external components
- Selecting a preset sound mode
- General settings — PSM
- Bluetooth settings
- Maintenance
- More about this unit
- Troubleshooting
- Specifications
- CОДЕРЖАНИЕ
- Подготовка
- Основные операции
- Прослушивание радио
- Операции с дисками
- Использование устройств Bluetooth ®
- Прослушивание устройства USB
- Прослушивание с устройства автоматической смены компакт-дисков
- Прослушивание тюнера DAB
- Прослушивание с проигрывателя iPod или D.
- Прослушивание с других внешних устройств
- Выбор запрограммированного режима звучания
- Общие настройки — PSM
- Настройки Bluetooth
- Обслуживание
- Дополнительная
- Устранение проблем
- Технические характеристики
- ЗМІСТ
- Підготовка
- Основні функції
- Прослуховування радіо
- Робота з дисками
- Використання Bluetooth ®-пристроїв
- Прослуховування USB-пристроїв
- Прослуховування пристрою зміни CD-дисків
- Прослуховування тюнера DAB (цифрового радіомовлення)
- Прослуховування програвачів iPod / D.
- Прослуховування інших зовнішніх компонентів
- Вибір запрограмованих режимів звучання
- Загальні параметри — PSM
- Налаштування
- Обслуговування
- Додаткова інформація
- Пошук та усунення несправностей
- Характеристики
- Please reset your unit


