Dell Latitude XT2 – страница 2
Инструкция к Ноутбуку Dell Latitude XT2
Оглавление
- Dell™ Latitude™ XT2 Service Manual

Working With Files
You can open, delete, or move many files or folders at one time by selecting multiple items from a list. Using a tablet pen, hover over one item at a time and
select the check box that appears to the left of each item.
To turn check boxes on:
1.
Go to
Folder Options
.
2.
Click on the
View
tab.
3.
Under
Advanced settings
, select the
Use check boxes to select items
check box, and then click
OK
.
Using the Pen as a Pen
The Windows Vista handwriting recognition software makes it easy to enter text into your applications with the pen. Some applications, such as Windows
Journal, allow you to write with the pen directly into the application window.
Tablet-PC Input Panel
When an application does not directly support pen input, you can use the
Tablet PC Input Panel
to enter text into your application. If you tap in an editable
area, the Tablet PC Input Panel icon
appears. Tapping the icon makes Input Panel slide out from the edge of the display.
You can also open the Input Panel by tapping the Input Panel tab, which is docked at the edge of the screen when the Input Panel is hidden.
You can move the Input Panel tab by dragging it up or down along the edge of the screen. Then, when you tap it, the Input Panel opens at the same
horizontal location on the screen that the tab appears.
You can use the writing pad, the character pad, or the on-screen keyboard to enter text. The writing pad and the character pad convert your handwriting into
typed text. The on-screen keyboard works just like a standard keyboard except that you enter text by tapping keys with your tablet pen. The following table
describes the different choices for using the Input Panel.
The writing pad and character pad have a number pad, a symbol pad, and web quick keys to help you quickly and accurately enter these types of text. These
quick keys are hidden when you start to write, but appear after you insert or delete your writing.
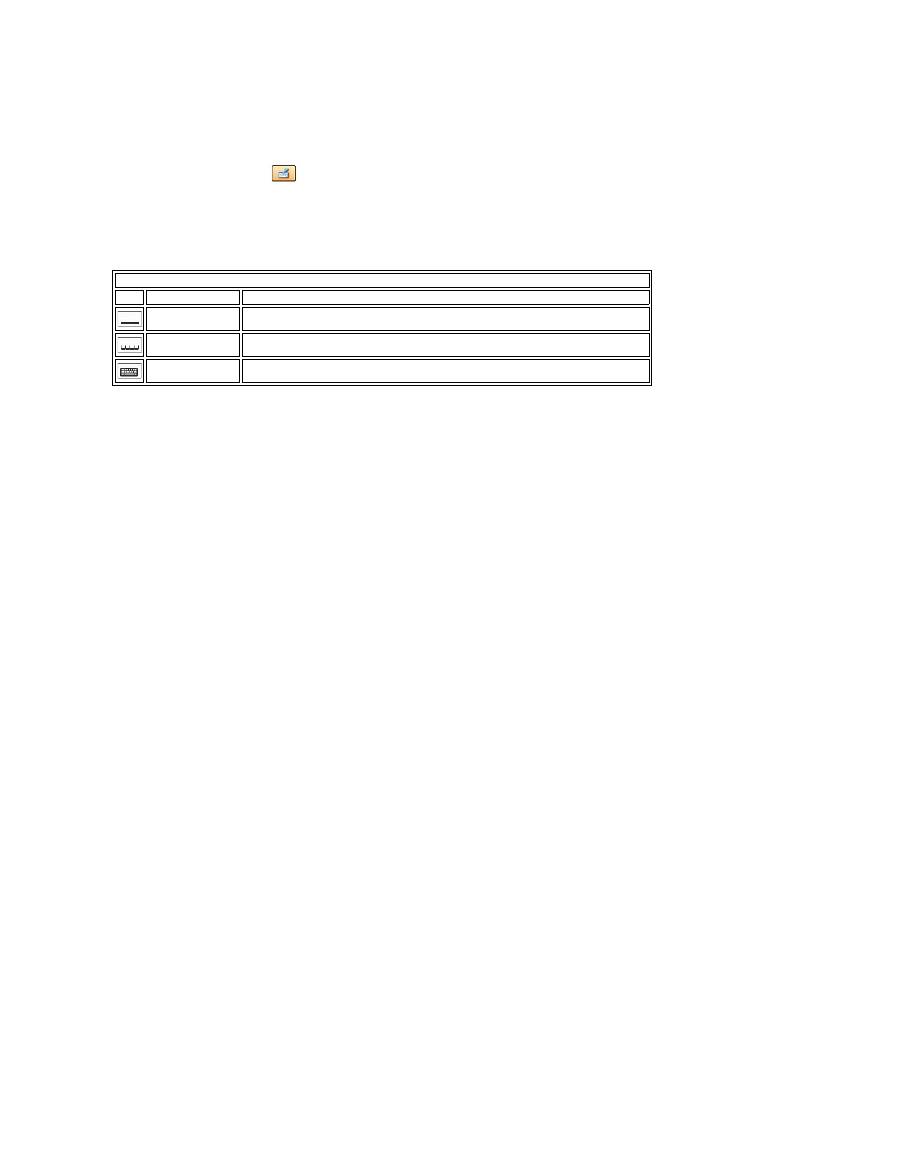
Pen Flicks
Input Panel Icons
Icon
Name
Function
Writing Pad
With the writing pad, you can write continuously as if you were writing on a lined piece of
paper.
Character Pad
The character pad converts your handwriting to typed text, one letter, number, or symbol at a
time.
On-screen
Keyboard
The on-screen keyboard is similar to a standard keyboard.
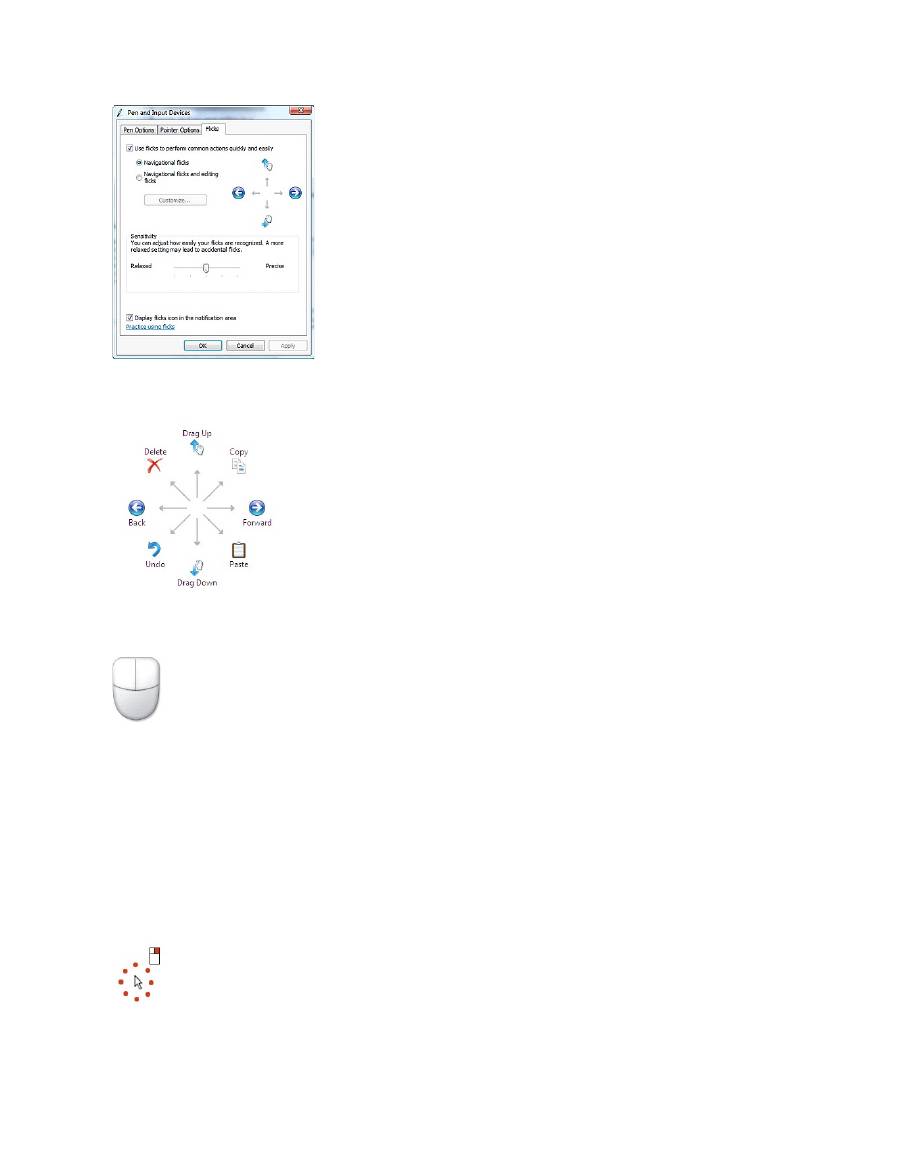
Pen flicks enable you to use the pen to perform actions that normally require a keyboard, such as pressing <Page Up> or using the directional arrow keys. Pen
flicks are quick, directional gestures. You simply quickly draw a short line in one of eight directions. When a pen flick is recognized, the Tablet-PC performs the
action assigned. The image below depicts the default pen flick settings. These can be customized by going to
Start
>
Control Panel
>
Pen and Input Devices
and clicking on the
Flicks
tab.
Touch Usage
One of the key advantages of the Latitude XT2 Tablet PC is the ability to easily switch from pen input to touch input.
When you use Touch Mode, a translucent image of a computer mouse, called the touch pointer, floats beneath your finger. The touch pointer has left and right
mouse buttons that you can tap with your finger. You use the area beneath the buttons to drag the touch pointer.
Windows XP
Pen Usage
Using the Pen as a Mouse
You can use the pen the same way you use a mouse or touch pad with a notebook computer. Holding the pen near the display makes a small cursor appear.
Moving the pen moves the cursor.
Tapping on the screen once is the same as clicking with a mouse. A double-tap constitutes a double-click.
Right-clicking with the pen is accomplished by holding the pen tip down on the screen until a red circle surrounds the pointer as illustrated to the right. Lifting
the pen from here opens up the corresponding submenu.
Using the Pen as a Pen
The native handwriting recognition software makes it easy to enter text into your applications with the pen. Some applications, such as Windows Journal,
allow you to write with the pen directly into the application window.
Tablet PC Input Panel
When an application does not directly support pen input, you can use the
Tablet PC Input Panel
to enter text into your application. If you tap in an editable
area, the Tablet PC Input Panel icon
appears. Tapping the icon makes Input Panel appear.
You can move the Input Panel tab by dragging it up or down along the edge of the screen. Then, when you tap it, the Input Panel opens at the same
horizontal location on the screen that the tab appears.
You can use the writing pad, the character pad, or the on-screen keyboard to enter text. The writing pad and the character pad convert your handwriting into
typed text. The on-screen keyboard works just like a standard keyboard except that you enter text by tapping keys with your tablet pen. The following table
describes the different choices for using the Input Panel.
The writing pad and character pad have a number pad, a symbol pad, and web quick keys to help you quickly and accurately enter these types of text. These
quick keys are hidden when you start to write, but appear after you insert or delete your writing.
Touch Usage
One of the key advantages of your Tablet-PC is the ability to easily switch from pen input to touch input. Similar to how the pen works, tapping with your
finger on the screen once is the same as clicking with a mouse. A double-tap constitutes a double-click.
Right-clicking in Touch Mode is accomplished by holding your finger tip down on the screen until a red circle surrounds the pointer. This can be difficult to see as
often times user's fingers cover the pointer. Lifting your finger from this point opens up the corresponding submenu.
Tablet and Pen Settings
Most of the settings for the tablet and pen are located in Control Panel under Tablet and Pen Settings. These are also accessed through Dell Control Point
System Manager.
Input Panel Icons
Icon
Name
Function
Writing Pad
With the writing pad, you can write continuously as if you were writing on a lined piece of
paper.
Character Pad
The character pad converts your handwriting to typed text, one letter, number, or symbol at a
time.
On-screen
Keyboard
The on-screen keyboard is similar to a standard keyboard.

Table-PC User Modes
Dell™ Latitude™ XT2 Service Manual
Notebook Mode
Your Tablet-PC can be used either in notebook mode or tablet mode. To use your Tablet-PC in notebook mode, open the display until it reaches a comfortable
viewing angle as in the image to the right, and use the keyboard and display as you would those of any other notebook computer.
Tablet Mode
Your Tablet-PC converts from notebook mode to tablet mode with a 180-degree clockwise twist of the display
’
s rotating hinge.
When you convert your Tablet-PC between notebook and tablet modes, the screen orientation of your Tablet-PC will automatically change according to the
settings you have established in the Dell Control Point System Manager application or the Windows Vista Pen and Tablet settings application, most commonly
from landscape (notebook mode) to portrait (tablet mode).
CAUTION:
Forcing the hinge beyond the 180-degree point will damage the Tablet-PC.
Open the display of the Tablet-PC until it
reaches a 90-degree angle, perpendicular
to the base.
Brace the base with one hand on the palm rest, grasp the top of the
display with the other hand, and, following the directional arrow
inscribed on the hinge cover, turn the rotating hinge clockwise 180
degrees until you feel the display engage securely.
Lay the display assembly on the base
with the display facing upwards.

Tablet-PC Settings
Dell™ Latitude™ XT2 Service Manual
Installation
The N-trig Tablet Settings applet is built into the driver package. You can either install it directly from the ResourceCD or obtain the latest version from
support.dell.com
. Once the file has been extracted, an InstallShield Wizard will walk you through the process of installing the software. The appearance of the
N-trig icon is an indication of a successful installation.
Windows™ XP vs. Windows Vista™
There is only one major difference in the N-trig applet between XP and Vista. On the Digitizer Options tab, under the Input Mode section, there is no listing for
Dual Mode on the XP version. Windows XP does allow use of both pen and touch but the seamless switching capability that Vista offers is not available.
N-trig Applet
The N-trig Tablet Settings applet is used to adjust several settings for the digitizer. Once the N-trig drivers are loaded, an icon appears in the system tray.
Hovering over the icon with your pointer displays the firmware version number. Right-clicking the icon brings up the sub menu below.
Clicking on Properties opens up the N-trig Tablet Settings window.
There are four tabs on the N-trig Tablet Settings window:
l
Digitizer Options
l
Interaction Options
l
Multi-Touch Gestures
l
About

Memory and Mini-Card Cover
Dell™ Latitude™ XT2 Service Manual
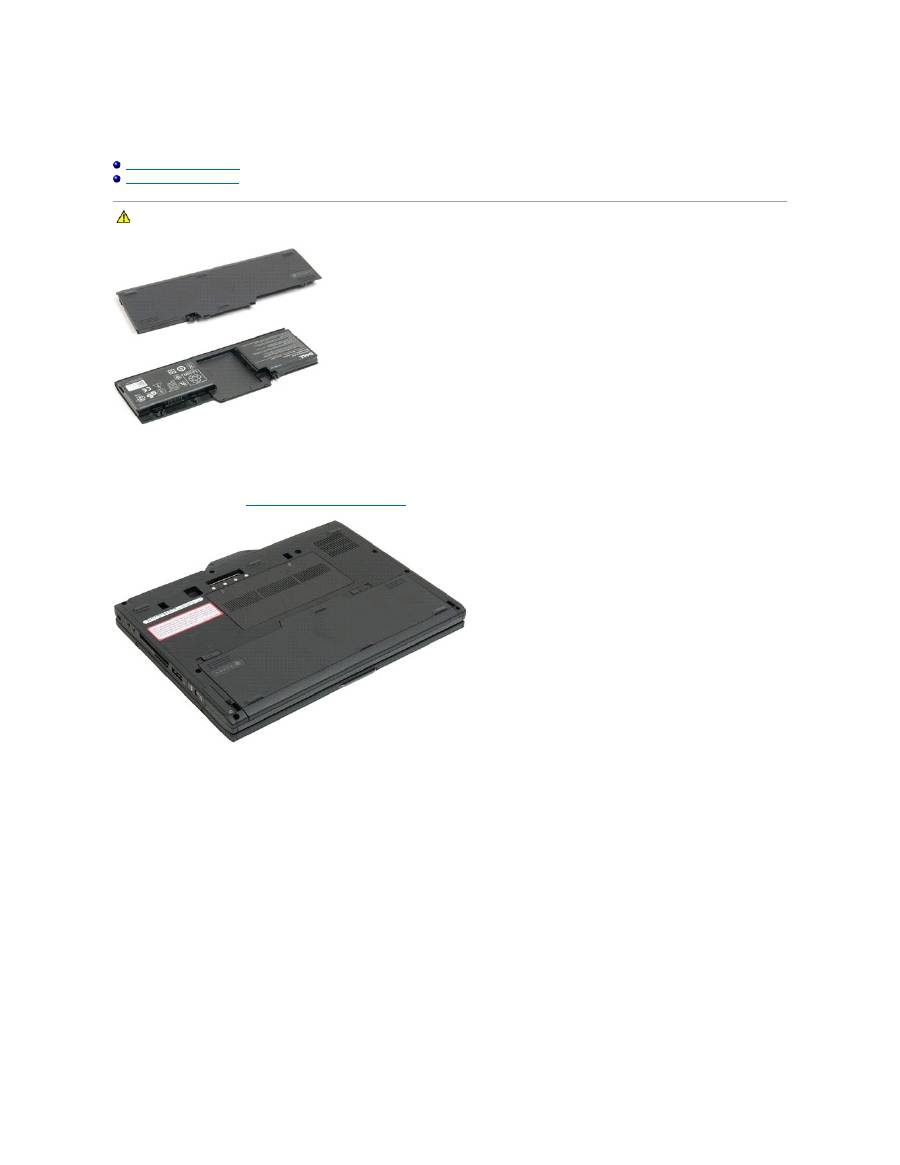
Removing the Memory and Mini-Card Cover
Replacing the Memory and Mini-Card Cover
Removing the Memory and Mini-Card Cover
1.
Follow the procedures in
Before Working Inside Your Tablet-P C
.
2.
Remove the
battery
from the Tablet-PC.
3.
Loosen the two captive screws on the memory and mini-card cover.
WARNING:
Before working inside your Tablet-PC, read the safety information that shipped with your Tablet-PC. For additional safety best
practices information, see the Regulatory Compliance Homepage at www.dell.com/regulatory_compliance.
4.
Tilt the cover towards the front of the Tablet-PC.
5.
Lift the cover at an angle, and remove from the Tablet-PC.
Replacing the Memory and Mini-Card Cover
1.
Insert the tabs of the memory and mini-card cover into the slots of the base.
2.
Rotate the cover down and into place.
3.
Tighten the two captive screws on the memory and mini-card cover.

4.
Install the battery. See
Replacing the Main Battery
.
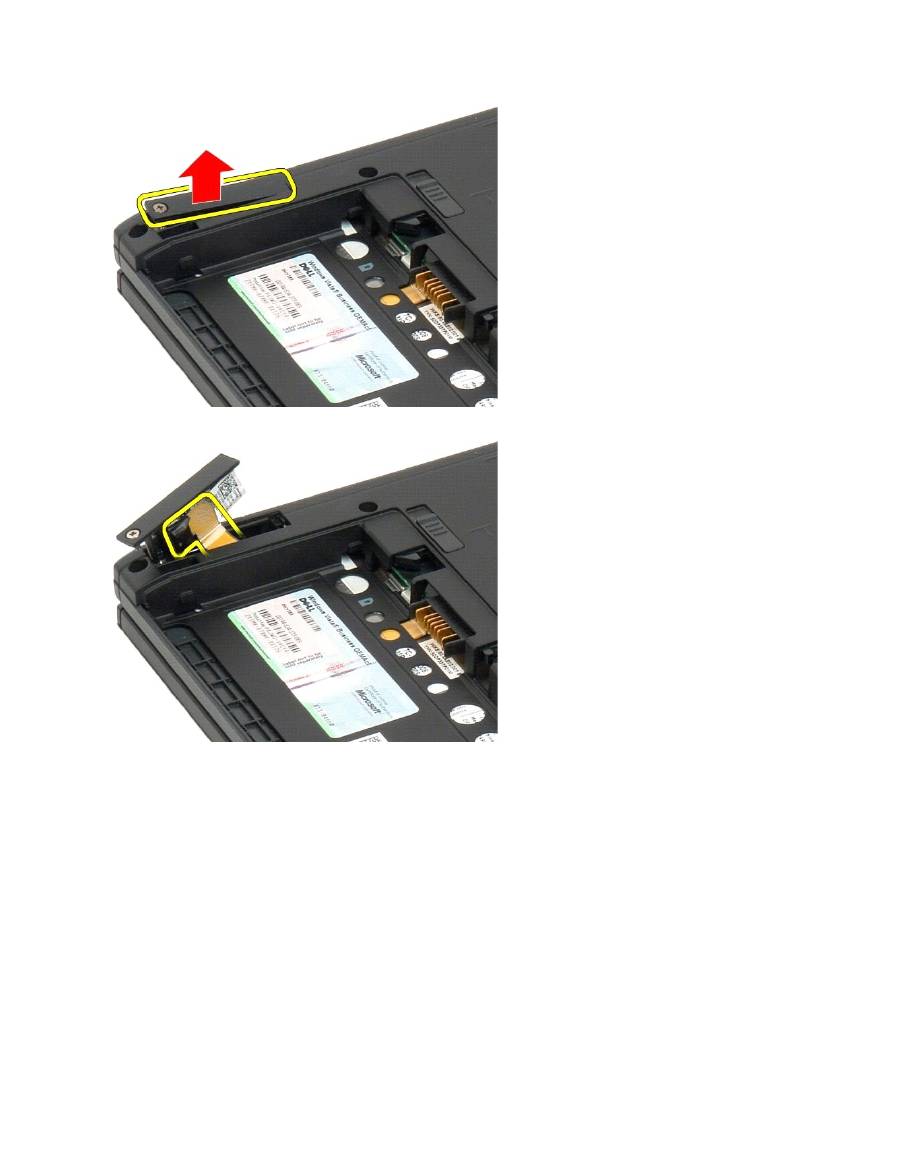
Main Battery
Dell™ Latitude™ XT2 Service Manual
Removing the Main Battery
Replacing the Main Battery
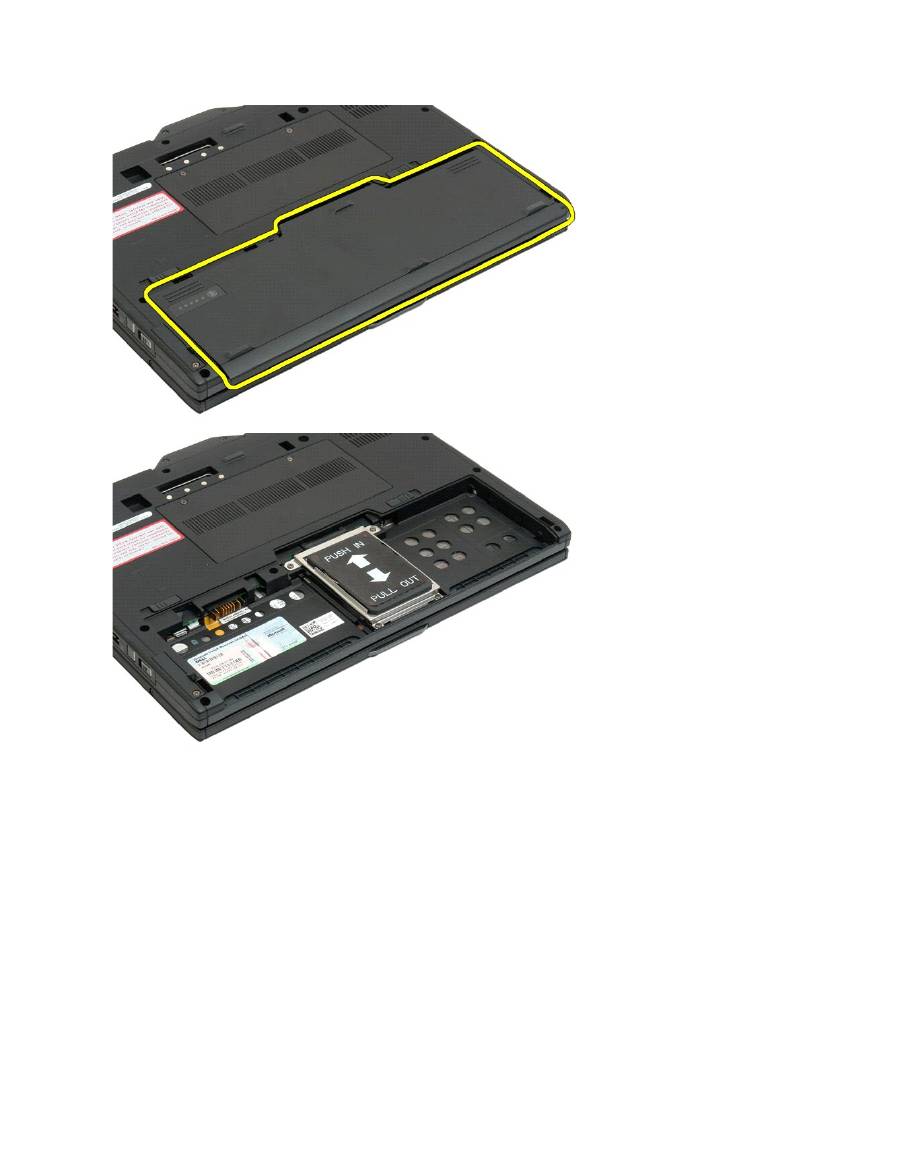
Removing the Main Battery
1.
Follow the procedures in
Before Working Inside Your Tablet-P C
.
2.
Slide the two battery-bay latch releases on the bottom of the Tablet-PC outward to each side.
WARNING:
Before working inside your Tablet-PC, read the safety information that shipped with your Tablet-PC. For additional safety best
practices information, see the Regulatory Compliance Homepage at www.dell.com/regulatory_compliance.

3.
Slide the battery out of the battery bay.
4.
Remove the battery from the Tablet-PC.
Replacing the Main Battery
1.
Slide the new battery into the battery bay.
2.
Slide the battery until it locks into position.
When properly seated, the battery is flush with the bottom edge of the computer and the battery-bay release latches are in the inward position as shown in
Step 4 above.

Battery Latch
Dell™ Latitude™ XT2 Service Manual
Removing the Battery Latch
1.
Follow the procedures in
Before Working Inside Your Tablet-P C
.
2.
Remove the
battery
from the Tablet-PC.
3.
Remove the
hard drive
from the Tablet-PC.
4.
Remove the
memory and mini-card cover
from the Tablet-PC.
5.
Remove the
memory
from the Tablet-PC.
6.
Remove the
mini-card
from the Tablet-PC.
7.
Remove the
BIOS chip
from the Tablet-PC.
8.
Remove the
Bluetooth module
from the Tablet-PC.
9.
Remove the
hinge cover
from the Tablet-PC.
10.
Remove the
keyboard
from the Tablet-PC.
11.
Remove the
display assembly
from the Tablet-PC.
12.
Remove the
palm rest
from the Tablet-PC.
13.
Remove the
system board
from the Tablet-PC.
14.
Remove the screw securing the right battery latch.
WARNING:
Before working inside your Tablet-PC, read the safety information that shipped with your Tablet-PC. For additional safety best
practices information, see the Regulatory Compliance Homepage at www.dell.com/regulatory_compliance.

15.
Slide the latch assembly to the right.
16.
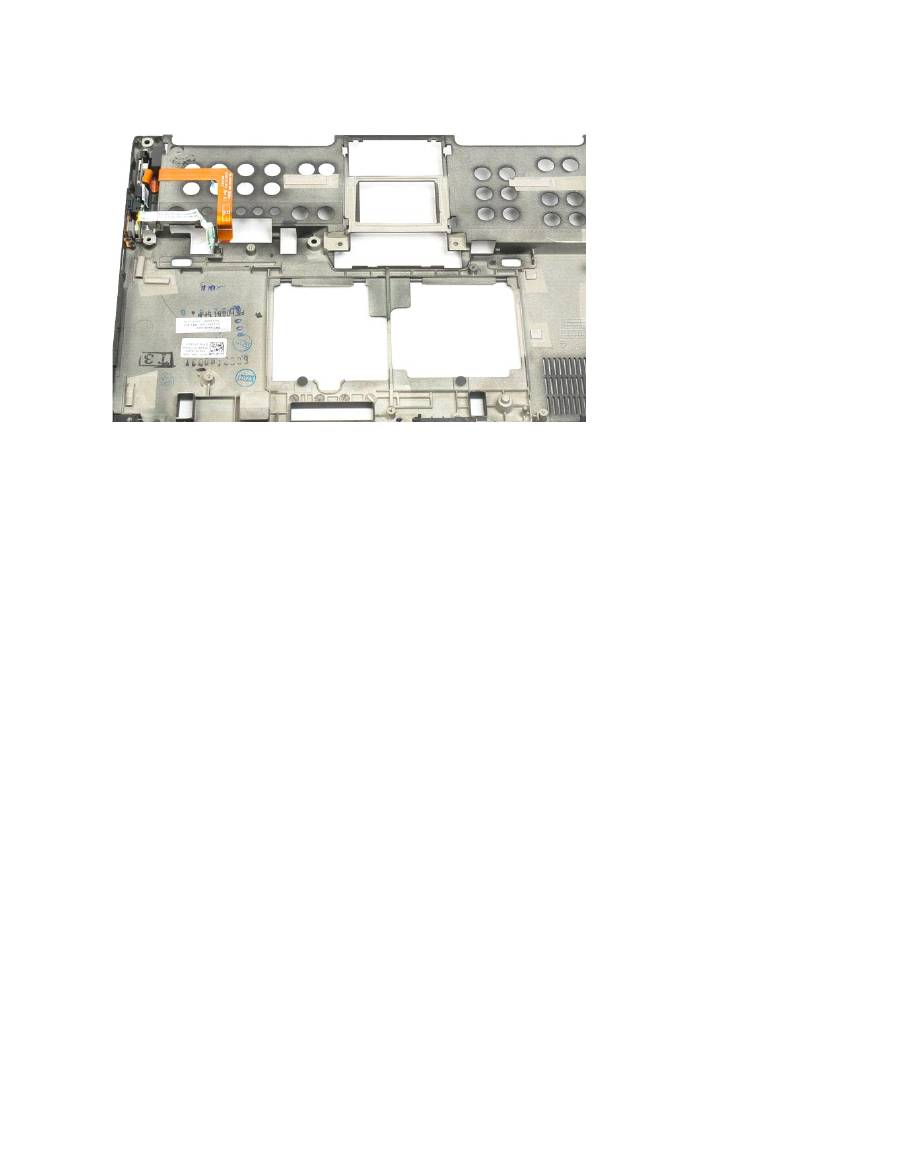
Remove the right latch inside assembly from the bottom plastics.
17.
Remove the right latch from the outside of the Tablet-PC.
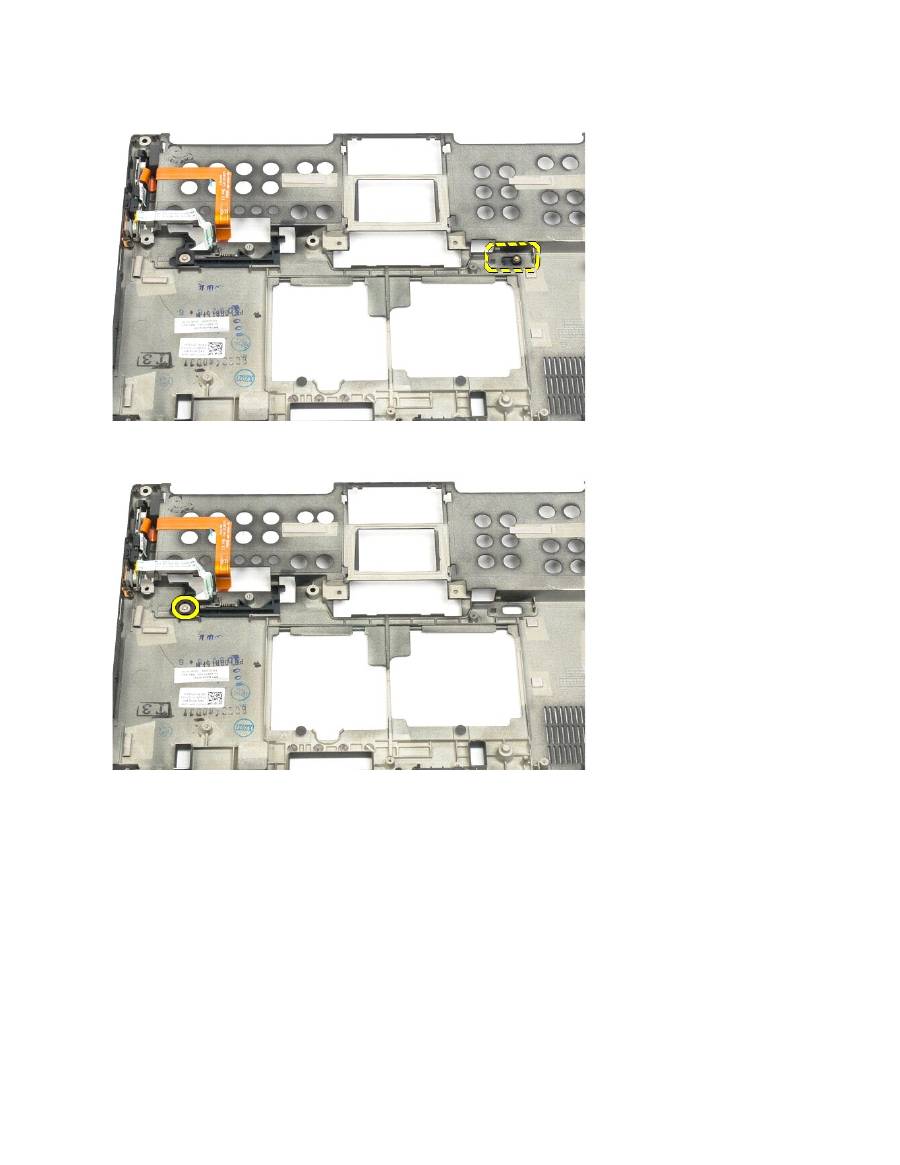
18.
Remove the screw securing the left latch assembly to the Tablet-PC.
18.
Slide the inside latch assembly to the right and lift out of the bottom plastic.
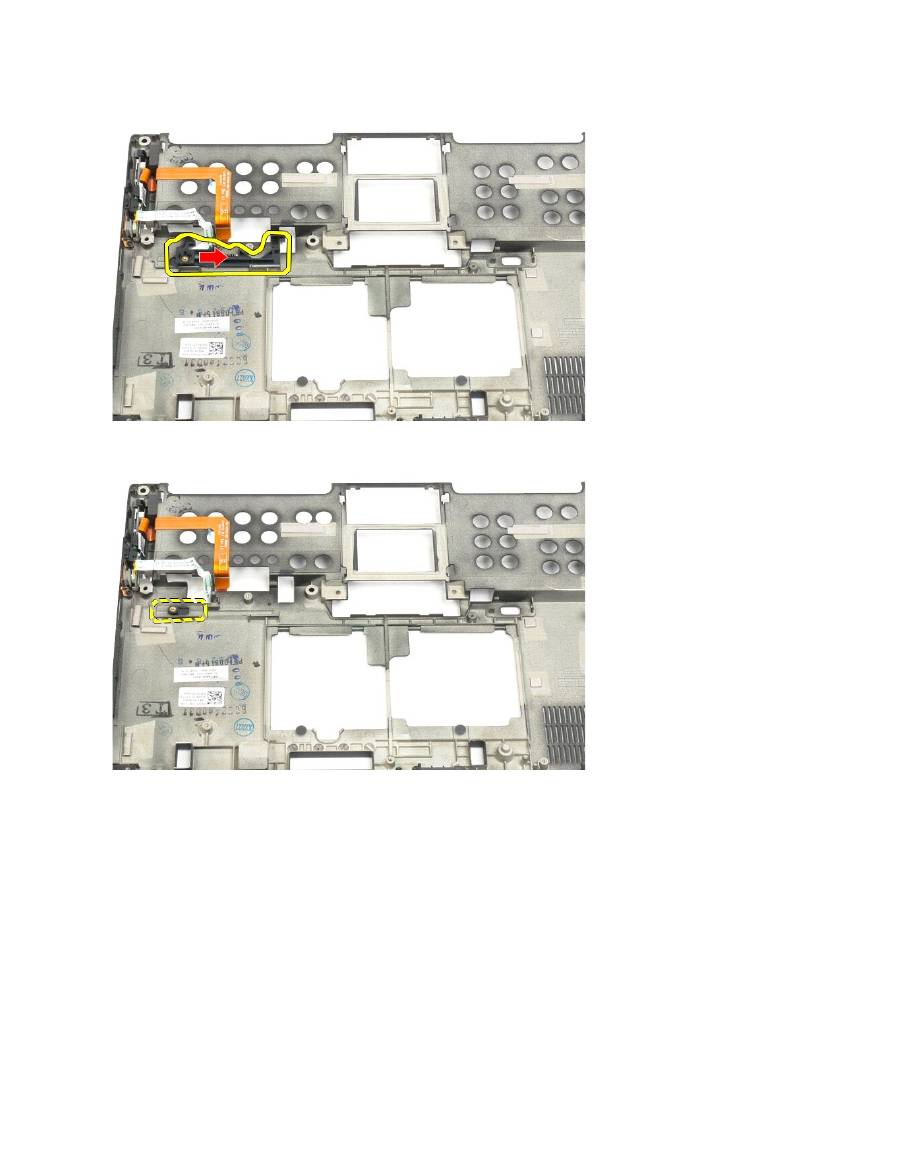
19.
Remove the left battery latch from the outside of the Tablet-PC.
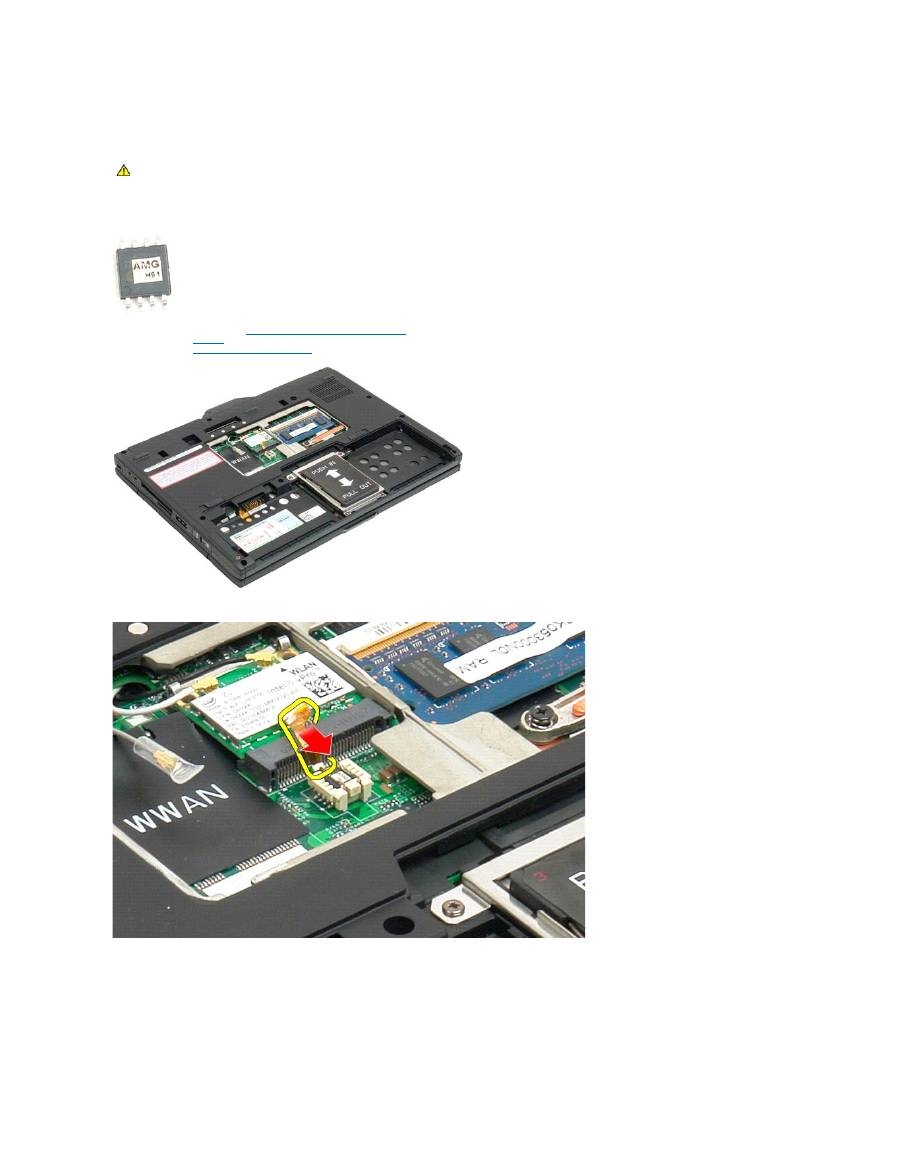
BIOS Chip
Dell™ Latitude™ XT2 Service Manual
Removing the BIOS Chip
1.
Follow the procedures in
Before Working Inside Your Tablet-P C
.
2.
Remove the
battery
from the Tablet-PC.
3.
Remove the
memory and mini-card cover
from the Tablet-PC.
4.
Use the orange tab to open the BIOS chip retaining clip.
5.
Use your fingers or small tweezers so remove the BIOS chip from the Tablet-PC.
WARNING:
Before working inside your Tablet-PC, read the safety information that shipped with your Tablet-PC. For additional safety best
practices information, see the Regulatory Compliance Homepage at www.dell.com/regulatory_compliance.


Internal Card With Bluetooth ® Wireless Technology
Dell™ Latitude™ XT2 Service Manual
Removing the Internal Card With Bluetooth Wireless Technology
Replacing the Internal Card With Bluetooth Wireless Technology
Removing the Internal Card With Bluetooth Wireless Technology
1.
Follow the procedures in
Before Working Inside Your Tablet-P C
.
2.
Remove the
battery
from the Tablet-PC.
3.
Loosen the captive screw on the Bluetooth assembly.
4.
Carefully lift the Bluetooth assembly out of the Tablet-PC.
WARNING:
Before working inside your Tablet-PC, read the safety information that shipped with your Tablet-PC. For additional safety best
practices information, see the Regulatory Compliance Homepage at www.dell.com/regulatory_compliance.
5.
Disconnect the Bluetooth cable from the Bluetooth.
6.
Remove the Bluetooth assembly from the Tablet-PC.
