Dell Latitude E5420 – страница 2
Инструкция к Ноутбуку Dell Latitude E5420
Оглавление

Dell Latitude Ultrabook, E-Family & Mobile Precision Reimage “How-To” Guide
2.6.9.3 Control Point Security Manager
- Dell Control Point Security Manager module is a Dell developed modular
application providing provides access to authentication, encryption, fingerprint
readers, and smartcard technologies:
1. Obtain Security Status
2. Manage Logins and Passwords
3. Manage Data Protection
o Security Software Stack:
1. For these security devices to function and interface on E-Family notebooks,
install the appropriate Software stack (Applications and Utilities)
2. The security software stack can be obtained through one of the two options:
3. Control Point Security Manager Application which is offered to E-Family
Customers through Dell’s support website
4. Third party security software specific to the customer’s environment. Dell does
rd
not provide 3
party security software
o The Control Point Security Manager Application is available on Dell’s driver &
downloads support web site (support.dell.com) under the “Control Point” section
o Refer to Table B2 under Appendix-B for DCP Security Manager features
st
2.6.9.4
Control Point Connection Manager,
(applies to 1
generation Latitude E-
Family & Mobile Precision only)
o Dell Control Point Connections Manager module is a Dell developed modular
application providing a complete communications management environment:
o Allows the user to create multiple mobile profile settings
o Ability to create, export, and import user defined usage profiles
o System custom configuration
o Execute comprehensive diagnostics and troubleshooting
o Provides the capability to enable or disable any of the radios on the notebook
such as Wi-Fi, Bluetooth GPS, UWB, and mobile broadband
- The Control Point Connection Manager Application is available on Dell’s driver &
downloads support web site (support.dell.com) under the “Control Point” section
- Refer to Table B3 under Appendix-B for DCP Security Manager features

Dell Latitude Ultrabook, E-Family & Mobile Precision Reimage “How-To” Guide
rd
th
2.6.10 Dell Feature Enhancement Pack – DFEP,
(applies to Latitude Precision 3
& 4
generation E-Family & Mobile Precision, except Latitude 3330)
o Dell Feature Enhancement Pack – DFEP is a Dell developed application providing a
complete set of power management configuring and alerting capabilities
Support for hot keys and system events
Dell customized power plans and extensions
Battery Health Information
Touch Panel
Keyboard hotkey information, including backlighting
Smart Settings
o The DFEP Application is available on Dell’s driver & downloads support web site
(support.dell.com) under “System Utilities” section
Note
: Supported for Windows7 only
Note
: Dell Feature Enhancement Pack will uninstall Dell System Manager if present on the
systems
rd,
th
2.6.11 Dell Data Protection | Access – DDPA,
(for Latitude Precision 3
& 4
generations E-Family & Mobile Precision, except Latitude 3330)
- Dell Data Protection Access Application is a Dell developed application providing provides
access to authentication, encryption, fingerprint readers, and smartcard technologies:
Obtain Security Status
Manage Logins and Passwords
Manage Data Protection
- The Dell Date Protection | Access Application components are available on Dell’s driver &
downloads support web site (support.dell.com) under the “Dell Data Protection” section
- The following components should be installed in order:
Prerequisites Installer
- This installer contains Windows Installer 4.5 and Microsoft .NET Framework 3.5 SP1
- Both of these are required in order for Dell Data Protection | Access to work on
Windows XP and Vista
Drivers Installer
Note
: The Dell Data Protection | Access application installer will not install if the
DDPA Drivers installer is not on the platform FIRST

Dell Latitude Ultrabook, E-Family & Mobile Precision Reimage “How-To” Guide
th
Note
: Application Installer for 4
generations Latitude E-Family & Precision Mobile
INCLUDED driver and middleware Installer already. Please ignore Drivers and
th
Middleware Installer on 4
generations Latitude E-Family & Precision Mobile.
Middleware Installer
- This installer contains certain relevant Microsoft QFEs
- It also contains the NTRU Trusted Software Stack (TSS) that provides TPM access
Application Installer
- This is the main application Dell Data Protection | Access
Note
: It will only install if the Drivers Installer has already been installed on the system,
so the installation order is important
o Refer to Table B3 under Appendix-B for DDPA – Data Protection Access
2.6.12 Wireless Local Network Adapters (WLAN)
o Microsoft XP 32 & 64-Bit, Vista 32 & 64-Bit and Win7/8 32 & 64-Bit Operating Systems do not
provide native device driver support for WLAN controllers featured in Dell Latitude E-Family
& Mobile Precision systems. To obtain wireless network functionality, install the Wireless
LAN device driver applicable to the WLAN devices installed in the notebook computer
found under the “Network” section posted on Dell’s driver & downloads support web site
(support.dell.com). The installer also provides WLAN application support which provides
additional features including enterprise authentication enhancements
Note
: With Intel Wireless Display (WiDi) you can quickly connect your laptop to your TV
and projector using the Intel® Centrino®wireless solution that’s already built into your
laptop. Because it’s based on Wi-Fi*, there are no cables between the laptop and
TV/Projector. To obtain Wireless Display(ONLY applied to Intel WLAN) functionality,
install the Wireless Display Application found under the “Network” section posted on
Dell’s driver & downloads support web site (support.dell.com).
o Microsoft Windows XP 32 & 64-Bit, Windows Vista 32 & 64-Bit, and Windows 7/8 32 & 64-Bit
Operating Systems do not provide native device driver support for WiMAX controllers
featured in Dell E-Family systems. To obtain WiMAX functionality, install the WiMAX
software applicable to the WiMAX device installed in the notebook computer. This is
available on Dell’s driver & downloads support web site (support.dell.com) under the
“Network” section
o Customers choosing to utilize the Dell Wireless (DW) WLAN Card Utility or Intel PROSet /
Wireless should not install Control Point Connection Manager. If Control Point Connection
Manager is installed, uninstall the existing Intel PROSet / Wireless or Dell Wireless WLAN
entries in Add / Remove Programs (or Programs and Features) before installing this software.
Customers may also choose to uninstall Dell Control Point Connection manager or
uncheck the Wi-Fi control within Dell Control Point Connection Manager

Dell Latitude Ultrabook, E-Family & Mobile Precision Reimage “How-To” Guide
2.6.13 Wireless Personal Area Network Adapter (UWB / WPAN)
o Microsoft XP 32 & 64-Bit, Vista 32 & 64-Bit, and Win7/8 32 & 64-Bit Operating Systems do
not support the Bluetooth controllers featured on Latitude E-Family & Mobile Precision
systems. To obtain Bluetooth or UWB functionality, install the associated Bluetooth or UWB
device drivers available on Dell’s driver & downloads support web site (support.dell.com)
under the “Network” section
2.6.14 Mobile Broadband Wireless Wide Area Network Adapter (WWAN)
o Microsoft XP 32 & 64-Bit, Vista 32 & 64-Bit, and Win7/8 32 & 64-Bit Operating Systems do
not provide native support for the broadband Wireless WAN controllers featured in Dell
Latitude E-Family & Mobile Precision systems. To obtain broadband functionality, install the
Broadband device driver applicable to the wireless WAN devices installed in the system, and
to the service carrier you have a contract with available on Dell’s driver & downloads
support web site (support.dell.com) under the “Communication” section
st
o The Wireless 5600 EVDO-HSPA module(
applies to 1
generation Latitude E-Family & Mobile
Precision only
) requires the installation of Dell Control Point Connection Manager. Install
the driver and FW before installing the Dell Control Point Connection Manager. The latest
versions of Dell Control Point Connection Manager (v1.3 and later) provide the WWAN
drivers and FW in the Dell Control Point Connection Manager Driver Pack. Earlier versions
provide the drivers and FW in one single Dell Control Point Connection Manager installer.
The Dell Control Point Connection Manger application and Driver Packs can be found under
the “Control Point” section posted on Dell’s driver & downloads support web site
(support.dell.com). Individual driver and FW releases for the 5600 EVDO-HPSA module can
be found under the “Communication” section posted on Dell’s driver & downloads support
web site (support.dell.com). It is highly recommended to use the Driver Packs to ensure
version compatibility

Dell Latitude Ultrabook, E-Family & Mobile Precision Reimage “How-To” Guide
2.6.15 Touchpad
o Microsoft XP 32 & 64-Bit, Vista 32 & 64-Bit, and Win7/8 32 & 64-Bit Operating Systems do
not include the Dell Touchpad drivers
o The Microsoft native OS mouse driver only provides basic point and click functionality. No
advanced features are available with the native driver and this may provide a less than
optimal user experience
o Dell recommends installing the appropriate Dell Touchpad driver for the following user
experience benefits:
1. The driver is tuned to the system characteristics to offer enhanced cursor
acceleration and precision
2. The driver provides the core palm rejection features
3. Access to additional features and control setting (varies with system) including:
Enhanced scrolling and tapping
Touch sensitivity control
Multi-Touch Gestures (2nd Generation)
Jog Shuttle control (M6400 & M6500)
Differences between Dell Touchpad devices and drivers:
st
nd
o Dell Touchpad drivers are different between the 1
and 2
generation of systems. Drivers
st
nd
from the 1
generation (Dell Touchpad / Pointing Stick) and 2
generation (Dell Multi-
Touch Touchpad) are NOT compatible. Dell strongly recommends only installing the
rd
appropriate driver for the system. 3
generation Latitude Touchpad driver is backward
nd
compatible on 2
generation Latitude systems
o Dell Touchpad drivers are found under the “Input Device Drivers” section posted on Dell’s
driver & downloads support web site (support.dell.com)
E4200
E4300
E5400
E5500
E6400
E6400 ATG
E6500
M2400
M4400
M6400
E4310
E5410
E5510
E6410
E6410 ATG
E6510
M4500
M6500
E5420 /
E5520
E6320
E6420
E6420 ATG
E6520
M4600
M6600
E5430 /
E5530
3330
E6230/E6330/
/E6430u
E6430/E6430s
E6430 ATG
E6530
M4700
M6700
Dell Touchpad / Pointing Stick
X X X X X X X
Dell Multi-Touch Touchpad
X X X X X X X X X X X X X X X X X X X X X
Dell Jog Shuttle Touchpad
X
Dell Jog Shuttle Touchpad (Multi-Touch)
X
st
1
Generation
nd
2
Generation
Solution
rd
3
Generation
4th Generation

Dell Latitude Ultrabook, E-Family & Mobile Precision Reimage “How-To” Guide
2.6.16 Free Fall Sensor
o Microsoft XP 32 & 64-Bit, Vista 32 & 64-Bit, and Win7/8 32 & 64-Bit Operating Systems do
not include the Free Fall Sensor driver. Install the following driver provided by Dell:
1. Free Fall Sensor driver found under the “Applications” section posted on Dell’s driver
& downloads support web site (support.dell.com)
2.6.17 Modem (Only applies to some systems)
o Microsoft XP 32 & 64-Bit, Vista 32 & 64-Bit, and Win7/8 32 & 64-Bit Operating Systems do
not include the Conexant modem driver. Install the following driver provided by Dell:
1. Conexant D330,HDA,MDC,v.92,modem available on Dell’s driver & downloads
support web site (support.dell.com) under the “Communication” section
o If Dell Control Point Connection Manager module is installed, the Conexant modem driver
does not need to be installed
2.6.18 Intel vPro or AMT (
Applicable ONLY to vPro Configurations
)
o Intel Active Management Technology (Intel AMT) allows users to easily manage networked
computers to:
1. Discover computing assets on a network
2. Remotely repair systems even after operating system failures
3. Protect networks from incoming threats while easily keeping software up to date
o Ensure that the following drivers provided by Dell are being installed prior to installing the
AMT drivers:
1. Intel Mobile Chipset driver
2. Intel 825xx Gigabit Platform LAN Network Device
3. Intel Wireless WLAN driver for WLAN AMT manageability via Intel WLAN adapter
o Microsoft XP 32 & 64-Bit, Vista 32 & 64-Bit, and Win7/8 32 & 64-Bit Operating Systems do
not include the AMT drivers. The AMT drivers are available on Dell’s driver & downloads
support web site (support.dell.com) under the “Chipset” section
st
1. For E-Family 1
generation systems
Intel AMT HECI
Intel AMT SOL/ LMS
nd
2. For E-Family 2
generation systems
Intel AMT HECI (Unified AMT6 Driver)
rd
3. For E-Family 3
generation systems,
Intel Unified AMT 7 Management Interface Driver

Dell Latitude Ultrabook, E-Family & Mobile Precision Reimage “How-To” Guide
Intel Identity Protection Technology (IPT) feature requires IPT Middleware to be
installed after the AMT Unified driver
th
4. For E-Family 4
generation systems,
Intel Unified AMT 8 Management Interface Driver
Intel Identity Protection Technology (IPT) feature was included in Intel Unified
AMT8 Management Interface Driver already.
2.6.19 USB 3.0
o Microsoft XP 32 & 64-Bit, Vista 32 & 64-Bit, and Win7/8 32 & 64-Bit Operating Systems do
not include the USB 3.0 driver. Install the USB 3.0 driver available on Dell’s driver &
downloads support web site (support.dell.com) under the “Chipset” section
2.6.20 Touch Screen Digitizer
o Microsoft XP 32 & 64-Bit, Vista 32 & 64-Bit, and Win7 32 & 64-Bit Operating Systems do not
include the digitizer driver and application. Install the appropriate Touchscreen driver and
application available on Dell’s driver & downloads support web site (support.dell.com) under
the “Input Device Drivers” section
st
2.6.21 Webcam -
applies to 1
generation Latitude E-Family & Mobile Precision only
)
o The Dell E-Family Webcam driver enables the built-in system digital camera. Install the
following driver provided by Dell for Microsoft Windows XP 32 & 64 Bit only:
1. Creative Labs Integrated Webcam driver available on Dell’s driver & downloads
support web site (support.dell.com) under the “Input Device Drivers” section
2. For video capturing / streaming features, install webcam software available from a
variety of third party providers and as freeware
E6400 ATG
E6410 ATG
M6500
E6420
E6420 ATG
E6520
M4600
M6600
E6430 ATG
M4700
M6700
Digitech Touch Screen
X X
eGalax EMPIA
X X X X
n-Trig Multi Touch
X X X X
Solution
st
1
Generation
nd
2
Generation
rd
3
Generation
4th Generation

Dell Latitude Ultrabook, E-Family & Mobile Precision Reimage “How-To” Guide
2.6.22 Windows Update
o Dell recommends performing Microsoft Windows updates to ensure the latest security,
reliability, and compatibility updates are installed. These updates can be downloaded from
Windowsupdate.Microsoft.com
st
2.6.23 Latitude ON / Precision ON -
applies to 1
generation Latitude E-Family & Mobile
Precision only
)
o Microsoft XP 32 & 64-Bit, Vista 32 & 64-Bit, and Win7 32 & 64-Bit Operating Systems do not
include the Latitude ON / Precision ON driver and application
o The following table lists which products supports the Latitude ON / Precision ON feature
o In order to enable the Latitude ON / Precision ON button to hibernate Windows when
switching to Latitude ON / Precision ON modes, Dell recommends installing the appropriate
software. In order to determine the appropriate software to install, boot to the system BIOS
and check the following:
1. Under BIOS settings -> system configuration
Latitude ON – ARM module is installed:
Install the "Control Point Button Service" in Windows available on Dell’s
driver & downloads support web site (support.dell.com) under the
“Control Point” section
NOTE: If you installed the Dell Control Point Connection Manager, the
“Control Point Button Service” is already installed
Latitude ON Flash / Precision ON Flash – Flash module is installed
Install the "Latitude ON Flash” in Windows available on Dell’s driver &
downloads support web site (support.dell.com) under the “Applications”
section
E4200
E4300
E5400
E5500
E6400
E6400 ATG
E6500
M2400
M4400
M6400
E6410
E6410 ATG
E6510
M4500
E4310
E5410
E5510
M6500
Latitude ON Reader
X X X X X X
Latitude ON Flas h
X X X X X X
Latitude ON
X X X
Precision ON Reader
X X
Precision ON Flas h
X X
st
1
Generation
nd
2
Generation
Latitude
ON
Precision
ON
Solution

Dell Latitude Ultrabook, E-Family & Mobile Precision Reimage “How-To” Guide
Latitude ON Reader / Precision ON Reader
Install the "Reader 2.0" in Windows available on Dell’s driver &
downloads support web site (support.dell.com) under the “Applications”
section
2.6.24 Intel® Responsiveness Technologies
o Intel® Responsiveness Technology include below three components
o Intel® Smart Response Technology
1. Smart response is a driver-based feature that emulates a hybrid drive using a
traditional hard disk drive (HDD) and a small solid state drive (SSD). It stores
frequently used files, data, and applications to a special partition on a small SSD
device. It provides SSD-like read/write performance for the files used most
frequently, while providing lower overall storage cost when used with the larger-
sized traditional HDD.
2. Install the Dell IMSM / IRST driver and application available on Dell’s driver &
downloads support web site (support.dell.com) under the “SATA Drivers” section
o Intel® Rapid Start Technology
1. Rapid Start is a BIOS-based feature that replaces Windows® hibernate with a new
low-power state; it can improve resume time vs. hibernate by ~2x.
2. Install the "Rapid Start technology manager" in Windows available on Dell’s driver &
downloads support web site (support.dell.com) under the “Applications” section.
o Intel® Smart Connect Technology
1 Smart Connect is a BIOS- and driver-based technology that periodically wakes the
system from the Windows® sleep state to refresh email or social networking
applications. When the system is equipped with specific wireless devices, it can
detect the presence of known networks while asleep, waking only when
connectivity is available. When properly equipped with specific wireless devices,
Smart Connect can also provide quick internet connection readiness, by keeping
wireless devices active in a low-power mode during sleep.
2 Install the " Intel® Smart Connect Configuration Application and Driver package " in
Windows available on Dell’s driver & downloads support web site (support.dell.com)
under the “Applications” section.
Table of Storage configurations supported:
Boot Disk (below)/
Technology (right)
Smart Connect
Rapid Start
Smart Response
HDD only
Not supported
Not supported
Not supported

Dell Latitude Ultrabook, E-Family & Mobile Precision Reimage “How-To” Guide
HDD + SSD
Not supported
Supported
Supported
HDD + mSATA
Not supported
Supported
Supported
SSD only
Supported
Supported
Not supported (Note: SSD
performance achieved without Smart
Response)
mSATA only
Supported
Supported
Not supported (Note: SSD
performance achieved without Smart
Response)
Hybrid Drive
Not supported
Not supported
Not supported (Note: Hybrid Drive is
similar in performance to Smart
Response)
Note
: Supported for Windows7/8 only
Note
: Please refer to Intel Responsiveness Technologies Guide for detail settings of these
features.
Dell Latitude Ultrabook, E-Family & Mobile Precision Reimage “How-To” Guide
Appendix

Dell Latitude Ultrabook, E-Family & Mobile Precision Reimage “How-To” Guide
Appendix A
.NET Framework Requirements
What is .NET Framework?
The .NET Framework is a software framework from Microsoft, which is bundled with Windows
operating systems. The .NET Framework is intended to be used by most applications created for the
Microsoft Windows platform.
.NET Framework Requirements?
Windows 7 Windows Vista Windows XP
.NET 3.5 .NET 3.0 .NET 1.1
Intel GMA 4500MHD Graphics
Intel GMA HD Graphics
Intel Media Adapter HD/HD 2000/HD 3000
N/A .NET 3.5x N/A
.NET 3.0 .NET 3.0 .NET 3.0
.NET 3.0
Intel MS M / RST Storage
AMD Catalys t Control Center - Control Panel
.NET 3.0
.NET 3.0
Driver / S W S tack
Intel
Dell Latitude Ultrabook, E-Family & Mobile Precision Reimage “How-To” Guide
Appendix B
512e / 4KBe HDD Re-image Guidelines
1 What is Advanced Format HDD?
HDD industry is moving towards supporting higher drives capacity, to address the current limitations
with the 512-byte sector HDDs, the industry is moving towards the Advanced Format with 4KB sector
HDDs.
The transition to 4KB sector HDDs will allow storage devices to more easily adopt larger capacities in
both the notebook and desktop space.
While hard drives will transition to 4KB sectors and to maintain backwards compatibility, current
Advanced Format 4KB HDDs, also known as 512e HDDs, will emulate 512-byte SATA
communications to hosts and will operate at 4KB.
2 How does an Advanced Format HDD impact OS Images?
Even though a 512e drive is designed to be backward compatible, most of current Operating Systems
are not aware of the Advanced Format technology. Depending on the Operating System and its
service pack, some extra steps may be required to optimize the performance of the Advanced Format
(512e) HDDs and to maintain full Operating System and Application functionality.
These extra steps could require using alignment tools to fix any sector misalignment as a result of
deploying a non-Advanced Format aware image on an Advanced Format HDD which may otherwise
cause performance issues.

Dell Latitude Ultrabook, E-Family & Mobile Precision Reimage “How-To” Guide
3 Re-imaging Requirements when using Advanced Format HDDs
The following are the re-imaging guidelines needed to support Advanced Format HDDs. These
requirements are dependent on which Operating System will be installed and which method of
deployment will be used.
3.1 Microsoft Operating Systems Advanced Format Aware Readiness
An Operating System is Advanced Format Aware if it meets the following criteria:
o It understands the concept of physical sector vs. logical sector
o It maximizes writes using multiples of 4k bytes
o Disk partition starts at the boundary of 4k sector
Not all current Microsoft Operating Systems are Advanced Format Aware (refer to the Table below). A
system configured with an Advanced Format drive and an operating system that is not Advanced
Format aware can experience sector misalignment, resulting in performance or compatibility issues.
- Some extra steps may be required for re-imaging even with Advanced Format Aware Microsoft
Operating Systems, Install/upgrade to the latest Intel Storage driver
- Apply the applicable Microsoft KB article
- Partition alignment
such as (Please refer to section 3.2 for detailed instructions):
Operating System
Advanced Format
Aware
Microsoft Windows 7 SP1
Yes
Microsoft Windows 7
Yes
Microsoft Vista SP1
Yes
Microsoft Vista
No
Microsoft XP (all versions)
No
Microsoft Windows PE 3.0 or Later
Yes
Microsoft Windows PE older versions
No

Dell Latitude Ultrabook, E-Family & Mobile Precision Reimage “How-To” Guide
3.2 Image Installation Guidelines
3.2.1 Clean Image Installation on an Advanced Format HDD
Microsoft® OS Installation
Method
Windows 7 SP1
Windows 7
Windows Vista SP1
Windows Vista
Windows XP
Using Dell Operating
System Media
1. Install/Upgrade
Intel RST
Storage driver to
(1)
9.6 or later
1. Apply Microsoft KB
article 982018
2. Install/Upgrade Intel
RST Storage driver
(1)
to 9.6 or later
1. Apply Microsoft KB
article 2470478
2. Install/Upgrade
Intel RST Storage
driver to 9.6 or
(1)
later
(2)
1. Use Alignment Tool
to ensure
Advanced Format drive partitions
are properly aligned
2. Install/Upgrade Intel RST Storage
(1)
driver to 9.6 or higher
Using non-Dell off the shelf
Operating System Media
1. Install/Upgrade
Intel RST
Storage driver to
(1)
9.6 or later
1. Apply Microsoft KB
article 982018
2. Install/Upgrade Intel
RST Storage driver
(1)
to 9.6 or later
1. Apply Microsoft KB
article 2470478
2. Install/Upgrade
Intel RST Storage
driver to 9.6 or
(1)
later
(2)
1. Use Alignment Tool
to ensure
Advanced Format drive partitions
are properly aligned
2. Install/Upgrade Intel RST Storage
(1)
driver to 9.6 or higher
Using Windows PE 3.0 or
prior
Note: If using a Win PE
version earlier than 3.0,
apply Windows Automated
KIT
1. Install/Upgrade
Intel RST
Storage driver to
(1)
9.6 or later
1. Apply Microsoft KB
article 982018
2. Install/Upgrade Intel
RST Storage driver
(1)
to 9.6 or later
1. Apply Microsoft KB
article 2470478
2. Install/Upgrade
Intel RST Storage
driver to 9.6 or
(1)
later
1. Install/Upgrade Intel RST Storage
(1)
driver to 9.6 or higher
Using Windows PE 3.1
(1)
1. Install/Upgrade Intel RST Storage driver to 9.6 or later
- (1)
The Intel RST Driver 9.6 or higher can be found on the Dell Support website in Dell Drivers and Downloads for your system
under the SATA drivers section
- (2)
Please refer to the Partition Alignment Tools - Section 3.4
3.2.2Deploying 512B pre-installed image to an Advanced Format drive
Microsoft® OS Installation
Method
Windows 7 SP1
Windows 7
Windows Vista SP1
Windows Vista
Windows XP
Using Dell Factory Installed
Image
No actions required. Dell Factory Images include required components.
Not Available
Not Available
Using Sector-Based Utilities
(Norton Ghost, Altiris, etc.)
1. Use Alignment
(2)
Tool
to
ensure
Advanced
Format drive
partitions are
properly aligned
before re-
imaging
2. Install/Upgrade
Intel RST Storage
driver to 9.6 or
(1)
later
1. Use Alignment
(2)
Tool
to ensure
Advanced Format
drive partitions are
properly aligned
before re-imaging
2. Apply Microsoft KB
article 982018
3. Install/Upgrade Intel
RST Storage driver
(1)
to 9.6 or later
1. Use Alignment
(2)
Tool
to ensure
Advanced Format
drive partitions are
properly aligned
before re-imaging
2. Apply Microsoft KB
article 2470478
3. Install/Upgrade Intel
RST Storage driver
(1)
to 9.6 or later
(2)
1. Use Alignment Tool
to ensure
Advanced Format drive partitions
are properly aligned before re-
imaging
2. Install/Upgrade Intel RST Storage
(1)
driver to 9.6 or later
- (1)
The Intel RST Driver 9.6 or higher can be found on the Dell Support website in Dell Drivers and Downloads for your system
under the SATA drivers section
- (2)
Please refer to the Partition Alignment Tools - Section 3.4

Dell Latitude Ultrabook, E-Family & Mobile Precision Reimage “How-To” Guide
3.3 Other Partition Alignment Requirements
Environment
Action
IRRT / RAID 0,1 & 5 Configuration
(1)
Use Alignment Tools
to ensure Advanced Format drive
partitions are properly aligned
Data Protection / Encryption
(1)
Use Alignment Tools
to ensure Advanced Format drive
partitions are properly aligned before encrypting the drive.
Note:
Misaligned encrypted Advanced Format drives need
to be decrypted, then aligned and re-encrypted
(1)
Please refer to the Partition Alignment Tools - Section 3.4
3.4 Partition Alignment Options
Partition alignment is required for older operating systems and is recommended for new operating
systems in order to insure proper hard drive performance and imaging between drives of differing
sector sizes. An aligned partition is when the starting offset of the partition is divisible by 4096 Bytes
or by 8 for logical block addressing (LBA) numbers.
3.4.1 Pre-Installation of Operating System
This section lists a few options for partition alignment pre-installation of OS:
- Using Ghost:
Ghost 11.5 will maintain the alignment state of the Gold/Master image. If the disk image is
built and aligned on a 512e/Advanced Format drive, the clones of that image will remain
aligned. If the image is built on a 512B, Ghost command line switch {-align=1MB} can be
used to ensure alignment when deployed to any drive.
- Using DISKPART:

Dell Latitude Ultrabook, E-Family & Mobile Precision Reimage “How-To” Guide
DISKPART may be used to enable storage configuration or create a partition at an explicit
disk offset from a script, a remote session, or another command prompt.
Dell recommends using WinPE's (3.0 or greater) Diskpart.exe from Windows Vista or
Windows 7 to create the partitions for Windows XP installation. This will create a partition
that is Advanced Format aligned. Without PE, starting with Windows Vista or Windows 7 DVD
to create the partition for the Windows XP will create correct partitioning. On how to use
DISKPART utility and how to divide the offset value of the selected partition, refer to
Microsoft KB Article 300415
3.4.2 Post-Installation of Operating System
The Paragon Alignment Tool (PAT) is a hardware agnostic tool available for download from the
Dell Support website in Dell Drivers and Downloads for your system under the
SATA Drives
section. This tool can be used after an Operating System is installed to align the partitions of
an Advanced Format drive.
Dell Latitude Ultrabook, E-Family & Mobile Precision Reimage “How-To” Guide
Appendix C
General Re-Imaging FAQs
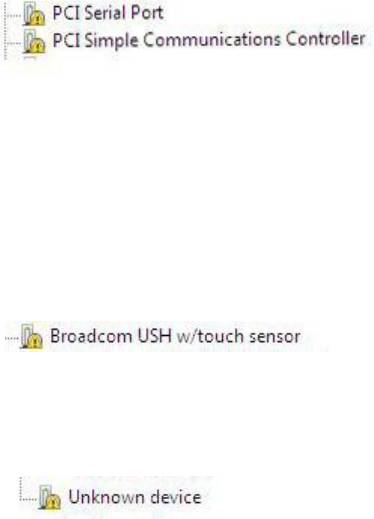
1. How do I resolve a PCI Yellow Bang?
a. After installing the drivers and you have this PCI yellow bang in device manager, you need to
install the following drivers found in the Chipset folder:
st
b. For E-Family 1
generation you need to install two drivers - AMT SOL / LMS and AMT HECI
nd
c. For E-Family 2
generation you need to install one driver - AMT HECI
2. How do I resolve a Broadcom USH Yellow Bang?
a. After installing the drivers and you have this USH yellow bang in device manager, you need
to install the Control Point Security Device Driver Pack
nd
3. How do I resolve this Unknown Device yellow bang on E-Family 2
generation?
a. After installing the drivers and you have an unknown device yellow bang in device manager,
you need to install the ST Micro Freefall Sensor driver found under Chipset
4. What drivers are in the Control Point Security Device Driver pack?
a. The driver pack has the drivers for all security related hardware, including:
1. Broadcom Trusted Platform Module
2. Atmel Trusted Platform Module
3. STMicroelectronics Trusted Platform Module
4. Winbond Trusted Platform Module
5. O2Micro Smart Card Reader
6. Dell Smart Card Keyboard
7. UPEK TouchChip Fingerprint Reader
8. Authentec Fingerprint Reader
9. Broadcom Unified Security Hub
10. Vista Storage Driver Update (for ATAPI.SYS)
5. Can I use WiMax and WiFi at the same time?
a. No, the wireless adapter only supports one of them being active at one time
6. What is the Dell System Software utility and why do I need it?
Dell Latitude Ultrabook, E-Family & Mobile Precision Reimage “How-To” Guide
a. The Dell System Software utility provides critical updates and patches for your operating
system necessary for the correct operation of your system. It is important to install this utility
first after re-imaging your system. It is found under the System Utilities folder on the Dell
Drivers and Download page
7. What is the Client System Update application?
a. Located under System Management > Client System Update, this is primarily targeted at
Customers who want to manage systems on their own. The tool is designed to allow users
to specify their update preferences and apply updates based on the criticality. Alternatively,
end users can use the scheduling option to keep their system up-to-date with the systems
software released by Dell
8. What is eSATA?
One of the connectors on the system is a dual eSATA / USB combo port. It can interface with
either an eSATA device or a USB device. eSATA is an industry standard interface. A few of the
key benefits of eSATA technology are:
o Data speeds up to six times faster than USB 2.0 and IEEE 1394
o Robust and user friendly external connection
o High performance, cost effective expansion storage
o Up to 2 meter shielded cables and connectors

Dell Latitude Ultrabook, E-Family & Mobile Precision Reimage “How-To” Guide
Appendix D
Tables
- Control Point System Manager Features - Table B1
Category Feature
DCP SM
Release
Version
Availablity of Feature
when DCP Installed?
Availablity of Feature
when Dell provides
drivers/middleware, but No DCP
App?
Availabilty of Feature
when only Windows OS installed?
user profiles v1.0 Yes N/A
Only power schemes are available in
the OS.
View battery manufacturer info. v1.0 Yes N/A Yes, through BIOS
View battery health info. v1.0 Yes N/A Yes, through BIOS
battery charge enable/disable status v1.0 Yes N/A Yes
Network card power management v1.0 Yes Yes (Intel LOM) No (some Broadcom LOMs)
Extended Battery Life/ All Day Battery Life.
(ADBL)
v1.0 Yes N/A No
Dell Enhanced Performance Plans (User
Selectable Thermal Tables for Performance,
temperature and sound levels)
v1.4 Yes N/A No
Digidesign Audio/Video mode v1.3 Yes N/A Yes, thru individual settings in BIOS/OS
Display settings
Inactivate display and system timeouts when
activating an external display using FnF8.
v1.0 Yes N/A No
Fn+F2 to enable Battery Charge disable v1.0 Yes N/A Yes, but with No screen pop-up display
Fn+F3 launch DCP w/ Battery Status v1.0 Yes N/A No
Fn+F7 to enable/disable DCP v1.0 Yes N/A No
Fn+F8 to switch between display settings v1.0 Yes N/A Yes, but with No screen pop-up display
Hot Key customizaton
User hot key customization ability (also Fn+D
functionality which is set to toggle display by
default).
v1.0 Yes N/A No
Keyboard backlighting
Keyboard backlighting options (to be able to
set the intensity, inactivity timeout values
and input triggers.)
v1.0 Yes N/A Yes, but with No screen pop-up display
Ability to Adjust Brightness Level v1.0 Yes N/A Yes, but with No screen pop-up display
feedback through on screen display v1.0 Yes N/A No
Ability to enale/disable ALS v1.0 Yes N/A Yes
ALS Feedback through on screen display v1.0 Yes N/A No
Reporting of Ambient Temp log information
at OS presence (PWS only)
v1.2 Yes N/A Through BIOS
Reporting of CPU Temp log information at OS
presence (PWS only)
v1.2 Yes N/A Through BIOS
Reporting of SMART Alerts log information at
OS presence (PWS only)
v1.2 Yes N/A Through BIOS
Reporting of ECC Alerts log information at OS
presence (PWS only)
v1.2 Yes N/A Through BIOS
Privacy Screen - Discreet Graphics Fn+E to enable/disable Privacy screen v1.0 Yes N/A No
Privacy Screen - UMA Graphics Fn+E to enable/disable Privacy screen v1.2.01 Yes N/A No
"Color Space" Panel Settings for
RGB LED Displays (17" only)
Provides system level controls for NTSC,
sRGB, Pro Photo RGB/Kodak or Adobe color
settings (certain panels only)
v1.3 Yes N/A No
Brightness
Function Keys
Hardware Monitoring for Desktops
Power Manager
