Dell Latitude D520 – страница 3
Инструкция к Ноутбуку Dell Latitude D520
Оглавление
- Dell™Latitude™D520User'sGuide

Back to Contents Page
U.S.A. (Austin, Texas)
International Access Code:
011
Country Code: 1
Employee Purchase Program (EPP) Customers
toll-free:1-800-695-8133
Financial Services website:
www.dellfinancialservices.com
Financial Services (lease/loans)
toll-free:1-877-577-3355
Financial Services (Dell Preferred Accounts [DPA])
toll-free:1-800-283-2210
Business
Customer Service and Support
toll-free:1-800-456-3355
Employee Purchase Program (EPP) Customers
toll-free:1-800-695-8133
Support for printers, projectors, PDAs, and MP3 players
toll-free:1-877-459-7298
Public(government,education,andhealthcare)
Customer Service and Support
toll-free:1-800-456-3355
Employee Purchase Program (EPP) Customers
toll-free:1-800-695-8133
Dell Sales
toll-free:1-800-289-3355
or toll-free:1-800-879-3355
Dell Outlet Store (Dell refurbished computers)
toll-free:1-888-798-7561
Software and Peripherals Sales
toll-free:1-800-671-3355
Spare Parts Sales
toll-free:1-800-357-3355
Extended Service and Warranty Sales
toll-free:1-800-247-4618
Fax
toll-free:1-800-727-8320
Dell Services for the Deaf, Hard-of-Hearing, or Speech-Impaired
toll-free:1-877-DELLTTY
(1-877-335-5889)
U.S. Virgin Islands
E-mail: la-techsupport@dell.com
General Support
toll-free:1-877-702-4360
Venezuela
Website: www.dell.com/ve
E-mail: la-techsupport@dell.com
General Support
0800-100-4752
Back to Contents Page
Using the Keyboard and Touch Pad
Dell™Latitude™D520User'sGuide
Numeric Keypad
Key Combinations
Touch Pad
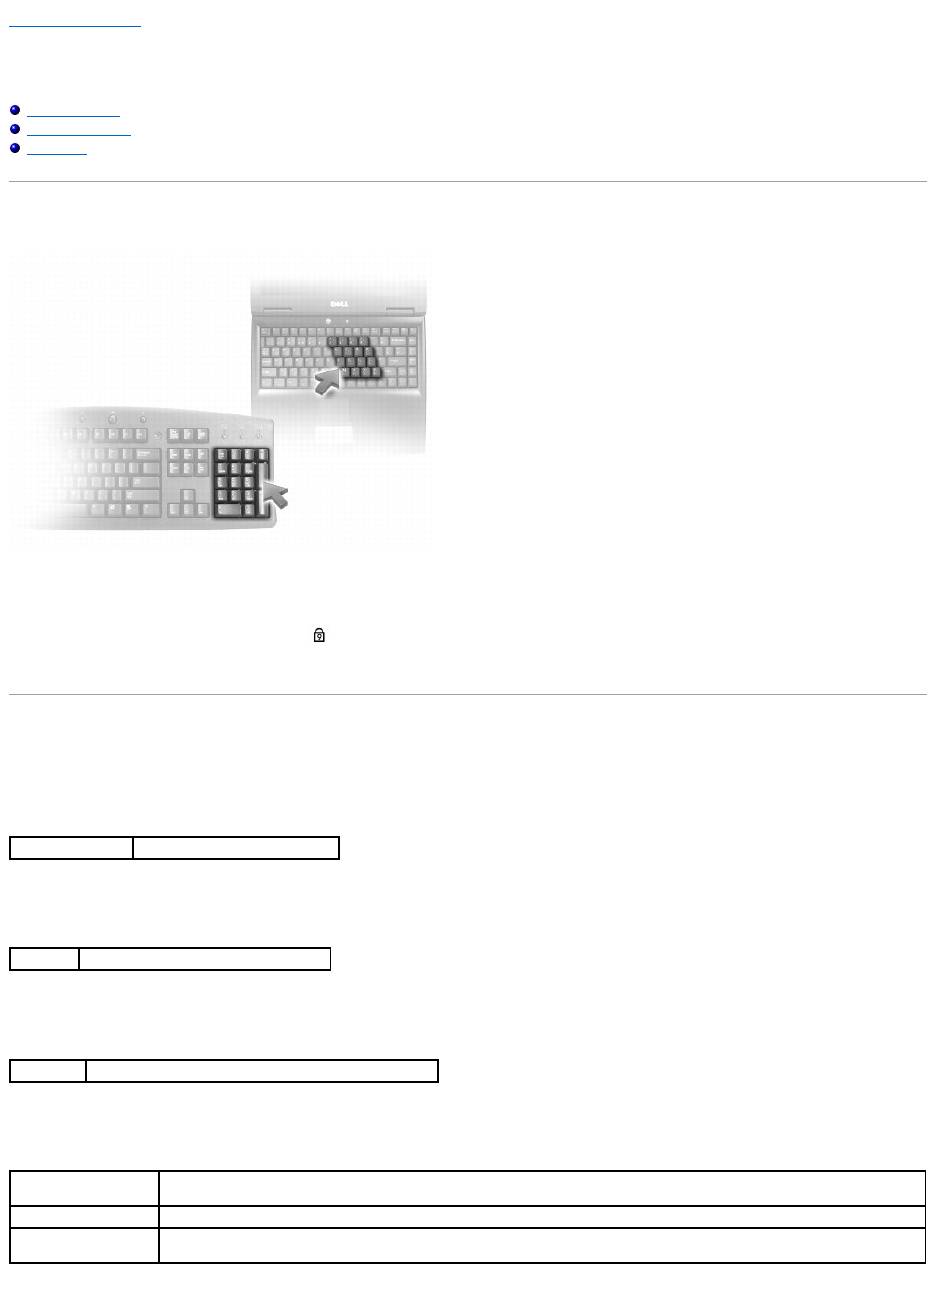
Numeric Keypad
The numeric keypad functions like the numeric keypad on an external keyboard. Each key on the keypad has multiple functions. The keypad numbers and
symbols are marked in blue on the right of the keypad keys. To type a number or symbol, hold down <Fn> and press the desired key.
l To enable the keypad, press <Num Lk>. The light indicates that the keypad is active.
l To disable the keypad, press <Num Lk> again.
Key Combinations
System Functions
Battery
CD or DVD Tray
Display Functions
<Ctrl><Shift><Esc>
Opens the Task Manager window
<Fn><F3>
DisplaystheDell™QuickSetBatteryMeter
<Fn><F10>
Ejects the tray out of the drive (if Dell QuickSet is installed).
<Fn><F8>
Switches the video image to the next display option. The options include the integrated display, an external monitor, and both
displays simultaneously.
<Fn> and up-arrow key
Increases brightness on the integrated display only (not on an external monitor).
<Fn> and down-arrow
key
Decreases brightness on the integrated display only (not on an external monitor).
Speaker Functions
Radios (Including Wireless Networking and Bluetooth® Wireless Technology)
Power Management
Microsoft®Windows®Logo Key Functions
To adjust keyboard operation, such as the character repeat rate, open the Control Panel, click Printers and Other Hardware, and click Keyboard. For
information about the Control Panel, access the Windows Help and Support Center (see Windows Help and Support Center).
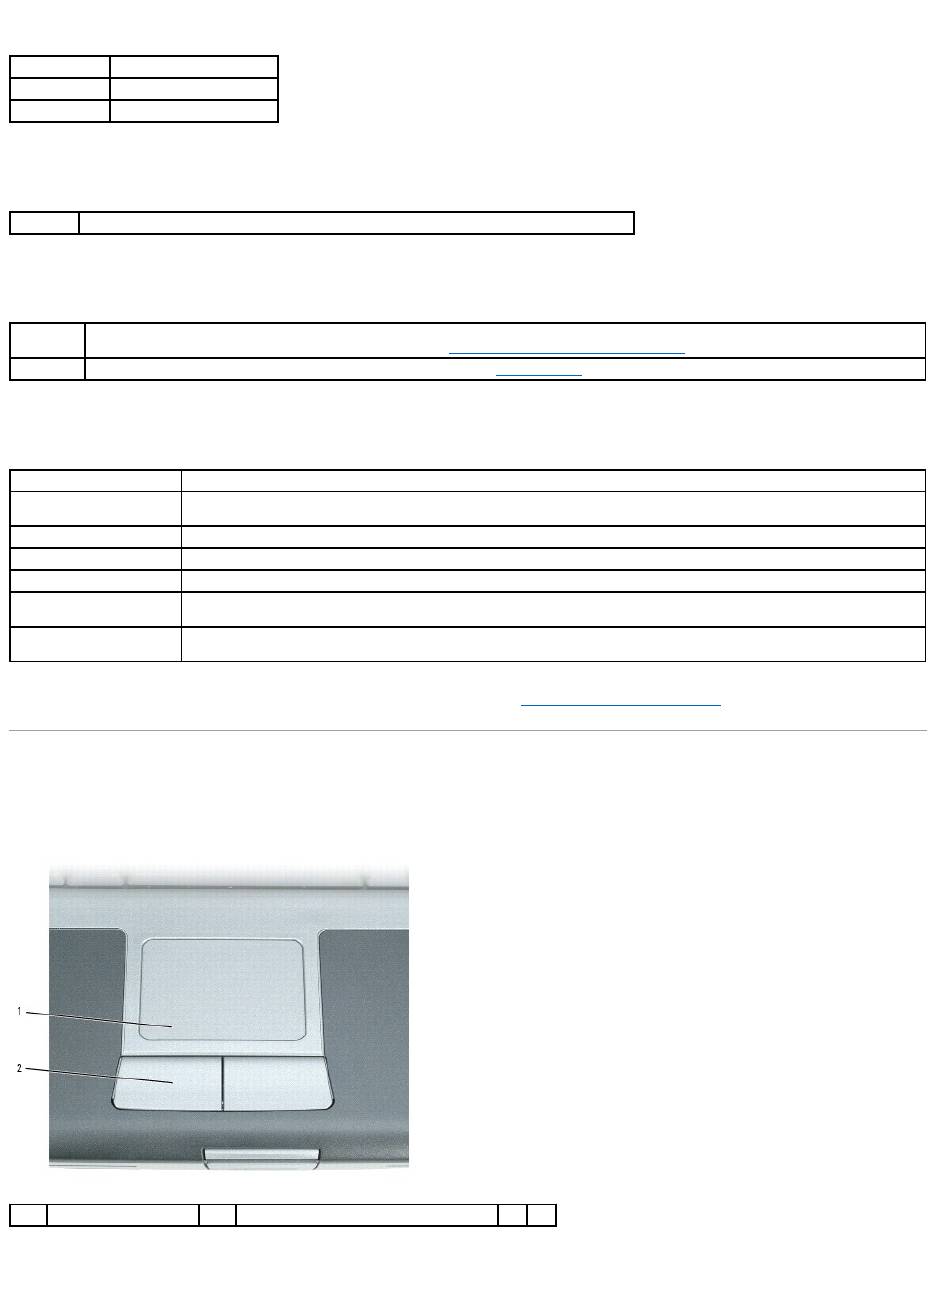
Touch Pad
The touch pad detects the pressure and movement of your finger to allow you to move the cursor on the display. Use the touch pad and touch pad buttons as
you would use a mouse.
l To move the cursor, lightly slide your finger over the touch pad.
l To select an object, lightly tap once on the surface of the touch pad or use your thumb to press the left touch-pad button.
<Fn><PageUp>
Increases speaker volume.
<Fn><PageDn>
Decreases speaker volume.
<Fn><End>
Mutes speaker volume.
<Fn><F2>
Enables and disables radios, including wireless networking and Bluetooth wireless technology.
<Fn><Esc>
Activates a power management mode. You can reprogram this keyboard shortcut to activate a different power management mode using the
Advanced tab in the Power Options Properties window (see Configuring Power Management Settings).
<Fn><F1>
Puts the computer into hibernate mode. Dell QuickSet is required (see Dell™QuickSet).
Windows logo key and <m>
Minimizes all open windows
Windows logo key and
<Shift><m>
Restores all minimized windows. This key combination functions as a toggle to restore minimized windows following the use of
the Windows logo key and <m> key combination.
Windows logo key and <e>
Runs Windows Explorer
Windows logo key and <r>
Opens the Run dialog box
Windows logo key and <f>
Opens the Search Results dialog box
Windows logo key and
<Ctrl><f>
Opens the Search Results-Computer dialog box (if the computer is connected to a network)
Windows logo key and
<Pause>
Opens the System Properties dialog box
1
touch pad
2
touch pad buttons

l To select and move (or drag) an object, position the cursor on the object and tap twice on the touch pad. On the second tap, leave your finger on the
touch pad and move the selected object by sliding your finger over the surface.
l To double-click an object, position the cursor on the object and tap twice on the touch pad or use your thumb to press the left touch-pad button twice.
Customizing the Touch Pad
You can use the Mouse Properties window to disable the touch pad or adjust its settings.
1. Click Start® Control Panel® Printers and Other Hardware® Mouse. See the Windows Help and Support Center for information about the Control
Panel,. To access the Windows Help and Support Center, see Windows Help and Support Center.
2. In the Mouse Properties window:
l Click the Device Select tab to disable the touch pad.
l Click the Pointer tab to adjust touch pad settings.
3. Click OK to save the settings and close the window.
Back to Contents Page
Back to Contents Page
Using Multimedia
Dell™Latitude™D520User'sGuide
Playing a CD or DVD
Adjusting the Volume
Adjusting the Picture
Copying CDs and DVDs
Connecting Your Computer to a TV or Audio Device
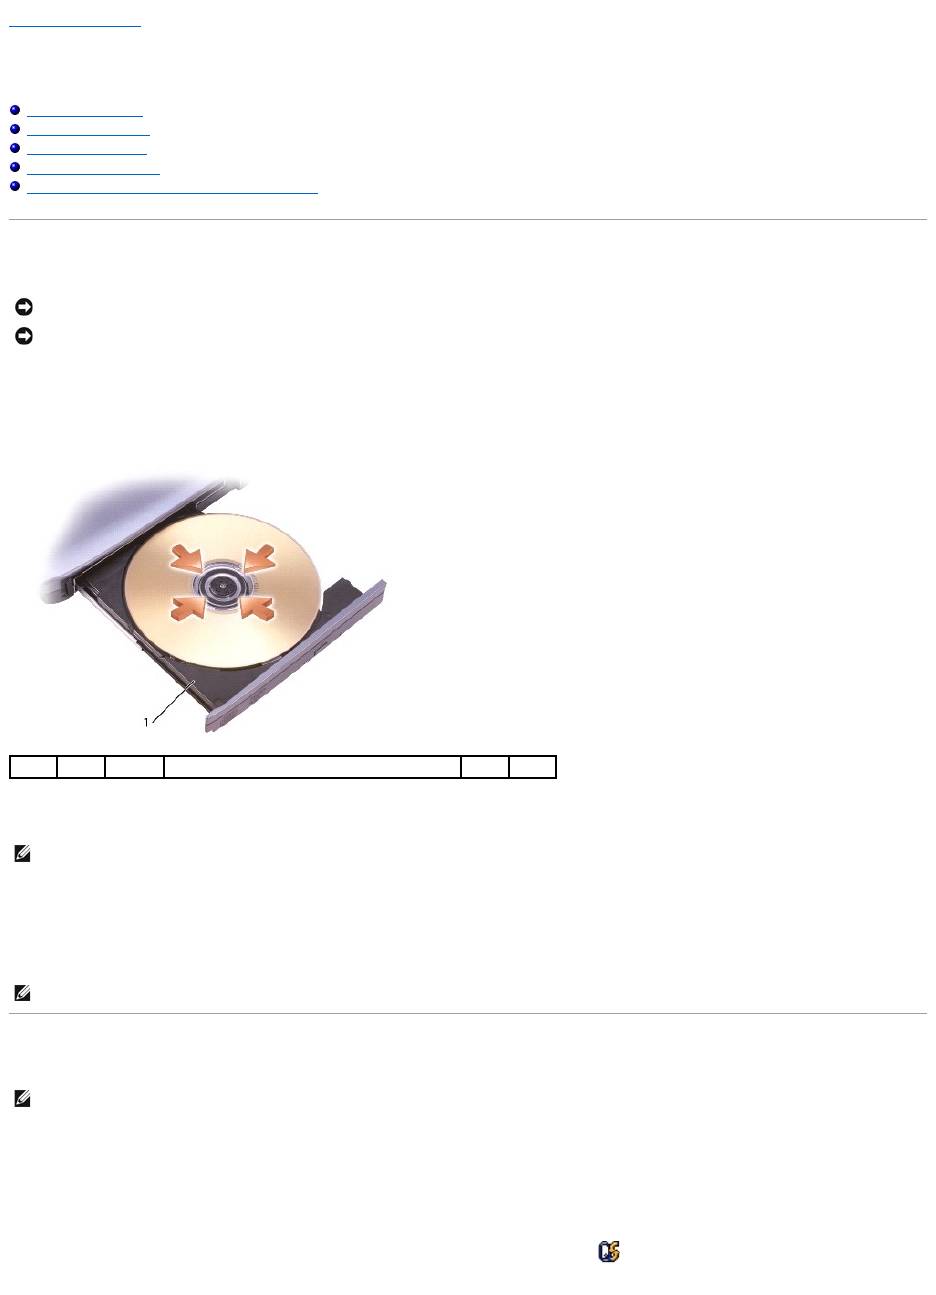
Playing a CD or DVD
1. Press the eject button on the front of the drive.
2. Pull out the tray.
3. Place the disc, label side up, in the center of the tray and snap the disc onto the spindle.
4. Push the tray back into the drive.
To format CDs for storing data, to create music CDs, or to copy CDs, see the CD software that came with your computer.
Adjusting the Volume
1. Click the Start button, point to Programs® Accessories® Entertainment (or Multimedia), and then click Volume Control.
2. In the Volume Control window, click and drag the bar in the Volume Control column and slide it up or down to increase or decrease the volume.
For more information on volume control options, click Help in the Volume Control window.
The Volume Meter displays the current volume level, including mute, on your computer. Either click the icon in the taskbar and select or deselect Disable
On Screen Volume Meter or press the volume control buttons to enable or disable the Volume Meter on the screen.
NOTICE: Do not press down on the CD or DVD tray when you open or close it. Keep the tray closed when you are not using the drive.
NOTICE: Do not move the computer when you are playing CDs or DVDs.
1
CD/DVD tray
NOTE: If you use a CD/DVD drive that shipped with another computer, you need to install the drivers and software necessary to play CDs or DVDs or
write data. For more information, see the Drivers and Utilities CD (the Drivers and Utilities CD is optional and may not be available for your computer or in
certain countries).
NOTE: Ensure that you follow all copyright laws when you create CDs.
NOTE: When the speakers are muted, you do not hear the CD or DVD playing.

When the Volume Meter is enabled, adjust the volume with the volume control buttons or by pressing the following key combinations:
l Press <Fn><PageUp> to increase the volume.
l Press <Fn><PageDn> to decrease the volume.
l Press <Fn><End> to mute the volume.
For more information about QuickSet, right-click the icon in the taskbar and click Help.
Adjusting the Picture
If an error message notifies you that the current resolution and color depth are using too much memory and preventing DVD playback, adjust the display
properties.
1. Click the Start button and click Control Panel.
2. Under Pick a category, click Appearance and Themes.
3. Under Pick a task..., click Change the screen resolution.
4. In the Display Properties window, click and drag the bar in Screen resolution to reduce the screen resolution setting.
5. Click the drop-down menu under Color quality, and then click Medium (16 bit).
6. Click OK to save the settings and close the window.
Copying CDs and DVDs
This section applies only to computers that have a CD-RW, DVD+/-RW, or CD-RW/DVD (combo) drive.
The following instructions explain how to make an exact copy of a CD or DVD. You can also use Sonic DigitalMedia for other purposes, such as creating music
CDs from audio files stored on your computer or backing up important data. For help, open Sonic DigitalMedia and then click the question mark icon in the
upper-right corner of the window.
How to Copy a CD or DVD
The DVD-writabledrivesinstalledinDell™computerscanwritetoandreadDVD+/-R, DVD+/-RW and DVD+R DL (dual layer) media, but cannot write to and may
not read DVD-RAM or DVD-R DL media.
1. Click the Start button, point to Programs® Sonic® DigitalMedia Projects, and then click Copy.
2. Under the Copy tab, click Disc Copy.
3. To copy the CD or DVD:
l If you have one CD or DVD drive, ensure that the settings are correct and click the Disc Copy button. The computer reads your source CD or DVD
and copies the data to a temporary folder on your computer hard drive.
When prompted, insert a blank CD or DVD into the drive and click OK.
l If you have two CD or DVD drives, select the drive into which you have inserted your source CD or DVD and click the Disc Copy button. The
computer copies the data from the source CD or DVD to the blank CD or DVD.
Once you have finished copying the source CD or DVD, the CD or DVD that you have created automatically ejects.
Using Blank CDs and DVDs
NOTE: Ensure that you observe all copyright laws when creating CDs or DVDs.
NOTE: The types of CD or DVD drives offered by Dell may vary by country.
NOTE: CD-RW/DVD combo drives cannot write to DVD media. If you have a CD-RW/DVD combo drive and you experience recording problems, check for
available software patches on the Sonic support website at www.sonic.com.
NOTE: Most commercial DVDs have copyright protection and cannot be copied using Sonic DigitalMedia.
CD-RW drives can write to CD recording media only (including high-speed CD-RW) while DVD-writable drives can write to both CD and DVD recording media.
Use blank CD-Rs to record music or permanently store data files. After creating a CD-R, you cannot write to that CD-R again (see the Sonic documentation for
more information). Use blank CD-RWs to write to CDs or to erase, rewrite, or update data on CDs.
Blank DVD+/-Rs can be used to permanently store large amounts of information. After you create a DVD+/-R disc, you may not be able to write to that disc
again if the disc is "finalized" or "closed" during the final stage of the disc creation process. Use blank DVD+/-RWs if you plan to erase, rewrite, or update
information on that disc later.
CD-Writable Drives
DVD-Writable Drives
Helpful Tips
l Use Microsoft®Windows®Explorer to drag and drop files to a CD-R or CD-RW only after you start Sonic DigitalMedia and open a DigitalMedia project.
l Use CD-Rs to burn music CDs that you want to play in regular stereos. CD-RWs do not play in most home or car stereos.
l You cannot create audio DVDs with Sonic DigitalMedia.
l Music MP3 files can be played only on MP3 players or on computers that have MP3 software installed.
l Commercially available DVD players used in home theater systems may not support all available DVD formats. For a list of formats supported by your
DVD player, see the documentation provided with your DVD player or contact the manufacturer.
l Do not burn a blank CD-R or CD-RW to its maximum capacity; for example, do not copy a 650-MB file to a blank 650-MB CD. The CD-RW drive needs 1–2
MB of the blank space to finalize the recording.
l Use a blank CD-RW to practice CD recording until you are familiar with CD recording techniques. If you make a mistake, you can erase the data on the
CD-RW and try again. You can also use blank CD-RWs to test music file projects before you record the project permanently to a blank CD-R.
l See the Sonic website at www.sonic.com for additional information.
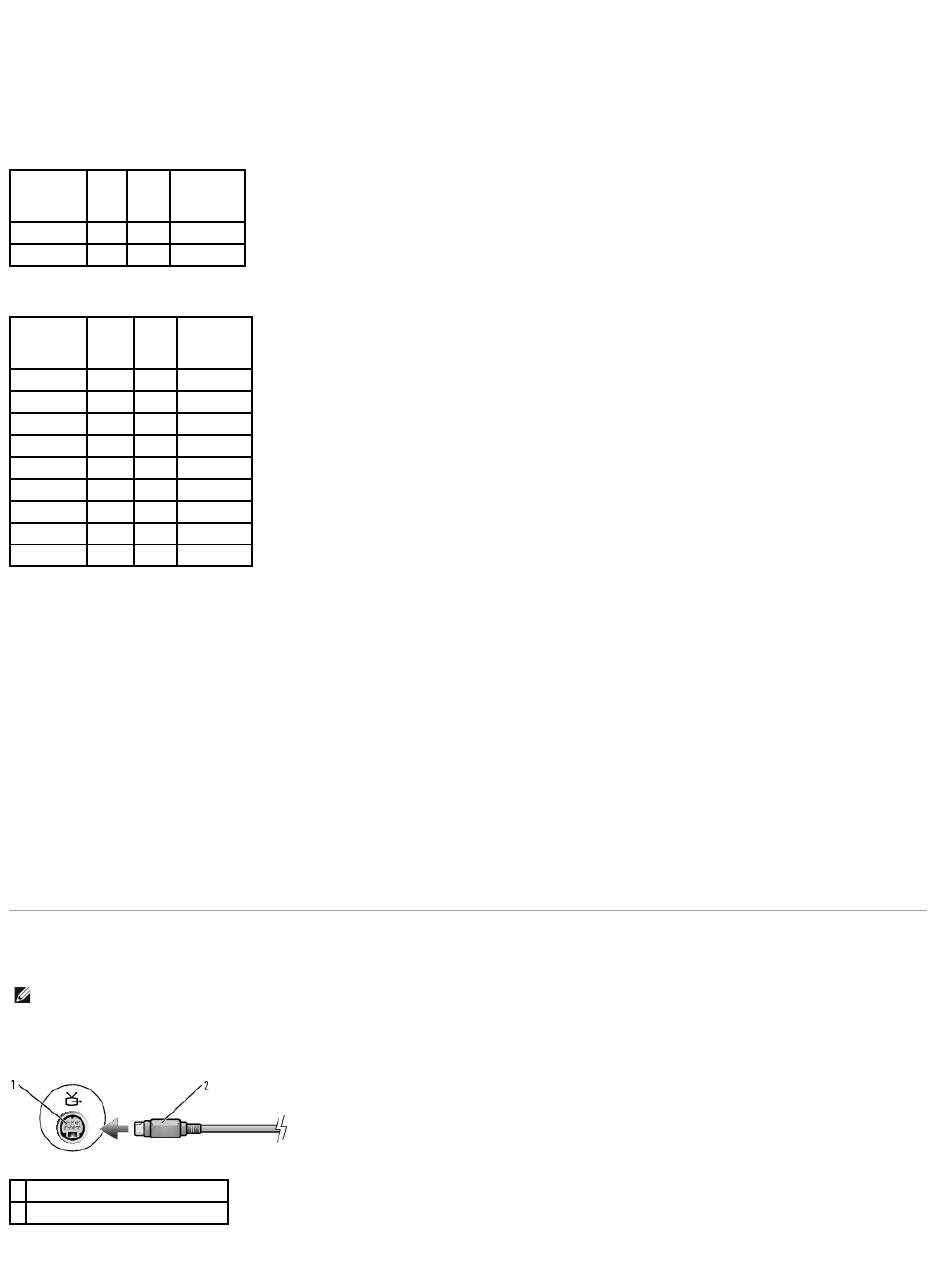
Connecting Your Computer to a TV or Audio Device
Your computer has an S-video TV-out connector that, together with a standard S-video cable (available from Dell), enables you to connect the computer to a
TV.
Your TV has either an S-video input connector or a composite video-input connector. Depending on what type of connector is available on your TV, you can use
a commercially available S-video cable or composite video cable to connect your computer to your TV.
Media Type
Read
Write
Rewritable
CD-R
Yes
Yes
No
CD-RW
Yes
Yes
Yes
Media Type
Read
Write
Rewritable
CD-R
Yes
Yes
No
CD-RW
Yes
Yes
Yes
DVD+R
Yes
Yes
No
DVD-R
Yes
Yes
No
DVD+RW
Yes
Yes
Yes
DVD-RW
Yes
Yes
Yes
DVD+R DL
Yes
Yes
No
DVD-R DL
Maybe
No
No
DVD-RAM
Maybe
No
No
NOTE: Video and audio cables for connecting your computer to a TV or other audio device are not included with your computer and are not available in
certain countries. If available in your country, cables may be purchased at most consumer electronics stores or from Dell.
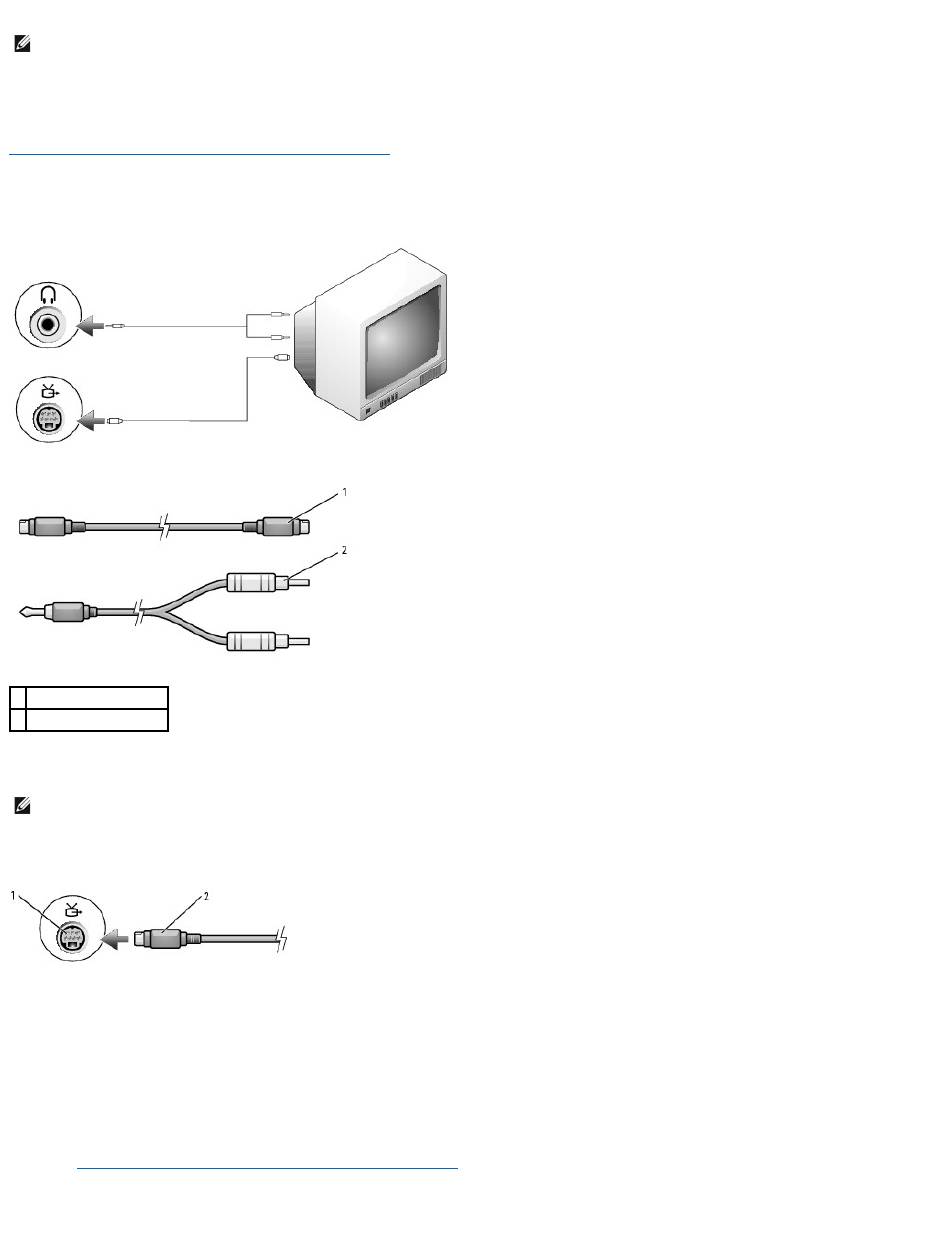
1
S-video TV-out connector
2
standard S-video cable connector
It is recommended that you connect video and audio cables to your computer in one of the following combinations.
l S-video and standard audio
l Composite video and standard audio
When you finish connecting the video and audio cables between your computer and your TV, you must enable your computer to work with the TV. See
Enabling the Display Settings for a TV in Microsoft® Windows® XP to ensure that the computer recognizes and works properly with the TV.
S-Video and Standard Audio
1. Turn off the computer and the TV and/or audio device that you want to connect.
2. Plug one end of the S-video cable in to the S-video input connector on the computer.
3. Plug the other end of the S-video cable in to the S-video input connector on your TV.
4. Plug the single-connector end of the audio cable in to the headphone connector on your computer.
5. Plug the two RCA connectors on the other end of the audio cable in to the audio input connectors on your TV or other audio device.
6. Turn on the TV and any audio device that you connected (if applicable), and then turn on the computer.
7. See "Enabling the Display Settings for a TV in Microsoft® Windows® XP" to ensure that the computer recognizes and works properly with the TV.
Composite Video and Standard Audio
NOTE: See the diagrams at the beginning of each subsection to help you determine which method of connection you should use.
1
standard S-video cable
2
standard audio cable
NOTE: You can connect an S-video cable directly to the S-video TV-out connector on the computer (without the TV/digital audio adapter cable) if your TV
or audio device supports S-video but not S/PDIF digital audio.
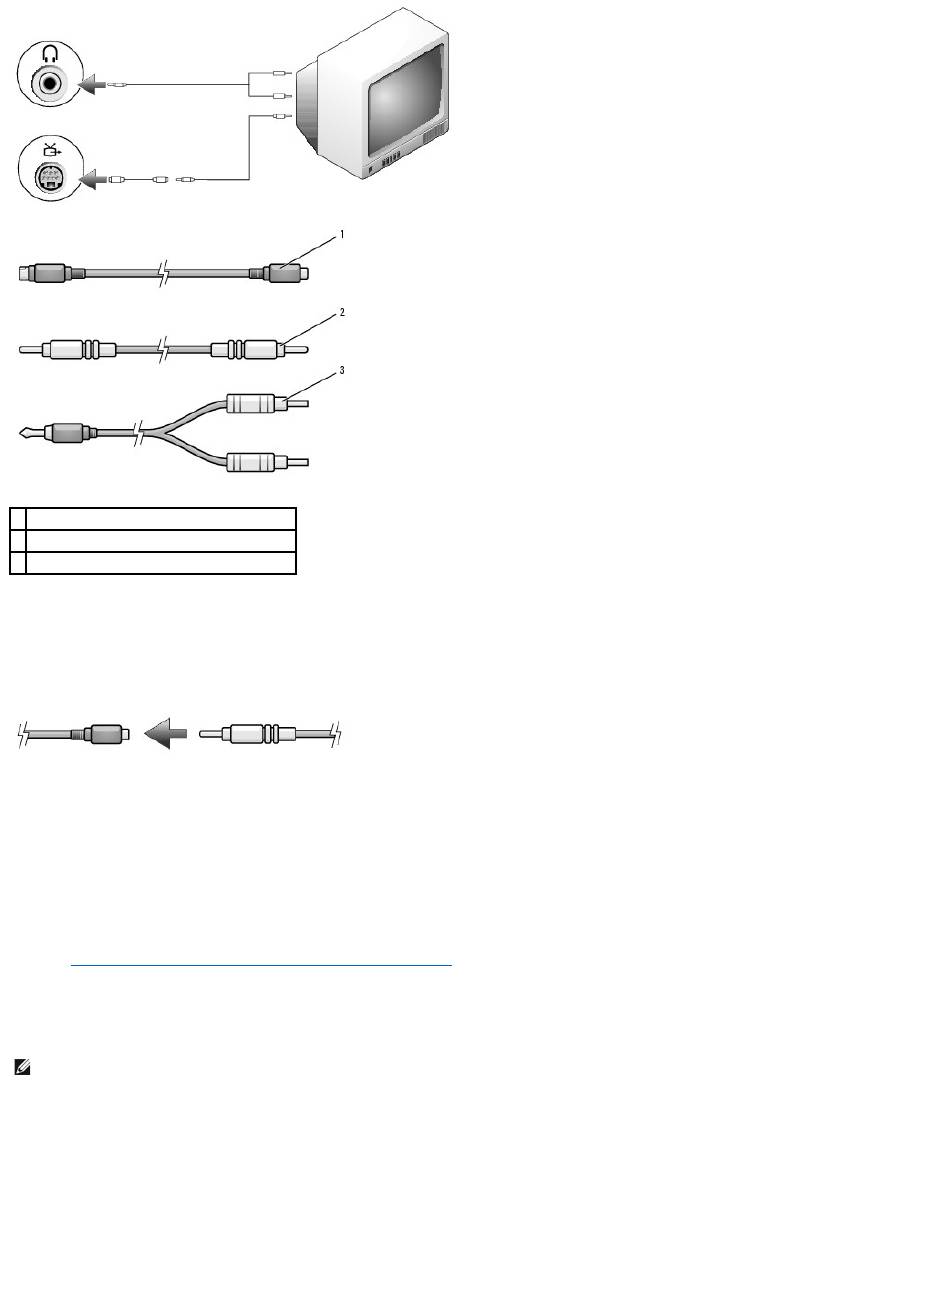
1. Turn off the computer and the TV and/or audio device that you want to connect.
2. Connect the standard video to composite video adapter cable to the S-video TV-out connector on the computer.
3. Plug one end of the composite video cable in to the composite video-input connector on the standard video to composite video cable.
4. Plug the other end of the composite video cable in to the composite video-input connector on the TV.
5. Plug the single-connector end of the audio cable in to the headphone connector on the computer.
6. Plug the two RCA connectors on the other end of the audio cable in to the audio input connectors on your TV or other audio device.
7. Turn on the TV, turn on any audio device that you connected (if applicable), and then turn on the computer.
8. See Enabling the Display Settings for a TV in Microsoft® Windows® XP to ensure that the computer recognizes and works properly with the TV.
Setting Up the Cyberlink (CL) Headphones
If your computer has a DVD drive, you can enable digital audio for DVD playback.
1. Click Start® Programs®PowerDVD to launch the Cyberlink PowerDVD program.
2. Insert a DVD into the DVD drive.
If the DVD begins playing, click the stop button.
3. Click the Settings option.
1
standard S-video to composite video adapter
2
composite video cable
3
standard audio cable
NOTE: The CL headphone feature is available only if your computer has a DVD drive.

4. Click the DVD option.
5. Click the DVD Audio Setting icon.
6. Click the arrows beside the Speaker Configuration setting to scroll through the options, and select the Headphones option.
7. Click the arrows beside the Audio listening mode setting to scroll through the options, and select the CL Headphone option.
8. Click the arrows beside the Dynamic range compression option to select the most suitable option.
9. Click the Back button once, and then click the Back button again to return to the main menu screen.
Enabling the Display Settings for a TV in Microsoft®Windows®XP
1. Click the Start button and click Control Panel.
2. Click Appearances and Themes.
3. Under or pick a Control Panel icon, click Display.
4. Click the Settings tab and click Advanced.
5. Click the Intel (R) Extreme Graphics tab.
6. Click Graphic Properties.
7. If you want to use only a TV without using the computer display or any other display options:
a. In the new window, click TV so that a red check mark directly on top of the TV icon.
b. Ensure that the settings are correct.
8. If you want to use a TV and the computer display at the same time:
a. In the new window, click Intel (R) Dual Display Clone and ensure that one of the devices listed is a TV.
b. Click Device Settings.
c. In the new window, ensure that the display resolution settings are correct.
9. Click Apply to view the new settings.
10. Click OK to confirm the settings change.
11. Click Yes to keep the new settings.
12. Click OK.
Back to Contents Page
NOTE: Ensure that you properly connect the TV before you enable the display settings.
Back to Contents Page
Setting Up a Network
Dell™Latitude™D520User'sGuide
Physically Connecting to a Network or Broadband Modem
Network Setup Wizard
Wireless Local Area Network (WLAN)
Mobile Broadband or Wireless Wide Area Network (WWAN)
Internet Connection Firewall
Physically Connecting to a Network or Broadband Modem
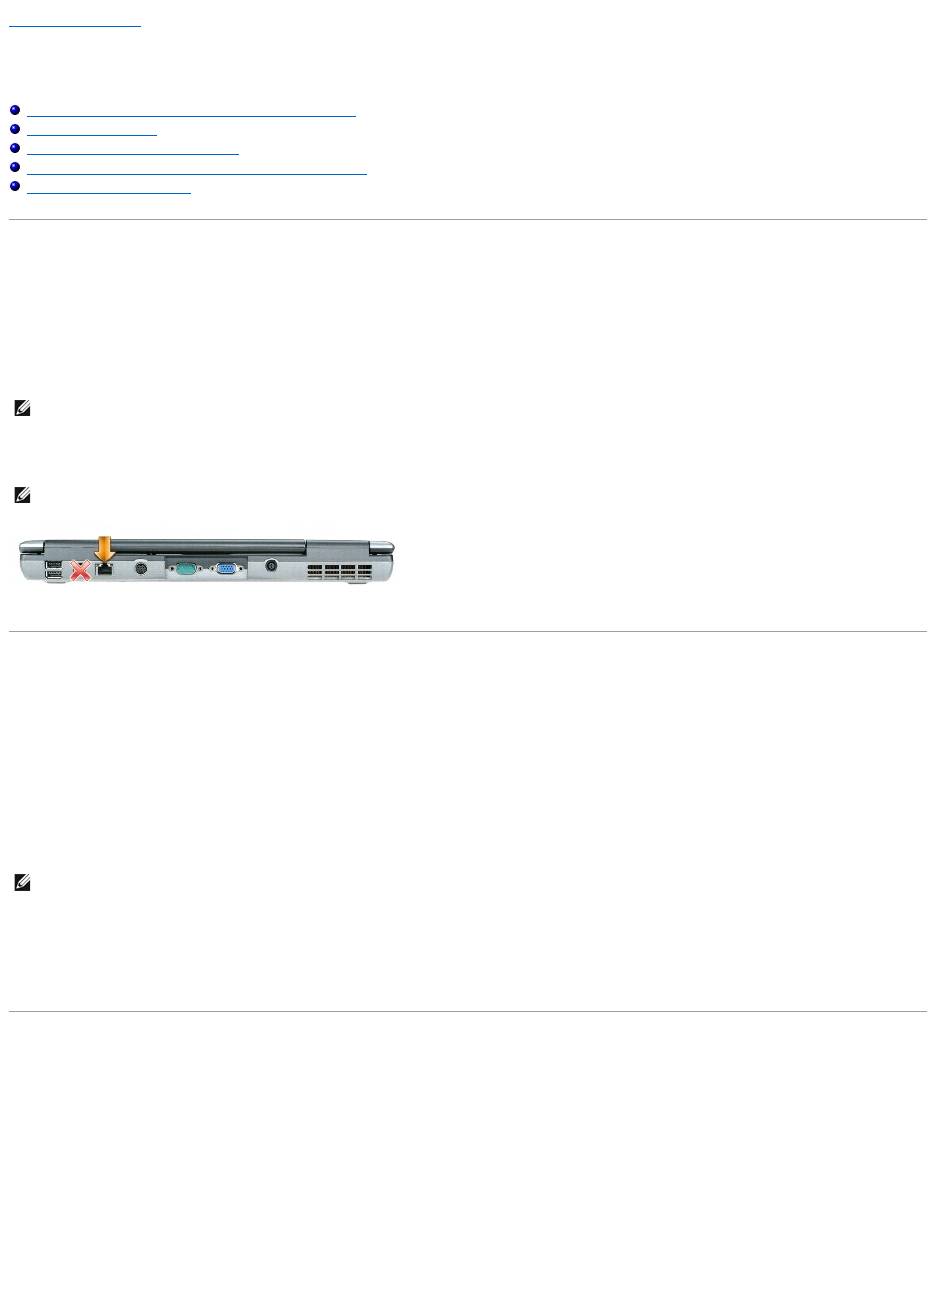
Before you connect your computer to a network that is not wireless, the computer must have a network adapter installed and a network cable connected to it.
To connect a network cable:
1. Connect the network cable to the network adapter connector on the back of your computer.
2. Connect the other end of the network cable to a network connection device or a network wall connector.
Network Setup Wizard
The Microsoft
®
Windows
®
XP operating system provides a Network Setup Wizard to guide you through the process of sharing files, printers, or an Internet
connection between computers in a home or small office.
1. Click Start® Programs® Accessories® Communications® Network Setup Wizard.
2. On the welcome screen, click Next.
3. Click Checklist for creating a network.
4. Complete the checklist.
5. Return to the Network Setup Wizard and follow the instructions on the screen.
Wireless Local Area Network (WLAN)
A WLAN is a series of interconnected computers that communicate with each other over the air waves rather than through a network cable connected to each
computer. In a WLAN, a radio communications device called an access point or wireless router connects network computers and provides network access. The
access point or wireless router and the wireless network card in the computer communicate by broadcasting data from their antennas over the air waves.
What You Need to Establish a WLAN Connection
Before you can set up a WLAN, you need:
l High-speed (broadband) Internet access (such as cable or DSL)
l A broadband modem that is connected and working
NOTE: Insert the cable connector until it clicks into place, and then gently pull the cable to ensure that it is securely attached.
NOTE: Do not use a network cable with a telephone wall connector.
NOTE: Selecting the connection method labeled This computer connects directly to the Internet enables the integrated firewall provided with Windows
XP Service Pack 2 (SP2).

l A wireless router or access point
l A wireless network card for each computer that you want to connect to your WLAN
l A network cable with the network (RJ-45) connector
Checking Your Wireless Network Card
Depending on what you selected when you purchased your computer, the computer has a variety of configurations. Use either of the following methods to
confirm that your computer has a wireless network card and to determine the type of card:
l The Start button and the Connect To option
l The order confirmation for your computer
Start Button and Connect To Option
1. Click the Start button.
2. Point to Connect To, and then click Show all connections.
If Wireless Network Connection does not appear under LAN or High-Speed Internet, you may not have a wireless network card.
If Wireless Network Connection appears, you have a wireless network card. To view detailed information about the wireless network card:
1. Right-click Wireless Network Connection.
2. Click Properties. The Wireless Network Connection Properties window appears. The wireless network card's name and model number are listed on
the General tab.
The Order Confirmation for Your Computer
The order confirmation that you received when you ordered your computer lists the hardware and software that shipped with your computer.
Setting Up a New WLAN
Connecting a Wireless Router and a Broadband Modem
1. Contact your Internet service provider (ISP) to obtain specific information about the connection requirements for your broadband modem.
2. Ensure that you have wired Internet access through your broadband modem before you attempt to set up a wireless Internet connection (see
Physically Connecting to a Network or Broadband Modem).
3. Install any software required for your wireless router. Your wireless router may have been shipped with an installation CD. Such CDs usually contain
installation and troubleshooting information. Install the required software according to the manufacturer's instructions.
4. Shut down your computer and any other wireless-enabled computers in the vicinity through the Start menu.
5. Disconnect your broadband modem power cable from the electrical outlet.
6. Disconnect the network cable from the computer and the modem.
7. Disconnect the AC adapter cable from your wireless router to ensure that there is no power connected to the router.
8. Insert a network cable into the network (RJ-45) connector on the unpowered broadband modem.
9. Connect the other end of the network cable into the Internet network (RJ-45) connector on the unpowered wireless router.
10. Ensure that no network or USB cables, other than the network cable connecting the modem and the wireless router, are connected to the broadband
modem.
NOTE: If your computer is set to the Classic Start menu option, you can view network connections by clicking the Start button, pointing to Settings,
and then pointing to Network Connections. If Wireless Network Connection does not appear, you may not have a wireless network card.
NOTE: Wait for a minimum of 5 minutes after disconnecting your broadband modem before you continue with the network setup.

11. Turn on only your broadband modem and wait for at least 2 minutes for the broadband modem to stabilize. After 2 minutes, proceed to step 12.
12. Turnonyourwirelessrouterandwaitforatleast2minutesforthewirelessroutertostabilize.After2minutes,proceedtothestep 13.
13. Start your computer and wait until the boot process completes.
14. See the documentation that came with your wireless router to do the following in order to set up the wireless router:
l Establish communication between your computer and your wireless router.
l Configure your wireless router to communicate with your broadband router.
l Find out your wireless router's broadcast name. The technical term for the name of your router's broadcast name is Service Set Identifier (SSID)
or network name.
15. If necessary, configure your wireless network card to connect to the wireless network (see Connecting to a Wireless Local Area Network).
Connecting to a Wireless Local Area Network
This section provides general procedures for connecting to a network via wireless technology. Specific network names and configuration details vary. See
Wireless Local Area Network (WLAN) for more information about how to prepare for connecting your computer to a WLAN.
Your wireless network card requires specific software and drivers for connecting to a network. The software is already installed.
Determining the Wireless Network Device Manager
Depending on the software installed on your computer, different wireless configuration utilities may manage your network devices:
l Your wireless network card's configuration utility
l The Windows XP operating system
To determine which wireless configuration utility is managing your wireless network card:
1. Click Start® Settings® Control Panel.
2. Double-click Network Connections.
3. Right-click the Wireless Network Connection icon, and then click View Available Wireless Networks.
If the Choose a wireless network window states Windows cannot configure this connection, the wireless network card's configuration utility is managing
the wireless network card.
If the Choose a wireless network window states Click an item in the list below to connect to a wireless network in range or to get more information, the
Windows XP operating system is managing the wireless network card.
For specific information about the wireless configuration utility installed on your computer, see your wireless network documentation in the Windows Help and
Support Center:
1. Click the Start button and click Help and Support.
2. Under Pick a Help topic, click Dell User and System Guides.
3. Under Device Guides, select the documentation for your wireless network card.
Completing the Connection to the WLAN
When you turn on your computer and a network (for which your computer is not configured) is detected in the area, a pop-up appears near the wireless signal
icon (which signals that a wireless network has been detected) in the lower-right corner of the Windows desktop.
Follow the instructions provided in any utility prompts that appear on your screen.
NOTE: Restart your wireless equipment in the order described below to prevent a potential connection failure.
NOTE: Before you connect to a WLAN, ensure that you have followed the instructions in Wireless Local Area Network (WLAN).
®
NOTE: The following networking instructions do not apply to internal cards with Bluetooth
wireless technology or cellular products.
NOTE: If the software is removed or corrupted, follow the instructions in the user documentation for your wireless network card. Verify the type of
wireless network card installed in your computer and then search for that name on the Dell Support website at support.dell.com. For information on the
type of wireless network card that is installed in your computer, see Checking Your Wireless Network Card.

Once you have configured your computer for the wireless network that you selected, another pop-up notifies you that your computer is connected to that
network.
Thereafter, whenever you log on to your computer within the range of the wireless network that you selected, the same pop-up notifies you of the wireless
network connection.
Enabling/Disabling the Wireless Network Card
You can turn your computer's wireless networking function on and off by pressing the <Fn><F2> key combination. If the wireless networking function is turned
on, press <Fn><F2> to disable it. If the wireless networking function is turned off, press <Fn><F2> to enable it.
MonitoringtheStatusofWirelessNetworkConnectionsThroughDell™QuickSet
The wireless activity indicator provides an easy way to monitor the status of your computer's wireless devices. Right-click the Dell QuickSet icon in your taskbar
to select or deselect Wireless Activity Indicator Off to turn the wireless activity indicator on or off.
The wireless activity indicator indicates whether your computer's wireless devices are enabled or disabled. When you turn the wireless networking function on
or off, the wireless activity indicator changes to display the status.
For more information about the wireless activity indicator, see the Dell QuickSet Help file. For information about QuickSet and how to access the Dell QuickSet
Help file, see Dell™QuickSet.
Mobile Broadband or Wireless Wide Area Network (WWAN)
Much like a WLAN, a Mobile Broadband network (also known as a WWAN) is a series of interconnected computers that communicate with each other through
wireless technology. However, a Mobile Broadband network uses cellular technology and therefore provides Internet access in the same varied locations from
which cellular telephone service is available. Your computer can maintain the Mobile Broadband network connection regardless of its physical location, as long
as the computer remains in the service area of your cellular service provider.
What You Need to Establish a Mobile Broadband Network Connection
To set up a Mobile Broadband network connection, you need:
l A Mobile Broadband ExpressCard
For instructions on using ExpressCards, see ExpressCard.
l The Dell Mobile Broadband Card Utility (already installed on your computer if you purchased the card when you purchased your computer, or on the CD
that accompanied your card if purchased separately from your computer)
If the utility is corrupted or deleted from your computer, see the Dell Mobile Broadband Card Utility user's guide for instructions. The user's guide is
available through the Windows Help and Support Center (or on the CD that accompanied your card if you purchased it separately from your computer).
To access the Help and Support Center, see Windows Help and Support Center.
Connecting to a Mobile Broadband Network
Use the Dell Mobile Broadband Card Utility to establish and manage a Mobile Broadband network connection to the Internet:
1. Click the Dell Mobile Broadband Card Utility icon, , in the Windows taskbar, to run the utility.
2. Click Connect.
NOTE: If you select a secure network, you must enter a WEP or WPA key when prompted. Network security settings are unique to your network. Dell
cannot provide this information.
NOTE: Your computer can take up to 1 minute to connect to the network.
NOTE: If you are unable to connect to a wireless network, ensure that you have all the components for establishing a WLAN (see What You Need to
Establish a WLAN Connection), and then verify that your wireless network card is enabled by pressing <Fn><F2>.
NOTE: Your computer supports use of a 34-mm ExpressCard in an adapter to provide Mobile Broadband (WWAN) connectivity. Your computer does not
support use of a WWAN Mini-Card.
NOTE: These instructions apply only to Mobile Broadband ExpressCards or Mini-Cards. They do not apply to internal cards with Bluetooth®wireless
technology or WLAN Mini-Cards.
NOTE: Before you connect to the Internet, you must activate Mobile Broadband service through your cellular service provider. For instructions and for
additional information about using the Dell Mobile Broadband Card Utility, see the user's guide available through the Windows Help and Support Center.
To access the Help and Support Center, see Windows Help and Support Center. The user's guide is also available on the Dell Support website at
support.dell.com and on the CD included with your Mobile Broadband card if you purchased the card separately from your computer.

3. Follow the instructions on the screen to manage the network connection with the utility.
Internet Connection Firewall
The Internet Connection Firewall provides basic protection from unauthorized access to the computer while the computer is connected to the Internet. The
firewall is automatically enabled when you run the Network Setup Wizard. When the firewall is enabled for a network connection, the firewall icon appears
with a red background in the Network Connections section of the Control Panel.
Note that enabling the Internet Connection Firewall does not reduce the need for virus-checking software.
For more information, see the Help and Support Center for the Microsoft®Windows®XP operating system. To access the Help and Support Center, see
Windows Help and Support Center.
Back to Contents Page
NOTE: The Connect button changes to the Disconnect button.

Back to Contents Page
Adding and Replacing Parts
Dell™Latitude™D520User'sGuide
Before You Begin
Hard Drive
Media Bay
Hinge Cover
Keyboard
Memory
Wireless Cards
Internal Card With Bluetooth®Wireless Technology
Coin-Cell Battery
Before You Begin
This chapter provides procedures for removing and installing the components in your computer. Unless otherwise noted, each procedure assumes that the
following conditions exist:
l You have performed the steps in Turning Off Your Computer and Before Working Inside Your Computer.
l YouhavereadthesafetyinformationinyourDell™Product Information Guide.
Recommended Tools
The procedures in this document may require the following tools:
l Small flat-blade screwdriver
l Phillips screwdriver
l Small plastic scribe
l Flash BIOS update (see the Dell Support website at support.dell.com)
Turning Off Your Computer
1. Shut down the operating system:
a. Save and close any open files, exit any open programs, click Start® Shut Down.
b. Select Shut down® OK.
The computer turns off after the operating system shutdown process finishes.
2. Ensure that the computer and any attached devices are turned off. If your computer and attached devices did not automatically turn off when you shut
down your operating system, press and hold the power button for 4 seconds.
Before Working Inside Your Computer
Use the following safety guidelines to help protect your computer from potential damage and to help ensure your own personal safety.
CAUTION: Some of the parts described in this chapter may be replaceable by a certified service technician only and are not customer-
replaceable.
NOTICE: To avoid losing data, save and close any open files and exit any open programs before you turn off your computer.
CAUTION: Before you begin any of the procedures in this section, follow the safety instructions in the Product Information Guide.
CAUTION: Handle components and cards with care. Do not touch the components or contacts on a card. Hold a card by its edges or by its metal
mounting bracket. Hold a component such as a processor by its edges, not by its pins.
NOTICE: Damage due to servicing that is not authorized by Dell is not covered by your warranty.
NOTICE: When you disconnect a cable, pull on its connector or on its pull-tab, not on the cable itself. Some cables have a connector with locking tabs; if
you are disconnecting this type of cable, press in on the locking tabs before you disconnect the cable. As you pull connectors apart, keep them evenly
aligned to avoid bending any connector pins. Also, before you connect a cable, ensure that both connectors are correctly oriented and aligned.
1. Ensure that the work surface is flat and clean to prevent the computer cover from being scratched.
2. Turn off your computer (see Turning Off Your Computer).
3. Disconnect any telephone or network cables from the computer.
4. Disconnect your computer and all attached devices from their electrical outlets.
5. Remove the battery (see Replacing the Battery).
6. Press the power button to ground the system board.
Hard Drive
To replace the hard drive in the hard drive bay:
1. Follow the procedures in Before You Begin.
2. Turn the computer upside-down, and remove the two screws that secure the hard drive carrier to the chassis.
3. Slide the hard drive carrier out of the computer.
NOTICE: To prevent damage to the computer, perform the following steps before you begin working inside the computer.
NOTICE: To disconnect a network cable, first unplug the cable from your computer and then unplug it from the network wall connector.
NOTICE: To prevent damage to the system board, remove the main battery before you service the computer.
CAUTION: If you remove the hard drive from the computer when the drive is hot, do not touch the metal housing of the hard drive.
CAUTION: Before you begin any of the procedures in this section, follow the safety instructions in the Product Information Guide.
NOTICE: To prevent data loss, turn off your computer before removing the hard drive. Do not remove the hard drive while the computer is turned on, in
standby mode, or in hibernate mode.
NOTICE: Hard drives are extremely fragile; even a slight bump can damage the drive.
NOTE: DelldoesnotguaranteecompatibilityorprovidesupportforharddrivesfromsourcesotherthanDell.
NOTE: If you are installing a hard drive from a source other than Dell, you need to install an operating system (see Restoring Your Operating System)
and drivers (see Drivers) on the new hard drive.
1
screws (2)
2
hard drive
NOTICE: When the hard drive is not in the computer, store it in protective antistatic packaging. See "Protecting Against Electrostatic Discharge" in the
Product Information Guide.
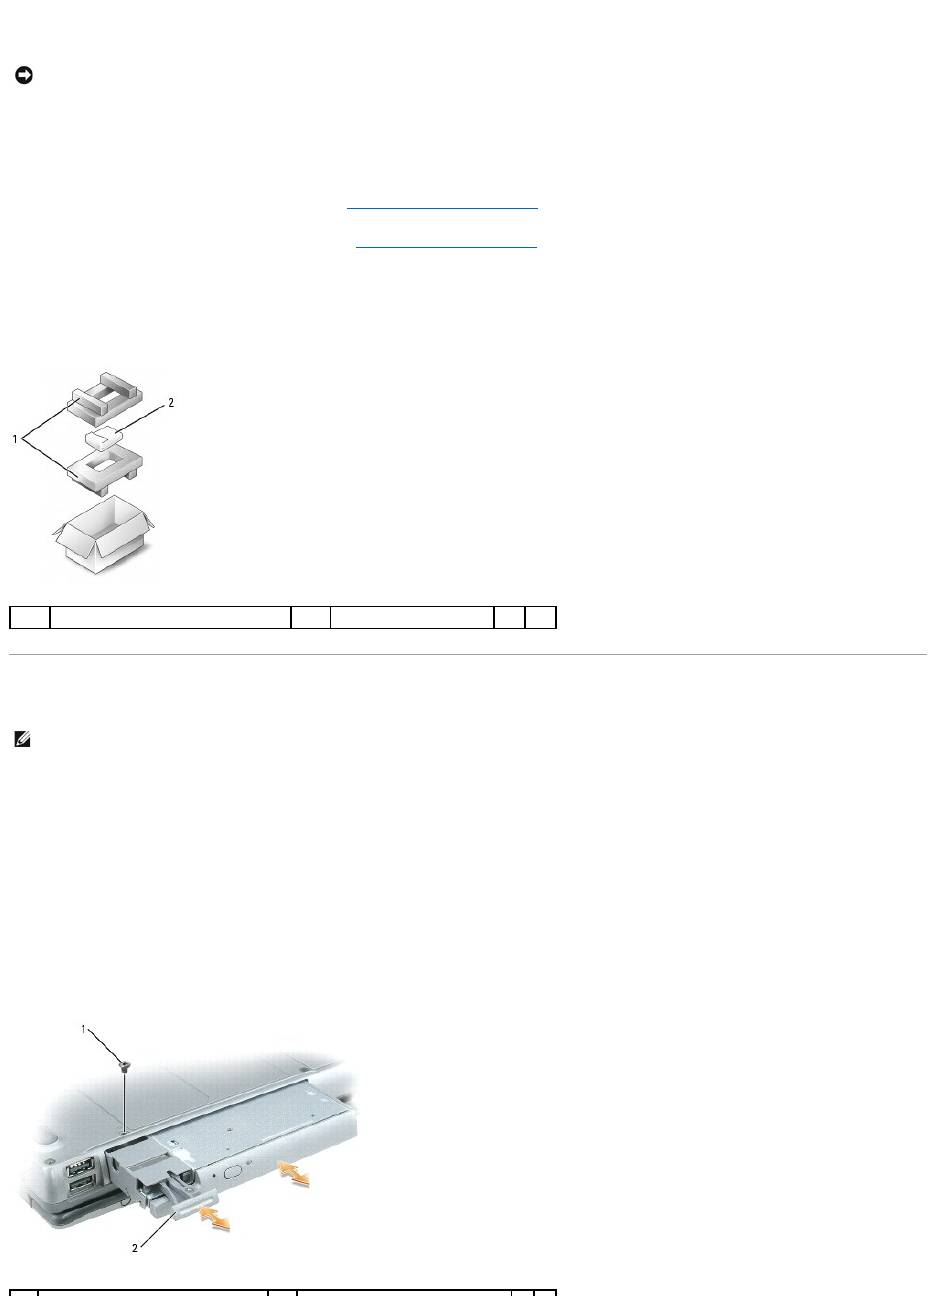
4. Remove the new drive from its packaging.
Save the original packaging for storing or shipping the hard drive.
5. Slide the new hard drive into the bay and into the connector until it is fully seated.
6. Replace the screws.
7. Install the operating system for your computer (see Restoring Your Operating System).
8. Install the drivers and utilities for your computer (see Reinstalling Drivers and Utilities).
Returning a Hard Drive to Dell
Return your old hard drive to Dell in its original or comparable foam packaging. Otherwise, the hard drive may be damaged in transit.
Media Bay
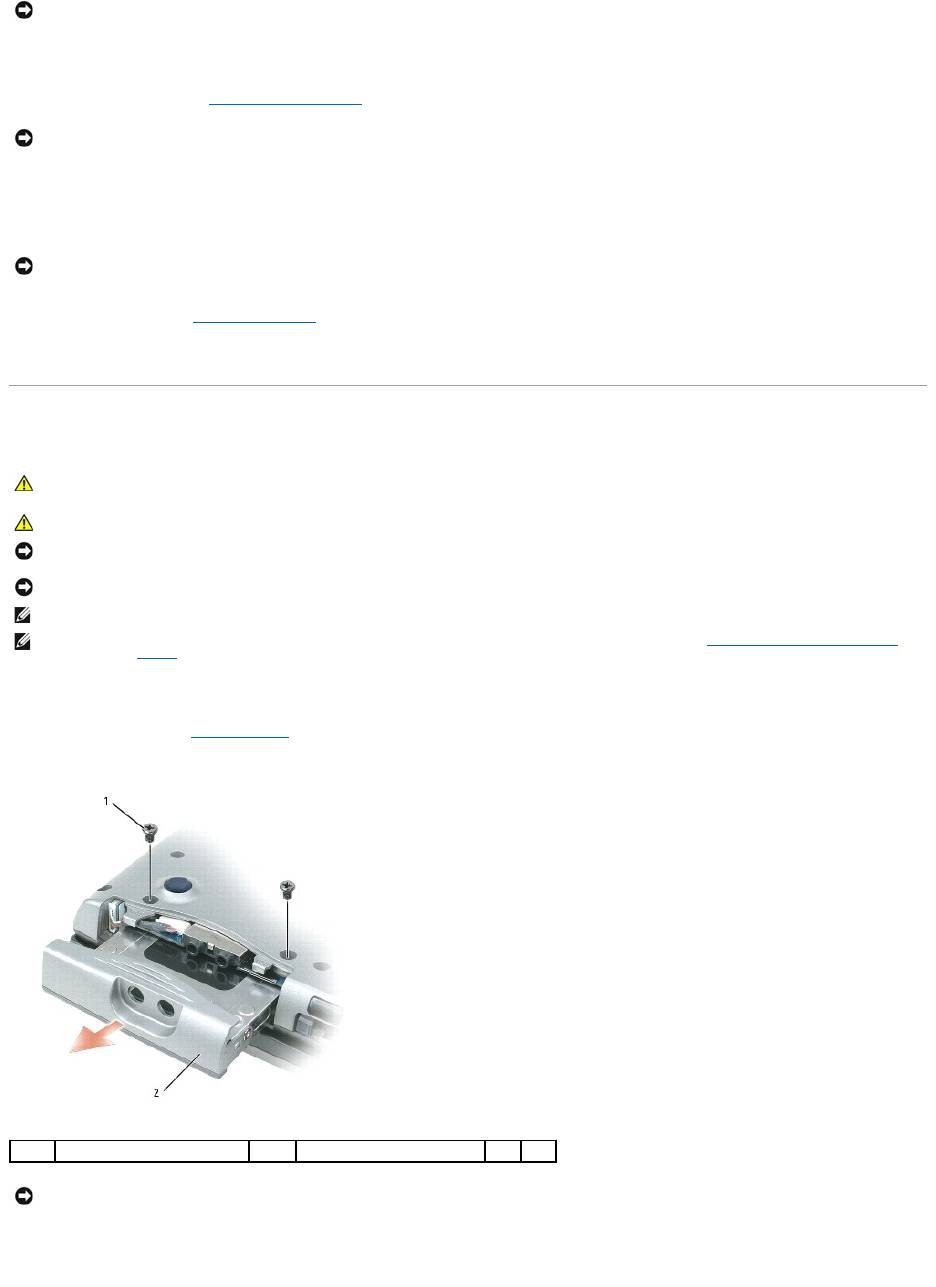
Removing the Device Security Screw
Remove the device security screw (if present) before you remove the device:
1. Save and close any open files, exit any open programs, and shut down the computer.
2. If the computer is connected to a docking device (docked), undock it. See the documentation that came with your docking device for instructions.
3. Close the display and turn the computer upside-down.
4. Use a #1 Phillips screwdriver to remove the device security screw from the bottom of the computer.
NOTICE: Use firm and even pressure to slide the drive into place. If you use excessive force, you may damage the connector.
1
foam packaging
2
hard drive
NOTE: If the device security screw is not present, you can remove and install devices while the computer is running and connected to a docking device
(docked).
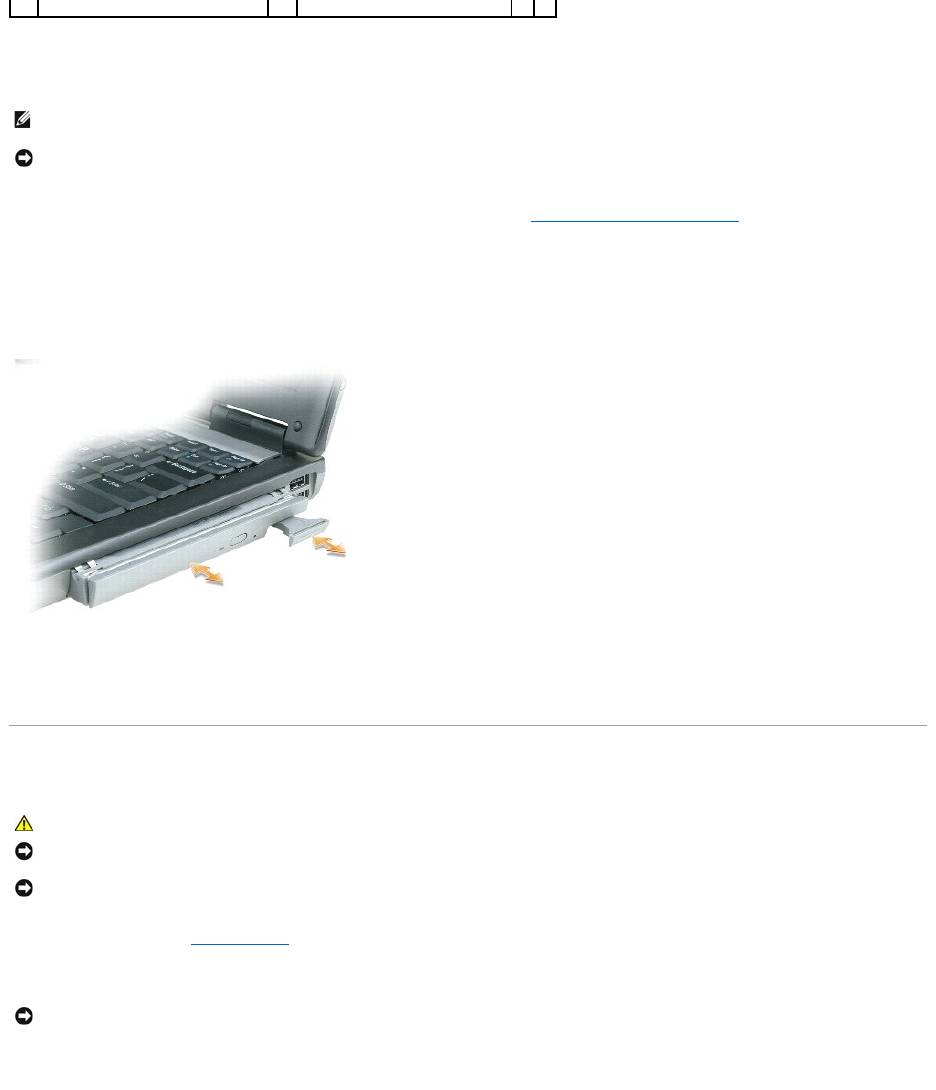
Removing and Installing Media Bay Devices
1. Remove the device security screw, if present, from the bottom of the computer (see Removing the Device Security Screw).
2. If the computer is running, double-click the Safely Remove Hardware icon on the taskbar, click the device you want to eject, and click Stop.
3. Press the device latch release.
4. Pull the device out of the media bay.
5. Push the new device into the bay until it clicks.
Hinge Cover
1. Follow the procedures in Before You Begin.
2. Turn the computer top-side up, and then open the display all the way (180 degrees) so that it rests on your work surface.
3. Insert a scribe into the indent to carefully pry up the hinge cover on the right side.
1
device security screw
2
device latch release
NOTE: If the device security screw is not installed, you can remove and install devices while the computer is running and connected to a docking device
(docked).
NOTICE: To prevent damage to devices, store them in a safe, dry place when they are not installed in the computer. Avoid pressing down on them or
placing heavy objects on top of them.
CAUTION: Before you begin any of the procedures in this section, follow the safety instructions in the Product Information Guide.
NOTICE: To avoid electrostatic discharge, ground yourself by using a wrist grounding strap or by periodically touching an unpainted metal surface (such
as a connector on the back of the computer).
NOTICE: The hinge cover is fragile and can be damaged if extreme force is used. Be careful when removing the hinge cover.
NOTICE: To avoid damaging the hinge cover, do not lift the cover on both sides simultaneously.
4. Ease the hinge cover up, moving from right to left, and remove it.
5. To replace the hinge cover, insert the left edge of the cover into the hinge cover slot, and press from left to right until the cover snaps into place.
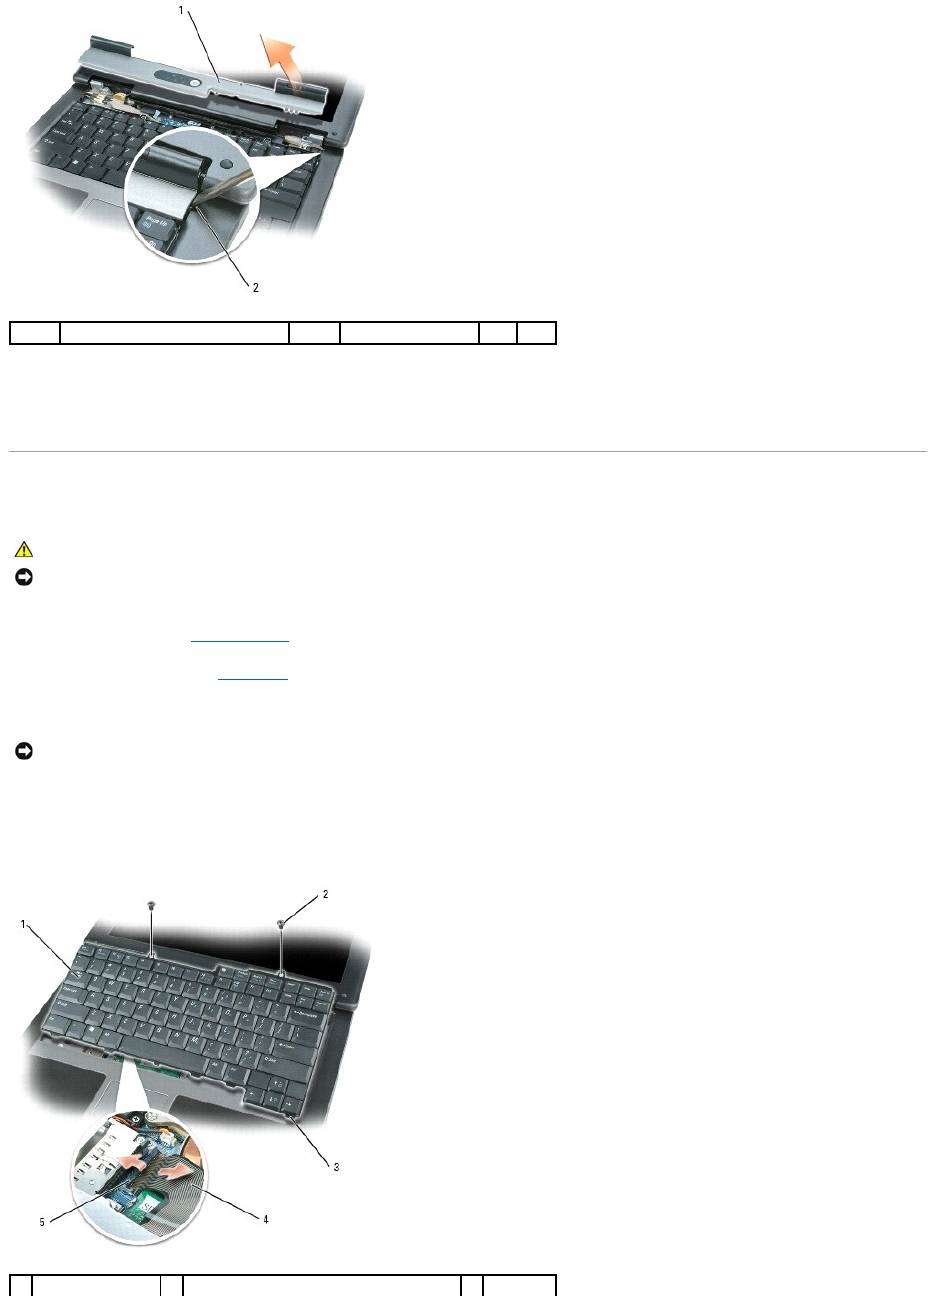
Keyboard
1. Follow the procedures in Before You Begin.
2. Remove the hinge cover (see Hinge Cover).
3. Remove the two screws at the top of the keyboard.
4. Lift the keyboard only enough to hold it up and slightly forward to allow access to the keyboard connector on the system board.
5. To release the keyboard cable from the connector on the system board, rotate the plastic bar on the keyboard connector to the left side of the
computer.
1
hinge cover
2
indent
CAUTION: Before you begin any of the procedures in this section, follow the safety instructions in the Product Information Guide.
NOTICE: To avoid electrostatic discharge, ground yourself by using a wrist grounding strap or by periodically touching an unpainted metal surface (such
as a connector on the back of the computer).
NOTICE: The keycaps on the keyboard are fragile, easily dislodged, and time-consuming to replace. Be careful when removing and handling the
keyboard.
1
keyboard
2
keyboard screws
3
tabs (5)
