JVC MultiMediaNavigator: 8 EN
8 EN: JVC MultiMediaNavigator
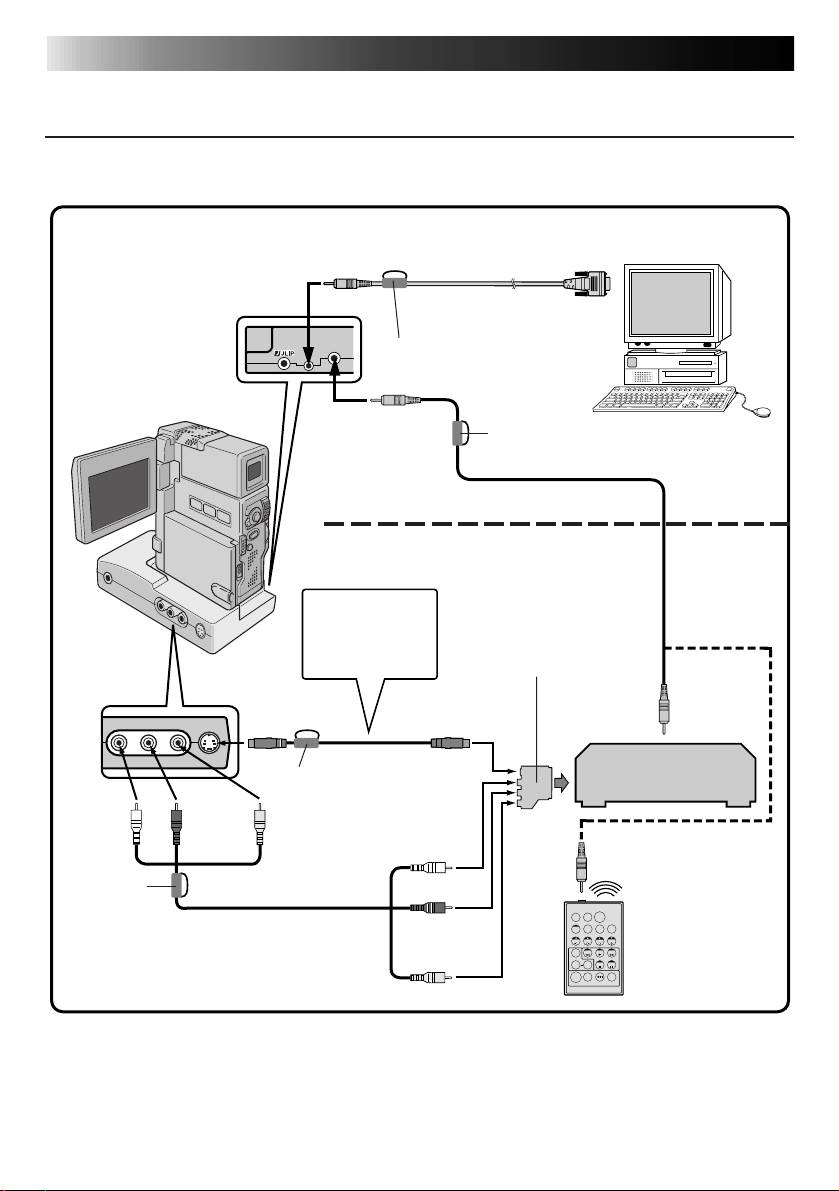
CONNECTIONS (cont.)
8 EN
WHEN CONNECTED TO A VCR NOT EQUIPPED WITH A
JLIP JACK
When using a VCR not equipped with a JLIP jack, set your VCR brand using the remote control
unit provided with the video camera, then perform editing using the remote control.
When JLIP Video Capture is used:
To COM port
(RS-232C)
To PC jack
PC connection cable
(provided)
Core filter
To EDIT jack
Video Camera
Core filter
PC
Editing cable (provided)
When JLIP Video Producer is used:
Connect this if
the video unit
If your VCR has a SCART
has an S-Video
connector, use the cable
input jack.
adapter (PAL only).
To remote
To S OUT
To S-VIDEO
jack
input jack
pause jack
S-VIDEO cable
VCR
Core filter
(provided)
(Recording deck)
White to
Red to
Yellow to
AUDIO L
AUDIO R
VIDEO
White to
Connect here if the
AUDIO L
recording deck doesn’t
have a remote pause jack.
Core filter
TW
AUDIO/VIDEO cable
Red to
(provided)
AUDIO R
Remote control unit
(provided)
Yellow to VIDEO

INSTALLATION
EN 9
INSTALLATION
®
Refer to the Windows
95/98 manual or your computer’s manual for details on basic
®
Windows
95/98 operating procedures.
Installing MultiMediaNavigator/JLIP Video Producer
®
1. Start up Windows
.
• Close any other applications that are running.
Make sure that there are no icons of other applications on the task bar.
2. Insert the CD-ROM into the CD-ROM drive.
Click Start on the task bar — Run.
3. Click Browse — CD-ROM icon in the Look in: column.
4. Double-click the JVC folder.
5.
To install MultiMediaNavigator, go to step 6.
To install JLIP Video Producer, double-click the Vdpro folder, then go to step 6.
6. Double-click the Setup.exe icon.
7. Click OK.
The set-up program will load. Follow the instructions that appear on the screen.
®
®
Installing Adobe
Acrobat
Reader 3.0
®
1. Start up Windows
.
• Close any other applications that are running.
Make sure that there are no icons of other applications on the task bar.
2. Insert the CD-ROM into the CD-ROM drive.
Click Start on the task bar — Run.
3. Click Browse — CD-ROM icon in the Look in: column.
4. Double-click the Reader folder.
5. Double-click the Setup.exe icon.
6. Click OK.
The set-up program will load. Follow the instructions that appear on the screen.
Installing NewSoft Presto! Mr. Photo/PhotoAlbum/ImageFolio
®
1. Start up Windows
.
• Close any other applications that are running.
Make sure that there are no icons of other applications on the task bar.
2. Insert the CD-ROM into the CD-ROM drive.
Click Start on the task bar — Settings — Control Panel.
3. Double-click Add/Remove Programs.
Click Install — Next — Browse — CD-ROM icon in the Look in: column.
4. Double-click the NewSoft folder.
5. Double-click Setup.exe.
6. Click Finish.
• Once the installation program loads, follow the instructions displayed on your screen.
7. Click Install in the Language Selection window.
• The installation program will automatically detect the language being used in the version of
®
Windows
you are running.
8. Click Next> in the Select Components window.
• Click the check box to deselect any software you do not wish to install.
The set-up program will load. Follow the instructions that appear on the screen.
Оглавление
- 2 EN
- 4 EN
- 6 EN
- 8 EN
- 10 EN
- 12 EN
- 14 EN
- 16 EN
- 18 EN
- 20 EN
- 2 DE
- 4 DE
- 6 DE
- 8 DE
- 10 DE
- 12 DE
- 14 DE
- 16 DE
- 18 DE
- 20 DE
- 2 FR
- 4 FR
- 6 FR
- 8 FR
- 10 FR
- 12 FR
- 14 FR
- 16 FR
- 18 FR
- 20 FR
- 2 NE
- 4 NE
- 6 NE
- 8 NE
- 10 NE
- 12 NE
- 14 NE
- 16 NE
- 18 NE
- 20 NE
- 2 CA
- 4 CA
- 6 CA
- 8 CA
- 10 CA
- 12 CA
- 14 CA
- 16 CA
- 18 CA
- 20 CA
- 2 IT
- 4 IT
- 6 IT
- 8 IT
- 10 IT
- 12 IT
- 14 IT
- 16 IT
- 18 IT
- 20 IT
- 2 DA
- 4 DA
- 6 DA
- 8 DA
- 10 DA
- 12 DA
- 14 DA
- 16 DA
- 18 DA
- 20 DA
- 2 SU
- 4 SU
- 6 SU
- 8 SU
- 10 SU
- 12 SU
- 14 SU
- 16 SU
- 18 SU
- 20 SU
- 2 SV
- 4 SV
- 6 SV
- 8 SV
- 10 SV
- 12 SV
- 14 SV
- 16 SV
- 18 SV
- 20 SV
- 2 NO
- 4 NO
- 6 NO
- 8 NO
- 10 NO
- 12 NO
- 14 NO
- 16 NO
- 18 NO
- 20 NO
- 2 РУ
- 4 РУ
- 6 РУ
- 8 РУ
- 10 РУ
- 12 РУ
- 14 РУ
- 16 РУ
- 18 РУ
- 20 РУ
