JVC MultiMediaNavigator: 12 EN
12 EN: JVC MultiMediaNavigator
MODIFYING TITLE/FRAME IMAGES
12 EN
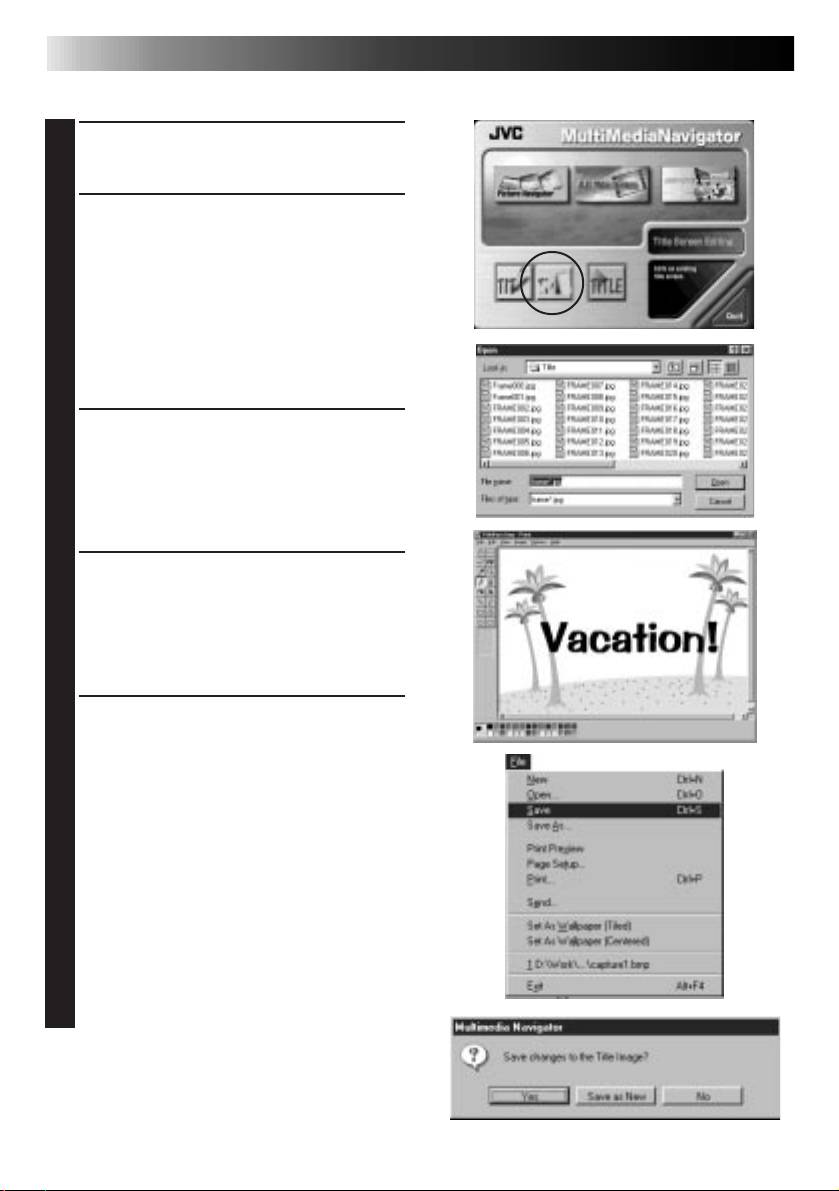
You can modify Title/Frame Images you’ve already created.
Click on the Title Screen Editing icon in
1
the MultiMediaNavigator window.
Select the Title/Frame Image file you
2
wish to modify and click OK.
• An image editor application that
supports the BMP format starts up.
• If you wish to link to a different image
editor application, refer to Help in
®
Windows
.
Modify your Title/Frame Image.
3
• For more details, refer to the image
editor application’s instruction
manual.
Select File — Save.
4
• If you select File — Save As, you will
not be able to transfer the Title/Frame
Image to the video source unit.
Select File — Exit.
5
• When the message “Save changes to
the Title Image?” appears, click Yes if
you wish to use the same file name.
• If you wish to use a different file
name, click Save as New.
• If you with to cancel, click No.
• When the message “Title Image was
saved as FRAME (number)” appears,
click OK.
The image is saved in a file format (JPEG)
that can be transferred to the video
source unit.
TRANSFERRING TITLE/FRAME IMAGES
EN 13
You can transfer Title/Frame Images you created on the PC to the video source unit
that is packaged with MultiMediaNavigator.
Preparation
1. Insert a MultiMediaCard into the video
source unit.
2. Set your video source unit to the PLAY/
PC position.
(For more details, refer to the video
source unit’s instruction manual.)
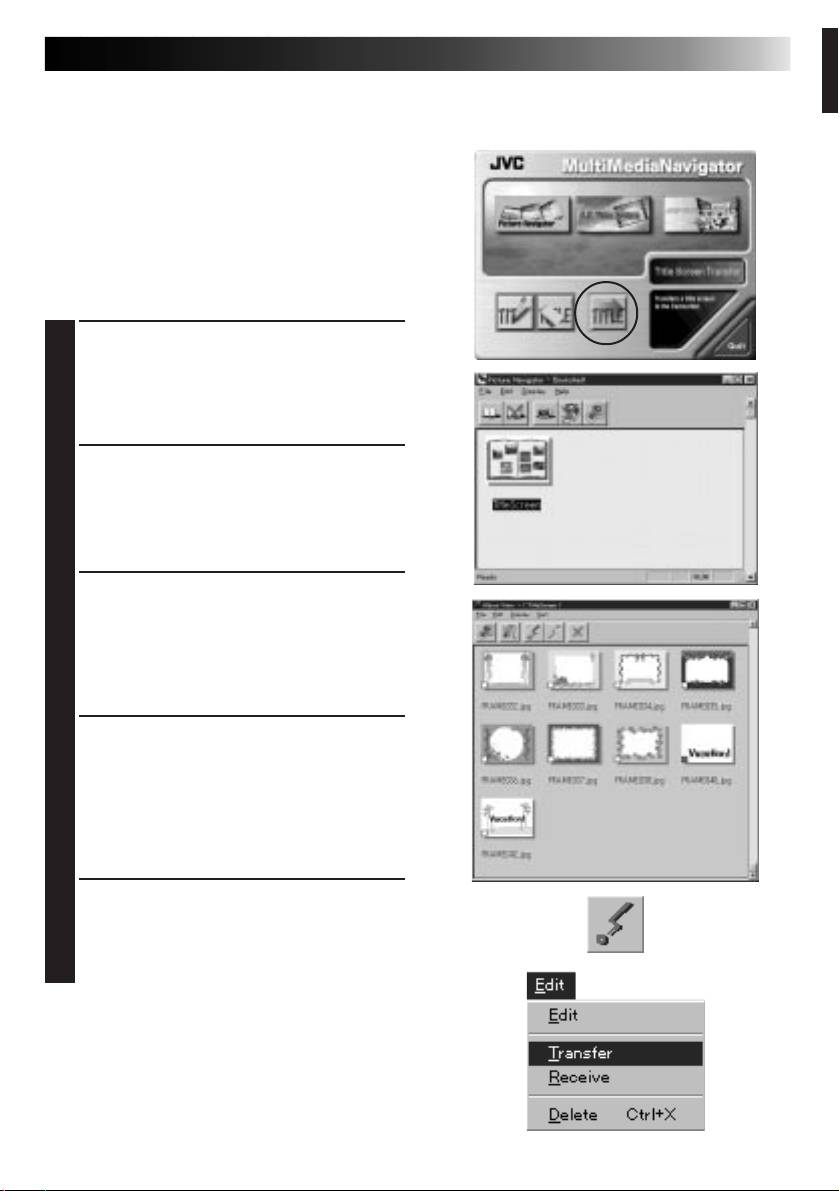
Click the Title Screen Transfer icon in
1
the MultiMediaNavigator window.
• Picture Navigator starts up.
Double-click the TitleScreen album.
2
• A list of all the Title/Frame Images
appears
in the window.
Select the Title/Frame Image you wish to
3
transfer.
• The check box in the lower left corner
of the index image changes color.
Click the Transfer icon or select Edit —
4
Transfer.
• The Title/Frame Image is transferred to
the video source unit and stored in the
MultiMediaCard.
Add the Title/Frame Image to a still
5
image in the video source unit.
(For more details, refer to the video
source unit’s instruction manual.)
Оглавление
- 2 EN
- 4 EN
- 6 EN
- 8 EN
- 10 EN
- 12 EN
- 14 EN
- 16 EN
- 18 EN
- 20 EN
- 2 DE
- 4 DE
- 6 DE
- 8 DE
- 10 DE
- 12 DE
- 14 DE
- 16 DE
- 18 DE
- 20 DE
- 2 FR
- 4 FR
- 6 FR
- 8 FR
- 10 FR
- 12 FR
- 14 FR
- 16 FR
- 18 FR
- 20 FR
- 2 NE
- 4 NE
- 6 NE
- 8 NE
- 10 NE
- 12 NE
- 14 NE
- 16 NE
- 18 NE
- 20 NE
- 2 CA
- 4 CA
- 6 CA
- 8 CA
- 10 CA
- 12 CA
- 14 CA
- 16 CA
- 18 CA
- 20 CA
- 2 IT
- 4 IT
- 6 IT
- 8 IT
- 10 IT
- 12 IT
- 14 IT
- 16 IT
- 18 IT
- 20 IT
- 2 DA
- 4 DA
- 6 DA
- 8 DA
- 10 DA
- 12 DA
- 14 DA
- 16 DA
- 18 DA
- 20 DA
- 2 SU
- 4 SU
- 6 SU
- 8 SU
- 10 SU
- 12 SU
- 14 SU
- 16 SU
- 18 SU
- 20 SU
- 2 SV
- 4 SV
- 6 SV
- 8 SV
- 10 SV
- 12 SV
- 14 SV
- 16 SV
- 18 SV
- 20 SV
- 2 NO
- 4 NO
- 6 NO
- 8 NO
- 10 NO
- 12 NO
- 14 NO
- 16 NO
- 18 NO
- 20 NO
- 2 РУ
- 4 РУ
- 6 РУ
- 8 РУ
- 10 РУ
- 12 РУ
- 14 РУ
- 16 РУ
- 18 РУ
- 20 РУ