JVC KD-R402: Menu operations
Menu operations: JVC KD-R402

Menu operations
1 Call up the menu. 2 Select the desired item. 3 Repeat step 2 if necessary.
• To return to the previous menu,
ENGLISH
press BACK.
[Turn] = [Press]
• To exit from the menu, press
DISP or MENU.
Initial: Underlined
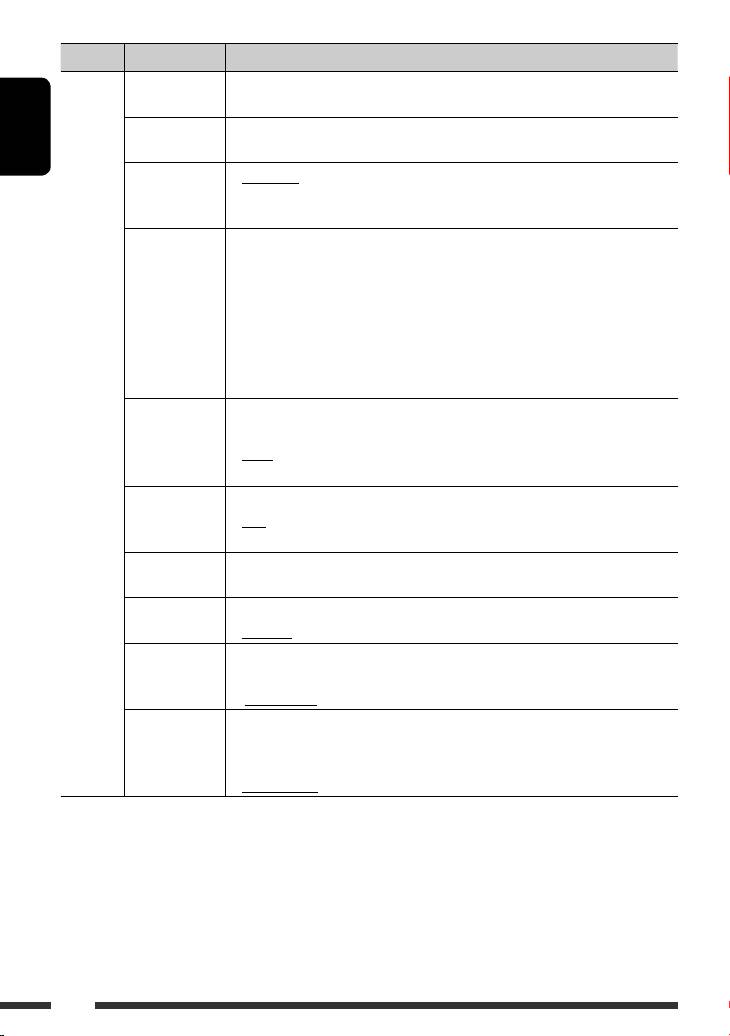
Category Menu items Selectable settings, [reference page]
DEMO
• DEMO ON
: Display demonstration will be activated automatically if no
Display
operation is done for about 20 seconds, [6].
DEMO
demonstration
• DEMO OFF
: Cancels.
1
CLOCK DISP *
• CLOCK ON
: Clock time is shown on the display at all times when the
Clock display
power is turned off.
• CLOCK OFF
: Cancels; pressing DISP will show the clock time for about
5 seconds when the power is turned off, [6].
CLOCK SET
: Adjust the hour, then the minute, [6].
Clock setting
(Initial: 0:00)
CLOCK
24H/12H
• 24 HOUR
: See also page 6 for setting.
Time display mode
• 12 HOUR
2
CLOCK ADJ *
• AUTO
: The built-in clock is automatically adjusted using the CT
Clock adjustment
(clock time) data in the Radio Data System signal.
• OFF
: Cancels.
EQ
: Select a preset sound mode suitable to the music genre.
EQ
Equalizer
USER, ROCK, CLASSIC, POPS, HIP HOP, JAZZ
DIMMER
• DIMMER ON
: Dims the display and button illumination.
Dimmer
• DIMMER OFF
: Cancels.
3
SCROLL*
• SCROLL ONCE
: Scrolls the displayed information once.
Scroll
• SCROLL AUTO
: Repeats scrolling (at 5-second intervals).
• SCROLL OFF
: Cancels.
Pressing DISP for more than one second can scroll the display regardless of the
DISPLAY
setting.
TAG DISPLAY
• TAG ON
: Shows the Tag information while playing MP3/WMA
Tag display
tracks.
• TAG OFF
: Cancels.
1
*
If the power supply is not interrupted by turning off the ignition key of your car, it is recommended to select
“CLOCK OFF” to save the car’s battery.
2
*
Takes effect only when CT data is received.
3
*
Some characters or symbols will not be shown correctly (or will be blanked) on the display.
16
EN16-21_KD-R501_003A_f.indd 16EN16-21_KD-R501_003A_f.indd 16 9/10/08 11:11:29 AM9/10/08 11:11:29 AM

Category Menu items Selectable settings, [reference page]
4
AF-REG *
• AF ON
: When the currently received signals become weak, the unit
Alternative
switches to another station (the programme may differ
frequency/
from the one currently received), [9].
regionalization
• The AF indicator lights up.
ENGLISH
reception
• AF-REG ON
: When the currently received signals become weak, the
unit switches to another station broadcasting the same
programme.
• The AF and REG indicators light up.
• OFF
: Cancels.
4
PTY-STANDBY *
PTY OFF, PTY
: Activates PTY Standby Reception with one of the PTY
PTY standby
codes
codes, [9].
4
TA VOLUME *
VOLUME 00
: (Initial: VOLUME 15)
Traffic
– VOLUME 50
TUNER
announcement
(or VOLUME 00
5
volume
– VOLUME 30)*
4
P-SEARCH *
• SEARCH ON
: Activates Programme Search, [9].
Programme search
• SEARCH OFF
: Cancels.
6
MONO *
• MONO ON
: Activate monaural mode to improve FM reception, but
Monaural mode
stereo effect will be lost, [7].
• MONO OFF
: Restore the stereo effect.
IF BAND
• AUTO
: Increases the tuner selectivity to reduce interference noises
Intermediate
between adjacent stations. (Stereo effect may be lost.)
frequency band
• WIDE
: Subject to interference noises from adjacent stations, but
sound quality will not be degraded and the stereo effect
will remain.
COLOR 01
: Select one of the preset or user color for display and button (except T/P/
– COLOR 29,
/0) illumination.
USER
(For customize color settings, “USER,” see page 19.)
COLOR
(for KD-R501)
MENU COLOR
• OFF
: Cancels.
Menu color
• ON
: Changes the display and button (except T/P/ /0)
illumination during menu, list search and playback mode
operations.
MENU COLOR
(for KD-R501)
4
*
Only for FM Radio Data System stations.
5
*
Depends on the amplifier gain control.
6
*
Displayed only when the source is “FM.”
Continued on the next page
SETTINGS
17
EN16-21_KD-R501_003A_f.indd 17EN16-21_KD-R501_003A_f.indd 17 9/10/08 11:23:10 AM9/10/08 11:23:10 AM
Category Menu items Selectable settings, [reference page]
7,
8
FADER*
*
R06 – F06 : Adjust the front and rear speaker output balance.
Fader
(Initial: 00)
8
BALANCE *
L06 – R06 : Adjust the left and right speaker output balance.
Balance
(Initial: 00)
ENGLISH
LOUD
• LOUD OFF
: Cancels.
Loudness
• LOUD ON
: Boost low and high frequencies to produce a well-balanced
sound at a low volume level.
VOL ADJUST
VOL ADJ –05
: Preset the volume adjustment level of each source (except
Volume adjust
—
FM), compared to the FM volume level. The volume level
VOL ADJ +05
will automatically increase or decrease when you change the
(Initial: VOL
source.
ADJ 00)
• Before making an adjustment, select the source you want to
adjust.
• “VOL ADJ FIX” appears on the display if “FM” is selected as
the source.
L/O MODE
• SUB.W
: Select if the REAR LINE OUT terminals are used for connecting
Line output
a subwoofer (through an external amplifier).
AUDIO
mode
• REAR
: Select if the REAR LINE OUT terminals are used for connecting
the speakers (through an external amplifier).
9
SUB.W FREQ *
• LOW
: Frequencies lower than 72 Hz are sent to the subwoofer.
Subwoofer
• MID
: Frequencies lower than 111 Hz are sent to the subwoofer.
cutoff frequency
• HIGH
: Frequencies lower than 157 Hz are sent to the subwoofer.
9
SUB.W LEVEL *
SUB.W 00
: Adjust the subwoofer output level.
Subwoofer level
— SUB.W 08
(Initial: SUB.W 04)
BEEP
• BEEP OFF
: Deactivates the key touch tone.
Key touch tone
• BEEP ON
: Activates the key touch tone.
TEL MUTING
• MUTING 1/
: Select either one which mutes the sounds while using a
Telephone
MUTING 2
cellular phone.
muting
• MUTING OFF
: Cancels.
10
AMP GAIN *
• LOW POWER
: VOLUME 00 – VOLUME 30 (Select if the maximum power
Amplifier gain
of each speaker is less than 50 W to prevent damaging the
control
speaker.)
• HIGH POWER
: VOLUME 00 – VOLUME 50
7
*
If you are using a two-speaker system, set the fader level to “00.”
8
*
This adjustment will not affect the subwoofer output.
9
*
Displayed only when “L/O MODE” is set to “SUB.W.”
10
*
The volume level automatically changes to “VOLUME 30” if you change to “LOW POWER” with the volume level
set higher than “VOLUME 30.”
18
EN16-21_KD-R501_003A_f.indd 18EN16-21_KD-R501_003A_f.indd 18 9/10/08 11:11:33 AM9/10/08 11:11:33 AM
Оглавление
- Basic operations
- Preparation
- Listening to the radio
- Disc operations
- Listening to the USB device
- Listening to the other external components
- Using the remote controller — RM-RK50
- Selecting a preset sound mode
- Menu operations
- Color settings (for KD-R501)
- More about this unit
- Troubleshooting
- Maintenance
- Specifications
- Grundlegende Bedienung
- Vorbereitung
- Rundfunkempfang
- Bedienung der Disc
- Hören vom USB-Gerät
- Hören von den anderen externen Komponenten
- Verwendung der Fernbedienung — RM-RK50
- Wählen eines Vorgabe-Klangmodus
- Menü-Bedienungen
- Farbeinstellungen (für KD-R501)
- Weitere Informationen zu Ihrem Receiver
- Störungssuche
- Wartung
- Technische Daten
- Основные операции
- Подготовка
- Прослушивание радио
- Операции с дисками
- Прослушивание устройства USB
- Прослушивание с других внешних устройств
- Использование пульта дистанционного управления—
- Выбор запрограммированного режима звучания
- Операции с меню
- Настройки цвета (для KD-R501)
- Дополнительная информация о приемнике
- Устранение проблем
- Обслуживание
- Технические характеристики
- Βασικές λειτουργίες
- Προετοιμασία
- Ακρόαση ραδιοφωνικών σταθµών
- Λειτουργίες δίσκου
- Ακρόαση συσκευής USB
- Ακρόαση άλλων εξωτερικών συσκευών
- Χρήση του τηλεχειριστηρίου — RM-RK50
- Επιλογή προεπιλεγμένης κατάστασης ήχου
- Λειτουργίες μενού
- Ρυθμίσεις χρώματος (για το KD-R501)
- Περισσότερα σχετικά µε το δέκτη αυτό
- Αντιµετώπιση προβληµάτων
- Συντήρηση
- Προδιαγραφές
