JVC KD-AVX33 – страница 2
Инструкция к Автомагнитоле JVC KD-AVX33
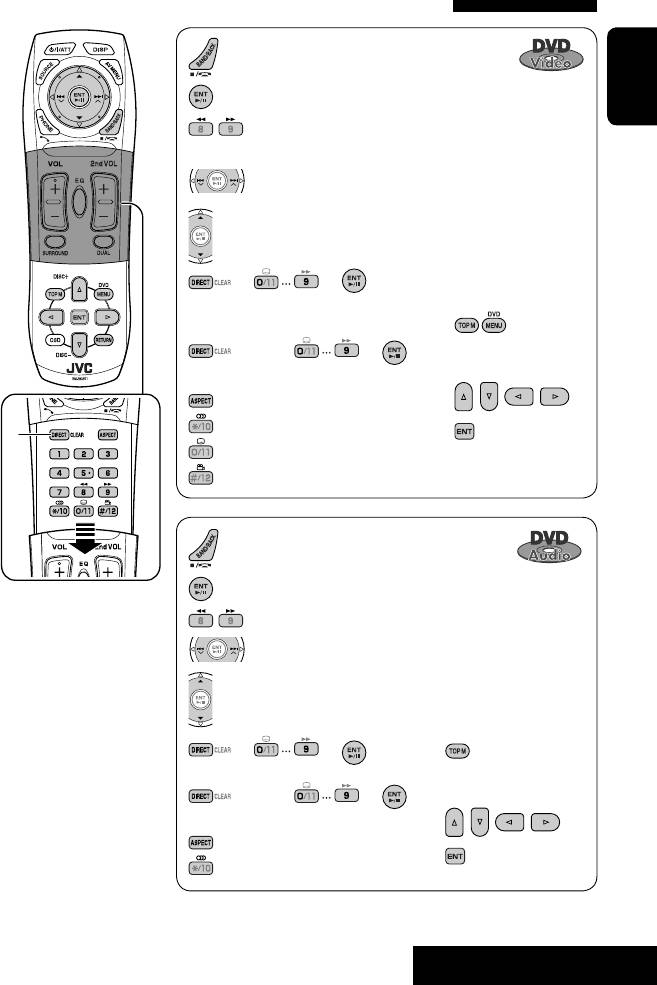
Operations using the remote controller—RM-RK251
: Stop playback.
: Start playback/Pause (if pressed during playback).
ENGLISH
2
: Reverse/forward search.*
(No sound can be heard.)
3
(Slow motion*
during pause. No sound can be heard.)
: Press: Select chapter (during playback or pause).
4
Hold: Reverse/forward search.*
: Select title (during playback or pause).
Using menu driven
= = :
features
Select chapter.
Select title (when not playing).
1
(twice) = = :
2 Select an item you want
to start playback.
Select title (during playback or pause).
: Select aspect ratio.
: Select audio language.
1
3
*
: Select subtitle language.
: Select view angle.
: Stop playback.
: Start playback/Pause (if pressed during playback).
2
: Reverse/forward search.*
1
*
Erases the misentry of the
: Press: Select track.
number.
4
Hold: Reverse/forward search.*
2
*
Search speed: x2 ] x5 ]
: Select group.
x10 ] x20 ] x60
Using menu driven
3
*
Slow motion speed: 1/32 ]
features
1/16 ] 1/8 ] 1/4 ] 1/2
= = :
1
4
*
Search speed: x2 ] x10
Select track.
2 Select an item you want
(twice) = = :
to start playback.
Select group.
: Select aspect ratio.
3
: Select audio stream.
21
OPERATIONS
Book 1.indb 21Book 1.indb 21 07.2.1 8:22:37 PM07.2.1 8:22:37 PM
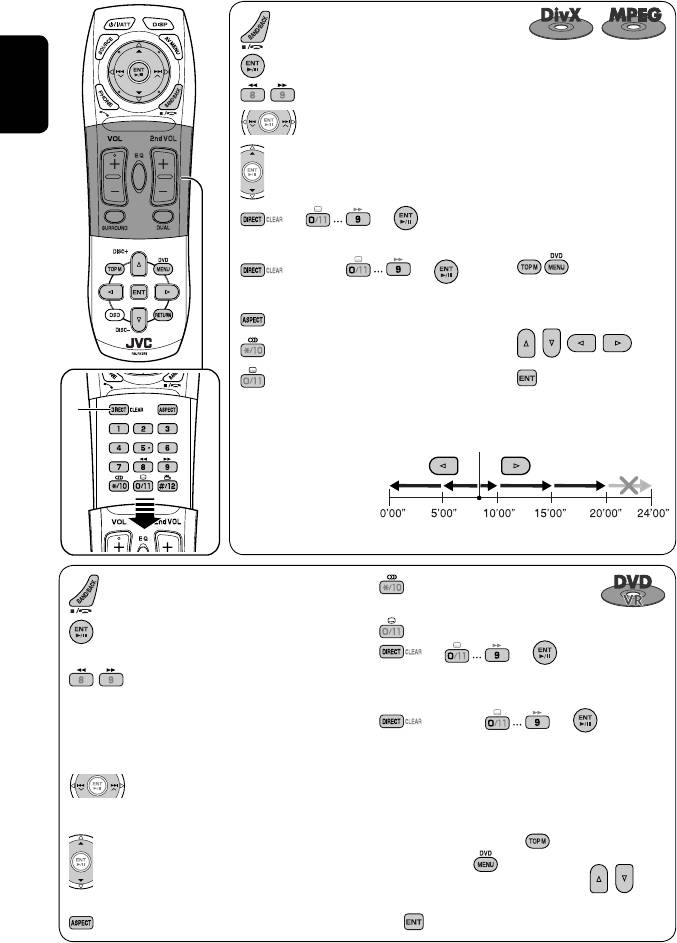
: Stop playback.
: Start playback/Pause (if pressed during playback).
2
: Reverse/forward search*
. (No sound can be heard.)
ENGLISH
: Press: Select track.
3
Hold: Reverse/forward search*
. (No sound can be heard.)
: Select folder.
For DivX6: Using menu
= = :
driven features
Select track (within the same folder).
(twice) = = :
1
Select folder.
2 Select an item you want to
start playback.
: Select aspect ratio.
: Select audio language. (DivX only)
3
: Select subtitle language. (DivX only)
1
*
While playing...
Back/advance the scenes
Current playback position
by 5 minutes.
2nd press
1st press
3rd press
1st press
2nd press
: Select audio channel
: Stop playback.
(ST: stereo, L: left, R: Right).
: Start playback/Pause (if pressed during
: Turn on/off subtitle.
playback).
= = :
4
: Reverse/forward search*
. (No sound
Select chapter.
can be heard.)
Select program (when not playing).
5
(Slow motion*
during pause. No sound
(twice) = = :
can be heard.)
Select program/play list (during playback or
Reverse slow motion does not work.
pause).
: Press: Select chapter (during playback
Using Original Program/Play List screens
or pause).
6
(☞ page 30)
Hold: Reverse/forward search*
1 For Original Programs:
: Select program.
For Play List:
Select play list (during playback or
2 Select an item you want to start
pause).
playback.
: Select aspect ratio.
3 (Hide screen)
22
Book 1.indb 22Book 1.indb 22 07.2.1 8:22:38 PM07.2.1 8:22:38 PM
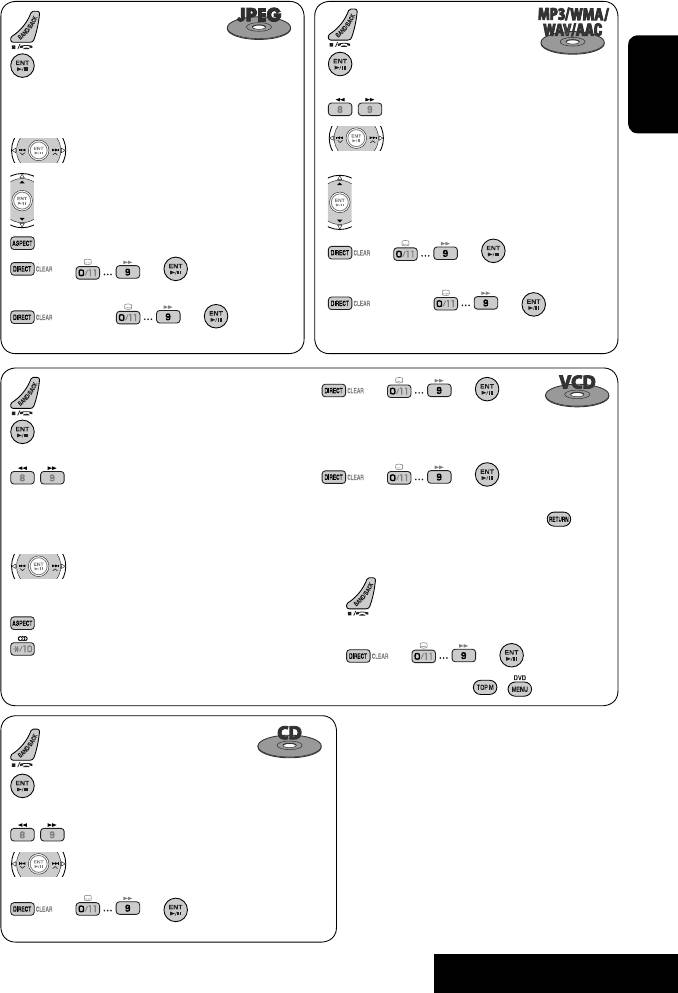
: Stop playback.
: Stop playback.
: Start playback. (Slide show: each file is
: Start playback/Pause (if
shown for a few seconds.)
pressed during playback).
4
Shows the current file until you change
: Reverse/forward search*
.
ENGLISH
it if pressed during Slide show.
: Press: Select track.
: Select track.
6
Hold: Reverse/forward search*
.
: Select folder.
: Select folder.
: Select aspect ratio.
= = :
= = :
Select track (within the same folder).
Select track (within the same folder).
(twice) = = :
(twice) = = :
Select folder.
Select folder.
= = :
: Stop playback.
Select track.
: Start playback/Pause (if pressed during
playback).
During PBC playback...
4
: Reverse/forward search*
.
= = :
5
(Forward slow motion*
during pause. No
Select an item on the menu.
sound can be heard.)
To return to the previous menu, press
.
Reverse slow motion does not work.
: Press: Select track.
To cancel PBC playback
6
Hold: Reverse/forward search*
(No sound
1
can be heard.)
: Select aspect ratio.
2 Start the desired track.
: Select audio channel (ST: stereo, L: left, R:
= =
Right).
• To resume PBC, press / .
1
*
Erases the misentry of the number.
2
*
Search speed: ¡1 ] ¡2 ] ¡3
: Stop playback.
3
*
Search speed: ¡1 ] ¡2
: Start playback/Pause (if pressed during
4
*
Search speed: x2 ] x5 ] x10 ] x20 ] x60
playback).
5
*
Slow motion speed: 1/32 ] 1/16 ] 1/8 ]
4
: Reverse/forward search*
.
1/4 ] 1/2
6
*
Search speed: x2 ] x10
: Press: Select track.
6
Hold: Reverse/forward search*
.
= = : Select track.
23
OPERATIONS
Book 1.indb 23Book 1.indb 23 07.2.1 8:22:40 PM07.2.1 8:22:40 PM
Playing back a bonus group
Enjoying surround sounds
If a DVD Audio including a “bonus group”
You can enjoy multi-channel surround playback
is detected, the BONUS indicator lights up on the disc
through the front, center, surround speakers.
information screen.
• After connecting the center speaker, make
sure to activate the center speaker; otherwise,
ENGLISH
To play a bonus group...
no sound comes out of the center speaker (☞
1 Select the bonus group.
page 53).
• The bonus group is usually recorded as the last
• All surround mode can also be used for “USB.”
group.
MULTI: For multi-channel encoded sources such
2 Enter the key number.
1
2
as Dolby Digital*
, DTS*
, and DVD Audio.
(When activated, “MULTI” is shown on the disc
: Move the entry position
information screen.)
Dolby Pro Logic II (Movie/Music): For 2 channel
: Select a number
sources except for DivX/MPEG 1/MPEG2 discs.
To turn on the surround
• “key number” (a kind of password) for the bonus
1
group is not open to public. The way of getting
AV Menu
the key number depends on the disc.
3 Follow the interactive instructions shown on
Setup
ENT
Enter
the monitor.
2
Selecting browsable still picture
Disc Surround menu icon
When a disc including browsable still
AV Menu
pictures is detected, the B.S.P indicator lights up on the
disc information screen.
Disc Surround
ENT
Enter
When disc shows the BSP selecting icons such as @ or
# on the screen...
3
1 Select an item you want to display.
Disc Surround
Surround Off
Surround On
2
Auto
• Surround Off: Deactivates surround.
• Surround On: Activates surround = go to the
following steps.
24
Book 1.indb 24Book 1.indb 24 07.2.1 8:22:42 PM07.2.1 8:22:42 PM
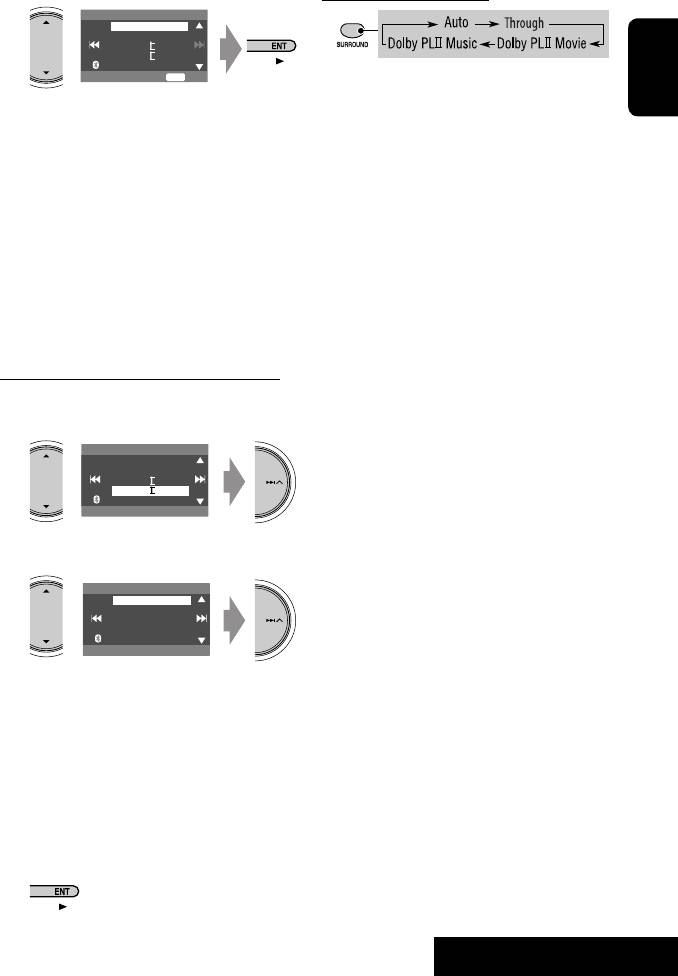
On the remote controller:
4
Surround On
Auto
Through
Dolby PLII Movie
Dolby PLII Music
ENT
Set
• You cannot change the <Dolby PL II Music>
settings using the remote controller.
ENGLISH
• Auto: When multi-channel digital signals come
in, “MULTI” surround is activated.
1
*
Manufactured under license from Dolby Laboratories.
When 2-channel or 2.1-channel signals come in,
Dolby, Pro Logic, and the double-D symbol are
“4CH STEREO” is activated.
trademarks of Dolby Laboratories.
• Through: All incoming channel signals are sent
2
*
“DTS” and “DTS Digital Surround” are registered
to the corresponding speakers.
trademarks of DTS, Inc.
• Dolby PLII Movie: Activates Dolby Pro Logic II
Movie.
• Dolby PLII Music: Activates Dolby Pro Logic
II Music. You can adjust <Panorama> and
<Center Width> settings. (☞ below)
To change the <Dolby PLII Music> setting
in step 4 above...
1
Surround On
Auto
Through
Dolby PLII Movie
Dolby PLII Music
Panorama
2
Dolby PLII Music
Panorama
CenterWidth
On
• Panorama: Select <On> to add wraparound
sound effect.
• Center Width: Adjust the center image so it
may be heard only from the center speaker,
only form the left/right front speaker as a
“phantom” center image, or various combination
of these speakers. As the number increases, the
“phantom” effect becomes stronger (normally
select <4>).
3
25
OPERATIONS
Book 1.indb 25Book 1.indb 25 07.2.1 8:22:43 PM07.2.1 8:22:43 PM
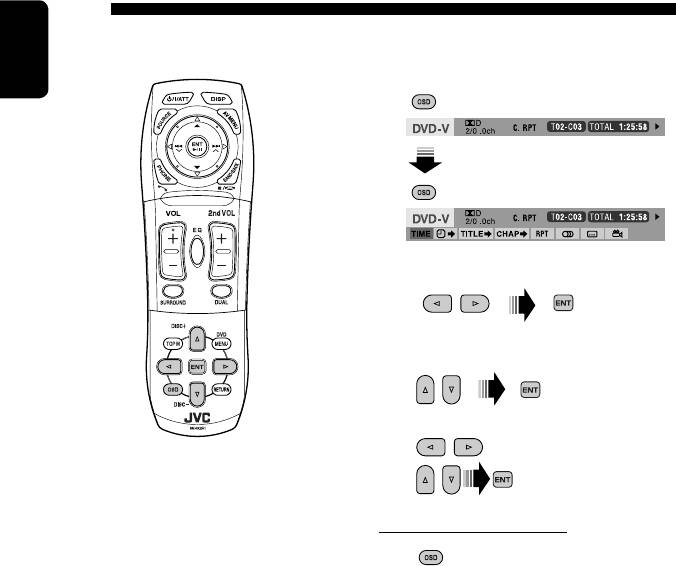
Operations using the on-screen bar (DVD/VCD/DivX/MPEG1/MPEG2/
JPEG)
These operations are possible on the monitor using the remote controller.
1 Display the on-screen bar. (☞ page 27)
ENGLISH
2 Select an item.
3 Make a selection.
If a pop-up menu appears...
• For entering time/numbers...
: Move the entry position
: Select a number
To remove the on-screen bar
26
Book 1.indb 26Book 1.indb 26 07.2.1 8:22:44 PM07.2.1 8:22:44 PM

On-screen bar
Information
C. RPT
T02-C03 TOTAL 1:25:58
DVD -V
Operation
TIME TITLE CHAP
RPT
ENGLISH
Above example is of DVD Video. Items shown on the bar vary due to the disc type.
1 Disc type
5 Time indication
2 • DVD: Audio signal format
TOTAL
Elapsed playing time of the disc
• VCD: PBC
T. REM
Remaining title time (for DVD)
1
3 Playback mode*
Remaining disc time (for others)
DVD Video:
TIME
Elapsed playing time of the current
2
T. RPT: Title repeat
chapter/track*
C. RPT: Chapter repeat
REM
Remaining time of the current
2
DVD Audio:
chapter/track*
T. RPT: Track repeat
6 Playback status
DVD-VR:
Play
C. RPT: Chapter repeat
Reverse/forward search
PG. RPT: Program repeat
Reverse/forward slow-motion
DivX/MPEG:
Pause
T. RPT: Track repeat
Stop
F. RPT: Folder repeat
7 Operation icons
JPEG:
TIME
Change time indication (see 5)
F. RPT: Folder repeat
Time Search (Specify a certain scene
VCD:
by entering time.)
TITLE
T. INT: Track intro
Title Search (by its number)
CHAP
T. RPT: Track repeat
Chapter Search (by its number)
GROUP
A. RND: All random
Group Search (by its number)
TRACK
4 Playback information
Track Search (by its number)
1
T02-C03
Current title/chapter
RPT
Repeat play*
INT
1
G02-T03
Current group/track
Intro play*
RND
1
PG-001
Random play*
C-002
Current program/chapter
Change the audio language, audio
PL-003
channel or audio stream
C-004
Current playlist/chapter
Change the subtitle language
TRACK 01
Current track
Change the view angle
F001-T001
Current folder/track
PAGE
Change the browsable still pictures
F002-F002
Current folder/file (JPEG)
(pages)
1
*
☞ page 19
2
*
Not applicable for DVD-VR.
27
OPERATIONS
Book 1.indb 27Book 1.indb 27 07.2.1 8:22:45 PM07.2.1 8:22:45 PM
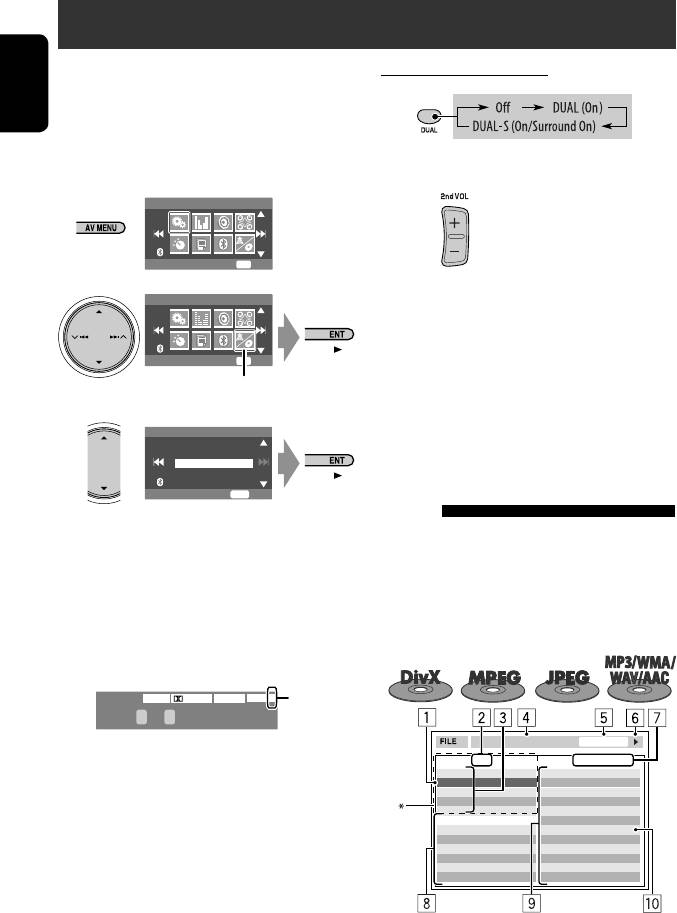
Dual Zone operations
You can enjoy a disc playback on the external monitor
On the remote controller:
connected to the VIDEO OUT and 2nd AUDIO OUT plugs,
1
while listening to any other source than “USB” through
ENGLISH
the speakers.
• When Dual Zone is in use, you can only operate the
2 Adjust the volume through the 2nd AUDIO
DVD/CD player using the remote controller.
OUT plug.
1
AV Menu
Setup
ENT
Enter
2
3 Operate the DVD/CD player.
AV Menu
1
*
JVC original headphone virtual surround system. This
surround will also work for the main source “DISC” if
Dual Zone
ENT
Enter
“On/Surround On” is selected as the sub-source. This
Dual Zone menu icon
surround does not work for DivX/MPEG1/MPEG2 discs.
2
*
Displayed being shaded if Headphone Surround is not
3
Dual Zone
applied.
Off
On
On/Surround On
Operations using the control
ENT
Set
screen
• Off: Deactivates Dual Zone.
For discs except DVD and VCD:
• On (DUAL): Activates Dual Zone without
1
While Dual Zone is on, these operations are possible on
applying Headphone Surround*
.
the external monitor using the remote controller.
• On/Surround On (DUAL-S): Activates Dual
The control screen automatically appears when you
Zone and applies Headphone Surround.
insert a disc. (For DivX/MPEG1/MPEG2/JPEG; while not
playing.)
When Dual Zone is activated, the main source is
changed to “DISC.”
DVD
FLATDIGITALVIDEO
DUAL-S
2
*
T 01 C 02 0:45:38
TIME 00:00:14T. RPT
Ex. When “On/Surround On” is selected.
Folder : 2 / 3
Track : 6 / 14 (Total 41)
01 Music
Cloudy.mp3
02 Music
Fair.mp3
Fog.mp3
To select a different source (main source) to listen
03 Music
Hail.wma
Indian summer.mp3
through the speakers:
Track Information
Rain.mp3
Album
Shower.mp3
Press SRC (source) on the control panel.
Weather
Snow.mp3
Artist
Thunder.wma
• By using the buttons on the control panel,
Robert M. Smith
Typhoon.mp3
Title
Wind.mp3
you can operate the newly selected source without
Rain
Winter sky.mp3
affecting Dual Zone (DISC) operations.
• You cannot select “USB” for the main source.
Ex.: MP3/WMA
28
Book 1.indb 28Book 1.indb 28 07.2.1 8:22:46 PM07.2.1 8:22:46 PM
1 Current folder (highlighted bar)
2 Current folder number/total folder number
3 Folder list
T. RPT
TIME 00:14
*
If tag data includes “Jacket Picture” (baseline JPEG), it
Track : 6 / 14
will be displayed. If you press OSD, the playback mode
MODE
Cloudy
Fair
selection window appears. (☞ below)
REPEAT
Fog
ENGLISH
TRACK
Hail
Indian summer
4 Selected playback mode (☞ below)
Track Information
Rain
Album
Shower
5 Elapsed playing time of the current track (not
Four seasons
Snow
Artist
Thunder
displayed for JPEG)
Robert M. Smith
Typhoon
Title
Wind
6 Operation status
Rain
Winter sky
7 Current track number/total number of tracks in the
current folder (total number of tracks on the disc)
Ex.: CD Text
8 Track information (only for MP3/WMA/WAV/AAC)
1 Playback mode selection window: appears when
9 Track list
OSD is pressed (☞ below).
p Current track (highlighted)
2 Selected playback mode (☞ below)
3 Elapsed playing time of the current track
To select a folder or track
4 Operation status
1 Select “Folder” column or “Track” column on
5 Current track number/total number of tracks on the
the control screen.
disc
6 Track information
7 Track list
2 Select a folder or track.
8 Current track (highlighted bar)
• If necessary, press ENT to start playback.
To select a track
• If necessary, press ENT to start playback.
Selecting playback modes
Selected playback mode
You can also change the playback modes using the
DivX/MPEG1/MPEG2/JPEG: ☞ page 27
playback mode selection window.
MP3/WMA/WAV/AAC:
• For CD/MP3/WMA/WAV/AAC: Intro/Repeat/
T. INT: Track intro
Random
F. INT: Folder intro
• For DivX/MPEG1/MPEG2/JPEG: Repeat
T. RPT: Track repeat
F. RPT: Folder repeat
1
F. RND: Folder random
A. RND: All random
2 Only for CD/MP3/WMA/WAV: Select a
CD:
playback mode.
T. INT: Track intro
T. RPT: Track repeat
3 Select your desired option.
A. RND: All random
4
29
OPERATIONS
Book 1.indb 29Book 1.indb 29 07.2.1 8:22:47 PM07.2.1 8:22:47 PM

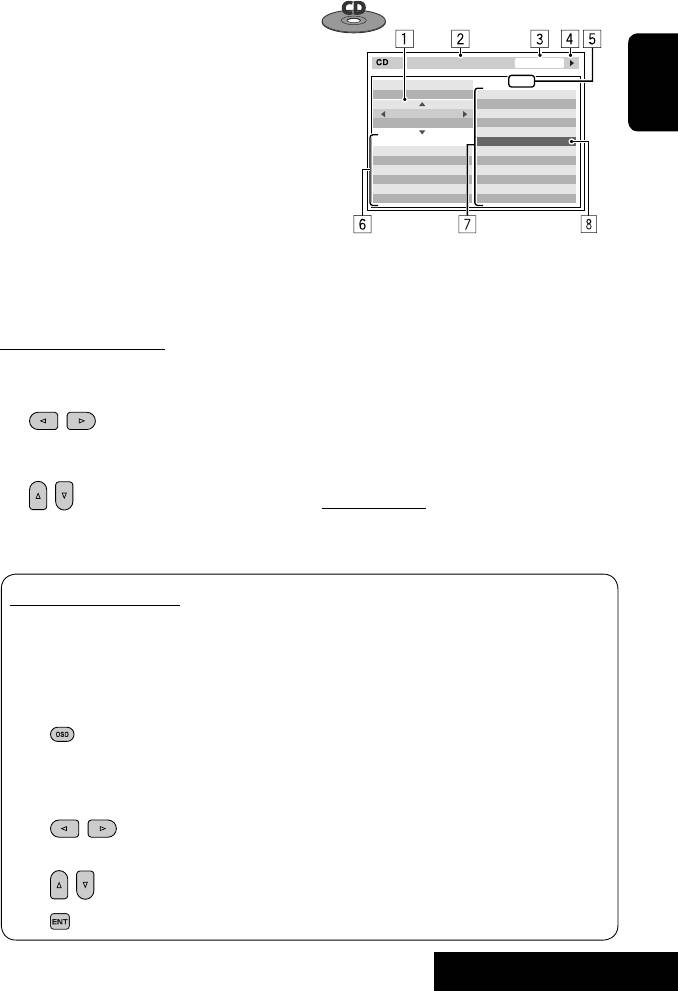
Operations using the list
List screen for DVD-VR
screen
You can use Original Program and Play List screen
anytime while playing DVD-VR with its data
For discs except DVD, VCD, and CD
recorded.
While Dual Zone is on, these operations are possible on
• These screens can be displayed on the built-in
the external monitor using the remote controller.
ENGLISH
monitor and the external monitor.
While not playing...
1 Display the Original Program/Play List
screen.
1 Display the list screen.
or
ORIGINAL PROGRAM
No Date Ch ime itle
TT
1 25/04/07 4ch 19:00 JVC DVD World 2004
Folder : 144/240 Track 144/198 Page : 4/7
2 17/05/07 8ch 10:30
fol120
fol130
fol140
fol150
3 22/05/07 8ch 17:00 Music Festival
fol121
fol131
fol141
fol151
4 26/05/07 L-1 13:19 children 001
fol122
fol132
fol142
fol152
5 20/06/07 4ch 22:00
fol123
fol133
fol143
fol153
6 25/06/07 L-1 8:23 children 002
fol124
fol134
fol144
fol154
fol125
fol135
fol145
fol155
fol126
fol136
fol146
fol156
fol127
fol137
fol147
fol157
fol128
fol138
fol148
fol158
fol129
fol139
fol149
fol159
PLAY LIST
2 Select a folder on the list.
No Date Chap Length Title
1 25/05/07 001 1:03:16 My JVC World
2 17/06/07 005 1:35:25
3 20/06/07 003 0:10:23 Favorite music
4 25/06/07 001 0:07:19 children001-002
Folder : 144/240 Track 144/198 Page : 4/5
file0121.mp3
file0131.mp3
file0141.wma
file0151.wma
file0122.mp3
file0132.mp3
file0142.mp3
file0152.mp3
file0123.wma
file0133.mp3
file0143.wma
file0153.wma
file0124.mp3
file0134.mp3
file0144.mp3
file0154.mp3
file0125.mp3
file0135.wma
file0145.mp3
file0155.wma
2 Select an item you want.
file0126.wma
file0136.mp3
file0146.mp3
file0156.wma
file0127.wma
file0137.wma
file0147.mp3
file0157.wma
file0128.mp3
file0138.mp3
file0148.wma
file0158.wma
file0129.mp3
file0139.wma
file0149.wma
file0159.mp3
file0130.wma
file0140.wma
file0150.wma
file0160.wma
1 Program/Play list number
3 Select a track on the list.
2 Recording date
3 Recording source (TV station, the input terminal
of the recording equipment, etc.)
4 Start time of recording
• To go back to the folder list, press .
5 Title of the program/play list*
6 Highlighted bar (current selection)
1 Current folder number/total folder number
7 Creating date of play lists
2 Current track number/total number of tracks in the
8 Total number of chapters
current folder
9 Playback time
3 Current page/total number of the pages included
*
The title of the original program or play list may
in the list
not be displayed depending on the recording
4 Current folder/track (highlighted bar)
equipment.
30
Book 1.indb 30Book 1.indb 30 07.2.1 8:22:48 PM07.2.1 8:22:48 PM
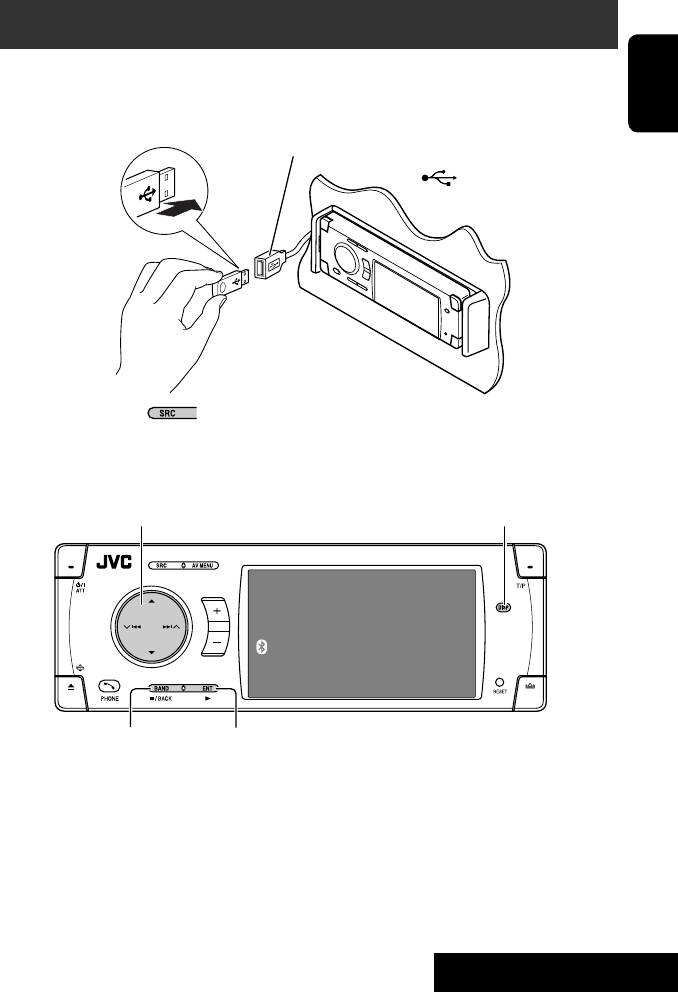
USB operations
1
You can connect a USB mass storage class device such as a USB memory, Digital Audio player*
, portable HDD, etc. to
the unit.
ENGLISH
~ Connect a USB device.
USB cable from the rear of the unit.
• You cannot connect a computer to the
USB ( ) terminal of the unit.
Ÿ Select “USB”.
4 ¢ Press: Select track
Hold: Reverse/forward search
5 ∞ Press: Select folder
DISP: Press if no playback picture appears , but disc
Hold: Display Folder List
information screen (
☞ pages 16 to 18) is displayed.
USB
Now Reading ...
15: 45
7: Stop playback
3: Start playback if necessary.
2
1
This unit can play DivX/JPEG/MPEG1/MPEG2*
/MP3/
*
Except for JVC D. Player XA-HD500.
3
2
WMA/WAV/AAC*
files stored in a USB mass storage
*
Except for MPEG2 files recorded by JVC Everio
class device.
camcorder (extension code <.mod>).
3
• You can operate the USB device in the same way you
*
This unit can play back AAC files encoded using
operate the files on discs. (☞ page 19 to 27)
iTunes. This unit cannot play back AAC files purchased
• You cannot select “USB”when Dual Zone is in use.
from the iTunes Store.
• All tracks in the USB device will be played repeatedly
until you change the source.
31
OPERATIONS
Book 1.indb 31Book 1.indb 31 07.2.1 8:22:49 PM07.2.1 8:22:49 PM
Caution:
• Avoid using the USB device if it might hinder your safety driving.
• Do not pull out and attach the USB device repeatedly while “Now Reading...” is flashing on the monitor.
• Do not start the car engine if a USB device is connected.
• Stop play back before disconnecting a USB device.
ENGLISH
• Make sure all important data has been backed up to avoid losing the data.
• Do not leave a USB device in the car, expose to direct sunlight, or high temperature to avoid deformation or
cause damages to the device.
Selecting playback modes
You can use only one of the following playback
3
modes—Intro/Repeat/Random.
Mode
All Off
Ex. To select Track Repeat
Intro
Repeat
Random
Off
1
AV Menu
4
Repeat
Off
Track
Setup
ENT
Enter
Folder
2
ENT
Set
AV Menu
When one of the playback modes is selected, the
corresponding indicator lights up on the information
Mode
ENT
Enter
screen.
Mode menu icon
To cancel, select <All Off> in step 3 or <Off> in
step 4.
File type Intro Repeat Random
Track: Plays the first 15
Track: Repeats current track
Folder: Randomly plays all
seconds of each track
Folder: Repeats all tracks of
tracks of current folder,
Folder: Plays the first 15
the current folder
then tracks of next folders
seconds of the first track of
USB (All): Randomly plays all
each folder
tracks
Track: Repeats current track
Folder: Repeats current folder
—
—
Folder: Repeats current folder
—
—
32
Book 1.indb 32Book 1.indb 32 07.2.1 8:22:49 PM07.2.1 8:22:49 PM

Bluetooth® operations — Cellular phone/audio player
Connecting a Bluetooth device
for the first time
ENGLISH
Pairing and PIN Code
Bluetooth is a short-range wireless radio
When you connect a Bluetooth device to the unit
communication technology for the mobile device such
for the first time, make pairing between the unit
as mobile phones, portable PCs, and other devices. The
and the device. Pairing allows Bluetooth devices to
bluetooth devices can be connected without cables and
communicate each other.
communicate each other.
To make pairing, you may need to enter the PIN
• The serial number is printed on the label placed on
(Personal Identification Number) code of your Bluetooth
the bottom of the unit.
device you want to connect.
• Refer to the list (included in the box) to see the
countries where you may use the Bluetooth®
• Once the connection is established, it is registered in
function.
the unit even if you reset the unit. Up to five devices
can be registered in total.
Bluetooth profile
• Only one device can be connected at a time for each
This unit supports the following Bluetooth profiles;
source (“Bluetooth Phone” and “Bluetooth Audio”).
HSP (Headset Profile)
• To use the Bluetooth function, you need to turn on
HFP (Hands-Free Profile)
Bluetooth function of the device.
A2DP (Advanced Audio Distribution Profile)
AVRCP (Audio/Video Remote Control Profile)
Preparation: Operate the device to turn on its
SPP (Serial Port Profile)
Bluetooth function.
OPP (Object Push Profile)
Registration (Pairing) methods
Features
Use either of the following items in the <Bluetooth>
menu to register and establish the connection with a
You can operate Bluetooth devices through the unit as
device.
follows:
• Select “Bluetooth Phone” or “Bluetooth Audio” as the
• Receiving a call
source to operate the <Bluetooth> menu.
• Making a call—from phone book, from call history
(Redial/Missed Call/Received Call), by dialing
<Open> Make the unit ready to establish
number, by preset numbers, by voice command
a new Bluetooth connection.
• Receiving the SMS (Short Message Service)
Connection is established by
• Play back a Bluetooth audio player
operating the Bluetooth device.
<Search> Make the unit ready to establish
Refer also to the instructions supplied with the
a new Bluetooth connection.
Bluetooth device.
Connection is established by
operating the unit.
• The Bluetooth word mark and logos are owned by
the Bluetooth SIG, Inc. and any use of such marks
by Victor Company of Japan, Limited (JVC) is under
license. Other trademarks and trade names are those
of their respective owners.
Continued on the next page
33
OPERATIONS
Book 1.indb 33Book 1.indb 33 07.2.1 8:22:50 PM07.2.1 8:22:50 PM

Registering using <Open>
7 Operate the target Bluetooth device. (While
“Open...” is flashing on the screen.)
1 Select “Bluetooth Phone” or “Bluetooth
Enter the same PIN code (as entered in the above
Audio.”
step) on the device to be connected.
Bluetooth Phone
FLAT
NEW DEVICE
ENGLISH
Now connection is established and you can use the
15: 45
device through the unit.
Select “NEW DEVICE” by pressing 5 / ∞.
The device remains registered even after you
2
disconnect the device. Use <Connect> (or activate
AV Menu
<Auto Connect>) to connect the same device
from next time. (☞ pages 58 and 59)
Setup
ENT
Enter
Searching for available devices
3
Perform steps 1 to 3 on the left, then...
AV Menu
1
NEW DEVICE
Dial Menu
Message
Bluetooth
ENT
Enter
Open
Search
Bluetooth menu icon
Special Device
4
NEW DEVICE
Dial Menu
Message
The unit searches for available devices and displays
Open
Search
the list of them. (If no available device is detected,
Special Device
“Device Unfound” appears.)
2 Select a device you want to connect.
5
Enter a PIN (Personal Identification
Number)* code to the unit.
• You can enter any number you like (1-digit to
16-digit number).
* Some devices have their own PIN code. Enter the
specified PIN code to the unit.
3 Enter the specific PIN code of the device to
the unit.
PIN Code
• Refer to the instructions supplied with the device
1234
to check the PIN code.
ENT
Enter
• To delete an unwanted digit, select blank space.
4 Use the Bluetooth device to connect.
6
Now connection is established and you can use the
device through the unit.
34
Book 1.indb 34Book 1.indb 34 07.2.1 8:22:51 PM07.2.1 8:22:51 PM
Connecting a special device
Deleting a registered device
Perform steps 1 to 3 of “Registering using <Open>”
1 Select “Bluetooth Phone” or “Bluetooth
on page 34, then...
Audio,” then select a registered device you
1
want to delete.
NEW DEVICE
Dial Menu
Message
ENGLISH
Open
Search
Special Device
The unit displays the list of the preset devices.
2 Perform steps 2 and 3 of “Registering using
2 Select a device you want to connect.
<Open>” on page 34, then...
• Select <Delete Pair>, then <Yes>.
3 Use <Open> (or <Search>) to connect.
Connecting/disconnecting a registered
device
1 Select “Bluetooth Phone” or “Bluetooth
Audio,” then select a registered device you
want to connect/disconnect.
2 Perform steps 2 and 3 of “Registering using
<Open>” on page 34, then...
• Select <Connect> to connect the selected
device.
• Select <Disconnect> to disconnect the selected
device.
You can set the unit to connect a Bluetooth device
automatically when the unit is turned on. (☞ page
59)
35
OPERATIONS
Book 1.indb 35Book 1.indb 35 07.2.1 8:22:52 PM07.2.1 8:22:52 PM
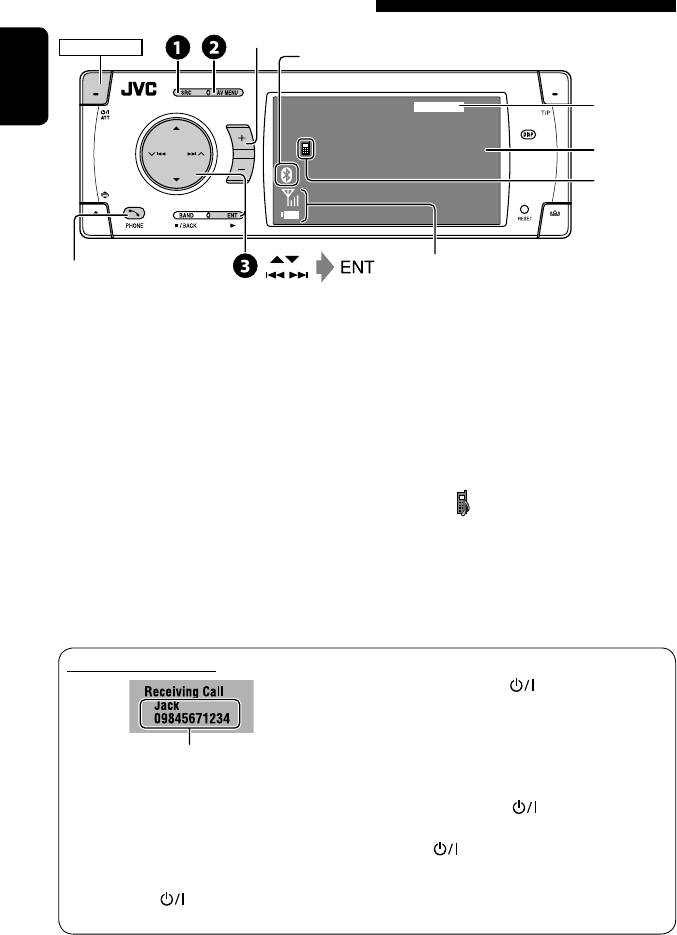
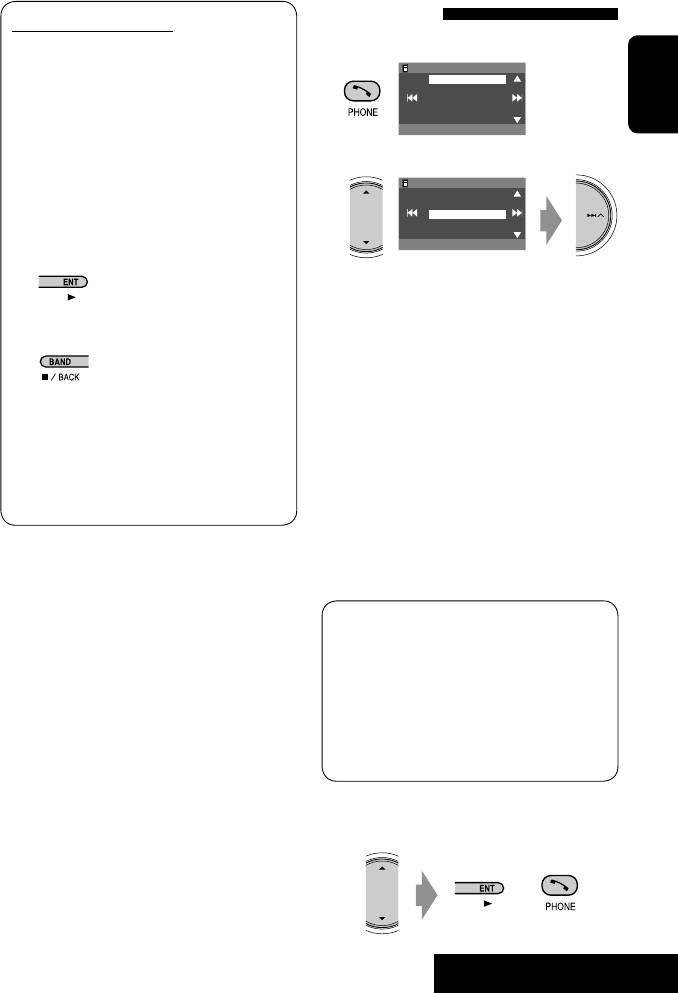
Using the Bluetooth cellular phone
1
Adjust the volume
*
POWER]ON
Turns Blue when the Bluetooth device is connected.
ENGLISH
Bluetooth Phone
FLAT
☞ page 48
Connected
Connected Device Name
3
device name
*
4
*
15: 45
2
Press: Display <Dial Menu>
Status of the device*
Signal strength/Battery remainder
Answers incoming call
Hold: Display <Redial> list
1
*
You can adjust the volume level for “Bluetooth Phone”
~ Select “Bluetooth Phone.”
without affecting the volume level for other sources.
2
*
Appears only when the information comes from the
Ÿ Enter the <Bluetooth> menu.
device.
! Establish the connection with a device,
3
*
Each time you press 5 ∞, the registered device
then make a call (or settings using the
name (and “NEW DEVICE” when a new device can be
<Bluetooth> menu).
registered) appear in turn.
☞ pages 34, 50, 58, and 59
4
*
When a cellular phone with audio function is
When the sound is stopped or interrupted during
connected, appears.
the use of a Bluetooth device, try the following
remedies.
You can adjust the microphone volume level. (☞ page
• Turn off, then turn on the unit.
59)
• (When the sound is not yet restored,) connect the
device again. (☞ “Connecting/disconnecting a
registered device” on page 35)
When a call comes in...
To end the call or reject an incoming call
Hold any button (except ATT or +/–).
Answering a waiting call
If your cellular phone is equipped with the call
Name and phone number (if acquired)
waiting function, you can put the current call on hold
The source is automatically changed to “Bluetooth
and answer the waiting call.
Phone.”
Press any button (except ATT and +/–).
When <Auto Answer> is activated...
• To restore the on-hold call, press any button
The unit answers the incoming calls automatically.
(except ATT and +/–) again.
(☞ page 59)
• When you end one call, you can connect to the
• When <Auto Answer> is deactivated, press any
other.
button (except ATT or +/–) to answer the
incoming call.
36
Book 1.indb 36Book 1.indb 36 07.2.1 8:22:53 PM07.2.1 8:22:53 PM
Making a call
When an SMS comes in...
If the cellular phone is compatible with SMS
1 Display the <Dial Menu>.
P902i
(Short Message Service) and <Message Info> is
Redial
Received Calls
set to <Auto> (☞ page 59), the unit rings and
Phonebook
Missed Calls
“Receiving Message” appears on the monitor to
Phone number
ENGLISH
Annie
inform you of the arrival of the message.
• You cannot edit or send a message through the
2 Select the method to make a call.
unit.
P902i
Redial
Received Calls
Phonebook
When <Message Info> is set to <Auto>...
Missed Calls
Phone number
To read the message
Annie
While “Receiving Message” is displayed...
• Redial* : Shows the list of the phone numbers
you have dialed = go to the following step.
• The source is changed to “Bluetooth Phone.”
• Received Calls* : Shows the list of the received
To read the message later
calls = go to the following step.
• Phonebook* : Shows the phone book of the
connected cellular phone = go to the following
• The message is stored into <Message>
step.
= <Unread>. (☞ page 58)
• Missed Calls* : Shows the list of the missed
calls = go to the following step.
When <Message Info> is set to <Manual>
• Phone Number : Shows the phone number
Access the message list to read a message.
entry screen = “How to enter phone number”
(☞ page 58)
on the next page.
• Voice Dialing (Only when the connected
cellular phone has the voice recognition system):
Speak the name you want to call.
* Displays only when your cellular phone is
equipped with these functions.
– If not displayed, please try to transfer the
phone book memory of the cellular phone
to this unit. (Refer to the instruction manual
supplied with your cellular phone.)
– With some cellular phones, the phone book
memory is transferred automatically.
3 Select the name/phone number you want to
call.
or
37
OPERATIONS
Book 1.indb 37Book 1.indb 37 07.2.1 8:22:54 PM07.2.1 8:22:54 PM
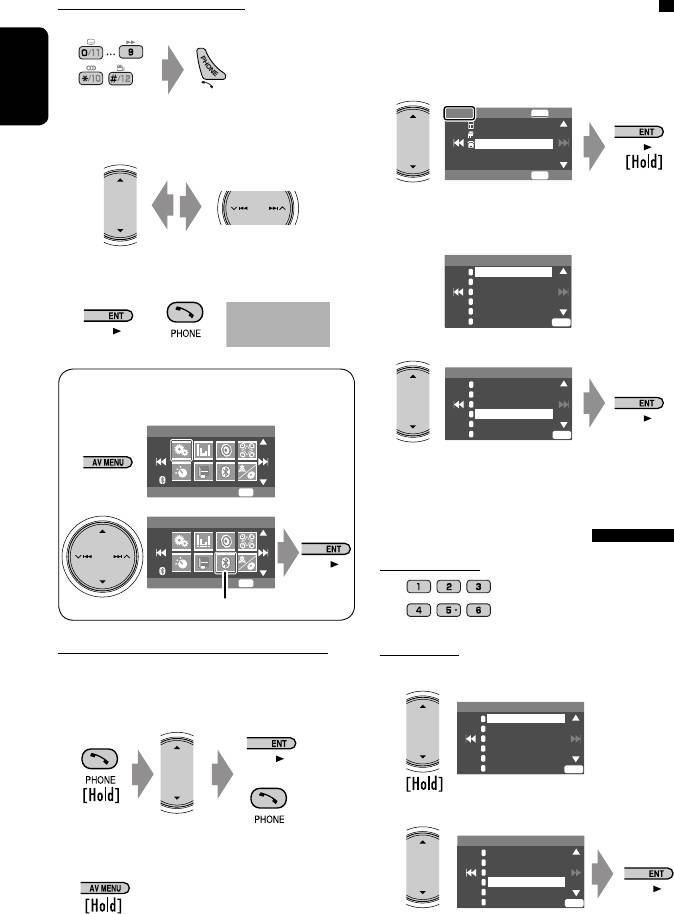
How to enter phone number
Presetting the phone numbers
On the remote:
You can preset up to six phone numbers.
1 Display the phone number you want to
preset by using one of <Dial Menu> items.
ENGLISH
On the unit:
Jack
ENT
Store
12312341234
09898765432
1
09845671234
Select a number. Move the entry position.
ENT
Dial
Ex.: “Jack” is selected from the phone book
Preset Memory list appears.
Preset Memory
• To delete an unwanted digit, select blank space.
1
11122223333
2
22233336666
2
3
44455556666
4
11133334444
Dialling ...
5
99988887777
or
Jack
6
55566668888
ENT
09845671234
2 Select a preset number.
Preset Memory
1
11122223333
<Dial Menu> can be also accessed through <AV
2
22233336666
3
44455556666
Menu> = <Bluetooth> = <Dial Menu>.
4
11133334444
5
99988887777
AV Menu
6
55566668888
ENT
The phone number selected in step 1 is now
stored in preset number 4.
Setup
ENT
Enter
AV Menu
To call a preset number
On the remote:
Bluetooth
ENT
Enter
Bluetooth menu icon
Direct operations to redial / Voice Dialing
On the unit:
You can use the following functions regardless of the
1
current source.
To redial
Preset List
1
11122223333
2
22233336666
3
44455556666
4
09845671234
5
99988887777
6
55566668888
ENT
or
2
To activate Voice Dialing
Preset List
1
11122223333
You can make a call by your voice.
2
22233336666
3
44455556666
4
09845671234
5
99988887777
Speak the name you want to call.
6
55566668888
ENT
38
Book 1.indb 38Book 1.indb 38 07.2.1 8:22:54 PM07.2.1 8:22:54 PM
• Preset List can also be accessed through <AV
You can use the following buttons on the remote
Menu> = <List>.
controller for the Bluetooth phone operations. For
AV Menu
details, ☞ pages 8 and 9.
Setup
ENT
Enter
ENGLISH
AV Menu
List
ENT
Enter
List menu icon
Using the Bluetooth audio player
Reverse/forward skip
Turns Blue when the Bluetooth
POWER]ON
1
device is connected.
*
Bluetooth Audio
FLAT
☞ page 48
3
*
Connected Device Name
4
*
15: 45
2
Pause
Status of the device*
Signal strength/Battery remainder
1
*
Each time you press 5 ∞, the registered device
~ Select “Bluetooth Audio.”
names (and “NEW DEVICE” when a new device can
be registered) appear in turn. You cannot select “New
Ÿ Start playback.
Device” when a Bluetooth audio player is connected.
• See pages 33 to 35 for connecting a new device.
2
*
Appears only when the information comes from the
• See page 35 for connecting/disconnecting a
device.
registered device.
3
*
Indicates the button pressed. It may be different from
• See page 35 for deleting a registered device.
the operation status.
When the sound is stopped or interrupted during
4
*
When a cellular phone with audio function is
the use of a Bluetooth device, try the following
connected, appears.
remedies.
• Turn off, then turn on the unit.
You can use the following buttons on the remote
• (When the sound is not yet restored,) connect the
controller for the Bluetooth audio operations. For
device again. (☞ “Connecting/disconnecting a
details, ☞ pages 8 and 9
registered device” on page 35)
Bluetooth Information:
If you wish to receive more information about
Bluetooth, visit our JVC web site.
39
OPERATIONS
Book 1.indb 39Book 1.indb 39 07.2.1 8:22:56 PM07.2.1 8:22:56 PM
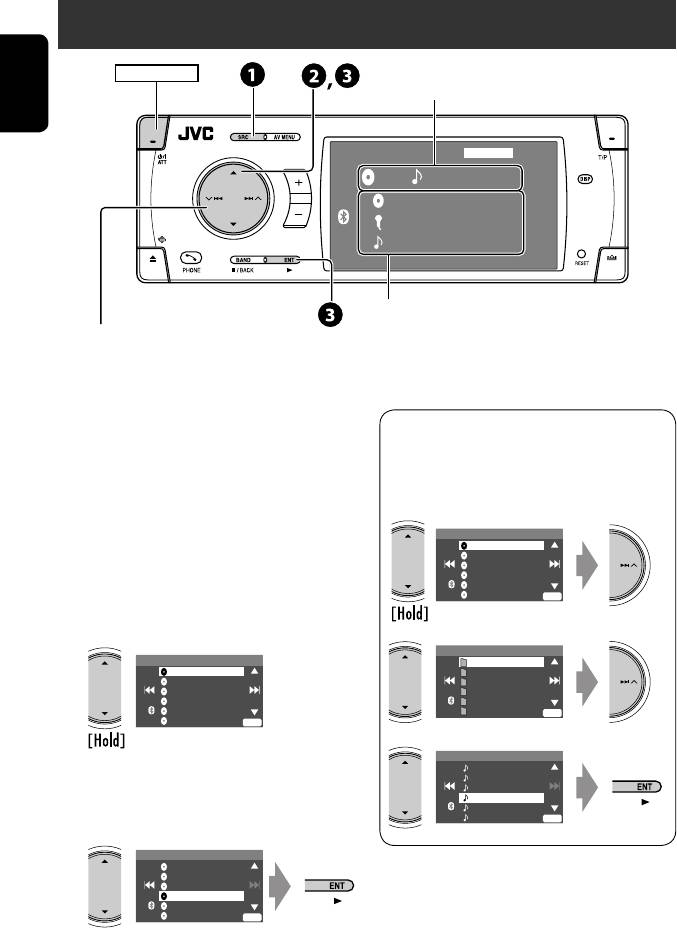
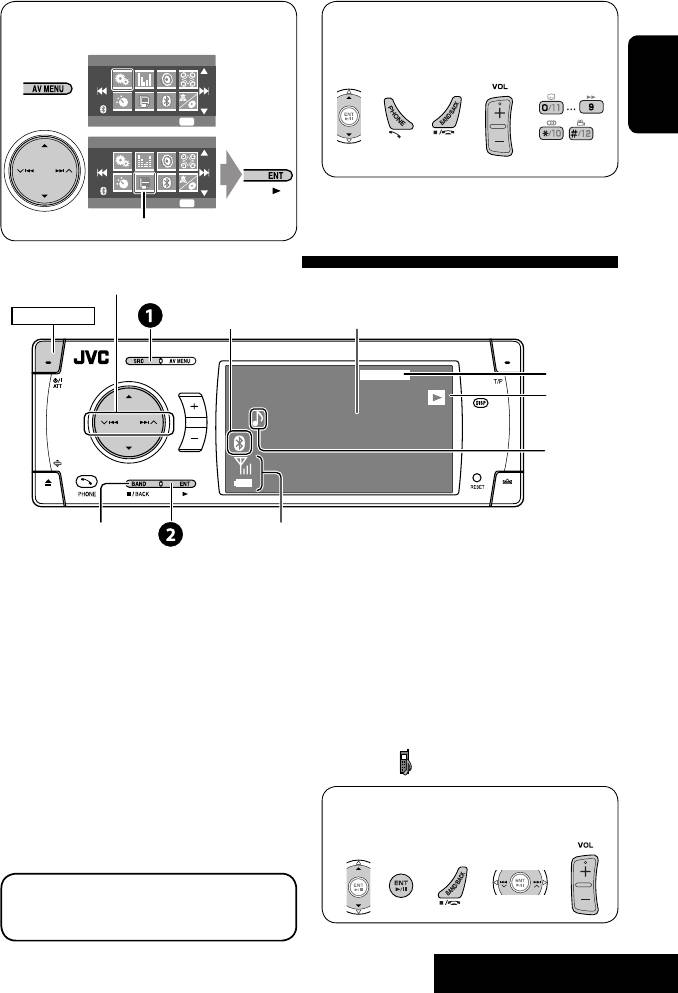
Listening to the CD changer
POWER]ON
Disc no./Track no./Playing time
ENGLISH
CD-CH
FLAT
01 01 0:02:38
Disc Title
Artist Name
Current Track Title
15: 45
“No Name” appears for conventional CDs
4 ¢ Press: Select track
Hold: Reverse/forward search
5 ∞ Press: Select folder (MP3 only)
Hold: Display Disc List
It is recommended to use a JVC MP3-compatible CD
• While playing an MP3 disc, you can select and
changer with your unit.
start playing a track in the disc using the Lists:
• You can play only CDs (CD-DA) and MP3 discs.
Disc List (select the current disc) = Folder List
= File List, then start playing a track you want.
Preparation:
Make sure <Changer> is selected for the external
Disc List
input setting. (☞ page 55)
MP3 DISC
DISC 02
DISC 03
DISC 04
DISC 05
~ Select “CD-CH.”
Off
DISC 06
ENT
Ÿ Display the Disc List.
Folder List
Disc List
My Best
MP3 DISC
Cinema
DISC 02
Pops
DISC 03
My Best2
DISC 04
Favorite Song
DISC 05
Off
Cinema2
ENT
Off
DISC 06
ENT
File List
Song011.mp3
• Each time you hold the button, you can
Song012.mp3
Song013.mp3
display the other list of the remaining discs.
Song014.mp3
Song015.mp3
Off
Song016.mp3
ENT
! Select a disc to start playing.
Disc List
MP3 DISC
DISC 02
DISC 03
DISC 04
DISC 05
Off
DISC 06
ENT
40
Book 1.indb 40Book 1.indb 40 07.2.1 8:22:57 PM07.2.1 8:22:57 PM


