JVC GR-D340 E: Date/Time Settings
Date/Time Settings: JVC GR-D340 E
MasterPage: Start_Right
G R -D 3 4 0 P A L .b o o k P a g e 1 5 Thursday , Octo ber 27 , 2005 3:19 PM
GETTING STARTED
EN 15
Power-Linked Operation
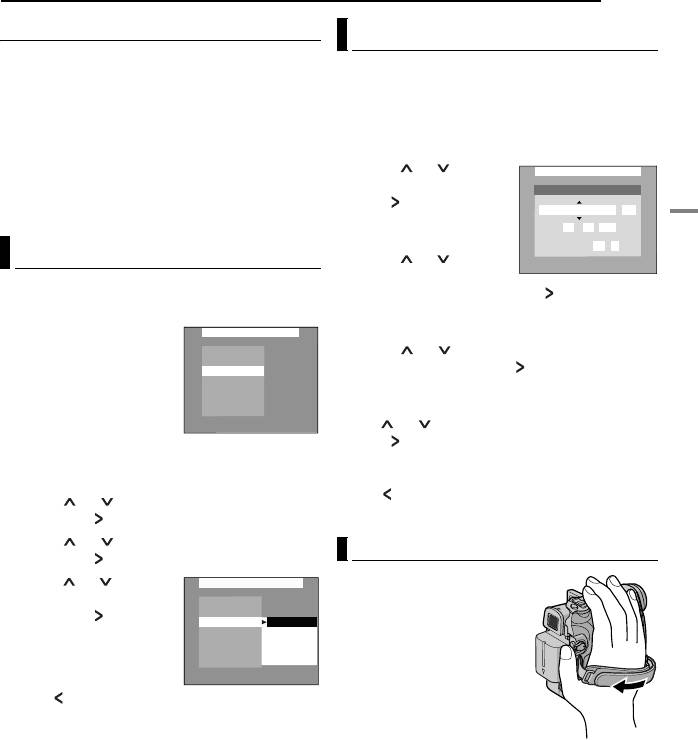
Date/Time Settings
When the Power Switch is set to “REC”, you can
The date/time is recorded onto the tape at all
also turn on/off the camcorder by opening/
times, but its display can be turned on or off
closing the LCD monitor or pulling out/pushing in
during playback. (墌 pg. 23, 25)
the viewfinder.
INFORMATION:
1 Perform steps 1 – 4 in “Language Settings”
The following explanations in this manual
on the left column.
supposes the use of LCD monitor in your
2 Press or to select
LADSIYP
operation. If you want to use the viewfinder,
“CLOCK ADJ.”, and press
O
KCL C
A
D
J
.
close the LCD monitor and pull out the
SET or . The date
MONTH.DATE.YEAR
24h
viewfinder fully.
display format is
1 . 1 . 2006
highlighted.
3 : 13
Language Settings
3 Press or to select
the desired date display
The language on the display can be changed.
format, and then press SET or . Select from
(墌 pg. 25)
“MONTH.DATE.YEAR”, “DATE.MONTH.YEAR”
or “YEAR.MONTH.DATE”.
1 Set the Power Switch to
LADSIYP
GETTING STARTED
"REC" while pressing
BRIGHT
4 Press or to select the time display
down the Lock Button
CL C
O
K
A
D
J
.
format, then press SET or . Select from “24h”
LANGUAGE
located on the switch.
/TIDA E
MET
or “12h”.
NCREON S E
COTI E
DEM
2 Open the LCD monitor
DEMO MODE
5 Set the year, month, date, hour and minute.
fully. (墌 pg. 18) Set the
Press or to select the value, then press
recording mode to “M”.
SET or . Repeat this step until you have input
(墌 pg. 14)
all the settings.
3 Press MENU. The Menu Screen appears.
NOTE:
Press to return to the previous setting.
4 Press or to select “DISPLAY”, and
press SET or . The DISPLAY Menu appears.
6 Press MENU. The Menu Screen closes.
5 Press or to select “LANGUAGE”, and
Grip Adjustment
press SET or .
6 Press or to select
LADSIYP
1 Adjust the velcro strip.
the desired language, and
BRIGHT
2 Pass your right hand
press SET or .
CL C
O
K
A
D
J
.
LANGUAGE
ENGLISH
through the loop and grasp
/TIDA E
MET
FRANÇAIS
7 Press MENU. The
the grip.
NCREON S E
ESPAÑOL
COTI E
DEM
ITALIANO
Menu Screen closes.
DEMO MODE
NEDERLANDS
3 Adjust your thumb and
fingers through the grip to
NOTES:
● Press whenever you want to return to the
easily operate the
previous menu screen.
Recording Start/Stop
● You cannot enter menu screen during recording.
Button, Power Switch and
Power Zoom Lever. Be
sure to fasten the velcro strip to your preference.
Оглавление
- 2 EN READ THIS FIRST !
- SAFETY PRECAUTIONS
- 4 EN
- 6 EN Major Features of this Camcorder
- 8 EN Index
- Controls Other Parts
- 10 EN
- Provided Accessories
- 12 EN
- 14 EN
- Date/Time Settings
- 16 EN Viewfinder Adjustment Brightness Adjustment Of The Display
- Loading/Unloading A Cassette
- 18 EN
- 20 EN
- Normal Playback
- 22 EN
- Changing The Menu Settings
- 24 EN
- 26 EN
- Wide Mode Snapshot (Record Still Image On
- 28 EN Manual Focus Exposure Control
- Iris Lock
- 30 EN White Balance Adjustment Manual White Balance Adjustment
- Wipe Or Fader Effects Program AE, Effects and Shutter
- 32 EN
- Dubbing To A VCR
- 34 EN
- Connection To A Personal Computer
- 36 EN
- 38 EN
- Cleaning The Camcorder
- 40 EN
- 42 EN


