JVC GR-D340 E: Changing The Menu Settings
Changing The Menu Settings: JVC GR-D340 E
MasterPage: Start_Right
MENUS FOR DETAILED ADJUSTMENT
EN 23
Video Recording Menus
Changing The Menu Settings
FUNCTION (墌 pg. 24)
This camcorder is equipped with an easy-to-use,
SETTING (墌 pg. 24)
on-screen menu system that simplifies many of
SYSTEM (墌 pg. 25)
FUNCTION
the more detailed camcorder settings.
DISPLAY (墌 pg. 25)
WIPE/FADER
OFF
EFFECT
WHITE
(墌 pg.23–26)
PROGRAM AE
BLACK
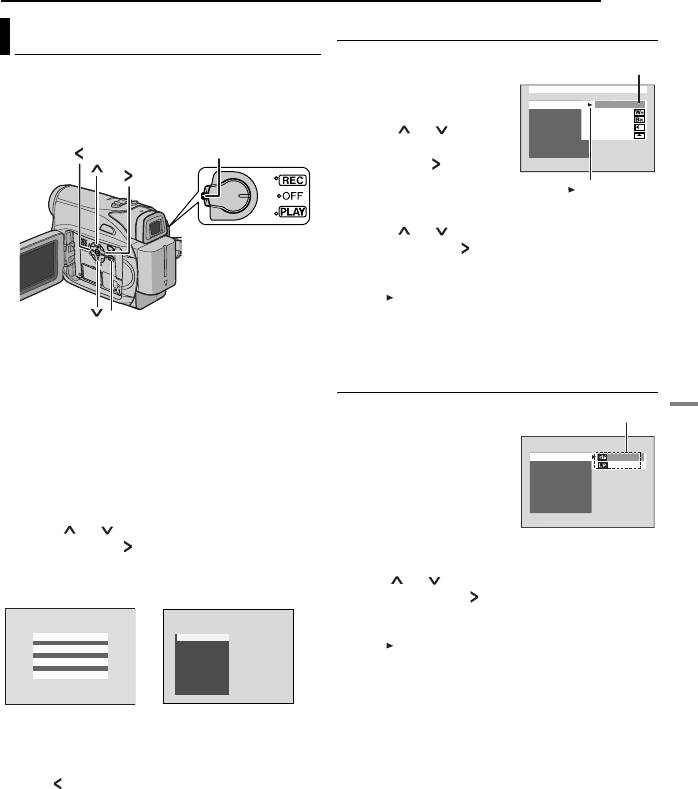
1) Press or to select
SHUTTER
SLIDE
EXPOSURE
SCROLL
Lock button
the desired selection and
W.BALANCE
TELE MACRO
press SET or . The Sub
Menu appears.
● Example: FUNCTION
Menu
2) Press or . Select the desired parameter
and press SET or . Selection is complete.
● Repeat the procedure if you wish to set other
function menus.
● The “ ” indicator shows the setting that is
currently saved inside the camcorder’s
MENU
memory.
1 For Video Recording Menus:
3) Press MENU. The Menu Screen closes.
● Set the Power Switch to “REC” while pressing
Video Playback Menus
down the Lock Button located on the switch.
● Set the recording mode to “M”. (墌 pg. 14)
REC MODE (墌 pg. 26)
For Video Playback Menus:
SOUND MODE
Set the Power Switch to “PLAY” while pressing
(墌 pg. 26)
down the Lock Button located on the switch.
NARRATION (墌 pg. 26)
BRIGHT (墌 pg. 26)
2 Open the LCD monitor fully. (墌 pg. 18)
DATE/TIME (墌 pg. 26)
3 Press MENU. The Menu Screen appears.
ON SCREEN (墌 pg. 26)
TIME CODE (墌 pg. 26)
4 Press or to select the desired function,
1) The Sub Menu appears.
and press SET or . The selected function
● Example: REC MODE Menu.
ADVANCED FEATURES
menu appears.
Screen for Video
Screen for Video
Press or to select the desired parameter
Recording Menu
Playback Menu
and press SET or . Selection is complete.
● Repeat the procedure if you wish to set other
function menus.
FUNCTION
REC MODE
SOUND MODE
● The “” indicator shows the setting that is
SETTING
NARRA T I ON
BR I GHT
SYSTEM
DA ETT/IME
currently saved inside the camcorder’s memory.
DISPLAY
ON S RCEEN
TIME CODE
2) Press MENU. The Menu Screen closes.
5 Setting procedure hereafter depends on the
selected function.
NOTES:
● Press whenever you want to cancel or return to
the previous Menu Screen.
● You cannot enter Menu screen during recording.
S
e
l
ecte
d
ADVANCED FEATURES
G R -D 3 4 0 P A L .b o o k P a g e 2 3 Thursday , Oc to ber 27 , 2005 3:19 PM
parameter
“ ” Indicator
Sub Menu
REC MODE
SOUND MODE
NARRATION
BRIGHT
DATE / TIME
ON SCREEN
TIME CODE
Оглавление
- 2 EN READ THIS FIRST !
- SAFETY PRECAUTIONS
- 4 EN
- 6 EN Major Features of this Camcorder
- 8 EN Index
- Controls Other Parts
- 10 EN
- Provided Accessories
- 12 EN
- 14 EN
- Date/Time Settings
- 16 EN Viewfinder Adjustment Brightness Adjustment Of The Display
- Loading/Unloading A Cassette
- 18 EN
- 20 EN
- Normal Playback
- 22 EN
- Changing The Menu Settings
- 24 EN
- 26 EN
- Wide Mode Snapshot (Record Still Image On
- 28 EN Manual Focus Exposure Control
- Iris Lock
- 30 EN White Balance Adjustment Manual White Balance Adjustment
- Wipe Or Fader Effects Program AE, Effects and Shutter
- 32 EN
- Dubbing To A VCR
- 34 EN
- Connection To A Personal Computer
- 36 EN
- 38 EN
- Cleaning The Camcorder
- 40 EN
- 42 EN


