JVC GR-D340 E: 18 EN
18 EN: JVC GR-D340 E
VIDEO RECORDING & PLAYBACK
MasterPage: Left
G R -D 3 4 0 P A L .b o o k P a g e 1 8 Thursday , Oc to ber 27 , 2005 3:19 PM
VIDEO RECORDING
18 EN
Tape Remaining Time
Basic Recording
Approximate tape remaining
62 min
NOTE:
time appears on the display.
Before continuing, perform the procedures listed
“---min” means the
below:
camcorder is calculating the
● Power (墌 pg. 12)
remaining time. When the
● Loading A Cassette (墌 pg. 17)
remaining time reaches 2 minutes, the indication
starts blinking.
Power Zoom Lever
● The time required to calculate and display the
remaining tape length, and the accuracy of the
calculation, may vary according to the type of tape
used.
POWER/CHARGE Lamp
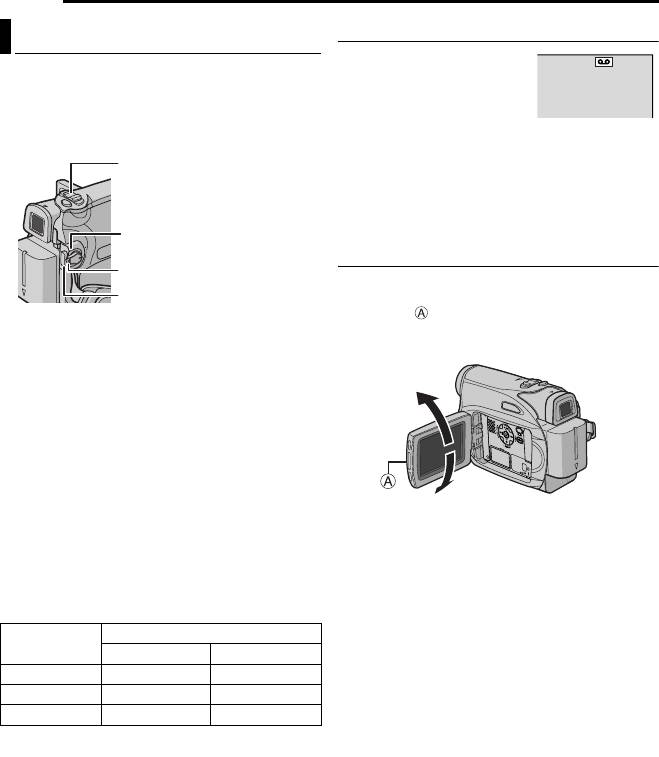
LCD Monitor And Viewfinder
Power Switch
While using the LCD monitor:
Recording Start/Stop Button
Make sure the viewfinder is pushed back in. Pull
on the end of the LCD monitor and open the
LCD monitor fully. It can rotate 270° (90°
1 Remove the lens cap. (墌 pg. 12)
downward, 180° upward).
2 Open the LCD monitor fully.
180˚
3 Set the Power Switch to “REC” while pressing
down the Lock Button located on the switch.
● The POWER/CHARGE lamp lights and the
camcorder enters the Record-Standby mode.
“T PAUSE” is displayed.
● To record in LP (Long Play) mode, 墌 pg. 24.
4 To start recording, press the Recording Start/
90˚
Stop Button. “T REC” appears on the display
While using the viewfinder:
while recording is in progress.
Make sure the LCD monitor is closed and
5 To stop recording, press the Recording Start/
locked. Pull out the viewfinder fully.
Stop Button again. The camcorder re-enters the
Record-Standby mode.
NOTES:
● The image will not appear simultaneously on the
Approximate recording time
LCD monitor and the viewfinder. When the
viewfinder is pulled out while the LCD monitor is
Recording mode
Tape
opened, you can select which one to use. Set
SP LP
“PRIORITY” to the desired mode in SYSTEM
30 min. 30 min. 45 min.
Menu. (墌 pg. 23, 25)
60 min. 60 min. 90 min.
● Coloured bright spots may appear all over the
LCD monitor or the viewfinder. However, this is not
80 min. 80 min. 120 min.
a malfunction. (墌 pg. 37)
NOTES:
● If the Record-Standby mode continues for
5 minutes and no operation is performed
(
“T PAUSE” indicator may not appear), the
camcorder’s power shuts off automatically. To turn
the camcorder on again, push back and pull out
the viewfinder again or close and re-open the LCD
monitor.
● When a blank portion is left between recorded
scenes on the tape, the time code is interrupted
and errors may occur when editing the tape. To
avoid this, refer to “Recording From The Middle Of
A Tape” (墌 pg. 20).
● To turn the melody sounds off, 墌 pg. 23, 25.
MasterPage: Start_Right
VIDEO RECORDING
EN 19
Zooming
Journalistic Shooting
Produces the zoom in/out effect, or an
In some situations,
instantaneous change in image magnification.
different shooting
angles may provide
Zoom In
more dramatic results.
Slide the Power Zoom Lever towards “T”.
Hold the camcorder in
Zoom Out
the desired position
Slide the Power Zoom Lever towards “W”.
and tilt the LCD
● The further you slide the Power Zoom Lever, the
monitor in the most
quicker the zoom action.
convenient direction. It
can rotate 270° (90°
Zoom in (T: Telephoto)
downward, 180°
upward).
1
x
10
x
20
x
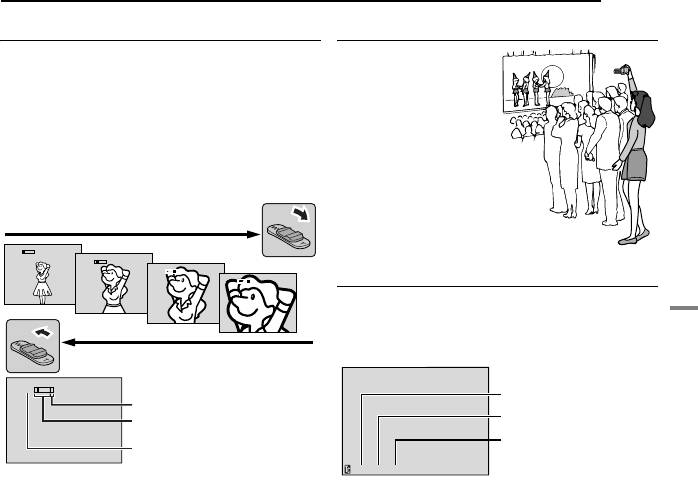
Time Code
40
x
During recording, a time code is recorded on the
tape. This code is to confirm the location of the
recorded scene on the tape during playback.
Zoom out (W: Wide angle)
10
x
Minutes
Digital zoom zone
Seconds
32X (optical) zoom zone
Frames*
Approximate zoom ratio
(25 frames = 1 second
12:34:24
NOTES:
* Frames are not displayed during recording.
● Focusing may become unstable during zooming.
If recording starts from a blank portion, the time
In this case, set the zoom while in Record-
code begins counting from “00:00:00”
VIDEO RECORDING & PLAYBACK
Standby, lock the focus by using the manual focus
(minute:second:frame). If recording starts from
(墌 pg. 28), then zoom in or out in Record mode.
the end of a previously recorded scene, the time
● Zooming is possible to a maximum of 800X, or it
code continues from the last time code number.
can be switched to 32X magnification using the
If during recording a blank portion is left partway
optical zoom. (墌 pg. 24)
through the tape, the time code is interrupted.
● Zoom magnification of over 32X is done through
When recording is resumed, the time code starts
digital image processing, and is therefore called
counting up again from “00:00:00”. This means
Digital Zoom.
● During Digital Zoom, the quality of image may
the camcorder may record the same time codes
suffer.
as those existing in a previously recorded scene.
● Macro shooting (as close as approx. 5 cm to the
To prevent this, perform Recording From The
subject) is possible when the Power Zoom Lever
Middle Of A Tape (墌 pg. 20) in the following
is set all the way to “W”. Also see “TELE MACRO”
cases;
in FUNCTION Menu on page 24.
● When shooting again after playing back a
● When shooting a subject close to the lens, zoom
recorded tape.
out first. If zoomed-in in the auto focus mode, the
● When power shuts off during shooting.
camcorder may automatically zoom out
● When a tape is removed and re-inserted during
depending on the distance between the
shooting.
camcorder and the subject. This will not occur
● When shooting using a partially recorded tape.
when “TELE MACRO” is set to “ON”. (墌 pg. 24)
● When shooting on a blank portion located partway
through the tape.
● When shooting again after shooting a scene then
opening/closing the cassette holder cover.
)
G R -D 3 4 0 P A L .b o o k P a g e 1 9 Thursday , Oc to ber 27 , 2005 3:19 PM
Display
CONTINUED ON NEXT PAGE
Оглавление
- 2 EN READ THIS FIRST !
- SAFETY PRECAUTIONS
- 4 EN
- 6 EN Major Features of this Camcorder
- 8 EN Index
- Controls Other Parts
- 10 EN
- Provided Accessories
- 12 EN
- 14 EN
- Date/Time Settings
- 16 EN Viewfinder Adjustment Brightness Adjustment Of The Display
- Loading/Unloading A Cassette
- 18 EN
- 20 EN
- Normal Playback
- 22 EN
- Changing The Menu Settings
- 24 EN
- 26 EN
- Wide Mode Snapshot (Record Still Image On
- 28 EN Manual Focus Exposure Control
- Iris Lock
- 30 EN White Balance Adjustment Manual White Balance Adjustment
- Wipe Or Fader Effects Program AE, Effects and Shutter
- 32 EN
- Dubbing To A VCR
- 34 EN
- Connection To A Personal Computer
- 36 EN
- 38 EN
- Cleaning The Camcorder
- 40 EN
- 42 EN


