Beurer EM35: 3. Description of Device
3. Description of Device: Beurer EM35
3. Description of Device
5
3 4
6
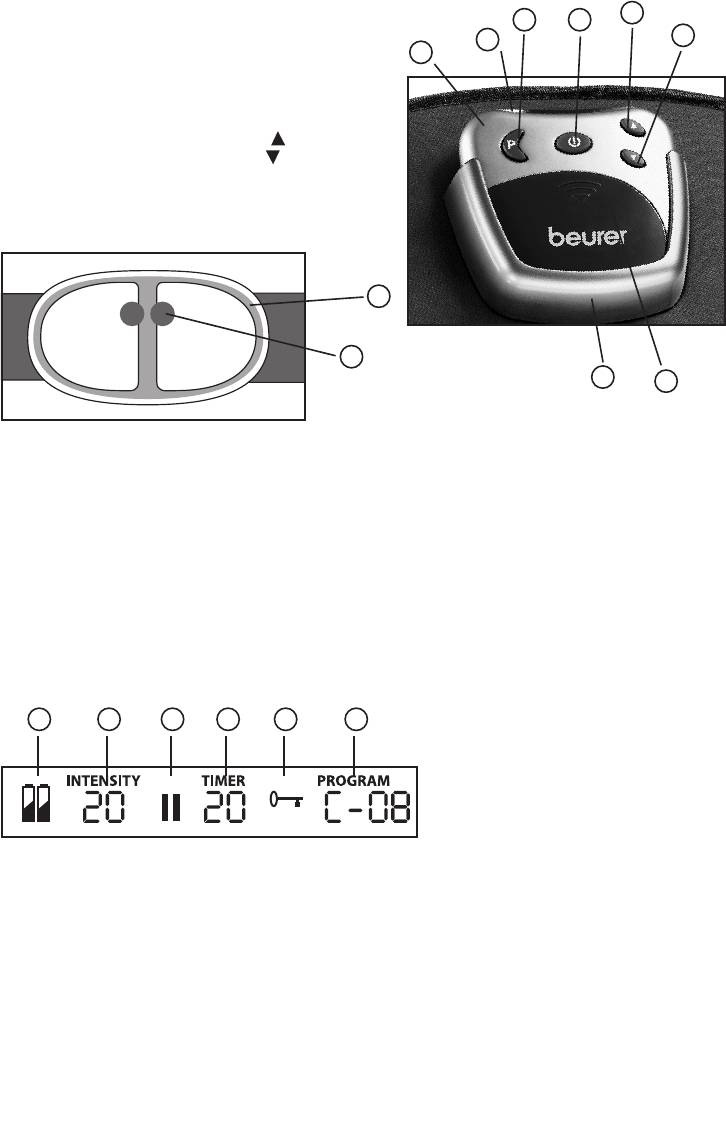
Part names
2
1
1. Operating unit
2. LCD display
3. Program and lock key
4. On / O / Pause key
5. Selection key - Increase intensity
6. Selection key - Reduce intensity
7. Battery compartment lid
8. Holder
9. Surface electrodes
10. Covers for electrode connection
9
10
8
7
If the self-adhesive covers for electrode connection are missing or become detached, we strongly
advise you to stick on the enclosed electrode covers.
Never attach the belt with bare metal electrodes. Use of the belt without electrode covers can cause
injury.
Description of the display symbols
A Battery status display: flashes if the battery is flat
B Intensity: set intensity levels 0 - 40
C Pause symbol: flashes if pause is activated
D Timer: remaining time for the program started
E Key: key lock is activated
F Program: selected program with the number of training cycles already
completed
A B C D E F
4. Operation
Inserting batteries
If the battery symbol in the display flashes, the batteries are flat and must be replaced. The opera-
ting unit must be removed from the holder on the belt to insert or replace batteries.
– Release the magnetic connector by pulling the device away from the belt.
The magnetic connector of the two contact buttons clicks out noticeably.
– Pull the device upwards out of the holder.
– Remove the battery compartment lid by pressing and sliding in the direction of the arrow.
– Insert the batteries observing the markings in the battery compartment. Ensure correct battery
polarity.
11

Note:
– Rechargeable batteries cannot be used for this device.
– If the device is not in use, we recommend keeping the device separate from the belt. If the
device is not needed for a long period, we recommend first removing the batteries.
– Used batteries do not belong in domestic garbage. You are legally obligated to
dispose of the batteries. Dispose of these through your electrical dealer or your
local recycling center.
– Batteries containing pollutants are marked with the following symbols:
Pb = battery contains lead,
Cd = battery contains cadmium,
Hg = battery contains mercury.
– Please dispose of the device in accordance with EC Directive –
WEEE (Waste Electrical and Electronic Equipment).
If you have any queries, please contact the appropriate local authorities.
Attaching the belt
Before each training session you should ensure that your skin is clean and free of creams or oils.
Only then can the device work optimally.
– Lay the belt down with the electrodes facing towards you.
– Moisten both electrodes and your stomach with water. Make sure the electrode surfaces are
evenly moistened to avoid high voltage points on your skin during subsequent training.
– Place the belt around your waist so that the electrodes are positioned on your stomach. Then
close the Velcro fastener.
The belt is made of an elastic material and fits a wide range of waist sizes. Take care that it is tight
enough for good contact between the electrode and skin, but does not constrict you.
Where must the belt not be used:
– On the head: here it can cause seizures
– On the neck / carotid artery: here it can cause cardiac arrest
– On the pharynx and larynx: here it can cause muscle spasms, which lead to suocation
– Neat the ribcage: here it can increase the risk of ventricular fibrillation and lead to cardiac arrest
Where must the belt only be used:
Only attach the belt around the stomach.
The navel should be covered at the center.
navel
Automatic deactivation
If the device is not used after it is switched on, it switches o automatically after 5 minutes.
12
Оглавление
- DEUTSCH
- 3. Gerätebeschreibung
- 4. Inbetriebnahme
- 5. Anwendung
- 6. Reinigung
- ENGLISH
- 3. Description of Device
- 5. Use
- 6. Cleaning
- 7. Technical Specifications:
- FRANÇAIS
- 2. Remarques importantes
- 3. Description de l‘appareil
- 4. Mise en service
- 5. Utilisation
- 6. Nettoyage
- ESPAÑOL
- 3. Descripción del aparato
- 4. Puesta en funcionamiento
- 5. Aplicación
- 6. Limpieza
- ITALIANO
- 3. Descrizione dell‘apparecchio
- 4. Messa in servizio
- 5. Modalità d’uso
- 6. Pulizia
- TÜRKÇE
- 3. Aletin tarifi
- 5. Kullanım
- 6. Aletin temizlenmesi
- РУССКИЙ
- Повреждения
- 3. Описание прибора
- Указания:
- Автоматическое выключение
- 6. Очистка
- 8. Гарантия
- POLSKI
- 3. Opis urządzenia
- 4. Uruchomienie
- 5. Zastosowanie
- 6. Czyszczenie


