Yamaha DVD-S1800: FUNCTIONAL OVERVIEW
FUNCTIONAL OVERVIEW: Yamaha DVD-S1800
FUNCTIONAL OVERVIEW
English
FUNCTIONAL OVERVIEW
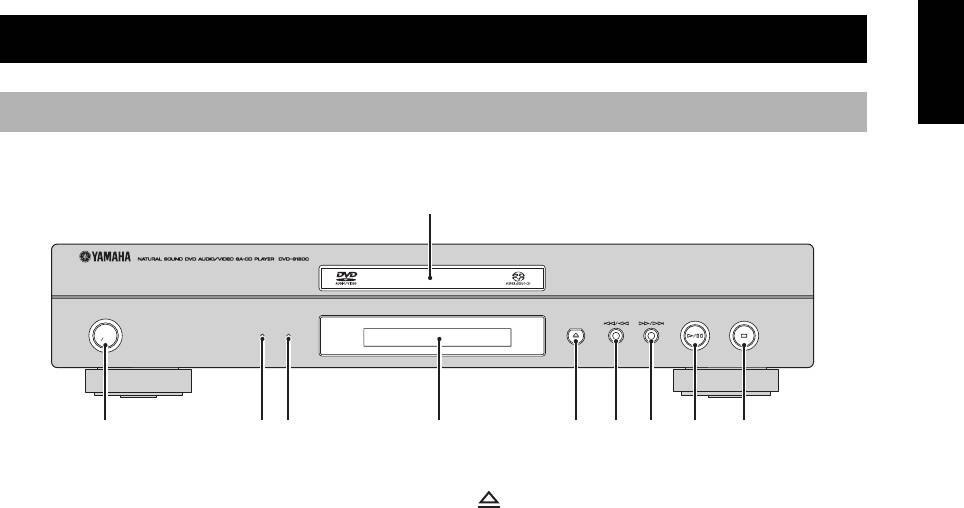
Front panel
STANDBY
HDMI AUDIO DIRECT
ON
1 Disc tray
6
Load a disc in the disc tray.
Opens or closes the disc tray.
2 STANDBY/ON
7
b/w
Turns on this unit or sets it to the standby mode.
Searches backward.*
Moves to the previous chapter or track.
3 HDMI indicator
Lights up green when an HDMI component is
8 f/a
recognized by this unit and the HDMI mode is set to
Searches forward.*
on.
Moves to the next chapter or track.
Lights up orange when no HDMI component is
recognized by this unit while the HDMI mode is set to
9 p/e
on.
Starts or pauses playback.
4 AUDIO DIRECT indicator
0 s
Lights up when you select the AUDIO DIRECT mode
Stops playback.
by pressing AUDIO DIRECT on the remote control.
5 Front panel display
* Press and hold the button for about two seconds.
Displays playback information or settings.
5 En
3
1
6 7 8 092 4 5
FUNCTIONAL OVERVIEW
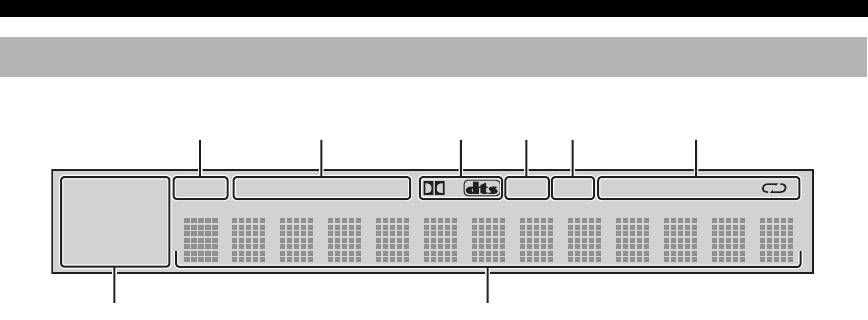
Front panel display
252134
SVCD WMA
P.SCAN TITLE GROUP CHP/ TRK MULTI D.MIX PROG. RANDOM ALL AD
B
MP3 JPEG
DVD AUDIO
SA-CD
DivX
6
7
1 P.SCAN indicator
5 D.MIX indicator (DVD-Audio only)
Lights up when the progressive scan function is
Lights up when playing the disc that allows down
activated.
mixing of the multi-channel audio source.
2 Playback mode indicators
6 Disc indicators
Display the icon for the selected playback mode.
Display the icon for the disc type.
3 Decoder indicators
7 Information display
Display the icon for the selected internal decoder.
Displays various information such as a title/chapter/
track number or elapsed playing time.
4 MULTI indicator
Lights up when playing the multi-channel audio
source.
y
You can adjust the brightness of the front panel display using
DIMMER on the remote control.
6 En
FUNCTIONAL OVERVIEW
English
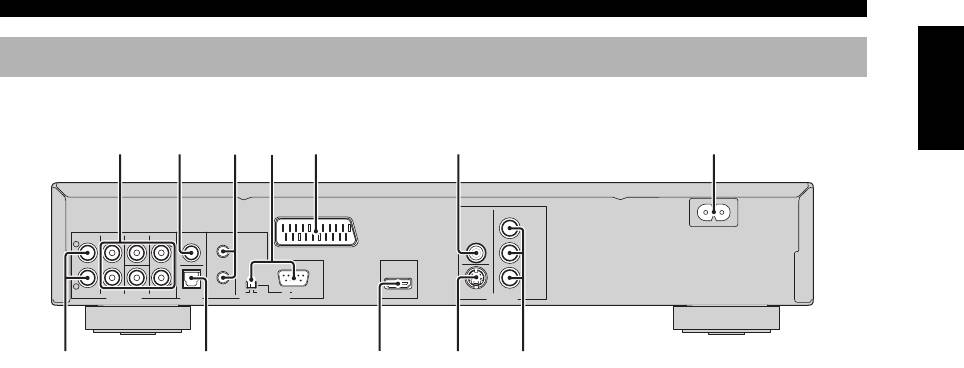
Rear panel
MAINS
PR
/ CR
CENTER
COAXIAL
IN
VIDEO
L
L
AV
PB
/ CB
Y
R
R
MIXED 2CH
FRONT
SUBWOOFER
SURROUND
OPTICAL
OUT
ON
OFF
RS 232C
HDMI
S VIDEO
COMPONENT
AUDIO OUT DIGITAL REMOTE CONTROL VIDEO OUT
1 AUDIO OUT (6ch discrete) jacks
7 MAINS
Connect to the 6ch input jacks of your AV receiver.
Connect the supplied power cable.
2 DIGITAL (COAXIAL) jack
8 AUDIO OUT (MIXED 2CH) jacks
Connect to the coaxial input jack of your AV receiver.
Connect to the audio input jacks of your AV receiver or
stereo system.
3 REMOTE CONTROL (IN/OUT) connectors
Use in custom installations to transmit remote control
9 DIGITAL (OPTICAL) jack
signals via cable connections.
Connect to the optical input jack of your AV receiver.
4 REMOTE CONTROL (RS-232C) terminal
0 HDMI jack
(U.S.A., Canada, U.K., Europe, and Russia
Connect to the HDMI input jack of your HDMI
models only)
component.
Use as an expansion terminal for commercial use.
Consult your dealer for details.
q VIDEO OUT (S VIDEO) jack
Connect to the S-video input jack of your AV receiver.
5 AV terminal
(U.K., Europe, and Russia models only)
w VIDEO OUT (COMPONENT) jacks
Connect to SCART input terminal of your TV.
Connect to the component input jacks of your AV
receiver.
6 VIDEO OUT (VIDEO) jack
Connect to the composite video input jack of your AV
receiver.
■ Remote control connectors and RS-232C terminal
The REMOTE CONTROL (IN/OUT) connectors and the REMOTE CONTROL (RS-232C) terminal are used in
custom installation. Keep the RS-232C switch set to OFF and do not connect any cables to these connectors during
normal use.
Caution: Do not touch the inner pins of the jacks on the rear panel of this unit. Electrostatic discharge
may cause permanent damage to this unit.
7 En
89 0qw
25 6 7134
(U.K., Europe, and Russia models)
FUNCTIONAL OVERVIEW
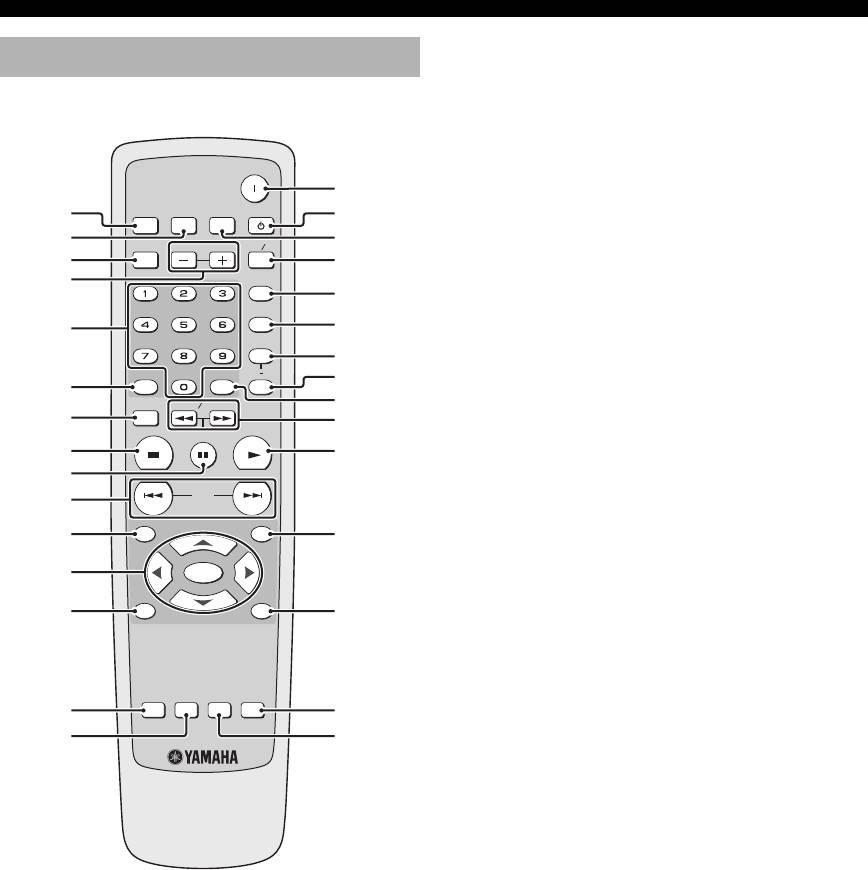
1 DIMMER
Remote control
Selects from three different levels of brightness for the
front panel display: bright, dim and auto.
For auto setting, brightness is automatically set to low
only during playback.
POWER
y
2 HDMI
DIMMER
HDMI
AUDIO DIRECT STANDBY
1
u
Switches between the HDMI resolution settings or
2
i
turns off the HDMI mode (see page 36).
GROUP PAGE
MULTI 2CH
3
o
y
4
PROG
• You can select the HDMI resolution by pressing HDMI on
p
RANDOM
the remote control repeatedly or by using the HDMI Video
5
a
setup menu.
REPEAT
• If you press HDMI on the remote control once, the
s
currently selected resolution setting is displayed in the top
A B
d
6
ENTERCLEAR
left corner of the display and in the front panel display.
SETUP
SLOW SEARCH
f
7
g
STOP
PLAY
PAUSE
3 GROUP
8
h
Selects the DVD-Audio group (see page 25).
9
SKIP
0
4 PAGE (+/–)
ON SCREENTOP MENU
q
j
Selects the DVD-Audio still picture (see page 24).
w
ENTER
5 Numeric buttons (0-9)
MENU RETURN
Select numbered items in the currently displayed
e
k
menu.
6 CLEAR
SUBTITLE
AUDIO ZOOM
ANGLE
Clear the mode or setting (see page 20).
r
l
t
;
7 SETUP
Accesses or exits from the setup menu of this unit
(see page 28).
8 STOP (
7
)
Stops playback (see page 18).
9 PAUSE (
8
)
Pauses playback temporarily (see page 18).
Frame-by-frame playback (see page 18).
0 SKIP (
l22 / 33l)
Moves to the previous/next chapter or track.
q TOP MENU
Displays the top-level disc menu.
y
The title menu is displayed for discs with the title menu.
8 En

FUNCTIONAL OVERVIEW
w Cursors ( / / /
)
d A-B
English
Selects an item in the currently displayed menu.
Repeats a specific segment (see page 19).
ENTER
Confirms the menu selection.
f ENTER
Confirms the menu selection.
e MENU
Accesses the menu of a disc (see page 20).
g SLOW
/ SEARCH (22 / 33)
Searches backward or forward (see page 19).
r SUBTITLE
Selects the subtitle language (see page 24).
h PLAY (
3
)
Starts playback (see page 18).
t AUDIO
Selects the audio language or format (see page 24).
j ON SCREEN
Accesses or exit from the on-screen display (OSD)
menu of this unit (see page 21).
y POWER (
l
)
Press twice during playback to access the Picture
Turns on this unit (see page 15).
Setting menu (see page 22).
u STANDBY ( )
k RETURN
Sets this unit to the standby mode (see page 15).
Returns to the previous setup menu.
i AUDIO DIRECT
l ZOOM
Turns off the video output during audio disc playback
Enlarges the video image (see page 23).
in order to improve audio quality. Press again to turn on
the video output. This function is not available when an
HDMI component is recognized by this unit.
; ANGLE
In the AUDIO DIRECT mode, the front panel display
Selects the DVD camera angle (see page 23).
goes out. Once this unit is turned off, the AUDIO
DIRECT mode is cleared (only when an SA-CD disc is
played back, the mode is cleared if the disc tray is
y
opened/closed).
Two ENTER buttons (w and f) act in the same way.
o MULTI
/ 2CH
Selects a sound mode: Stereo or Multi-channel.
Changes the SA-CD playback area (see page 25).
p PROG
Accesses the program setup menu to program disc
tracks or exit from its menu (see page 20).
a RANDOM
Plays tracks in random order (see page 19).
s REPEAT
Repeats the chapter, track, title, group or disc
(see page 19).
9 En
Оглавление
- CAUTION: READ THIS BEFORE OPERATING THIS UNIT.
- CONTENTS
- INTRODUCTION
- FUNCTIONAL OVERVIEW
- CONNECTIONS
- GETTING STARTED
- DISC OPERATION
- SETUP MENU
- LANGUAGE CODE LIST
- TROUBLESHOOTING
- GLOSSARY
- SPECIFICATIONS
- ПРЕДУПРЕЖДЕНИЕ: ВНИМАТЕЛЬНО ИЗУЧИТЕ ЭТО ПЕРЕД ИСПОЛЬЗОВАНИЕМ АППАРАТА.
- СОДЕРЖАНИЕ
- ВВЕДЕНИЕ
- ФУНКЦИОНАЛЬНЫЙ ОБЗОР
- ПОДКЛЮЧЕНИЯ
- ПОДГОТОВКА К ЭКСПЛУАТАЦИИ
- УПРАВЛЕНИЕ ДИСКОМ
- МЕНЮ НАСТРОЙКИ
- СПИСОК ЯЗЫКОВЫХ КОДОВ
- ВОЗМОЖНЫЕ НЕИСПРАВНОСТИ И СПОСОБЫ ИХ УСТРАНЕНИЯ
- СПРАВОЧНИК
- ТЕХНИЧЕСКИЕ ХАРАКТЕРИСТИКИ


