Yamaha DVD-S1800: CONNECTIONS
CONNECTIONS: Yamaha DVD-S1800
CONNECTIONS
CONNECTIONS
General notes on connections
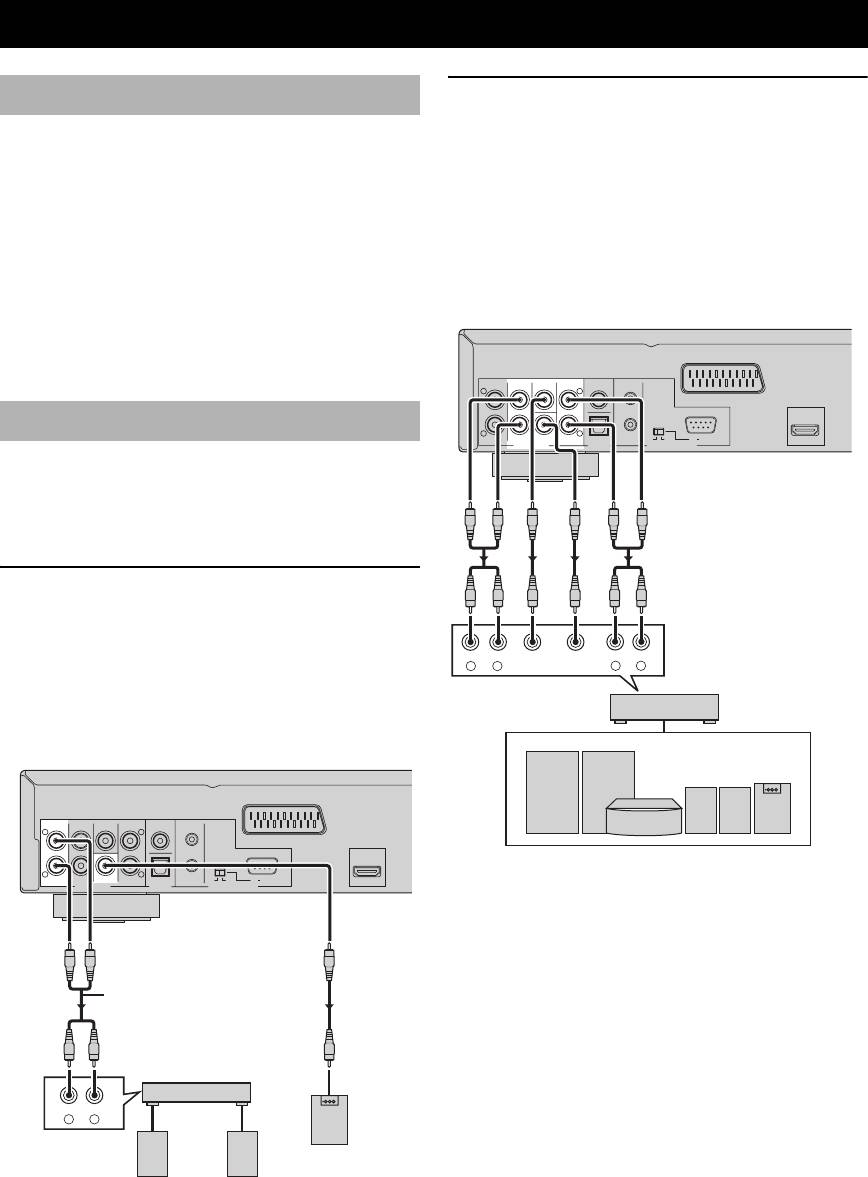
Connecting an AV receiver with 6ch/
multi-channel input
Be sure to turn off this unit and unplug the power supply
cable, before you make or change connections.
■ Analog connections
• Depending on the component you want to connect, there
If you want to reproduce multi-channel Super Audio CD
are various ways to make connections. Possible
(SA-CD) and DVD-Audio, connect AUDIO OUT (6ch
connections are described below.
discrete) jacks of this unit to the corresponding input
• Refer to the manuals supplied with your other
jacks of your AV receiver using commercially available
components as necessary to make the best connections.
audio pin cables.
• Do not connect this unit via your VCR. The video
quality could be distorted by the copy protection system.
• Do not connect the audio out jack of this unit to the
phono in jack of your audio system.
CENTER
COAXIAL
IN
L
L
AV
Audio connections
R
R
MIXED 2CH
FRONT SUBWOOFER
SURROUND
OPTICAL
OUT ON
OFF
RS 232C
HDMI
AUDIO OUT
DIGITAL
REMOTE CONTROL
This unit has digital coaxial, digital optical, analog 6ch
This unit (U.K., Europe,
and Russia models)
discrete, and analog mixed 2ch output jacks. Connection
depends on the availability of audio jacks on your
component.
Connecting a stereo amplifier
Connect AUDIO OUT (MIXED 2CH) jacks of this unit to
the corresponding input jacks of your audio component
FRONT
CENTER
SUBWOOFER
SURROUND
(such as a stereo amplifier) using the supplied audio pin
RL
RL
cable. You can connect a subwoofer to the
AV receiver
SUBWOOFER jack.
This unit (U.K., Europe, and Russia models)
Speakers
CENTER
COAXIAL
IN
L
L
AV
R
R
MIXED 2CH FRONT
SUBWOOFER
SURROUND
OPTICAL
OUT ON
OFF
RS 232C
HDMI
AUDIO OUT
DIGITAL
REMOTE CONTROL
Audio pin cable
(supplied)
Stereo
amplifier
CD / DVD
RL
Subwoofer
Left
Right
speaker
speaker
10 En
CONNECTIONS
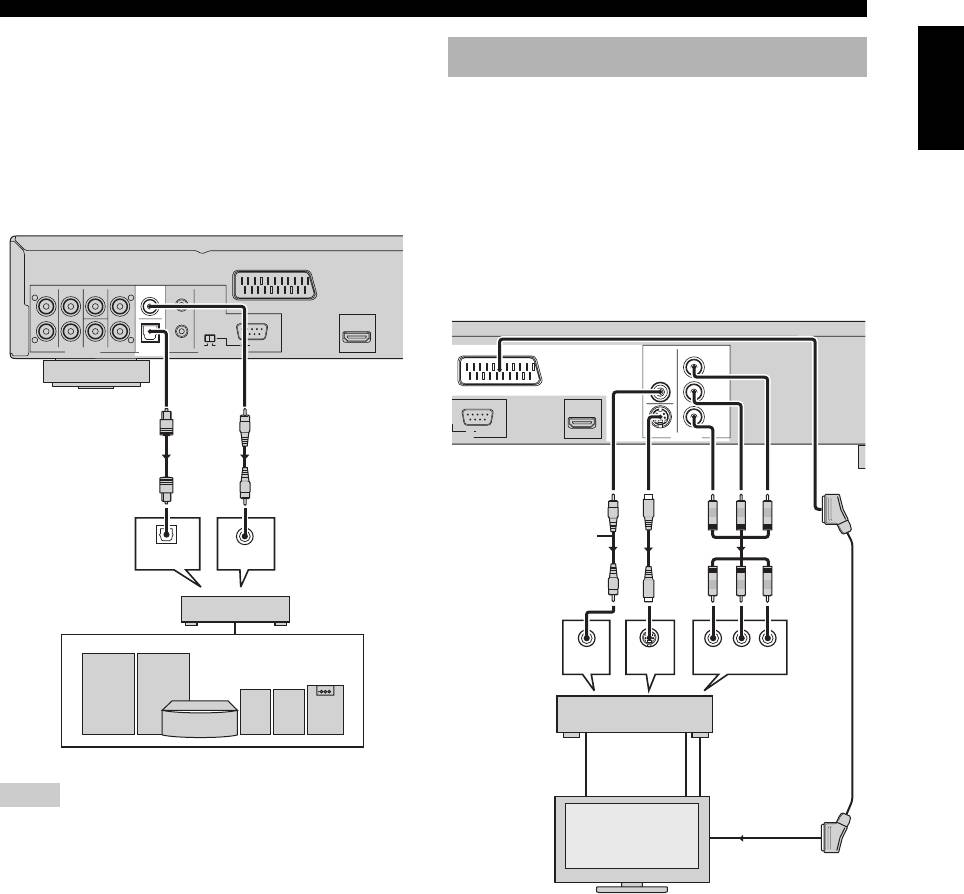
■ Digital connections
English
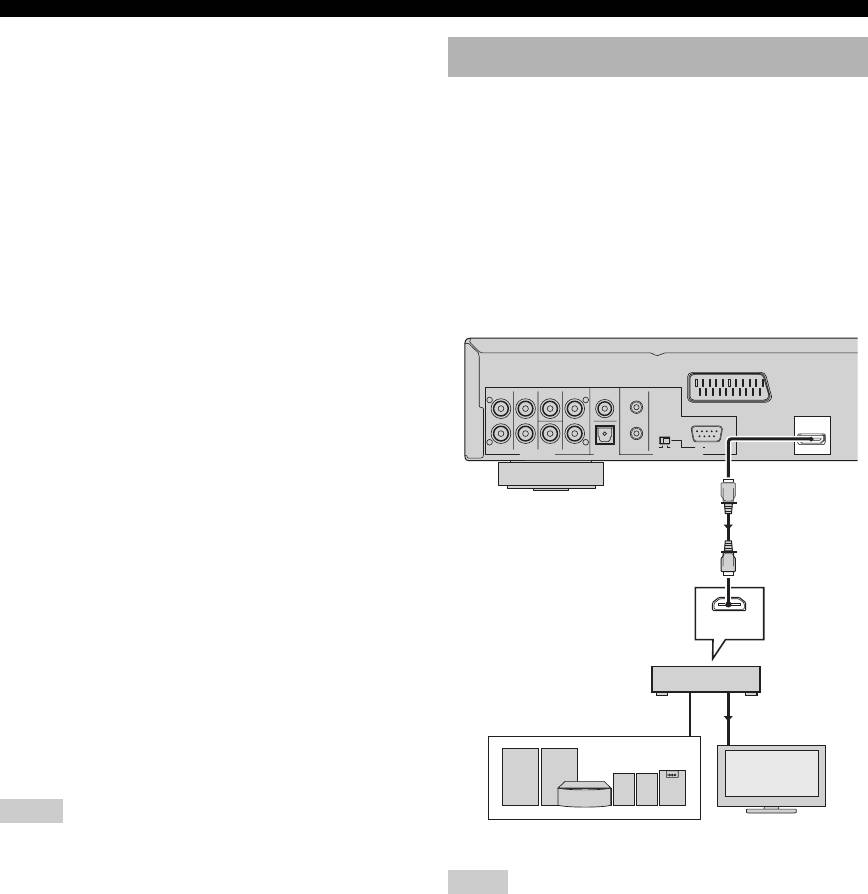
Video connections
If you want to use the Dolby Digital, DTS, or MPEG
function on your AV receiver, connect DIGITAL
This unit has SCART, composite video, S-video, and
(OPTICAL) <A> or DIGITAL (COAXIAL) <B> jack of
component video output jacks. If your AV receiver has
this unit to the corresponding input jacks of your AV
video output jacks, connect your receiver and then your
receiver using a commercially available digital optical or
TV so that you can use one TV for several different video
digital coaxial cable.
sources (LD, VCR, etc.) by simply switching the input
source selector on your receiver.
Use the one that corresponds to the input jacks on the
component to be connected.
CENTER
COAXIAL
IN
L
L
AV
R
R
MIXED 2CH
FRONT SUBWOOFER
SURROUND
OPTICAL
OUT ON
OFF
RS 232C
HDMI
AUDIO OUT
DIGITAL
REMOTE CONTROL
This unit (U.K.,
Europe, and
Russia models)
<B><A>
OPTICAL
COAXIAL
IN
IN
AV receiver
Speakers
Notes
• If you make a connection with <A> or <B>, set [Digital Out]
to [All] (see “Setting the digital output” on page 31).
• If the audio format of the digital output does not match the
capabilities of your receiver, the receiver produces a distorted
sound or no sound at all. Make sure to select the appropriate
audio format from the menu screen on the disc.
Pressing AUDIO on the remote control once or more may
change not only the audio languages but also the audio format.
• SA-CD audio signals are not output from DIGITAL
(COAXIAL/OPTICAL) jacks.
• If you want to enjoy Dolby Digital, DTS, and MPEG formats,
you must connect this unit to an AV receiver that supports
these formats.
11 En
O
This unit (U.K., Europe, and Russia models)
PR
/ CR
VIDEO
AV
PB
/ CB
Y
RS 232C
HDMI
S VIDEO
COMPONENT
NTROL VIDEO OUT
Video
pin cable
(supplied)
<B> <C> <D><A>
VIDEO
S-VIDEO
PR/CR YPB/CB
IN
IN
COMPONENT VIDEO IN
AV
receiver
VIDEO
S VIDEO
COMPONENT
OUT
OUT
VIDEO OUT
VIDEO
S VIDEO
COMPONENT
IN
IN
VIDEO IN
TV
CONNECTIONS
■ Composite video jack <A>
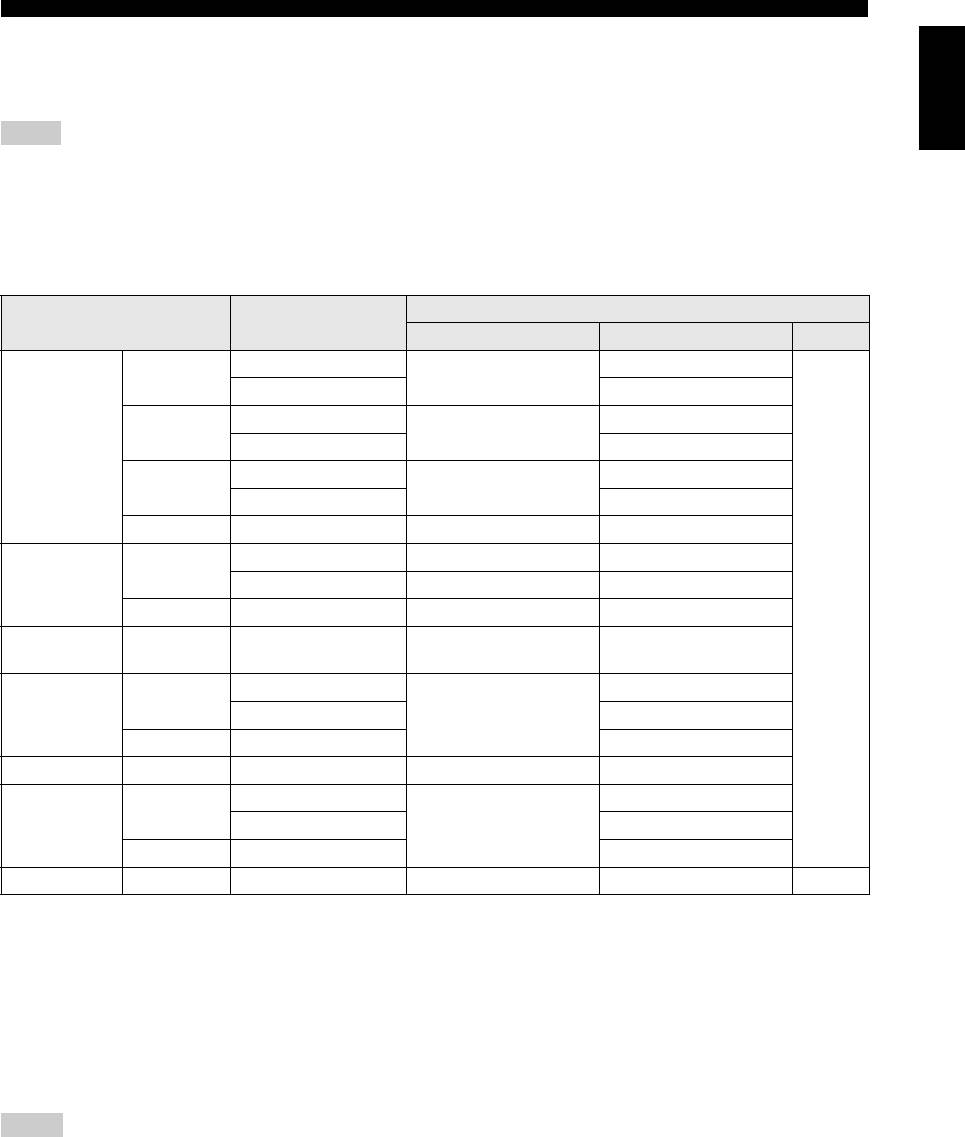
HDMI connection
Connect VIDEO OUT (VIDEO) jack of this unit to the
video input jack of your AV receiver, and then to that of
HDMI (High-Definition Multimedia Interface) provides
your TV using the supplied video pin cable.
high quality digital audio and video on a single
connection.
■ S-video jack <B>
Connect the HDMI jack of this unit to an HDMI input jack
S-video connections achieve a clearer picture than
of your AV receiver, and then to that of your TV using a
composite video connections by transmitting video signals
commercially available HDMI cable.
on separate wires for luminance (Y) and chrominance (C).
If your receiver does not have an HDMI input jack, you
Connect VIDEO OUT (S VIDEO) jack of this unit to
can achieve a better video image by connecting the HDMI
S-video input jack of your AV receiver, and then to that of
jack of this unit directly to the HDMI input jack of your
your TV using a commercially available S-video cable.
TV.
■ Component video jacks <C>
Component video connections achieve higher fidelity
color reproduction than S-video connections by
CENTER
COAXIAL
IN
transmitting video signals on separate wires for luminance
L
L
AV
(Y: green) and chrominance (PB: blue, PR: red). Connect
VIDEO OUT (COMPONENT) jacks of this unit to the
R
R
MIXED 2CH
FRONT SUBWOOFER
SURROUND
OPTICAL
OUT ON
OFF
RS 232C
HDMI
AUDIO OUT
DIGITAL
REMOTE CONTROL
component input jacks of your AV receiver, and then to
those of your TV using a commercially available
component cable. Observe the color of each jack when
This unit (U.K., Europe, and
you make connections.
Russia models)
If your receiver does not have component output jacks,
you can achieve a better video image by connecting the
component output jacks of this unit directly to the
component input jacks of your TV.
HDMI
IN
■ SCART terminal <D>
(U.K., Europe, and Russia models only)
AV receiver
If your TV has only a terminal for video input, you can
HDMI OUT
connect the TV directly to this unit.
HDMI IN
Connect AV terminal of this unit to SCART input terminal
of your TV using a commercially available SCART cable.
Notes
Speakers
TV
• Ensure that the “TV” indication on SCART cable is connected
to the TV set and “DVD” indication on SCART cable is
connected to this unit.
Notes
• S-video signal is not output at AV terminal. See page 36 for
• You need to make appropriate audio connections if the
SCART video setting.
connected component does not input audio signals (see
page 10).
• This unit is not compatible with HDCP-incompatible HDMI or
DVI components.
• You need a commercially available HDMI/DVI conversion
cable when you connect this unit to other DVI components. In
this case, you need to use another audio connection to this
connection because the HDMI jack of this unit does not output
any audio signals.
• Do not disconnect or turn off the power of the HDMI/DVI
component connected to the HDMI jack of this unit while data
is being transferred. Doing so may disrupt playback or cause
noise.
y
When connecting an HDMI component, refer to the manual
supplied with your component.
12 En
CONNECTIONS
■ HDMI video output
English
This unit is compatible with the following video formats:
480p/60 Hz, 576p/50 Hz, 720p/50 Hz, 60 Hz, 1080i/50 Hz, 60 Hz, and 1080p/50 Hz, 60 Hz.
Notes
• You need to select one of the HDMI resolution settings by pressing HDMI on the remote control repeatedly or by using the HDMI
Video setup menu (see page 36).
• Depending on the connected DVI component, black and white in the image may not be distinct. In this case, adjust the picture setting
of the connected DVI component.
■ HDMI audio output
Analog output
HDMI Audio
Audio format
setting
Auto*
1
PCM Off
Multi-channel
PCM multi*
2
Dolby Digital
Dolby Digital
Stereo PCM 2ch
Multi-channel
PCM multi*
2
DTS
DTS
DVD-Video
Stereo PCM 2ch
Multi-channel
PCM multi*
2
MPEG
MPEG
Stereo PCM 2ch
PCM 2ch*
4
Multi-channel/Stereo PCM 2ch PCM 2ch
Multi-channel PCM (PPCM) multi*
2,3
PCM (PPCM) multi*
2,3
Multi
DVD-Audio
Stereo PCM (PPCM) 2ch*
3
PCM (PPCM) 2ch*
3
2ch*
4
Multi-channel/Stereo PCM (PPCM) 2ch PCM (PPCM) 2ch
Off
CD/MP3/
2ch Multi-channel/Stereo PCM 2ch PCM 2ch
WMA/DivX
®
Multi-channel
PCM multi*
2
Multi
DTS-CD
Stereo PCM 2ch
DTS
2ch Multi-channel/Stereo PCM 2ch
VCD 2ch Multi-channel/Stereo PCM 2ch PCM 2ch
Multi-channel
PCM multi*
2
Multi
SVCD
Stereo PCM 2ch
MPEG
2ch Multi-channel/Stereo PCM 2ch
SA-CD Multi/2ch Multi-channel/Stereo – – –
*1:If the connected HDMI component does not support bitstream signals (Dolby Digital, DTS, and MPEG), the audio
output is automatically changed from bitstream signals to PCM signals.
*2:If the HDMI component does not support multi-channel audio signals, the audio output is automatically changed
from PCM multi-channel signals to PCM stereo signals and 48 kHz/16 bits signals or less.
*3:If the audio source is prohibited from downmixing, the front L/R channel audio and 48 kHz/16-bit signals or less are
output instead of downmixed stereo.
*4:If the connected component does not support more than 48 kHz, the audio output is automatically changed to 48 kHz/
16-bit signals or less.
Notes
• You need to set HDMI Audio (see page 37).
• SA-CD signals cannot be output using HDMI. Make an analog connection to listen to SA-CD (see page 10).
13 En
CONNECTIONS
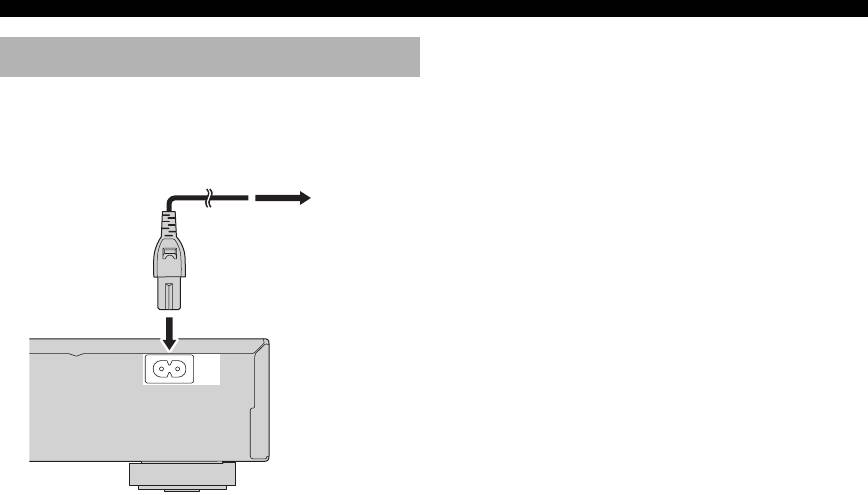
Connecting the power cable
After all other connections are complete, plug the supplied
power cable into MAINS of this unit and then plug the
power cable to an AC outlet.
To an AC
outlet
MAINS
14 En
Оглавление
- CAUTION: READ THIS BEFORE OPERATING THIS UNIT.
- CONTENTS
- INTRODUCTION
- FUNCTIONAL OVERVIEW
- CONNECTIONS
- GETTING STARTED
- DISC OPERATION
- SETUP MENU
- LANGUAGE CODE LIST
- TROUBLESHOOTING
- GLOSSARY
- SPECIFICATIONS
- ПРЕДУПРЕЖДЕНИЕ: ВНИМАТЕЛЬНО ИЗУЧИТЕ ЭТО ПЕРЕД ИСПОЛЬЗОВАНИЕМ АППАРАТА.
- СОДЕРЖАНИЕ
- ВВЕДЕНИЕ
- ФУНКЦИОНАЛЬНЫЙ ОБЗОР
- ПОДКЛЮЧЕНИЯ
- ПОДГОТОВКА К ЭКСПЛУАТАЦИИ
- УПРАВЛЕНИЕ ДИСКОМ
- МЕНЮ НАСТРОЙКИ
- СПИСОК ЯЗЫКОВЫХ КОДОВ
- ВОЗМОЖНЫЕ НЕИСПРАВНОСТИ И СПОСОБЫ ИХ УСТРАНЕНИЯ
- СПРАВОЧНИК
- ТЕХНИЧЕСКИЕ ХАРАКТЕРИСТИКИ


