Yamaha BD-S1067 Black: SETUP MENU
SETUP MENU: Yamaha BD-S1067 Black

SETTINGS
SETUP MENU
The SETUP menu enables various audio/visual settings and adjustments for functions using the remote control unit.
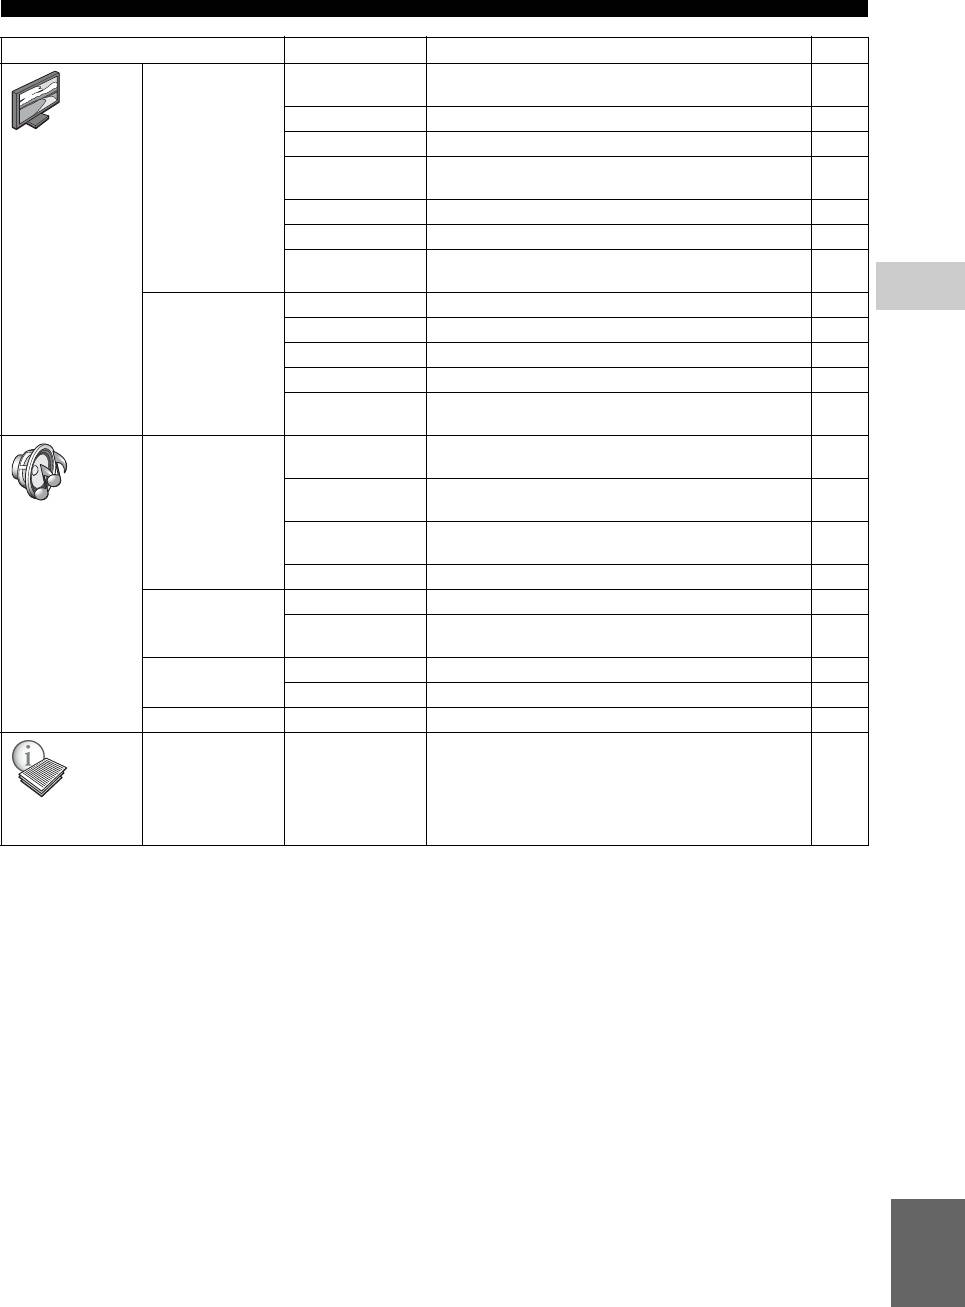
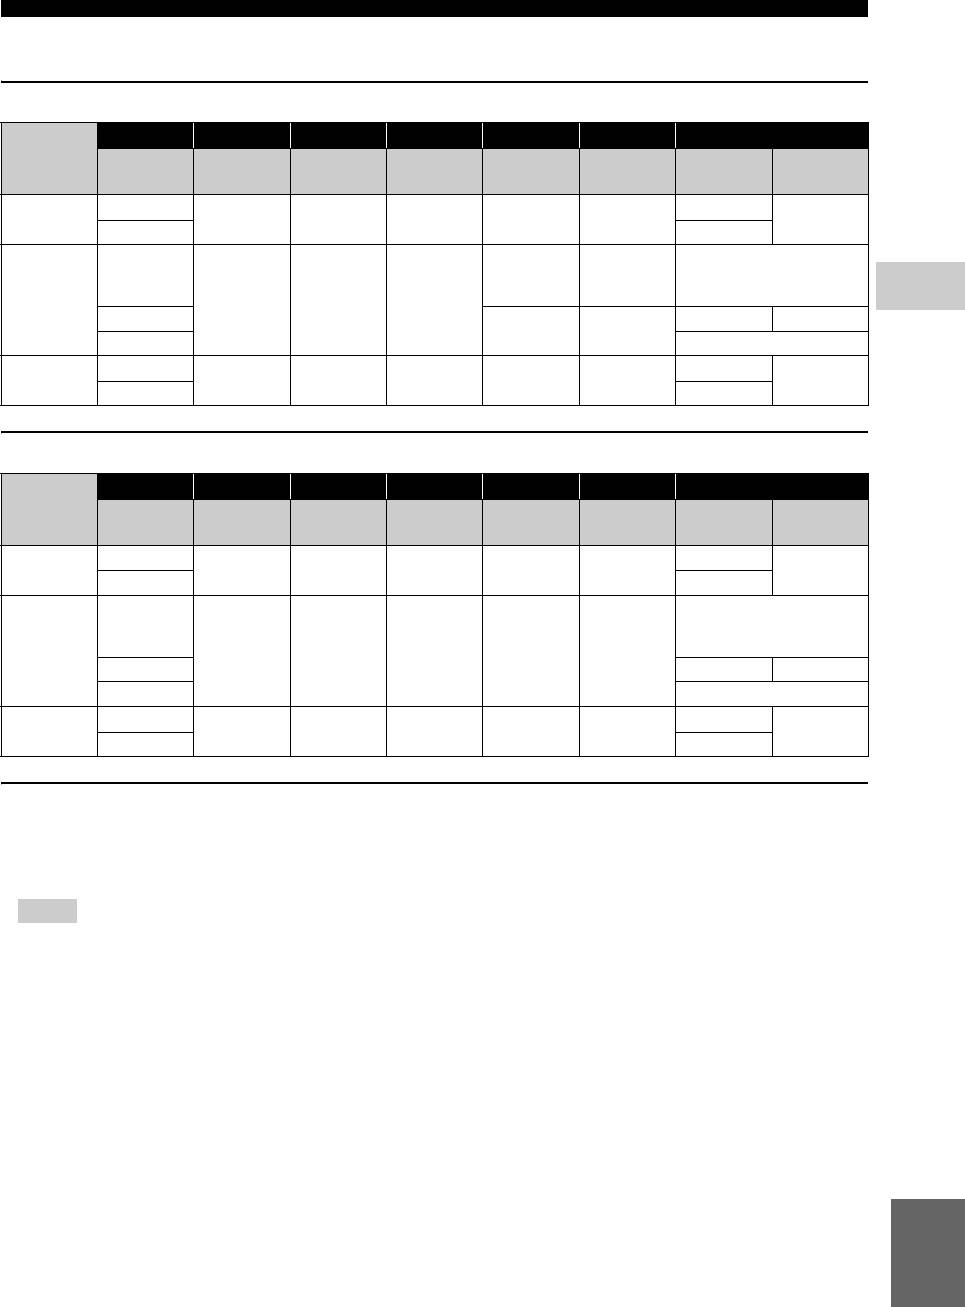
Menu/Submenu Item Function Page
System Screen Saver Sets screen saver on/off. 29
Disc Auto Playback Sets this Player to start disc playback automatically. 29
HDMI Control Sets this Player to receive control signal from the remote
29
General Setting
control of your TV/AV receiver.
Network Control Sets the control via Ethernet to on/off. 29
Load Default Resets all settings to the default setting except Security
29
setting.
Upgrade Performs upgrade of this Player. 29
Easy Setup Sets language, resolution, screen aspect ratio. 29
Local Storage Displays status of Local Storage (p. 29), formats Local
29
Storage and selects the front/rear USB port for Local Storage.
Language OSD Selects the language for On Screen Display. 30
Menu Prioritizes the language for disc menu. 30
Audio Prioritizes the language for audio. 30
Subtitle Prioritizes the language for subtitle. 30
Playback Closed Caption Sets the closed caption to on/off. 30
Angle Mark Sets to display the Angle Mark when BD/DVD with multiple
30
angles is played back.
PIP Mark Sets to display the PIP Mark when BD/DVD with Picture in
30
Picture is played back.
Secondary Audio
Sets to display the Secondary Audio Mark when BD/DVD
30
Mark
with secondary audio is played back.
DivX(R) VOD
Displays registration code for DivX(R) video.
30
DRM
DVD-Audio Mode Sets DVD-Audio mode to DVD-Audio/DVD-Video. 30
Security Change Password Changes password for Parental Control and Country Code. 30
Parental Control Sets the Parental Control depending on the disc content. 30
Country Code Sets your Country Code. 30
Network Internet Connection Sets the internet connection to Enable/Disable. 31
Information Displays network information screen. 31
Connection Test Performs the network connection test. 31
IP Setting Sets the IP setting to Auto/Manual. 31
BD-Live
Sets the BD-Live connection to Permitted/Partial Permitted/
31
Connection
Prohibited.
DLNA Sets the DLNA to Enable/Disable. 31
Proxy Setting Sets the proxy setting. 31
26 En
SETUP MENU
Menu/Submenu Item Function Page
TV TV Screen Sets the screen aspect ratio of the connected TV, and adjust
31
the video output.
Resolution Selects the resolution of output video. 31
Display Setting
TV System Selects the TV System from NTSC/PAL/Multi. 32
Color Space Selects Color Space from RGB/YCbCr 4:4:4/YCbCr 4:2:2/
32
Full RGB.
HDMI Deep Color Selects HDMI Deep Color from 30 bits/36 bits/Off. 32
HDMI 1080p 24Hz Sets HDMI 1080p 24Hz to auto/off. 32
Lip Sync Adjusts the lag between video and audio, such as when the
32
mouth movement is out of sync with the voice.
4
Video Process Video Mode Adjusts the visual image. 32
SETTINGS
Color Adjust Adjusts Brightness/Saturation/Hue for each color. 32
Auto Contrast Adjusts contrast to optimize the played back image. 32
Noise Reduction Sets the level of Noise Reduction. 32
De-interlacing
Sets how to detect the video signal.
32
Mode
Audio Output Coaxial/Optical Selects the output mode of COAXIAL jack/OPTICAL
33
terminal from Bitstream/PCM/Reencode/Off.
HDMI Selects the output mode of HDMI terminal from Bitstream/
33
PCM/Reencode/Off.
Audio Setting
Downsampling Selects the digital audio signal down sampling frequency
33
from 48k/96k/192k.
DRC Sets the DRC (Dynamic Range Compression). 33
SACD Output SACD Priority Selects a contents when Hybrid SA-CD is played back. 33
HDMI Output Selects the output mode of HDMI terminal from DSD/PCM
33
when SA-CD is played back.
Speaker Setting Configuration Sets the audio output of 7.1 ch surround jack. 33
2ch Downmix Selects down mix method to analog 2-ch. 33
Post Process Multi-channelizes the 2-channel audio signal. 33
Displays software version and MAC address (p. 41).
33
System
Information
English
27 En
SETUP MENU
■ Example of SETUP menu
3. Select a menu item.
operation
Press 5/a to select Parental Control, then press
You need to call up the SETUP menu screen to perform
ENTER or cursor 3.
settings for this Player. The following is the explanation
for basic operations of the SETUP menu.
4. Enter password.
Enter your password with number buttons.
– The default password is 0000.
– You cannot move to the next setting screen until
you have input the correct password.
Example: Setting Parental Control
– To change the password, refer to “Change
Password” (p. 30).
Note
– Some items cannot be set during playback. In this
case, press twice to stop playback completely
before setting.
1. Display the SETUP menu screen.
Press SETUP to display the SETUP menu screen.
Press 2/3 to select General Setting, then press
ENTER or a .
5. Select a next item.
Press 5/a to select the Parental Control Level for
BD/DVD, then press ENTER.
2. Select a Submenu.
Press 5 /a to select Security, then press ENTER or
cursor 3.
6. Exit the menu screen.
Press 2 to return to the previous menu.
28 En
TOP MENU
POP-UP/MENU
ENTER
RETURN
ON SCREEN
CLEAR SEARCH
SETUP
PIP
REPEAT
HOME

SETUP MENU
■ General Setting
Network Control
You can set control via Ethernet to on/off. This player
The default settings are marked with “
*
”.
employs Yamaha Network Control protocol (YNC).
*
System
On, Off
Screen Saver
Notes
You can set the screen saver to on/off.
When set to on, this Player will switch to screen saver
– When set to on, power consumption during standby
mode if there is no operation for 3 minutes. After that, this
mode increases due to network control function.
Player will turn to standby mode when there is no
– When set to on, the system startup time is increased.
operation for 6 minutes.
Load Default
On
*
, Off
You can reset all settings of this Player to default setting
4
except Security setting (p. 30). For details on default
Disc Auto Playback
SETTINGS
settings, see pages 26-33.
You can set Disc Auto Playback to on/off. When set to on,
a disc will play back automatically after loading.
Upgrade
On
*
You can upgrade the software manually from Disc, USB
, Off
Storage or Network. For details on software upgrade, refer
HDMI Control
to “SOFTWARE UPGRADE” (p. 36).
You can set the Player to receive control signal from a
Easy Setup
TV/AV receiver compatible with the HDMI Control
You can perform Easy Setup (p. 18).
function via an HDMI cable (p. 12).
Local Storage
On, Off
*
You can display Local Storage information, format Local
Storage, and select Front USB/Rear USB to save the BD-
Using HDMI Control function
Live data.
Using the HDMI Control function, you can interactively
To format (empty) the BUDA folder in the USB memory
operate this Player with your TV (HDMI Control
device, select Information and press ENTER when
function supported).
“Format” is focused on the screen.
When you connect this Player to the TV compatible with
the HDMI Control function using an HDMI cable and
Front USB, Rear USB
*
set HDMI Control in the SETUP menu to on (p. 29), you
can perform the function listed below.
Local Storage
It is used as an auxiliary memory when Blu-ray Disc is
• Automatic input select function
played back.
When you start playback of this Player, the input
selector of the TV (and an AV receiver if this Player is
connected to the TV via the AV receiver) is switched
to this Player automatically. TV Power is turned on
automatically depending on the TV.
• Automatic power off function
When you turn off the TV while this Player is in stop
mode and the SETUP menu screen is not displayed,
the power of this Player is also turned off
automatically.
Notes
– HDMI Control function may not work properly
depending on the TV.
– Functions other than ones shown above may work
depending on the TV or AV receiver.
– In order to make the HDMI Control function
available, set up settings for the HDMI Control
function on ALL components (this Player, TV,
and AV receiver). Certain operation may also be
required.
– Each function may be set independently to
activate/deactivate depending on the TV.
English
– Refer to the operation manuals supplied with the
TV and/or AV receiver for details regarding setup.
29 En
SETUP MENU
DivX(R) VOD DRM
Language
You can display registration code for DivX(R) video.
OSD
DVD-Audio Mode
You can select the language for On Screen Display which
Some DVD-Audio discs contain the DVD-Video content
is the messages or menu displayed on the screen such as
in addition to the DVD-Audio content. You can select
SETUP menu.
DVD-Audio mode or DVD-Video mode.
English
*
, , , , ,
Fran
, ,
Note
– For Russia model, default setting is .
Menu
– This setting is only available when no disc is loaded.
You can prioritize the language for disc menu.
*
Security
English
, , , , , ,
, Portuguese, Danish, , Finnish,
Change Password
Norwegian, , Korean, Japanese, More
You can set the password for changing the Parental
Control Level and Country Code. Refer to “Parental
Notes
Control” (p. 30) and “Country Code” (p. 30).
– For Russia model, default setting is .
– For Korea model, default setting is Korean.
– The default password is 0000.
Audio
Parental Control
You can prioritize the audio language for BD/DVD
playback. For details on setting items, see “Menu” (p. 30).
In some BD/DVD discs, a control level for disc viewing is
set depending on the age of the viewer. You can set the
Subtitle
Parental Control shown on the screen depending on the
You can prioritize the language for Subtitle.
disc content.
The password (see “Change Password” on p. 30) needs to
English, , , , , ,
be entered before the Parental Control Levels is set.
, Portuguese, Danish, , Finnish,
After you set the Parental Control, when you play back a
Norwegian, , Korean, Japanese, More, Off
*
disc with level higher than current Parental Control Level,
or you want to change the Parental Control Level, a dialog
Notes
box will pop up to ask you to enter the password.
– For Russia model, default setting is .
Off*, 1 to 8
– For Korea model, default setting is Korean.
Country Code
You can set the Country Code you live in. The password
Playback
(see “Change Password” on p. 30) needs to be entered
Closed Caption
before the Country Code is set. This setting may be used
You can set to display the closed caption (p. 40) when BD/
for rating of Parental Control and disc playback.
DVD with closed caption is played back.
On, Off
*
Angle Mark
You can set to display the Angle Mark ( ) when BD/
DVD with multiple angles is played back.
On
*
, Off
PIP Mark
You can set to display the PIP Mark ( ) when BD with
picture in picture (p. 25) is played back.
On
*
, Off
Secondary Audio Mark
You can set to display the Secondary Audio Mark ( )
when BD with secondary audio is played back.
On
*
, Off
30 En
ç
ais Español Deutsch Italiano
Svenska Nederlandse
Fran
ç
ais Español Deutsch Italiano
Nederlandse Svenska
Fran
ç
DVD-AUDIO
*
Both DVD-Audio/Video contents are played back.
Only the DVD-Audio content may be played back
depending on the disc.
DVD-VIDEO Only the DVD-Video content is played back.
Note
Note
ais Español Deutsch Italiano
Nederlandse Svenska
SETUP MENU
■ Display Setting
Network
The default settings are marked with “
*
”.
Internet Connection
Set this item to Enable when you use BD-Live (p. 25), DLNA
TV
(p. 21) and software upgrade from the network (p. 36).
TV Screen
Enable
*
, Disable
You can set the screen aspect ratio of the connected TV,
and adjust the video output.
Information
If you switch your TV (i.e. because you have bought a
You can display network information screen. On this
new one) and the screen aspect ratio of the connected TV
screen, you can view the information of Interface
changes, you will have to change the TV Screen setting.
(Ethernet), Address Type, IP Address, Subnet Mask,
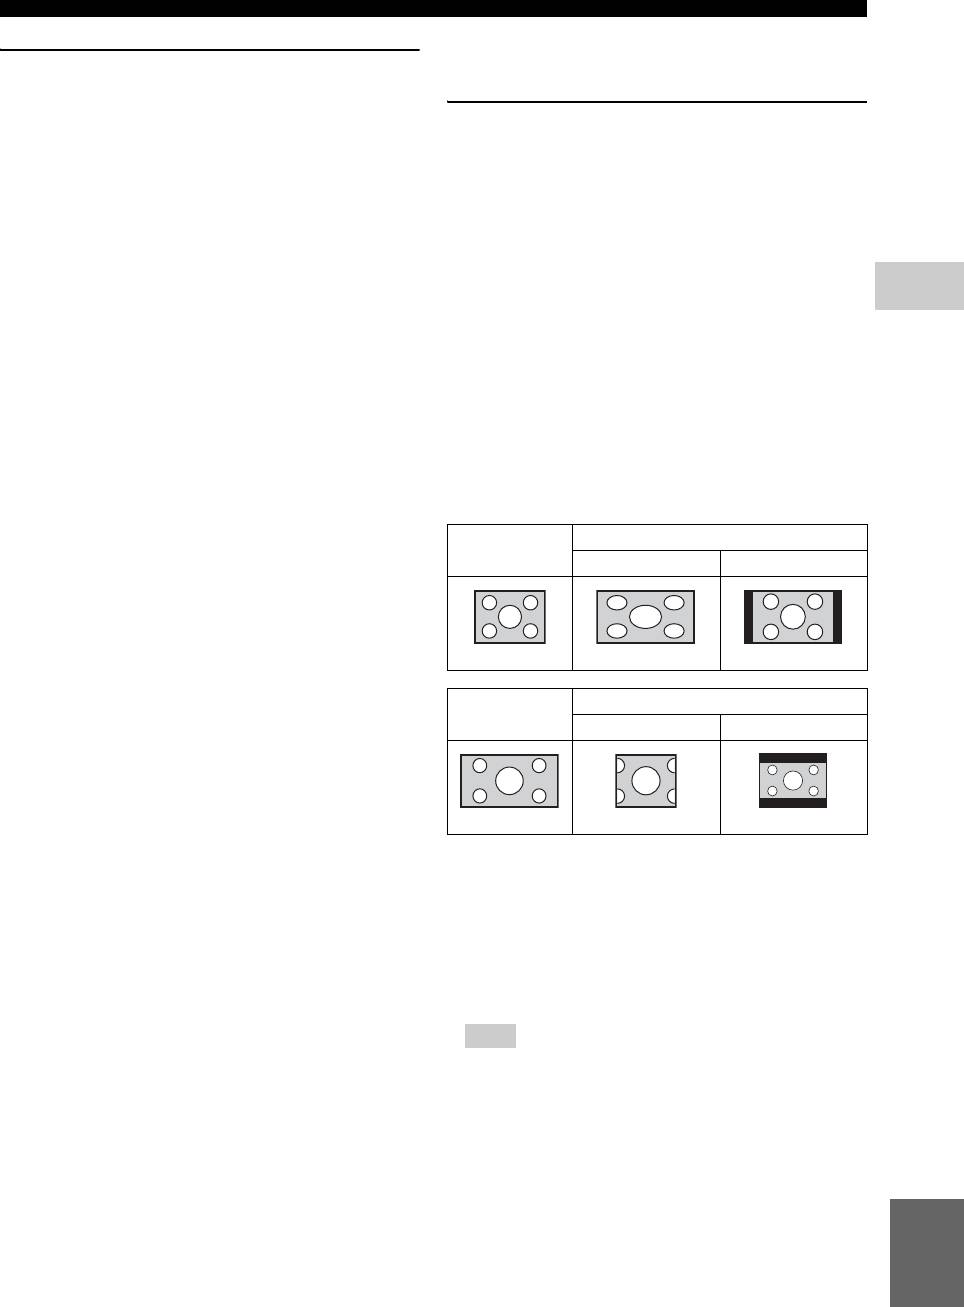
16:9 Full Select this when this Player is connected to a TV
Default Gateway, and DNS.
4
with a 16:9 screen. When a 4:3 aspect ratio video is
Connection Test
played back, the video is displayed as shown below.
SETTINGS
You can perform an internet connection test. If the test is
16:9 Normal
*
Select this when this Player is connected to a TV
failed, please check “IP Setting” (p. 31) and perform the
with a 16:9 screen. When a 4:3 aspect ratio video is
test again.
played back, the video is displayed as shown below.
IP Setting
4:3 Pan Scan Select this when this Player is connected to a TV
with a 4:3 screen. When a 16:9 aspect ratio video is
You can set IP Setting to Auto/Manual. When set to Auto,
played back, the video is displayed as shown below.
IP address is allocated automatically by system. When set
4:3 Letterbox Select this when this Player is connected to a TV
to Manual, IP Address, Subnet Mask, Default Gateway
with a 4:3 screen. When a 16:9 aspect ratio video is
and DNS should be set manually.
played back, the video is displayed as shown below.
Auto
*
, Manual
Original
On 16:9 (wide screen) TV
BD-Live Connection
image size
16:9 Full 16:9 Normal
You can set access restriction to BD-Live contents.
Permitted
Allows all BD-Live discs to connect the network.
Partial
Allows only discs with owner certification.
Permitted
*
4:3
Prohibited Prohibits all BD-Live discs to connect the network.
On 4:3 TV
DLNA
Original
image size
You can set the DLNA (p. 21) to Enable/Disable. When
4:3 Pan Scan 4:3 Letterbox
you do not use the DLNA function, set to Disable.
Enable
*
, Disable
Proxy Setting
16:9
You can set Proxy Setting. Set to Disable for normal use.
Set to Enable to set the proxy setting.
Resolution
Enable Enables proxy host and proxy port setting.
You can select the video output resolution from Auto,
Disable
*
Sets proxy server to disable. Select this item when
480i/576i, 480p/576p, 720p, 1080i, and 1080p. When set
proxy server is not used.
to Auto, resolution is set to the maximum resolution
according to the connected TV. For more details on output
Proxy Host Sets proxy host.
formats, refer to “About the video output formats” (p. 35).
Proxy Port Sets proxy port.
Auto
*
, 480i/576i, 480p/576p, 720p, 1080i, 1080p
Note
– To output HD audio (such as Dolby TrueHD or
DTS-HD Master Audio) from HDMI terminal, set
Resolution to Auto or more than 720p.
English
31 En

SETUP MENU
TV System
You can select TV System from PAL, NTSC and Multi.
Video Process
Set the same TV System as your TV set. For more details
Video Mode
on output formats, refer to “About the video output
You can select Video Mode below.
formats” (p. 35).
NTSC
*
Standard* The image is most natural and well-balanced. This
, PAL,
(Korea, Taiwan and Central and South America
mode suits for normal use.
Multi
models)
Vivid The image is more vivid and sharp.
NTSC, PAL
*
,
(Russia and Asia models)
Multi
Cinema The image suits for watching movie in dark room.
Custom You can adjust the visual image manually. Press 5/
Color Space
a to select the parameter, then press 2/3 to adjust
You can select the Color Space (p. 40) output from
the figure.
HDMI. This function is available when this Player is
Brightness
connected with an HDMI cable.
Adjusts the overall brightness of the image.
RGB Outputs video signal at normal signal range.
Saturation
YCbCr 4:4:4
*
Sets Color Space to YCbCr 4:4:4.
Adjusts the richness of the color in the projected
YCbCr 4:2:2 Sets Color Space to YCbCr 4:2:2.
image.
Full RGB When RGB is set and white and black on the screen
Hue
are too faint, select this item. This setting is effective
Adjusts the tint of the projected image.
when a connected component supports RGB 0-255
Contrast
range.
Adjusts the bright areas (white levels) in the image.
Sharpness
Note
Adjusts the sharpness of objects in the video.
– This function is only available on TVs that support
CTI
this function.
Smoothes out the edges of color images. Color
HDMI Deep Color
images are rendered more distinct.
When your TV and/or AV receiver is compatible with
The default settings are 0.
Deep Color (p. 40), set this item according to your TV/AV
receiver. This function is available when this Player is
Color Adjust
connected with an HDMI cable.
You can adjust Brightness/Saturation/Hue for each color
30 bits, 36 bits, Off
*
(Red/Green/Blue/Yellow/Cyan/Magenta). To use this
function, set Video Mode to Custom. For details on the
HDMI 1080p 24Hz
setting items, see “Video Mode” (p. 32).
This outputs the BD-Video encoded in 24Hz frame rate in
The default settings are 0.
HDMI 1080p 24Hz. Smoother video playback may be
available with this function. This function is available
Auto Contrast
when your TV/AV receiver support this function, and this
Adjusts contrast to optimize the played back image.
Player is connected with an HDMI cable. For more details
Off
*
, On
on output formats, refer to “About the video output
formats” (p. 35).
Noise Reduction
Auto
*
, Off
You can set the Noise Reduction to a level of 0 to 3. 0 is
off, and 3 is the maximum level.
Note
0
*
, 1, 2, 3
– This setting is disabled when output resolution is
De-interlacing Mode
other than 1080p.
You can select how to detect the video signal. Set to Auto
for normal use. When horizontal stripping noise appears
Lip Sync
on the screen, set this to Film/Video to remove the noise.
You can set/adjust the Lip Sync (p. 41) function. To adjust
Lip Sync manually, select Manual, then press 2 /3 to
Auto
*
, Film, Video
adjust the figure.
Auto
*
, Manual, Off
32 En

SETUP MENU
■ Audio Setting
HDMI Output
You can select audio signal output from HDMI terminal
The default settings are marked with “
*
”.
when SA-CD is played back.
DSD
*
Outputs DSD raw signal. When this Player is
Audio Output
connected to DSD compatible AV receiver, this item
Coaxial/Optical
is recommended.
You can select the output mode of COAXIAL jack and
PCM Outputs PCM signal decoded by this Player.
OPTICAL terminal. For more details on output formats,
refer to “About the audio output formats” (p. 34).
Speaker Setting
Bitstream
Outputs digital signal without any processing.
Secondary Audio is not output.
Configuration
PCM Outputs 2-channel PCM.
You can set the output of 7.1 ch surround depending on
4
the connected speaker or amplifier.
Reencode
*
Outputs Bitstream with Secondary Audio. The audio
SETTINGS
signal is output in DTS signal.
1 Press 5/a to select a speaker you want to configure,
Off Mutes sound.
then press ENTER.
2 Adjust the figures below. Note that some of items are
HDMI
not displayed depend on the selected speaker.
You can select the output mode of HDMI ternminal. For
details on setting items, see “Coaxial/Optical” (p. 33). For
Size When the woofer section of a speaker is 16 cm (6-1/
more details on output formats, refer to “About the audio
2 in) or larger, select Large. When smaller than 16
output formats” (p. 34).
cm (6-1/2 in), select Small.
Bitstream
*
*
, PCM, Reencode, Off
Large
, Small
Trim -12 to 0 dB (in 0.5 dB step)
Note
The default setting is 0 dB.
Delay 0.5 to 10 m (in 0.5 m step)
– To output HD audio (such as Dolby TrueHD or
DTS-HD Master Audio) from HDMI terminal, set
The default setting is 3 m.
Resolution to Auto or more than 720p (p. 31).
Disable When selected speaker is not in use, select Yes.
Downsampling
Yes, No
*
You can select digital audio signal down-sample
frequency. This function is effective for the audio signal
3 Press RETURN to go back to speaker selection.
output from the COAXIAL jack/OPTICAL terminal.
2ch Downmix
48k
*
The highest sampling rate of digital PCM output is
You can select down mix method to analog 2-ch from
48 kHz.
Stereo or Lt/Rt.
96k The highest sampling rate of digital PCM output is
96 kHz.
Stereo
*
Changes channel output to stereo, which only
delivers sound from the two front speakers.
192k The highest sampling rate of digital PCM output is
Lt/Rt Select this item if this unit is connected to a Dolby
192 kHz.
Pro Logic decoder. Sound from rear speakers is
mixed to the 2 ch stereo sound.
DRC
You can set the DRC (Dynamic Range Compression)
(p. 40) to on/off/Auto. When set to Auto, DRC is
Post Process
automatically turned on for a source with DRC
You can multi-channelize the 2-channel audio signal. To
information in Dolby TrueHD format. DRC makes the
multi-channelize, select NEO6, then select Cinema or
strong sound such as plosive sound lower, and
Music mode.
conversations more audible. It is useful when you watch
*
movies in the night.
Off
, NEO6
Off
*
, On, Auto
■ System Information
SACD Output
Software version and MAC address (p. 41) are displayed.
SACD Priority
You can select a content played back from multi-channel
or stereo (2-channel) contents when a Hybrid SA-CD
(p. 4) including both is loaded.
English
Multi-ch
*
, 2-ch
33 En

SETUP MENU
■ About the audio output formats
MIXED 2CH/
HDMI COAXIAL/OPTICAL
7.1 ch
surround
Source format Bitstream PCM Reencode Bitstream PCM Reencode
PCM 2ch PCM 2ch PCM 2ch 2ch
PCM 5.1ch PCM 5.1ch PCM 2ch 2ch/5.1ch
PCM 7.1ch PCM 7.1ch PCM 2ch 2ch/7.1ch
Dolby Digital Dolby Digital PCM 5.1ch Dolby Digital Dolby Digital PCM 2ch Dolby Digital 2ch/5.1ch
with SA
*
or
BCS
**
Dolby Digital
Dolby Digital
Dolby Digital
PCM up to
Plus
Dolby Digital PCM 2ch Dolby Digital
Plus
with SA
*
or
Plus
7.1ch
Dolby Digital
BCS
**
2ch/7.1ch
Dolby
Dolby
Dolby
PCM up to
TrueHD
Dolby Digital PCM 2ch Dolby Digital
TrueHD
with SA
*
or
TrueHD
7.1ch
Dolby Digital
BCS
**
PCM up to
DTS DTS
with SA
*
or
DTS DTS PCM 2ch DTS 2ch/5.1ch
5.1ch
BCS
**
DTS HD High
DTS HD High
DTS HD High
PCM up to
Resolution
DTSPCM 2chDTS
Resolution
with SA
*
or
Resolution
7.1ch
DTS
BCS
**
2ch/7.1ch
DTS-HD
DTS-HD
DTS-HD
PCM up to
Master Audio
DTSPCM 2chDTS
Master Audio
with SA
*
or
Master Audio
7.1ch
DTS
BCS
**
* “SA” is a Secondary Audio.
** “BCS” is a button click sound, the sound effect for pop-up menus, etc.
SA-CD output formats
SACD Output settings
MIXED 2CH/7.1ch
HDMI COAXIAL/OPTICAL
SACD Priority HDMI Output
surround
DSD DSD up to 5.1ch No output 2ch/5.1ch
Multi-ch
PCM PCM up to 5.1ch No output 2ch/5.1ch
DSD DSD 2ch No output 2ch/2ch
2-ch
PCM PCM 2ch No output 2ch/2ch
Notes
– When Coaxial/Optical or HDMI is set to Bitstream, secondary audio is not output. (p. 33)
– To output HD audio (such as Dolby TrueHD or DTS-HD Master Audio) from HDMI terminal, set Resolution to
Auto or more than 720p (p. 31).
– For SA-CD playback, Configuration in Speaker Setting (p. 33) is effective only when HDMI Output is set to
PCM.
34 En
SETUP MENU
■ About the video output formats
When TV System is set to NTSC
Resolution Auto 480i/576i 480p/576p 720p 1080i 1080p
HDMI
– – – – – On Off
1080p 24Hz
Playback BD
1080p 24 Hz
HDMI
Max 480i 480p 720p 60 Hz 1080i 60 Hz
1080p 60 Hz
others 1080p 60 Hz
Playback
commercially-
480p 480p 480p
released DVD
4
COMPONENT
480i 480i 480p
Playback BD
off 1080i 60 Hz
SETTINGS
720p 60 Hz 1080i 60 Hz
others 1080i 60 Hz
Playback BD
off
VIDEO
480i 480i 480i 480i 480i
480i
others 480i
When TV System is set to PAL
Resolution Auto 480i/576i 480p/576p 720p 1080i 1080p
HDMI
– – – – – On Off
1080p 24Hz
Playback BD
1080p 24 Hz
HDMI
Max 576i 576p 720p 50 Hz 1080i 50 Hz
1080p 50 Hz
others 1080p 50 Hz
Playback
commercially-
576p
released DVD
COMPONENT
576i 576i 576p 576p 576p
Playback BD off 576p
others 576p
Playback BD
off
VIDEO
576i 576i 576i 576i 576i
576i
others 576i
When TV System is set to Multi
When TV System is set to Multi, video signal is output at the same frequency as the source. Refer to the tables above for
details on the frequency setting of the TV and resolution of the output video signal.
While a menu screen such as SETUP menu is displayed, video signal is output at the same frequency as the source.
Notes
– “Max” in the table means that resolution is set to the maximum resolution supported by the connected TV.
– HDMI 1080p 24Hz setting is disabled when output resolution is other than 1080p.
– When HDMI 1080p 24Hz setting is on, video signal is output from HDMI during BD playback.
– When commercially-released DVD is played back with component output, maximum resolution is 480p/576p.
– When TV System is set to NTSC and video source is not 60 Hz, the video output signal is converted to 60 Hz.
– When TV System is set to PAL and video source is not 50 Hz, the video output signal is converted to 50 Hz.
English
35 En
Оглавление
- ĎÐĹÄÓĎÐĹĆÄĹÍČĹ: ÂÍČĚŔŇĹËÜÍÎ ĎÐÎ×ČŇŔÉŇĹ ÝŇÎ ĎĹÐĹÄ ČŃĎÎËÜÇÎÂŔÍČĹĚ ŔĎĎŔÐŔŇŔ.
- ŃÎÄĹÐĆŔÍČĹ
- ÂÎÇĚÎĆÍÎŃŇČ ÝŇÎĂÎ ĎÐÎČĂÐŰÂŔŇĹËß
- Î ÄČŃĘŔŐ Č ÔŔÉËŔŐ
- ÎÐĂŔÍŰ ÓĎÐŔÂËĹÍČß Č ÔÓÍĘÖČČ
- ÂÂĹÄĹÍČĹ ĎĹÐĹÄ ÂŰĎÎËÍĹÍČĹĚ ĎÎÄĘËŢ×ĹÍČÉ
- HDMI ĎÎÄĘËŢ×ĹÍČĹ
- ĎÎÄĘËŢ×ĹÍČĹ ÂČÄĹÎ
- ĎÎÄĘËŢ×ĹÍČĹ ŔÓÄČÎ
- ŃĹŇĹÂÎĹ Č USB−ĎÎÄĘËŢ×ĹÍČĹ
- ÄÐÓĂČĹ ĎÎÄĘËŢ×ĹÍČß
- ÍŔ×ŔËÜÍŰĹ ÓŃŇŔÍÎÂĘČ/ĎÐÎŃŇŔß ÓŃŇŔÍÎÂĘŔ
- HOME/MEDIA ĚĹÍŢ
- ÐŔŃŘČÐĹÍÍŰĹ ÎĎĹÐŔÖČČ ÂÎŃĎÐÎČÇÂĹÄĹÍČß
- ĚĹÍŢ ÓŃŇŔÍÎÂĘČ
- ÎÁÍÎÂËĹÍČĹ ĎÐÎĂÐŔĚĚÍÎĂÎ ÎÁĹŃĎĹ×ĹÍČß
- ÓŃŇÐŔÍĹÍČĹ ÍĹČŃĎÐŔÂÍÎŃŇĹÉ
- ĂËÎŃŃŔÐČÉ
- ŇĹŐÍČ×ĹŃĘČĹ ŐŔÐŔĘŇĹÐČŃŇČĘČ
- CAUTION: READ THIS BEFORE OPERATING YOUR UNIT.
- CONTENTS
- WHAT YOU CAN DO WITH THIS PLAYER
- ABOUT DISCS AND FILES
- CONTROLS AND FUNCTIONS
- INTRODUCTION TO CONNECTIONS
- HDMI CONNECTION
- VIDEO CONNECTIONS
- AUDIO CONNECTIONS
- NETWORK AND USB CONNECTION
- OTHER CONNECTIONS
- INITIAL WIZARD/EASY SETUP
- HOME/MEDIA MENU
- ADVANCED PLAYBACK OPERATION
- SETUP MENU
- SOFTWARE UPGRADE
- TROUBLESHOOTING
- GLOSSARY
- SPECIFICATIONS


