JVC KW-AVX706: Introduction
Introduction: JVC KW-AVX706
Introduction
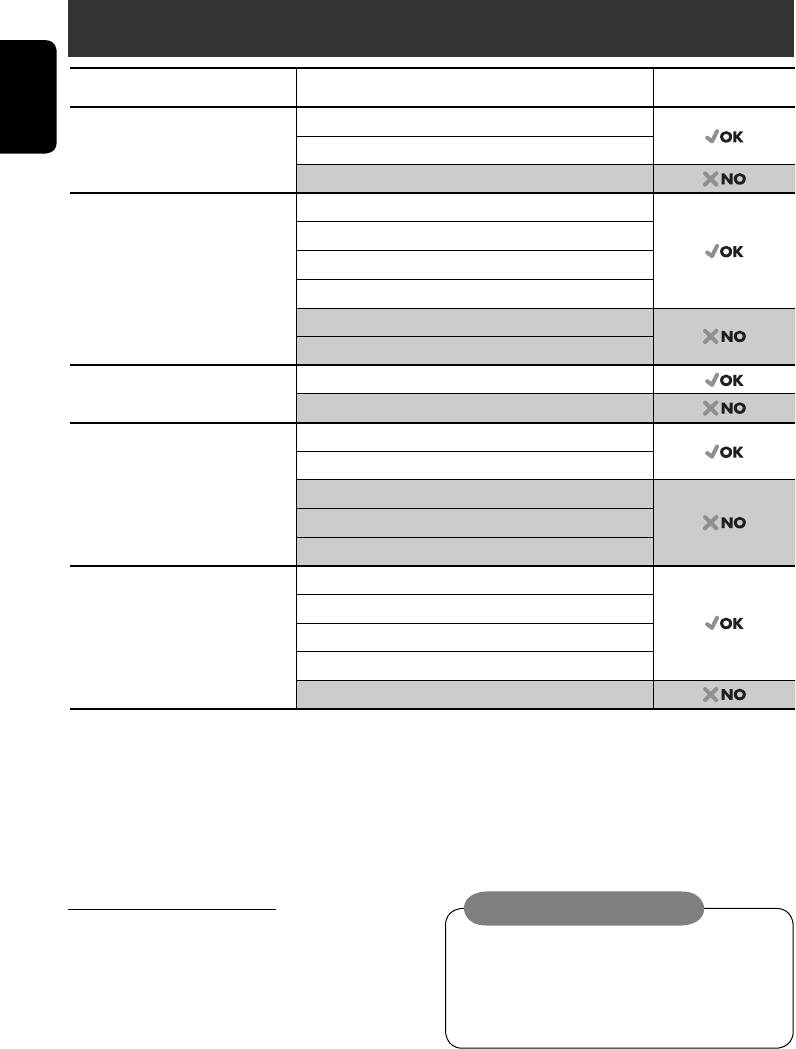
Disc type Recording format, file type, etc. Playable
DVD DVD Video
ENGLISH
DVD Audio
DVD-ROM
DVD Recordable/Rewritable
DVD Video
1
2
(DVD-R*
/-RW, +R/+RW*
)
DivX/MPEG1/MPEG2
• Compliant to UDF bridge format
JPEG
• DVD-RAM cannot be played.
MP3/WMA/WAV
MPEG4
DVD-VR, +VR
Dual Disc DVD side
Non-DVD side
CD/VCD Audio CD/CD Text (CD-DA), DTS-CD
VCD (Video CD)
SVCD (Super Video CD)
CD-ROM
CD-I (CD-I Ready)
CD Recordable/Rewritable
CD-DA
(CD-R/-RW)
DivX/MPEG1/MPEG2
• Compliant to ISO 9660 level 1,
JPEG
level 2, Romeo, Joliet
MP3/WMA/WAV
MPEG4
1
*
DVD-R recorded in multi-border format is also playable (except for dual layer discs).
2
*
It is possible to play back finalized +R/+RW (Video mode only) discs. However, the use of +R double layer disc is not recommended.
• “DVD Logo” is a trademark of DVD Format/Logo Licensing Corporation registered in the US, Japan and other countries.
Notice for DualDisc playback
Caution on volume setting:
The Non-DVD side of a “DualDisc” does
Discs produce very little noise compared
not comply with the “Compact Disc Digital
with other sources. Lower the volume
Audio” standard. Therefore, the use of Non-
before playing a disc to avoid damaging
DVD side of a DualDisc on this product is not
the speakers by the sudden increase of the
recommended.
output level.
4
EN02-06_KW-AVX706EE_f.indd 4EN02-06_KW-AVX706EE_f.indd 4 06.2.17 4:44:51 PM06.2.17 4:44:51 PM

Note on Region Code:
If you insert a DVD Video disc of an
DVD players and DVD Video discs have
incorrect Region Code
their own Region Code numbers. This unit
“Region Error Please Eject” appears on the
can only play back DVD discs whose Region
monitor.
Code numbers include “5.”
ENGLISH
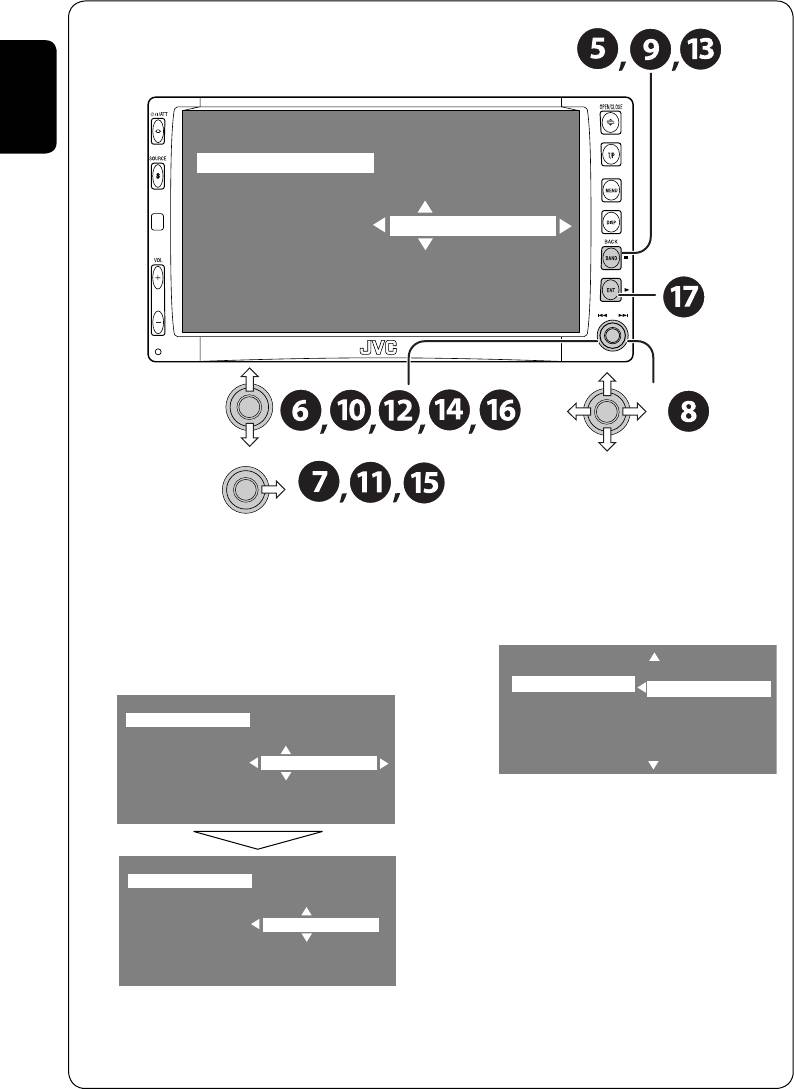
Before operating the unit—Cancel the display demonstration and set the clock
• See also page 42.
MENU
Setup
Display
Surround
Clock
Equalizer
Disc Setup 1
Sound
Disc Setup 2
Mode
Tuner
List
Input
~ Turn on the power.
Ÿ Display the <MENU>.
! Select <Setup> ] <Display> ] <Demonstration>, then activate the <Demonstration>
screen.
Setup
Display
Demonstration
Display
Demonstration
Off
Surround
Clock
Wall Paper
Clock
Wall Paper
On
Equalizer
Disc Setup 1
Level Meter
Disc Setup 1
Level Meter
Sound
Disc Setup 2
Scroll
Disc Setup 2
Scroll
Mode
Tuner
Tag Display
Tuner
Tag Display
List
Input
Dimmer
Input
Dimmer
⁄ Cancel the display demonstrations.
Select “Off.”
Demonstration
Off
Wall Paper
On
Level Meter
Scroll
Tag Display
Dimmer
Continued on the next page
5
EN02-06_KW-AVX706EE_f.indd 5EN02-06_KW-AVX706EE_f.indd 5 06.2.17 4:44:53 PM06.2.17 4:44:53 PM
ENGLISH
Time Set
12Hours/24Hours
Clock Adjust
0:00
% Activate the <12Hours/24Hours> screen.
@ Return to the <Setup> menu.
fi Select either the 12-hour or 24-hour
¤ Select <Clock> ]<Time Set>.
system.
# Activate the <Time Set> screen.
Time Set
12 Hours
‹ Set the clock time.
12Hours/24Hours
24
Hours
Clock Adjust
Time Set
12Hours/24Hours
Clock Adjust
15:00
^ Return to the <Clock> menu.
fl Select <Clock Adjust>.
& Activate the <Clock Adjust> screen.
Time Set
12Hours/24Hours
‡ Select the <Clock Adjust> setting.
Clock Adjust
15:45
• Off: Cancels.
• Auto: Activate auto clock adjustment
using the clock time (CT) data from
an FM RDS station.
$ Return to the <Clock> menu.
* Finish the procedure.
› Select <12Hours/24Hours>.
6
EN02-06_KW-AVX706EE_f.indd 6EN02-06_KW-AVX706EE_f.indd 6 06.2.17 4:44:54 PM06.2.17 4:44:54 PM
Оглавление
- CONTENTS
- Introduction
- Basic operations — Control panel
- Basic operations — Remote controller (RM-RK240)
- Listening to the radio
- Disc operations
- Dual Zone operations
- SD operations
- Listening to the CD changer
- Listening to the DAB tuner
- Watching TV
- Listening to the iPod®/D. player
- Listening to other external components
- Sound equalization
- Assigning titles to the sources
- Menu operations
- Maintenance
- More about this unit
- Troubleshooting
- Specifications
- CОДЕРЖАНИЕ
- Введение
- Основные операции — Панель управления
- Основные операции — Пульт дистанционного управления (RM-RK240)
- Прослушивание радио
- Операции с дисками
- Операции в режиме “Dual Zone”
- Операции с SD-картам
- Прослушивание с устройства автоматической смены компакт-дисков
- Прослушивание тюнера DAB
- Просмотр телевизора
- Прослушивание с проигрывателя iPod® или D.
- Прослушивание с других внешних компонентов
- Звуковой эквалайзер
- Присвоение названий источникам
- Операции с меню
- Обслуживание
- Дополнительная информация о приемнике
- Устранение проблем
- Технические характеристики
- Please reset your unit


