Sony STR-SE501 – page 3
Manual for Sony STR-SE501
Table of contents
- WARNING Precautions
- About This Manual T ABLE OF CONTENTS Additional Information
- Hooking Up the Components Unpacking
- Antenna Hookups
- Audio Component Hookups
- Video Component Hookups
- Digital Component Hookups
- 5.1CH Input Hookups
- Other Hookups
- CONTROL A1 hookup (STR-DE545 and STR-SE501 only) AUX AUDIO IN hookup Connecting the AC power cord
- Hooking Up and Setting Up the Speaker System
- Speaker System Hookup
- Speaker System Hookup
- Performing Initial Setup Operations
- Multi Channel Surround Setup
- Center speaker size ( Rear speaker size (
- Multi Channel Surround Setup
- Adjusting the speaker volume
- Before turning on the receiver Checking the connections Before You Use Your Receiver Multi Channel Surround Setup
- There is no sound no matter which component is selected. No sound is heard from one of the front speakers.
- Front Panel Parts Descriptions Location of Parts and Basic Operations ? 1 switch Function buttons
- INPUT MODE button
- Front Panel Parts Description
- 25
- Front Panel Parts Description
- Enjoying Surround Sound
- Selecting a Sound Field
- Sound field information
- Use the buttons on the front panel to operate the following modes Selecting a Sound Field
- Understanding the Multi-Channel Surround Displays
- Understanding the Multi-Channel Surround Displays
- Customizing Sound Fields
- Adjusting the level parameters Customizing Sound Fields
- Adjusting the bass/treble Resetting customized sound fields to the factory settings
- Customizing Sound Fields Adjustable parameters for each sound field
- Receiving Broadcasts
- Brief descriptions of buttons used to receive broadcasts
- Storing FM Stations Automatically Direct Tuning
- Preset Tuning Presetting radio stations Automatic Tuning
- Tuning to preset stations Receiving RDS broadcasts Displaying the RDS Information Using the Radio Data System (RDS)
- Using the Radio Data System (RDS) Monitoring traffic, news, or information programmes (EON) Locating a station by programme type
- Description of program types
- Other Operations
- Recording Naming Preset Stations and Program Sources
- Recording on a video tape Using the Sleep Timer Recording
- Adjustment Using the SET UP Button
- Troubleshooting Additional Information
- Reference sections for clearing the receiver’s memory
- Specifications Amplifier section
- FM tuner section AM tuner section Video section General
- Glossary
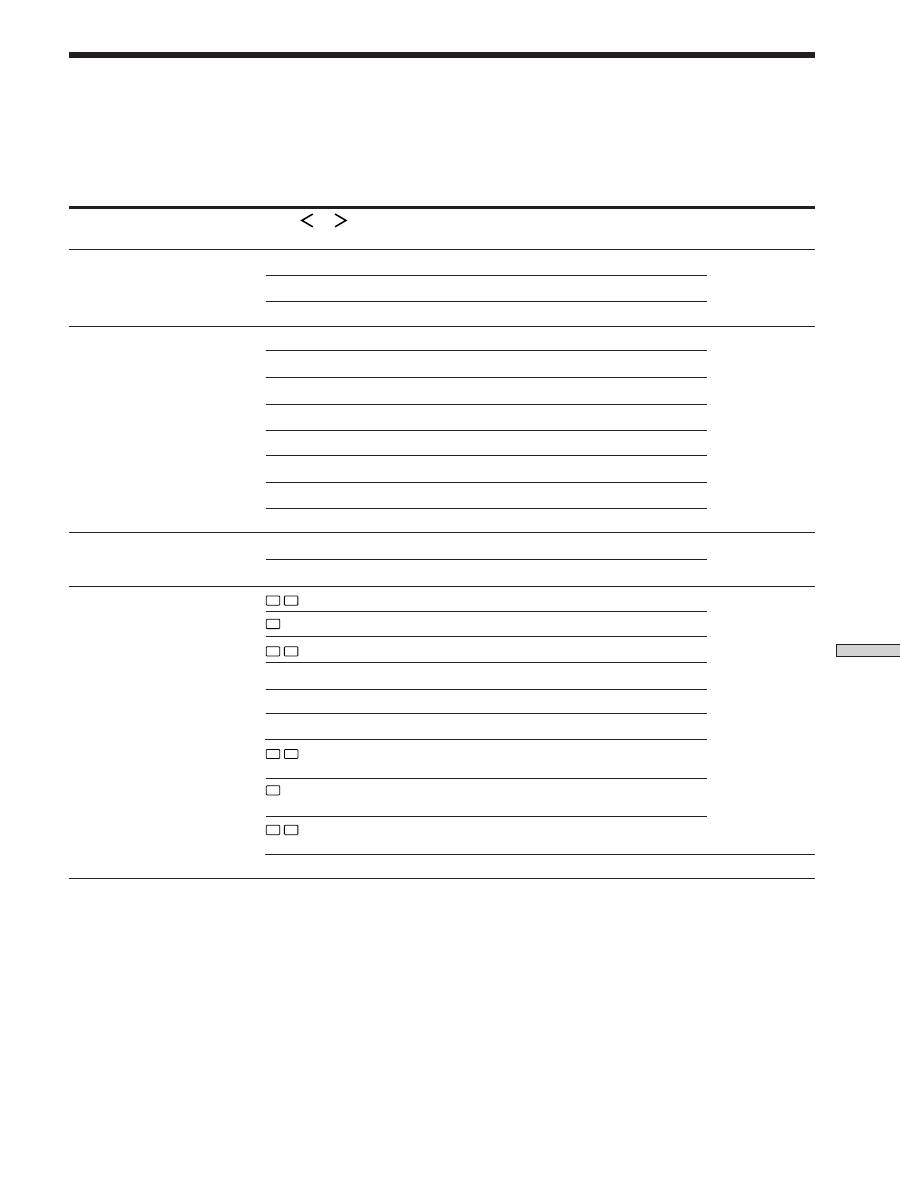
- Settings Using SUR, LEVEL, BASS/TREBLE, and SET UP buttons
- Remote Button Description (STR-DE445 only)
- Changing the factory setting of a function button
- Remote Button Description (STR-DE445 only)
- Index
Receiving Br
oadcasts
41
GB
n
A1
˜
A2
˜
...
˜
A0
˜
B1
˜
B2
˜
...
˜
B0
N
n
C0
˜
...C2
˜
C1
N
Tuning to preset stations
You can tune the preset stations either of the following
two ways.
Scanning the preset stations
1
Press TUNER.
The last received station is tuned in.
2
Press PRESET/PTY SELECT + or PRESET/PTY SELECT –
repeatedly to select the preset station you want.
Each time you press the button, the receiver tunes in
one preset station at a time, in the corresponding order
and direction as follows:
z
You can scan the preset stations by program type
See page 42.
Using the preset codes
1
Press TUNER.
The last received station is tuned in.
2
Press SHIFT to select a memory page (A, B or C),
then press the preset number of the station you
want using the numeric buttons on the supplied
remote.
Receiving RDS broadcasts
Simply select a station from the FM band.
When you tune in a station that provides RDS services,
the station name appears in the display.
Note
RDS may not work properly if the station you tuned to is not
transmitting the RDS signal properly or if the signal strength is
weak.
Displaying the RDS Information
Press DISPLAY. Each time you press DISPLAY, the display
advances one step through the following information.
**This information also appears for non-RDS FM stations.
Notes
• If there is an emergency announcement by governmental
authorities, ALARM flashes in the display.
• When the message consists of 9 characters or more, the
message scrolls across the display.
• The following messages appear if a station is not providing a
particular RDS service:
“NO PTY” (the selected programme type is not available)
“NO TEXT” (text data is not available)
“NO TIME” (clock time data is not available)
• Depending on the method used by the radio station to send the
text, some text messages may be incomplete.
Using the Radio Data
System (RDS)
Information displayed
Station Name**
Frequency**
Programme Type
Radio Text
Clock (24-hour system)
Sound field currently
applied**
You can:
Locate each station by name (e.g.,
WDR) instead of frequency.
Locate each station by frequency.
Locate a specific type of
programme being broadcast. (See
page 43 for the types of
programmes you can select.)
Display the text messages sent by
the RDS station.
Display the current time
Display the current sound field.

42
GB
Receiving Br
oadcasts
Using the Radio Data System (RDS)
Monitoring traffic, news, or information
programmes (EON)
The EON (Enhanced Other Network) function allows the
receiver to switch automatically to a station broadcasting
traffic announcements, news or information programmes.
When such a programme starts on a station networking
with the preset FM RDS station, the receiver automatically
tunes in the station.
After the programme ends, the receiver switches back to
the original preset station or the programme source you
were originally listening to.
1
Tune to an FM station.
2
Press RDS EON to select the programme you want
to monitor.
Each time you press RDS EON, the indicators light as
follows:
TA (Traffic Announcement)
.
NEWS
.
INFO (Information)
.
OFF (No indication lights up)
The receiver enters EON standby mode.
“NO TA”, “NO NEWS”, or “NO INFO” appears if you
press RDS EON before tuning to an RDS station.
When a station starts broadcasting the programme you
selected, the receiver switches to the station, a message
(e.g., “NOW TA”) appears and the respective indicator
(e.g.,“TA”) flashes. After the programme ends, the
receiver switches back to the station you were listening to
(or the function you were using).
To stop monitoring the programme
Press RDS EON once.
Turn off the EON feature when you want to record a
programme without interruptions, especially when you
want to do timer recording.
Notes
• To use this function, be sure to store the RDS stations
beforehand.
• When the selected station has a weak signal, “WEAK SIG”
appears and then, the receiver returns to the previous station or
programme source.
Locating a station by programme type
(PTY)
You can locate a station you want by selecting a
programme type. The receiver tunes in the type of
programmes currently being broadcast from the RDS
stations stored in the receiver's preset memory.
1
Press RDS PTY to display the current PTY type.
Press PRESET/PTY SELECT + or – until the
programme type you want appears in the display.
See the following table for the programme types you
can select.
2
Press RDS PTY while the programme type appears
in the display.
The tuner starts searching the preset RDS stations for
the programme (“SEARCH” and the programme type
are displayed alternately).
When the receiver finds the programme you are
looking for, it stops searching. The preset number of
the preset station currently broadcasting the selected
programme type flashes, and the receiver receives the
station.
Note
“NO PTY” appears when the programme type that you've
selected is not being broadcast and the receiver returns to the
original station.
/

Receiving Br
oadcasts
43
GB
Description of program types
Programme type
What you hear
NONE
Any programmes not defined
below.
NEWS
News programmes.
AFFAIRS
Topical programmes that expand
on current news.
INFO
Programmes about consumer
affairs and professional advice
(eg. medical advice).
SPORT
Sports programmes.
EDUCATE
Educational programmes, such
as a “how-to” programme and
advice.
DRAMA
Radio plays and serials.
CULTURE
Programmes about national or
regional culture, such as religion,
language, and societal concerns.
SCIENCE
Programmes about the natural
sciences.
VARIED
Programmes containing celebrity
interviews, panel games, and
comedy.
POP M
Popular music programmes.
ROCK M
Rock music programmes.
EASY M
Easy listening (middle of the
road music).
LIGHT M
Classical music, such as
instrumental, vocal, and choral.
CLASSICS
Performances of major
orchestras, chamber music,
opera, etc.
OTHER M
Music that does not fit into any
of the above categories, such as
rhythm & blues and reggae.
Programme type
What you hear
WEATHER
Programmes about the weather
report.
FINANCE
Stock Market reports, commerce,
trading etc.
CHILDREN
Programmes targeted at young
audience for entertainment and
interest.
SOCIAL
Programmes on sociology,
history, geography, psychology
and society.
RELIGION
Aspect of beliefs and faiths.
PHONE IN
Expression of views by phone or
at a public forum.
TRAVEL
Programmes on package tours,
destinations, travel ideas and
opportunity.
LEISURE
Programmes on recreational
activities which listeners might
participate.
JAZZ
Polyphonic, syncopated music.
COUNTRY
Songs originating from American
Southern States.
NATION M
Current popular music of the
Nation or Region.
OLDIES
“Golden age” music.
FOLK M
Music which has roots in the
musical culture of a particular
nation.
DOCUMENT
Programme concerning factual
matters.
44
GB
RDS EON RDS PTY
SOUND FIELD
TUNER
NAME
SET UP
ENTER
MULTI CHANNEL DECODING
MASTER VOLUME
DISPLAY
INPUT MODE
VIDEO
MD/TAPE
CD
TUNER
AUX
DVD/LD
TV/SAT 5.1CH INPUT
CINEMA STUDIO
LEVEL
I
–
i
+
SET UP
BASS BOOST
TONE
FM/AM
MUTING
TONE
BASS
BOOST
SHIFT
MEMORY
FM MODE
– TUNING +
NAME
ENTER
SUR
BASS/
TREBLE
SOUND FIELD
A. F. D.
A
B
C
2CH
MODE
DIMMER
SPEAKERS
R
ON
r
OFF
A
PHONES
B
?
/
1
PRESET/
– PTY SELECT +
Other Operations
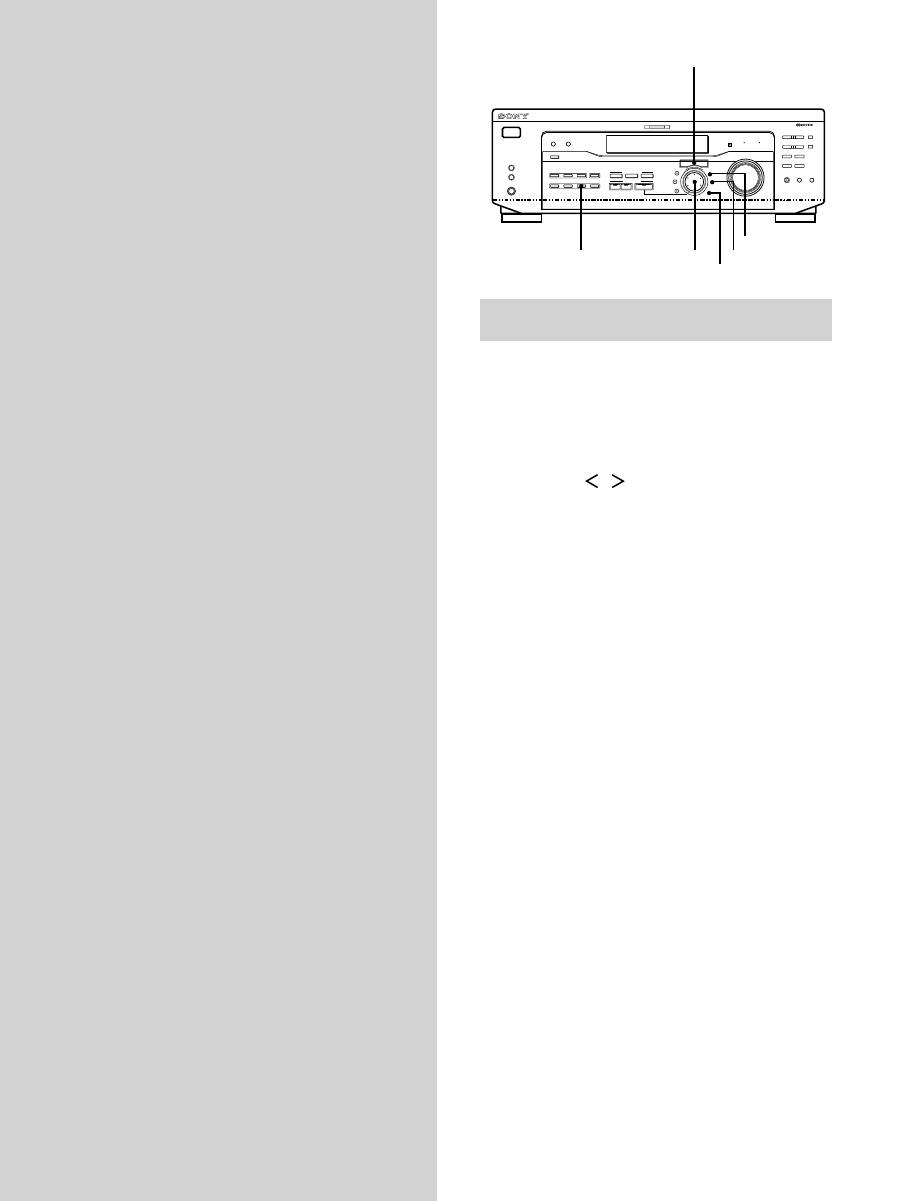
Brief descriptions of buttons that appear
in this chapter
NAME button:
Press to name preset stations or program
sources.
Jog dial:
Use to select characters when naming preset
stations or program sources.
Cursor buttons (
/
):
Use to move the cursor when
naming preset stations or program sources.
TUNER button:
Press to select the tuner.
SET UP button:
Press to enter the set up mode.
ENTER button:
Press to enter the completed name of the
preset station or program source.
Cursor buttons
Jog dial
45
GB
Other Operations
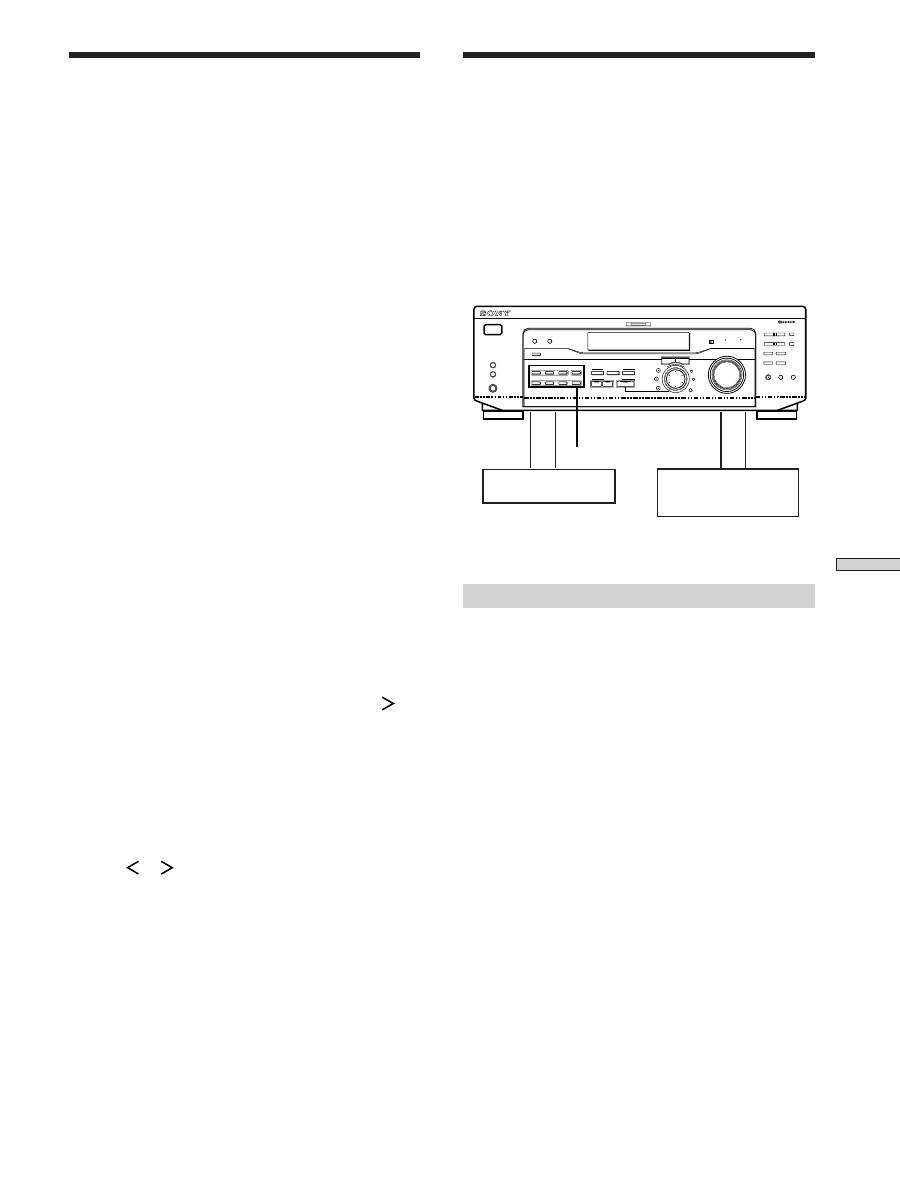
Recording
Your receiver makes it easy to record to and from the
components connected to it. You don’t have to connect the
playback and recording components directly to each
other: once you select a program source on the receiver,
you can record and edit as you normally would using the
controls on each component.
Before you begin, make sure you’ve connected all
components properly.
ç
: Audio signal flow
c
: Video signal flow
Recording on an audio tape or MiniDisc
You can record on a cassette tape or MiniDisc using the
receiver. Refer to the instruction manual of your cassette
deck or MD deck if you need help.
1
Select the component to be recorded.
2
Prepare the component for playing.
For example, insert a CD into the CD player.
3
Insert a blank tape or MD into the recording deck
and adjust the recording level, if necessary.
4
Start recording on the recording deck, then start
playback on the playback component.
Notes
• You cannot record a digital audio signal using a component
connected to the analog MD/TAPE REC OUT jacks.
• Sound adjustments do not affect the signal output from the
MD/TAPE REC OUT jacks.
RDS EON RDS PTY
SOUND FIELD
MULTI CHANNEL DECODING
MASTER VOLUME
DISPLAY
INPUT MODE
VIDEO
MD/TAPE
CD
TUNER
AUX
DVD/LD
TV/SAT 5.1CH INPUT
CINEMA STUDIO
LEVEL
I
–
i
+
SET UP
BASS BOOST
TONE
FM/AM
MUTING
TONE
BASS
BOOST
SHIFT
MEMORY
FM MODE
– TUNING +
NAME
ENTER
SUR
BASS/
TREBLE
SOUND FIELD
A. F. D.
A
B
C
2CH
MODE
DIMMER
SPEAKERS
R
ON
r
OFF
A
PHONES
B
?
/
1
PRESET/
– PTY SELECT +
Naming Preset Stations and
Program Sources
You can enter a name (index name) of up to 8 characters
for preset stations and program sources. These names (for
example, “VHS”) appear in the receiver’s display when a
station or program source is selected.
Note that no more than one name can be entered for each
preset station or program source.
This function is useful for distinguishing components of
the same kind. For example, two VCRs can be specified as
“VHS” and “8MM”, respectively. It is also handy for
identifying components connected to jacks meant for
another type of component, for example, a second CD
player connected to the MD/TAPE jacks.
1
To name a preset station
Press TUNER.
The last station you received is tuned in.
To name a program source
Select the program source (component) to be
named, then go to Step 3.
2
Tune in the preset station you want to create an
index name for.
If you are not familiar with how to tune in preset
stations, see “Tuning to preset stations” on page 41.
3
Press NAME.
4
Create an index name by using the jog dial and
cursor buttons:
Turn the jog dial to select a character, then press
to
move the cursor to the next position.
To insert a space
Turn the jog dial until a blank space appears in the
display (you can find the space character between “
]
”
and “A”).
If you’ve made a mistake
Press
or
repeatedly until the character to be
changed flashes, then turn the jog dial to select the
right character.
5
Press ENTER.
To assign index names to other stations
Repeat Steps 2 to 5.
Note
You cannot change the name of an RDS station.
Playback component
(program source)
c
ç
ç
c
Recording component
(tape deck, MD deck,
VCR)
Function buttons

46
GB
Other Operations
Recording on a video tape
You can record from a TV, or an LD player using the
receiver. You can also add audio from a variety of audio
sources when editing a video tape. See your LD player’s
instruction manual if you need help.
1
Select the program source to be recorded.
2
Prepare the component for playing.
For example, insert the laser disc you want to record
into the LD player.
3
Insert a blank video tape into the VCR for
recording.
4
Start recording on the recording VCR, then start
playing the laser disc you want to record.
z
You can record the sound from any audio source onto a
video tape while recording from a laser disc
Locate the point where you want to start recording from another
audio source, select the program source, then start playback. The
audio from that source will be recorded onto the audio track of
the video tape instead of the audio from the original medium.
To resume audio recording from the original medium, select the
video source again.
Note
Please be sure to make both digital and analog connections to the
DVD/LD inputs. Analog recording is not possible if you only
make digital connections.
Using the Sleep Timer
You can set the receiver to turn off automatically at a
specified time.
Press SLEEP on the remote while the power is on.
Each time you press SLEEP, the time changes as shown
below.
n
2:00:00
n
1:30:00
n
1:00:00
n
0:30:00
n
OFF
The display dims after you have specified the time.
z
You can freely specify the time
First, press SLEEP on the remote, then specify the time you want
using the jog dial on the receiver. The sleep time changes in 1
minute intervals. You can specify up to 5 hours.
z
You can check the time remaining before the receiver turns
off
Press SLEEP on the remote. The remaining time appears in the
display.
Recording

47
GB
Other Operations
Adjustment Using the SET
UP Button
The SET UP button allows you to make the following
adjustments.
Selecting the 5.1CH video input
This parameter lets you specify the video input to be used
with the audio signals from the 5.1CH INPUT jack. The
5.1CH video input is set to DVD/LD by default.
1
Press SET UP.
2
Press the cursor buttons (
or
) to select
“5.1 V. IN”.
3
Turn the jog dial to select the video input you
want.

48
GB
Troubleshooting
If you experience any of the following difficulties while
using the receiver, use this troubleshooting guide to help
you remedy the problem. Also, see “Checking the
connections” on page 20 to verify that the connections are
correct. Should any problem persist, consult your nearest
Sony dealer.
There’s no sound or only a very low-level sound
is heard.
,
Check that the speakers and components are
connected securely.
,
Make sure that you’ve selected the correct
component on the receiver.
,
Make sure that you’ve set the SPEAKERS selector
correctly (see page 23). (STR-DE545 and STR-SE501
only)
,
Press MUTING on the remote if the MUTING
indicator is lit.
,
The protective device on the receiver has been
activated because of a short circuit. Turn off the
receiver, eliminate the short-circuit problem and
turn on the power again.
The left and right sounds are unbalanced or
reversed.
,
Check that the speakers and components are
connected correctly and securely.
,
Adjust front balance parameter in the LEVEL
menu.
Severe hum or noise is heard.
,
Check that the speakers and components are
connected securely.
,
Check that the connecting cords are away from a
transformer or motor, and at least 3 meters (10 feet)
away from a TV set or fluorescent light.
,
Move your TV away from the audio components.
,
The plugs and jacks are dirty. Wipe them with a
cloth slightly moistened with alcohol.
No sound is heard from the center speaker.
,
Make sure the sound field function is on (press
SOUND FIELD – MODE).
,
Select a sound field containing the word “cinema”
or “virtual” (see pages 28 - 30).
,
Adjust the speaker volume (see page 19).
,
Make sure the center speaker size parameter is set
to either SMALL or LARGE (see page 17).
Additional Information

49
GB
Additional Information
No sound or only a very low-level sound is heard
from the rear speakers.
,
Make sure the sound field function is on (press
SOUND FIELD – MODE).
,
Select a sound field containing the word “cinema”
or “virtual” (see pages 28 - 30).
,
Adjust the speaker volume (see page 19).
,
Make sure the rear speaker size parameter is set to
either SMALL or LARGE (see page 17).
No sound is heard from the sub woofer.
,
Make sure the sub woofer is set to ON (see page
18).
Recording cannot be done.
,
Check that the components are connected correctly.
,
Select the source component with a FUNCTION
button.
,
When recording from a digital component, make
sure the input mode is set to ANALOG (see page
23) before recording with a component connected
to the analog MD/TAPE terminals.
Radio stations cannot be tuned in.
,
Check that the antennas are connected securely.
Adjust the antennas and connect an external
antenna if necessary.
,
The signal strength of the stations is too weak
(when tuning in with automatic tuning). Use direct
tuning.
,
No stations have been preset or the preset stations
have been cleared (when tuning by scanning preset
stations). Preset the stations (see page 40).
,
Press DISPLAY so that the frequency appears in
the display.
RDS does not work.
,
Make sure that you’re tuned to an FM RDS station.
,
Select a stronger FM station.
The station was interrupted by another station
or the receiver automatically starts scanning
stations.
,
The EON function is activated. Turn off the EON
function if you don’t want the current program to
be interrupted.
The RDS information that you want does not
appear.
,
Contact the radio station and find out whether or
not they actually provide the service in question. If
so, the service may be temporarily out of order.
The surround effect cannot be obtained.
,
Make sure the sound field function is on (press
SOUND FIELD – MODE).
,
Make sure that the SPEAKERS selector is set to A
or B (not A+B) if you connected two sets of front
speakers. (STR-DE545 and STR-SE501 only)
“PCM--kHz” appears on the display.
,
The sampling frequency is more than 48 kHz.
Change the DVD setting to 48 kHz.
Nothing appears on the display.
,
When the display turns off immediately after the
receiver is turned on, press DIMMER to change the
display mode.
No picture or an unclear picture appears on the
TV screen or monitor.
,
Select the appropriate function on the receiver.
,
Set your TV to the appropriate input mode.
,
Move your TV away from the audio components.
The remote does not function.
,
Point the remote at the remote sensor
g
on the
receiver.
,
Remove any obstacles in the path between the
remote and the receiver.
,
Replace both batteries in the remote with new
ones, if they are weak.
,
Make sure you select the correct function on the
remote.
,
If the remote is set to operate the TV only, use the
remote to select a source or component other than
TV before operating the receiver or other
component.
Reference sections for clearing the
receiver’s memory
To clear
See
All memorized settings
page 15
Customized sound fields
page 35

50
GB
Additional Information
Specifications
Amplifier section
POWER OUTPUT
Rated Power Output at Stereo mode
STR-DE545/SE501:
(8 ohms 1 kHz, THD
0.7%)
100 W + 100 W
STR-DE445:
(8 ohms 1 kHz, THD
0.7%)
60 W + 60 W
Reference Power Output
STR-DE545/SE501:
(8 ohms 1 kHz, THD
0.7%)
Front: 100 W + 100 W
Center: 100 W
Rear: 100 W + 100 W
STR-DE445:
(8 ohms 1 kHz, THD
0.7%)
Front: 60 W + 60 W
Center: 60 W
Rear: 60 W + 60 W
Frequency response
CD, MD/TAPE, DVD/
LD, TV/SAT, VIDEO,
AUX:
10 Hz - 50 kHz + 0.5/
–2 dB (with sound
field, tone, and bass
boost bypassed)
Inputs (Analog)
5.1CH INPUT, CD,
DVD/LD, MD/TAPE,
TV/SAT, VIDEO,
AUX:
Sensitivity: 250 mV
Impedance: 50
kilohms
S/N
a)
: 96 dB (A, 250
mV
b)
)
a) INPUT SHORT
b) Weighted network, input level
Inputs (Digital)
DVD/LD (coaxial):
Sensitivity: –
Impedance: 75 ohms
S/N: 100 dB (A, 20
kHz LPF)
DVD/LD, TV/SAT*
(optical):
Sensitivity: –
Impedance: –
S/N: 100 dB (A, 20
kHz LPF)
* STR-DE545 and STR-SE501 only.
Outputs
MD/TAPE (REC OUT);
VIDEO (AUDIO
OUT):
Voltage: 250 mV,
Impedance: 10
kilohms
SUB WOOFER:
Voltage: 2 V
Impedance: 1
kilohms
PHONES:
Accepts low- and
high-impedance
headphones
BASS BOOST
+6 dB at 70 Hz
TONE
±6 dB at 100 Hz and
10 kHz
Sampling Frequency
48 kHz

51
GB
Additional Information
FM tuner section
Tuning range
87.5 - 108.0 MHz
Antenna terminals
75 ohms, unbalanced
Sensitivity
Mono: 18.3 dBf, 2.2 µV/
75 ohms
Stereo: 38.3 dBf, 22.5
µV/75 ohms
Usable sensitivity
11.2 dBf, 1 µV/75 ohms
S/N
Mono: 76 dB
Stereo: 70 dB
Harmonic distortion at 1 kHz
Mono: 0.3%
Stereo: 0.5%
Separation
45 dB at 1 kHz
Frequency response
30 Hz - 15 kHz +0.5/–2
dB
Selectivity
60 dB at 400 kHz
AM tuner section
Tuning range
531 - 1602 kHz
Antenna
Loop antenna
Usable sensitivity
50 dB/m (at 999 kHz)
S/N
54 dB (at 50 mV/m)
Harmonic distortion
0.5 % (50 mV/m, 400
kHz)
Selectivity
At 9 kHz: 35 dB
Video section
Inputs
Video: 1 Vp-p 75 ohms
S-video*:
Y: 1 Vp-p 75 ohms
C: 0.286 Vp-p 75 ohms
Outputs
Video: 1 Vp-p 75 ohms
S-video*:
Y: 1 Vp-p 75 ohms
C: 0.286 Vp-p 75 ohms
* STR-DE545 and STR-SE501 only.
General
System
Tuner section:
PLL quartz-locked
digital synthesizer
system
Preamplifier section:
Low-noise NF type
equalizer
Power amplifier section:
Pure-complementary
SEPP
Power requirements
230 V AC, 50/60 Hz
Power consumption
STR-DE545/SE501:
220 W
STR-DE445: 160 W
AC outlets (STR-DE545 and STR-SE501
only)
1 switched, max 100 W
Dimensions
430
×
303
×
157 mm
including projecting
parts and controls
Mass (Approx.)
STR-DE545: 7.9 kg
STR-DE445: 7.7 kg
STR-SE501: 8.2 kg
Supplied accessories
See page 4.
Design and specifications are subject to
change without notice.
52
GB
Additional Information
Glossary
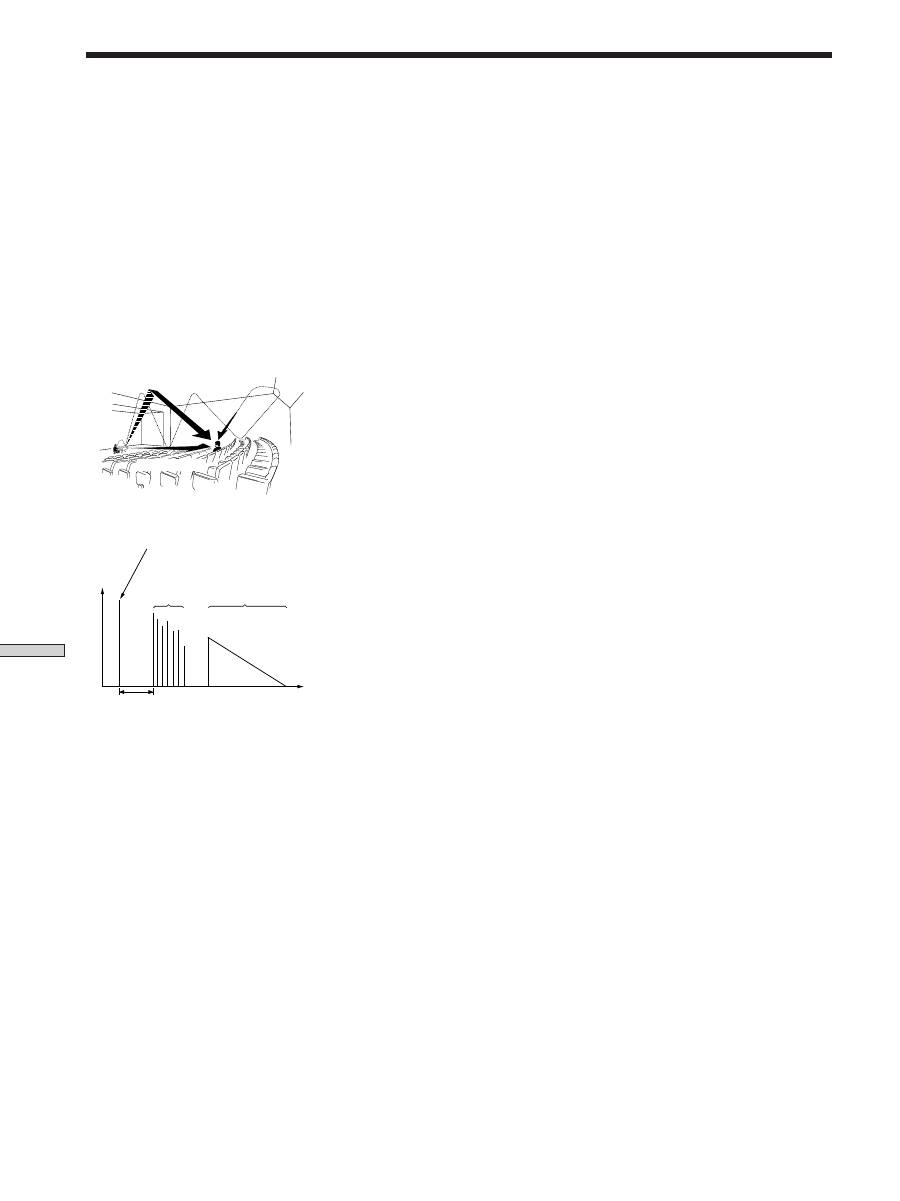
Surround sound
Sound that consists of three elements:
direct sound, early reflected sound
(early reflections) and reverberative
sound (reverberation). The acoustics
of the surrounding space affect the
way these three sound elements are
heard. Surround sound combines
these sound elements in such a way
that you actually can sense the size of
the venue, as well as its type.
• Types of sound
• Transition of sound from rear speakers
Dolby Pro Logic Surround
As one method of decoding Dolby
Surround, Dolby Pro Logic Surround
produces four channels from two-
channel sound. Compared with the
former Dolby Surround system,
Dolby Pro Logic Surround reproduces
left-to-right panning more naturally
and localizes sounds more precisely.
To take full advantage of Dolby Pro
Logic Surround, you should have one
pair of rear speakers and a center
speaker. The rear speakers output
monaural sound.
Dolby Digital (AC-3)
This sound format for movie theaters
is more advanced than Dolby Pro
Logic Surround. In this format, the
rear speakers output stereo sound
with an expanded frequency range
and a sub woofer channel for deep
bass is independently provided. This
format is also called “5.1” because the
sub woofer channel is counted as 0.1
channel (since it functions only when
a deep bass effect is needed). All six
channels in this format are recorded
separately to realize superior channel
separation. Furthermore, since all the
signals are processed digitally, less
signal degradation occurs. The name
“AC-3” comes from the fact that it is
the third audio coding method to be
developed by the Dolby Laboratories
Licensing Corporation.
Digital Cinema Sound
This is the generic name of the
surround sound produced by digital
signal processing technology
developed by Sony. Unlike previous
surround sound fields mainly
directed at the reproduction of music,
Digital Cinema Sound is designed
specifically for the enjoyment of
movies.
Reverberation
Direct sound
Early
reflections
Reverberation
Early reflection time
Early reflections
Direct sound
Time
Level
53
GB
Additional Information
Press and light
Press
or
to select
Turn jog dial to select
See page
SUR button
EFFECT LEVEL
depends on sound mode (in 16 steps)
Settings Using SUR, LEVEL, BASS/TREBLE, and SET UP
buttons
You can make various settings using the LEVEL, SUR, BASS/TREBLE, SET UP buttons, jog dial, and cursor buttons. The
table below shows each of the settings that these buttons can make.
33
WALL TYPE
between –8 to +8 (in 1 increment steps)
REVERBERATION TIME
between –8 to +8 (in 1 increment steps)
FRONT BALANCE
between –8 to +8 (in 1 increment steps)
REAR BALANCE
between –8 to +8 (in 1 increment steps)
CENTER LEVEL
between –10 dB to +6 dB (in 1 dB steps)
SUB WOOFER LEVEL
between –10 dB to +6 dB (in 1 dB steps)
LFE MIX LEVEL
OFF, or –20 dB to 0 dB (in 1 dB steps)
LEVEL button
REAR LEVEL
between –10 dB to +6 dB (in 1 dB steps)
34
dts LFE MIX LEVEL
OFF, or –20 dB to +10 dB (in 1 dB steps)
DYNAMIC RANGE COMP
OFF, 0.1 to 0.9 (in 0.1 dB steps), STD, or MAX
L
R
(FRONT)
LARGE or SMALL
16
C
(CENTER)
LARGE, SMALL, or NO
LS
RS
(REAR)
LARGE, SMALL, or NO
REAR PL.
PL. SIDE or PL. BEHD.
REAR HGT.
HGT. LOW or HGT. HIGH
SUB WOOFER
S.W. YES or S.W. NO
L
R
(FRONT) XX.X METER
between 3 feet (1.0 meters) and 40 feet (12.0
meters) (in 1 foot (0.1 meter) steps)
C
(CENTER) XX.X METER
between FRONT and 5 feet (1.5 meters) (in 1 foot
(0.1 meter) steps)
LS
RS
(REAR) XX.X METER
between FRONT and 15 feet (4.5 meters) (in 1
foot (0.1 meter) steps)
*SET UP
47
5.1 V. IN [XXX]
V-TV/SAT, V-DVD/LD, V-VIDEO
BASS/TREBLE button
BASS
between –6 dB to +6 dB (2 dB step)
35
TREBLE
between –6 dB to +6 dB (2 dB step)
* When you press the SET UP button, you can select NORM. SP (for normal speakers) or MICRO SP (for Micro Satellite speakers).
(page 16)

54
GB
Additional Information
Remote Button Description (STR-DE445 only)
You can use the remote to operate the components in your system. The tables below show the settings of each button.
Remote Button
Operations
Function
SLEEP
Receiver
Activates the sleep
function and the
duration which the
receiver turns off
automatically.
AV
?
/
1
TV/VCR/
Turns the audio and
CD player/
video components on or
DVD player/
off.
MD deck/
VCD player/
LD player/
DAT deck
?
/
1
Receiver
Turns the receiver on or
off.
VIDEO
Receiver
To watch video tapes.
DVD/LD
Receiver
To watch DVD or laser
disc.
TV/SAT
Receiver
To watch TV programs or
satellite receiver.
MD/TAPE
Receiver
To listen Minidisc
or audio tape.
CD
Receiver
To listen to compact disc.
TUNER
Receiver
To listen to radio
programs.
AUX
Receiver
To listen to an audio
equipment.
5.1CH
Receiver
To watch DVD player or
Dolby Digital.
0-9
Receiver
Use with “SHIFT” button
to select tuner preset
station numeric input
during DIRECT
TUNING or MEMORY
mode.
CD player/
Selects track numbers.
MD deck/
0 selects track 10.
VCD player/
LD player/
DAT deck
TV/VCR/SAT
Selects channel numbers.
>10
CD player/
Selects tracks numbers
MD deck/
over 10.
Tape deck/
LD player/
VCD player
ENTER
TV/VCR/SAT/
After selecting a channel,
Tape deck/
disc or track using the
LD player/
numeric buttons, press
VCD player/
to enter the value.
MD deck/
DAT deck
SHIFT
Receiver
Press repeatedly to select
a memory page for
presetting radio stations
or tuning to preset
stations.
Remote Button
Operations
Function
-/--
TV
Selects the channel
entry mode, either
one or two digit.
D.TUNING
Receiver
Tuner station direct key-
in mode.
.
/
>
CD player/
Skips tracks.
MD deck/
DVD player/
LD player/
VCD player/
Tape deck/VCR/
DAT deck
m
/
M
CD player/
Searches tracks
DVD player/
(forward or backward).
VCD player
MD deck/
Fastforwards or
Tape deck/
rewinds.
VCR/
LD player/
DAT deck
n
Tape deck
Starts play on the
reverse side.
N
CD player/
Starts play.
MD deck/Tape
deck/VCR/
DVD player/
VCD player/
LD player/
DAT deck
X
CD player/
Pauses play or record.
MD deck/Tape
(Also starts recording
deck/VCR/
with components in
DVD player/
record standby.)
VCD player/
LD player/
DAT deck
x
CD player/
Stops play.
MD deck/Tape
deck/VCR/
DVD player/
VCD player/
LD player/
DAT deck
POSITION*
TV
Changes the position of
the small picture.
SWAP*
TV
Swaps the small and the
large picture.
DISC
CD player
Select discs (Mega
storage CD player only).
SUB CH +/–*
TV
Selects preset channels
for the small picture.
CH PRESET
Receiver
Scans and selects preset
+/–
stations.
TV/VCR/SAT
Selects preset channels.
DISPLAY
TV/VCR/
Selects information
LD player/
displayed on the TV
DVD player/
screen.
VCD player
* Only for Sony TVs with the picture-in-picture function.

55
GB
Additional Information
Changing the factory setting of a function
button
If the factory settings of the FUNCTION buttons don’t
match your system components, you can change them.
For example, if you have two CD players and you don’t
have a tape deck or an MD recorder, you can assign the
MD/TAPE button to your second CD player.
Note that the settings of the TUNER button cannot be
changed.
Function buttons
Numeric buttons
Remote Button
Operations
Function
P IN P*
TV
Activates the picture-in-
picture function.
JUMP
TV
Toggles between the
previous and the current
channels.
WIDE
TV
Selects the wide picture
mode.
D. SKIP
CD player
Skips discs (CD player
with multi-disc changer
only).
ANT TV/VTR
VCR
Selects output signal
from the aerial terminal:
TV signal or VCR
program.
TV/VIDEO
TV/VCR
Selects input signal: TV
input or video input.
A. F. D.
Receiver
Auto Format Decoding.
2CH/OFF
Receiver
Turns off sound field.
MODE
Receiver
Selects sound field mode.
EQ/TONE
Receiver
Turns the tone effect on
or off.
BASS BOOST
Receiver
Reinforces bass in front
speakers.
MUTING
Receiver
Mutes the sound from
the receiver.
TEST TONE
Receiver
Press to output test tone.
CURSOR MODE
Receiver
Press this button
repeatedly to select one
of the three cursor
modes: LEVEL,
SURROUND and BASS/
TREBLE.
MASTER VOL
Receiver
Adjusts the master
+/–
volume of the receiver.
MENU </>
Receiver
Selects a menu item.
MENU +/–
Receiver
Makes adjustment or
change the setting.
MENU
DVD
Displays DVD menu.
F
/
f
/
G
/
g
DVD
Selects a menu item.
ENTER
DVD
Enters the selection.
RETURN
DVD
Returns to the previous
menu or exits the menu.
TITLE
DVD
Displays DVD title.
* Only for Sony TVs with the picture-in-picture function.
Note
Some Sony equipments cannot be controlled by this remote as
shown in the table above.
P
p
D.SKIP
9
(
0
)
=
+
>10
0
7
8
9
4
5
6
1
2
3
ENTER
MD/TAPE
CD
TUNER
VIDEO
5.1CH
SYSTEM
STANDBY
AUX
SHIFT
POSITION
DISPLAY
JUMP
A.F.D.
EQ/TONE
MUTING
MODE
WIDE
P IN P
SWAP
DISC
– /– –
– SUB CH +
CH/
PRESET
ANT
TV/VTR
TV/
VIDEO
SOUND FIELD
2CH/OFF
BASS
BOOST
CURSOR
MODE
MENU
MASTER
VOL
TEST
TONE
D.TUNING
RETURN
MENU
ENTER
TITLE
f
F
G
g
SLEEP
AV
?
/
1
?
/
1
DVD/LD
TV/SAT
>10
ENTER
?
/
1
AV
?
/
1
MASTER VOL –
=

56
GB
Additional Information
1
Hold down the Function button whose function you
want to change (for example, MD/TAPE).
2
Press the corresponding button of the component
you want to assign to the Function button (for
example, 1 - CD player).
The following buttons are assigned to select the functions:
* Sony VCRs are operated with a VTR 1, 2 or 3 setting.
These correspond to Beta, 8mm and VHS respectively.
Now you can use the MD/TAPE button to control a
second CD player.
To change the AUX function to another function
Hold down SLEEP and press the corresponding button of the
component you want to assign it to.
To change the 5.1 CH function to another function
Hold down AV
?
/
1
and press the corresponding button of the
component you want to assign it to.
To reset a button to its factory setting
Repeat the above procedure.
To reset all the function buttons to their factory setting
Press
?
/
1
, AV
?
/
1
and MASTER VOL – at the same time.
To operate
CD player
DAT deck
MD deck
Tape deck A
Tape deck B
LD player
VCR (remote control mode VTR 1*)
VCR (remote control mode VTR 2*)
VCR (remote control mode VTR 3*)
TV
DSS (Digital Satellite Receiver)
DVD
VCD player
Remote Button Description (STR-DE445 only)
Press
1
2
3
4
5
6
7
8
9
0
>10
ENTER
.

57
GB
Additional Information
Index
A
AC-3. See Dolby Digital (AC-3)
Adjusting
brightness of the display 24
speaker volumes 19
surround parameters 34
Automatic tuning 40
B
Basic receiver operations
22 - 26
Batteries 4
C
Changing
display 24
effect level 33
Checking the connections 20
Clearing receiver’s memory 15
Connecting. See Hookups
CONTROL A1 10, 11
Customizing sound fields 33
D
Demonstration mode 3
Digital Cinema Sound 52
Direct tuning 39
Dolby Digital (AC-3) 52
Dolby Pro Logic Surround 52
Dubbing. See Recording
E, F, G
Editing. See Recording
Effect level 33
H
Hookups
5.1CH Input 9
AC power cord 11
antennas 5
audio components 6
digital components 8
CONTROL A1 10, 11
speaker system 13
video components 7
I, J, K
Indexing. See Naming
L, M
Labeling. See Naming
N, O
Naming
preset stations 45
program sources 45
P, Q
Parameter 34, 36
Preset stations
how to preset 40
how to tune 41
Preset tuning 40
R
Receiving broadcasts
automatically 40
directly 39
preset stations 40
Recording
on an audio tape or MD 45
on a video tape 46
S
Scanning
preset stations. See Preset
tuning
radio stations. See Automatic
tuning
Selecting
component 22
front speaker system 23
sound field 28
Sleep timer 46
Sound field
adjustable parameters 36
customizing 33
pre-programmed 28 - 30
resetting 35
selecting 28
Speakers
adjusting speaker volume 19
connection 13
front speakers (A/B) 23
impedance 14
placement 16
Supplied accessories 4
Surround sound 16 - 20, 27 - 36,
52
T
Test tone 19
Troubleshooting 48
Tuning
automatically 40
directly 39
preset stations 40
U, V, W, X, Y, Z
Unpacking 4

2
RU
ВНИМАНИЕ!
Во избежание
возгорания или
поражения
электрическим током не
допускайте попадания
аппарата под дождь и
берегите его от сырости.
Во избежание
поражения
электрическим током не
вскрывайте корпус
аппарата. Его
техническое
обслуживание должно
производиться только
специалистами.
Не устанавливайте
аппарат в тесных
замкнутых
пространствах, таких,
как книжные полки или
встроенные шкафы.
Меры предосторожности
Эксплуатация
Перед подключением дополнительной
аппаратуры обязательно выключайте
ресивер и отключайте его от сети.
Чистка
Корпус и панель управления следует
протирать мягкой материей, слегка
смоченной слабым раствором моющего
средства. Не используйте жесткие
ткани, абразивные порошки или
растворители типа спирта или бензина.
Если в процессе эксплуатации
ресивера у Вас возникнут какие-
либо вопросы или проблемы,
просим обратиться к ближайшему
дилеру фирмы Sony.
Безопасность при эксплуатации
При попадании внутрь корпуса каких-
либо твердых предметов или
жидкостей отключите ресивер от сети
и не пользуйтесь им до тех пор, пока
его не проверит специалист.
Источники питания
• Перед началом пользования
убедитесь в том, что рабочее
напряжение аппарата соответствует
параметрам Вашей электросети.
Табличка с указанием рабочего
напряжения расположена на тыльной
стенке корпуса ресивера.
• Питание не отключено до тех пор,
пока сетевой провод остается
подключенным к розетке, даже если
сам аппарат при этом выключен.
• Если Вы в течение долгого времени
не собираетесь пользоваться
ресивером, не забудьте отключить его
от сетевой розетки. Для этого
потяните за вилку сетевого провода;
никогда не тяните за шнур.
• Замену сетевого шнура можно
производить только в
специализированной мастерской.
Размещение
• Во избежание перегрева и для
продления срока службы ресивера
его следует устанавливать в местах,
где обеспечивается достаточная
циркуляция воздуха.
• Не устанавливайте ресивер
поблизости от источников тепла или
там, где возможны прямое попадание
солнечных лучей, скопления пыли или
резкие сотрясения.
• Не следует класть или ставить на
ресивер каких-либо предметов,
способных перекрыть
вентиляционные отверстия, так как
это может вывести его из строя.

3
RU
Пояснения к настоящей
инструкции
Обозначения
• В руководстве по эксплуатации указан порядок
пользования органами управления ресивера. Вы можете,
кроме того, пользоваться кнопками на пульте
дистанционного управления, имеющими те же или
сходные обозначения. С более подробной информацией
об использовании ПДУ RM-PP404 (касается только
моделей STR-DE545 и STR-SE501) можно ознакомиться в
отдельном руководстве по эксплуатации, прилагаемом к
пульту.
• В этом руководстве по эксплуатации используется
условный графический символ:
z
который указывает на полезные советы, облегчающие
использование той или иной функции.
Данный ресивер включает в себя Dolby* Digital, Pro Logic
Surround и DTS** Digital Surround System.
*
Произведено по лицензии Dolby Laboratories. “DOLBY ”,
“AC-3” , “PRO LOGIC” и символ двойного a являются
торговыми марками Dolby Laboratories.
**
Произведено по лицензии “Digital Theater Systems, Inc”. Патент
США No 5,451,942 и другие всемирные патенты “DTS” и “DTS
Digital Surround”, зарегистрированные или находящиеся в
процессе регистрации, являются торговыми марками “Digital
Theater Systems, Inc”. © 1996 “Digital Theater Systems, Inc”. Все
права защищены.
Содержание
Подключение компонентов 4
Распаковка 4
Подключение антенн 5
Подключение аудио компонентов 6
Подключение видео компонентов 7
Подключение цифровых компонентов 8
Подключение к разъему 5.1CH INPUT 9
Другие виды подключений 10
Подключение и настройка
акустических систем 12
Подключение акустических систем 13
Подготовка к эксплуатации 15
Настройка многоканального пространственного звучания
16
Перед включением ресивера 20
Расположение органов управления и
основные операции 22
Описание элементов передней панели 22
Использование пространственного
звучания 27
Выбор звукового поля 28
Индикация режимов многокананального
пространственного звука 31
Пользовательская настройка звуковых полей 33
Прием радиопередач 37
Автоматическое запоминание FM - станций
(AUTOBETICAL) 39
Прямая настройка 39
Автоматическая настройка 40
Фиксированная настройка 40
Использование системы передачи текстовых данных
(RDS) 41
Прочие операции 44
Ввод названий фиксированных радиостанций и других
источников 45
Запись 45
Использование таймера отключения 46
Корректировка функций кнопки SET UP 47
Дополнительная информация 48
Поиск и устранение неисправностей 48
Технические характеристики 50
Глоссарий 52
Настройки, осуществляемые при помощи кнопок SUR,
LEVEL, BASS/TREBLE и SET UP 53
Описание кнопок пульта дистанционного управления
(только для модели STR-DE445) 54
Алфавитный указатель 57
Демонстрационный режим
При первичном подключении к источнику питания активизируется
демонстрационный режим. В начале демонстрационного режима на
дисплее отображается следующее сообщение:
“NOW DEMONSTRATION MODE IF YOU FINISH
DEMONSTRATION PLEASE PRESS POWER KEY WHILE THIS
MESSAGE APPEARS IN THE DISPLAY THANK YOU”
Для отмены демонстрации
В момент появления вышеупомянутого сообщения нажмите кнопку
“
1/u
”, чтобы выключить ресивер. При последующем включении
ресивера демонстрационный режим не будет активизироваться.
Для просмотра демонстрации
Удерживая в нажатом состоянии кнопку “SET UP”, нажмите кнопку
“
1/u
” для включения питания.
Примечания
• Запуск демонстрации очищает память ресивера. Для подробного
ознакомления с тем, какие данные стираются, смотрите раздел
“Очистка памяти ресивера” на стр. 15.
• При активации демонстрационного режима звук отключен.
Модель
Функция
CONTROL A1
SPEAKERS FRONT B
S-Video
TV/SAT OPTICAL IN
AC OUTLET
DE545
•
•
•
•
•
DE445
SE501
•
•
•
•
•
Перед Вами руководство по эксплуатации модели
STR-DE545, STR-DE445 и STR-SE501. Проверьте номер
Вашей модели, указанный в правом верхнем углу лицевой
панели аппарата или в нижнем правом углу пульта
дистанционного управления. В данном руководстве по
эксплуатации в иллюстрациях используется модель STR-
DE545 и пульт дистанционного управления (ПДУ) RM-U304,
если не упоминаются другие модели. Любые различия в
функционировании разных моделей четко обозначены
пометками в тексте, например фразой “только для модели
STR-DE545”.
Типы различий
4
RU
Подключение компонентов
Эта глава описывает, как
подключаются к ресиверу
различные Аудио и Видео
компоненты. Убедитесь, что
изучили разделы, описывающие
имеющиеся у Вас компоненты,
прежде, чем Вы подключите их к
ресиверу.
Распаковка
Проверьте наличие в комплекте ресивера следующих
принадлежностей:
• Проволочная FM-антенна (1)
• Рамочная АМ-антенна (1)
• Батарейки R6 (размер -AA) (2)
• Только для моделей STR-DE545 и STR-SE501
• ПДУ RM-PP404 (пульт дистанционного
управления) (1)
• Руководство по эксплуатации ПДУ (1)
• Руководство по эксплуатации CONTROL A1 (1)
• Только для STR-DE445
• ПДУ RM-U304 (1)
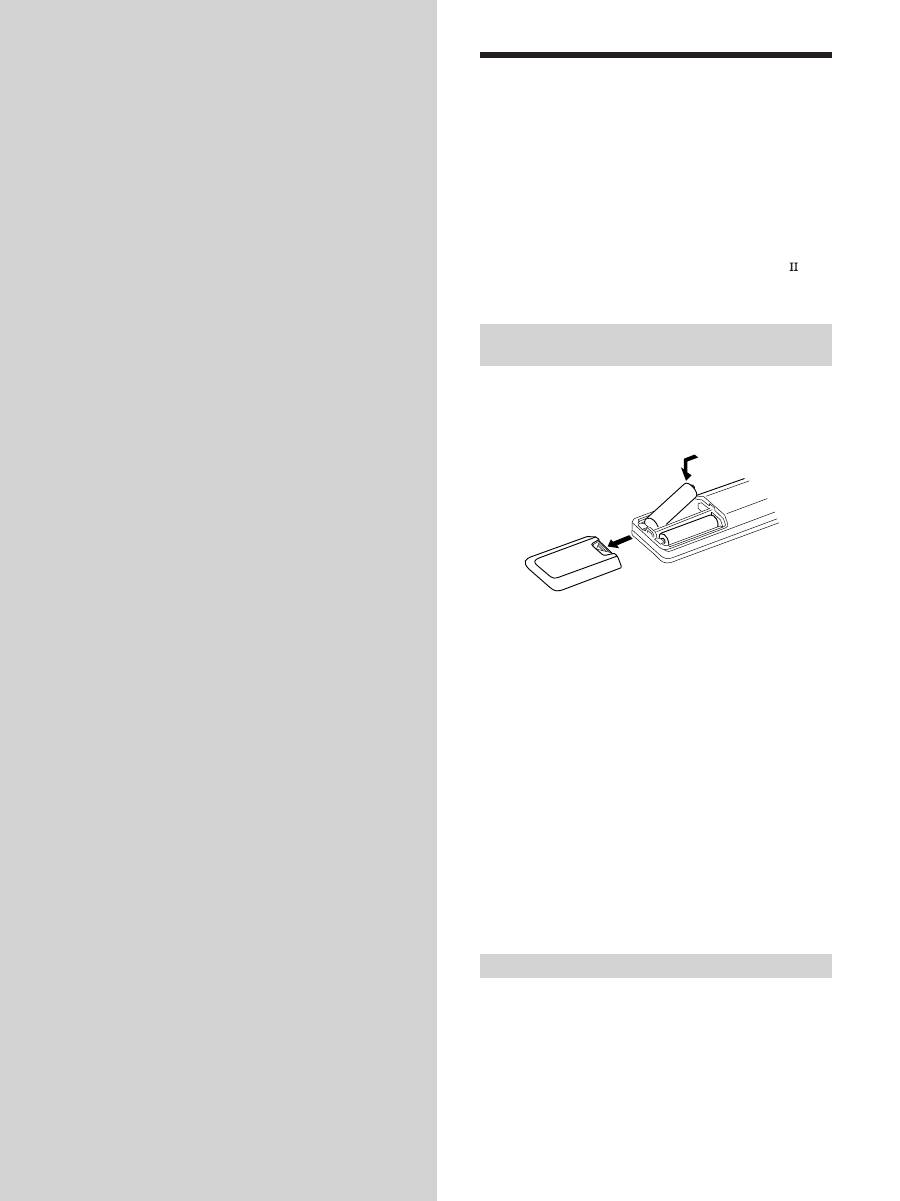
Установка батареек в пульт
дистанционного управления
Установите в пульт две батарейки R6 (размера -АА),
соблюдая полярность, указанную значками + и –
внутри отcека для батареек. При использовании ПДУ
направляйте его в сторону приемника дистанционного
сигнала
g
, имеющегося на лицевой панели ресивера.
Для получения более подробной информации
обратитесь к руководству по эксплуатации,
прилагающемся к Вашему ПДУ (только для моделей
STR-DE545 и STR-SE501).
z
Когда следует заменять батарейки?
При нормальной эксплуатации батареек должно хватать
примерно на 6 месяцев. Когда ресивер перестает
реагировать на команды с пульта дистанционного
управления, замените обе батарейки новыми.
Примечания
• Не оставляйте пульт в местах, где он может подвергаться
воздействию слишком высокой температуры или
влажности.
• Не устанавливайте в пульт новую батарейку вместе со
старой.
• Не допускайте попадания на дистанционный сенсор
прямых солнечных лучей или прямого света
осветительных приборов. Это может нарушить работу ПДУ.
• Если Вы в течение долгого времени не собираетесь
пользоваться ПДУ, извлеките из него батарейки во
избежание повреждений, которые могут быть вызваны их
протечкой или коррозией.
Прежде всего
• Прежде, чем подсоединять какие-либо компоненты,
обесточьте всю аппаратуру.
• До завершения всех соединений не подключайте
сетевой шнур к сети.
• Во избежание шумового фона или помех следите за
надежностью контактов.
• При подключении соединительного аудио/видео
кабеля цвет разъемов должен соответствовать
цвету гнезд, к которым они подключаются: желтый
(видео) к желтому; белый (L стереоканал) к белому,
а красный (R стереоканал) к красному.
]
]
}
}


