Sony STR-SE501 – page 2
Manual for Sony STR-SE501
Table of contents
- WARNING Precautions
- About This Manual T ABLE OF CONTENTS Additional Information
- Hooking Up the Components Unpacking
- Antenna Hookups
- Audio Component Hookups
- Video Component Hookups
- Digital Component Hookups
- 5.1CH Input Hookups
- Other Hookups
- CONTROL A1 hookup (STR-DE545 and STR-SE501 only) AUX AUDIO IN hookup Connecting the AC power cord
- Hooking Up and Setting Up the Speaker System
- Speaker System Hookup
- Speaker System Hookup
- Performing Initial Setup Operations
- Multi Channel Surround Setup
- Center speaker size ( Rear speaker size (
- Multi Channel Surround Setup
- Adjusting the speaker volume
- Before turning on the receiver Checking the connections Before You Use Your Receiver Multi Channel Surround Setup
- There is no sound no matter which component is selected. No sound is heard from one of the front speakers.
- Front Panel Parts Descriptions Location of Parts and Basic Operations ? 1 switch Function buttons
- INPUT MODE button
- Front Panel Parts Description
- 25
- Front Panel Parts Description
- Enjoying Surround Sound
- Selecting a Sound Field
- Sound field information
- Use the buttons on the front panel to operate the following modes Selecting a Sound Field
- Understanding the Multi-Channel Surround Displays
- Understanding the Multi-Channel Surround Displays
- Customizing Sound Fields
- Adjusting the level parameters Customizing Sound Fields
- Adjusting the bass/treble Resetting customized sound fields to the factory settings
- Customizing Sound Fields Adjustable parameters for each sound field
- Receiving Broadcasts
- Brief descriptions of buttons used to receive broadcasts
- Storing FM Stations Automatically Direct Tuning
- Preset Tuning Presetting radio stations Automatic Tuning
- Tuning to preset stations Receiving RDS broadcasts Displaying the RDS Information Using the Radio Data System (RDS)
- Using the Radio Data System (RDS) Monitoring traffic, news, or information programmes (EON) Locating a station by programme type
- Description of program types
- Other Operations
- Recording Naming Preset Stations and Program Sources
- Recording on a video tape Using the Sleep Timer Recording
- Adjustment Using the SET UP Button
- Troubleshooting Additional Information
- Reference sections for clearing the receiver’s memory
- Specifications Amplifier section
- FM tuner section AM tuner section Video section General
- Glossary
- Settings Using SUR, LEVEL, BASS/TREBLE, and SET UP buttons
- Remote Button Description (STR-DE445 only)
- Changing the factory setting of a function button
- Remote Button Description (STR-DE445 only)
- Index

21
GB
Hooking Up and Setting Up the Speaker System
There is no sound no matter which component is
selected.
,
Check that both the receiver and all components
are turned on.
,
Check that the volume level on the display is not
set to VOL MIN by turning the MASTER
VOLUME.
,
Check that the SPEAKERS selector is not set to
OFF or to a position for front speakers that are not
connected to the receiver (see “
7
SPEAKERS
selector” on page 23). (STR-DE545 and STR-SE501
only)
,
Check that all speaker cords are connected
correctly.
,
Press the MUTING button to turn off the indicator.
There’s no sound from a specific component.
,
Check that the component is connected correctly to
audio input jacks for that component.
,
Check that the cord(s) used for the connection is
(are) fully inserted into the jacks on both the
receiver and the component.
No sound is heard from one of the front
speakers.
,
Connect a pair of headphones to the PHONES jack
and set the SPEAKERS selector to OFF to verify
that sound is output from the headphones (see “
7
SPEAKERS selector” and “PHONES jack” on page
23).
If only one channel is output from the headphones,
the component may not be connected to the
receiver correctly. Check that all the cords are fully
inserted into the jacks on both the receiver and the
component.
If both channels are output from the headphones,
the front speaker may not be connected to the
receiver correctly. Check the connection of the front
speaker which is not outputting any sound.
If you encounter a problem that is not included above, see
“Troubleshooting” on page 48.

22
GB
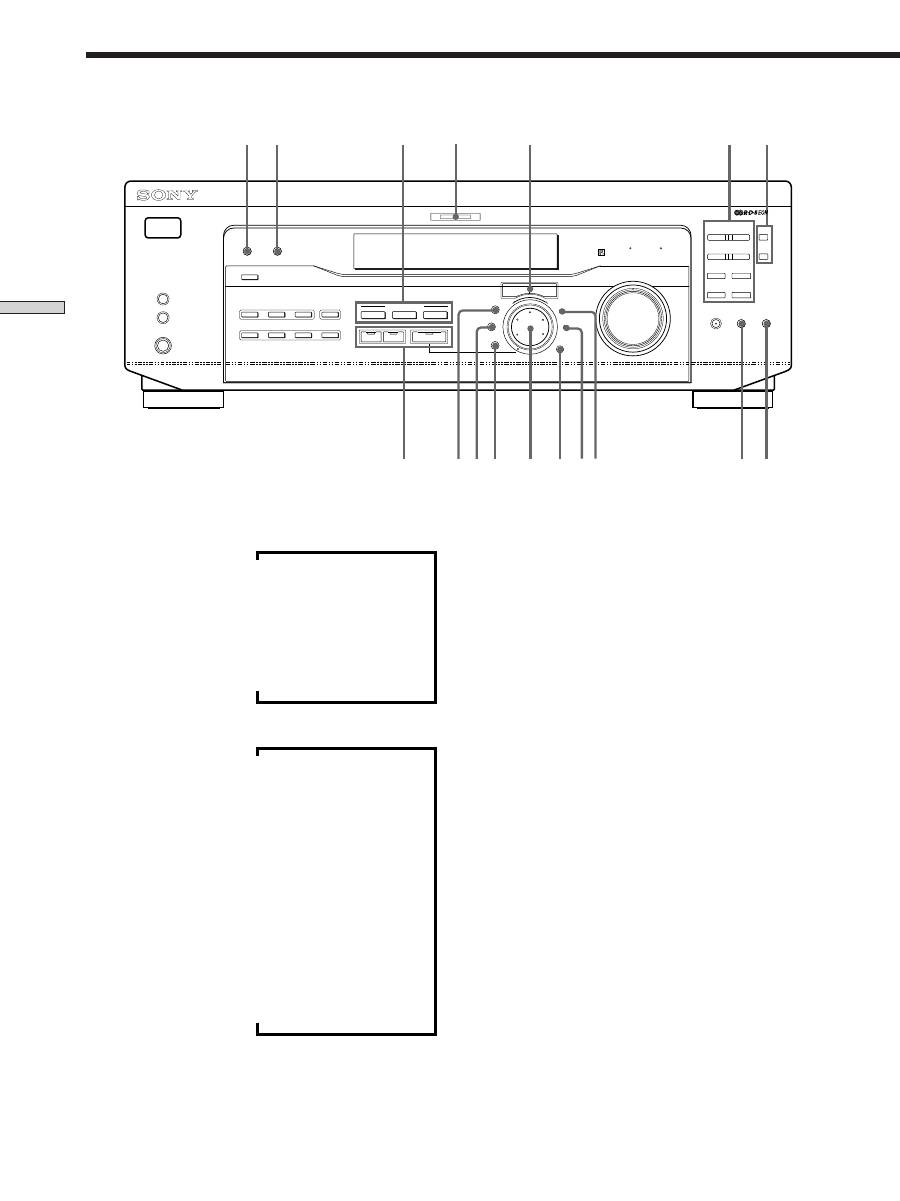
Front Panel Parts
Descriptions
Location of Parts and Basic Operations
This chapter provides information
about the locations and functions of
the buttons and controls on the front
panel. It also explains basic
operations.
1
?
/
1
switch
Press to turn the receiver on and off.
2
Function buttons
Press one of the buttons to select the component you
want to use.
To select
Press
VCR
VIDEO
TV or satellite tuner
TV/SAT
DVD or LD player
DVD/LD
MD or Tape deck
MD/TAPE
CD player
CD
Built in tuner
TUNER
An audio component
AUX
After selecting the component, turn on the component
you selected and play the program source.
• After selecting VCR, DVD player, or LD player, turn on the
TV and set the TV’s video input to match the component
you selected.

23
GB
Location of Parts and Basic Amplifier Operations
3
INPUT MODE button
Press to select the input mode for your digital
components (DVD/LD and TV/SAT).
Each press switches the input mode of the currently
selected component.
Select
To
AUTO
Give priority to digital signals
when there are both digital and
analog connections. If there are
no digital signals, analog is
selected
DIGITAL (OPTICAL)
Specify the digital audio signals
input to the DIGITAL OPTICAL
input jacks
DIGITAL (COAXIAL)
Specify the digital audio signals
input to the DIGITAL COAXIAL
input jacks (DVD/LD only)
ANALOG
Specify the analog audio signals
input to the AUDIO IN (L and R)
jacks
4
5.1CH INPUT button
Press to enjoy the audio source connected to the 5.1CH
INPUT jacks with the video from the selected
component.
• When the 5.1CH INPUT is selected, the tone, bass booster,
and sound field effects do not function.
• To change the video input displayed when 5.1CH INPUT is
selected, press SET UP (
ws
) and then press cursor buttons
(
w;
) repeatedly to select “5.1 V. IN” (see page 47 for
details).
5
MASTER VOLUME control
After turning on the component you selected, rotate to
adjust the volume.
6
MUTING button
Press to mute the sound. The indicator lights up when
the sound is muted.
7
SPEAKERS selector (STR-DE545 and STR-SE501 only)
Press according to the front speakers you want to
drive.
Press
To select
A
The speakers connected to the FRONT
SPEAKERS A terminals
B
The speakers connected to the FRONT
SPEAKERS B terminals
A+B*
The speakers connected to both the FRONT
SPEAKERS A and B terminals (parallel
connection)
* Be sure to connect the front speakers with nominal impedance of
8 ohms or higher if you want to select both sets of front speakers.
STR-DE445 only
Press SPEAKERS button to ON.
PHONES jack
Connects headphones.
• To use the headphones, press the SPEAKERS button to OFF
to output sound to the headphones.
• When listening to the headphones, set the sound field to
2CH to get the correct soundstage.
2 4
3
6
5
7
1
MULTI CHANNEL DECODING
MASTER VOLUME
DISPLAY
INPUT MODE
VIDEO
MD/TAPE
CD
TUNER
AUX
DVD/LD
TV/SAT 5.1CH INPUT
CINEMA STUDIO
LEVEL
I
–
i
+
SET UP
BASS BOOST
TONE
FM/AM
MUTING
TONE
BASS
BOOST
SHIFT
MEMORY
FM MODE
RDS EON RDS PTY
PRESET/
– PTY SELECT +
– TUNING +
NAME
ENTER
SUR
BASS/
TREBLE
SOUND FIELD
A. F. D.
A
B
C
2CH
MODE
DIMMER
SPEAKERS
R
ON
r
OFF
A
PHONES
B
?
/
1
24
GB
Location of Parts and Basic Amplifier Operations
v
8
DISPLAY button
Press repeatedly to change the information on the
display window as follows:
Index name of the component
v
FUNCTION button indication
v
Sound field applied to the program source
When the tuner is selected
v
Index name of the preset station* or program
station name**
v
Frequency
v
Program type indication**
v
Radio text**
v
Current time
v
Sound field applied to the band or the preset
station
* Index name appears only when you have assigned one to the
component or preset station (see page 45). Index name does not
appear when only blank spaces have been entered, or it is the
same as the function button.
** These indications appear only during RDS reception (see page
41).
9
DIMMER button
Press repeatedly to adjust the brightness of the display.
0
Use the SOUND FIELD buttons to enjoy surround
sound. For details, see “Enjoying Surround Sound”
starting from page 27.
A.F.D. button / indicator
Press to set the receiver to automatically detect the
type of audio signal being input and perform proper
decoding (if necessary).
2CH button / indicator
Press to output sound from only the front (left and
right) speakers.
MODE button / indicator
Press to activate the sound field selection mode (page
28).
qa
MULTI CHANNEL DECODING indicator
This indicator lights up when the unit is decoding
signals recorded in a multi channel format.
Front Panel Parts Description
8
qa
w;
qs
qd qf
qh
qg
9
q;
qkql
ws
wd
wf
wa
qj
MULTI CHANNEL DECODING
MASTER VOLUME
DISPLAY
INPUT MODE
VIDEO
MD/TAPE
CD
TUNER
AUX
DVD/LD
TV/SAT 5.1CH INPUT
CINEMA STUDIO
LEVEL
I
–
i
+
SET UP
BASS BOOST
TONE
FM/AM
MUTING
TONE
BASS
BOOST
SHIFT
MEMORY
FM MODE
RDS EON RDS PTY
PRESET/
– PTY SELECT +
– TUNING +
NAME
ENTER
SUR
BASS/
TREBLE
SOUND FIELD
A. F. D.
A
B
C
2CH
MODE
DIMMER
SPEAKERS
R
ON
r
OFF
A
PHONES
B
?
/
1

25
GB
Location of Parts and Basic Amplifier Operations
qs
Use the CINEMA STUDIO buttons to enjoy the
CINEMA STUDIO sound effects.
A/B/C buttons
Press to activate the CINEMA STUDIO A, B or C
sound field (page 29).
qd
BASS BOOST button
Press to increase the bass of the front speakers. The
BASS BOOST indicator lights up when the function is
turned on.
qf
TONE button
Press to turn the tone effect on or off. The TONE
indicator lights up when the tone is turned on.
When you adjust the tone using the BASS/TREBLE
parameters (page 35), the settings are stored automati-
cally and can be reproduced whenever you turn on the
tone.
z
When you want to listen to an analog source without any
digital processing
Do the following to bypass the sound field, tone, and bass
booster circuits.
1 Press 2CH.
2 Press BASS BOOST to turn off the BASS BOOST indicator.
3 Press TONE to turn off the TONE indicator.
The result will be a sound that is highly faithful to the program
source.
qg
The following buttons operate the built-in tuner. For
details, see “Receiving Broadcasts” starting from page
37.
SHIFT button
Selects a memory page for preset stations.
MEMORY button
Press to memorize a preset station.
qh
The following buttons operate the built-in tuner. For
details, see “Receiving Broadcasts” starting from page
37.
PRESET/PTY SELECT +/– buttons
Scan all preset stations.
Select program types during PTY operations.
TUNING +/– buttons
Scan all the available radio stations.
FM/AM button
Selects the FM or AM band.
FM MODE button
If “STEREO” flashes in the display and the FM stereo
reception is poor, press this button. You will not have
the stereo effect but the sound is improved.
RDS EON button
Press to set the receiver to automatically switch to
stations broadcasting traffic announcements, news, or
information program. The RDS EON button does not
function during AM reception.
RDS PTY button
Press to scan stations by program type. The RDS PTY
button does not function during AM reception.
qj
LEVEL button
Press to activate the speaker level parameters (page
34). The indicator on the button lights up and you can
adjust the various speaker level parameters (front
balance, rear balance, etc.).
Press again to turn off the indicator.
qk
SUR button
Press to activate the surround parameters (page 33).
The indicator on the button lights up and you can
adjust the various surround parameters (effect level,
wall type, etc.).
Press again to turn off the indicator.
ql
BASS/TREBLE button
Press to adjust the tone (page 35).
w;
Cursor buttons (
/
)
Press to select various speaker level, surround, and
bass/treble parameters (etc.).

26
GB
Location of Parts and Basic Amplifier Operations
wa
Jog dial
Turn to adjust the selected speaker level, surround,
and bass/treble parameters (etc.).
ws
SET UP button
Press to activate the setup mode, then use the cursor
buttons (
w;
) to select any of the following indications.
You can then make various settings using the jog dial
(
wa
).
When you select
You can
Speaker type
Specify the type of speakers.
(page 16)
Speaker setup
Specify the front, center, rear
speaker sizes, the rear speaker
position, and whether or not you
are using a sub woofer. (page 16)
Speaker Distance
Specify the front, center, and rear
speaker distances. (page 18)
5.1CH video input
Specify the video input to be
used with the audio signals from
the 5.1CH INPUT jacks. (page 47)
wd
NAME button
Press to activate the name function and enter names
for preset stations and program sources (page 45).
wf
ENTER button
Press to enter individual characters for the preset
station and program source names.
Front Panel Parts Description

27
GB
Enjoying Sur
round Sound
Enjoying Surround Sound
This chapter describes how to set up
the receiver to enjoy surround sound.
You can enjoy multi channel surround
when playing back software encoded
with Dolby Digital or DTS.
You can take advantage of surround sound simply by
selecting one of the receiver’s pre-programed sound
modes. They bring the exciting and powerful sound of
movie theaters and concert halls into your home. You can
also customize the sound modes to obtain the sound you
desire by changing the various surround parameters.
The receiver containes a variety of different sound modes.
The cinema sound modes are designed for use when
playing back movie software (DVD, LD, etc.) encoded
with multi channel surround sound or Dolby Pro Logic.
In addition to decoding the surround sound, some of
these modes also provide sound effects commonly found
in movie theaters.
The virtual sound modes contain compelling applications
of the Sony Digital Cinema Sound digital signal
processing technology. They shift the sound away from
the actual speaker locations to simulate the presence of
several “virtual” speakers.
The music (etc.) sound modes are designed for use with
standard audio sources and TV broadcasts. They add
reverberation to the source signal to make you feel as if
you were in a concert hall or stadium (etc.). Use these
sound modes with two-channel sources like CD and
stereo broadcasts of sports programs or musical concerts.
For more information about the sound modes, see pages
29 - 30.
A.F.D.
The “Auto Format Decoding” sound mode presents the
sound exactly as it was encoded, without adding any
reverberation (etc.).
To fully enjoy surround sound, you must register the
number and location of your speakers. See “Multi-
Channel Surround setup” starting on page 16 to set the
speaker parameters before enjoying surround sound.
28
GB
Enjoying Sur
round Sound
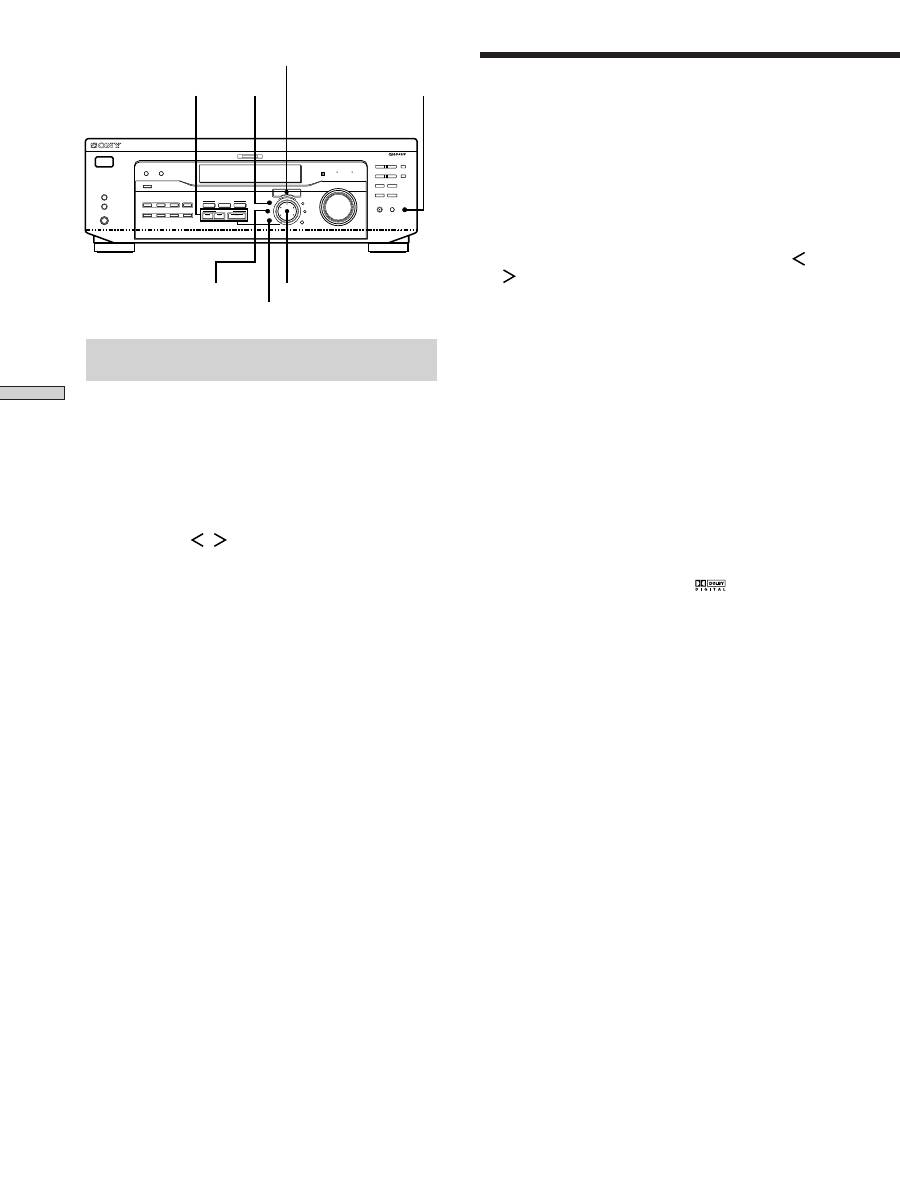
Selecting a Sound Field
You can enjoy surround sound simply by selecting one of
the pre-programed sound fields according to the program
you want to listen to.
1
Press MODE.
The current sound field is indicated in the display.
2
Turn the jog dial or press the cursor buttons (
or
) to select the sound field you want.
See the table starting on page 29 for information on
each sound field.
To turn the sound field off
Press A.F.D. or 2CH (page 24).
z
The receiver memorizes the last sound field selected for each
program source (Sound Field Link)
Whenever you select a program source, the sound field that was
last applied is automatically applied again. For example, if you
listen to CD with HALL as the sound field, change to a different
program source, then return to CD, HALL will be applied again.
With the tuner, sound fields are memorized separately for AM,
FM, and all preset stations.
z
You can identify Dolby Surround-encoded software by
looking at the packaging
Dolby Digital discs are labeled with the
logo, and Dolby
Surround encoded programs are labeled with the
A
logo.
Brief descriptions of buttons used to
enjoy surround sound
LEVEL button:
Press to customize the level parameters.
SUR button:
Press to customize the surround parameters
in the current sound field.
BASS/TREBLE button:
Press to adjust the tone.
Cursor buttons (
/
):
Use to select parameters after
pressing the LEVEL, SUR, BASS/TREBLE or SET UP
buttons.
Jog dial:
Use to adjust parameters and select sound fields
(etc.).
SOUND FIELD buttons:
A.F.D. button:
Press to set the receiver to
automatically detect the type of audio signal being
input and perform proper decoding (if necessary).
MODE button:
Press to activate the sound field
selection mode.
2CH button:
Press to output sound from only the
front (left and right) speakers.
TONE button:
Turns the tone effect on or off.
Cursor buttons
Jog dial
SOUND FIELD buttons
RDS EON RDS PTY
SUR
BASS/TREBLE
LEVEL
TONE
MULTI CHANNEL DECODING
MASTER VOLUME
DISPLAY
INPUT MODE
VIDEO
MD/TAPE
CD
TUNER
AUX
DVD/LD
TV/SAT 5.1CH INPUT
CINEMA STUDIO
LEVEL
I
–
i
+
SET UP
BASS BOOST
TONE
FM/AM
MUTING
TONE
BASS
BOOST
SHIFT
MEMORY
FM MODE
PRESET/
– PTY SELECT +
– TUNING +
NAME
ENTER
SUR
BASS/
TREBLE
SOUND FIELD
A. F. D.
A
B
C
2CH
MODE
DIMMER
?
/
1
SPEAKERS
R
ON
r
OFF
A
B
PHONES

29
GB
Enjoying Sur
round Sound
Software with multi channel surround audio signals is
played according to the way it was recorded.
Software with two channel audio signals, is decoded
with Dolby Pro Logic to create surround effects.
Reproduces the sound characteristics of the Sony
Pictures Entertainment “Cary Grant Theater” cinema
production studio.
Reproduces the sound characteristics of the Sony
Pictures Entertainment “Kim Novak Theater” cinema
production studio.
Reproduces the sound characteristics of the Sony
Pictures Entertainment scoring stage.
Uses 3D sound imaging to create an array of virtual rear
speakers positioned higher than the listener from a
single pair of actual rear speakers. This mode creates
four sets of virtual speakers surrounding the listener at
approximately a 30° angle of elevation.
Uses 3D sound imaging to create virtual rear speakers
from the sound of the front speakers without using
actual rear speakers. This mode creates five sets of
virtual speakers surrounding the listener at a 30° angle
of elevation.
NORM. SUR
(NORMAL SURROUND)
C. STUDIO A
(CINEMA STUDIO A)
C. STUDIO B
(CINEMA STUDIO B)
C. STUDIO C
(CINEMA STUDIO C)
V. MULTI*
(VIRTUAL MULTI
DIMENSION)
V. SEMI-M*
(VIRTUAL SEMI-MULTI
DIMENSION)
This is a standard mode, great for
watching most type of movie.
This mode is ideal for watching science-
fiction or action movies with lots of sound
effects.
This mode is ideal for watching musicals
or classic films where music is featured in
the soundtrack.
* “VIRTUAL” sound field: Sound field with virtual speakers.
Sound field information
Sound field
Effect
Notes
SIDE**
L
C
R
LS
RS
RS
LS
RS
LS
BEHIND**
** See
page 17
L
C
R
LS
RS
RS
LS
RS
LS
L
C
R
LS
RS
RS
LS
RS
LS
30
GB
Enjoying Sur
round Sound
Sound field
Effect
Notes
Ideal for soft acoustic sounds.
Great for rock or pop music.
Be sure to set the game machine to stereo
mode when using game software with
stereo sound capabilities.
Notes
• The effects provided by the virtual speakers may cause increased noise in the playback signal.
• When listening to sound fields that employ the virtual speakers, you will not be able to hear any sound coming directly from the rear
speakers.
Reproduces the acoustics of a rectangular concert hall.
Reproduces the acoustics of a jazz club.
Reproduces the acoustics of a 300-seat live house.
Obtains maximum audio impact from video game
software.
HALL
JAZZ
(JAZZ CLUB)
LIVE
(LIVE HOUSE)
GAME
Automatically detects the type of audio signal being
input (Dolby Digital, Dolby Pro Logic, or standard two
channel stereo) and performs the proper decoding if
necessary. This mode presents the sound as it was
recorded/encoded, without adding any effects.
Outputs the sound from the front left and right
speakers only. Standard two channel (stereo) sources
completely bypass the sound field processing. Multi
channel surround formats are downmixed to two
channels.
AUTO FORMAT DECODING
(Press the A.F.D. button)
2 CHANNEL
(Press the 2CH button)
You can use this mode as a reference. Set
the tone to OFF while using this mode to
hear the source sound exactly as it was
recorded.
This allows you to play any source using
only the front left and right speakers.
Use the buttons on the front panel to operate the following modes
Note
No sound is output from the sub woofer when the 2 CHANNEL mode is selected. To listen to two channel (stereo) sources using the front
left and right speakers and a sub woofer, use the AUTO FORMAT DECODING mode.
Selecting a Sound Field
Sound field information
31
GB
Enjoying Sur
round Sound
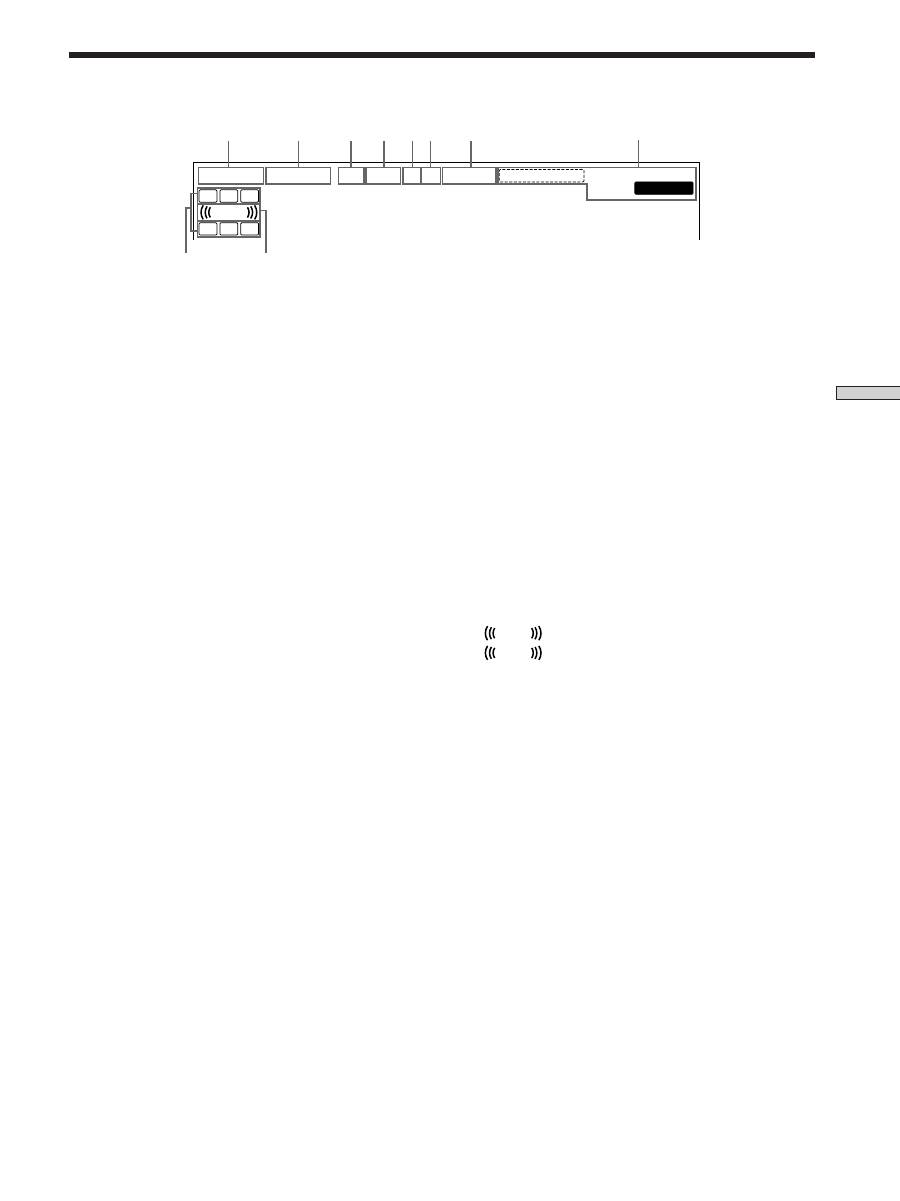
Understanding the Multi-Channel Surround Displays
1
;
DIGITAL
This indicator lights up when a sound field other than
2 CHANNEL is selected and the unit is decoding
signals recorded in the Dolby Digital (AC-3) format.*
* However, this indicator does not light when the recording format
is 2/0 or 2/0 Pro logic.
2
PRO LOGIC
Lights up when the receiver applies Pro Logic
processing to two channel signals in order to output
the center and surround channel signals.**
** However, this indicator does not light if the center and rear
speakers are set to “NO”, or the SPEAKER button is set to
“OFF” and the A.F.D. or NORMAL SURROUND sound fields
are selected.
3
OPT
Lights up when the source signal is a digital signal
being input through the OPT terminal.
4
COAX
Lights up when the source signal is a digital signal
being input through the COAX terminal.
5
;
Lights up when Dolby Digital (AC-3) signals are
input.
6
dts
Lights up when DTS signals are input.
Note
When playing a DTS format disc, be sure that you
have made digital connections and that INPUT MODE
is NOT set to ANALOG (see
3
on page 23).
7
D. RANGE
Lights up when dynamic range compression is active.
See page 35 to adjust the dynamic range compression.
8
Tuner indicators
These indicators light up when using the receiver to
tune in radio stations, etc. See pages 37 - 43 for tuner
operations.
9
Playback channel indicators
The letters light up to indicate the channels being
played back.
L: Front Left
R: Front Right
C: Center (monaural)
LS: Left Surround
RS: Right Surround
S: Surround (monaural or the rear components
obtained by Pro Logic processing)
The boxes around the letters light up to indicate the
speakers used to playback the channels.
See the next page for details regarding the playback
channel indicators.
q;
L F E
L F E
will light up when the disc being played
contains the LFE (Low Frequency Effect) channel and
when the sound of the LFE channel signal is actually
being reproduced.
PRO LOGIC
D.RANGE
MONO
RDS
TA NEWS INFO
STEREO
OPT
LS S RS
L
C
R
MEMORY
L F E
DIGITAL
a
dts
a
COAX
1
2
3
9
q;
4
6
5
7
8

32
GB
Enjoying Sur
round Sound
Source sound displays
The letters (L, C, R, etc.) indicate the source sound. The box around the letters varies to show how the receiver downmixes
the source sound (based on the speakers settings). When using music sound modes such as HALL or JAZZ CLUB, the
receiver adds reverberation based on the source sound.
The following table shows how the indicators light up when using AUTO FORMAT DECODING mode.
Although the table below shows almost all of the configurations available from multi channel surround signals, the ones
marked “ ” are the most common.
* Signals with Dolby surround encoded flag OFF
** Signals with Dolby surround encoded flag ON
*** The sampling rate is displayed.
Notes
• The receiver performs Pro Logic decoding and the display conforms to 2/0** when using the following movie sound modes with 2/0*
or STEREO PCM format signals. (C. STUDIO A, B, C, V. MULTI, and V. SEMI-M.)
• When using music sound modes such as HALL or JAZZ CLUB with standard audio formats e.g., PCM, the receiver creates rear
signals from the front L and R signals. In this case, sound is output from the rear speakers, but output channel indicators for the rear
speakers do not light.
Understanding the Multi-Channel Surround Displays
1/0
2/0*
3/0
2/1
3/1
2/2
3/2
2/0**
DOLBY DIGITAL [1/0]
DTS [1/0]
DOLBY PROLOGIC
PCM XX kHz***
DIGITAL
a
C
C
DOLBY DIGITAL [2/0]
DTS [2/0]
DOLBY DIGITAL [3/0]
DTS [3/0]
DOLBY DIGITAL [2/1]
DTS [2/1]
DOLBY DIGITAL [3/1]
DTS [3/1]
DOLBY DIGITAL [2/2]
DTS [2/2]
DOLBY DIGITAL [3/2]
DTS [3/2]
DOLBY DIGITAL [2/0]
DIGITAL
a
C
dts
C
DIGITAL
a
C
dts
C
DIGITAL
a
C
dts
C
DIGITAL
a
L
C
R
L
C
R
DIGITAL
a
L
C
R
L
C
R
DIGITAL
a
L
C
R
L
C
R
DIGITAL
a
L
C
R
L
C
R
L
R
L
R
L
R
dts
L
R
DIGITAL
a
L
S
R
L
S
R
DIGITAL
a
L
S
R
L
S
R
DIGITAL
a
L
S
R
L
S
R
DIGITAL
a
L
S
R
L
S
R
DIGITAL
a
L
C
S
R
L
C
S
R
DIGITAL
a
L
C
S
R
L
C
S
R
DIGITAL
a
L
C
S
R
L
C
S
R
DIGITAL
a
L
C
S
R
L
C
S
R
DIGITAL
a
L
LS
R
RS
L
LS
R
RS
DIGITAL
a
L
LS
R
RS
L
LS
R
RS
DIGITAL
a
L
LS
R
RS
L
LS
R
RS
DIGITAL
a
L
LS
R
RS
L
LS
R
RS
DIGITAL
a
L
LS
C
R
RS
L
LS
C
R
RS
DIGITAL
a
L
LS
C
R
RS
L
LS
C
R
RS
DIGITAL
a
L
LS
C
R
RS
L
LS
C
R
RS
DIGITAL
a
L
LS
C
R
RS
L
LS
C
R
RS
PRO LOGIC
L
C
S
R
PRO LOGIC
L
C
S
R
PRO LOGIC
L
C
S
R
PRO LOGIC
L
C
S
R
PRO LOGIC
L
C
S
R
PRO LOGIC
L
C
S
R
PRO LOGIC
L
C
S
R
PRO LOGIC
L
C
S
R
L
R
L
R
L
R
L
R
L
R
L
R
L
R
L
R
dts
Recording
Format
(Front/Rear)
Input Channel Display
Source sound and Output Channel Display
All speakers
present
Rear speakers
absent
Center speaker
absent
Rear/center
speakers absent
dts
dts
dts
dts
dts
dts
dts
dts
dts
dts
dts
dts
dts
dts
dts
dts
dts
dts
dts
dts
dts
dts
dts

33
GB
Enjoying Sur
round Sound
Customizing Sound Fields
By adjusting the surround parameters and the tone
characteristics of the front speakers, you can customize
the sound fields to suit your particular listening situation.
Once you customize a sound field, the changes are stored
in memory indefinitely (unless the receiver is unplugged
for about two weeks). You can change a customized
sound field any time by making new adjustments to the
parameters.
See the table on page 36 for the parameters available in
each sound field.
To get the most from multi channel
surround sound
Position your speakers and do the procedures described
in “Multi Channel Surround Setup” starting on page 16
before you customize a sound field.
Adjusting the surround parameters
The SUR menu contains parameters that let you
customize various aspects of the current sound field. The
settings available in this menu are stored individually for
each sound field.
1
Start playing a program source encoded with multi
channel surround sound.
2
Press SUR.
The button lights up and the first parameter is
displayed.
3
Press the cursor buttons (
or
) to select the
parameter you want to adjust.
4
Turn the jog dial to select the setting you want.
The setting is stored automatically.
Effect level (EFFECT)
Initial setting : (depends on sound mode)
This parameter lets you adjust the “presence” of the
current surround effect.
Wall type (WALL)
Initial setting : midpoint
When sound is reflected off soft material, such as a
curtain, the high frequency elements are reduced. A hard
wall is highly reflective and does not significantly affect
the frequency response of the reflected sound. This
parameter lets you control the level of the high
frequencies to alter the sonic character of your listening
environment by simulating a softer (S) or harder (H) wall.
The midpoint designates a neutral wall (made of wood).
Reverberation (REVB.)
Initial setting : midpoint
Before sound reaches our ears, it is reflected
(reverberated) many times between the left and right
walls, ceiling, and floor. In a large room, sound takes more
time to bounce from one surface to another than in a
smaller room. This parameter lets you control the spacing
of the early reflections to simulate a sonically larger (L) or
smaller (S) room.
• The reverberation can be adjusted from REVB. S. 1 ~
REVB. S. 8 (short) to REVB. L. 1 ~ REVB. L. 8 (long) in
17 steps.
• The midpoint (REVB. MID) designates a standard room
with no adjustment.

34
GB
Enjoying Sur
round Sound
Adjusting the level parameters
The LEVEL menu contains parameters that let you adjust
the balance and speaker volumes of each speaker. The
settings available in this menu are applied to all sound
fields.
1
Start playing a program source encoded with multi
channel surround sound.
2
Press LEVEL.
The button lights up and the first parameter is
displayed.
3
Press the cursor buttons (
or
) to select the
parameter you want to adjust.
4
Turn the jog dial to select the setting you want.
The setting is stored automatically.
*Front balance (
L
R
)
Initial setting : balance
Lets you adjust the balance between the front left and
right speakers.
• The balance can be adjusted ±8 steps.
• These settings can also be adjusted using the supplied
remote. See “Adjusting the speaker volume” (page 19).
*Rear balance (
LS
RS
)
Initial setting : balance
Lets you adjust the balance between the rear left and right
speakers.
• The balance can be adjusted ±8 steps.
• These settings can also be adjusted using the supplied
remote. See “Adjusting the speaker volume” (page 19).
*Rear level (REAR)
Initial setting : 0 dB
Lets you adjust level of the rear (left and right) speakers.
• The level can be adjusted in 1 dB steps from –10 dB to
+6 dB.
• These settings can also be adjusted directly using the
supplied remote. See “Adjusting the speaker volume”
(page 19).
*Center level (CTR)
Initial setting : 0 dB
Lets you adjust the level of the center speaker.
• The level can be adjusted in 1 dB steps from –10 dB to
+6 dB.
*Sub woofer level (S.W. xx)
Initial setting : 0 dB
Lets you adjust the level of the sub woofer.
• The level can be adjusted in 1 dB steps from –10 dB to
+6 dB.
* The parameters can be adjusted separately for 5.1 CH INPUT.
LFE (Low Frequency Effect) mix level (LFE
;
xx)
Initial setting : 0 dB
This parameter lets you attenuate the level of the LFE
(Low Frequency Effect) channel output from the sub
woofer without affecting the level of the bass frequencies
sent to the sub woofer from the front, center or rear
channels via the bass redirection circuitry.
• The level can be adjusted in 1 dB steps from –20.0 dB to
0 dB (line level). 0 dB outputs the full LFE signal at the
mix level determined by the recording engineer.
• Selecting OFF mutes the sound of the LFE channel from
the sub woofer. However, the low frequency sounds of
the front, center, or rear speakers are output from the
sub woofer according to the settings made for each
speaker in the speaker setup (page 16).
dts LFE (Low Frequency Effect) mix level
(LFE
dts
xx)
Initial setting: 0 dB
This parameter lets you attenuate the level of the LFE
(Low Frequency Effect) channel output from the sub
woofer without affecting the level of the bass frequencies
sent to the sub woofer from the front, center or rear
channels via the “dts” bass redirection circuitry.
• The level can be adjusted in 1 dB steps from –20.0 dB to
+10.0 dB (line level).
• Selecting OFF mutes the sound of the LFE channel from
the sub woofer. However, the low frequency sounds of
the front, center, or rear speakers are output from the
sub woofer according to the settings made for each
speaker setup (For details, refer to “Multi Channel
Surround Setup”).
z
About the level differences in the LFE MIX settings
The “dts LFE MIX” level is set to +10.0 dB and “LFE MIX” (Dolby
Digital) is set to 0 dB. This is because there is an initial difference
of 10 dB in the overall mix between the Dolby Digital and dts
LFE channel levels. Essentially, with the “dts LFE MIX” level set
to +10 dB and the “LFE MIX (Dolby Digital)” level set to 0 dB,
approximately the same amounts of LFE channel signal are
distributed to the other audio channels in the overall mix.
Customizing Sound Fields

35
GB
Enjoying Sur
round Sound
Dynamic range compressor (COMP.
D. RANGE
xx)
Initial setting : OFF
Lets you compress the dynamic range of the sound track.
This may be useful when you want to watch movies at
low volumes late at night.
• OFF reproduces the sound track with no compression.
• STD reproduces the sound track with the dynamic
range intended by the recording engineer.
• 0.1 ~ 0.9 allow you to compress the dynamic range in
small steps to achieve the sound you want.
• MAX provides a dramatic compression of the dynamic
range.
Note
Dynamic range compression is not possible with DTS sources.
z
About the Dynamic Range Compressor
This parameter allows you to compress the dynamic range of the
soundtrack based on the dynamic range information included in
the Dolby Digital signal. “STD” is standard compression, but
because many sources have only light compression, you may not
notice much difference when using 0.1~0.9.
Therefore, we recommend using the “MAX” setting. This greatly
compresses the dynamic range and allows you to view movies
late at night at low volumes. Unlike analog limiters, the levels are
predetermined and it provides a very natural compression.
Adjusting the bass/treble
The BASS/TREBLE button lets you adjust the tone (bass
or treble) of the front speakers for optimum sound. You
can adjust the tone for each separate sound field.
1
Start playing a program source encoded with multi
channel surround sound.
2
Press BASS/TREBLE.
The button lights up and the first parameter is
displayed.
3
Press the cursor buttons (
or
) to select the
parameter you want to adjust.
4
Turn the jog dial to select the setting you want.
The setting is stored automatically.
You can select a tone level of -6 dB to +6 dB in 2 dB
steps.
5
Press TONE so that the TONE indicator lights up.
z
You can turn off the tone without erasing it
The tone settings are stored separately for each sound field. Press
the TONE button to turn the TONE indicator off.
Resetting customized sound fields to the
factory settings
1
If the power is on, press
?
/
1
to turn off the power.
2
Hold down MODE and press
?
/
1
.
“SUR CLR” appears in the display and all sound fields
are reset at once.

36
GB
Enjoying Sur
round Sound
Customizing Sound Fields
Adjustable parameters for each sound field
EFFECT
WALL
REVERB
FRONT
REAR
REAR
CENTER SUB WOOFER LFE
dts LFE
LEVEL
TYPE
TIME
BAL.
BAL.
LEVEL
LEVEL
LEVEL
MIX
mix
2CH
r
r
r
A.F.D.
r
r
r
r
r
r
r
NORMAL SURROUND
r
r
r
r
r
r
r
CINEMA STUDIO A
r
r
r
r
r
r
r
r
CINEMA STUDIO B
r
r
r
r
r
r
r
r
CINEMA STUDIO C
r
r
r
r
r
r
r
r
V. MULTI DIMENSION
r
r
r
r
r
r
r
V. SEMI–M. DIMENSION
r
r
r
r
r
HALL
r
r
r
r
r
r
r
r
r
r
JAZZ CLUB
r
r
r
r
r
r
r
r
r
r
LIVE HOUSE
r
r
r
r
r
r
r
r
r
r
GAME
r
r
r
r
r
r
r
r
r
r
5.1CH INPUT
r
r
r
r
r
D.RANGE
BASS/TREBLE
COMP.
2CH
r
r
A.F.D.
r
r
NORMAL SURROUND
r
r
CINEMA STUDIO A
r
r
CINEMA STUDIO B
r
r
CINEMA STUDIO C
r
r
V. MULTI DIMENSION
r
r
V. SEMI–M. DIMENSION
r
r
HALL
r
r
JAZZ CLUB
r
r
LIVE HOUSE
r
r
GAME
r
r
5.1CH INPUT

37
GB
Receiving Br
oadcasts
Receiving Broadcasts
This chapter describes how to receive
FM or AM broadcasts and how to
preset selected stations.
You can tune in stations on this receiver in the following
ways:
Automatic FM Memory (AUTOBETICAL)
You can have the receiver automatically store up to 30 of
the clearest FM and FM RDS stations in alphabetical order
(see page 39).
Direct Tuning
You can enter a frequency of the station you want directly
by using the numeric buttons on the remote (see page 39).
Automatic Tuning
If you don’t know the frequency of the station you want,
you can let the receiver scan all available stations in your
area (see page 40).
Preset Tuning
After you have tuned in stations using Direct Tuning or
Automatic Tuning, you can preset them to the receiver
(see page 40). Then you can tune in any of the stations
directly by entering its 2-character code (see page 41). Up
to 30 FM or AM stations can be preset. The receiver will
also scan all the stations that you have preset (see page
41).
RDS functions
Radio Data System (RDS) is a broadcasting service that
allows radio stations to send additional information along
with the regular radio programme signal. This receiver
offers you three convenient RDS features:
— Displaying the RDS information (see page 41)
— Monitoring of traffic, news, or information
programmes (see page 42)
— Locating a station by programme type (see page 42)
Note that RDS is operable only for FM stations.
*
*
Not all FM stations provide RDS service, nor do they provide the
same types of services. If you are not familiar with the RDS services
in your area, check with your local radio stations for details.
Before you begin, make sure you have:
• Connected an FM and AM antenna to the receiver (see
page 5).
• Selected the appropriate speaker system (see page 23).
(STR-DE545 and STR-SE501 only)

38
GB
Receiving Br
oadcasts
Brief descriptions of buttons used to
receive broadcasts
TUNING +/– buttons:
Press to scan all available radio
stations.
DISPLAY button:
Press to display the RDS information.
MEMORY button:
Uses for memorizing preset stations.
PRESET/PTY SELECT +/– buttons:
Press to scan all preset
radio stations or select program types.
RDS EON button:
Press to set the receiver to switch
stations automatically.
RDS PTY button:
Press to scan preset stations by the
program type.
FM MODE button:
If “STEREO” flashes in the display
and the FM stereo reception is poor, press this button to
improve the sound. You will not be able to enjoy stereo
effect but the sound will be less distorted.
Note
If “STEREO” does not appear at all even when the FM broadcast
is received normally, press this button to turn on the “STEREO”
indication.
FM/AM button:
Press to select the FM or AM band.
SHIFT button:
Press to select a memory page (A, B, or C)
for presetting radio stations or tuning to preset stations.
TUNER:
Press to select the tuner.
On the remote (STR-DE445 only):
D. TUNING:
Press this button to enter a frequency directly
using the numeric buttons.
Numeric buttons:
Press to enter a numeric value when
inputting the frequency directly, presetting radio stations,
or tuning to preset stations.
MULTI CHANNEL DECODING
RDS EON RDS PTY
SOUND FIELD
FM/AM
DISPLAY
PRESET/PTY SELECT +/–
TUNING +/–
FM MODE
RDS EON
TUNER
MEMORY
RDS PTY
SHIFT
MULTI CHANNEL DECODING
MASTER VOLUME
DISPLAY
INPUT MODE
VIDEO
MD/TAPE
CD
TUNER
AUX
DVD/LD
TV/SAT 5.1CH INPUT
CINEMA STUDIO
LEVEL
I
–
i
+
SET UP
BASS BOOST
TONE
FM/AM
MUTING
TONE
BASS
BOOST
SHIFT
MEMORY
FM MODE
PRESET/
– PTY SELECT +
– TUNING +
NAME
ENTER
SUR
BASS/
TREBLE
SOUND FIELD
A. F. D.
A
B
C
2CH
MODE
DIMMER
SPEAKERS
R
ON
r
OFF
A
PHONES
B
?
/
1
Numeric buttons
P
p
D.SKIP
9
(
0
)
=
+
>10
0
7
8
9
4
5
6
1
2
3
ENTER
MD/TAPE
CD
TUNER
VIDEO
5.1CH
SYSTEM
STANDBY
AUX
SHIFT
POSITION
DISPLAY
JUMP
A.F.D.
EQ/TONE
MUTING
MODE
WIDE
P IN P
SWAP
DISC
– /– –
– SUB CH +
CH/
PRESET
ANT
TV/VTR
TV/
VIDEO
SOUND FIELD
2CH/OFF
BASS
BOOST
CURSOR
MODE
MENU
MASTER
VOL
TEST
TONE
D.TUNING
RETURN
MENU
ENTER
TITLE
f
F
G
g
SLEEP
AV
?
/
1
?
/
1
DVD/LD
TV/SAT
D.TUNING
STR-DE445 only
Receiving Br
oadcasts
39
GB
Storing FM Stations
Automatically
(AUTOBETICAL)
This function lets you store up to 30 FM and FM RDS
stations in alphabetical order without redundancy.
Additionally, it only stores the stations with the clearest
signals.
If you want to store FM or AM stations one by one, see
“Presetting radio stations” on page 40.
For details on the buttons used in this section, see “Brief
descriptions of buttons used to receive broadcasts” on
page 38.
1
Press
?
/
1
to turn off the receiver.
2
Hold down MEMORY and press
?
/
1
to turn the
receiver back on.
“Autobetical select” appears in the display and the
receiver scans and stores all the FM and FM RDS
stations in the broadcast area.
For RDS stations, the tuner first checks for stations
broadcasting the same program, then stores only the
one with the clearest signal. The selected RDS stations
are sorted alphabetically by their Program Service
name, then assigned a two character preset code. For
more details on RDS see page 41.
Regular FM stations are assigned two character preset
codes and stored after the RDS station.
When done, “Autobetical finish” appears in the
display momentarily and the receiver returns to
normal operation.
Notes
• Do not press any of the buttons on the receiver or supplied
remote during autobetical operation.
• If you move to another area, repeat this procedure to store
stations in your new area.
• For details on tuning the stored stations, see page 40.
• The FM MODE setting is also stored along with the station.
• If you move the antenna after storing stations with this
procedure, the stored settings may no longer be valid. If this
happens, repeat this procedure to store the stations again.
Direct Tuning
For details on the buttons used in this section, see “Brief
descriptions of buttons used to receive broadcasts” on
page 38.
1
Press TUNER.
The last received station is tuned in.
2
Press FM/AM to select the FM or AM band.
3
Press D.TUNING on the remote.
4
Press the numeric buttons on the remote to enter
the frequency.
Example 1: FM 102.50 MHz
Example 2: AM 1350 kHz
If you cannot tune in a station and the
entered numbers flash
Make sure you’ve entered the right frequency. If not,
repeat Steps 3 and 4.
If the entered numbers still flash, the frequency is not
used in your area.
5
If you’ve tuned in an AM station, adjust the
direction of the AM loop antenna for optimum
reception.
6
Repeat Steps 2 to 5 to receive other stations.
z
If you try to enter a frequency not covered by the tuning
interval
The entered value is automatically rounded up or down.
Tuning interval is:
FM:
50 kHz
AM:
9 kHz
b
b
b
b
0
2
5
0
1
b
b
b
3
5
0
1

40
GB
Receiving Br
oadcasts
Preset Tuning
For details on the buttons used in this section, see “Brief
descriptions of buttons used to receive broadcasts” on
page 38.
Before tuning to preset stations, be sure to preset them by
performing steps on “Presetting radio stations” below.
Presetting radio stations
1
Press TUNER.
The last received station is tuned in.
2
Tune in the station that you want to preset using
Direct Tuning (page 39)‚ or Automatic Tuning (this
page).
3
Press MEMORY.
“MEMORY” appears in the display for a few seconds.
Do Steps 4 to 6 before “MEMORY” goes out.
4
Press SHIFT to select a memory page (A, B or C).
Each time you press SHIFT, the letter “A,” “B” or “C”
appears in the display.
5
Select a preset number by pressing PRESET/PTY
SELECT + or PRESET/PTY SELECT –.
If “MEMORY” goes out before you press the preset
number, start again from Step 3.
6
Press MEMORY again to store the station.
If “MEMORY” goes out before you can store the
station, start again from Step 3.
7
Repeat Steps 2 to 6 to preset another station.
To change a preset number to another station
Do Steps 1 to 6 to preset the new station to the number.
Note
If the AC power cord is disconnected for about two weeks, all the
preset stations will be cleared from the receiver’s memory, and
you will have to preset the stations again.
Automatic Tuning
For details on the buttons used in this section, see “Brief
descriptions of buttons used to receive broadcasts” on
page 38.
1
Press TUNER.
The last received station is tuned in.
2
Press FM/AM to select the FM or AM band.
3
Press TUNING + or TUNING –.
Press the + button to scan from low to high; press the –
button to scan from high to low.
When the receiver reaches either end of the
band
Scanning is repeated in the same direction.
The receiver stops scanning whenever a station is
received.
4
To continue scanning, press TUNING + or TUNING –
again.


