JVC KW-AV50: INTRODUCTIONS
INTRODUCTIONS: JVC KW-AV50
INTRODUCTIONS
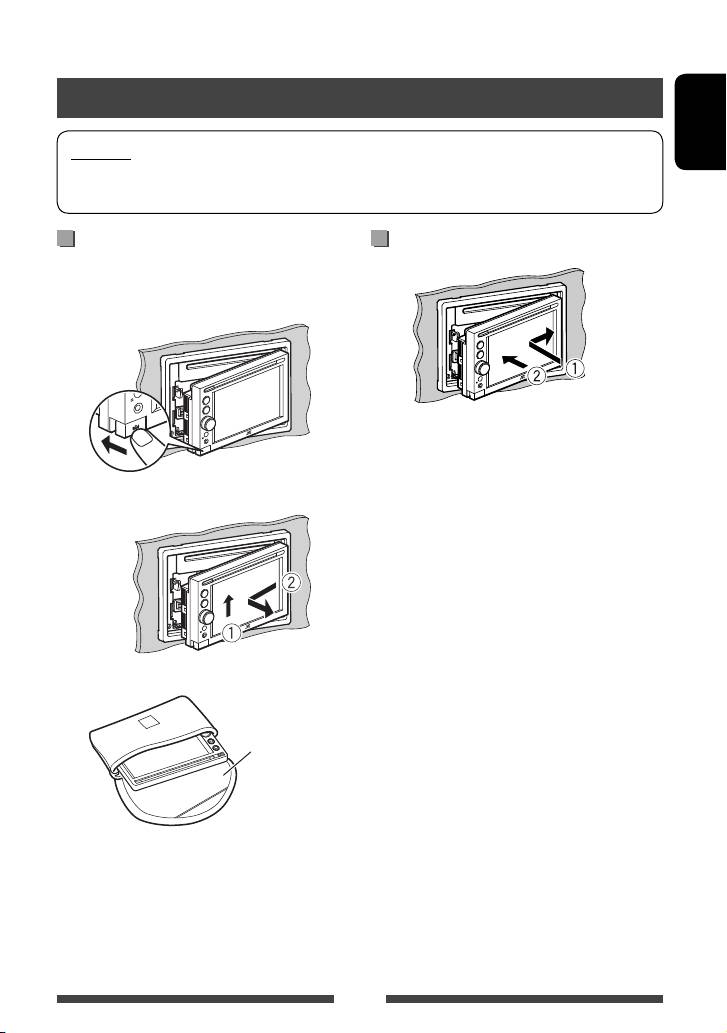
Detaching/attaching the monitor panel
Cautions
ENGLISH
• Hold the monitor panel securely so as not to drop it accidentally.
• Fit the monitor panel onto the attaching plate until it is firmly locked.
Attaching Detaching
Turn off the ignition switch before detaching the
monitor panel.
1
2
3
Soft case (supplied)
5
EN_KW-AV50EU.indb 5EN_KW-AV50EU.indb 5 11/09/16 14:2011/09/16 14:20
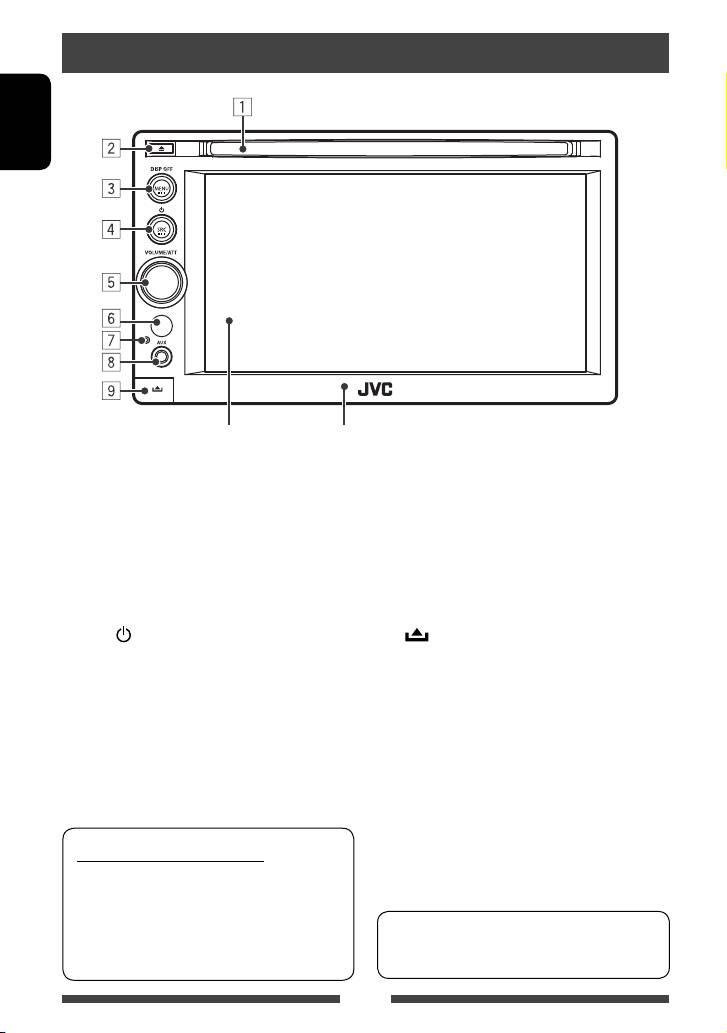
Component names and functions
ENGLISH
Screen (touch panel) Monitor panel
1 Loading slot
5 VOLUME/ATT knob (☞ page 10)
2 0 (Eject) button
• Attenuates the sound. (Press)
Ejects the disc.
• Adjusts the audio volume. (Turn)
3 MENU/DISP OFF button
6 Remote sensor
• Displays <AV Menu> screen. (Press)
7 Reset button
(☞ page 12)
Resets the unit. (☞ page 3)
• Turns off/on the screen. (Hold) (☞ page 10)
8 AUX input terminal
4 SRC /
button
9
(Detach) button
• Selects the AV source. (Press) (☞ page 13)
Detaches the monitor panel. (☞ page 5)
• Turns off the AV source. (Hold)
Caution on volume setting:
Digital devices (CD/USB) produce very little noise
compared with other sources. Lower the volume
before playing these digital sources to avoid
You can change the color of the buttons on the
damaging the speakers by sudden increase of the
monitor panel. (☞ page 37)
output level.
6
EN_KW-AV50EU.indb 6EN_KW-AV50EU.indb 6 11/09/16 14:2011/09/16 14:20
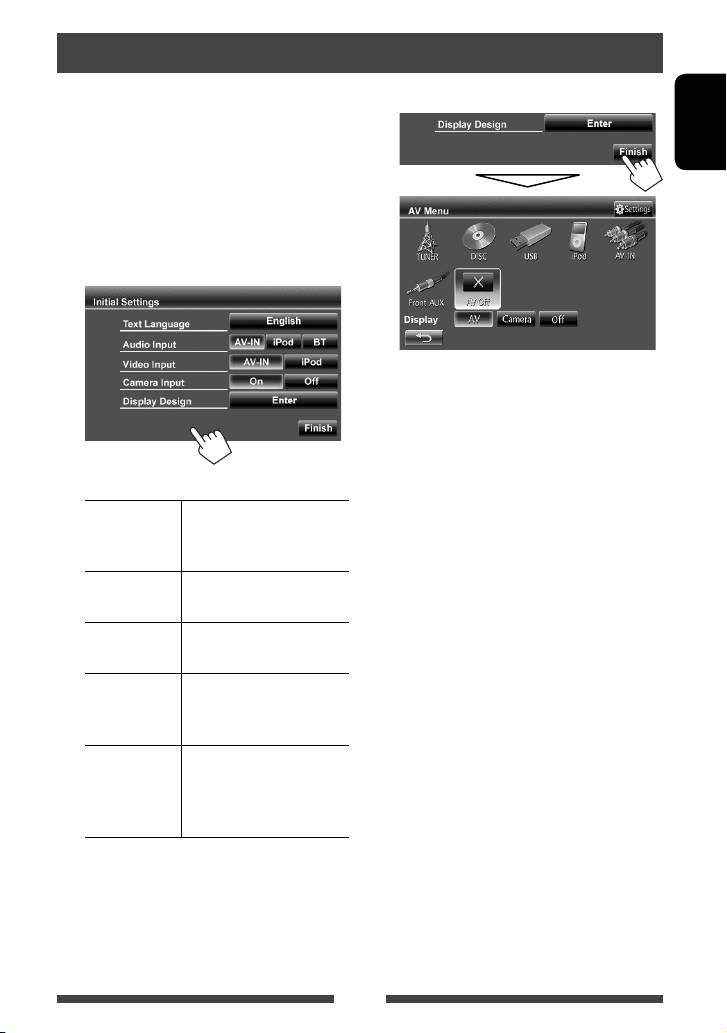
Initial Settings
When you power on the unit for the first time or reset
3 Finish the procedure.
the unit, the initial setting screen appears.
• You can also change the settings on the <Settings>
screen. (☞ page 42)
ENGLISH
1 Turn on the ignition switch.
The power is turned on, and the initial setting
screen appears.
2
<AV Menu> is displayed.
• <AV Off> is selected initially. Select the
playback source. (☞ page 13)
Text
Select the text language used
Language
for on-screen information.
(☞ page 45)
Audio Input Select the use of the LINE IN
jacks. (☞ page 44)
Video Input Select the use of the VIDEO IN
jack. (☞ page 44)
Camera Input Select <On> when
connecting the rear view
camera. (☞ page 44)
Display
Select the background and
Design
the colors of the text and the
monitor panel buttons. (☞
page 37)
7
EN_KW-AV50EU.indb 7EN_KW-AV50EU.indb 7 11/09/16 14:2011/09/16 14:20
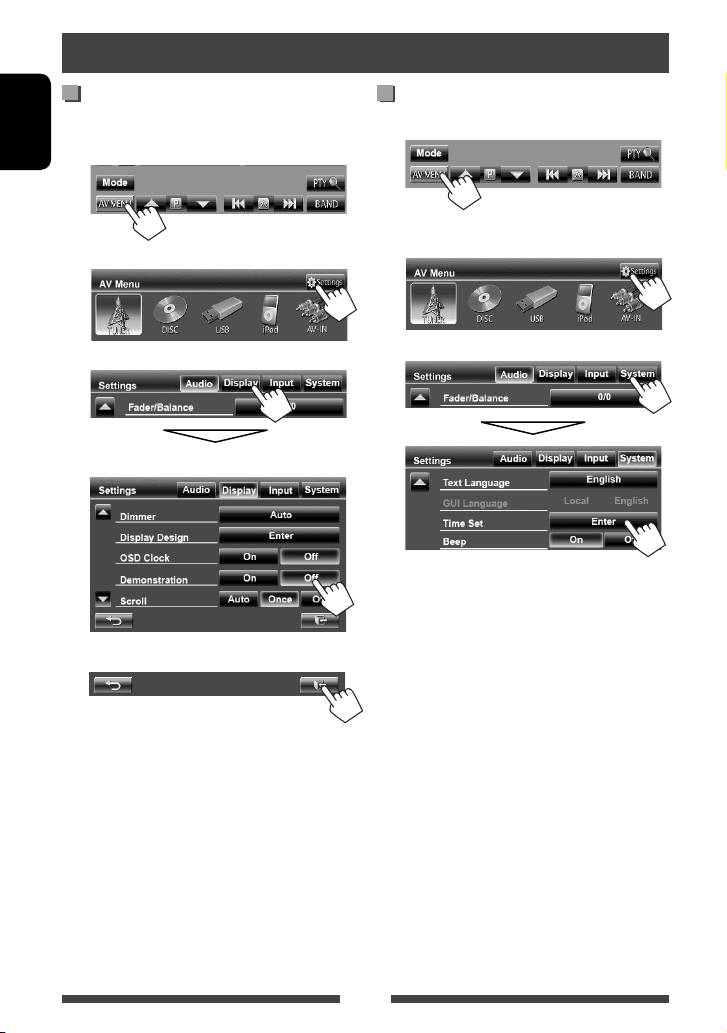
Canceling the display demonstration and setting the clock
Canceling the display
Setting the clock
demonstration
1 Display <AV Menu> screen.
ENGLISH
1 Display <AV Menu> screen.
2 Display <Settings> screen.
2 Display <Settings> screen.
3
3
Select <Off>.
4 Finish the procedure.
8
EN_KW-AV50EU.indb 8EN_KW-AV50EU.indb 8 11/09/16 14:2011/09/16 14:20
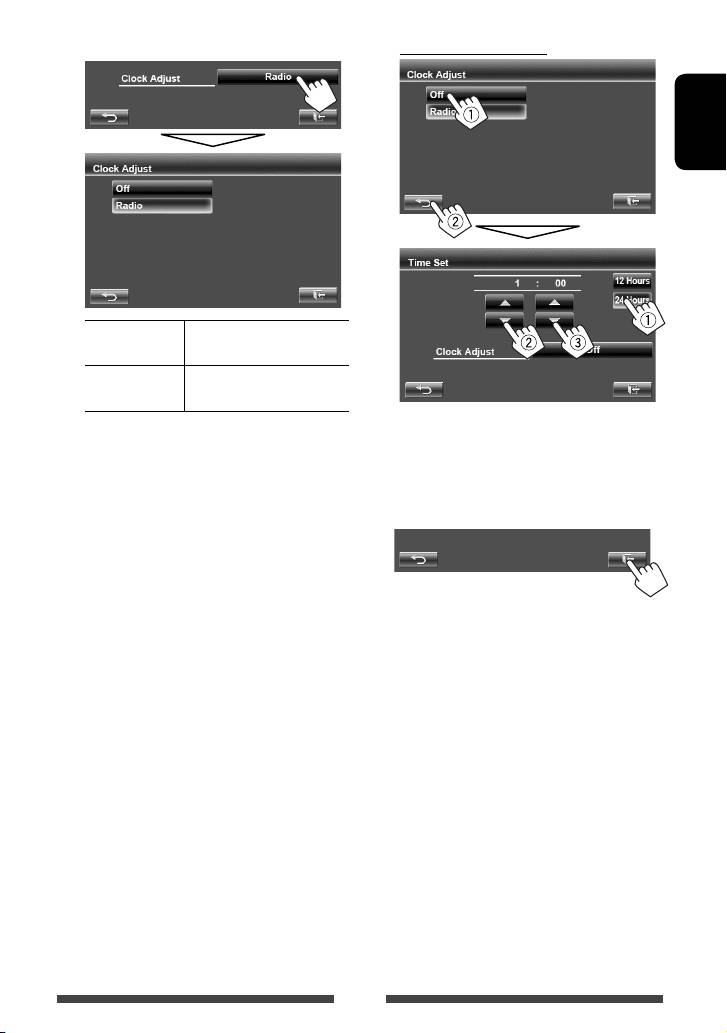
To set the clock manually
4 Set the clock time.
ENGLISH
<Off>
Sets the clock manually. (☞
right column)
<Radio> Synchronizes the clock time
with Radio Data System.
1
Select the time display format
2
Adjust the hour
3
Adjust the minute
5 Finish the procedure.
9
EN_KW-AV50EU.indb 9EN_KW-AV50EU.indb 9 11/09/16 14:2011/09/16 14:20
Common operations
Turning on the power
Turning off the screen
Turn on the ignition switch.
• The power is turned off when the ignition switch is
ENGLISH
turned off.
(Hold)
Adjusting the volume
The screen is turned off.
To adjust the volume
• About the adjustable volume range, ☞ page 42
• You can also turn off the screen on <AV Menu>
(<Amplifier Gain>).
screen.
IncreaseDecrease
• On the control screen, you can also adjust the
volume by moving your finger on the touch panel as
illustrated.
IncreaseDecrease
To return to the <AV Menu> screen
Touch the screen.
To attenuate the sound
The ATT indicator lights up.
To cancel the attenuation, press the volume
adjustment knob.
10
EN_KW-AV50EU.indb 10EN_KW-AV50EU.indb 10 11/09/16 14:2011/09/16 14:20
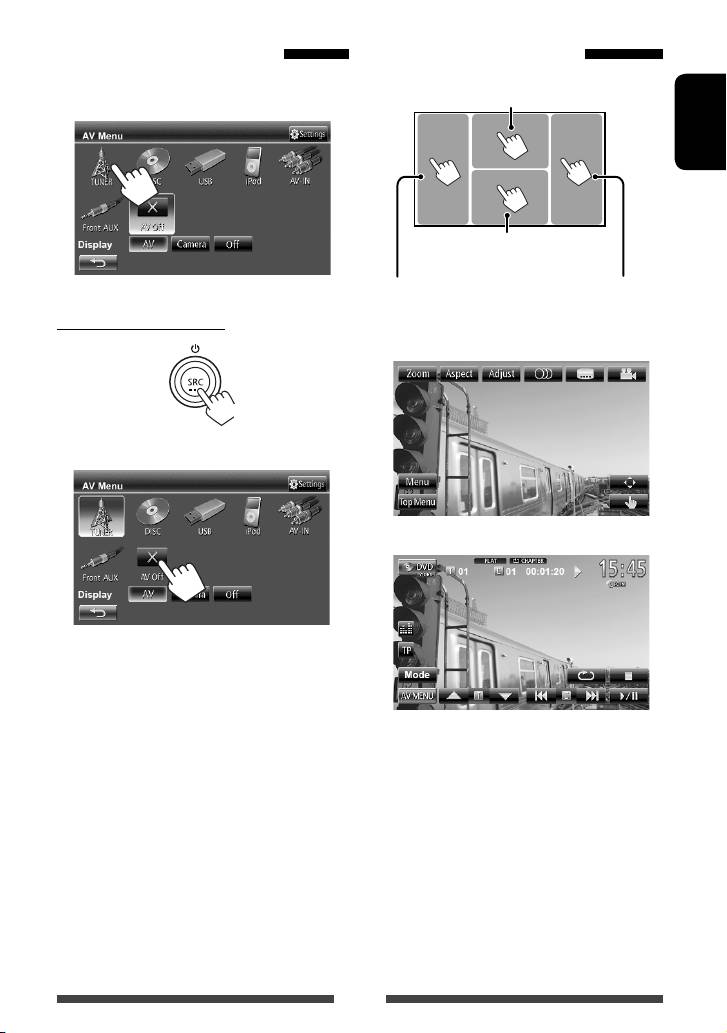
Turning on the AV source
Touch screen operation
A Displays the video control menu while
You can activate the AV function by selecting source on
playing a video.
<AV Menu> screen.
ENGLISH
B Displays the operation buttons
while playing a video.
Goes to the previous
Goes to the next
chapter/track.*
chapter/track.*
To turn off the AV source
A Video control menu
(Hold)
or
B Source control screen for video playback
• The operation buttons disappear by touching the
screen or when no operation is done for about 10
seconds.
* Not available for video from an external component.
Dragging your finger to left or right functions in the
same way as touching.
11
EN_KW-AV50EU.indb 11EN_KW-AV50EU.indb 11 11/09/16 14:2011/09/16 14:20
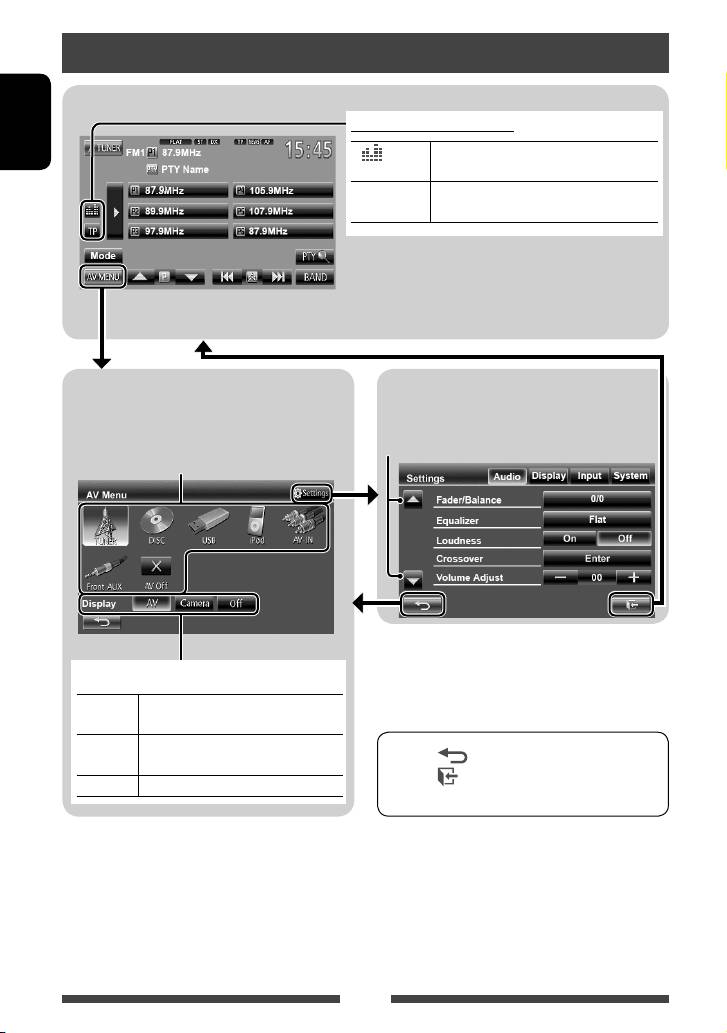
Switching screens
Source control screen
Common operating buttons
ENGLISH
[ ]
Displays the sound adjustment screen.
(
☞ page 35)
[TP] Activates/deactivates TA standby reception
mode. (
☞ page 17 )
<AV Menu>
<Settings>
• Changes the AV source.
Changes the detailed settings. (☞ page 42)
• Displays the <Settings> screen.
Changes the page
☞ page 13
Select an item to display on the screen.
[AV] Displays the source control screen.
(☞ above)
[Camera] Displays the picture from the rear view
• Press [ ] to return to the previous screen.
camera. (☞ page 41)
• Press [
] to display the current source control
[Off]
Turns off the screen. (
☞ page 10)
screen.
12
EN_KW-AV50EU.indb 12EN_KW-AV50EU.indb 12 11/09/16 14:2011/09/16 14:20
