Beurer KS 52: Important Notes – keep for later use!
Important Notes – keep for later use!: Beurer KS 52

Die gesetzlichen Gewährleistungen des Kunden bleiben ducrh die Garantie unberührt. Für Geltendma-
chung eines Garantiefalles innerhalb der Garantiezeit ist durch den Kunden der Nachweis des Kaufes zu
führen. Die Garantie ist innerhalb eines Zeitraumes von 5 Jahren ab Kaufdatum gegenüber der Beurer
GmbH, Söflinger Straße 218, 89077 Ulm, geltend zu machen. Der Kunde hat im Garantiefall das Recht
zur Reparatur der Ware bei unseren eigenen oder bei von uns autorisierten Werkstätten. Weitergehende
Rechte werden dem Kunden (aufgrund der Garantie) nicht eingeräumt.
ENGLISH
Dear Customer,
Thank you for choosing one of our products. Our name stands forhigh-quality, thoroughly tested
products for the applications in the areas of heat, weight, blood pressure, body temperature, pulse,
gentle therapy, massage and air.
Please read these instructions for use carefully and keep them for later use, be sure to make them
accessible to other users and observe the information they contain.
Best regards,
Your Beurer Team
Important Notes – keep for later
use!
1. Caution
•
Protect your personal scales from impact with hard objects, moisture, dust, chemicals, toiletries,
liquid cosmetics, great temperature fluctuation and closeness to sources of heat (open fires, radia-
tors).
•
Repairs may only be performed by Beurer Customer Service or by accredited retailers.
•
All our personal scales comply with EU guideline 2004/108 + relevant supplements. Should you have
any questions regarding operation and usage of our appliances, please contact your local retailers
or Beurer Customer Service.
•
Cleaning: You can clean the scale with a damp cloth and a little washing up liquid, if required. Never
immerse the scale in water or rinse it under running water.
•
Storage: Do not place any objects on the scale when not in use.
•
Strong electromagnetic fields (e.g. cell phones) may impair the accuracy of the scale.
•
The scales can accept a maximum load of 11 lb. The weight measurement is displayed in 1/8 oz
divisions.
•
The scale is not intended to be used for commercial purposes.
•
Any transport locking device fitted must be removed.
•
Never pull on the display housing to fold the scale down. Be careful when unfolding the scale, oth-
erwise you may jam your fingers.
2. Use
This wall-mounted kitchen scale is designed for weighing foodstuffs and smaller objects up to a maxi-
mum weight of 5 kg. It is additionally provided with a built-in clock and can also be used as a timer for
periods of up to 99 minutes with accuracy to one second.
5
2.1 Starting up
Batteries
Batteries (2 x AA 1.5 V) are necessary to operate the scale. Insert
them into the battery compartment in the front of the scale before
–
+
operation. Make sure they are correctly inserted. The scale must be
+
–
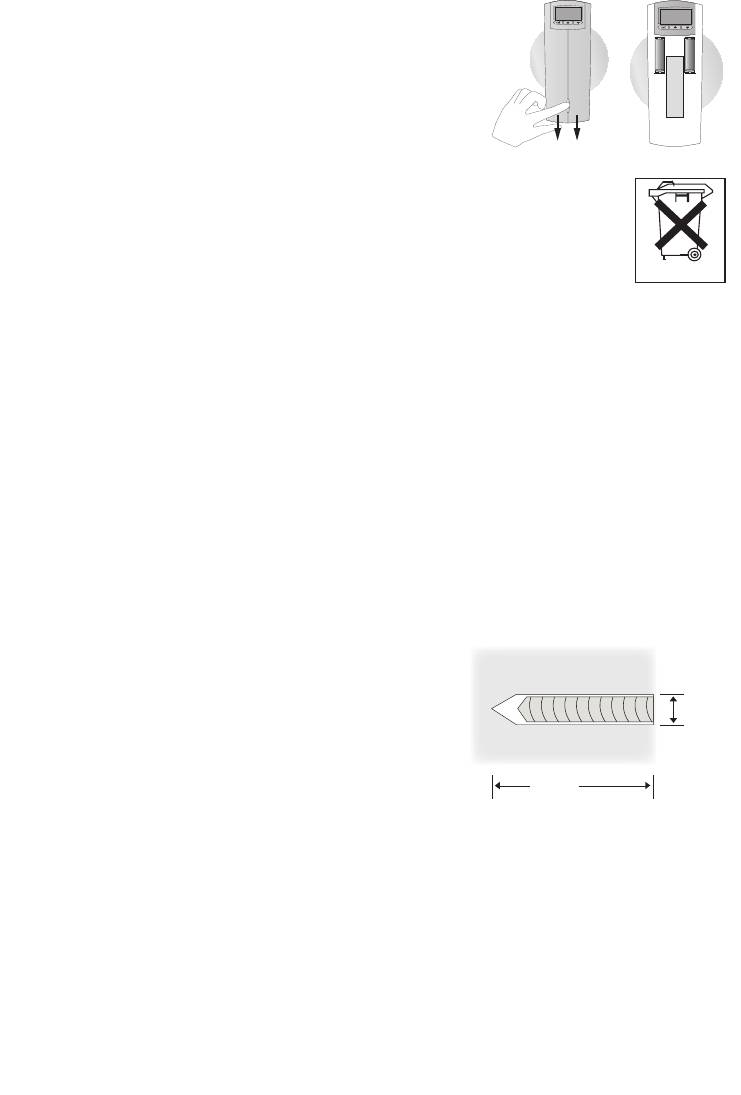
folded together to replace the batteries. Press the button on the front
and pull the battery compartment down to open it (Fig. 1). Insert the
battery correctly (Fig. 2) and close the battery compartment cover by
pushing upwards. If the display shows “Lo” or the battery symbol,
it is time to replace the battery.
Fig. 1 Fig. 2
Spent batteries and rechargeable batteries do not constitute normal household waste!
They are considered to be toxic waste and, as such, should be disposed of in special
containers, toxic waste collection points or brought to electrical goods dealers.
Note: Batteries containing pollutant substances are marked as follows:
Pb = Battery contains lead, Cd = Battery contains cadmium, Hg = Battery contains
Pb Cd Hg
mercury.
Setting the time
The scale must be in standby mode (time displayed) to set the time. Press the “Set” button (3 seconds).
The hours start flashing. Set the hours with the “
쑿
” and
쑼
” keys and press “Set” to confirm. Then
the minutes start flashing. Set the minutes with the “
쑿
” and “
쑼
” keys. Press “Set” to confirm and to
exit the time setting procedure.
Note: The time display depends on the specified weight unit. If you have selected g or ml, the time will
be displayed in 24-hour mode. If you have selected lb or fl.oz, the time will be displayed in 12-hour
mode with am and pm.
Wall mounting
The wall-mounted kitchen scale must be fastened to a solid wall with the included plastic wall-mount.
Make sure that there are no pipes or electric wires behind the wall before you start drilling and the
wall-mount is secured strongly enough for the wall-mounted kitchen scale. Make sure that there is
enough room at the selected spot for folding down the scale for weighing. Mark the 4 drill holes with
the wall-mount. Use a spirit level.
Drill the holes at least 40 mm deep, insert the wall plugs and
screw the wall-mount firmly to the wall – the hooks must point
upwards. You can also use different screws for different wall
6 mm
materials (e.g. wood, plaster).
Place the wall-mounted kitchen scale on the hooks and press it
firmly into the retainer to click it into place.
You can remove the wall-mounted kitchen scale at any time by
40 mm
lifting it up out of the wall-mount.
2.2 Weighing
Fold the scale glass plate down for weighing. Press the “ON/TARA” button in order to switch on the
scale.
8888
appears briefly. As soon as 0 g appears, the scale is ready for measuring. The weight is
displayed in 1 g graduations. If you wish to use different units, press the “Unit” key. Every time the key
is pressed, the unit switches from grams (g), pounds and ounces (lb/oz) and fluid ounces (fl.oz).
Weighing without a bowl
Place the item to be weighed directly on the scale. The weight thereof is displayed immediately.
6

Weighing with a container
If you place a container on the scale before switching it on, the weigh of the container is already taken
into account. If you remove the container, the weight of the container will be displayed as a negative
value. Press the “ON/TARA” button in order to set the scale back to 0. 0 will be displayed constantly
after flashing several times. The scale is now ready for weighing. If you placed a container on the scale
after switching it on, the weigh of the container will be displayed. Press the “ON/TARA” button and the
scale will display 0 again after flashing several times.
Adding ingredients
If you add additional ingredients (e.g. baking ingredients), the new total weight will be displayed.
However, if you wish to display the weight of the added ingredient separately, press “ON/TARA” first
(additional weighing function). Wait for 0 to be displayed constantly after flashing several times. The
scale is now ready for weighing additional ingredients.
Note: If more than a total of 5 kg is placed on the scale, it will display “Err”.
Automatic switch-off
If the kitchen scale is left unused for longer than approx. 120 seconds, it automatically switches itself
off! You can also turn the scale off manually by pressing the button „ON/TARA“ for 3 seconds. Fold
the scales back in again.
2.3 Timer function
Activate the timer function by pressing the Timer key. The time period starts flashing. Set the minutes
with the “
쑿
” and “
쑼
” keys and press “Set” to confirm. Then the seconds display starts flashing. Set
the seconds with the “
쑿
” and “
쑼
” keys. Press “Set” to start the timer function.
You can stop the timer at any time and return to weighing mode by pressing “ON/TARA”. The timer
beeps and the display flashes when the set time has elapsed.
Press “Set” to return to the time display.
3. Disposal
Please dispose of the blanket in accordance with the directive 2002/96/EG – WEEE (Waste Electrical
and Electronic Equipment). If you have any queries, please refer to the local authorities responsible
for waste disposal.
7
Оглавление
- Wichtige Hinweise – für den späteren Gebrauch aufbewahren!
- Important Notes – keep for later use!
- Consignes importantes – à conser- ver pour une utilisation ultérieure!
- Información importante: consérvese para su uso posterior!
- Importante – da conservare per l’uso successivo!
- Önemli bilgiler – sonradan kullanım için saklayınız!
- Важные указания – сохраните для последующего использования!
- Ważne informacje – zachować do późniejszego stosowania!
- Belangrijke aanwijzingen – Te bewaren voor later gebruik!
- Instruções importantes — guardar para usos posteriores!
- Σημαντικές υποδείξεις – φυλάξτε τες για μεταγενέστερη χρήση!


