Sony SPK-HC: Using the Sports Pack Shooting Moving Pictures 1 When recording on a cassette tape or a disc, turn the POWER switch to “CAMERA” (1). When recording on “Memory Stick,” turn the POWER switch to “MEMORY” (2). 2 Press START/STOP button to start recording.
Using the Sports Pack Shooting Moving Pictures 1 When recording on a cassette tape or a disc, turn the POWER switch to “CAMERA” (1). When recording on “Memory Stick,” turn the POWER switch to “MEMORY” (2). 2 Press START/STOP button to start recording.: Sony SPK-HC
Table of contents
- Table of contents Features and Precautions
- Precautions on Use Water Leakage
- Precautions on Use (continued)
- Maintenance
- Preparing
- Selecting the Camera Mounting Shoe
- Preparing (continued) Installing the Video Camera Recorder 1 Attach the camera mounting shoe. 2 Release the buckles. 3 Coat the front glass with anti-fogging lens solution. 4 Remove foreign materials.
- 5 Connect the plugs to the each jacks of the video camera recorder. When using DCR-HC40/HC30/HC20/HC18/HC16
- Preparing (continued)
- 6 Installing the video camera recorder. 7 Close the rear body.
- Preparing (continued) Preparing the Sports Pack 1 Adjust the grip strap. 2 Attach the shoulder strap.
- Using the Sports Pack Shooting Moving Pictures 1 When recording on a cassette tape or a disc, turn the POWER switch to “CAMERA” (1). When recording on “Memory Stick,” turn the POWER switch to “MEMORY” (2). 2 Press START/STOP button to start recording.
- Using the Sports Pack (continued)
- Recording a Still Picture A. When in MEMORY mode B. When in CAMERA mode
- Using the Sports Pack (continued) Playing Back with the Remote Commander 1 Turn the POWER switch to “VCR.” 2 Press N PLAY on the remote.
- Removing the Video Camera Recorder 1 Turn the POWER switch to “OFF.” 2 Release the buckles, and open the rear body. 3 Pull out the camera mounting shoe.
- Using the Sports Pack (continued) 4 Stop taking out the video camera recorder at the point where the remote plug and the microphone plug come out from the sports pack. Then, disconnect the plugs from the video camera recorder.
- 5 Detach the camera mounting shoe.
- Identifying parts
- Troubleshooting
- Specifications
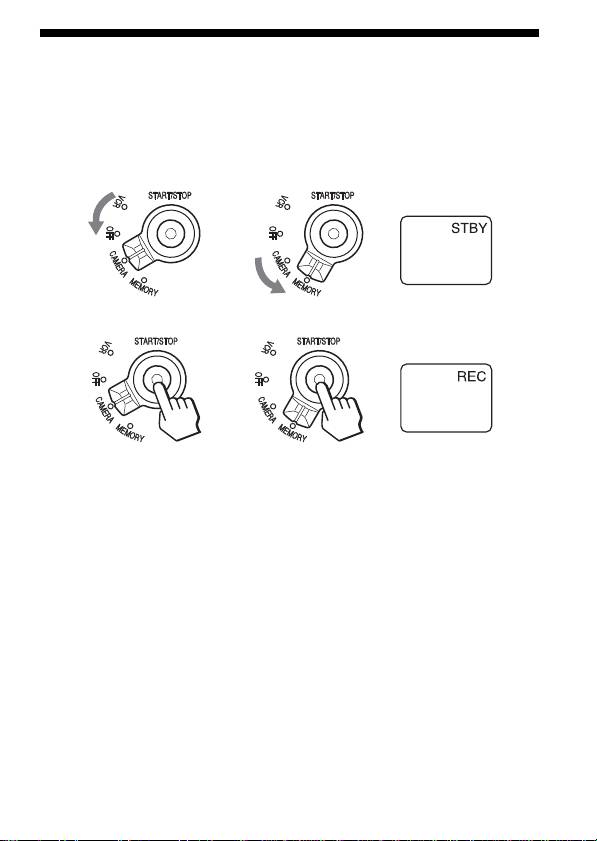
Using the Sports Pack
Shooting Moving Pictures
1 When recording on a cassette tape or a disc, turn the POWER
switch to “CAMERA” (1). When recording on “Memory Stick,”
turn the POWER switch to “MEMORY” (2).
12
DISPLAY
2 Press START/STOP button to start recording.
DISPLAY
Notes
•When using DCR-DVD201/DVD101/DVD91, you cannot shoot moving
pictures with the POWER switch turned to “MEMORY.”
•When using DCR-HC40/HC30/HC20/HC18/HC16/HC15/HC14/
TRV33/TRV22/TRV19/TRV14/TRV12 in CAMERA mode, moving
pictures are recorded on a cassette tape and when using DCR-DVD201/
DVD101/DVD91 in CAMERA mode, they are recorded on a disc.
To stop shooting
Press the START/STOP button.
If you press the START/STOP button once more, shooting will start again.
To turn off the power
Stop recording before turning the POWER switch to “OFF.”
13-GB
Top 10 manuals
100.00
NZXT HALE90 1000W99.99
Samsung SM-R38099.97
AEG BSB 18C99.97
Dell 2700W99.97
Smeg KSEC70X99.96
Beurer HDE 4099.96
Pyramida KH 50 v.299.96
MSI CSM-H81M-P3299.96
AEG HR 562799.95
Melissa 640-048