Sony SPK-HC: 6 Installing the video camera recorder. 7 Close the rear body.
6 Installing the video camera recorder. 7 Close the rear body.: Sony SPK-HC
Table of contents
- Table of contents Features and Precautions
- Precautions on Use Water Leakage
- Precautions on Use (continued)
- Maintenance
- Preparing
- Selecting the Camera Mounting Shoe
- Preparing (continued) Installing the Video Camera Recorder 1 Attach the camera mounting shoe. 2 Release the buckles. 3 Coat the front glass with anti-fogging lens solution. 4 Remove foreign materials.
- 5 Connect the plugs to the each jacks of the video camera recorder. When using DCR-HC40/HC30/HC20/HC18/HC16
- Preparing (continued)
- 6 Installing the video camera recorder. 7 Close the rear body.
- Preparing (continued) Preparing the Sports Pack 1 Adjust the grip strap. 2 Attach the shoulder strap.
- Using the Sports Pack Shooting Moving Pictures 1 When recording on a cassette tape or a disc, turn the POWER switch to “CAMERA” (1). When recording on “Memory Stick,” turn the POWER switch to “MEMORY” (2). 2 Press START/STOP button to start recording.
- Using the Sports Pack (continued)
- Recording a Still Picture A. When in MEMORY mode B. When in CAMERA mode
- Using the Sports Pack (continued) Playing Back with the Remote Commander 1 Turn the POWER switch to “VCR.” 2 Press N PLAY on the remote.
- Removing the Video Camera Recorder 1 Turn the POWER switch to “OFF.” 2 Release the buckles, and open the rear body. 3 Pull out the camera mounting shoe.
- Using the Sports Pack (continued) 4 Stop taking out the video camera recorder at the point where the remote plug and the microphone plug come out from the sports pack. Then, disconnect the plugs from the video camera recorder.
- 5 Detach the camera mounting shoe.
- Identifying parts
- Troubleshooting
- Specifications
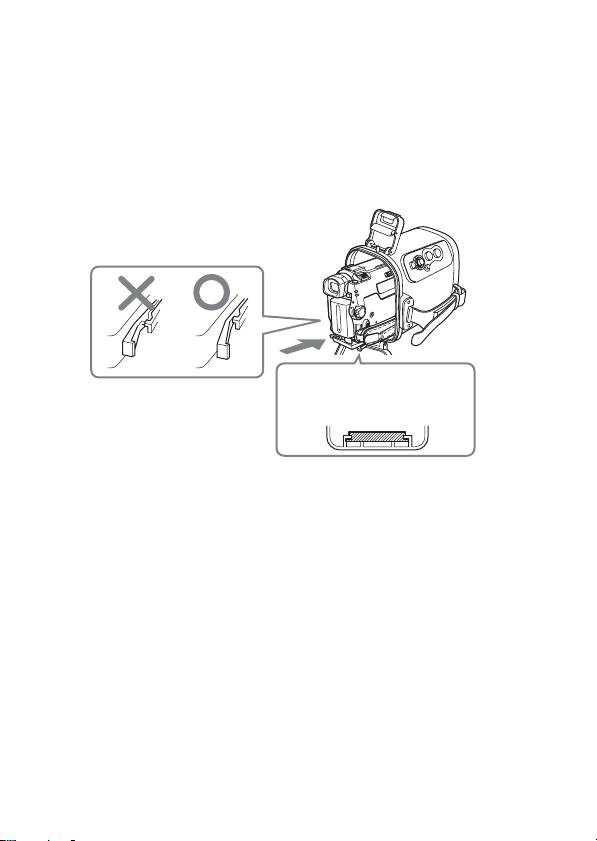
6 Installing the video camera recorder.
Align the camera mounting shoe with the guide on the front body.
Insert the video camera recorder by pushing the rear of the camera
mounting shoe until it clicks. Check the knob on each side of the
camera mounting shoe to ensure that it locked properly. Be careful not
to pinch the cords then.
Be sure that the connected remote plug or microphone plug does not
touch any parts inside the sports pack.
Be careful not to pinch the cords in the grip strap of the video camera
recorder.
Camera mounting shoe
Body Guide
Note
Be sure to keep the video camera recorder horizontal when installing
it. Inserting the video camera recorder into the front body vertically
may damage the camera mounting shoe and the front body.
7 Close the rear body.
Then secure the rear body, and fasten the buckles until they click.
Notes
•Be careful not to pinch the cords when closing the rear body.
•When the video camera recorder is put into the sports pack, the
center of the lens may shift with respect to the front glass of the
sports pack.
This will cause no problems when recording.
11-GB
