Sony SPK-HC: Precautions on Use (continued)
Precautions on Use (continued): Sony SPK-HC
Table of contents
- Table of contents Features and Precautions
- Precautions on Use Water Leakage
- Precautions on Use (continued)
- Maintenance
- Preparing
- Selecting the Camera Mounting Shoe
- Preparing (continued) Installing the Video Camera Recorder 1 Attach the camera mounting shoe. 2 Release the buckles. 3 Coat the front glass with anti-fogging lens solution. 4 Remove foreign materials.
- 5 Connect the plugs to the each jacks of the video camera recorder. When using DCR-HC40/HC30/HC20/HC18/HC16
- Preparing (continued)
- 6 Installing the video camera recorder. 7 Close the rear body.
- Preparing (continued) Preparing the Sports Pack 1 Adjust the grip strap. 2 Attach the shoulder strap.
- Using the Sports Pack Shooting Moving Pictures 1 When recording on a cassette tape or a disc, turn the POWER switch to “CAMERA” (1). When recording on “Memory Stick,” turn the POWER switch to “MEMORY” (2). 2 Press START/STOP button to start recording.
- Using the Sports Pack (continued)
- Recording a Still Picture A. When in MEMORY mode B. When in CAMERA mode
- Using the Sports Pack (continued) Playing Back with the Remote Commander 1 Turn the POWER switch to “VCR.” 2 Press N PLAY on the remote.
- Removing the Video Camera Recorder 1 Turn the POWER switch to “OFF.” 2 Release the buckles, and open the rear body. 3 Pull out the camera mounting shoe.
- Using the Sports Pack (continued) 4 Stop taking out the video camera recorder at the point where the remote plug and the microphone plug come out from the sports pack. Then, disconnect the plugs from the video camera recorder.
- 5 Detach the camera mounting shoe.
- Identifying parts
- Troubleshooting
- Specifications
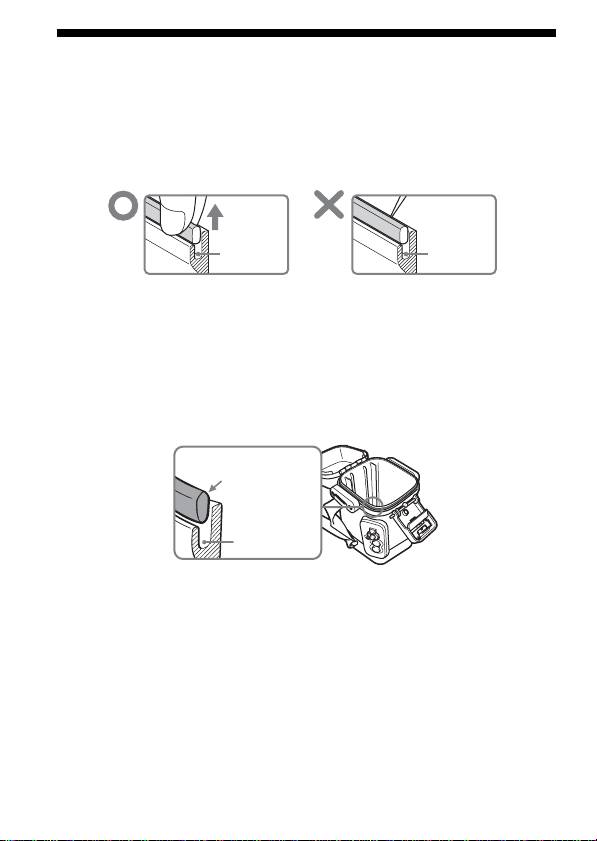
Precautions on Use (continued)
Notes on the Waterproof Gasket
•Check that there are no scratches or cracks on the waterproof gasket as
they may allow water to leak in. If there are scratches or cracks, replace
the damaged waterproof gasket with a new one.
Do not remove the waterproof gasket with a metal tool or a tool with a
sharp point.
Groove Groove
•After checking that there are no cracks or dust on the waterproof gasket,
coat it slightly with the supplied grease using your finger. This will
prevent wearing.
While applying the grease, recheck for cracks or dust.
Never use cloth or paper for greasing as the fibers may cling.
Do not use any type of grease other than that supplied, as it may damage
the waterproof gasket.
•Put the waterproof gasket in the grooves evenly, with the tapering side
up. Never twist it.
Tapering side up
Groove
•The useful life of the waterproof gasket depends upon the maintenance
and the frequency of use, but we recommend changing it once a year. To
replace the waterproof gasket, please consult the nearest Sony dealer. Be
sure to check the water leakage after replacing the waterproof gasket.
Checking for the water leakage after replacing the
waterproof gasket
Check for the water leakage before installing the video camera recorder.
Close the sports pack without installing the video camera recorder, and
keep the sports pack submerged under water at a depth of about 15 cm (6
inches) for about 3 minutes and then check for water leakage.
4-GB
