Fagor CFB-90AX: Description of the hood
Description of the hood: Fagor CFB-90AX
The value can be set to a time period of anywhere between 60
Description of the hood
minutes and 1 minute.
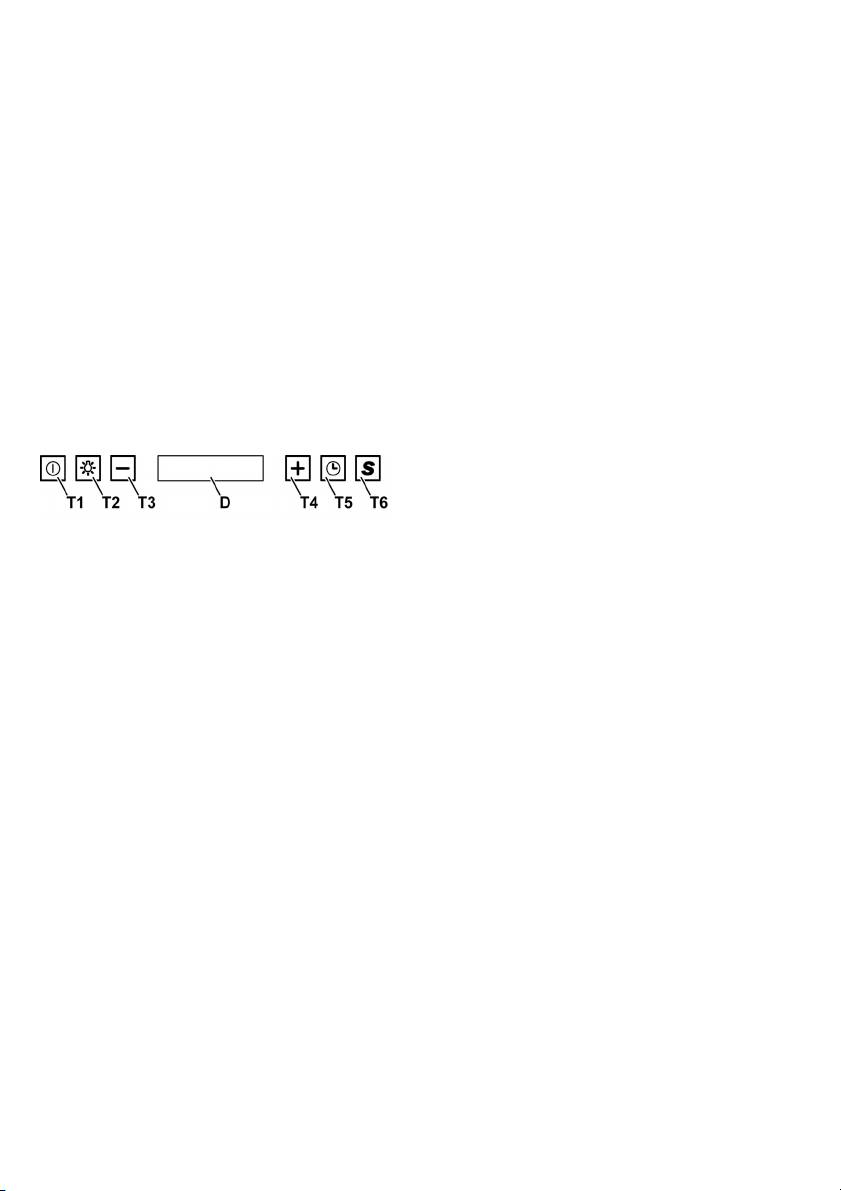
Fig. 1
Within 5 seconds of the “TIMER” button being pressed, the
1. Control panel
system will enter its programming mode and the user will be
2. Grease filter
able to set the timer countdown period using the "-" and "+"
3. Grease filter release handle
buttons. If none of the buttons are pressed within a period of 5
4. Halogen lamp
seconds from when the Timer function was selected or the
5. Vapour catcher
time period programmed, the countdown will begin.
6. Telescopic chimney
The timer countdown can be activated as follows:
7. Air outlet (used for filter version only)
- after pressing the TIMER button for the first time
8. Sensors
(default time value);
- by pressing the TIMER button within 5 seconds of
Operation
setting the desired countdown time period.
Use the high suction speed in cases of concentrated kitchen
Once the timer has begun counting down, it may be cancelled
vapours. It is recommended that the cooker hood suction is
by pressing the TIMER button.
switched on for 5 minutes prior to cooking and to leave in
operation during cooking and for another 15 minutes
T6. "S" Sensor key
approximately after terminating cooking.
Automatic function (COOKING)
The system is set by default in manual mode, to activate
Control panel
automatic mode press key "S".
To select the functions of the hood just touch the commands.
During cooking the system reacts promptly to increases in
Steam and remains in the speed established for at least a
minute before returning to the lower speed/switches off.
When cooking is finished and the environmental parameters
have returned to the levels preceding cooking, the system
T1. ON/OFF engine
turns itself off.
By pressing the push-button the cooker hood is started at
The system turns the hood off after 30 minutes if the
speed 1.
parameters are close to the stand-by condition.
By pressing the push-button during working the cooker hood
It is possible to disable the automatic working mode as
passes to OFF mode.
follows:
- By pressing the "S" key, the motor goes off.
T2. Light button
- By pressing the "+" and "-" key, the system decreases or
Light ON/OFF button.
increases, if possible, the speed of the motor.
T3. "-" Speed decrease key
Selecting the hob
Press the key to reduce the speed of the motor.
This operation optimizes the automatic working of the hood,
proceed as follows:
D. Display
Set the hood to OFF
Indicates the status of the hood.
Press the "+" key for about 5 seconds until the hob being
currently used is displayed.
T4. “+” Increase motor speed
"gas": Gas hob
The speed sequence is 1-2-3-4, therefore every time the
"ind": Induction hob
“+” button is pressed the motor moves on to the next
"elt": Electric hob
speed level.
th
The hob is selected cyclically by pressing key "+"
If the motor is at the 4
speed level and the “+” button is
Once the hob has been selected, wait for 10” to accept the
pressed, you will hear a beep.
function.
The acceptance of the hob selected is displayed by the
th
The 4
motor speed level is the intensive function and is
sequence of 3 flashing cycles of the symbol related to the hob
timer-operated.
selected.
The standard period of time is 5’, at the end of which the
The set default hob is the Gas hob.
hood reverts to speed level 2.
To deactivate the function before the set time has elapsed,
simply press the “-” button.
T5. Timer button
The timer value can be increased or decreased in steps of 1
minute; the default time period is set to 10 minutes.
11

Automatic Calibration
Grease filter warning
Note: Carry out calibration when the hood is installed for the
After 80 hours of operation, "Grease Filter" appears on the
first time.
display. When this text appears, the filter needs to be washed.
Set the hood to OFF.
To reset the grease filter signal, set the hood to ON (at any
Press the “S” button.
speed), press the "T1" key for 5 seconds until the prolonged
The state of calibration in progress is shown by the flashing
"beep".
“sensor” symbol.
When the hood is switched on again, the "Grease Filter"
Note: Do not activate the hood during calibration.
disappears.
The grease filter counter will reset after this procedure is
The sensor envisages an activation time which depends on
complete.
the calibration of the same, the necessary time varies
according to the hob selected.
Charcoal filter warning
Gas Hob: about 1,5 minutes
After 320 hours of operation, "Charcoal Filter" appears on the
Induction Hob: about 13 minutes
display. When this text appears, the filter needs to be
Electric Hob: about 13 minutes
replaced.
Calibration is necessary to stabilize the system, thus avoiding
To reset the charcoal filter signal, set the hood to ON (at any
malfunctions of the hood.
speed), press the "T1" key for 5 seconds until the prolonged
Calibration must be carried out with motor off.
"beep".
When the hood is switched on again, the "Charcoal
Sensor test
Filter" disappears.
It is constant during automatic working.
The charcoal filter counter will reset after this procedure is
In case of failure the display shows an "Err" and the symbol
complete.
"sensor" both flashing (contact the technical assistance
office).
If both signals are active at the same time, just carry out the
However the hood can be used in manual mode.
resetting operation once.
SPECIAL FUNCTIONS
Enabling/disabling the charcoal filter warning
Set the hood to ON (at any speed), press the "T1" key for 10
Programming the Clock
seconds.
The clock may be reset by pressing and holding the
"Able" and "Charcoal Filter": signal enabled
“Timer” button for 5 seconds, then pressing the “-” and
"None" and " Charcoal Filter ": signal enabled
“+” buttons to adjust the time.
The time setting mode is displayed by the two flashing
Enabling/disabling the sound signal
points.
Set the hood to ON (at any speed).
The user may increase/decrease the time in steps of 1
The sound signals may be activated or deactivated by
minute; however, if the “-” or “+” button is pressed for 1
pressing and holding the "T2" button for 5 seconds.
second, the time is decreased/increased in steps of 5
If the sound signal has been activated, it should emit a
minutes. In this case, the control panel rounds the time
beep and the text “Snd” should appear on the display for
off to the nearest 5 minutes.
3 seconds.
The user can end the clock resetting stage by pressing
If the sound signal has been deactivated, the text “Snd”
the “Timer” button.
should appear on the display for 3 seconds and no beep
If none of the buttons are pressed for 1 minute, the control
should be emitted.
panel accepts the set value and adds on 1 minute, then
begins to operate normally.
Temperature alarm
The clock can be displayed in 12h or 24h format.
The hood is equipped with a temperature sensor which
To display the format set, press the "-" key for about 5
activates the motor at speed 2 in case the temperature in
seconds until the time format being currently used is
the display zone is too high.
displayed.
The cyclic selection takes place by pressing the "-" key
If the motor is OFF or at speed level 1 and the alarm
shortly.
intervenes, the motor will move to speed level 2 and the text
Once the format has been selected, after 10 seconds the
“care” will appear on the display. While the appliance is in its
system accepts the last choice made.
alarm operating status, the user may only increase the motor
The symbol related to the format flashes for 3 times.
rd
th
speed (3
and 4
levels). When the temperature of the
cooker hood returns to a level below the alarm threshold, the
motor will return to the status which was set before the alarm
condition occurred.
12
Оглавление
- IT - Istruzioni di montaggio e d'uso
- Collegamento Elettrico
- Descrizione della cappa
- Manutenzione Sostituzione Lampade
- EN - Instruction on mounting and use
- Electrical connection
- Description of the hood
- Maintenance Replacing lamps
- FR - Prescriptions de montage et mode d’emploi
- Installation
- Description de la hotte
- Entretien Remplacement des lampes
- DE - Montage- und Gebrauchsanweisung
- Befestigung
- Kontrolpaneel
- Fettfilter
- Ersetzen der Lampen
- ES - Montaje y modo de empleo
- Conexión eléctrica
- Descripción de la campana
- Mantenimiento Sustitución de la lámpara
- PT - Instruções para montagem e utilização
- Instalação
- Descrição do exaustor
- Filtro de carvão activo (só para a versão filtrante)
- NL - Montagevoorschriften en gebruiksaanwiizing
- Het installeren
- Beschrijving van de wasemkap
- Onderhoud Vervanging lampjes
- CS - Návod na montáž a používání
- Elektrické připojení
- Pohled na digestoř
- Údržba
- Tukový filtr
- SK - Návod na použitie a montáž
- Elektrické napojenie
- Opis odsávača pary
- Údržba
- Protitukový filter
- HU - Felszerelési és használati utasítás
- Villamos bekötés
- Az elszívó leírása
- Karbantartás
- Tisztítás Égőcsere
- RU - Инструкция по монтажу у эксплуатации
- Установка
- Описание вытяжки
- Фильтры задержки жира
- Замена ламп
