Zelmer 13Z015: 4. Filling the water tank
4. Filling the water tank: Zelmer 13Z015
4. Filling the water tank
ATTENTION! Fill the tank (1) with water only when the power cord is unplugged from the power grid. A valve in
the bottom part of the tank prevents leaking water.
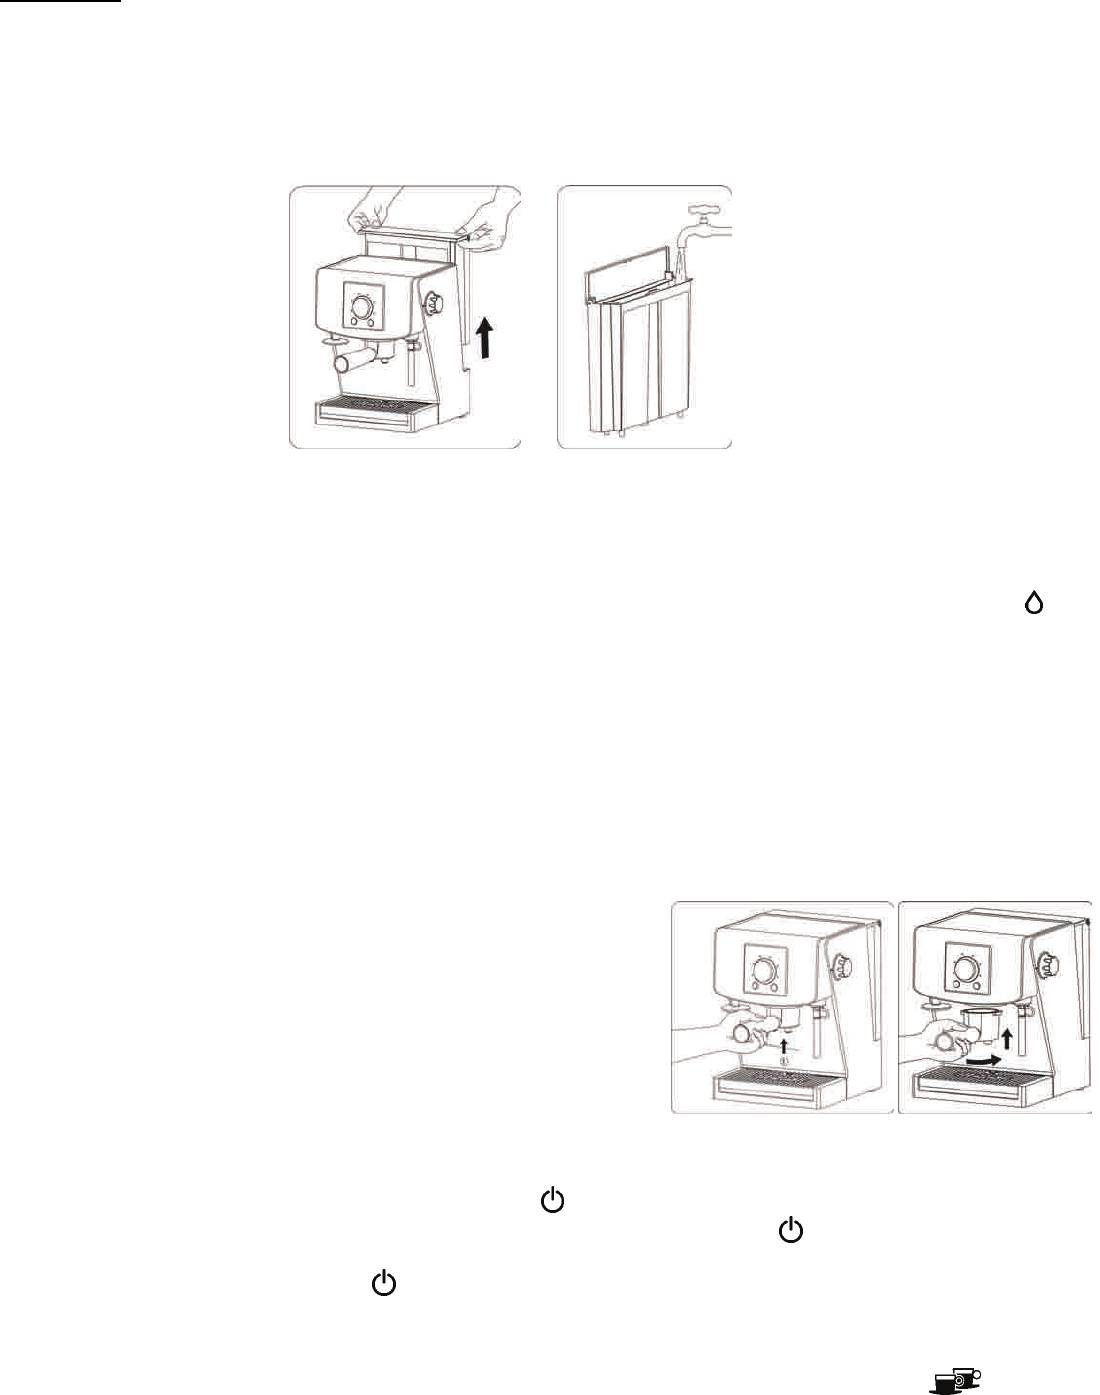
• Remove the water tank (1) by pulling it up (Fig. 1).
• Open the cover of the water tank (1) and fill it with cold, fresh water (Fig.2). The MAX mark shall not be
exceeded.
• Put the tank (1) back and press it.
• Close the cover of the tank (1).
• We could fill the tank with water also without taking it out of the espresso machine, e.g. by using a jug of water.
Fig. 1
Fig. 2
WARNING! The es should not be used, whe re starting the process of
presso machine n the tank (1) is empty. Befo
coffee brewing m nk (1) is full of water. ith hot water. For the hygienic
ake sure that the ta
Do not fill the tank (1) w
reasons do not le k for the long time.
ave water in the
tan
WARNING! Reme sure that the water leve the tank (1) is appropriate (not too low). If this
mber to make l in
situation happens, the alarm signal will be repeated until the tank (1) is filled with water and the indicator
(N)
on the control panel sta
rts flashing.
5. Warming up the cups
Using of a cup heated to the appropriate temperature before starting the coffee brewing process enhances the taste of
the coffee just after its making and results in thick foam on top of it.
You can preheat a cup using two methods. First method is that a cup is heated with the use of the steam from the steam
wand (10) according to the point 6.2.
Cups may be preheated also by putting them before the coffee brewing process on the special cup heating plate (2) on
the upper side of the espresso machine.
6. Before first use (rinsing the machine)
Before first use or if the machine hasn’t been used for a prolonged
period, it is advisable to run a rinse cycle through the machine.
6.1. The rinse cycle for espresso function
6.1.1. Turn the machine off at the power outlet and unplug the power
cord.
6.1.2. Fill the tank (1) with water in accordance with point 4.
6.1.3. Install the empty filter holder (6) in the brew head (4), turning it
firmly right (Fig. 3).
6.1.4. Put a container on the drip tray grid (7), under the brew head
Fig. 3
(4
).
6.1.5. C we cket. The espresso machine will turn
onnect the machine to the po r grid putting the power plug to the so
o d, Power
n. The signal will soun On/Off button
(A) will be illuminated and knob indicator (C) will flash
se atoveral times. Then knob indic r (C) will go out. The Power On/Off button
(A) will stay illuminated all the
tim
e.
6.1.6. P n
oress the Power On/Off butt
(A). The signal will sound.
(C) will start flashing to inform
you that the espresso m6.1.7. Knob indicator achine is in the course of heating.
6.1.8. When the knob indicator (C) stops flashing, the signal will sound. Continuous glowing of the knob indicator (C)
means that the espresso machine is ready to use (attaining appropriate temperature).
6.1.9. Turn the knob of the espresso machine (B) in such a way that two big cups of coffee indicator
(G) on the
control panel will start being illuminated.
91
Оглавление
- (2‐12)
- WSKAZÓWKI DOTYCZĄCE BEZPIECZEŃSTWA PODCZAS UŻYTKOWANIA EKSPRESU DO KAWY
- DANE TECHNICZNE
- 1. Charakterystyka urządzenia
- 4. Napełnianie zbiornika wodą
- 7. Wybór trybu kawy w torebkach ekspresowych/trybu wysokiej temperatury parzenia
- 8. Przygotowanie espresso z użyciem zaprogramowanych ustawień pojemności kawy
- 9. Przygotowanie espresso z użyciem funkcji ręcznego parzenia kawy
- 11. Funkcja automatycznego wyłączania
- 13. Odkamienianie
- 14. Czyszczenie i konserwacja
- Ekologia – Zadbajmy o środowisko
- BEZPEČNOSTNÍ POKYNY PRO POUŽÍVÁNÍ KÁVOVARU–ESPRESO
- TECHNICKÉ ÚDAJE
- 2. Popis kávovaru
- 4. Plnění zásobníku na vodu
- 7. Volba módu porcované kávy espreso/módu vysoké teploty připravované kávy
- 9. Příprava kávy espreso s použitím funkce ruční přípravy kávy
- 10. Příprava páry (šlehání mléka)
- 11. Funkce automatického vypínání
- 14. Čištění a údržba
- 15. Problémy při používání kávovaru a jejich odstraňování
- BEZPEČNOSTNÉ PREDPISY POČAS POUŽÍVANIA KÁVO VARU
- TECHNICKÉ ÚDAJE
- 2. Zloženie prístroja
- 4. Naplnenie nádrže vodou
- 7. Výber funkcie kávy v expresových vrecúškach/funkcie vysokej teploty zalievanej kávy
- 9. Príprava espresso s použitím funkcie ručného zalievania kávy
- 10. Príprava pary (spenenie mlieka)
- 11. Funkcia automatického vypnutia
- 14. Čistenie a údržba
- Ekologicky vhodná likvidácia
- BIZTONSÁGI ELŐÍRÁSOK A KÁVÉFŐZŐ HASZNÁLATÁHOZ
- MŰSZAKI ADATOK
- 2. A készülék felépítése
- 4. A víztartály feltöltése
- 7. Filteres kávé mód/magas hőmérsékleten történő főzési mód választása
- 9. Presszókávé készítése kézileg
- 10. Gőzölés (tejhabosítás)
- 11. Automatikus kikapcsolás funkciója
- 14. Tisztítás és karbantartás
- 15. A használat során esetlegesen felmerülő problémák
- INDICAŢII CU PRIVIRE LA MĂSURILE DE SIGURANŢĂ ÎN TIMPUL FOLOSIRII MAŞINII DE CAFEA
- INFORMAŢII TEHNICE
- 2. Construcţia aparatului
- 4. Umplerea rezervorului cu apă
- 7. Aleg earea setării: cafea la plicuri/cafea produsă la temperatură înaltă
- 9. Pregătirea cafelei espresso în setarea manuală
- 10. Pregătirea aburului (pentru spuma de lapte)
- 11. Funcţia de stingere automat ă
- 14. Curăţarea si conservarea
- Ecologia – ai grijă de mediul înconjurător
- УКАЗАНИЯ КАСАЮЩИЕСЯ БЕЗОПАСНОСТИ ВО ВРЕМЯ ИСПОЛЬЗОВАНИЯ КОФЕВАРКИ–ЭК СПРЕССО
- ТЕХНИЧЕСКИЕ ДАННЫЕ
- 1. Характеристика устройства
- 4. Наполнение накопителя водой
- 7. В ыбор режима кофе в пакетиках/режима высокой температуры запаривания кофе
- 8. Приготовлени экспрессо при использовании запрограммированных е установок количества кофе
- 9. Приготовление эспрессо с использованием функции ручного заваривания кофе
- 11. Функция автоматического выключения
- 14. Очистка и уход
- Э от де кология – заб а о окружающей сре
- УКАЗАНИЯ ОТНОСНО БЕЗОПАСНОСТ ПРИ УПОТРЕБА НА ЕКСПРЕС ЗА К АФЕ
- ТЕХНИЧЕСКИ ДАННИ
- 2. Строеж на устройството
- 4. Напълване на резервоара с вода
- 7. И збор на режима на кафе в експрес–торбички/режима на висока темп а запарването ература н
- 9. П риготвяне на еспресо с използване на функция на ръчно запарване на к афето
- 10. Пр иготвяне на пара (запенване на мляко)
- 11. Функция автоматично изключване
- 12. Изпразване на поднос за оттичане
- 14. Почистване и поддържане
- Е жа кология – Гри за околната среда
- В КАЗІВКИ ЩОДО ТЕХНІКИ БЕЗПЕКИ ПІД ЧАС ЕКСПЛУАТАЦІЇ КАВОВАРКИ– Е КСПРЕСУ
- ТЕХНІЧНІ ДАНІ
- 1. Характеристика пристрою
- 4. Наповнення резервуару водою
- 7. Вибір режиму кави в експрес–пакетиках/режиму високої температури запарювання
- 8. П риготування еспресо з використанням запрограмованих установок об‘єм у кави
- 9. П риготування еспресо з використанням функції ручного запарювання кав и
- 11. Функція автоматичного вимикання
- 14. Чищення та догляд
- 15. Приклади проблем, що виникають під час експлуатації кавоварки– експресу
- SAFETY INSTRUCTIONS
- TECHNICAL DATA
- 2. Machine design
- 4. Filling the water tank
- 7. Choosing mode of coffe e in espresso bags/hot brewing temperature
- 9. Preparing espres using fu coffee so nction of manual brewing of
- 10. Preparing steam (milk foaming)
- 1. Automatic switch off function
- 14. Cleaning and care
- Ecology – Environmen t protection


