Yamaha RX-397 – страница 2
Инструкция к Ресиверу/Усилителю Yamaha RX-397
Оглавление
- ПРЕДУПРЕЖДЕНИЕ: ВНИМАТЕЛЬНО ИЗУЧИТЕ ЭТО ПЕРЕД ИСПОЛЬЗОВАНИЕМ АППАРАТА.
- СОДЕРЖАНИЕ
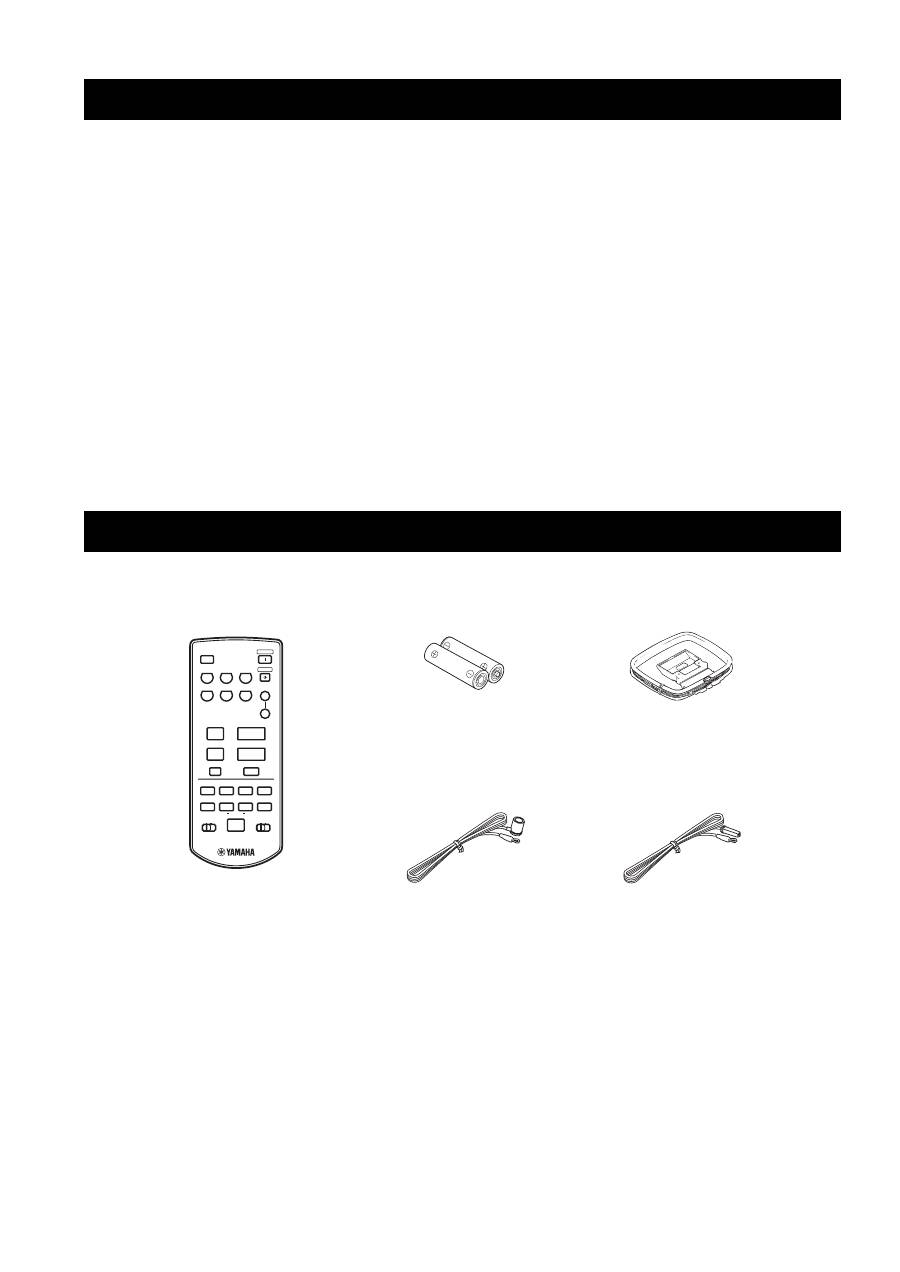
- ОПИСАНИЕ ПОСТАВЛЯЕМЫЕ АКСЕССУАРЫ
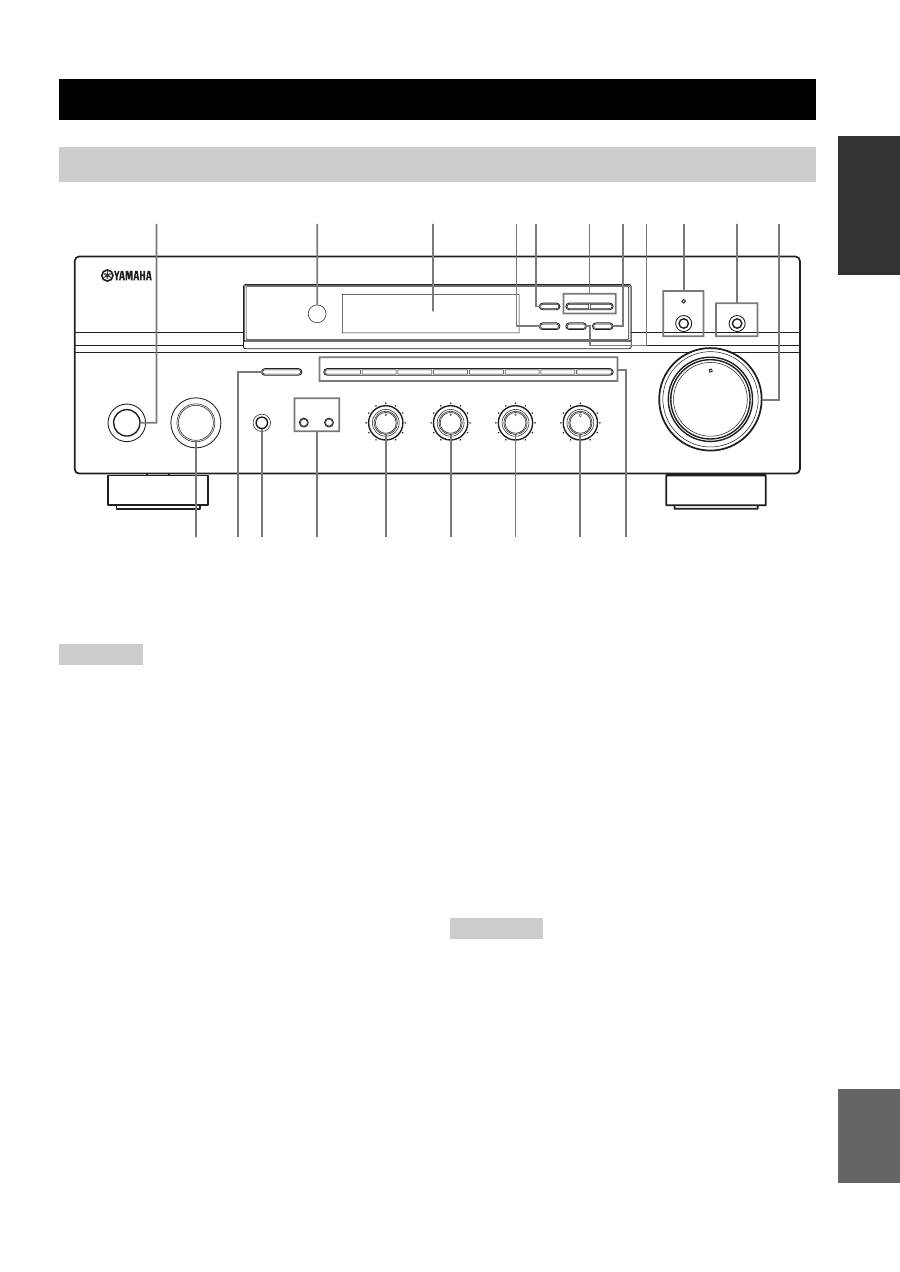
- СИСТЕМЫ УПРАВЛЕНИЯ И ФУНКЦИИ Фронтальная панель
- СИСТЕМЫ УПРАВЛЕНИЯ И ФУНКЦИИ
- СИСТЕМЫ УПРАВЛЕНИЯ И ФУНКЦИИ Дисплей фронтальной панели
- СИСТЕМЫ УПРАВЛЕНИЯ И ФУНКЦИИ Задняя панель
- Пульт ДУ
- СИСТЕМЫ УПРАВЛЕНИЯ И ФУНКЦИИ Установка батареек в пульт ДУ Использование пульта ДУ
- СОЕДИНЕНИЯ
- СОЕДИНЕНИЯ Подключение колонок
- СОЕДИНЕНИЯ Подключение АМ- и ЧМ-антенн
- СОЕДИНЕНИЯ Подключение рамочной АМ-антенны
- СОЕДИНЕНИЯ Подключение поставляемого силового кабеля питания
- Включение и отключение данного аппарата
- ВОСПРОИЗВЕДЕНИЕ И ЗАПИСЬ Воспроизведение источника
- Настойка тональности
- ВОСПРОИЗВЕДЕНИЕ И ЗАПИСЬ Запись источника
- ВОСПРОИЗВЕДЕНИЕ И ЗАПИСЬ Применение таймера сна
- Приглушение воспроизводимого звучания
- НАСТРОЙКА ДИАПАЗОНА ЧМ/AM Автоматическая настройка
- НАСТРОЙКА ДИАПАЗОНА ЧМ/AM Ручная настройка Автоматическая предустановка
- НАСТРОЙКА ДИАПАЗОНА ЧМ/AM Отрегулированная настройка и автоматическая предустановка
- НАСТРОЙКА ДИАПАЗОНА ЧМ/AM Ручная настройка и предустановка
- НАСТРОЙКА ДИАПАЗОНА ЧМ/AM Выбор предустановленных радиостанций Замена предустановленных радиостанций
- СИСТЕМА РАДИОДАННЫХ RADIO DATA SYSTEM (ТОЛЬКО МОДЕЛЬ ДЛЯ ЕВРОПЫ) Прием радиостанций системы Radio Data System Переключение режима Radio Data System
- СИСТЕМА РАДИОДАННЫХ RADIO DATA SYSTEM (ТОЛЬКО МОДЕЛЬ ДЛЯ ЕВРОПЫ) Функция PTY SEEK
- Функция EON
- ДОПОЛНИТЕЛЬНЫЕ НАСТРОЙКИ Изменение параметров меню ADVANCED SETUP
- Нажмите кнопку STANDBY/ON для подтверждения настройки.
- Общая часть ВОЗМОЖНЫЕ НЕИСПРАВНОСТИ И СПОСОБЫ ИХ УСТРАНЕНИЯ Неисправность
- Тюнер Неисправность
- Пульт ДУ Неисправность
- ТЕХНИЧЕСКИЕ ХАРАКТЕРИСТИКИ
19
PLAYING AND RECORDING
OPERA
T
ION
English
1
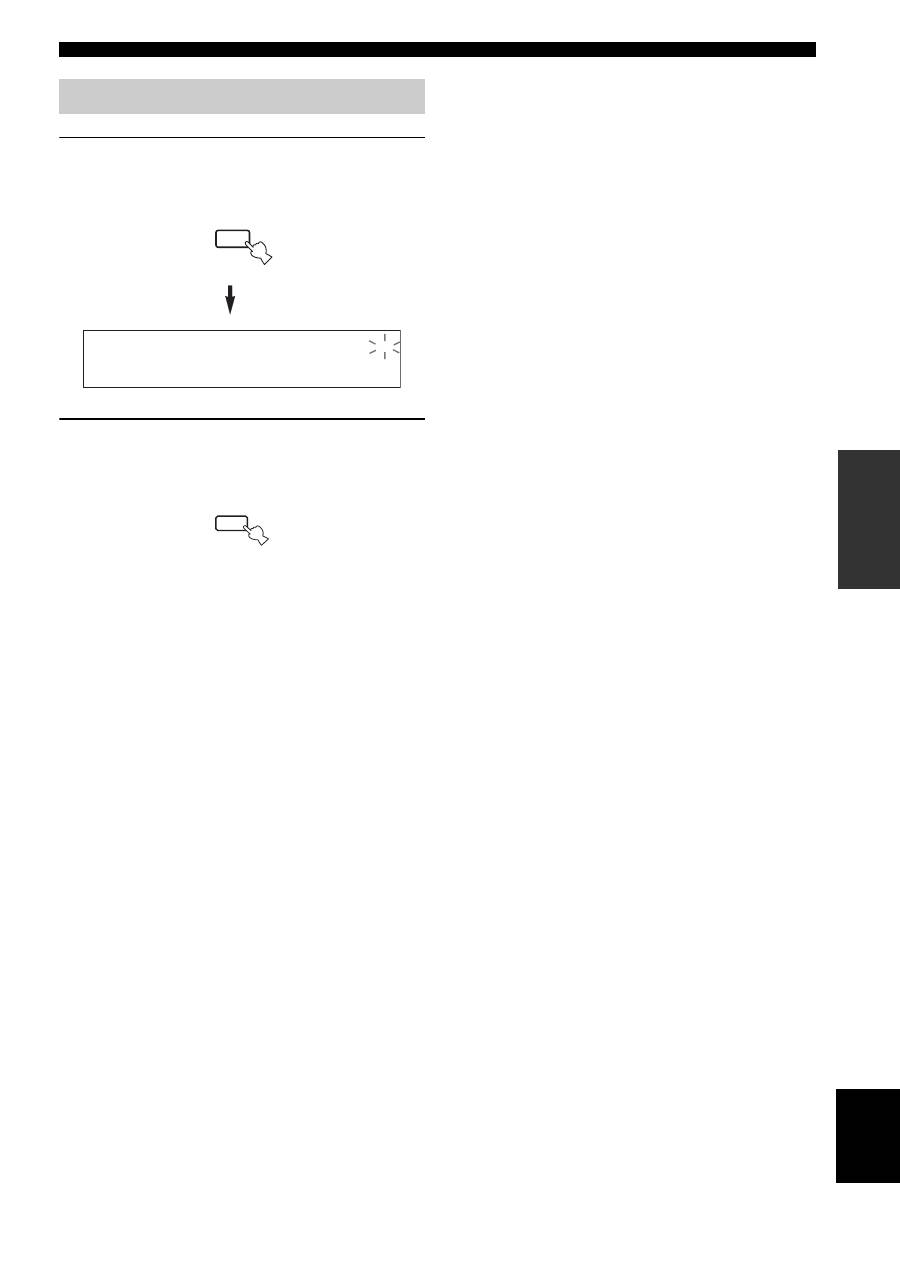
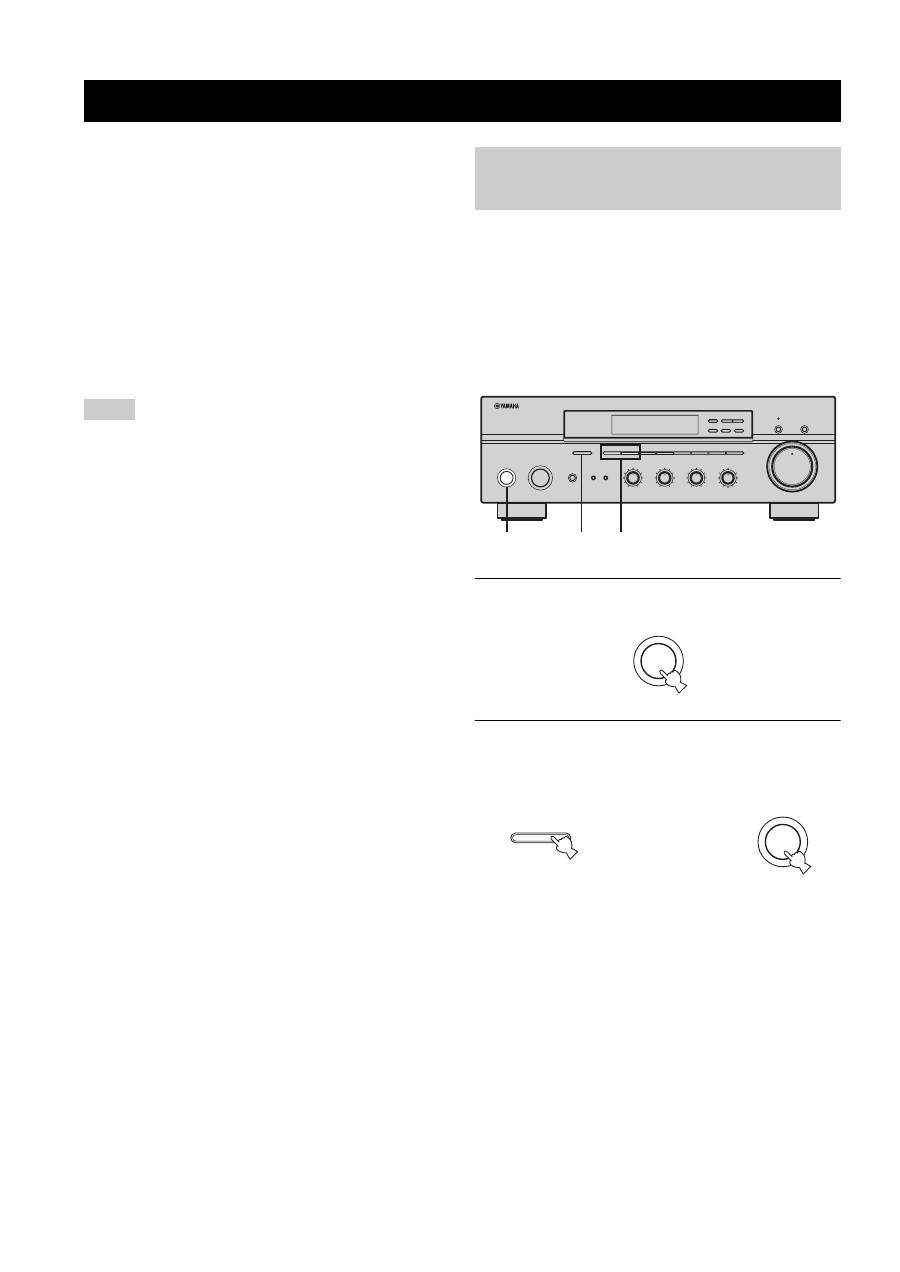
Press MUTE on the remote control to mute
the sound output.
The MUTE indicator flashes in the front panel
display.
2
Press MUTE on the remote control again to
resume the sound output.
The MUTE indicator disappears from the front panel
display.
Muting the sound output
MUTE
MUTE
MUTE
FM/AM TUNING
20
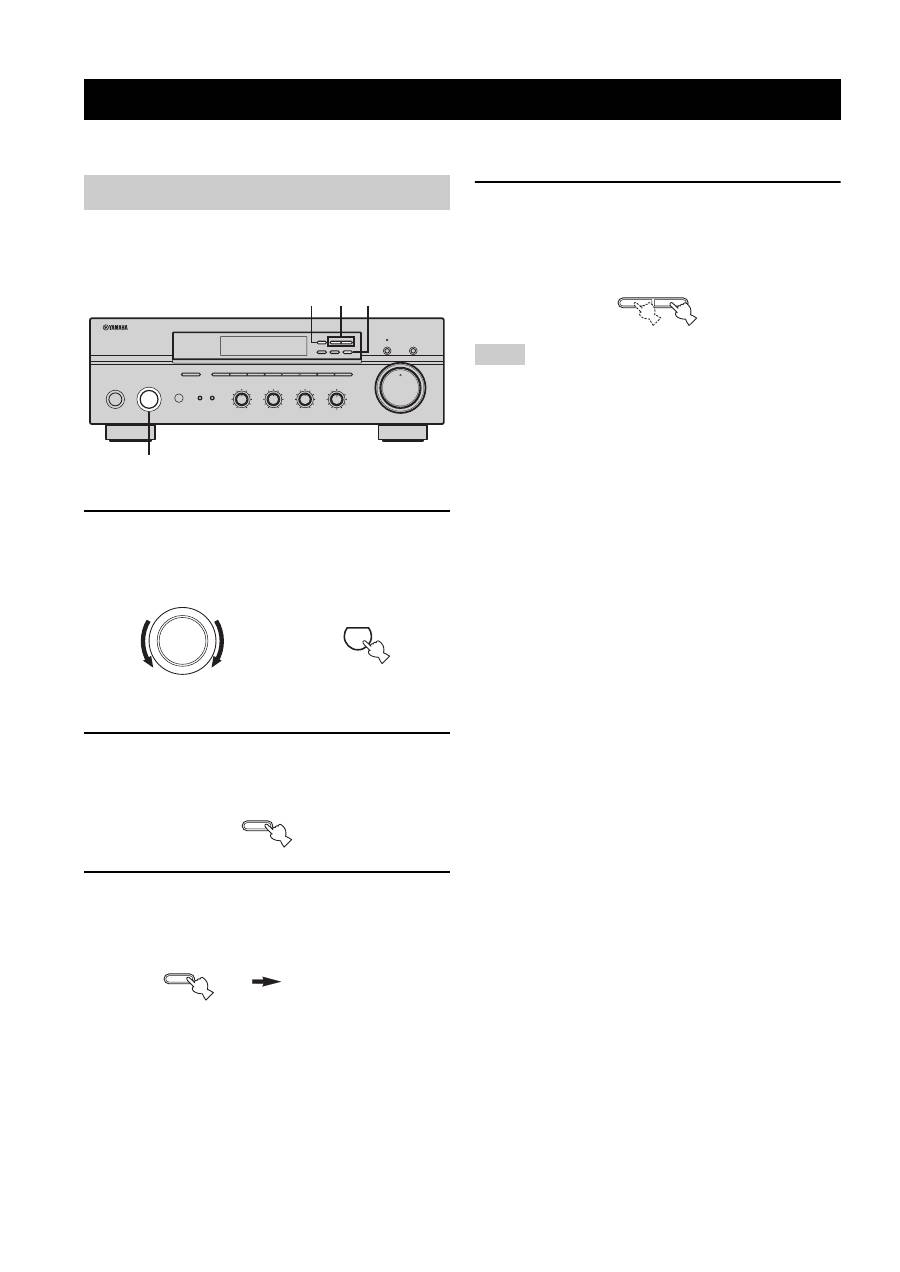
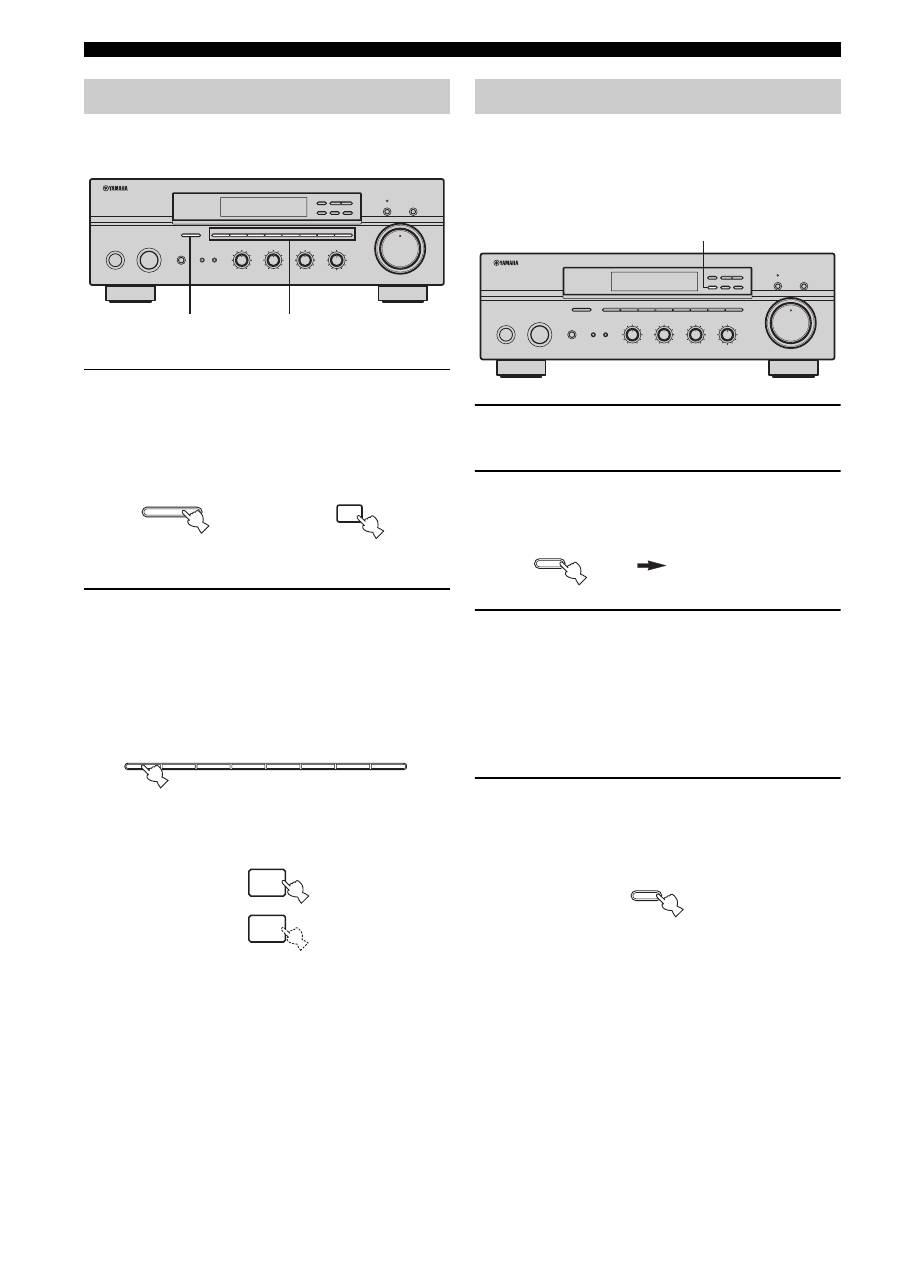
There are 2 tuning methods; automatic and manual. Select either method according to your preference and the strength of
station signals.
Automatic tuning is effective when station signals are
strong and there is no interference.
1
Rotate the INPUT selector (or press TUNER
on the remote control) to select TUNER as
the input source.
2
Press FM/AM on the front panel to select the
reception band (FM or AM).
FM or AM appears in the front panel display.
3
Press TUNING MODE on the front panel so
that the AUTO indicator lights up in the front
panel display.
4
Press TUNING
l
/
h
once to begin
automatic tuning.
Press
h
to tune into a higher frequency.
Press
l
to tune into a lower frequency.
• When you tune into a station, the frequency of the received
station is shown in the front panel display.
• To search for another station, press TUNING
l
/
h
once more.
• If the tuning search does not stop at the desired station because
the station signals are weak, try using the manual tuning
method.
FM/AM TUNING
Automatic tuning
STANDBY
/ON
INPUT
BASS
TAPE MONITOR
PURE DIRECT
5
5
1
0
1
4
4
2
2
3
3
+
–
VOLUME
l
TUNING
h
FM/AM
EDIT
A/B/C/D/E
1
2
3
4
5
6
7
8
MEMORY
MAN'L/AUTO FM
TUNING MODE
AUTO/MAN'L
TREBLE
5
5
1
0
1
4
4
2
2
3
3
+
–
BALANCE
5
5
1
0
1
4
4
2
2
3
3
R
L
LOUDNESS
5
7
1
FLAT
6
4
8
2
10
–30dB
3
9
SPEAKERS
B
A
2 4 3
1
0
12
12
2
8
4
∞
20
20
60
60
26
26
40
40
16
16
-dB
-dB
INPUT
TUNER
or
Front panel
Remote control
FM/AM
TUNING MODE
AUTO/MAN'L
AUTO
Lights up
Notes
l
TUNING
h
21
FM/AM TUNING
OPERA
T
ION
English
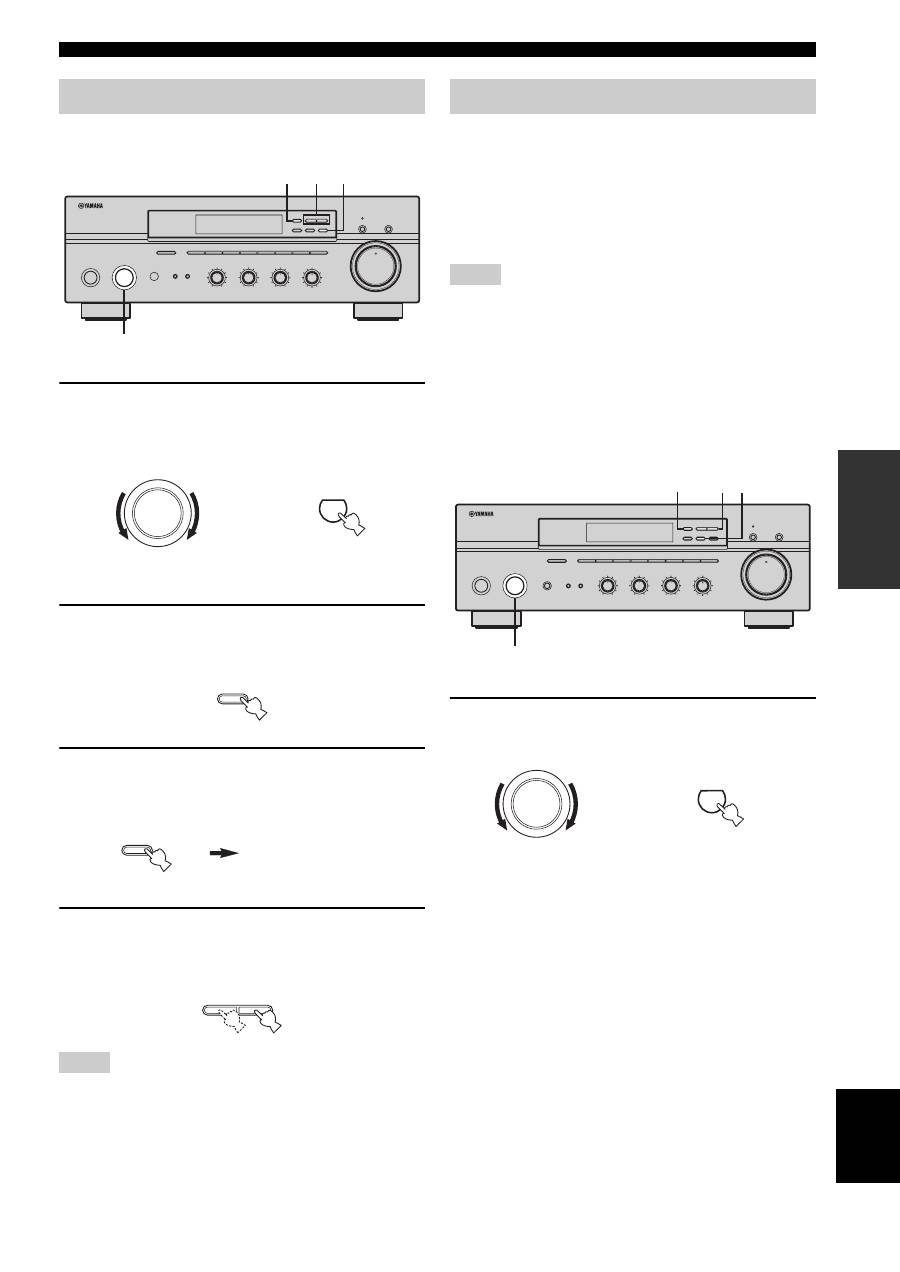
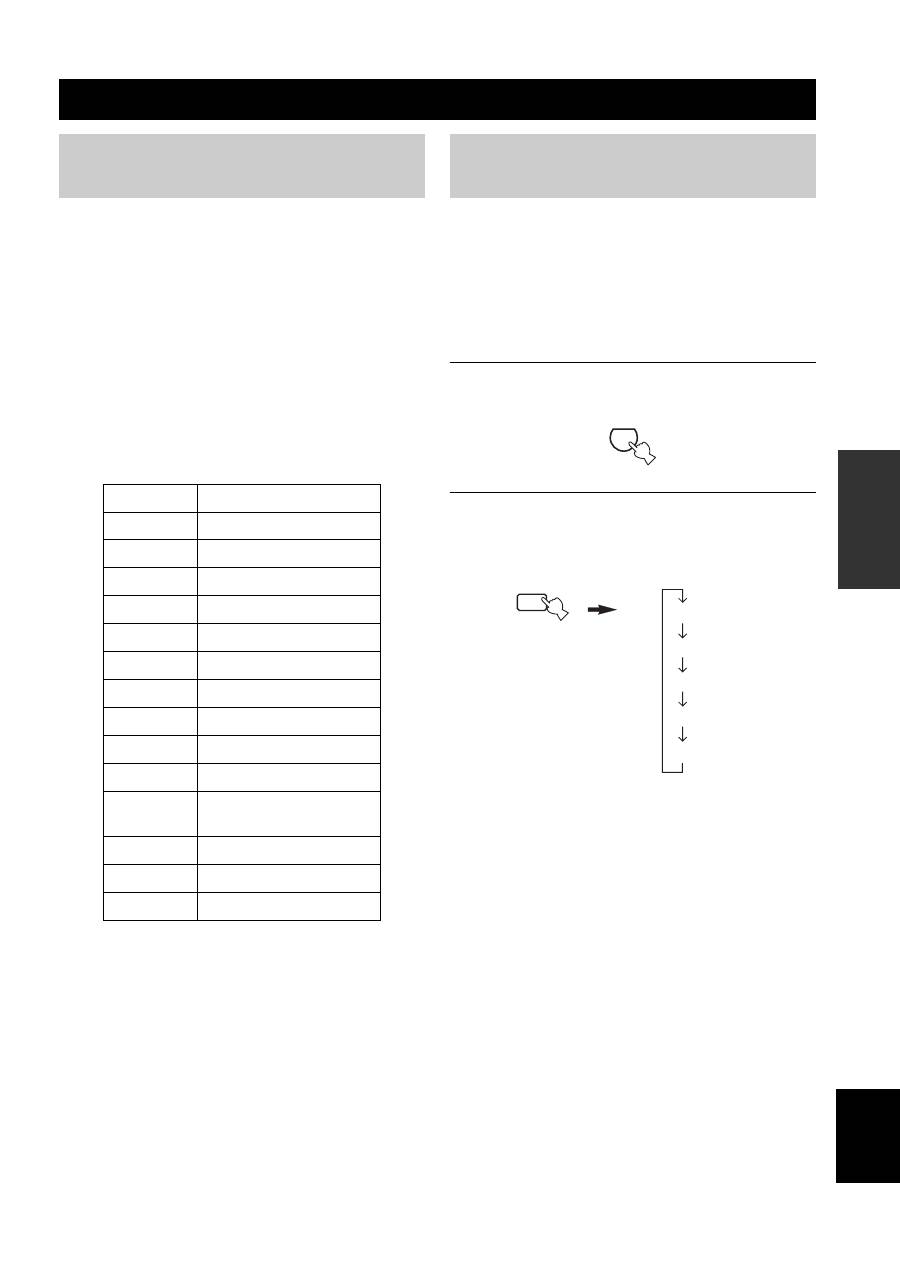
Manual tuning is effective when station signals are weak.
1
Rotate the INPUT selector (or press TUNER
on the remote control) to select TUNER as
the input source.
2
Press FM/AM on the front panel to select the
reception band (FM or AM).
FM or AM appears in the front panel display.
3
Press TUNING MODE on the front panel so
that the AUTO indicator disappears from the
front panel display.
4
Press TUNING
l
/
h
to manually tune into
the desired station.
Hold down the button to continue tuning search.
• When you tune into a station, the frequency of the received
station is shown in the front panel display.
• If you tune into an FM station, it is automatically received in the
monaural mode to increase signal quality.
You can use the automatic preset tuning method to
automatically store FM stations. This function enables this
unit to automatically tune into FM stations with strong
signals and store up to 40 (8 stations in each of the 5
groups, A1 to E8) of those received stations in order. You
can then easily recall any preset stations by selecting the
preset station numbers where they are stored.
• Any station data stored under a preset station number is cleared
when you store a new station under that preset station number.
• If the number of received stations does not reach 40 (E8),
automatic preset tuning automatically stops once searching all
available stations are tuned into and stored.
• Only FM stations with sufficient signal strength are stored
automatically by automatic preset tuning. If the station you
want to store is weak in signal strength, try using the manual
preset tuning method.
1
Rotate the INPUT selector (or press TUNER
on the remote control) to select TUNER.
Manual tuning
Notes
STANDBY
/ON
INPUT
BASS
TAPE MONITOR
PURE DIRECT
5
5
1
0
1
4
4
2
2
3
3
+
–
VOLUME
l
TUNING
h
FM/AM
EDIT
A/B/C/D/E
1
2
3
4
5
6
7
8
MEMORY
MAN'L/AUTO FM
TUNING MODE
AUTO/MAN'L
TREBLE
5
5
1
0
1
4
4
2
2
3
3
+
–
BALANCE
5
5
1
0
1
4
4
2
2
3
3
R
L
LOUDNESS
5
7
1
FLAT
6
4
8
2
10
–30dB
3
9
SPEAKERS
B
A
2 4 3
1
0
12
12
2
8
4
∞
20
20
60
60
26
26
40
40
16
16
-dB
-dB
INPUT
TUNER
or
Front panel
Remote control
FM/AM
TUNING MODE
AUTO/MAN'L
AUTO
Disappears
l
TUNING
h
Automatic preset tuning
Notes
STANDBY
/ON
INPUT
PHONES
BASS
TAPE MONITOR
PURE DIRECT
5
5
1
0
1
4
4
2
2
3
3
+
–
VOLUME
l
TUNING
h
FM/AM
EDIT
A/B/C/D/E
1
2
3
4
5
6
7
8
MEMORY
MAN'L/AUTO FM
TUNING MODE
AUTO/MAN'L
TREBLE
5
5
1
0
1
4
4
2
2
3
3
+
–
BALANCE
5
5
1
0
1
4
4
2
2
3
3
R
L
LOUDNESS
5
7
1
FLAT
6
4
8
2
10
–30dB
3
9
SPEAKERS
B
A
2
1
3 4
0
12
12
2
8
4
∞
20
20
60
60
26
26
40
40
16
16
-dB
-dB
INPUT
TUNER
or
Front panel
Remote control

22
FM/AM TUNING
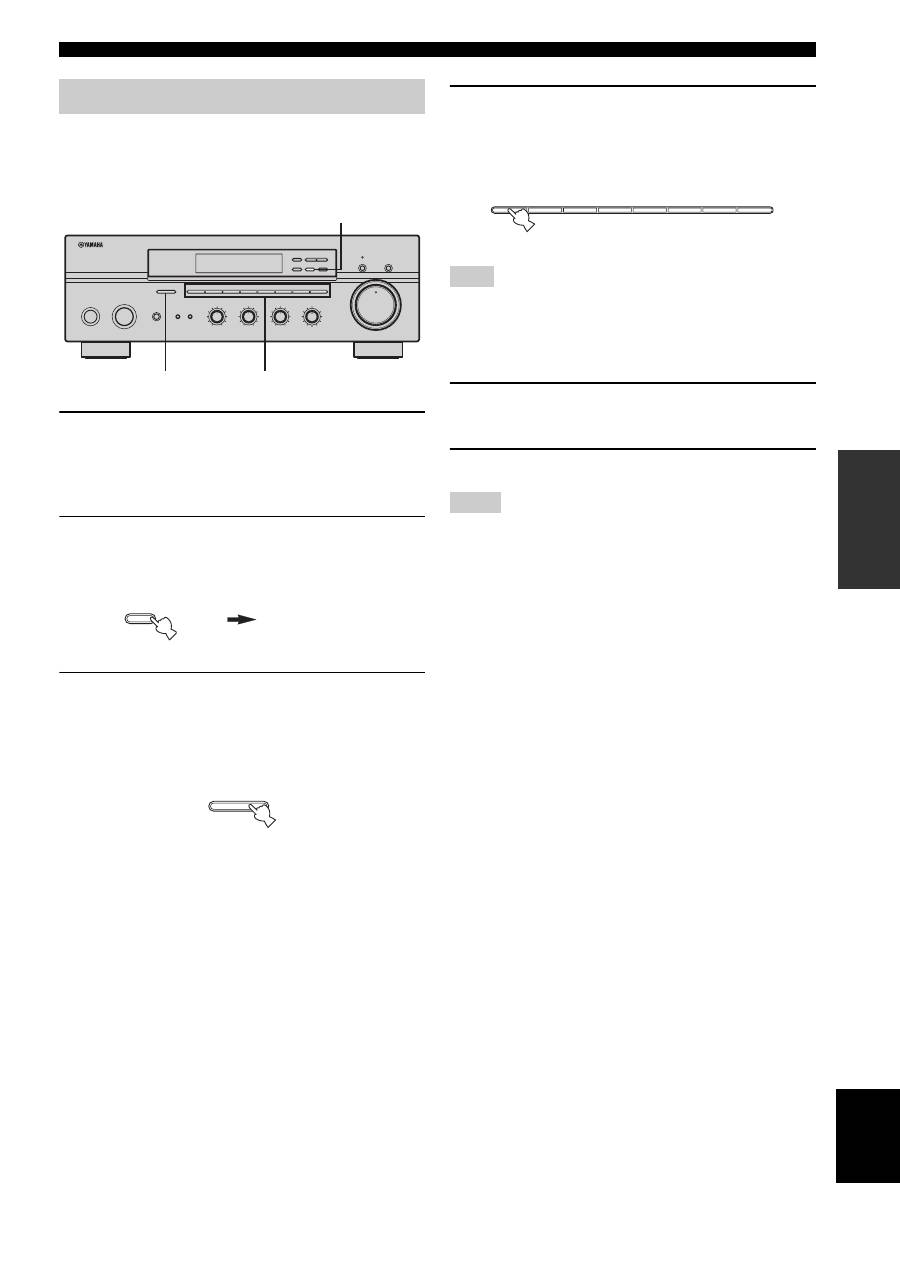
2
Press FM/AM on the front panel to select FM
as the reception band.
FM appears in the front panel display.
3
Press and hold MEMORY on the front panel
for more than 3 seconds.
The preset station group and the MEMORY and
AUTO indicators flash in the front panel display.
4
Press TUNING
l
/
h
once to begin
automatic preset tuning.
Press
h
to tune into higher frequencies.
Press
l
to tune into lower frequencies.
When automatic preset tuning is complete, the
frequency of the last preset station is shown in the
front panel display.
• If TUNING
l
/
h
is not pressed within approximately 5
seconds while the MEMORY and AUTO indicators are
flashing, automatic preset tuning automatically begins from the
currently displayed frequency and proceeds toward higher
frequencies.
• Received stations are sequentially programmed to 8 stations in
each preset station group (A1 to A8). If 8 stations are all
programmed in a preset station group, another 8 stations are
sequentially programmed in the next preset station group.
■
Customized automatic preset tuning
You can specify a preset station group and a preset station
number from which this unit stores the FM stations
received by automatic preset tuning.
1
Press and hold MEMORY on the front panel
for more than 3 seconds.
2
Press A/B/C/D/E and then press one of the
preset station number buttons on the front
panel to select the preset station group and
the preset station number where the first
received station will be stored.
For example, if you select C5, the first received
station is automatically programmed to C5 and the
next received stations are sequentially programmed
to C6, C7, etc.
3
Press TUNING
l
/
h
on the front panel to
begin automatic preset tuning.
Press
h
to tune into higher frequencies.
Press
l
to tune into lower frequencies.
When automatic preset tuning is complete, the
frequency of the last preset station is shown in the
front panel display.
Automatic preset tuning stops when the received stations have all
been stored up to E8.
Notes
FM/AM
MEMORY
MAN'L/AUTO FM
l
TUNING
h
Note
MEMORY
MAN'L/AUTO FM
A/B/C/D/E
1
2
3
4
5
6
7
8
l
TUNING
h
23
FM/AM TUNING
OPERA
T
ION
English
You can also manually store up to 40 stations (8 stations in
each of the 5 groups, A1 to E8). You can then easily recall
any preset stations by selecting the preset station numbers
where they are stored.
1
Repeat steps 1 to 4 in “Automatic tuning” or
in “Manual tuning” to tune into a station.
When you tune into a station, the frequency of the
received station is shown in the front panel display.
2
Press MEMORY on the front panel.
The MEMORY indicator flashes in the front panel
display for approximately 5 seconds.
3
Press A/B/C/D/E on the front panel
repeatedly to select a preset station group (A
to E).
The selected preset station group is shown in the front
panel display.
4
Press one of the preset station number
buttons on the front panel to select a preset
station number (1 to 8) where you want to
store the station.
This operation must be done within 5 seconds while the
MEMORY indicator is flashing in the front panel display.
Otherwise, the manual preset tuning process is automatically
canceled.
5
Press MEMORY on the front panel to store
the station.
6
Repeat steps 1 to 5 to store other stations.
• Any station data stored under a preset station number is cleared
when you store a new station under that preset station number.
• The reception mode (stereo or monaural) is stored along with
the station frequency.
Manual preset tuning
STANDBY
/ON
INPUT
PHONES
BASS
TAPE MONITOR
PURE DIRECT
5
5
1
0
1
4
4
2
2
3
3
+
–
VOLUME
l
TUNING
h
FM/AM
EDIT
A/B/C/D/E
1
2
3
4
5
6
7
8
MEMORY
MAN'L/AUTO FM
TUNING MODE
AUTO/MAN'L
TREBLE
5
5
1
0
1
4
4
2
2
3
3
+
–
BALANCE
5
5
1
0
1
4
4
2
2
3
3
R
L
LOUDNESS
5
7
1
FLAT
6
4
8
2
10
–30dB
3
9
SPEAKERS
B
A
3
4
2,5
0
12
12
2
8
4
∞
20
20
60
60
26
26
40
40
16
16
-dB
-dB
MEMORY
MAN'L/AUTO FM
MEMORY
Flashes
A/B/C/D/E
Note
Notes
1
2
3
4
5
6
7
8
24
FM/AM TUNING
You can tune into the desired station simply by selecting
the preset station number where it is stored.
1
Press A/B/C/D/E on the front panel
repeatedly (or on the remote control) to
select a preset station group (A to E).
The selected preset station group is shown in the front
panel display.
2
Press one of the preset station number
buttons on the front panel (or
PRESET
u
/
d
on the remote control) to
select a preset station number (1 to 8).
The preset station number appears in the front panel
display along with the reception band and the
frequency.
You can exchange the assignment of two preset stations
with each other. The following procedure describes an
example where a preset station E1 is exchanged with
another preset station A5.
1
Repeat steps 1 and 2 in “Selecting preset
stations” to select a preset station E1.
2
Press EDIT on the front panel.
E1 and the MEMORY indicator flash in the front
panel display.
3
Repeat steps 1 and 2 in “Selecting preset
stations” to select another preset station A5.
A5 and the MEMORY indicator flash in the front
panel display.
4
Press EDIT on the front panel again.
E1-A5 appears in the front panel display, indicating
that the two preset station assignments have been
exchanged.
Selecting preset stations
STANDBY
/ON
INPUT
PHONES
BASS
TAPE MONITOR
PURE DIRECT
5
5
1
0
1
4
4
2
2
3
3
+
–
VOLUME
l
TUNING
h
FM/AM
EDIT
A/B/C/D/E
1
2
3
4
5
6
7
8
MEMORY
MAN'L/AUTO FM
TUNING MODE
AUTO/MAN'L
TREBLE
5
5
1
0
1
4
4
2
2
3
3
+
–
BALANCE
5
5
1
0
1
4
4
2
2
3
3
R
L
LOUDNESS
5
7
1
FLAT
6
4
8
2
10
–30dB
3
9
SPEAKERS
B
A
1
2
0
12
12
2
8
4
∞
20
20
60
60
26
26
40
40
16
16
-dB
-dB
A/B/C/D/E
A/B/C/D/E
Front panel
or
Remote control
1
2
3
4
5
6
7
8
u
d
PRESET
or
Front panel
Remote control
Exchanging preset stations
STANDBY
/ON
INPUT
PHONES
BASS
TAPE MONITOR
PURE DIRECT
5
5
1
0
1
4
4
2
2
3
3
+
–
VOLUME
l
TUNING
h
FM/AM
EDIT
A/B/C/D/E
1
2
3
4
5
6
7
8
MEMORY
MAN'L/AUTO FM
TUNING MODE
AUTO/MAN'L
TREBLE
5
5
1
0
1
4
4
2
2
3
3
+
–
BALANCE
5
5
1
0
1
4
4
2
2
3
3
R
L
LOUDNESS
5
7
1
FLAT
6
4
8
2
10
–30dB
3
9
SPEAKERS
B
A
2,4
0
12
12
2
8
4
∞
20
20
60
60
26
26
40
40
16
16
-dB
-dB
EDIT
MEMORY
Flashes
MEMORY
Flashes
EDIT
RADIO DATA SYSTEM (EUROPE MODEL ONLY)
25
OPERA
T
ION
English
Radio Data System is a data transmission system used by FM
stations in many countries. The Radio Data System function is
carried out among the network stations.
This unit can receive various Radio Data System data such as PS
(Program Service name), PTY (Program Type), RT (Radio Text),
CT (Clock Time), EON (Enhanced Other Networks) when
receiving Radio Data System broadcasting stations.
■
PS (Program Service name) mode
The name of the Radio Data System station being received
is displayed.
■
PTY (Program Type) mode
There are 15 program types to classify Radio Data System
stations.
■
RT (Radio Text) mode
Information about the program (such as the title of the
song or name of the singer) on the Radio Data System
station being received is displayed using a maximum of 64
alphanumeric characters, including the umlaut symbol. If
other characters are used for RT data, they are displayed
with an underbar (_).
■
CT (Clock Time) mode
The current time is displayed and updated every minute.
If the data are accidentally cut off, “CT WAIT” may appear.
■
EON (Enhanced Other Networks)
See “EON function” on page 27.
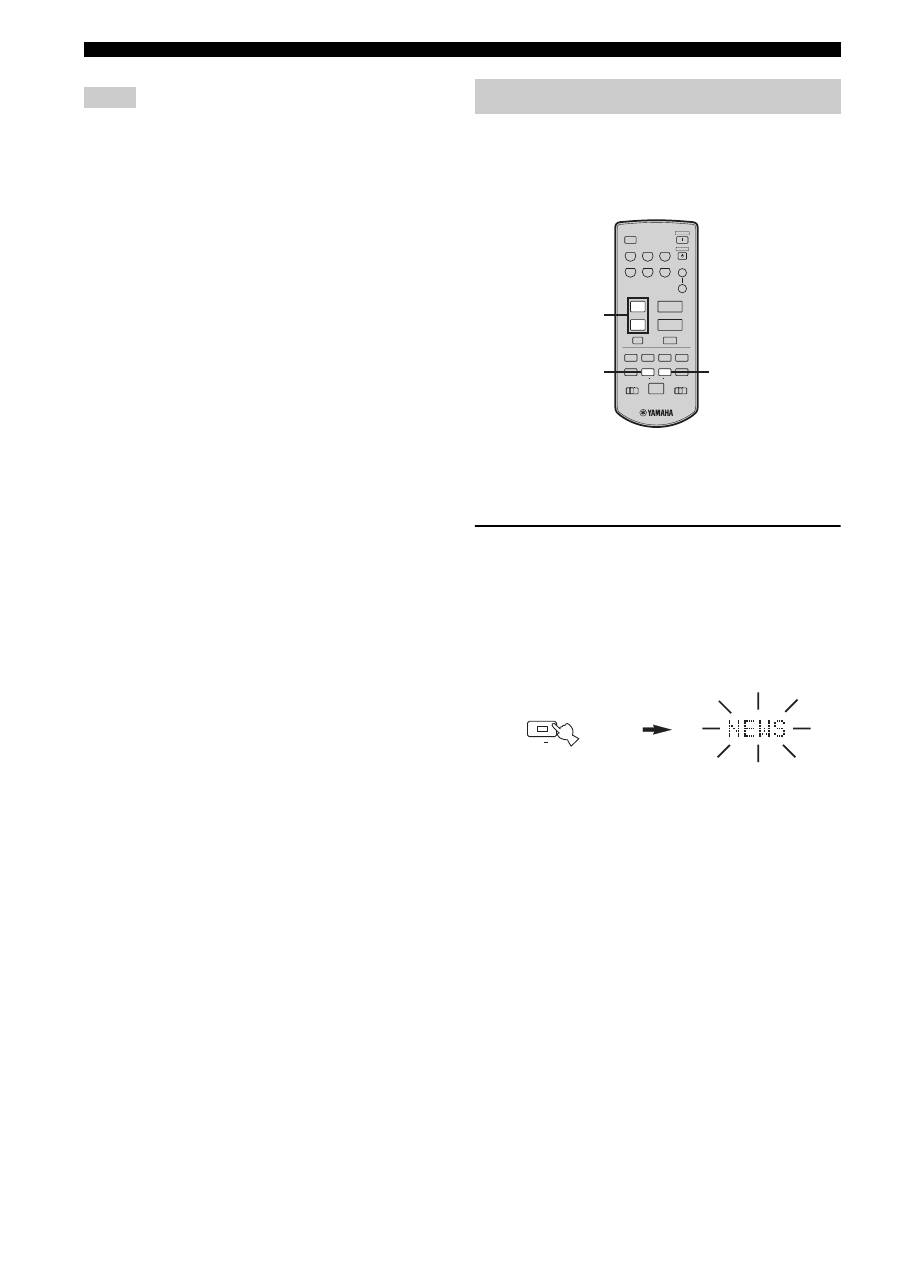
Four modes are available for displaying Radio Data
System data. The PS, PTY, RT and/or CT indicators that
correspond to the Radio Data System data services offered
by the station light up in the front panel display.
y
When performing this operation, first slide the AMP/DEVICE
switch to the AMP position.
1
Press TUNER on the remote control to set
this unit to tuner mode.
2
Press FREQ/TEXT repeatedly on the remote
control to display the various Radio Data
System data offered by the transmitting
station.
RADIO DATA SYSTEM (EUROPE MODEL ONLY)
Receiving Radio Data System stations
NEWS
News
AFFAIRS
Current affairs
INFO
General information
SPORT
Sports
EDUCATE
Education
DRAMA
Drama
CULTURE
Culture
SCIENCE
Science
VARIED
Light entertainment
POP M
Pops
ROCK M
Rock
M.O.R. M
Middle-of-the-road music
(easy-listening)
LIGHT M
Light classics
CLASSICS
Serious classics
OTHER M
Other music
Changing the Radio Data System mode
TUNER
FREQ/TEXT
DIR A
b
PS
PTY
RT
CT
Frequency display
Remote control
26
RADIO DATA SYSTEM (EUROPE MODEL ONLY)
• Do not press FREQ/TEXT until a Radio Data System indicator
lights up in the front panel display. You cannot change the mode
if you press the button prior to this. This is because this unit has
not finished receiving all of the Radio Data System data from
the station.
• Radio Data System data not offered by the station cannot be
selected.
• This unit cannot utilize the Radio Data System data source if
the signal received is not strong enough. In particular, the RT
mode requires a large amount of data, so it is possible that the
RT mode may not be displayed even if other Radio Data System
modes (PS, PTY, etc.) are displayed.
• Radio Data System data may not be received under poor
reception conditions. In such cases, press TUNING MODE
(AUTO/MAN’L MONO) so that the AUTO indicator
disappears from the front panel display. Although this will
change the reception mode to manual, Radio Data System data
may be displayed when you change the display to Radio Data
System mode.
• If the signal strength is weakened by external interference
during the reception of a Radio Data System station, the Radio
Data System data service may be cut off suddenly and
“...WAIT” will appear in the front panel display.
If you select the desired program type, this unit
automatically searches all preset Radio Data System
stations that are broadcasting a program of the required
type.
y
When performing this operation, first slide the AMP/DEVICE
switch to the AMP position.
1
Press PTY SEEK MODE on the remote
control to set this unit in the PTY SEEK
mode.
The program type of the station being received or
“NEWS” flashes in the front panel display.
To exit from the PTY SEEK mode, press PTY SEEK
MODE again.
Notes
PTY SEEK function
CD/DVD
PHONO
TUNER
MD
TAPE
AUX
SPEAKERS
B
A
POWER
STANDBY
+
–
u
d
SLEEP
REC
EON
FREQ/TEXT MODE
START
PTY SEEK
A/B
DISC
DIR A
p
DIR B
A/B/C/D/E
MUTE
PRESET
VOLUME
TAPE
CD
DEVICE
AMP
w
e
f
b
s
a
DISPLAY
2
3
1
MODE
PTY SEEK
Remote control
Flashes
27
RADIO DATA SYSTEM (EUROPE MODEL ONLY)
OPERA
T
ION
English
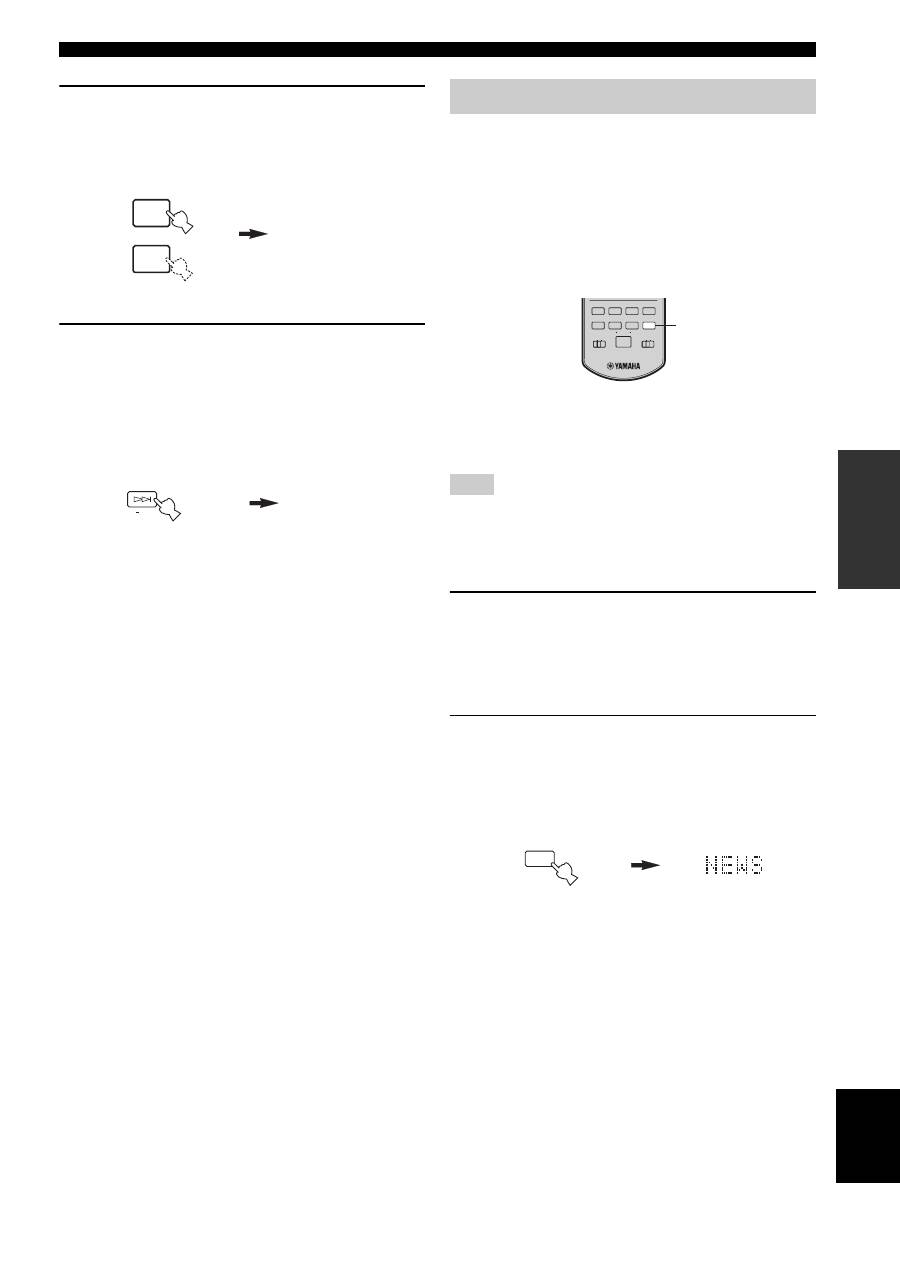
2
Press PRESET
u
/
d
on the remote control
to select the desired program type.
The selected program type appears in the front panel
display.
3
Press PTY SEEK START on the remote
control to begin searching all preset Radio
Data System stations.
The selected program type flashes and the PTY
HOLD indicator lights up in the front panel display
while searching for stations.
To cancel searching, press PTY SEEK START again.
• The unit stops searching when it finds a station
broadcasting the selected type of program.
• If the found station is not the one you desire, press
PTY SEEK START again. This unit resumes
searching for another station broadcasting the same
type of program.
This function uses the EON data service on the Radio
Data System station network. If you select the desired
program type (NEWS, INFO, AFFAIRS or SPORT), this
unit automatically searches for all preset Radio Data
System stations that are scheduled to broadcast the
selected type of program and switches from the station
currently being received to the new station when the
broadcast starts.
y
When performing this operation, first slide the AMP/DEVICE
switch to the AMP position.
This function can only be used when a Radio Data System station
that offers the EON data service is being received. When such a
station is being received, the EON indicator lights up in the front
panel display.
1
Check that the EON indicator is lit in the front
panel display.
If the EON indicator is not lit up, tune into another
Radio Data System station so that the EON indicator
lights up.
2
Press EON repeatedly on the remote control
to select the desired program type (NEWS,
INFO, AFFAIRS or SPORT).
The selected program type name appears in the front
panel display.
• If a preset Radio Data System station type starts
broadcasting the selected type of program, the unit
automatically switches from the program being
received to that program. (The EON indicator
flashes.)
• When broadcasting of the selected program ends,
the unit returns to the previous station (or another
program on the same station).
■
To cancel this function
Press EON repeatedly until no program type name is
shown in the front panel display.
POP M
u
d
PRESET
START
PTY SEEK
PTY HOLD
Remote control
Lights up
EON function
Note
REC
EON
FREQ/TEXT MODE
START
PTY SEEK
A/B
DISC
DIR A
p
DIR B
TAPE
CD
DEVICE
AMP
w
e
f
b
s
a
DISPLAY
2
EON
REC
DISC
Remote control
ADVANCED SETUP
28
■
ADVANCED SETUP menu parameters
Change the initial settings (indicated in bold under each
parameter) to reflect the needs of your listening
environment.
Factory presets
PRESET
Use to reset all parameters to the factory presets.
Choices:
CANCEL
, RESET
• Select CANCEL if you do not want the parameters of
this unit to be initialized when you reset the factory
presets.
• Select RESET if you want all of the parameters of this
unit to be initialized when you reset the factory presets.
• This setting does not affect the parameters in the ADVANCED
SETUP menu.
• The resetting process starts next time you turn on the power of
this unit.
Tuner
TU
(Asia and General models only)
Use to switch the frequency step selection according to the
frequency spacing in your area.
Choices:
AM10/FM100
, AM9/FM50
• North, Central and South America:
AM10/FM100 (kHz)
• Other areas: AM9/FM50 (kHz)
The ADVANCED SETUP menu is displayed in the front
panel display.
y
• During the ADVANCED SETUP procedure, audio output is
muted.
• During the ADVANCED SETUP procedure, only
STANDBY/ON, A/B/C/D/E and the preset station number
buttons (1 and 2) on the front panel are operational.
1
Press STANDBY/ON on the front panel to set
this unit to the standby mode.
2
Press and hold A/B/C/D/E on the front panel
and then press STANDBY/ON.
This unit is turned on, and the ADVANCED SETUP
menu appears in the front panel display.
ADVANCED SETUP
Notes
Changing the ADVANCED SETUP menu parameters
STANDBY
/ON
INPUT
PHONES
BASS
TAPE MONITOR
PURE DIRECT
5
5
1
0
1
4
4
2
2
3
3
+
–
VOLUME
l
TUNING
h
FM/AM
EDIT
A/B/C/D/E
1
2
3
4
5
6
7
8
MEMORY
MAN'L/AUTO FM
TUNING MODE
AUTO/MAN'L
TREBLE
5
5
1
0
1
4
4
2
2
3
3
+
–
BALANCE
5
5
1
0
1
4
4
2
2
3
3
R
L
LOUDNESS
5
7
1
FLAT
6
4
8
2
10
–30dB
3
9
SPEAKERS
B
A
2,4
1,2,5
3
0
12
12
2
8
4
∞
20
20
60
60
26
26
40
40
16
16
-dB
-dB
STANDBY
/ON
While holding down,
press
A/B/C/D/E
STANDBY
/ON

29
ADVANCED SETUP
OPERA
T
ION
English
3
(Asia and General models only)
Press the preset station number buttons (1
and 2) on the front panel to move through the
menu and select the parameter you want to
adjust.
See page 28 for available parameters.
4
Press A/B/C/D/E on the front panel
repeatedly to toggle between the available
parameters.
5
Press STANDBY/ON to confirm your setting.
The settings you made are reflected next time you turn on this
unit.
Note
1
2
A/B/C/D/E
STANDBY
/ON

TROUBLESHOOTING
30
Refer to the chart below if this unit does not function properly. If the problem you are experiencing is not listed below or
if the instructions below do not help, set this unit to the standby mode, disconnect the power cord, and contact the nearest
authorized YAMAHA dealer or service center.
■
General
TROUBLESHOOTING
Problem
Cause
Remedy
See
page
This unit fails to turn
on.
The power supply cord is not connected or
the plug is not completely inserted.
Connect the power supply cord firmly.
—
The impedance setting is incorrect.
Set the impedance to match your speakers.
10
The protection circuitry has been activated
because of a short circuit, etc.
Check that the speaker wires are not touching each
other and then turn the power of this unit back on.
10
The IMPEDANCE SELECTOR switch on
the rear panel is not set to either end.
Set the IMPEDANCE SELECTOR switch to either
end when the power of this unit is turned off.
10
This unit has been exposed to a strong
external electric shock (such as lightning
or strong static electricity).
Set this unit to the standby mode, disconnect the
power supply cord, plug it back in after 30 seconds,
then use it normally.
—
No sound
Incorrect input or output cable
connections.
Connect the cables properly. If the problem persists,
the cables may be defective.
9
No appropriate input source has been
selected.
Select an appropriate input source with the INPUT
selector on the front panel (or one of the input
selector buttons on the remote control).
15
The TAPE MONITOR function is turned
on.
Turn off the TAPE MONITOR function.
3
The SPEAKERS A/B switches are not set
properly.
Turn on the corresponding SPEAKERS A or
SPEAKERS B.
15
Speaker connections are not secure.
Secure the connections.
10
The sound suddenly
goes off.
The protection circuitry has been activated
because of a short circuit, etc.
Check that the IMPEDANCE SELECTOR setting is
correct.
10
Check that the speaker wires are not touching each
other and then turn the power of this unit back on.
10
Only the speaker on
one side can be
heard.
Incorrect cable connections.
Connect the cables properly. If the problem persists,
the cables may be defective.
9
Incorrect setting for the BALANCE
control.
Set the BALANCE control to the appropriate
position.
16
There is a lack of bass
and no ambience.
The + and – wires are connected in
reverse at the amplifier or the speakers.
Connect the speaker wires to the correct + and –
phase.
10
A “humming” sound
can be heard.
Incorrect cable connections.
Connect the audio plugs firmly. If the problem
persists, the cables may be defective.
9
No connection from the turntable to the
GND terminal.
Make the GND connection between the turntable and
this unit.
9
The volume level is
low while playing a
record.
The record is being played on a turntable
with an MC cartridge.
The turntable should be connected to this unit through
the MC head amplifier.
—
The volume level
cannot be increased,
or the sound is
distorted.
The component connected to the TAPE
OUT or the MD OUT jacks of this unit is
turned off.
Turn on the power of the component.
—

31
TROUBLESHOOTING
ADDITIONA
L
INF
O
RMA
T
IO
N
English
■
Tuner
The sound is
degraded when
listening with the
headphones
connected to the CD
player or the tape
deck connected to
this unit.
The power of this unit is turned off, or this
unit is set to the standby mode.
Turn on the power of this unit.
14
The sound level is
low.
The LOUDNESS control is functioning.
Set the LOUDNESS control to the FLAT position.
16
The INPUT selector
will not function
though it is rotated.
The TAPE MONITOR function is turned
on.
Turn off the TAPE MONITOR function.
3
Using the BASS,
TREBLE, BALANCE
and LOUDNESS
controls does not
affect the tonal
quality.
The PURE DIRECT button is turned on.
The PURE DIRECT button must be turned off to use
those controls.
16
Problem
Cause
Remedy
See
page
FM
FM stereo
reception is
noisy.
The particular characteristics of the FM
stereo broadcasts being received may
cause this problem when the transmitter is
too far away or the antenna input is poor.
Check the antenna connections.
Try using a high-quality directional FM antenna.
11
Try using the manual tuning method.
21
There is
distortion, and
clear reception
cannot be
obtained even
with a good FM
antenna.
There is multipath interference.
Adjust the antenna position to eliminate the multipath
interference.
—
The desired
station cannot
be tuned in
with the
automatic
tuning method.
The signal is too weak.
Try using a high-quality directional FM antenna.
11
Try using the manual tuning method.
21
Previously
preset stations
can no longer
be tuned in.
This unit has been disconnected for a long
period.
Preset the stations again.
21
AM
The desired
station cannot
be tuned in
with the
automatic
tuning method.
The signal is weak or the antenna
connections are loose.
Tighten the AM loop antenna connections and orient
it for the best reception.
—
Try using the manual tuning method.
21
There are
continuous
crackling and
hissing noises.
The noises may result from lightning,
fluorescent lamps, motors, thermostats or
other electrical equipment.
Try using an outdoor antenna and a ground wire.
This will help somewhat, but it is difficult to
eliminate all noise.
—
There are
buzzing and
whining noises.
A TV set is being used nearby.
Move this unit away from the TV set.
—

32
TROUBLESHOOTING
■
Remote control
Problem
Cause
Remedy
See
page
The remote control
does not work nor
function properly.
Wrong distance or angle.
The remote control will function within a maximum
range of 6 m (19.7 ft) and no more than 30 degrees
off-axis from the front panel.
8
Direct sunlight or lighting (from an
inverter type of fluorescent lamp, etc.) is
striking the remote control sensor of this
unit.
Reposition this unit.
—
The batteries are weak.
Replace all batteries.
8

SPECIFICATIONS
33
ADDITIONA
L
INF
O
RMA
T
IO
N
English
AUDIO SECTION
• Minimum RMS Output Power
(8
Ω
, 20 Hz to 20 kHz, 0.04% THD) ...................... 50 W + 50 W
• Dynamic Power (IHF)
(8/6/4/2
Ω
) ........................................................... 70/77/89/100 W
• Maximum Output Power [Europe model only]
(1 kHz, 0.7% THD, 4
Ω
) ...................................................... 55 W
• IEC Output Power [Europe model only]
(1 kHz, 0.04% THD, 8
Ω
) .................................................... 52 W
• Power Band Width
(0.08% THD, 25 W, 8
Ω
) ..................................... 10 Hz to 50 kHz
• Damping Factor (SPEAKERS A)
20 Hz to 20 kHz, 8
Ω
................................................. 150 or more
• Maximum Output Power (EIAJ)
[Asia and General models only]
(1 kHz, 10% THD, 8
Ω
) ....................................................... 85 W
• Maximum Input Signal
PHONO (1 kHz, 0.04% THD) ............................ 115 mV or more
CD/DVD, etc. (1 kHz, 0.04% THD) ...................... 2.2 V or more
• Frequency Response
CD/DVD, etc. (20 Hz to 20 kHz) ................................. 0 ± 0.5 dB
CD/DVD, etc. PURE DIRECT ON (10 Hz to 100 kHz)
....................................................................................... 0 ± 1.0 dB
• RIAA Equalization Deviation
PHONO ............................................................................ ± 0.5 dB
• Total Harmonic Distortion
PHONO to OUT (REC)
(20 Hz to 20 kHz, 3 V
)
........................................... 0.02% or less
CD/DVD, etc. to SPEAKERS
(20 Hz to 20 kHz, 25 W, 8
Ω
)
................................. 0.02% or less
• Signal to Noise Ratio (IHF-A Network)
PHONO (5 mV input shorted) ............................... 82 dB or more
CD/DVD, etc. (150 mV input shorted) ................ 108 dB or more
• Residual Noise (IHF-A Network)
PURE DIRECT ON .......................................................... 100 µV
• Input Sensitivity/Input Impedance
PHONO .................................................................. 2.5 mV/47 k
Ω
CD/DVD, etc. ....................................................... 150 mV/47 k
Ω
• Output Level/Output Impedance
OUT (REC)................................................ 150 mV/1.2 k
Ω
or less
• Headphone Output/Impedance
(Input 1 kHz, 150 mV, 8
Ω
, 0.04% THD)
CD/DVD, etc. .......................................................... 0.47 V/330
Ω
• Channel Separation
CD/DVD, etc. (5.1 k
Ω
input shorted, 1/10 kHz)
........................................................................... 65/50 dB or more
• Tone Control Characteristics
BASS
Boost/Cut (50 Hz) ........................................................... ±10 dB
Turnover Frequency ........................................................ 350 Hz
TREBLE
Boost/Cut (20 kHz) ......................................................... ±10 dB
Turnover Frequency ....................................................... 3.5 kHz
• Continuous Loudness Control
Attenuation (1 kHz) ........................................................... –30 dB
FM SECTION
• Tuning Range
[U.S.A. and Canada models] ........................... 87.5 to 107.9 MHz
[Asia and General models] ........ 87.5/87.50 to 107.9/108.00 MHz
[Other models] ............................................ 87.50 to 108.00 MHz
• Usable Sensitivity (IHF)........................................ 1.0 µV (11.2 dBf)
• Signal to Noise Ratio (IHF)
Mono/Stereo .............................................................. 76 dB/70 dB
• Harmonic Distortion (1 kHz)
Mono/Stereo ................................................................ 0.2%/0.3%
• Stereo Separation (1 kHz) ....................................................... 45 dB
• Frequency Response ........................... 20 Hz to 15 kHz, +0.5/–2 dB
AM SECTION
• Tuning Range
[U.S.A. and Canada models] .............................. 530 to 1710 kHz
[Asia and General models] ................. 530/531 to 1710/1611 kHz
[Other models] ................................................... 531 to 1611 kHz
• Usable Sensitivity ............................................................. 300 µV/m
GENERAL
• Power Supply
[U.S.A. and Canada models] .............................. AC 120 V, 60 Hz
[Asia model] .................................... AC 220/230-240 V, 50/60 Hz
[General model] ................ AC 110/120/220/230-240 V, 50/60 Hz
[Australia model] ............................................... AC 240 V, 50 Hz
[Europe model] ................................................... AC 230 V, 50 Hz
• Power Consumption .............................................................. 130 W
• Standby Power Consumption ................................................. 0.1 W
• Maximum Power Consumption [General model only]
(8
Ω
, 1 kHz, 10% THD) .................................................... 300 W
• AC Outlets
[Australia model] ............................... 1 (Total 100 W maximum)
[General model] ................................... 2 (Total 50 W maximum)
[Other models] ................................... 2 (Total 100 W maximum)
• Dimensions (W x H x D) ................................ 435 x 151 x 308 mm
(17-1/8” x 5-15/16” x 12-1/8”)
• Weight ............................................................. 7.4 kg (16 lbs. 5 oz.)
* Specifications are subject to change without notice.
SPECIFICATIONS

ATTENTION: VEUILLEZ LIRE CE QUI SUIT AVANT D’UTILISER L’APPAREIL.
i
1
Pour utiliser l’appareil au mieux de ses possibilités, lisez attentivement
ce mode d’emploi. Conservez-le soigneusement pour référence.
2
Installez cet appareil audio dans un endroit bien aéré, frais,
sec et propre – à l’abri de la lumière directe du soleil, des
sources de chaleur ou de vibration, des poussières, de
l’humidité et du froid. Ménagez un espace libre d’au moins
30 cm au-dessus, 20 cm sur la gauche et la droite et 20 cm à
l’arrière de l’appareil pour qu’il soit bien ventilé.
3
Placez l’appareil loin des équipements, moteurs et
transformateurs électriques, pour éviter les ronflements parasites.
4
N’exposez pas l’appareil à des variations brutales de
température, ne le placez pas dans un environnement très
humide (par exemple dans une pièce contenant un
humidificateur) car cela peut entraîner la condensation
d’humidité à l’intérieur de l’appareil qui elle-même peut être
responsable de secousse électrique, d’incendie, de dommage à
l’appareil ou de blessure corporelle.
5
Evitez d’installer l’appareil dans un endroit où des objets
peuvent tomber, ainsi que là où l’appareil pourrait être exposé
à des éclaboussures ou des gouttes d’eau. Sur le dessus de
l’appareil, ne placez pas:
–
D’autres appareils qui peuvent endommager la surface de
l’appareil ou provoquer sa décoloration.
–
Des objets se consumant (par exemple, une bougie) qui
peuvent être responsables d’incendie, de dommage à
l’appareil ou de blessure corporelle.
–
Des récipients contenant des liquides qui peuvent être à
l’origine de secousse électrique ou de dommage à l’appareil.
6
Ne couvrez pas l’appareil d’un journal, d’une nappe, d’un
rideau, etc. car cela empêcherait l’évacuation de la chaleur.
Toute augmentation de la température intérieure de l’appareil
peut être responsable d’incendie, de dommage à l’appareil ou
de blessure corporelle.
7
Ne branchez pas la fiche du cordon d’alimentation de
l’appareil sur une prise secteur aussi longtemps que tous les
raccordements n’ont pas été effectués.
8
Ne pas faire fonctionner l’appareil à l’envers. Il risquerait de
chauffer et d’être endommagé.
9
N’exercez aucune force excessive sur les commutateurs, les
boutons et les cordons.
10
Pour débrancher la fiche du cordon d’alimentation au niveau de
la prise secteur, saisissez la fiche et ne tirez pas sur le cordon.
11
Ne nettoyez pas l’appareil au moyen d’un solvant chimique, ce qui
pourrait endommager la finition. Utilisez un chiffon sec et propre.
12
N’alimentez l’appareil qu’à partir de la tension prescrite.
Alimenter l’appareil sous une tension plus élevée est
dangereux et peut être responsable d’incendie, de dommage à
l’appareil ou de blessure corporelle. YAMAHA ne saurait être
tenue responsable des dommages résultant de l’alimentation
de l’appareil sous une tension autre que celle prescrite.
13
Pour éviter tout dommage dû à la foudre lors d’orages,
débranchez le cordon d’alimentation secteur et les antennes
extérieures de la prise secteur.
14
Ne tentez pas de modifier ni de réparer l’appareil. Consultez
le service YAMAHA compétent pour toute réparation qui
serait requise. Le coffret de l’appareil ne doit jamais être
ouvert, quelle que soit la raison.
15
Si vous envisagez de ne pas vous servir de l’appareil pendant une
longue période (par exemple, pendant les vacances), débranchez
la fiche du cordon d’alimentation au niveau de la prise secteur.
16
Installez l’appareil près de la prise secteur et à un endroit tel
que la fiche secteur soit facilement accessible.
17
Lisez la section intitulée “GUIDE DE DÉPANNAGE” où
figurent une liste d’erreurs de manipulation communes avant
de conclure que l’appareil présente une anomalie de
fonctionnement.
18
Avant de déplacer l’appareil, appuyez sur STANDBY/ON
pour placer l’appareil en veille puis débranchez la fiche du
cordon d’alimentation au niveau de la prise secteur.
19
VOLTAGE SELECTOR
(Modèles pour l’Asie et modèle standard seulement)
Le commutateur VOLTAGE SELECTOR placé sur le panneau
arrière de cet appareil doit être convenablement positionné
AVANT de brancher la fiche du cordon d’alimentation secteur.
Les tensions d’alimentation possibles sont:
Modèle standard ......... 110/120/220/230–240 V CA, 50/60 Hz
Modèle pour l’Asie .................. 220/230–240 V CA, 50/60 Hz
ATTENTION: VEUILLEZ LIRE CE QUI SUIT AVANT D’UTILISER L’APPAREIL.
AVERTISSEMENT
POUR RÉDUIRE LES RISQUES D’INCENDIE OU
DE SECOUSSE ÉLECTRIQUE, N’EXPOSEZ PAS
CET APPAREIL À LA PLUIE OU À L’HUMIDITÉ.
L’appareil reste connecté au secteur tant qu'il est
raccordé à la prise secteur, même si vous le mettez hors
tension avec STANDBY/ON. Cet état s’appelle le
mode veille. Dans cet état, l’appareil est conçu pour
consommer une très faible quantité de courant.

1
PRÉP
ARA
TIONS
INTR
ODUCTION
Fr
anç
a
is
OPÉRA
T
IONS
IN
FO
R
M
A
T
IO
NS
C
O
MPL
É
M
E
NT
AIR
IES
PARTICULARITÉS ............................................. 2
ACCESSOIRES FOURNIS .................................. 2
COMMANDES ET FONCTIONS ....................... 3
Face avant ................................................................. 3
Afficheur de la face avant ......................................... 5
Panneau arrière ......................................................... 6
Boîtier de télécommande .......................................... 7
Mise en place des piles dans le boîtier de
télécommande ....................................................... 8
Utilisation du boîtier de télécommande .................... 8
RACCORDEMENTS ............................................ 9
Raccordement des enceintes ................................... 10
Raccordement des antennes AM et FM .................. 11
Raccordement du cordon d’alimentation ................ 13
Mise sous tension et hors tension de l’appareil ...... 14
LECTURE ET ENREGISTREMENT .............. 15
Lecture d’une source ............................................... 15
Réglage de la qualité du son ................................... 16
Enregistrement d’une source .................................. 17
Utilisation de la minuterie de mise hors service ..... 18
Cette touche coupe les sons .................................... 19
SYNTONISATION FM/AM ............................... 20
Syntonisation automatique ...................................... 20
Syntonisation manuelle ........................................... 21
Mise en mémoire automatique des fréquences ....... 21
Mise en mémoire manuelle ..................................... 23
Choix d’une présélection ........................................ 24
Échange des fréquences .......................................... 24
RADIO DATA SYSTEM (MODÈLE POUR
L’EUROPE SEULEMENT) ........................... 25
Réception des stations Radio Data System ............. 25
Sélection du mode Radio Data System ................... 25
Service PTY SEEK ................................................. 26
Service EON ........................................................... 27
RÉGLAGES APPROFONDIS ........................... 28
Modification des paramètres du menu
ADVANCED SETUP ........................................ 28
GUIDE DE DÉPANNAGE ................................. 30
CARACTÉRISTIQUES TECHNIQUES .......... 33
TABLE DES MATIÉRES
INTRODUCTION
PRÉPARATIONS
OPÉRATIONS
INFORMATIONS COMPLÉMENTAIRIES
PARTICULARITÉS
2
Amplificateur intégré à 2 voies
◆
Puissance de sortie minimum efficace
50 W + 50 W (8
Ω
), 0,04% DHT, 20 Hz à 20 kHz
◆
Puissance ultra-dynamique, capacité d’attaque à basse
impédance
Syntoniseur AM/FM perfectionné
◆
Présélection aléatoire de 40 fréquences
◆
Mise en mémoire automatique des fréquences
◆
Capacité d’échange des stations présélectionnées
◆
Touches de syntonisation Radio Data System
(Modèle pour l’Europe seulement)
Autres particularités
◆
Commutateur PURE DIRECT pour la reproduction la
plus fidèle possible d’une source sonore
◆
Contrôle variable de l’intensité sonore en continu
◆
Minuterie de mise hors service
◆
Commande à distance possible
• Le symbole
y
appelle votre attention sur un conseil d’utilisation.
• Certaines actions peuvent être commandées au moyen des touches de panneau de commande de l’appareil ou de celles de la
télécommande. Lorsque le nom d’une touche du panneau de commande de l’appareil diffère de celui de la télécommande, celui de la
télécommande est donné entre parenthèses.
• Ce mode d’emploi a été imprimé avant la fabrication de l’appareil. Les caractéristiques et la présentation ont pu être modifiées à fin
d’amélioration, etc. En cas de divergence entre le mode d’emploi et l’appareil, ce dernier prime.
Veuillez vous assurer que vous possédez bien les postes suivants.
PARTICULARITÉS ACCESSOIRES FOURNIS
CD/DVD
PHONO
TUNER
MD
TAPE
AUX
SPEAKERS
B
A
POWER
STANDBY
+
–
u
d
SLEEP
REC
EON
FREQ/TEXT MODE
START
PTY SEEK
A/B
DISC
DIR A
p
DIR B
A/B/C/D/E
MUTE
PRESET
VOLUME
TAPE
CD
DEVICE
AMP
w
e
f
b
s
a
DISPLAY
Boîtier de
télécommande
Piles (x2)
(AAA, R03, UM-4)
Antenne intérieure FM
(Modèles pour les États-
Unis, le Canada et modèle
standard seulement)
Antenne cadre AM
Antenne intérieure FM
(Modèles pour l’Europe
et l’Australie)
COMMANDES ET FONCTIONS
3
INTR
ODUCTION
Fr
anç
a
is
1
STANDBY/ON
Met l’appareil sous tension ou en veille.
Voir page 14 pour plus de détails.
En veille, l’appareil consomme une faible quantité d’électricité de
manière à être en mesure de recevoir les signaux infrarouges qui
peuvent être émis par le boîtier de télécommande.
2
Capteur de télécommande
Il reçoit les signaux émis par le boîtier de télécommande.
3
Afficheur de la face avant
Il fournit des informations relatives à l’état de l’appareil.
4
EDIT
Echange l’assignation de deux stations présélectionnées
lorsque TUNER est sélectionné comme source d’entrée
(voir page 24).
5
FM/AM
Commute la bande de fréquence de réception AM et FM
lorsque TUNER est sélectionné comme source d’entrée
(voir page 20).
6
TUNING
l
/
h
Sélectionne la fréquence de syntonisation lorsque TUNER
est sélectionné comme source d’entrée (voir page 20).
7
TUNING MODE
Commute le mode de syntonisation automatique (le
témoin AUTO est alors allumé) et manuelle (le témoin
AUTO est alors éteint) lorsque TUNER est sélectionné
comme source d’entrée.
8
MEMORY
Cette touche met une fréquence en mémoire (voir page 23).
Cette touche règle l’appareil en mode de syntonisation
automatique (voir page 21).
9
PURE DIRECT et témoin
Permet de restituer le son le plus pur possible lors de
l’écoute d’une source. Le témoin au-dessus de la touche
s’allume lorsque la fonction est activée (voir page 16).
0
TAPE MONITOR
Permet d’écouter le son de la cassette dans la platine à
cassette relié aux prises TAPE à l’arrière de cet appareil.
Lorsque la platine à cassette à trois têtes est utilisée pour
l’enregistrement, le son enregistré peut être contrôlé.
Le témoin TAPE MON s’allume sur l’afficheur de la face
avant lorsque vous appuyez sur TAPE MONITOR (voir
page 17).
• Lorsque le témoin TAPE MON s’allume, vous ne pouvez
sélectionner aucune source d’entrée.
• Pour écouter la source sélectionnée avec le sélecteur INPUT,
appuyez une nouvelle fois sur TAPE MONITOR de sorte que le
témoin TAPE MON s’éteigne.
• Lorsque TAPE (lecteur de cassette) est sélectionné avec le
sélecteur INPUT, cette fonction ne sera pas activée même en
appuyant sur la touche TAPE MONITOR.
COMMANDES ET FONCTIONS
Face avant
STANDBY
/ON
INPUT
PHONES
BASS
SPEAKERS
TAPE MONITOR
PURE DIRECT
5
5
1
0
1
4
4
2
2
3
3
+
–
VOLUME
l
TUNING
h
FM/AM
EDIT
A/B/C/D/E
1
2
3
4
5
6
7
8
MEMORY
MAN'L/AUTO FM
TUNING MODE
AUTO/MAN'L
B
A
TREBLE
5
5
1
0
1
4
4
2
2
3
3
+
–
BALANCE
5
5
1
0
1
4
4
2
2
3
3
R
L
LOUDNESS
5
7
1
FLAT
6
4
8
2
10
–30dB
3
9
0
12
12
2
8
4
∞
20
20
60
60
26
26
40
40
16
16
-dB
-dB
DISPLAY
2
1
5
4
7 8
3
0
9
6
D
C
B
E
F
G
H
I
J
A
(Modèles pour les États-Unis
et le Canada)
Remarque
Remarques

COMMANDES ET FONCTIONS
4
A
VOLUME
Ces touches augmentent ou diminuent le niveau sonore.
Elle est sans effet vis-à-vis du niveau OUT (REC).
B
Sélecteur INPUT
Ce bouton assure la sélection de la source que vous
désirez écouter.
C
A/B/C/D/E
Sélectionne le groupe de stations présélectionnées (A à E)
lorsque TUNER est sélectionné comme source d’entrée
(voir page 22).
D
Prise PHONES
Fournit les signaux audio destinés à l’écoute au casque.
Appuyez SPEAKERS A et B de manière que les témoins SP A/B
s’éteint avant de raccorder les casques à la prise PHONES.
E
SPEAKERS A/B
Les enceintes reliées aux prises SPEAKERS A et/ou
SPEAKERS B placées sur le panneau arrière sont mises
en service ou hors service chaque fois que vous appuyez
sur la touche correspondante (voir page 15).
F
BASS
Augmente ou diminue la réponse dans les basses
fréquences. La position 0 produit une fidélité uniforme
(voir page 16).
G
TREBLE
Augmente ou diminue la réponse dans les hautes
fréquences. La position 0 produit une fidélité uniforme
(voir page 16).
H
BALANCE
Équilibre le son fourni par les enceintes gauche et droite
pour compenser le déséquilibre dû à la disposition des
enceintes ou à la configuration de la pièce (voir page 16).
I
LOUDNESS
Retient toute la gamme des sons à bas volume pour
compenser la perte de sensibilité de l’oreille humaine au
niveau des hautes et basses fréquences lorsque le volume
est réduit (voir page 16).
J
Touches indiquant les numéros de stations
présélectionnées (1 à 8)
Sélectionne le numéro de station présélectionnée (1 à 8)
lorsque TUNER est sélectionné comme source d’entrée
(voir page 24).
Remarque
Remarque
