Yamaha DV-C6860: инструкция
Раздел: Бытовая, кухонная техника, электроника и оборудование
Тип: DVD-проигрыватель
Характеристики, спецификации
Инструкция к DVD-проигрывателю Yamaha DV-C6860
Оглавление
- ПРЕДУПРЕЖДЕНИЕ: ВНИМАТЕЛЬНО ИЗУЧИТЕ ЭТО ПЕРЕД ИСПОЛЬЗОВАНИЕМ АППАРАТА.
- Cодержание
- Введение Региональные коды Очистка дисков Поставляемые аксессуары Патентная информация Примечания по дискам
- Функциональный обзор Фронтальная панель
- Задняя панель
- Пульт ДУ
- Подключения Общие примечания по подключениям Аудиоподключения
- Видеосоединения
- Подготовка к эксплуатации Step1: Установка батареек в пульт ДУ
- Step2: Включение питания Step3: Настройка типа телевизора и дисплея
- Подготовка к эксплуатации
- Подготовка к эксплуатации Step4: Настойка языковых предпочтений
- Управление диском Основное воспроизведение Общие операции
- Управление диском Выбор различных функций повторного/смешанного воспроизведения
- Управление диском Управление воспроизведением видео
- Управление диском
- Управление диском Особые функции DVD
- Управление диском Audio CD диски Особые функции для VCD & SVCD Воспроизведение CD дисков с MP3/JPEG/Kodak фотографиями
- Управление диском Особые функции графического диска
- Управление диском
- Меню настройки Меню общей настройки
- Меню настройки
- Меню настройки Меню аудионастройки
- Меню настройки
- Меню настройки Меню видеонастройки
- Меню настройки
- Меню настройки
- Меню настройки Меню настройки предпочтений
- Меню настройки
- Меню настройки
- Языковые Коды
- Языковые Коды
- Устранение неисправностей Неисправность Решение
- Устранение неисправностей Неисправность Решение
- Справочник
- Технические параметры
G
DVD CHANGER
LECTEUR DE DVD CHANGEUR
DV-C6860
OWNER’S MANUAL
MODE D’EMPLOI
BEDIENUNGSANLEITUNG

VAROITUS
Important notes for users in the
Muiden kuin tässä esitettyjen toimintojen säädön tai
U.K.
asetusten muutto saattaa altistaa vaaralliselle säteilylle
tai muille vaarallisille toiminnoille.
Mains plug
DK
This apparatus is fitted with an approved 13
Advarsel: Usynlig laserstråling ved åbning når
Amp plug. To change a fuse in this type of plug
sikkerhedsafbrydere er ude af funktion. Undgå
proceed as follows:
utsættelse for stråling.
1 Remove fuse cover and fuse.
Bemærk: Netafbryderen STANDBY/ON er
2 Fix new fuse which should be a BS1362 5 Amp,
sekundært indkoblet og ofbryder ikke strømmen fra
A.S.T.A. or BSI approved type.
nettet. Den indbyggede netdel er derfor tilsluttet til
lysnettet så længe netstikket sidder i stikkontakten.
3 Refit the fuse cover.
N
If the fitted plug is not suitable for your jack
Observer: Nettbryteren STANDBY/ON er sekundert
outlets, it should be cut off and an appropriate
innkoplet. Den innebygdenetdelen er derfor ikke
plug fitted in its place.
frakoplet nettet så lenge apparatet er tilsluttet
If the mains plug contains a fuse, this should
nettkontakten.
have a value of 5 Amp. If a plug without a fuse
S
is used, the fuse at the distribution board should
Klass 1 laseraparat
not be greater than 5 Amp.
Varning! Om apparaten används på annat sätt än i
Note: The severed plug must be disposed to avoid
denna bruksanvisning specificerats, kan användaren
a possible shock hazard should it be inserted into
utsättas för osynlig laserstrålning, som överskrider
a 13 Amp jack elsewhere.
gränsen för laserklass 1.
How to connect a plug
Observera! Strömbrytaren STANDBY/ON är
The wires in the mains lead are coloured with
sekundärt kopplad och inte bryter inte strömmen från
the following code: blue = neutral (N),
nätet. Den inbyggda nätdelen är därför ansluten till
elnätet så länge stickproppen sitter i vägguttaget.
brown = live (L).
SF
● As these colours may not correspond with the
Luokan 1 laserlaite
colour markings identifying the terminals in your
Varoitus! Laitteen käyttäminen muulla kuin tässä
plug, proceed as follows:
käyttöohjeessa mainitulla tavalla saattaa altistaa
– Connect the blue wire to the terminal
käyttäjän turvallisuusluokan 1 ylittävälle
marked N or coloured black.
näkymättömälle lasersäteilylle.
– Connect the brown wire to the terminal
Oikeus muutoksiin varataan. Laite ei saa olla alttiina
marked L or coloured red.
tippu-ja roiskevedelle.
– Do not connect either wire to the earth
Toiminnanvalitsin STANDBY/ON on kytketty
terminal in the plug, marked E (or e) or
toisiopuolelle, eikä se kytke laitetta irti sähköverkosta.
coloured green (or green and yellow).
Sisäänrakennettu verkko-osa on kytkettynä
Before replacing the plug cover, make certain
sähköverkkoon aina silloin, kun pistoke on
that the cord grip is clamped over the sheath of
pistorasiassa.
the lead - not simply over the two wires.
Copyright in the U.K.
VARO!
Recording and playback of material may require
AVATTAESSA JA SUOJALUKITUS
OHITETTAESSA OLET ALTTIINA
consent. See Copyright Act 1956 and The
NÄKYMÄTTÖMÄLLE LASERSÄTEILYLLE.
Performer’s Protection Acts 1958 to 1972.
ÄLÄ KATSO SÄ TEESEEN.
VARNING!
OSYNLIG LASERSTRÅLNING NÄR DENNA
DEL ÄR ÖPPNAD OCH SPÄRREN ÄR
URKOPPLAD. BETRAKTA EJ STRÅLEN.
i
DANGER
This unit emits visible laser radiation when open.
CLASS 1 LASER PRODUCT
LASER KLASSE 1 PRODUKT
Avoid direct eye exposure to beam.
LUOKAN 1 LASERLAITE
When this unit is plugged into a wall outlet, do not
KLASS 1 LASER APPARAT
PRODUIT LASER DE CLASSE 1
place your eyes close to the opening of the disc
tray and other openings or look inside.
DANGER
Risque d'exposition au laser en cas d'ouverture.
Eviter toute exposition au faisceau.
1 LASER
PR
1 P
R
ODUKT
ODUCT
CLASS
KLASSE
1
Lorsque cet appareil est branché à la prise de
LUOKAN
PRODUIT LASER DE CL ASSE
KLASS 1 LASER APPARAT
LASER
1 LASERLAIT E
courant, ne pas approcher les yeux de l'ouverture
du plateau changeur et des autres ouvertures
pour regarder à l'intérieur.
GEFAHR
CAUTION
VISIBLE AND INVISIBLE LASER RADIATION WHEN
Sichtbare Laserstrahlen bei geöffneter Abdeckung.
OPEN. AVOID EXPOSURE TO BEAM
Achten Sie darauf, nicht direkt in den Laserstrahl zu
ADVARSEL
SYNLIG OG USYNLIG LASERSTRÅLING VED ÅBNING
blicken.
UNDGÅ UDSÆTTELSE FOR STRÅLING
Wenn das Gerät an die Wandsteckdose angeschlossen
ADVARSEL
SYNLIG OG USYNLIG LASERSTRÅLING NÅR DEKSEL
ÅPNES UNNGÅ EKSPONERING FOR STRÅLEN
ist, halten Sie die Augen von der Öffnung des Disc-
VARNING
SYNLIG OCH OSYNLIG LASERSTRÅLNING NÄR
Fachs oder anderen Öffnungen fern, und blicken Sie in
DENNA DEL ÄR ÖPPNAD BETRAKTA EJ STRÅLEN
diesem Fall nicht in das Innere des Geräts.
VA R O !
AVATTAESSA OLET ALTTIINA NÄKYVÄLLE JA
NÄKYMÄTTÖMÄLLE LASER SÄTEILYLLE, ÄLÄ KATSO SÄTEESEEN
ОПАСНОСТЬ
VORSICHT
SICHTBARE UND UNSICHTBARE LASERSTRAHLUNG
WENN ABDECKUNG GEÖFFNET NICHT DEM STRAHL AUSSETSEN
Данное устройство излучает в открытом
DANGER
VISIBLE AND INVISIBLE LASER RADIATION WHEN
состоянии видимые лазерные лучи. Не
OPEN AVOID DIRECT EXPOSURE TO BEAM
допускайте непосредственного воздействия
ATTENTION
RAYONNEMENT LASER VISIBLE ET INVISIBLE EN
лазерных лучей на глаза.
CAS D’OUVERTURE EXPOSITION DANGEREUSE AU FAISCEAU
Когда данное устройство подключено к
настенной розетке, не приближайте глаза к
ПРЕДУПРЕЖДЕНИЕ
ПРИ ОТКРЫТИИ УСТРОЙСТВА
отверстию лотка для диска и других
ВЫ МОЖЕТЕ ПОДВЕРГНУТЬСЯ ВОЗДЕЙСТВИЮ
отверстий и не смотрите на внутренние части.
ВИДИМОГО И НЕВИДИМОГО ЛАЗЕРНОГО ИЗЛУЧЕНИЯ.
ИЗБЕГАЙТЕ ВОЗДЕЙСТВИЯ ЛУЧА.
CAUTION
Use of controls or adjustments or performance of
LASER SAFETY
procedures other than those specified herein may
This unit employs a laser. Due to possible eye
result in hazardous radiation exposure.
injury, only a qualified service person should
remove the cover or attempt to service this device.
ATTENTION
L’emploi de commandes, de réglages ou un choix
SECURITE LASER
de procédures différents des spécifications de
L’appareil utilise un laser. En raison des risques de
cette brochure peut entraîner une exposition à
blessure des yeux, le retrait du couvercle ou les
d’éventuelles radiations pouvant être dangereses.
réparations de l’appareil devront être confiés
exclusivement à un technicien d’entretien qualifié.
ACHTUNG
Die Verwendung von Bedienungselementen oder
VORSICHT MIT DEM LASER
Einstellungen oder die Durchführung von
Dieses Gerät enthält einen Laser. Um unnötige
Bedienungsvorgängen, die nicht in dieser
Augenverletzungen zu vermeiden, sollten Sie alle
Anleitung aufgeführt sind, kann zu einem Kontakt
Wartungs- und Reparaturarbeiten einem
mit gefährlichen Laserstrahlen führen.
qualifizierten Wartungstechniker überlassen.
ПРЕДУПРЕЖДЕНИЕ
БЕЗОПАСНОЕ ИСПОЛЬЗОВАНИЕ ЛАЗЕРА
Использование органов управления или
Данное устройство содержит лазер. Из-за
настроек или выполнение процедур,
опасности травмирования глаз снимать
отличных от описанных в данном
крышку или обслуживать данное устройство
руководстве, могут привести к опасному
должен только сертифицированный
облучению.
специалист по техническому обслуживанию.
ii

CAUTION: READ THIS BEFORE OPERATING THIS UNIT.
1 To assure the finest performance, please read this
13 Do not attempt to modify or fix this unit. Contact
manual carefully. Keep it in a safe place for future
qualified YAMAHA service personnel when any
reference.
service is needed. The cabinet should never be
2 Install this unit in a well ventilated, cool, dry, clean
opened for any reason.
place — away from direct sunlight, heat sources,
14 When not planning to use this unit for long
vibration, dust, moisture, or cold. In a cabinet,
periods of time (i.e., vacation), disconnect the AC
allow about 2.5cm (1 inch) of free space all
power plug from the wall outlet.
around this unit for adequate ventilation.
15 Be sure to read the “Troubleshooting” section on
3 Locate this unit away from other electrical appliances,
common operating errors before concluding that
motors, or transformers to avoid humming sounds.
this unit is faulty.
4 Do not expose this unit to sudden temperature
16 Before moving this unit, press STANDBY/ON to
changes from cold to hot, nor locate this unit in
set the unit in standby mode, and then disconnect
an environment with high humidity (i.e., a room
the AC power plug from the wall outlet.
with a humidifier) to prevent condensation inside
17 Install this unit near the wall outlet and where the
this unit, which may cause an electrical shock, fire,
AC power plug can be reached easily.
damage to this unit, and/or personal injury.
5 Avoid installing this unit where foreign objects
The unit is not disconnected from the AC power
may fall onto this unit and/or this unit may be
source as long as it is connected to the wall outlet,
exposed to liquid dripping or splashing. On the
even if this unit itself is turned off. This state is called
top of this unit, do not place:
the standby mode. In this state, this unit is designed
– Other components, as they may cause damage
to consume a very small quantity of power.
and/or discoloration on the surface of this unit.
–
Burning objects (i.e., candles), as they may cause
WARNING
fire, damage to this unit, and/or personal injury.
TO REDUCE THE RISK OF FIRE OR ELECTRIC
– Containers with liquid in them, as they may fall,
SHOCK, DO NOT EXPOSE THIS UNIT TO
spilling the liquid and causing an electrical
RAIN OR MOISTURE.
shock to the user and/or damage to this unit.
6 Do not cover this unit with a newspaper, tablecloth,
curtain, etc. in order not to obstruct heat radiation.
Be sure to place this unit on a level surface.
If the temperature inside this unit rises, it may cause
If you do not do so, PLAYXCHANGE operation of
fire, damage to this unit, and/or personal injury.
this unit will not function correctly, and may damage
7 Do not plug in this unit to a wall outlet until all
the disc(s) and/or this unit itself.
connections are complete.
8 Do not operate this unit upside-down. It may
overheat, possibly causing damage.
LASER
9 Do not use excessive force on switches, knobs
Type Semiconductor laser GaAlAs
and/or cords.
Wave length 650 nm (DVD)
10 When disconnecting the power cord from the
780 nm (VCD/CD)
wall outlet, grasp the plug; do not pull the cord.
Output Power 7 mW (DVD)
11 Do not clean this unit with chemical solvents; this
10 mW (VCD/CD)
might damage the finish. Use a clean, dry cloth.
Beam divergence 60 degree
12 Only voltage specified on this unit must be used.
Using this unit with a higher voltage than specified
is dangerous and may cause fire, damage to this
Refer to pages i and ii at the beginning of the
unit, and/or personal injury. YAMAHA will not be
manual for more information.
held responsible for any damage resulting from use
of this unit with a voltage other than as specified.
iii

Contents
Special DVD features .......................................................... 16
Introduction
English
Playing by title..................................................................................... 16
Region codes ...........................................................................2
Camera angle......................................................................................16
Supplied accessories...............................................................2
Audio.......................................................................................................17
Notes on discs ........................................................................ 2
Subtitles..................................................................................................17
Cleaning discs ..........................................................................2
Special VCD & SVCD features ......................................... 17
Patent information.................................................................. 2
Playback control (PBC) ................................................................. 17
Audio CDs............................................................................. 17
Functional Overview
Playing by discs................................................................................... 17
Front panel............................................................................... 3
Playing MP3/JPEG/Kodak picture CDs............................ 17
Rear panel ................................................................................ 4
General operation............................................................................ 17
Remote control....................................................................... 5
Selecting a folder and track/file................................................. 18
Special picture disc features .............................................. 18
Preview function (JPEG) ...............................................................18
Connections
Zooming pictures ............................................................................. 18
General notes on connections............................................ 6
Playback with multi-angles...........................................................18
Audio connections .................................................................6
Scan effect............................................................................................. 19
Digital connection................................................................................6
Playing MP3 music and JPEG pictures simultaneously...19
Analog connection..............................................................................6
Video connections..................................................................7
SCART terminal <A>.......................................................................7
Setup Menu
Component video jacks <B>.......................................................7
General setup menu............................................................ 20
Composite video jack <C>...........................................................7
Locking/Unlocking the disc for viewing................................ 20
Dimming the front panel display..............................................20
Programming disc tracks and discs ......................................... 20
Getting Started
OSD language..................................................................................... 22
Inserting batteries into the remote control..................... 8
Screen saver......................................................................................... 22
Using the remote control ...............................................................8
Sleep timer ...........................................................................................22
Turning on the power........................................................... 9
Audio setup menu................................................................ 22
About the auto standby function ...............................................9
Setting the analog output............................................................. 23
Setting a TV type and display............................................... 9
Setting the digital output.............................................................. 23
Setting a color system for your TV ...........................................9
CD upsampling .................................................................................. 24
Setting an aspect ratio for your TV........................................10
Night mode..........................................................................................24
Setting a language preference ............................................11
Video setup menu................................................................ 24
Setting the OSD language ...........................................................11
TV type...................................................................................................24
Setting the audio, subtitle and disc menu languages.....11
Setting the TV display .................................................................... 25
Progressive............................................................................................ 26
Disc Operations
Picture settings ...................................................................................26
Basic playback........................................................................12
Switching the YUV/RGB............................................................... 27
General operation................................................................12
Preference setup menu....................................................... 27
Pausing playback................................................................................12
Audio, subtitle and disc menu................................................... 28
Selecting a track/chapter...............................................................13
Restricting playback with parental control ......................... 28
Searching backward/forward......................................................13
PBC (Playback control) ................................................................. 28
Stopping playback.............................................................................13
MP3/JPEG menu................................................................................28
Selecting the various repeat/shuffle functions................13
Changing the password.................................................................29
Repeat.....................................................................................................13
Resetting the system.......................................................................29
Repeating a section within a chapter/track........................14
Shuffle (except DVD/VCD/SVCD)........................................14
Language Code .......................... 30
Operations for video playback (DVD/VCD/SVCD).....14
Using the disc menu........................................................................14
Troubleshooting ........................ 32
Slow motion ........................................................................................14
Zooming in........................................................................................... 15
Resuming playback from the last stopped point.............15
Glossary ...................................... 34
On-screen display (OSD)............................................................15
Specifications ............................. 35
1 En
Introduction
Thank you for purchasing this unit. This
– Do not use any non-standard shaped
Owner’s Manual explains the basic
discs (heart-shaped, etc.).
operation of this unit.
– Do not use discs with tape, seals, or
paste on their surface. Doing so may
damage this unit.
Region codes
– Do not use discs affixed with labels
printed by a commercially available label
DVD discs must be labeled ALL
printer.
ALL
regions or Region 2 in order to
play on this unit.
You cannot play discs labeled for
2
Cleaning discs
other regions.
• When a disc becomes dirty, clean it
with a cleaning cloth. Wipe the disc
Supplied accessories
from the center out. Do not wipe in a
circular motion.
– Remote control
• Do not use solvents such as benzine,
– Two batteries (AA, R06, UM-3) for the
thinner, commercially available cleaners,
remote control
or antistatic spray intended for analog
– Audio pin cable
records.
– Video pin cable
– Owner’s Manual
Patent information
Notes on discs
Manufactured under license from
Dolby Laboratories. “Dolby”,
– This unit is designed for use with the
“Pro Logic” and the double-D
following discs: DVD-Video, Video CD,
symbol are trademarks of Dolby
Super Video CD, Audio CD, CD-R,
Laboratories.
CD-RW, DVD+RW, DVD+R, DVD-R
“DTS” and “DTS Digital Out” are
and DVD-RW.
trademarks of Digital Theater
– This unit can play:
Systems, Inc.
– MP3 and picture (Kodak, JPEG) files
recorded on CD-R(W).
This product incorporates copyright protection
– JPEG/ISO 9660 format
technology that is protected by method claims
– Maximum 30 characters per display
of certain U.S. patents and other intellectual
property rights owned by Macrovision
– CD-R and CD-RW cannot be played
Corporation and other rights owners. Use of
unless finalized.
this copyright protection technology must be
– Some discs cannot be played depending
authorized by Macrovision Corporation, and is
on the recording conditions, such as the
intended for home and other limited viewing
uses only unless otherwise authorized by
PC environment and application
Macrovision Corporation. Reverse engineering
software. The characteristics and
or disassembly is prohibited.
conditions of some discs (materials,
scratches, curvature, etc.) may result in
playback failure.
– Be sure to use only CD-R and CD-RW
discs made by reliable manufacturers.
2 En
Functional Overview
English
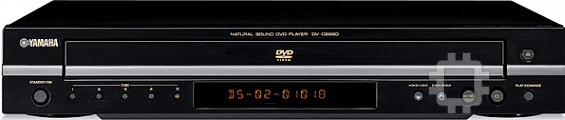
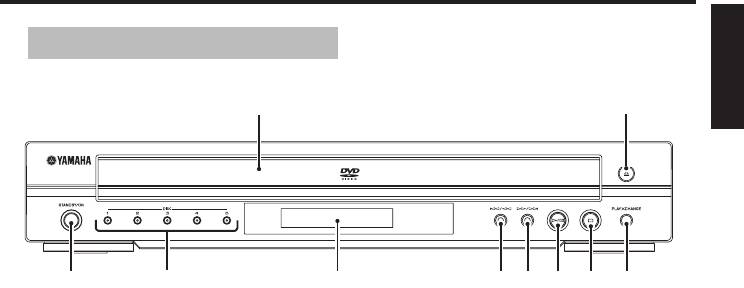
Front panel
1
2
0
9
8
67
5
1 Disc tray
7 S/Q
Loads up to 5 discs in the disc tray.
Searches backward.*
Moves to the previous chapter or track.
2 / (OPEN/CLOSE)
Opens or closes the disc tray.
8 Front panel display
Shows the current status of this unit.
3 PLAYXCHANGE
Reloads or unloads discs without
9 DISC (1, 2, 3, 4, 5) / LEDs
interrupting current disc playback.
Selects and directly plays back the preferred
disc.
4 9 (STOP)
Each LED lights up in orange when this unit
Stops playback.
recognizes that the corresponding disc has
been loaded.
5 B/; (PLAY/PAUSE)
0 STANDBY/ON
Starts or pauses playback.
Turns on this unit or sets it to the standby
mode.
6 R/T
While this unit is in the standby mode, it
Searches forward.*
consumes a small amount of power.
Moves to the next chapter or track.
* Press the button for about two seconds.
3 En
4
3
Functional Overview
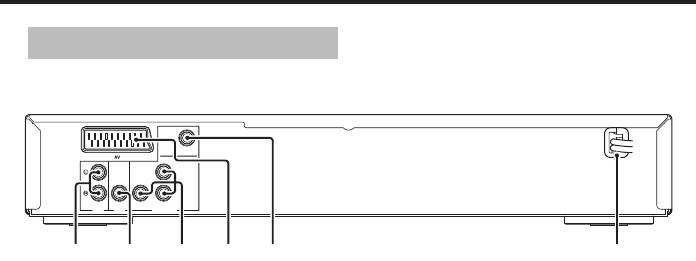
Rear panel
VIDEO
Y
COAXIAL COMPONENT
AUDI O
DIGITAL
PR /CR
PB /CB
OUT
OUT
VIDEO OUT
1
2
3
4
5
6
1 AUDIO OUT (L, R) jacks
4 AV terminal
Connect to the audio input jacks of your
Connect to SCART input terminal of your
AV receiver or stereo system.
TV.
2 DIGITAL OUT - COAXIAL jack
5 VIDEO OUT - VIDEO jack
Connect to the coaxial input jack of your
Connect to the composite video input jack
AV receiver.
of your AV receiver.
3 VIDEO OUT - COMPONENT
6 AC power cord
(Y, PB/CB, PR/CR) jacks
Connect to a standard AC outlet.
Connect to the component input jacks of
your AV receiver.
Caution: Do not touch the inner pins of the jacks on the rear panel of this unit.
Electrostatic discharge may cause permanent damage to this unit.
4 En
Functional Overview
English
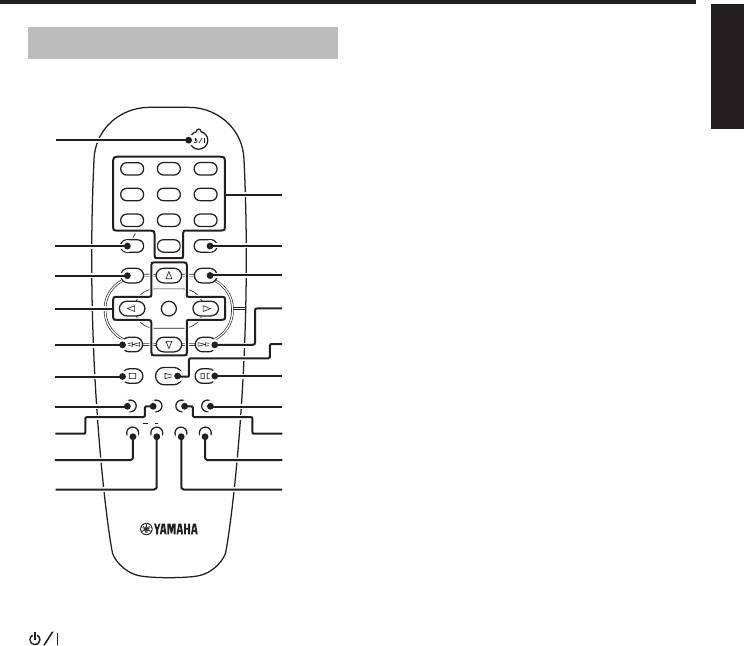
Remote control
6 STOP (9)
Stops playback.
7 SUBTITLE
Selects the subtitle language.
1
8 ANGLE
1
2
3
Selects the DVD camera angle.
4
5
6
q
9 REPEAT
7
8
9
Repeats the chapter, track, title, disc or
TOP MENU RETURN
ON SCREEN
0
2
w
all discs.
MENU SETUP
3
e
0 A-B
ENTER
Repeats a specific segment.
4
r
OK
q Numeric buttons (0-9)
5
t
STOP
PLAY
PAUSE
Selects numbered items in the currently
6
y
displayed menu.
SUBTITLE
ANGLE
ZOOM AUDIO
7
u
w ON SCREEN
REPEAT
A B
SHUFFLE
DISC SKIP
8
i
Accesses or exits from the on-screen
DVD
display (OSD) menu of this unit.
9
o
0
p
e SETUP
Accesses or exits from the setup menu
of this unit.
r T
Searches forward.*
Moves to the next chapter or track.
1
t PLAY (B)
Turns on this unit or sets it to the
Starts playback.
standby mode.
y PAUSE (;)
2 TOP MENU/RETURN
Pauses playback temporarily.
Displays the top-level disc menu (DVD).
Frame-by-frame playback.
Moves back to the previous menu (DVD*/
VCD).
u AUDIO
Selects the audio language or format.
3 MENU
Accesses the menu of a disc (DVD).
i ZOOM
Switches PBC on or off (VCD).
Enlarges the video image.
4 1 / 2/3 / 4
o DISC SKIP
Selects an item in the currently displayed
Selects another disc.
menu. Search or slow playback.
p SHUFFLE
ENTER/OK
Plays tracks in a random order.
Confirms the menu selection.
5 S
* Press and hold the button for about two
Searches backward.*
seconds.
Moves to the previous chapter or track.
5 En
Connections
You need to set “DIGITAL
General notes on connections
OUTPUT” to “ALL” (see “DIGITAL
OUTPUT” on page 23).
Be sure to turn off this unit and unplug the
power supply cable before you make or
Notes:
change connections.
– If the audio format of the digital output
does not match the capabilities of your
• Depending on the component you wish
receiver, the receiver produces a distorted
to connect, there are various ways to
sound or no sound at all. Make sure to
make connections. Possible connections
select the appropriate audio format from
are described below.
the menu screen on the disc.
• Refer to the manuals of your other
Pressing AUDIO on the remote control once
components as necessary to make the
or more may change not only the audio
best connections.
language but also the audio format. The
• Do not connect this unit via your VCR.
selected format appears in the front panel
The video quality could be distorted by
display for several seconds.
the copy protection system.
– If you wish to enjoy Dolby Digital, DTS, and
• Do not connect the audio out jack of
MPEG formats, you must connect this unit
this unit to the phono in jack of your
to an AV receiver that supports these
audio system.
formats.
Audio connections
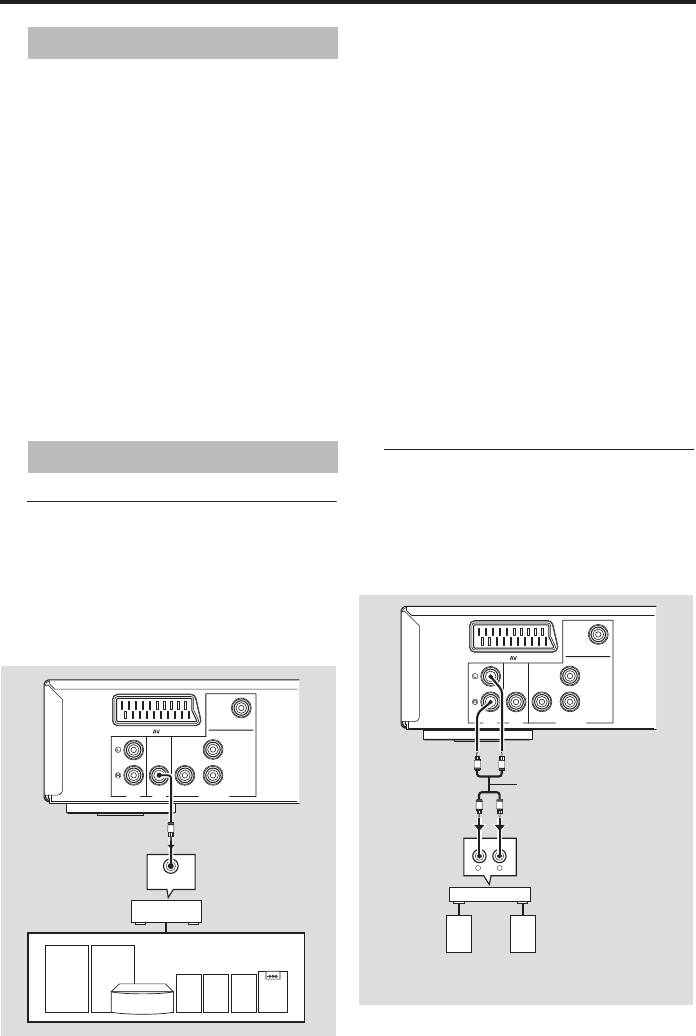
Analog connection
This unit has analog output jacks.
Connect AUDIO OUT (L, R) jacks of this
Digital connection
unit to the corresponding input jacks of
This unit has a coaxial digital out jack.
your audio component (such as a stereo
Connect DIGITAL OUT - COAXIAL jack
amplifier) using the supplied audio cable.
of this unit to your AV receiver equipped
with a Dolby Digital, DTS, or MPEG
decoder using a commercially available
coaxial cable.
VIDEO
Y
COAXIAL COMPONENT
AUDI O
DIGITAL
PR/CR
PB/CB
VIDEO
OUT
OUT
VIDEO OUT
Y
COAXIAL COMPONENT
This unit
R
L
Audio pin cable
AUDI O
DIGITAL
PR/CR
PB/CB
(supplied)
OUT
OUT
VIDEO OUT
R
L
This unit
C
CD/DVD
RL
COAXIAL
IN
Stereo
amplifier
AV receiver
Speakers
Left
Right
speaker
speaker
6 En
Connections
English
SCART terminal <A>
Video connections
If your TV has only a terminal for video
If your AV receiver has video output jacks,
input, you can connect the TV directly to
connect your receiver and then your TV
this unit.
so that you can use one TV for several
Connect AV terminal of this unit to
different video sources (LD, VCR, etc.) by
SCART input terminal of your TV using a
simply switching the input source selector
commercially available SCART cable.
of your AV receiver.
This unit has three types of video output
Note:
jacks. Use the one that corresponds to the
– Ensure that the “TV” indication on SCART
input jacks of the component to be
cable is connected to the TV set and “DVD”
connected.
indication on SCART cable is connected to
this unit.
This unit
Component video jacks <B>
Component video connections achieve
VIDEO
Y
higher fidelity color reproduction than
COAXIAL COMPONENT
S-video connections by transmitting video
signals on separate wires for luminance
AUDI O
DIGITAL
PR/CR
PB/CB
OUT
OUT
VIDEO OUT
(Y: green) and chrominance (P
B: blue,
Video pin
PR: red).
cable
PR
PB
Y
V
(supplied)
Connect VIDEO OUT - COMPONENT
(Y, PB/CB, PR/CR) jacks of this unit to
<B><A> <C>
component input jacks of your AV receiver
and then to those of your TV using a
PR
PB
Y
commercially available component cable.
YPB/CBPR/CR
Observe the color of each jack when you
COMPONENT
VIDEO
make connections. If your AV receiver
VIDEO
does not have component output jacks,
you can achieve a better video image by
AV receiver
connecting the component output jacks of
S VIDEO
COMPONENT
VIDEO
OUT
VIDEO OUT
OUT
this unit directly to the component input
jacks of your TV.
S VIDEO
COMPONENT
VIDEO
IN
VIDEO IN
IN
TV
Composite video jack <C>
Connect VIDEO OUT - VIDEO jack of this
unit to the video input jack of your AV
receiver and then to that of your TV using
the supplied video cable.
7 En
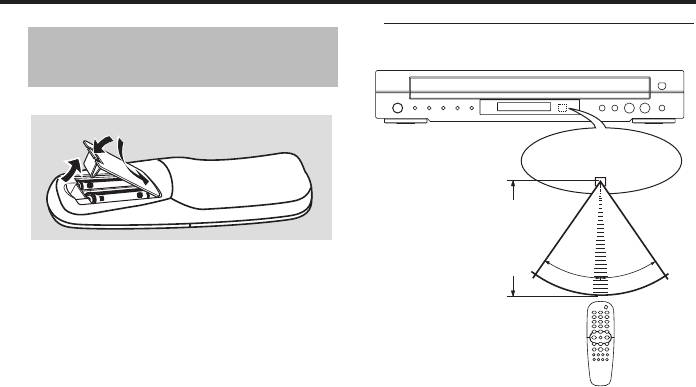
Getting Started
Using the remote control
Step 1: Inserting batteries
into the remote control
3
Remote control
1
sensor
2
2
Point the remote control at
the remote control sensor,
within approximately 6 m
(20 ft) from the unit.
1 Open the battery compartment.
30°
30°
2 Insert the two supplied batteries (AA, R06,
UM-3) following the indications (+/–)
inside the compartment.
3 Close the cover.
Notes:
– Insert batteries correctly according to the
polarity markings (+/–). The batteries
Handling the remote control
inserted in the opposite direction may leak.
• Do not spill water or other liquids on
– Replace the exhausted batteries
the remote control.
immediately with new ones to prevent a
• Do not drop the remote control.
leakage.
• Do not leave or store the remote
– Remove the batteries from the
control in the following types of
compartment if the remote control is not
conditions:
used for more than a month.
– places of high humidity, such as near a
– If the batteries have leaked, dispose of
bath
them immediately. Avoid touching the
– places of high temperature, such as near
leaked material or letting it come into
a heater or stove
contact with clothing, etc. Clean the battery
– places of extremely low temperatures
compartment thoroughly before installing
– dusty places
new batteries.
– Do not use old batteries together with new
ones.
– Do not use different types of batteries (such
as alkaline and manganese batteries)
together. Read the packaging carefully as
these different types of batteries may have
the same shape and color.
– Dispose of the batteries correctly in
accordance with your local regulations.
8 En
Getting Started
When “SCREEN SAVER” is set to
English
Step 2:
Turning on the power
“OFF” (see page 22):
The background or the paused picture is
1 Connect the AC power cord to an AC
displayed for 30 minutes.
outlet.
2 Turn on your TV and AV receiver.
This unit is set to the standby mode.
3 Select the appropriate input source of the
AV receiver connected to this unit. Refer
to the manual supplied with your AV
Step 3: Setting a TV type and
receiver for details.
display
4 Turn on this unit.
5 Set the TV to the correct Video IN channel
(e.g. EXT1, EXT2, AV1, AV2, AUDIO/
Setting a color system for your
VIDEO, etc. Refer to the manual supplied
TV
with your TV for details).
This unit is compatible with both NTSC
➜ The front panel display lights up and the
and PAL video formats. Select the color
default screen appears on the TV.
system that matches your TV.
About the auto standby function
This unit is automatically set to the standby
VIDEO SETUP PAGE
mode when disc playback is stopped or
TV TYPE PAL
TV DISPLAY MULTI
paused for more than 30 minutes.
PROGRESSIVE NTSC
PICTURE SETTING
When “SCREEN SAVER” is set to
COMPONENT
“ON” (see page 22):
The background is displayed when disc
playback is stopped or the paused picture
is displayed for 15 minutes.
1 Press SETUP.
2 Press 2 repeatedly to select “VIDEO
OR
SETUP PAGE”.
3 Press 3
/ 4 to highlight [TV TYPE], and
Background
Example of a
then press 2.
paused picture
4 Press 3 / 4 to highlight one of the following
options.
The screen saver is displayed for another 15
minutes.
This unit is set to the standby mode.
TIPS: To return to the previous menu, press 1.
To exit from the menu, press SETUP.
9 En

Getting Started
PAL
Setting an aspect ratio for your
Select this if the connected TV is a PAL
TV
system TV. It will change the video signals
You can set the aspect ratio of this unit to
of NTSC discs and output them in PAL
match your TV. If the aspect ratio of your
format.
TV is 4:3, you do not need to change this
MULTI
setting. If you have a widescreen TV,
Select this if the connected TV is
change this setting according to the
compatible with both NTSC and PAL
following procedure.
formats (such as a multi-system TV). The
For details, see “Setting the TV display” on
output format will be in accordance with
page 25.
the video signals of the disc.
NTSC
Select this if the connected TV is an NTSC
VIDEO SETUP PAGE
system TV. It will change the video signals
TV TYPE
of PAL discs and output them in NTSC
TV DISPLAY 4:3 PAN SCAN
PROGRESSIVE 4:3 LETTER BOX
format.
PICTURE SETTING 16:9
5 Select an item, and then press
COMPONENT
ENTER/OK to confirm your selection.
Notes:
– Before changing the current TV
1 Press SETUP.
standard setting, ensure that your TV
supports the selected TV type.
2 Press 2 repeatedly to select “VIDEO
– If the picture is not displayed
SETUP PAGE”.
properly on your TV, wait for 15
3 Press 3
/ 4 to highlight [TV DISPLAY], and
seconds for this unit to activate
then press 2.
automatic recovery.
4 Press 3 / 4 to highlight [16:9], and then
press ENTER/OK to confirm the
selection.
CHANGING PAL TO NTSC:
1. ENSURE THAT YOUR TV SUPPORTS
NTSC STANDARD.
2. IF THERE IS A DISTORTED PICTURE
DISPLAYED ON THE TV, WAIT 15
SECONDS FOR AUTO RECOVER.
CANCELOK
TIPS: To return to the previous menu, press 1.
To exit from the menu, press SETUP.
10 En
Getting Started
English
Setting the audio, subtitle and
Step 4: Setting a language
disc menu languages
preference
You can select your own preferred
language settings. This unit automatically
switches to your preferred language
PREFERENCE PAGE
whenever you load a disc. If the selected
AUDIO ENGLISH
SUBTITLE CHINESE
language is not available on the disc, the
DISC MENU FRENCH
default language of the disc will be used
PARENTAL SPANISH
instead. The OSD language in the system
PBC PORTUGUESE
MP3/JPEG NAV POLISH
menu remains once selected.
PASSWORD ITALIAN
DEFAULT TURKISH
Setting the OSD language
1 Press STOP (9) twice, and then press
SETUP.
2 Press 2 repeatedly to select
GENERAL SETUP PAGE
“PREFERENCE PAGE”.
DISC LOCK
ENGLISH
DISPLAY DIM DEUTSCH
3 Press 3
/ 4 to highlight one of the options
PROGRAM FRANÇAIS
below at a time, and then press 2.
OSD LANGUAGE ITALIANO
– AUDIO (audio language)
SCREEN SAVER NEDERLANDS
SLEEP POLSKI
– SUBTITLE (subtitle language)
РУССКИЙ
– DISC MENU (disc menu language)
TÜRKÇE
4 Press 3
/ 4 to select a language, and then
press ENTER/OK to confirm your
1 Press SETUP.
selection.
2 Press 1 / 2 to select “GENERAL SETUP
If the language you want is not in the
PAGE”.
list, select [OTHERS],
3 Press 3 / 4 to highlight [OSD
and then use the numeric buttons (0-9)
LANGUAGE], and then press 2.
on the remote control to enter the 4-digit
4 Press 3 / 4 to select a language, and then
language code (see “Language Code” on
press ENTER/OK to confirm your
page 30), and then press ENTER/OK to
selection.
confirm the code.
5 Repeat steps 3–4 for other language
settings.
TIPS: To return to the previous menu, press 1.
To exit from the menu, press SETUP.
11 En
Disc Operations
IMPORTANT!
5 To stop playback, press 9
(STOP) on the
– If the inhibition icon ( or X)
front panel or STOP (9) on the remote
appears on the TV screen when a
control.
button is pressed, the function for
• To play back a specific disc directly,
that button is not available on the
press DISC SKIP repeatedly on the
current disc or at the current time.
remote control or press DISC (1, 2, 3,
– Depending on the DVD or VIDEO
4, 5) on the front panel.
CD disc, some operations may
• Press PLAYXCHANGE on the front
operate differently or be
panel to open the disc tray, and then
restricted.
reload or unload discs without
– Do not push on the disc tray or put
interrupting current disc playback.
any objects other than discs on the
• Playback stops after all discs have been
disc tray. Doing so may cause the
played.
disc player to malfunction.
• When the disc tray is open, press
B/;
(PLAY/PAUSE),
/ (OPEN/CLOSE),
Basic playback
PLAYXCHANGE or
DISC (1, 2, 3, 4, 5) to close the disc
1 Press STANDBY/ON on the front panel
tray automatically.
or on the remote control.
2 Press /
(OPEN/CLOSE) on the front
panel to open the disc tray.
General operation
3 Place discs in the disc tray with the printed
Unless stated otherwise, all operations
side up.
described here are carried out using the
supplied remote control.
Pausing playback
1 During playback, press PAUSE (;).
➜ Playback is paused and the sound is
muted.
2 Press PAUSE (;) again to select the next
4 Press B/; (PLAY/PAUSE) on the front
picture frame.
panel or PLAY (B) on the remote
3 To resume normal playback, press
control.
PLAY (B).
➜ The disc tray closes and playback starts
automatically for all of the loaded discs
in the tray in sequence.
TIPS: The operating features described here might not be possible for certain discs.
Always refer to the instructions supplied with the disc.
12 En
Disc Operations
English
Selecting a track/chapter
Selecting the various repeat/
• Press S / T or use the numeric
shuffle functions
buttons (0-9) to select a track/chapter
number.
Repeat
• During repeated playback of a track/
chapter, press S / T to replay the
Repeating chapter/title/disc (DVD)
same track/chapter.
Each time you press REPEAT, the display
changes as follows:
Searching backward/forward
CHAPTER TITLE
1 Press and hold S / T or press 1 / 2.
REPEAT OFF
ALL DISC DISC
2 While searching, press S / T or
1 / 2 repeatedly to select the desired
CHAPTER*: repeats the current
speed.
chapter
TITLE: repeats the current title
3 To resume normal playback, press
DISC*: repeats the entire disc
PLAY (B).
ALL DISC*: repeats all discs loaded
Notes:
in the tray
– 1 / 2 key may not be available with some
REPEAT OFF: exits from the repeat mode
discs.
* This feature may not be available with some
– For MP3 and WMA, the search function
discs.
allows you to search the track currently
Repeating track/disc (except DVD)
being played.
Each time you press REPEAT, the display
changes as follows;
Stopping playback
TRACK DISC
• Press STOP (9).
REPEAT OFF ALL DISC
TRACK: repeats the current track
DISC: repeats the entire disc
ALL DISC: repeats all discs loaded in
the tray
REPEAT OFF: exits from the repeat mode
Notes:
– When only one disc is available in the disc
tray, it is continuously played when
ALL DISC is selected.
– For VCD, repeat playback is not available
when the PBC mode is selected.
TIPS: The operating features described here might not be possible for certain discs.
Always refer to the instructions supplied with the disc.
13 En

Disc Operations
Repeating a section within a
Operations for video playback
chapter/track
(DVD/VCD/SVCD)
1 While playing a disc, press A-B at the
desired starting point.
Using the disc menu
2 Press A-B again at the desired end point.
Depending on the disc, a menu may appear
•A and B can only be set within the same
on the TV screen once you load the disc.
chapter/track.
➜ The selected section repeats
To select a playback feature or item
continuously.
• Use 1 / 2/3 / 4 or the numeric
buttons (0-9) on the remote control,
3 To exit from the sequence, press A-B.
and then press ENTER/OK to start
playback.
Shuffle (except DVD/VCD/SVCD)
To access or exit from the menu
With the shuffle function, you can play
tracks in a random order.
• Press MENU on the remote control.
1 During playback, press SHUFFLE
repeatedly to select between SHUFFLE
Slow motion
DISC, SHUFFLE ALL DISC, and SHUFFLE
You can play back in slow motion.
OFF.
1 Press 3 for reverse slow motion or 4 for
➜ The selected mode appears in the front
forward slow motion.
panel display for several seconds.
2 During slow motion, press 3 / 4
• In the SHUFFLE DISC mode, all tracks
repeatedly to select the desired speed.
on the disc currently playing are played
3 To resume normal playback, press
in a random order.
PLAY (B).
• In the SHUFFLE ALL DISC mode, tracks
from all discs are played in a random
Note:
order:
– Reverse slow motion is not available for
– If the disc currently playing is a CD, only
VCDs and SVCDs.
tracks from CDs will be played.
– If the disc currently playing is formatted
in MP3 or WMA, tracks on the disc
currently playing are played in a random
order. When all the tracks on that disc
have been played, shuffle playback
continues with the next disc.
TIPS: The operating features described here might not be possible for certain discs.
Always refer to the instructions supplied with the disc.
14 En
Disc Operations
English
Zooming in
On-screen display (OSD)
This function allows you to enlarge or
The OSD menu shows disc playback
lessen the picture on the TV screen and
information (e.g., the title or chapter
pan through the enlarged picture.
number, elapsed playing time or audio/
subtitle language). A number of operations
1 During playback, press ZOOM repeatedly
are possible without interrupting disc
to display the picture at different scales.
playback.
• Use
1 / 2/3 / 4 to pan through the
enlarged picture.
1 During playback, press ON SCREEN.
➜ Playback continues.
➜ A list of available disc information
appears on the TV screen.
2 Press ZOOM repeatedly to return to the
original size.
DVD
MENU
Resuming playback from the last
TITLE 02/14
stopped point
CHAPTER 02/14
AUDIO 5.1CH
You can resume playback of the last 10
SUBTITLE ENG
discs, even if the discs were ejected or the
BITRATE 16 TITLE ELAPSED 0:02:25
power of this unit was turned off.
1 Load one of the last 10 discs.
VCD/SVCD
➜ “LOADING #” (#: the disc tray number
(1-5)) appears on the TV screen.
MENU
TRACK 02/14
2 Press PLAY (B) while “LOADING #” is
DISC TIME 0:49:17
displayed on the TV screen.
TRACK TIME 0:03:43
➜ “RESUME PLAY” appears on the TV
REPEAT OFF
screen and the disc is played back from
BITRATE 16 TOTAL ELAPSED 0:02:25
the last point.
2 Press 3 / 4 to view the information, and
To cancel the resume mode
then press ENTER/OK to access the
• When playback is stopped, press
selected item.
STOP (9) again.
3 Use the numeric buttons (0-9) to input
the number/time or press 3
/ 4 to make a
selection, and then press ENTER/OK to
confirm the selection.
➜ Playback changes to the selected time
or to the selected title/chapter/track.
TIPS: The operating features described here might not be possible for certain discs.
Always refer to the instructions supplied with the disc.
15 En

Disc Operations
Title/Chapter/Track selection
Repeat/Time display (DVD/VCD)
(DVD/VCD)
1 Press 3
/ 4 to select [REPEAT] or [TIME
1 Press 3 / 4 to select [TITLE] or
DISP.].
[CHAPTER] (DVD) or [TRACK] (VCD).
2 Press ENTER/OK to confirm the
2 Press ENTER/OK to confirm the
selection.
selection.
3 Press 3
/ 4 to highlight your selection, and
3 Select a title, chapter or track number
then press ENTER/OK.
using the numeric buttons (0-9).
Time display (CD)
Time search (DVD/VCD)
Each time you press ON SCREEN, the
1 Press 3
/ 4 to select [TT TIME] or [CH
time display changes as follows:
TIME] (DVD) or [TRACK TIME] or [DISC
TOTAL ELAPSED TOTAL REMAIN
TIME] (VCD).
• [TT TIME] refers to the total time of the
SINGLE REMAIN SINGLE ELAPSED
current title, and [CH TIME] refers to
the total time of the current chapter.
2 Press ENTER/OK to confirm the
Special DVD features
selection.
3 Enter hours, minutes and seconds from left
to right using the numeric buttons (0-9)
Playing by title
(e.g. 0:34:27).
1 Press MENU.
➜ The disc title menu appears on the TV
Audio/Subtitle/Angle (DVD)
screen.
You can change [AUDIO], [SUBTITLE] or
[ANGLE] if these functions are available on
2 Use 1 / 2/3 / 4 or the numeric buttons
the disc you are playing.
(0-9) to select a playback option.
1 Press 3
/ 4 to select [AUDIO],
3 Press ENTER/OK to confirm your
[SUBTITLE] or [ANGLE].
selection.
2 Press ENTER/OK to confirm the
selection.
Camera angle
3 For Audio and Subtitle:
• Press ANGLE repeatedly to select the
Press 3
/ 4 to highlight your selection, and
desired angle.
then press ENTER/OK.
OR
For Angle:
Select an angle using the numeric
buttons (0-9).
TIPS: The operating features described here might not be possible for certain discs.
Always refer to the instructions supplied with the disc.
16 En


