Sony KDL-22PX300 – page 2
Manual for Sony KDL-22PX300
Table of contents
4 Select the desired setting, and then press the button.
Setting TV display options
The setting of the item is completed. For details, see the instructions
for each item ( pages 21 to 26).
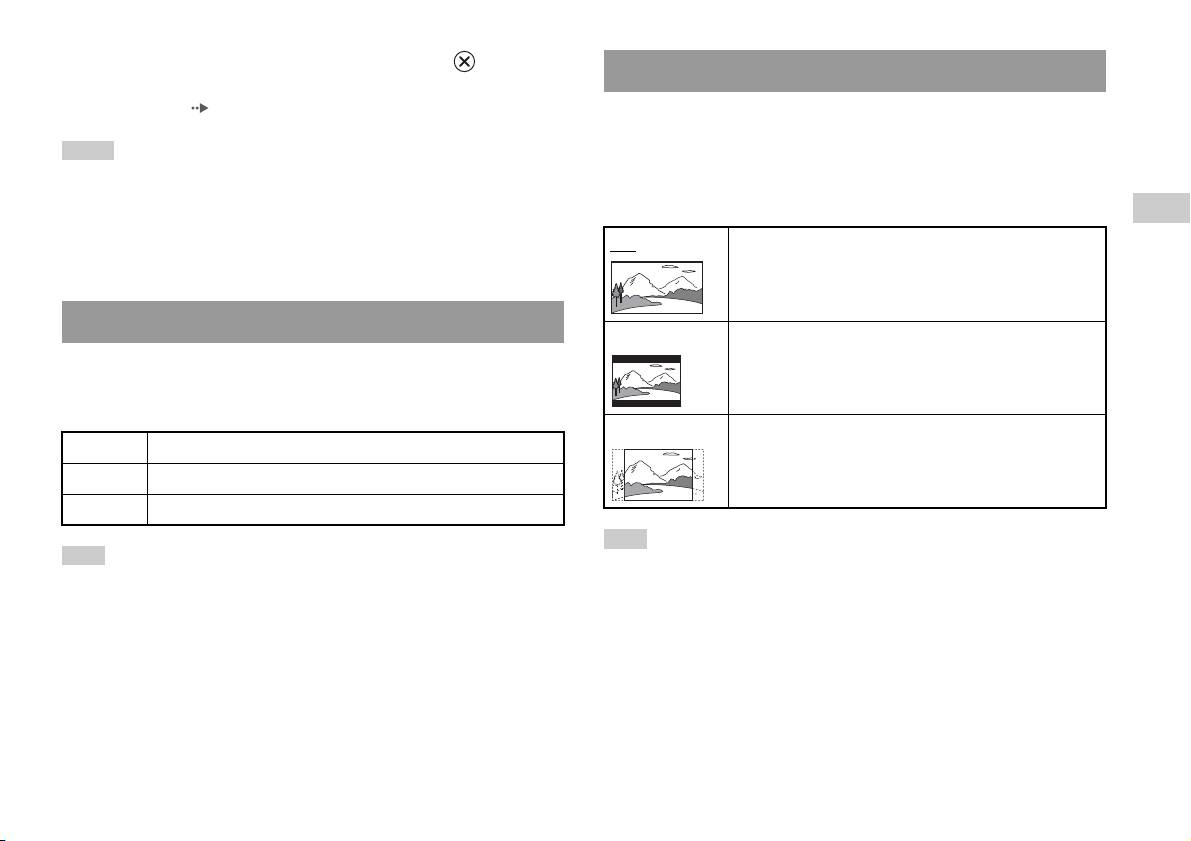
In the Screen Setup menu, you can set the screen size (aspect ratio) and
other options that affect picture quality.
Hints
• The default setting for each menu item is underlined in the explanations below.
TV Type
• To return to the Control Panel after making settings, press the SELECT button.
You can set the aspect ratio to match the screen format.
GB
• Settings are saved when you do any of the following:
DVDs
– Stop playback (including stopping Resume Play)
16:9 Screen Format: Wide
– Open the disc cover
Setting language options
4:3 Letter Box Screen Format: 4:3
In "Language Setup" you can choose the language for the DVD's menu,
This setting displays a wide picture with margins on the upper
and lower portions of the screen.
audio and subtitles. Note that if you select a language that is not recorded
on the DVD, one of the recorded languages is selected automatically.
4:3 PAN SCAN Screen Format: 4:3
Menu Selects the language for the DVD's menu
This setting displays a picture adjusted to the height of the
screen, cutting off portions at left and right that do not fit.
Audio Selects the language for the DVD's audio track
Subtitles Selects the language for the DVD's subtitles
Hint
Hint
When you set "Progressive" to "On", "TV Type" is automatically set to "16:9".
If you select "Audio Follow" for subtitles, the subtitle language will automatically be
set to match the language selected for the DVD's audio track.
Adjusting DVD player settings
21
DNR (Digital Noise Reduction)
Progressive
You can use this setting to help reduce roughness in the on-screen image
You can display an image in which the picture updates all the lines in one
and produce a cleaner picture.
pass. In most cases, this results in a clearer, flicker-free image.
Off
DNR is not used.
On Progressive scan (480p)*
DNR1 Increases picture quality
Off
Interlace scan
DNR2 Increases picture quality (maximum)
* The DVD player's progressive scan mode is only available when playing a disc
recorded in NTSC format, and viewed on a TV that supports progressive scan
(480p).
Hints
• "DNR2" is more effective for reducing image roughness than "DNR1", but in some
Hints
cases an afterimage may appear. If this occurs, select "Off".
• The DNR function may produce limited results on some DVDs.
• DVDs can contain video-based and film-based material, which use different frame
rates. When playing video-based material using progressive scan, some images
• When you set "Progressive" to "On", "DNR" is automatically turned off and cannot
may appear unnatural. If this occurs, set "Progressive" to "Off" and view in
be turned on.
standard interlace mode.
• When you set "Progressive" to "On", "TV Type" ( page 21) is automatically set
Outline Sharpening
to "16:9".
You can sharpen or soften the outline of the on-screen image. The higher
• DVD-RW disc (VR mode) content can only be viewed in standard interlace format.
the value, the sharper the outline. Normally, select "0".
The "Progressive" option is not available when playing such content.
•-2 •-1 •0
•+1 •+2
Hint
Depending on the DVD, Outline Sharpening may produce limited results.
Display
During playback, you can display playback status information in the top
right corner of the screen for a few seconds.
On
Playback status information is displayed for a few seconds.
Off Playback status information is not displayed.
22
Adjusting DVD player settings
4 Select the region to base the Parental Control level on, and
Setting viewer options
then press the button.
If you select "Other", see "Region code list" ( page 24).
Pause mode
You can use this option to set a picture status when playback is paused.
5 Select "Level", and then press the button.
The list of level options is displayed.
Auto A picture with moving elements is displayed without jitter. Normally
select this position.
GB
6 Select a restriction level, and then press the button.
DVDs
Frame A picture without moving elements can be displayed at high resolution.
To clear Parental Control
Parental Control
With DVD playback stopped, go to step 6 in "Setting Parental Control" and
In some regions, the viewing of some DVD content may be restricted
set "Level" to "Off".
based on viewer age or other factors. You can use the Parental Control
feature to restrict the level of content that may be viewed through your
built-in PlayStation
TM2.
The lower the value, the stricter the restriction.
Setting Parental Control
1 Select "Parental Control", and then press the button.
The screen for registering a password is displayed. If a password has
already been registered, the screen for confirming the password is
displayed.
2 Select a number, and then press the button.
Repeat step 2 to enter a four-digit password. If you want to clear a
number, press the button. When registering a password, you are
required to enter it again for confirmation.
3 Select "Region", and then press the button.
The list of region options is displayed.
Adjusting DVD player settings
23
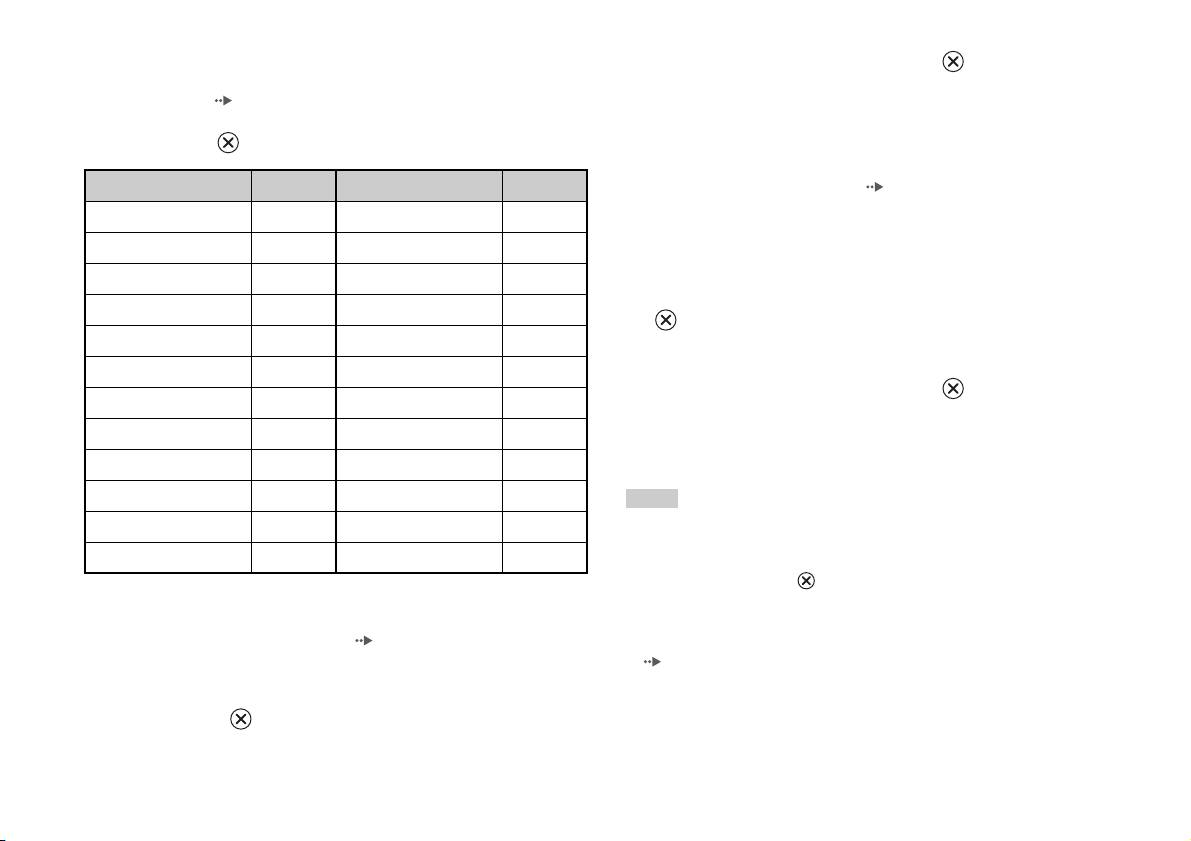
Region code list
2 Select a number, and then press the button.
To enter a Parental Control region code, select "Other" in step 4 of "Setting
Repeat step 2 to enter a four-digit password. You are required to enter
Parental Control" ( page 23). Use the directional buttons to select the
it again for confirmation.
first letter, and then press the right directional button. Then select the next
letter and press the button.
Temporary override of Parental Control restrictions
Region Code Region Code
1 Start playback of the DVD ( page 16).
Austria AT Malta MT
You will be prompted to temporarily change the Parental Control level
to allow playback. This usually occurs immediately at disc start-up but
Belgium BE Netherlands NL
may also occur at different times depending on the DVD.
Czech Republic CZ Norway NO
2 Using the directional buttons, select "Yes" and then press the
Denmark DK Poland PL
button.
Finland FI Portugal PT
The screen for entering the password is displayed.
France FR Russia RU
3 Select a number, and then press the button.
Germany DE Slovakia SK
Repeat step 3 to enter the four-digit password. After entering the
Greece GR Spain ES
password, playback will begin again. When DVD playback is stopped,
the Parental Control level returns to the original setting.
Ireland IE Sweden SE
Israel IL Switzerland CH
Hints
Italy IT Turkey TR
• If you forget your password, insert a DVD without the parental control feature. In
the control panel, select x (Stop) to stop playback, and then select x (Stop) again
Luxembourg LU United Kingdom GB
to clear resume play. Select "Setup", and then select "Parental Control" in "Custom
Setup", and then press the button. Press the SELECT button on the Analog
Controller, and then enter the number "7444".
Changing your password
• If you do not set a password, you cannot change the Parental Control settings.
In step 2 of "Setting Parental Control" ( page 23), complete the
• Some DVDs with the Parental Control feature do not allow use of playback modes
following steps:
( pages 18 to 19).
1 Using the directional buttons, select "Change Password" and
then press the button.
The screen for changing the password is displayed.
24
Adjusting DVD player settings

Dolby Digital
Setting sound options
This option sets Dolby Digital as the output signal for the DIGITAL OUT
(OPTICAL) connector.
Audio Digital Out
You can switch the method of outputting the audio signal when you
On Select this option when the built-in PlayStationTM2 is connected to an
connect the following audio devices to the DIGITAL OUT (OPTICAL)
audio device with a built-in Dolby Digital decoder.
connector.
Off
Select this option when the built-in PlayStationTM2 is connected to an
audio device without a built-in Dolby Digital decoder.
GB
DVDs
Caution
When the built-in PlayStationTM2 is connected to an audio device without a
DTS
Dolby Digital, DTS or MPEG decoder, set "Dolby Digital", "DTS" and
This option sets DTS as the output signal for the DIGITAL OUT
"MPEG" to "Off". If you set these options to "On" without the necessary
(OPTICAL) connector.
decoder, you may have no sound or an extremely loud noise may be emitted.
On Select this option when the built-in PlayStation
TM2 is connected to an
Digital Out (Optical)
audio device with a built-in DTS decoder.
This option sets the type of output for the DIGITAL OUT (OPTICAL)
Off
Select this option when the built-in PlayStationTM2 is connected to an
connector.
audio device without a built-in DTS decoder.
On Select this option when you want sound (audio signal) to be output
through the DIGITAL OUT (OPTICAL) connector.
MPEG
Settings for "Dolby Digital", "DTS" and "MPEG" are displayed.
This option sets MPEG AUDIO as the output signal for the DIGITAL
OUT (OPTICAL) connector.
Off Select this option when you do not want sound to be output through the
DIGITAL OUT (OPTICAL) connector.
Settings for "Dolby Digital", "DTS" and "MPEG" are not displayed.
On Select this option when the built-in PlayStation
TM2 is connected to an
audio device with a built-in MPEG decoder.
Off
Select this option when the built-in PlayStationTM2 is connected to an
audio device without a built-in MPEG decoder.
Adjusting DVD player settings
25

Audio Track Auto Select Mode
This setting gives priority to the audio track that contains the highest
number of channels when you play a DVD on which multiple audio
formats (PCM, Dolby Digital, DTS or MPEG) are recorded. If PCM,
Dolby Digital, DTS and MPEG have the same number of channels, the
built-in PlayStationTM2 selects PCM, Dolby Digital, DTS and MPEG
audio tracks in that order.
On Priority given
Off
No priority given
Hints
• If you set "DTS" to "Off" in "Audio Digital Out" ( page 25), the DTS audio
track is not played.
• Depending on the DVD, the audio channel with priority may be predetermined. In
this case, the audio track will be selected based on the DVD's order of priority.
DVD Volume
You can set this option if the audio output level of the DVD is low. You
can set this only when "Digital Out (Optical)" is set to "Off" in "Audio
Digital Out" ( page 25).
+2 Turns up the volume (maximum)
+1 Turns up the volume
Standard
Normally select this option.
Caution
If you set this option to "+1" or "+2", the sound may become distorted. If this
happens, change the setting to "Standard". Also note that if you set the volume
too high, it may harm your hearing or damage the speakers.
26
Adjusting DVD player settings

Main menu
Using the Browser screen
Displaying the main menu
You can do the following from the Browser screen:
From the main menu, you can access information and change various
• Copy or delete game data saved on a Memory Card
settings. You can also move to the following screens from the main menu.
• Start a game
The main menu is displayed when you turn on the built-in PlayStationTM2
• Start playback of an audio CD
GB
without a disc inserted.
Main menu
• Start playback of a DVD
• Browser screen ( page 27)
• System Configuration menu ( page 28)
1 Display the main menu ( page 27).
• Version Information screen ( page 31)
2 Using the directional buttons, select "Browser" and then
1 Press PlayStation 2 POWER ON on the TV's remote.
press button.
The main menu is displayed. Note that it may take some time for the
The Browser screen is displayed.
main menu to be displayed.
3 Insert a disc or Memory Card.
The icon for the inserted item is displayed on the Browser screen.
\
Hint
If you press PlayStation 2 POWER ON on the TV's remote with a disc inserted, the
main menu will not be displayed. To display the main menu, press the OPEN button
on the built-in PlayStation
TM2 front and remove the disc. Then press PlayStation 2
POWER ON on the TV's remote.
Displaying the main menu
27
4 Select an icon, and then press button.
• When you select the Memory Card icon, icons for data saved on the
Using the System Configuration
Memory Card are displayed. To copy or delete saved game data, see
"Copying or deleting game data" ( page 11).
menu
• If you select the icon for a PlayStation
TM2 or PlayStationTM format
software disc, the game will start.
From the System Configuration menu, you can change settings for
• When you select the icon for an audio CD, the tracks contained on
numerous options including language or time display, and audio or video
the CD are displayed. See "Playing an audio CD" ( page 12).
output method.
• If you select the icon for a DVD, playback of the DVD will begin.
1 Display the main menu ( page 27).
Hint
The message "There is no data" is displayed on the Browser screen when no Memory
2 Using the directional buttons, select "System Configuration"
Card or disc is inserted in the built-in PlayStation
TM2.
and then press button.
The System Configuration menu is displayed.
3 Select an item, and then press button.
The menu option becomes active and can be selected.
4 Select the desired setting, and then press button.
For details, see the instructions for each menu item ( pages 29 to
30).
28
Using the System Configuration menu

Hints
Screen Size
• The default setting for each menu item is underlined in the explanations below.
• Changes to each setting are saved and remain in effect even after you turn off or
You can set the display mode for the TV.
reset the built-in PlayStation
TM2.
4:3
Full*
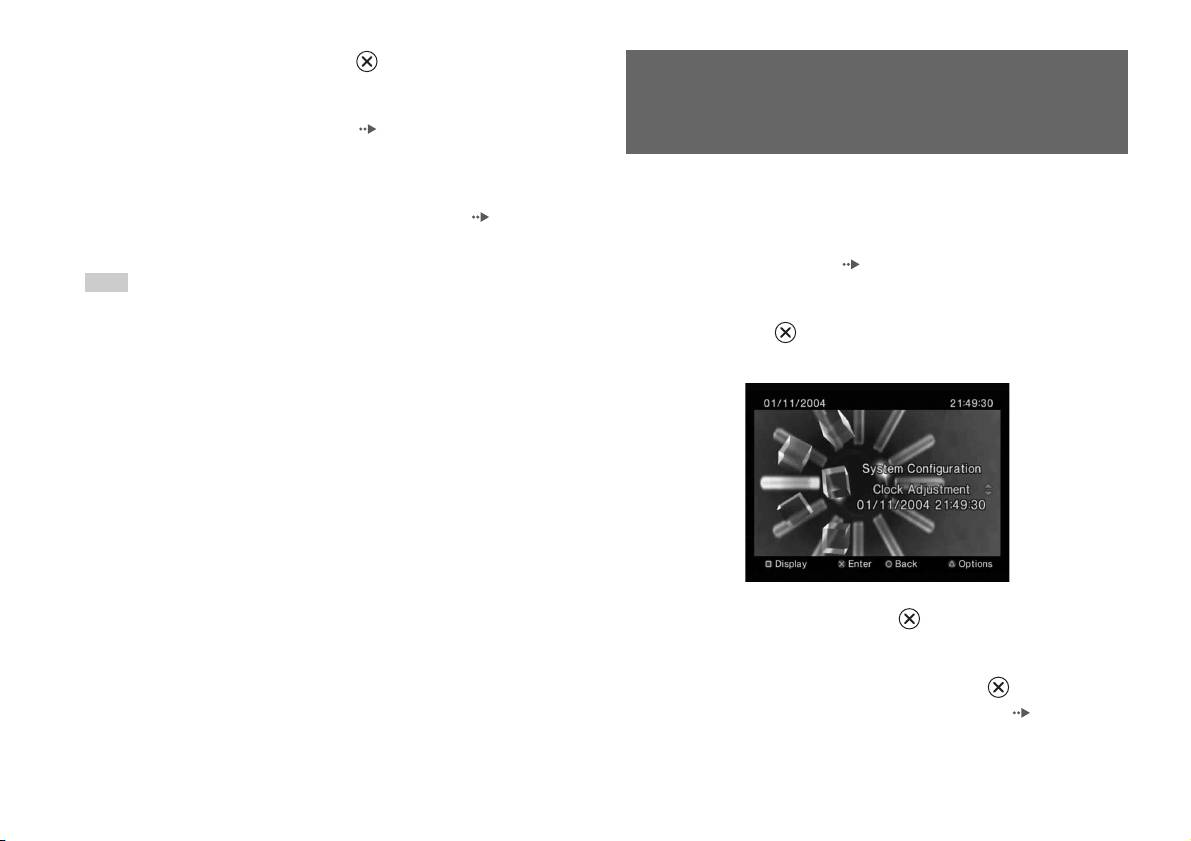
Clock Adjustment
GB
16:9
You can set the date and time. Use the directional buttons to set "Year",
Main menu
"Month", "Day", "Hour", "Minute" and "Second". The setting goes into
* "Full" display mode is compatible with the System Configuration menu, Browser
effect when you press the button.
screen and audio CD screen.
Optional settings
If you press the button at the "Clock Adjustment" screen, you can set
Digital Out (Optical)
options such as "Date Format" or "Time Format". Use the directional
You can set whether to output the signal through the DIGITAL OUT
buttons and the button to make each setting.
(OPTICAL) connector.
Time Format Sets the system clock to either 12-hour or 24-hour
On Select this option when you want to output signal
clock display
through the DIGITAL OUT (OPTICAL) connector.
Date Format Sets the display order of year, month and day
Off Select this option when you do not want to output
Time Zone Sets the time zone
signal through the DIGITAL OUT (OPTICAL)
connector.
Daylight Savings Time Sets Standard or Daylight Savings (Summer Time).
Normally select "Standard".
Using the System Configuration menu
29
German Displays messages in German
Remote Control
Italian Displays messages in Italian
You can set this option when using the DVD Remote Control (for
Dutch Displays messages in Dutch
PlayStation
TM2) (sold separately).
Portuguese Displays messages in Portuguese
Gameplay Function On Select this option when operating PlayStationTM2 or
PlayStation
TM format software with the DVD Remote
Control.
Gameplay Function Off Select this option when not operating PlayStation
TM2
or PlayStation
TM format software with the DVD
Remote Control.
Hint
The following limitations apply when the DVD Remote Control is set to "Gameplay
Function On":
– Depending on the software, some remote control buttons may not work properly.
– The buttons of the DVD Remote Control will not work when two or more
buttons are pressed at the same time.
– Some software titles may stop operating properly when a controller is removed
from controller port 1. If this happens, set to "Gameplay Function Off".
Language
You can use this option to select the language displayed on the main menu,
Browser screen, System Configuration menu, and Version Information
screen.
English Displays messages in English
French Displays messages in French
Spanish Displays messages in Spanish
30
Using the System Configuration menu

2 Select an item, and then press the button.
Using the Version Information
The available options are displayed.
screen
3 Select the desired setting, and then press the button.
For details, see the instructions for each item ( pages 31 to 33).
You can check version information for various built-in PlayStationTM2
Hint
components by selecting this option. You can also change optional settings
GB
The default setting for each menu item is underlined in the explanations below.
for some items.
Main menu
1 At the main menu ( page 27), press the button.
The Version Information screen is displayed.
Console
The built-in PlayStationTM2 automatically adjusts its internal settings for
optimal playback. When "Diagnosis" is set to "On", the built-in
PlayStationTM2 makes additional adjustments.
Diagnosis
Off Diagnosis is turned off.
On Diagnosis is turned on.
Hint
Optional settings
The "Diagnosis" setting will automatically return to the default setting in the
Optional settings are available for "Console", "PlayStation® Driver" and
following cases:
"DVD Player". "DVD Player" can be set only if the DVD player's
– When playback of PlayStation
TM2 or PlayStationTM format software or a DVD
"Progressive" option is set to "On".
begins
– When the built-in PlayStation
TM2 is reset
1 Using the directional buttons, select an item and then press
– When the built-in PlayStation
TM2 is turned off
the button.
The current setting for the item is displayed.
Using the Version Information screen
31
PlayStationTM Driver
DVD Player
You can set the PlayStationTM Driver programme to optimise performance
If you set "Progressive" to "On" when the built-in PlayStationTM2 is
of PlayStation
TM format software.
connected to a TV without the necessary equipment, the picture quality
may be reduced or the picture may not be displayed. You can clear the
Hint
"Progressive" setting by following the procedure below.
The settings will automatically return to the default settings in the following case:
Remove the DVD before clearing the setting.
– When the built-in PlayStation
TM2 is turned off
Clear Progressive Setting
Disc Speed
No Leaves the "Progressive" setting on
Standard Loads discs at normal speed
Yes Clears the "Progressive" setting
Fast Loads discs at high speed
1 Display the Version Information screen.
Hint
Set to "Standard" in the following cases:
2 Using the directional buttons, select "DVD Player" and then
– When fast loading does not produce improved results
press the button.
– When using a software that is not compatible with fast loading
The "Clear Progressive Setting" option is displayed.
Texture Mapping
3 Press the button.
Standard
Displays as normal
4 Select "Yes", and then press the button.
Smooth Displays with reduced roughness in on-screen images
5 Press the button twice.
Hint
The display returns to the main menu.
Set to "Standard" in the following cases:
– When smooth texture mapping does not produce improved results
6 Press the OPEN button on the built-in PlayStationTM2 front,
– If the picture does not display properly when set to "Smooth"
and place a DVD in the built-in PlayStation
TM2.
32
Using the Version Information screen

7 Close the disc cover.
Playback begins.
Hint
The setting will not be cleared if 1) you do not start a DVD after step 4 or 2) you reset
or turn off the built-in PlayStation
TM2 before step 6.
GB
Main menu
Using the Version Information screen
33
Networking
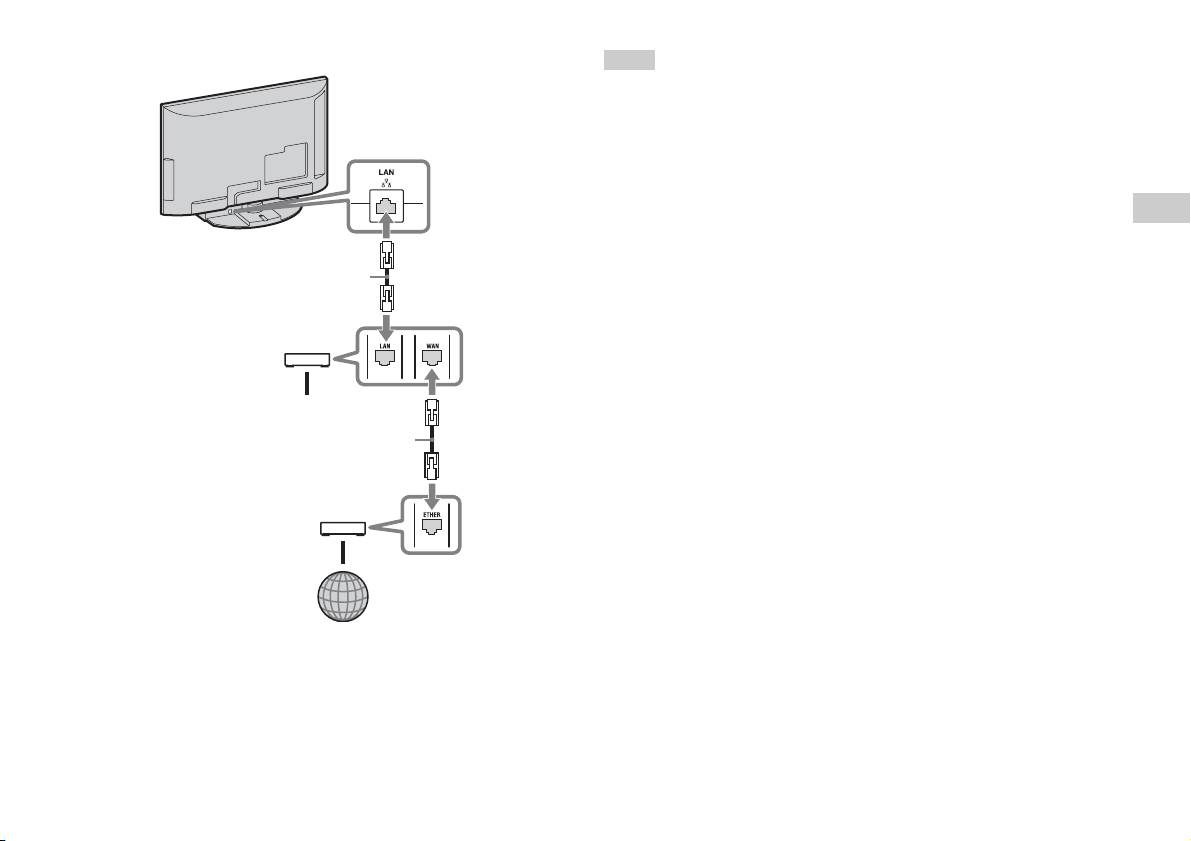
Connecting with an Ethernet cable
Connecting to a network
You can connect the built-in PlayStationTM2 to a network using an Ethernet
cable connected to the NETWORK connector on the rear. You can connect
to a 100 Base-TX or 10 Base-T network. Refer to the instructions supplied
You can enjoy online games by connecting the PlayStationTM2 to a
with the network device for details.
broadband network. To play all online games, you will need the following:
• A network compatible PlayStation
TM2 game
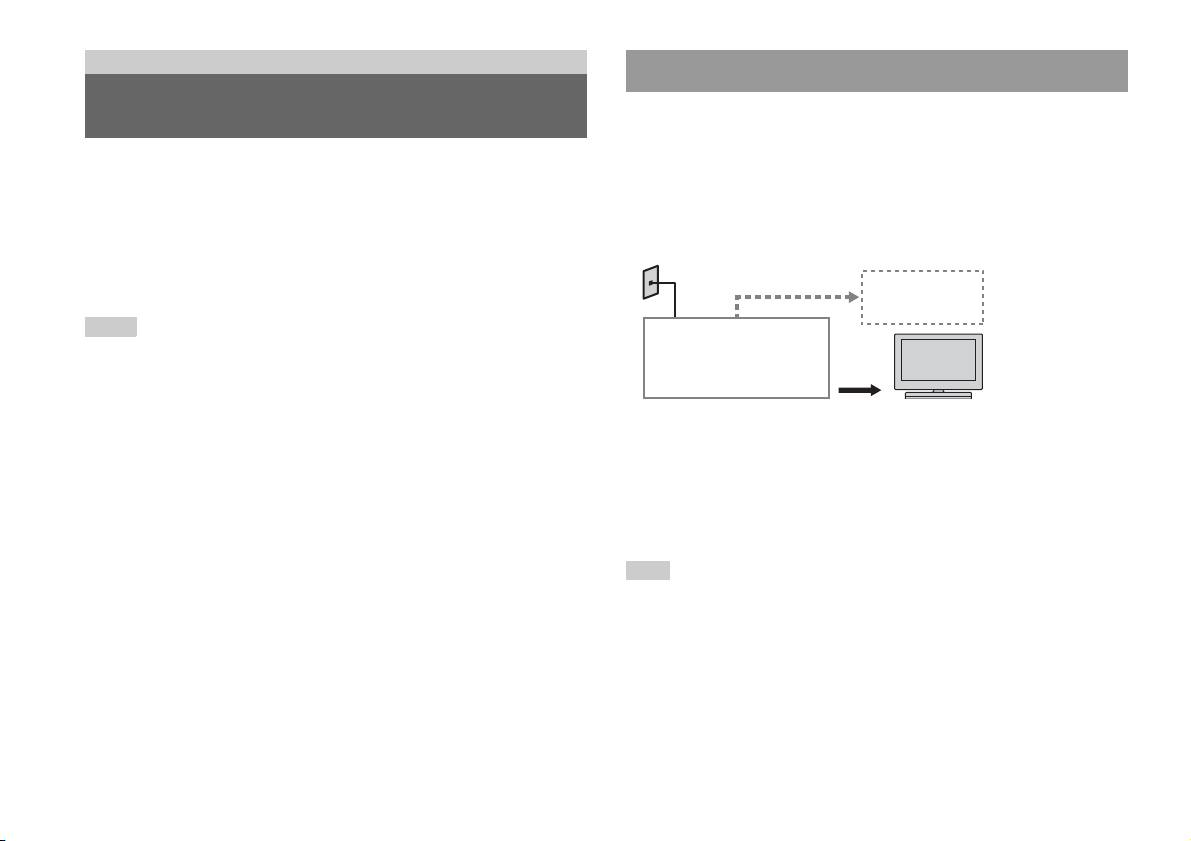
Basic Network Setup
• Broadband Internet service
Network line
• A commercially available Ethernet cable
• A memory card (8MB) (for PlayStation
TM2) (sold separately)
PC
Hints
• You cannot play online games using a dial-up or ISDN connection.
Broadband modem,
router etc.
• USB connectivity from the External Network Device to the USB connector is not
supported.
• There are two types of Ethernet cables: straight-through cable and crossover cable.
Network equipment Ethernet cable
(not supplied)
Ensure that you use the correct type of cable when connecting the PlayStation
TM2
to your Broadband Internet connection. Refer to the instructions supplied with the
Network line: This will vary depending on the type of broadband service
network device, or your Broadband Internet Service Provider for details.
in your home.
• Do not connect to the TV LAN using the Ethernet cable.
Network equipment: The type of equipment used will also vary
depending on the type of service.
Hint
When connecting the built-in PlayStationTM2 and a PC to the network, a network
device such as a router or a hub may be required. Refer to the instructions supplied
with the network device for details.
34
Connecting to a network
Connecting the built-in PlayStationTM2
Hints
• Do not plug the AC power cord (mains lead) into the electrical outlet until you have
made all other connections.
• Do not connect Ethernet cables or telephone cords of the following types to the
Built-in PlayStation
TM2
network connector; too much electrical current may pass through the connector,
causing a malfunction, excessive heat or fire in the connector:
– Standard residential telephone lines
– Ethernet cables not appropriate for use with a 10Base-T/100Base-TX network
GB
– Any ISDN (digital) compatible phone or data line
Networking
– PBX phone lines
– Other unknown types of telephone lines
Network cable (not supplied)
Router
To network devices
Network cable (not supplied)
DSL Modem/Cable Modem
Internet
1 Connect the Ethernet cable to the NETWORK connector on the
rear.
2 Connect the Ethernet cable to the network device.
Connecting to a network
35

Creating network settings
After you have connected an Ethernet cable to the built-in PlayStationTM2,
you will need to create and save network settings. To do this you need a
Network Access Disc supplied by registering your PlayStationTM2. You
can register your PlayStation
TM2.
You will need the following items to create a network setting:
– A Memory Card (8MB) (for PlayStationTM2) (sold separately)
– Login and network setup information provided by your Broadband Internet
Service Provider
Hint
Depending on the type of Internet service used, you may need to provide your
Broadband Internet Service Provider with your MAC Address. You can find the
MAC Address for your PlayStation
TM2 listed in the Version Information screen
( page 31).
36
Creating network settings
Connexion réseau
Table des matières
Connexion au réseau ....................................................................37
Création des paramètres réseau ....................................................39
Préparation
Noms des composants.................................................................... 3
Raccordement d’équipements audio numériques .......................... 5
Branchement de la manette............................................................6
Mise sous tension et hors tension de la PlayStation
TM2
intégrée .................................................................................... 6
Jeux
Comment jouer............................................................................... 7
Utilisation des Memory Cards (Cartes Mémoire)........................11
CD audio
Lecture d’un CD audio.................................................................13
DVD
Lecture d’un DVD ....................................................................... 15
Utilisation des modes de lecture .................................................. 19
Paramètres et réglages du lecteur DVD....................................... 22
Menu principal
Affichage du menu principal ....................................................... 29
Utilisation de l’écran navigateur.................................................. 30
Utilisation du menu Configuration du Système........................... 31
Utilisation de l’écran d’informations sur la version .................... 33
2
Table des matières
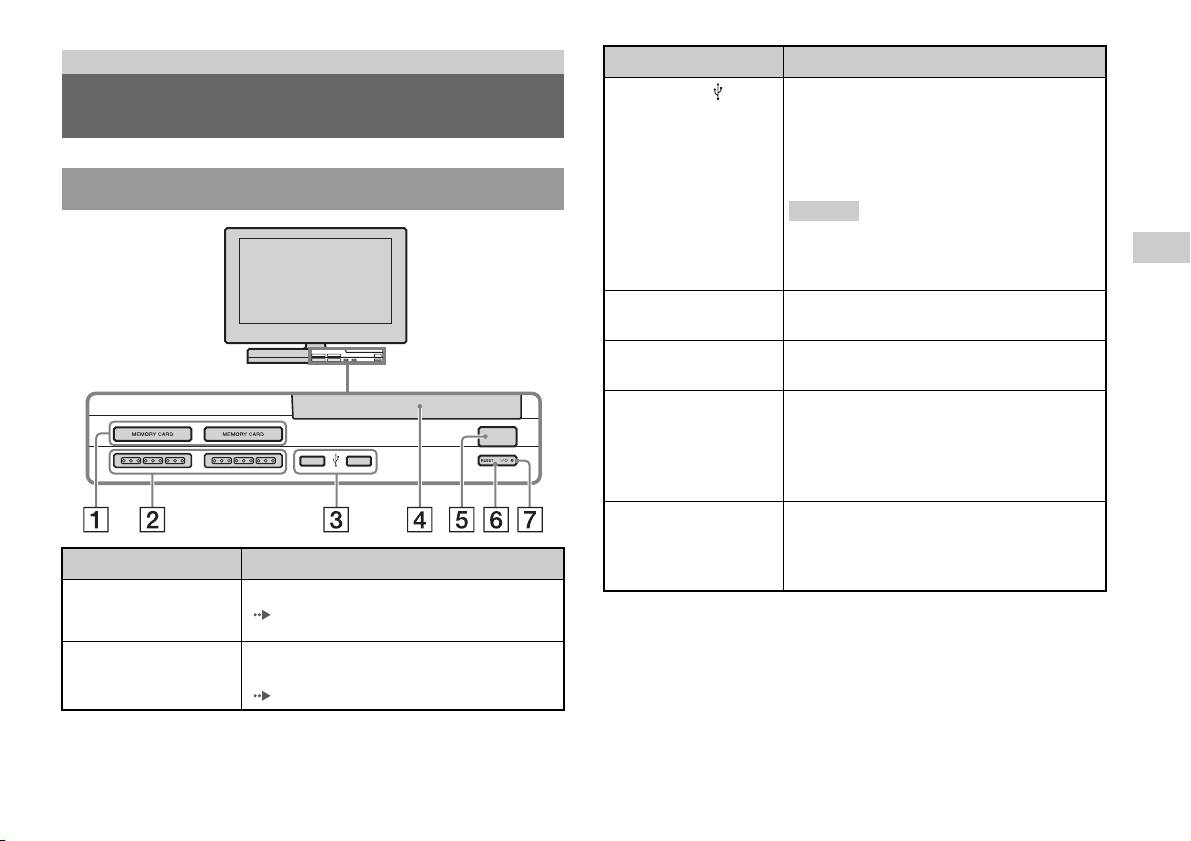
Préparation
Connexion à Description
3 Connecteur USB
Vous pouvez connecter divers périphériques USB à
Noms des composants
la PlayStation
TM2 intégrée, mais ils ne sont pas tous
compatibles. Pour en savoir davantage, reportez-
vous aux instructions fournies avec le périphérique
USB.
Avant de la PlayStationTM2 intégrée
Conseil
Vous ne pouvez pas lire de fichiers de photo, de
musique ou vidéo à l’aide du connecteur USB de la
FR
PlayStation.
Préparation
4 Couvercle du
Appuyez sur le bouton OPEN et le couvercle
compartiment à disque
s’ouvre en glissant.
5 Bouton OPEN
Appuyez pour ouvrir le couvercle du compartiment
à disque.
6 Bouton "/1 (marche/
Appuyez pour mettre sous tension la PlayStationTM2
veille)/RESET
intégrée, pour passer en mode de veille ou pour
OPEN
réinitialiser.
RESET : Appuyez une fois.
Veille : Appuyez pendant plus d’une seconde.
7 Indicateur "/1
S’allume en vert lorsque la PlayStationTM2 intégrée
(marche/veille)
est sous tension.
S’allume en rouge lorsque la PlayStation
TM2
Connexion à Description
intégrée est en mode de veille.
1 Fente pour MEMORY
Insérez une Memory Card (Carte Mémoire)
CARD (Carte Mémoire)
( page 11).
1/2
2 Port de manette 1/2
Insérez la Manette Analogique (DUALSHOCK®2)
dans un port de manette de la PlayStation
TM2
(page6).
Noms des composants
3

Arrière de la PlayStationTM2 intégrée
Connexion à Description
1 LAN
Vous pouvez jouer en ligne en connectant la
PlayStation
TM2 à un réseau à large bande
( page 37).
Conseil
Pour profiter des fonctions réseau domestique
« BRAVIA », connectez-vous au réseau du
téléviseur à l’aide d’un câble Ethernet ( page 37).
4
Noms des composants
1 2
Connexion à Description
2 DIGITAL AUDIO OUT
Vous pouvez écouter le son de la PlayStationTM2
(OPTICAL)
intégrée sur un système Home Cinéma raccordé via
l’entrée analogique.
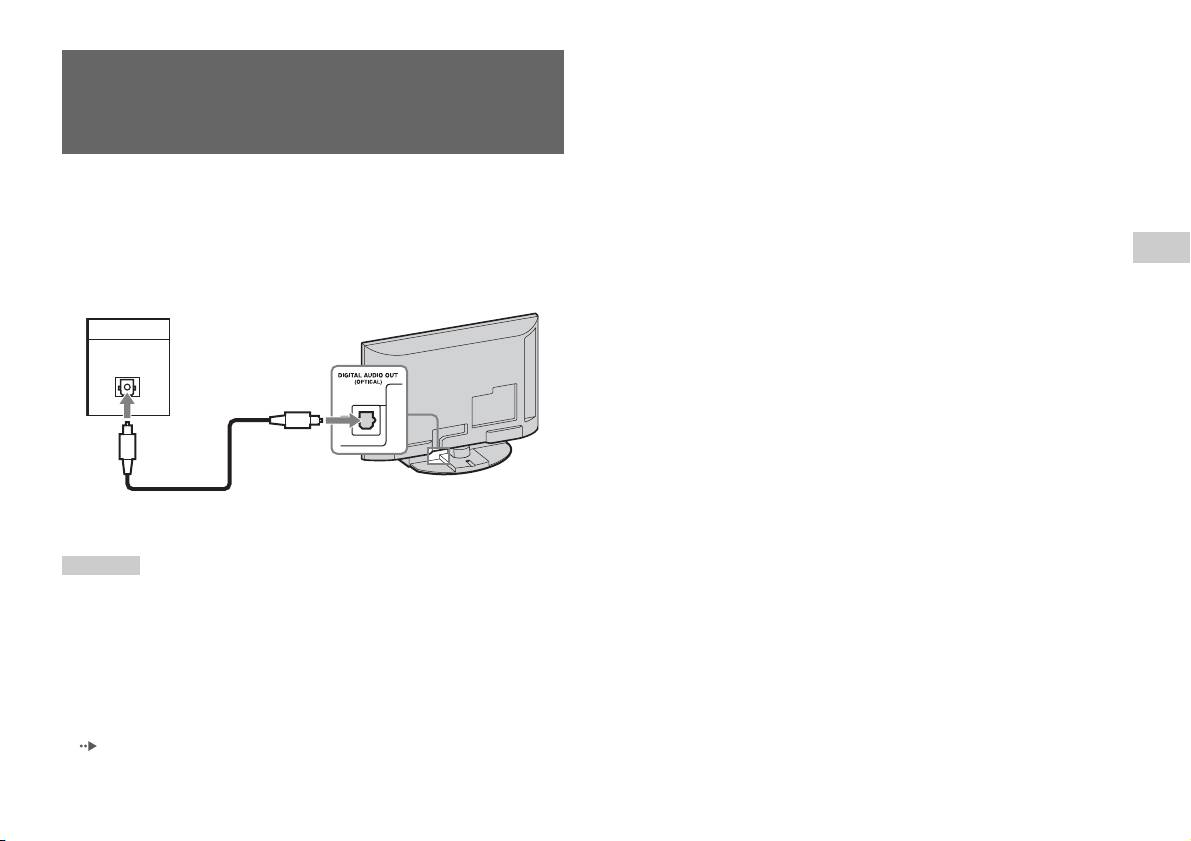
• La connexion DIGITAL AUDIO OUT (OPTICAL) reproduit le son numérique de
la PlayStation
TM2 intégrée.
Raccordement d’équipements
audio numériques
Vous pouvez profiter du son ambiophonique grâce à un câble numérique
optique commercialisé qui reproduit la qualité acoustique d’un cinéma ou
d’une salle de concert. Si vous raccordez la PlayStationTM2 intégrée à un
équipement audio à l’aide de connecteurs numériques, reportez-vous aux
FR
instructions qui accompagnent le périphérique à connecter.
Préparation
Périphérique connecté
Arrière de la PlayStationTM2 intégrée
DIGITAL IN
OPTICAL
Câble numérique optique
commercialisé
Conseils
• Si vous raccordez la PlayStationTM2 intégrée à un équipement audio à l’aide d’un
câble numérique optique, cela peut affecter la sortie audio de certains logiciels au
format PlayStation
TM2 et empêcher la reproduction du son. Si cela se produit,
utilisez un câble tel que le câble AV (non fourni) et connectez-le à la prise AUDIO
OUT du téléviseur. N’utilisez pas de câble numérique optique.
• Une fois l’équipement audio numérique raccordé, réglez le paramètre « DIGITAL
OUT (OPTICAL) » sur « Activé » dans le menu Configuration du Système. Pour
plus de détails, reportez-vous à la section « DIGITAL OUT (OPTICAL) »
( page 32).
Raccordement d’équipements audio numériques
5


