Yamaha DVD-S663: Getting Started
Getting Started: Yamaha DVD-S663
Getting Started
Getting Started
English
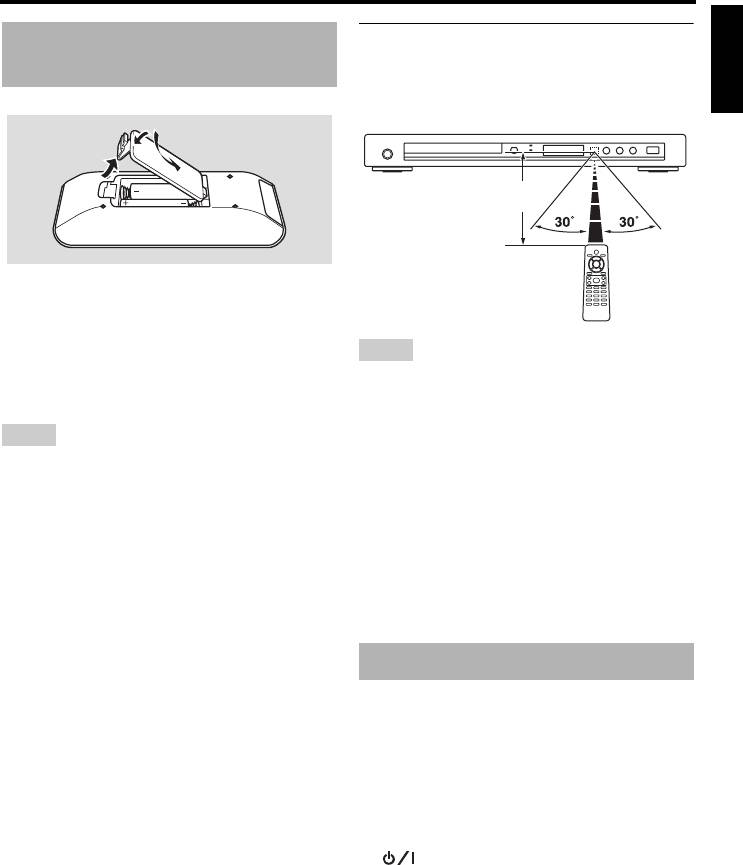
Using the remote control
Step 1: Inserting batteries into
Use the remote control within 6 m
the remote control
(approximately 20 ft) of this unit and point it
toward the remote control sensor.
3
1
Within 6 m
2
2
(approximately 20 ft)
1 Open the battery compartment.
2 Insert the two supplied batteries (AAA,
R03, UM-4) following the indications (+/–)
Notes
inside the compartment.
• Do not spill water or other liquids on the remote
3 Close the cover.
control.
• Do not drop the remote control.
Notes
• Do not leave or store the remote control in the
following types of conditions:
• Insert batteries correctly according to the polarity
– places of high humidity, such as near a bath
markings (+/–). Batteries inserted in the opposite
– places of high temperature, such as near a
orientation may leak.
heater or stove
• Replace the exhausted batteries immediately with
– places of extremely low temperature
new ones to prevent leakage.
– dusty places
• Remove the batteries from the compartment if the
• When the remote control works unstably, point it
remote control is not used for more than a month.
at an angle upward to the sensor.
• If the batteries have leaked, dispose of them
immediately. Avoid touching the leaked material
or letting it come into contact with clothing, etc.
Clean the battery compartment thoroughly before
Step 2: Turning on the power
installing new batteries.
• Do not use old batteries together with new ones.
1 Plug the power cable into the AC outlet.
• Do not use different types of batteries (such as
2 Turn on your TV and AV receiver.
alkaline and manganese batteries) together. Read
the packaging carefully as these different types of
3 Select the appropriate input source of the
batteries may have the same shape and color.
AV receiver (refer to the manual supplied
• Dispose of the batteries correctly in accordance
with your AV receiver).
with your local regulations.
4 Press STANDBY/ON on the front panel or
on the remote control to turn on this
unit.
➜ The front panel display lights up.
5 Set the TV to the correct video input (refer
to the manual supplied with your TV).
➜ The default screen appears on the TV.
13 En
Getting Started
PAL
Step 3: Setting a TV type/display
Select this if the connected TV is a PAL
and language
system TV. It will change the video signals of
NTSC discs and output them in PAL format.
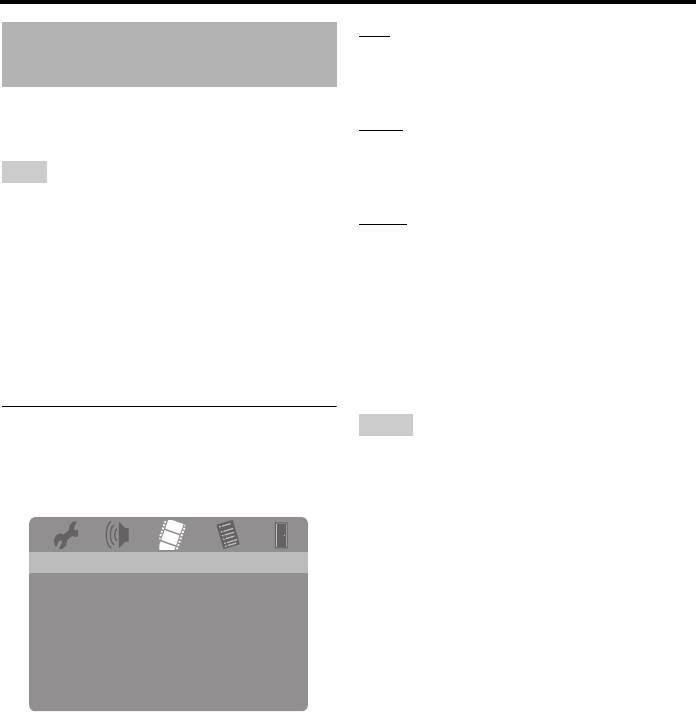
You can customize this unit using the setup
NTSC
menu displayed on the TV screen.
Select this if the connected TV is an NTSC
system TV. It will change the video signals of
Note
PAL discs and output them in NTSC format.
Unless stated otherwise, all operations described
MULTI
here are carried out using the supplied remote
Select this if the connected TV is compatible
control.
with both NTSC and PAL formats (such as a
y
multi-system TV).
• To return to the previous menu, press 2.
The output format will be in accordance with
• If the setting you have selected are not
the video signals of the disc.
appropriate, you can reset all settings to the initial
factory settings (see “Resetting the system” on
5 Select an item, and then press ENTER.
page 40).
6 Press SET UP to exit from the menu.
Setting a color system for your TV
Notes
This unit is compatible with both NTSC and
• Before changing the current TV standard setting,
PAL video formats. Select the color system
ensure that your TV supports the selected TV
that matches your TV.
type.
• When making HDMI connections, you cannot
change or select [TV TYPE].
VIDEO SETUP PAGE
y
TV TYPE PAL
If the picture is not displayed properly on your TV,
TV DISPLAY NTSC
wait for 15 seconds for this unit to activate
PROGRESSIVE MULTI
PICTURE SETTING
automatic recovery.
BLACK LEVEL
CLOSED CAPTION
.......
COMPONENT
*
HDMI SETUP
: [COMPONENT] is only for Europe and
*
Russia models.
1 Press SET UP.
2 Press 3 repeatedly to select “VIDEO
SETUP PAGE”.
3 Press 5/a to highlight [TV TYPE], and
then press 3.
4 Press 5/a to highlight one of the
following options.
14 En
Getting Started
English
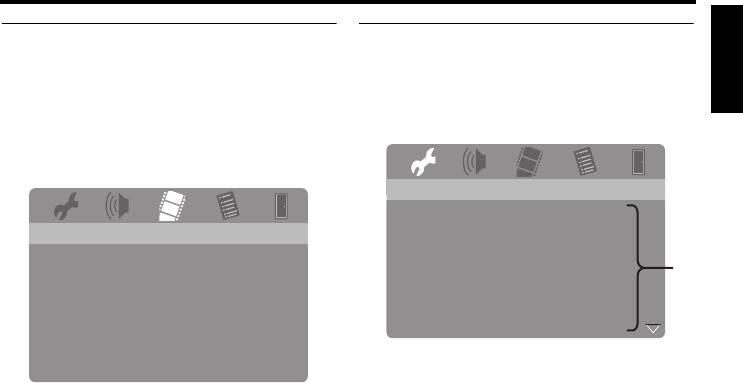
Setting an aspect ratio for your TV
Setting the OSD Language
You can set the aspect ratio of this unit to
You can select your own preferred language
match your TV. If the aspect ratio of your TV
for the setup menu. This setting remains once
is 16:9, you do not need to change this setting.
selected.
For details, see “Setting the TV display” on
page 33.
GENERAL SETUP PAGE
DISC LOCK ENGLISH
MP3 RECORD DANSK
VIDEO SETUP PAGE
PROGRAM DEUTSCH
TV TYPE
DISPLAY DIM ESPAÑOL
TV DISPLAY 4:3 PAN SCAN
OSD LANGUAGE FRANÇAIS
*
PROGRESSIVE 4:3 LETTER BOX
SCREEN SAVER ITALIANO
PICTURE SETTING 16:9
SLEEP NEDERLANDS
BLACK LEVEL
DIVX(R) VOD CODE NORSK
CLOSED CAPTION
.......
COMPONENT
*
: The menu items may change depending on
HDMI SETUP
*
the models.
: [COMPONENT] is only for Europe and
*
Russia models.
1 Press SET UP.
2 Press 2 / 3 to select “GENERAL SETUP
1 Press SET UP.
PAGE”.
2 Press 3 repeatedly to select “VIDEO
3 Press 5/a to highlight [OSD
SETUP PAGE”.
LANGUAGE], and then press 3.
3 Press 5/a to highlight [TV DISPLAY],
4 Press 5/a to select a language, and then
and then press 3.
press ENTER.
4 Press 5/a to highlight the desired setting,
5 Press SET UP to exit from the menu.
and then press ENTER.
5 Press SET UP to exit from the menu.
15 En
Getting Started
■ To select a language not in the list
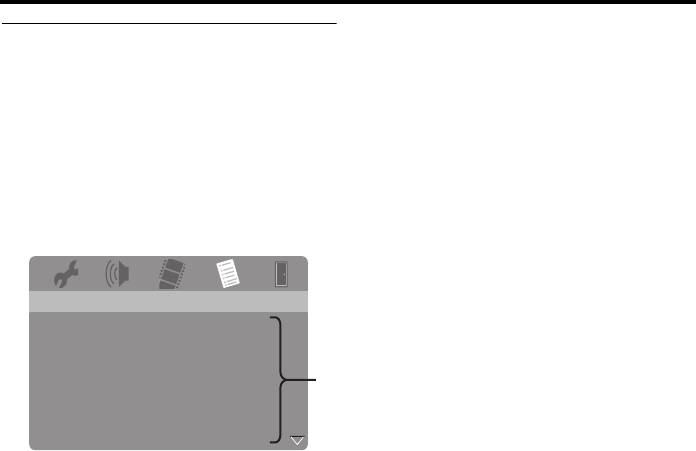
Setting the audio, subtitle, and disc
menu languages (DVD-Video only)
1 Select [OTHERS] in [AUDIO],
[SUBTITLE], or [DISC MENU], and then
You can select your own preferred language
press ENTER.
for the audio, subtitle, and disc menu. This
unit automatically switches to the selected
2 Use the numeric buttons (0-9) to enter
language whenever you load a disc. If the
the 4-digit language code (see “Language
selected language is not available on the disc,
Codes” on page 41), and then press
the default language of the disc will be used
ENTER.
instead.
3 Press SET UP to exit from the menu.
PREFERENCE PAGE
AUDIO ENGLISH
SUBTITLE CHINESE (SIMP)
DISC MENU FRENCH
PARENTAL SPANISH
VR LIST RUSSIAN
*
DATA DISC NAV POLISH
DIVX SUBTITLE ITALIAN
PBC TURKISH
: The menu items may change depending on
*
the models.
1 Press
7
twice to stop playback (if
necessary), and then press SET UP.
2 Press 3 repeatedly to select
“PREFERENCE PAGE”.
3 Press 5/a to highlight one of the options
below, and then press 3.
• AUDIO (audio language)
• SUBTITLE (subtitle language)
• DISC MENU (disc menu language)
4 Press 5/a to select a language, and then
press ENTER.
5 Repeat steps 3-4 for other language
settings.
6 Press SET UP to exit from the menu.
16 En
Оглавление
- Contents Contents
- Contents
- Introduction
- Functional Overview
- Connections
- Getting Started
- Playback Operation
- Setup Menu
- Language Codes
- Troubleshooting
- Glossary
- Specifications
- Содержание Содержание
- Содержание
- Введение
- Функциональный обзор
- Подключения
- Подготовка к эксплуатации
- Управление воспроизведением
- Меню настройки
- Языковые коды
- Устранение неисправностей
- Справочник
- Технические спецификации


