Yamaha DVD-S663: Functional Overview
Functional Overview: Yamaha DVD-S663
Functional Overview
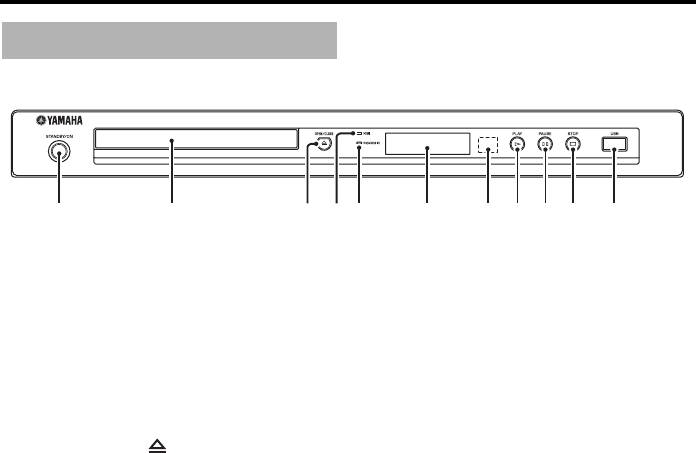
Front panel
1 STANDBY/ON
6 Front panel display
Turns on this unit or sets it to the standby mode
Shows the current status of this unit.
(see page 13). In the standby mode, this unit
7 Remote control sensor
consumes a small amount of power in order to
Receives infrared signals from the remote
receive infrared signals from the remote control.
control (see page 13).
2 Disc tray
8 PLAY (
p )
Loads a disc in the disc tray (see page 17).
Starts playback.
3 OPEN/CLOSE ( )
9 PAUSE ( )
Opens or closes the disc tray (see page 17).
Pauses playback.
4 HDMI indicator
Frame-by-frame playback (see page 17).
Lights up when an HDMI component is
0 STOP ( s )
connected and signals output via the HDMI jack
Stops playback.
of this unit.
q USB port
5 PROGRESSIVE indicator
Connect the USB connector of your USB device
Lights up when this unit is in the progressive
(see page 12).
mode (see page 34).
6 En
1 2354 6 87 9 0 q
Functional Overview
Functional Overview
English
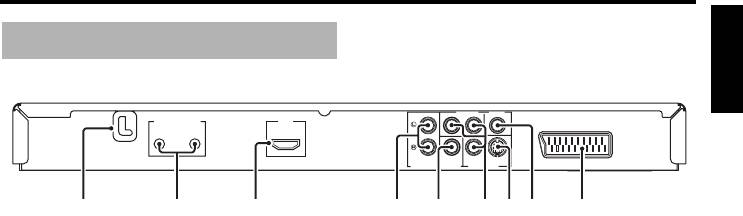
Rear panel
MAINS
PR
/ CR
COMPONENT VIDEO
Y
REMOTE CONTROL
HDMI
OUT
IN
COAXIAL
PB
/ CB
S VIDEO
AV
AUDIO OUT
VIDEO OUTDIGITAL OUT
914567832
(Europe model)
1 AC power cable
5 DIGITAL OUT - COAXIAL jack
Plug the power cable into the AC wall outlet.
Connect to the coaxial input jack of your AV
receiver (see page 9).
2 REMOTE CONTROL (IN, OUT) jacks
Connect the REMOTE CONTROL (IN) jack of
6 VIDEO OUT - COMPONENT (Y, PB/CB, PR/
this unit to the remote control output jack of
CR) jacks
your Yamaha AV receiver (see page 12).
Connect to the component input jacks of your
Connect the REMOTE CONTROL (OUT) jack
AV receiver (see page 10).
of this unit to the remote control input jack of
7 VIDEO OUT - S VIDEO jack
your Yamaha component.
Connect to the S-video input jack of your AV
3 HDMI jack
receiver (see page 10).
Connect to the HDMI input jack of your HDMI
8 VIDEO OUT - VIDEO jack
component (see page 11).
Connect to the composite video input jack of
4 AUDIO OUT (L, R) jacks
your AV receiver (see page 10).
Connect to the audio input jacks of your AV
9 AV terminal
receiver or stereo system (see page 9).
(Europe and Russia models only)
Connect to the SCART input terminal of your
TV (see page 10).
Caution: Do not touch the inner pins of the jacks on the rear panel of this unit.
Electrostatic discharge may cause permanent damage to this unit.
7 En
Functional Overview
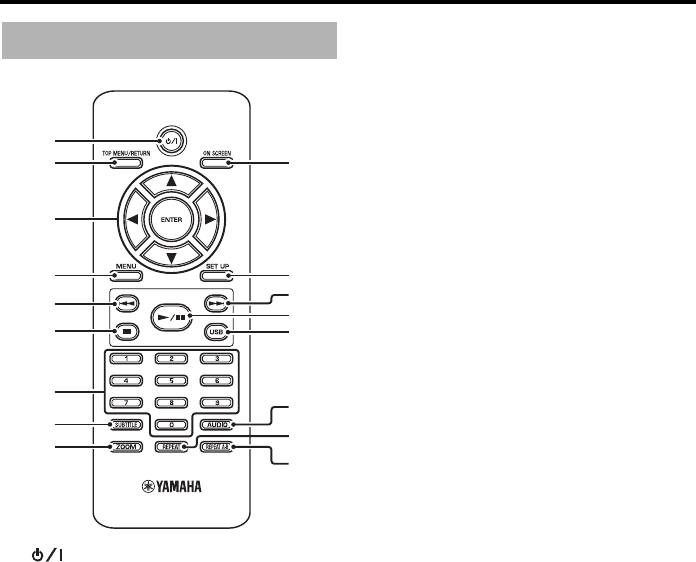
Remote control
6
7
Stops playback (see page 17).
Opens the disc tray.*
7 Numeric buttons (0-9)
1
Selects numbered items in the currently
2
0
displayed menu.
8 SUBTITLE
3
Selects the subtitle language (see pages 20 and
22).
9 ZOOM
4
q
Enlarges or shrinks the video image (see
w
5
pages 18 and 22).
e
6
r
0 ON SCREEN
Accesses or exits from the on-screen display
(OSD) menu of this unit (see page 19).
7
t
q SET UP
8
y
Accesses or exits from the setup menu of this
9
unit (see pages 14 and 27).
u
w 33l
Moves to the next chapter or track (see page 17).
Searches forward (see page 17).*
1
e 3 / 8
Turns on this unit or sets it to the standby mode
Starts or pauses playback (see page 17).
(see page 13). In the standby mode, this unit
consumes a small amount of power in order to
r USB
receive infrared signals from the remote control.
Accesses the contents of the connected USB
device or exits from the USB mode (see
2 TOP MENU/RETURN
page 23).
Displays the top-level disc menu (DVD).
Moves back to the previous menu (DVD*/VCD)
t AUDIO
(see page 20).
Selects the audio language or format (see
pages 20 and 22).
3 2 / 3/5/a
Selects an item in the currently displayed menu.
y REPEAT
Search or slow playback (see page 27).
Accesses or exits from the repeat/shuffle mode
ENTER
(see page 17).
Confirms the menu selection (see page 27).
u REPEAT A-B
4 MENU
Repeats a specified segment (see page 18).
Displays the menu of a disc (DVD/JPEG) (see
pages 18, 20, 21 and 22).
* Press and hold the button for about two seconds.
Switches PBC on or off (VCD) (see page 20).
5 l22
Moves to the previous chapter or track (see
page 17).
Searches backward (see page 17).*
8 En
Оглавление
- Contents Contents
- Contents
- Introduction
- Functional Overview
- Connections
- Getting Started
- Playback Operation
- Setup Menu
- Language Codes
- Troubleshooting
- Glossary
- Specifications
- Содержание Содержание
- Содержание
- Введение
- Функциональный обзор
- Подключения
- Подготовка к эксплуатации
- Управление воспроизведением
- Меню настройки
- Языковые коды
- Устранение неисправностей
- Справочник
- Технические спецификации


