JVC KD-G507: OTHER MAIN FUNCTIONS
OTHER MAIN FUNCTIONS: JVC KD-G507
OTHER MAIN FUNCTIONS
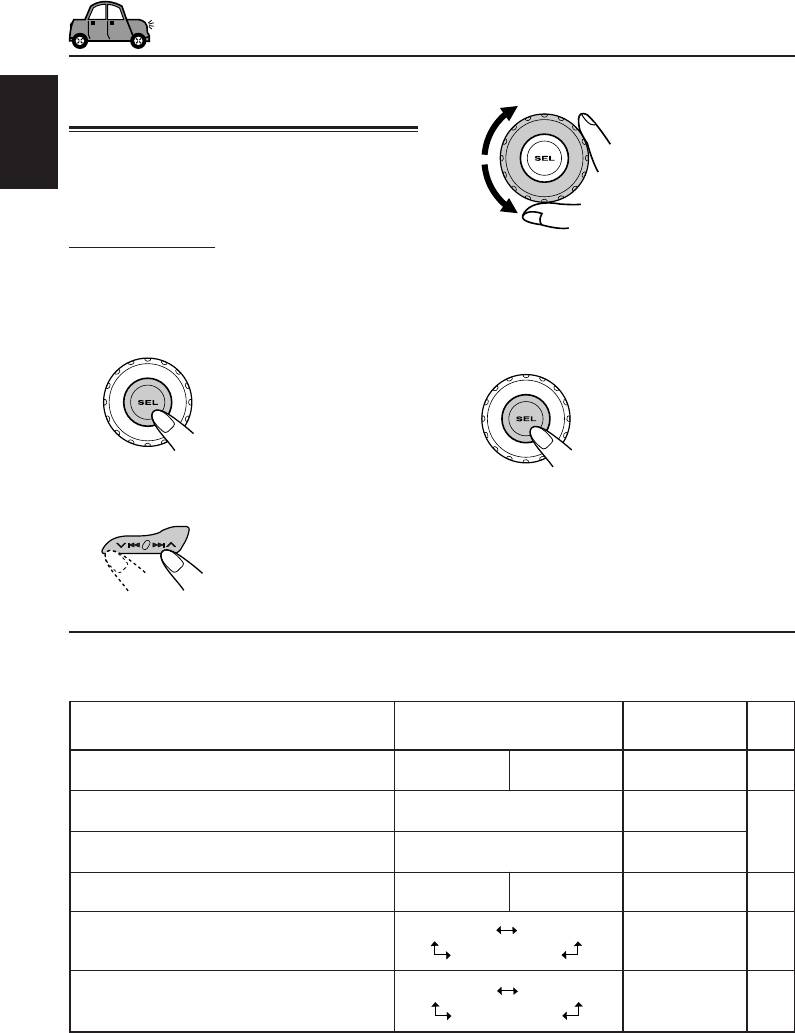
Changing the general settings
3
Adjust the PSM item selected.
(PSM)
You can change the items listed in the table
ENGLISH
below and on page 23 by using the PSM
(Preferred Setting Mode) control.
Basic Procedure
1
Press and hold SEL (select) for more
4
Repeat steps
2
and
3
to adjust the
than 2 seconds so that one of the
other PSM items if necessary.
PSM items appears on the display.
(See below and page 23.)
5
Finish the setting.
2
Select the PSM item you want to
adjust.
Preferred Setting Mode (PSM) items
• For detailed operations of each PSM items, refer to the pages listed in the table.
Factory-preset See
Indications Selectable values/items
settings page
DEMO Display demonstration
DEMO ONDEMO OFF DEMO ON 6
CLOCK H Hour adjustment
0 — 23
0 (0:00)
7
CLOCK M Minute adjustment
00 — 59
00 (0:00)
LEVEL Level display
OFF ON ON
23
DIMMER Dimmer mode
AUTO OFF
AUTO
23
ON
TEL Telephone muting
OFF MUTING 1
OFF
23
MUTING 2
22
EN22-25_KD-G507[EE]f.p65 11/21/03, 3:14 PM22
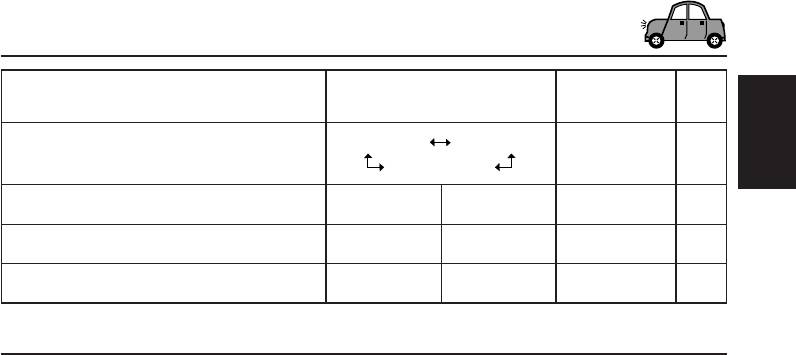
Factory-preset See
Indications Selectable values/items
settings page
SCROLL Scroll mode
ONCE AUTO
ONCE
23
OFF
ENGLISH
EXT IN* External component
CHANGER LINE IN CHANGER
24
TAG DISP Tag display
TAG OFF TAG ON TAG ON 24
AMP GAIN Amplifier gain control
LOW PWR HIGH PWR HIGH PWR 24
* Displayed only when one of the following sources is selected—FM, AM, and CD.
To select the level meter—LEVEL
To select the telephone muting—TEL
You can activate or deactivate the level meter
This mode is used when a cellular phone system
according to your preference.
is connected. Depending on the phone system
When shipped from the factory, level meter is
used, select either “MUTING 1” or “MUTING 2”
activated.
whichever mutes the sounds from this unit.
When shipped from the factory, this mode is
• ON: Shows the audio level indicator.
deactivated.
• OFF: Cancels the audio level indicator;
sound mode indicator is shown.
• MUTING 1: Select if this setting can mute the
sounds.
• MUTING 2: Select if this setting can mute the
To select the dimmer mode—DIMMER
sounds.
• OFF: Cancels the telephone muting.
When you turn on the car headlights, the display
automatically dims (Auto Dimmer).
When shipped from the factory, Auto Dimmer
To select the scroll mode—SCROLL
mode is activated.
You can select the scroll mode for the disc
• AUTO: Activates Auto Dimmer.
information (when the entire text cannot be
• OFF: Cancels Auto Dimmer.
shown at once).
• ON: Always dims the display.
When shipped from the factory, scroll mode is set
to “ONCE.”
Note:
Auto Dimmer equipped for this unit may not work
• ONCE: Scrolls only once.
correctly on some vehicles, particularly on those
• AUTO: Repeats the scroll (5-second
having a control dial for dimming.
intervals in between).
In this case, set the dimmer mode to “ON” or “OFF.”
• OFF: Cancels scroll mode.
Note:
Even if the scroll mode is set to “OFF,” you can scroll
the display by pressing DISP (display) for more than
one second.
23
EN22-25_KD-G507[EE]f.p65 11/21/03, 2:45 PM23

To select the external component to use
To select the amplifier gain control
—EXT IN
—AMP GAIN
You can connect the external component to the
You can change the maximum volume level of
CD changer jack on the rear using the Line Input
this unit. When the maximum power of the
ENGLISH
Adapter KS-U57 (not supplied).
speakers is less than 50 W, select “LOW PWR”
To use the external component as the playback
to prevent them from being damaged.
source through this unit, you need to select
When shipped from the factory, “HIGH PWR” is
which component—CD changer or external
selected.
component—to use.
• LOW PWR: You can adjust the volume level
When shipped from the factory, CD changer is
from “VOL 00” to “VOL 30.”
selected as the external component.
Note:
• CHANGER: To use the CD changer.
If you change the setting from
• LINE IN: To use the external component
“HIGH PWR” to “LOW PWR” while
other than CD changer.
listening at a volume level more than
30, the unit automatically changes the
Note:
volume level to “VOL 30.”
For connecting the Line Input Adapter KS-U57 and
the external component, refer to the Installation/
• HIGH PWR:You can adjust the volume level
Connection Manual (separate volume).
from “VOL 00” to “VOL 50.”
To turn the tag display on or off
—TAG DISP
An MP3 file can contain file information called
“ID3 Tag” where its album name, performer, track
title, etc. are recorded.
There are two versions—ID3v1 (ID3 Tag version 1)
and ID3v2 (ID3 Tag version 2). If both ID3v1 and
ID3v2 are recorded on a disc, ID3v2 information
will be shown.
When shipped from the factory, “TAG ON” is
selected.
• TAG ON: Turns on the ID3 tag display while
playing MP3 files.
• If an MP3 file does not have ID3
tags, folder name and file name
appear.
• TAG OFF: Turns off the ID3 tag display while
playing MP3 files. (Only the folder
name and file name can be
shown.)
24
EN22-25_KD-G507[EE]f.p65 11/21/03, 2:45 PM24
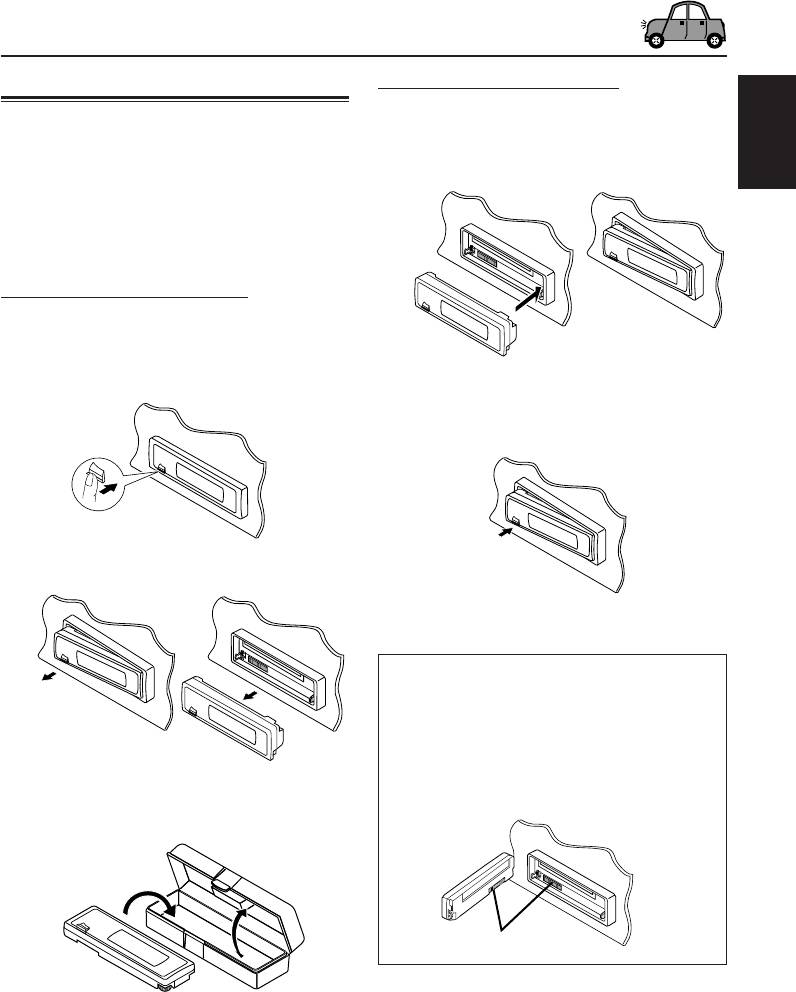
Detaching the control panel
Attaching the control panel
You can detach the control panel when leaving
1
Insert the right side of the control
the car.
panel into the groove on the panel
When detaching or attaching the control panel,
holder.
ENGLISH
be careful not to damage the connectors on the
back of the control panel and on the panel
holder.
Detaching the control panel
Before detaching the control panel, be sure to
turn off the power.
1
Unlock the control panel.
2
Press the left side of the control
panel to fix it to the panel holder.
2
Pull the control panel out of the unit.
Note on cleaning the connectors:
If you frequently detach the control panel, the
connectors will deteriorate.
To minimize this possibility, periodically wipe the
connectors with a cotton swab or cloth moistened
with alcohol, being careful not to damage the
connectors.
3
Put the detached control panel into
the provided case.
Connectors
25
EN22-25_KD-G507[EE]f.p65 11/21/03, 3:19 PM25
Оглавление
- CONTENTS
- LOCATION OF THE BUTTONS
- BASIC OPERATIONS
- RADIO OPERATIONS
- CD OPERATIONS
- MP3 INTRODUCTION
- MP3 OPERATIONS
- SOUND ADJUSTMENTS
- OTHER MAIN FUNCTIONS
- CD CHANGER OPERATIONS
- EXTERNAL COMPONENT OPERATIONS
- USING THE REMOTE CONTROLLER
- TROUBLESHOOTING
- MAINTENANCE
- SPECIFICATIONS
- СОДЕРЖАНИЕ
- РАСПОЛОЖЕНИЕ КНОПОК
- ОСНОВНЫЕ ОПЕРАЦИИ
- ОПЕРАЦИИ С РАДИОПРИЕМНИКОМ
- ОПЕРАЦИИ С КОМПАКТ-ДИСКАМИ
- ПРЕДИСЛОВИЕ К МР3
- ОПЕРАЦИИ МР3
- НАСТРОЙКА ЗВУКА
- ДРУГИЕ ГЛАВНЫЕ ФУНКЦИИ
- ОПЕРАЦИИ С ВНЕШНИМ КОМПОНЕНТОМ
- ИСПОЛЬЗОВАНИЕ ПУЛЬТА ДИСТАНЦИОННОГО УПРАВЛЕНИЯ
- ВЫЯВЛЕНИЕ НЕИСПРАВНОСТЕЙ
- ТЕХНИЧЕСКОЕ ОБСЛУЖИВАНИЕ
- ТЕХНИЧЕСКИЕ ХАРАКТЕРИСТИКИ
- Please reset your unit


