JVC KD-DV6207: Introduction
Introduction: JVC KD-DV6207
Introduction
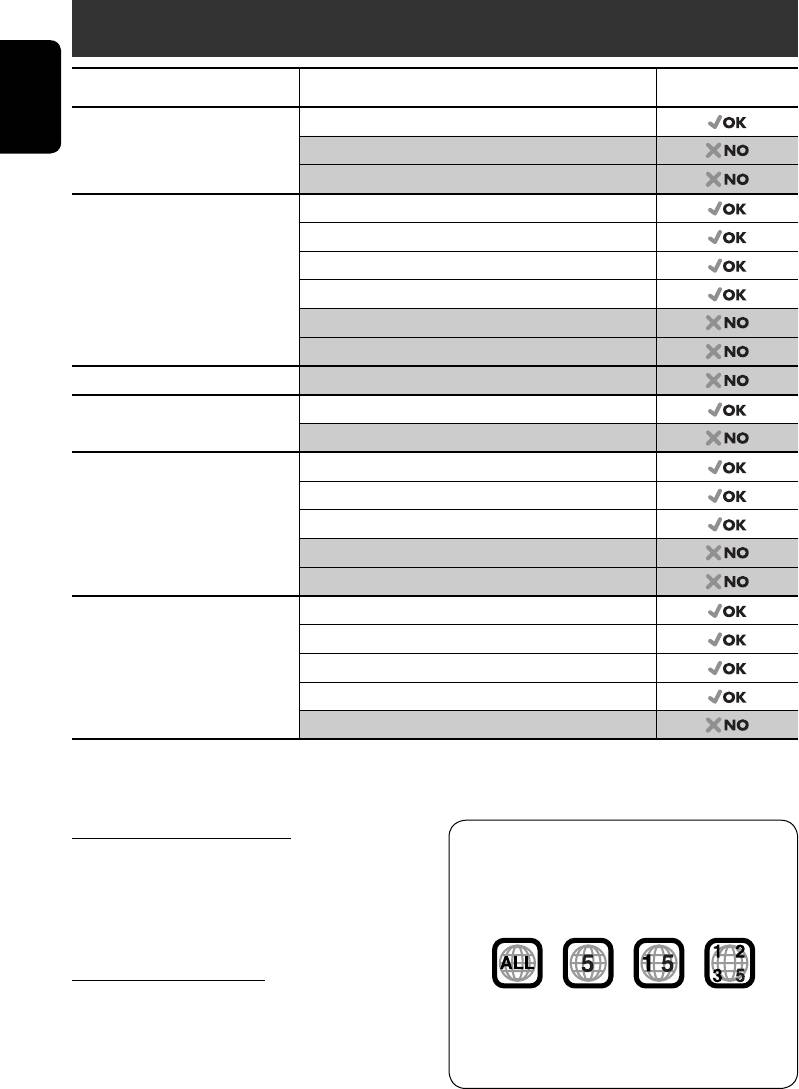
Disc type Recording format, file type, etc Playable
DVD DVD-Video
ENGLISH
DVD-Audio
DVD-ROM
DVD Recordable/Rewritable
DVD-Video
1
2
(DVD-R*
/-RW, +R/+RW*
)
DivX Video
MPEG-1/MPEG-2 Video
MP3/WMA/WAV
JPEG
DVD-VR, +VR
DVD-RAM All
Dual Disc DVD side
Non-DVD side
CD/VCD Audio CD (CD-DA), DTS-CD
VCD (Video CD)
CD-Text
CD-ROM
CD-I (CD-I Ready)
CD Recordable/Rewritable
CD-DA, DTS-CD
(CD-R/-RW)
DivX Video, VCD (Video CD)
• Compliant to ISO 9660 level 1,
MPEG-1/MPEG-2 Video
level 2, Romeo, Joliet
MP3/WMA/WAV
JPEG
1
*
DVD-R recorded in multi-border format is also playable (except for dual layer discs).
2
*
It is possible to play back finalized +R/+RW (Video mode only) discs. However, the use of +R double layer disc on this unit is not
recommended.
Caution for DualDisc playback
Note on Region Code:
The Non-DVD side of a “DualDisc” does not
DVD players and DVD-Video discs have
comply with the “Compact Disc Digital Audio”
their own Region Code numbers. This unit
standard. Therefore, the use of Non-DVD
can only play back DVD discs whose Region
side of a DualDisc on this product may not be
Code numbers include “5.”
recommended.
Caution on volume setting
Discs produce very little noise compared with
If you insert a DVD-Video disc of an
other sources. Lower the volume before playing
incorrect Region Code
a disc to avoid damaging the speakers by the
“REGION CODE ERROR!” appears on the
sudden increase of the output level.
monitor.
4
EN02-05_DV6207[EE]f.indd 4EN02-05_DV6207[EE]f.indd 4 12/22/05 8:00:36 PM12/22/05 8:00:36 PM
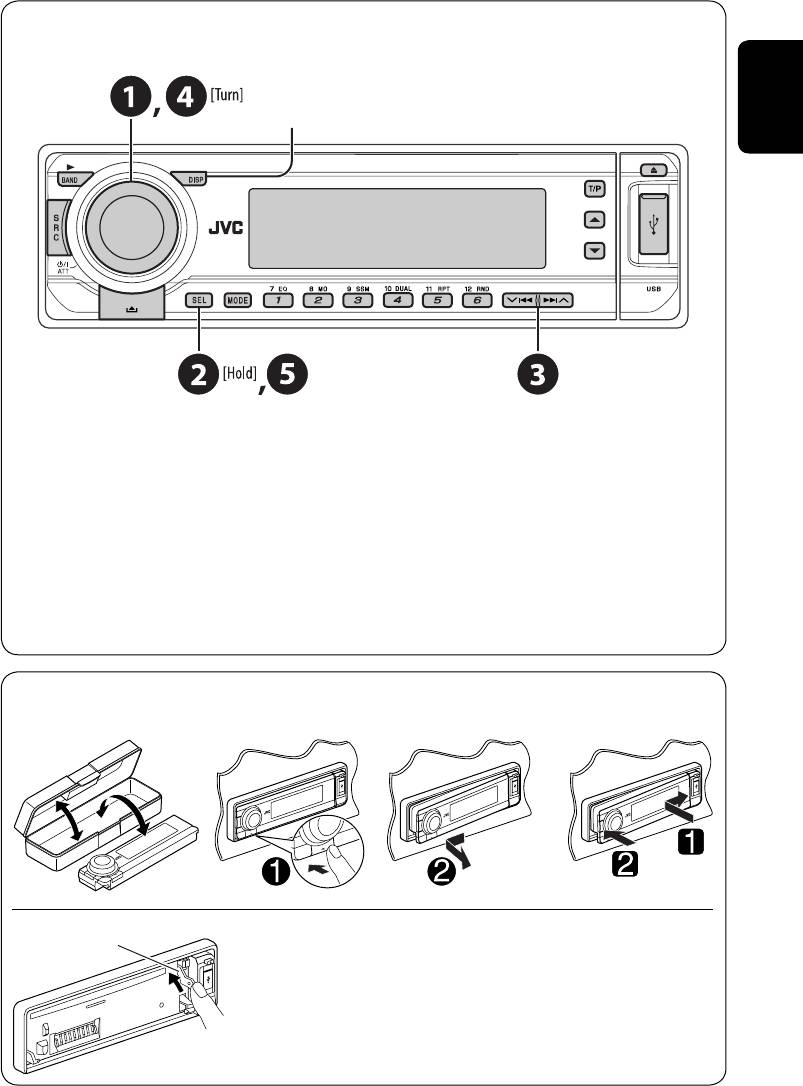
Before operating the unit — Cancel the display demonstration and set the clock
• See also page 29.
When the power is turned off: Check the current clock time
When the power is turned on: Change the display information
ENGLISH
~ Turn on the power.
Ÿ Enter the PSM settings.
! ] ⁄ Cancel the display demonstrations
Select “DEMO,” then “DEMO OFF.”
Set the clock
Select “CLOCK H” (hour), then adjust the hour.
Select “CLOCK M” (minute), then adjust the minute.
Select “24H/12H,” then “24H” (hour) or “12H” (hour).
@ Finish the procedure.
How to detach/attach the control panel
Detaching... Attaching...
Lever
CAUTION:
The lever comes out if you pressed the 0 button while the
panel is detached. If this happens, push the lever back into lock
position before attaching the panel.
5
EN02-05_DV6207[EE]f.indd 5EN02-05_DV6207[EE]f.indd 5 12/22/05 8:00:37 PM12/22/05 8:00:37 PM
Оглавление
- CONTENTS
- Introduction
- Basic operations — Control panel
- Basic operations — Remote controller (RM-RK230)
- Listening to the radio
- Searching for FM RDS programme — PTY search
- Disc operations
- Listening to the USB memory
- Listening to the CD changer
- Listening to the DAB tuner
- Listening to the iPod®/D. player
- Listening to the other external components
- Dual Zone operations
- Selecting a preset sound mode
- General settings — PSM
- Disc setup menu
- Assigning names to the sources
- Maintenance
- More about this unit
- Troubleshooting
- Specifications
- CОДЕРЖАНИЕ
- Введение
- Основные операции — Панель управления
- Основные операции — Пульт дистанционного управления (RM-RK230)
- Прослушивание радио
- Поиск программы FM RDS — поиск PTY
- Операции с дисками
- Прослушивание USB-памяти
- Прослушивание с устройства автоматической смены компакт-дисков
- Прослушивание тюнера DAB
- Прослушивание с проигрывателя iPod® или D.
- Прослушивание с других внешних устройств
- Операции в режиме “Dual Zone”
- Выбор запрограммированного режима звучания
- Общие настройки —
- Меню настройки диска
- Присвоение названий источникам звука
- Обслуживание
- Дополнительная информация о приемнике
- Устранение проблем
- Технические характеристики
- Please reset your unit


