JVC KD-DB711: ~
~ : JVC KD-DB711
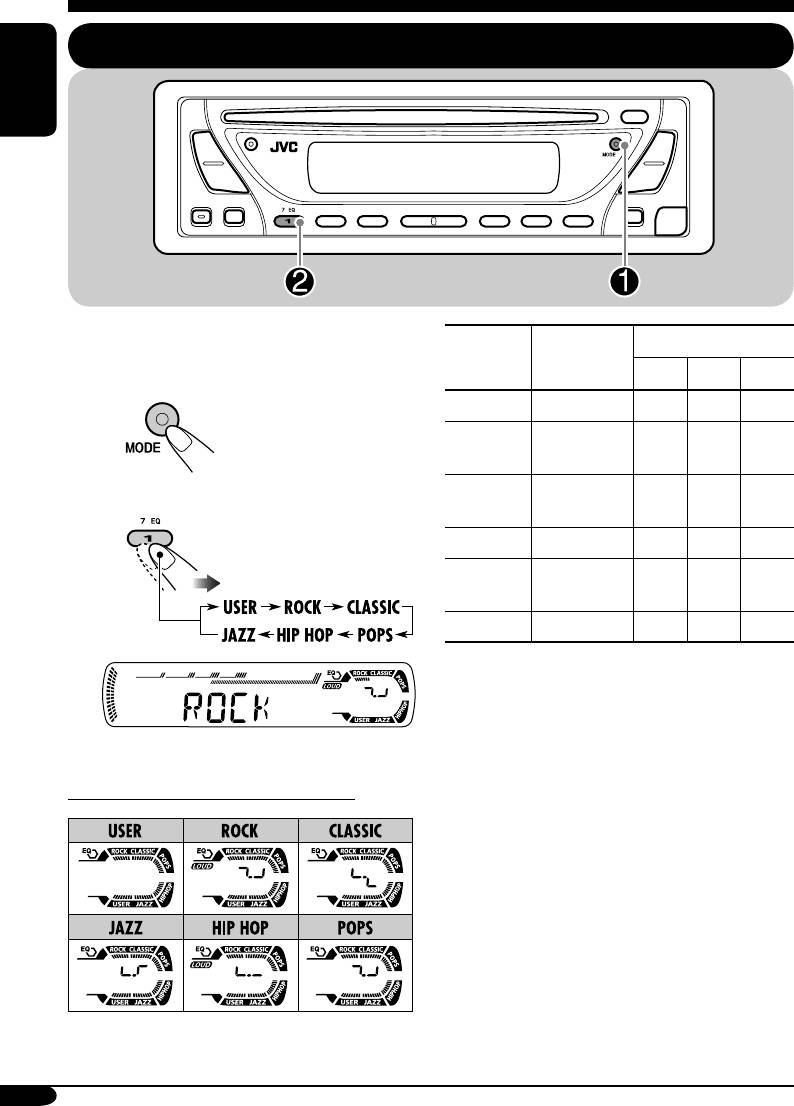
Sound adjustments
Selecting preset sound modes (C-EQ: custom equalizer)
ENGLISH
You can select a preset sound mode suitable to
Preset values
the music genre.
Indication For:
1
2
3
BAS
*
TRE
*
LOUD
*
USER
(Flat sound)
00 00 OFF
~
ROCK
Rock or
+03 +01 ON
disco music
CLASSIC
Classical
+01 –02 OFF
music
Ÿ
POPS
Light music
+04 +01 OFF
HIP HOP
Funk or rap
+02 00 ON
music
JAZZ
Jazz music
+02 +03 OFF
1
*
BAS: Bass
2
*
TRE: Treble
3
*
LOUD: Loudness
Ex.: When “ROCK” is selected
Indication pattern for each sound mode:
20
EN20-26_KD-DB711[EY]f.indd 20EN20-26_KD-DB711[EY]f.indd 20 1/13/05 1:12:14 PM1/13/05 1:12:14 PM
Indication To do: Range
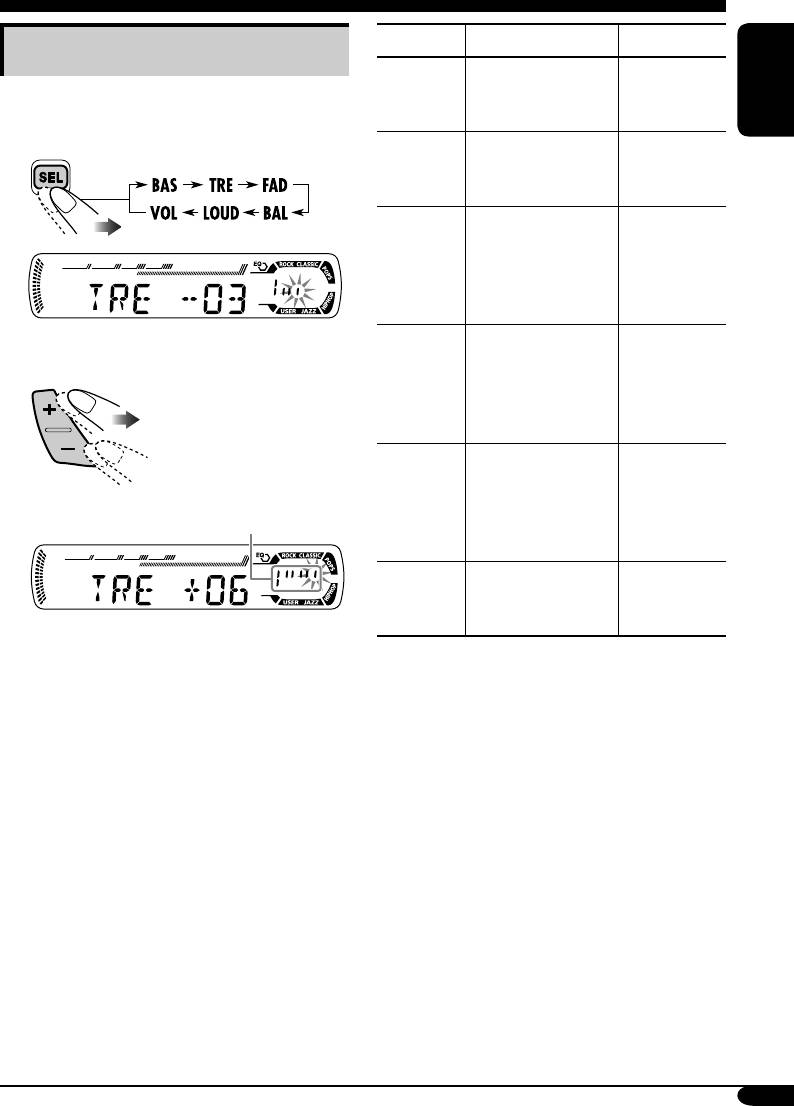
Adjusting the sound
1
BAS*
Adjust the bass. –06 (min.)
You can adjust the sound characteristics to your
(bass)
to
preference.
+06 (max.)
ENGLISH
1
TRE*
Adjust the treble. –06 (min.)
1
(treble)
to
+06 (max.)
2
FAD*
Adjust the front
R06 (Rear
(fader)
and rear speaker
only)
balance.
to
F06 (Front
only)
Ex.: When “TRE” is selected
BAL
Adjust the left
L06 (Left
(balance)
and right speaker
only)
balance.
to
2
R06 (Right
only)
1
LOUD*
Boost low and
LOUD ON
(loudness)
high frequencies
J
Indication pattern changes as
to produce a well-
LOUD OFF
you adjust the level.
balanced sound at
low volume level.
3
VOL*
Adjust the volume. 00 (min.) to
(volume)
30 or 50
4
(max.)*
1
*
When you adjust the bass, treble, or
loudness, the adjustment you have made is
stored for the currently selected sound mode
(C-EQ) including “USER.”
2
*
If you are using a two-speaker system, set
the fader level to “00.”
3
*
Normally the +/– buttons work as the volume
control. So you do not have to select “VOL”
to adjust the volume level.
4
*
Depending on the amplifier gain control
setting. (See page 24 for details.)
21
EN20-26_KD-DB711[EY]f.indd 21EN20-26_KD-DB711[EY]f.indd 21 1/13/05 1:12:15 PM1/13/05 1:12:15 PM
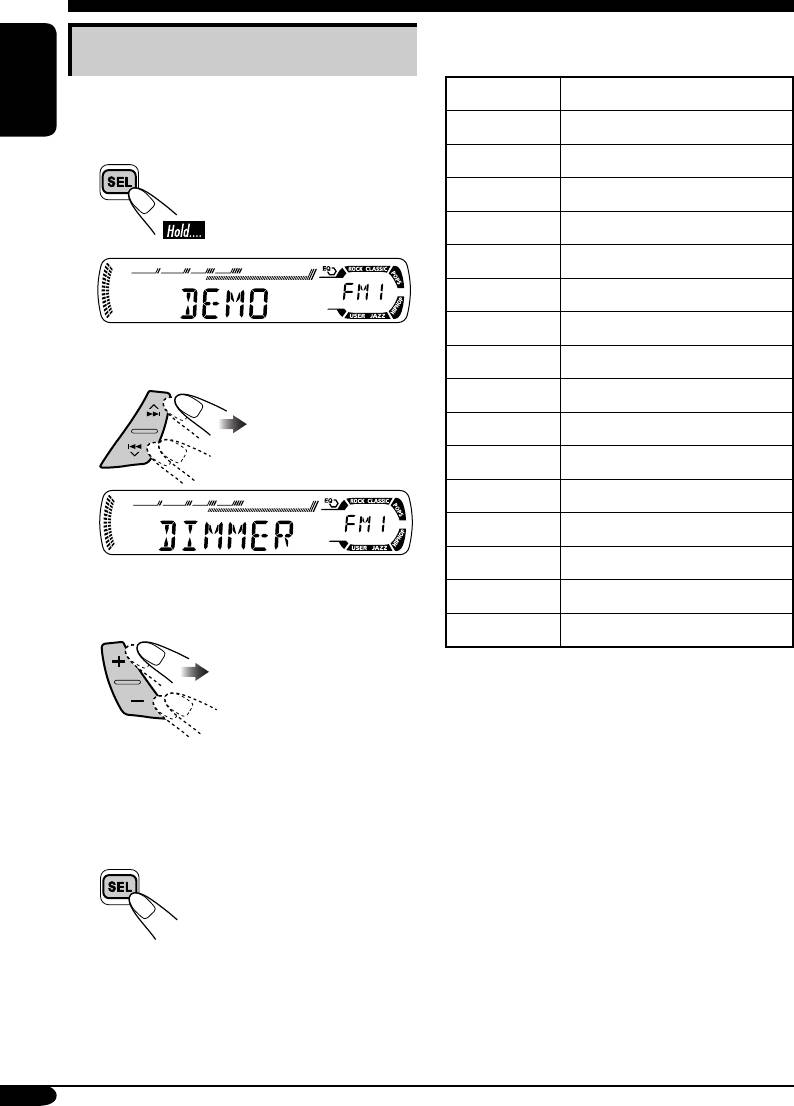
General settings — PSM
You can note your PSM setting in the table
Basic procedure
below.
You can change PSM (Preferred Setting Mode)
DEMO
items listed in the table that follows.
ENGLISH
CLOCK H
CLOCK M
1
24H/12H
CLK ADJ
AF-REG
PTY-STBY
TA VOL
P-SEARCH
2 Select a PSM item.
DAB AF
DAB VOL
DAB ANT
DIMMER
TEL
SCROLL
Ex.: When you select “DIMMER”
TAG DISP
3 Adjust the PSM item selected.
AMP GAIN
4 Repeat steps 2 and 3 to adjust the
other PSM items if necessary.
5 Finish the procedure.
22
EN20-26_KD-DB711[EY]f.indd 22EN20-26_KD-DB711[EY]f.indd 22 1/13/05 1:12:15 PM1/13/05 1:12:15 PM

Indications Selectable settings, [reference page]
DEMO
DEMO ON: [Initial]; Display demonstration will be activated
Display demonstration
automatically if no operation is done for about
20 seconds, [7].
ENGLISH
DEMO OFF: Cancels.
CLOCK H
0 – 23 (1 – 12), [7]
Hour adjustment
[Initial: 0 (0:00)]
CLOCK M
00 – 59, [7]
Minute adjustment
[Initial: 00 (0:00)]
24H/12H
12H O 24H, [7]
24 hours or 12 hours time
[Initial: 24H]
display
CLK ADJ
AUTO: [Initial]; The built-in clock is automatically adjusted
Clock adjustment
using the CT (clock time) data in the RDS signal.
OFF: Cancels.
AF-REG
When the received signals from the current station become weak...
Alternative frequency/
AF: [Initial]; Switches to another station (the programme
regionalization reception
may differ from the one currently received), [13].
• The AF indicator lights up.
AF REG: Switches to another station broadcasting the same
programme.
• The AF and REG indicators light up.
OFF: Cancels (not selectable when “DAB AF” is set to “AF
ON”).
PTY-STBY
Activates PTY Standby Reception with one of the 29 PTY codes,
PTY standby
[13].
OFF [Initial]
=
29 PTY codes, [11]
=
(back to the beginning)
TA VOL
[Initial: VOL 20]; VOL 00 – VOL 30 or 50*
Traffic announcement
* Depends on the amplifier gain control.
volume
P-SEARCH
ON: Using the AF data, the receiver tunes in to another
Programme search
frequency broadcasting the same programme as the
original preset RDS station is if the preset station
signals are not sufficient.
OFF: [Initial]; Cancels.
Continued...
23
EN20-26_KD-DB711[EY]f.indd 23EN20-26_KD-DB711[EY]f.indd 23 1/13/05 1:12:16 PM1/13/05 1:12:16 PM

Indications Selectable settings, [reference page]
DAB AF
AF ON:
[Initial];
Traces the programme among DAB services
Alternative frequency
and FM RDS stations, [15].
ENGLISH
reception
AF OFF: Cancels.
DAB VOL
You can adjust the volume level (VOL –12 — VOL +12) of DAB
DAB volume adjustment
tuner to match the FM sound level and store it in memory.
[Initial: VOL 00]
DAB ANT
You can allow this receiver to supply the power to the DAB aerial
DAB aerial
with the booster (not supplied).
ON:
When using the DAB aerial with the booster.
OFF: [Initial];
When using the DAB aerial without the booster.
DIMMER
ON: Activates dimmer.
Dimmer
OFF: [Initial]; Cancels.
TEL
MUTING 1/MUTING 2: Select either one which mutes the
Telephone muting
sounds while using the cellular phone.
OFF: [Initial]; Cancels.
SCROLL*
ONCE: [Initial]; Scrolls the disc information once.
Scroll
AUTO: Repeats scrolling (5-seconds interval in between).
OFF: Cancels.
• Pressing DISP for more than one second can scroll the display
regardless of the setting.
TAG DISP
TAG ON : [Initial]; Shows the ID3 tag while playing
Tag display
MP3/WMA tracks, [18].
TAG OFF: Cancels.
AMP GAIN
You can change the maximum volume level of this receiver.
Amplifier gain control
HIGH PWR: [Initial]; VOL 00 – VOL 50
LOW PWR: VOL 00 – VOL 30 (Select this if the maximum
power of the speaker is less than 50 W to prevent
them from damaging the speaker.)
*
Some characters or symbols will not be shown (and will be blanked) on the display.
(Ex. “ABCå!d#” ]“ABCA D ”.)
24
EN20-26_KD-DB711[EY]f.indd 24EN20-26_KD-DB711[EY]f.indd 24 1/13/05 1:12:16 PM1/13/05 1:12:16 PM
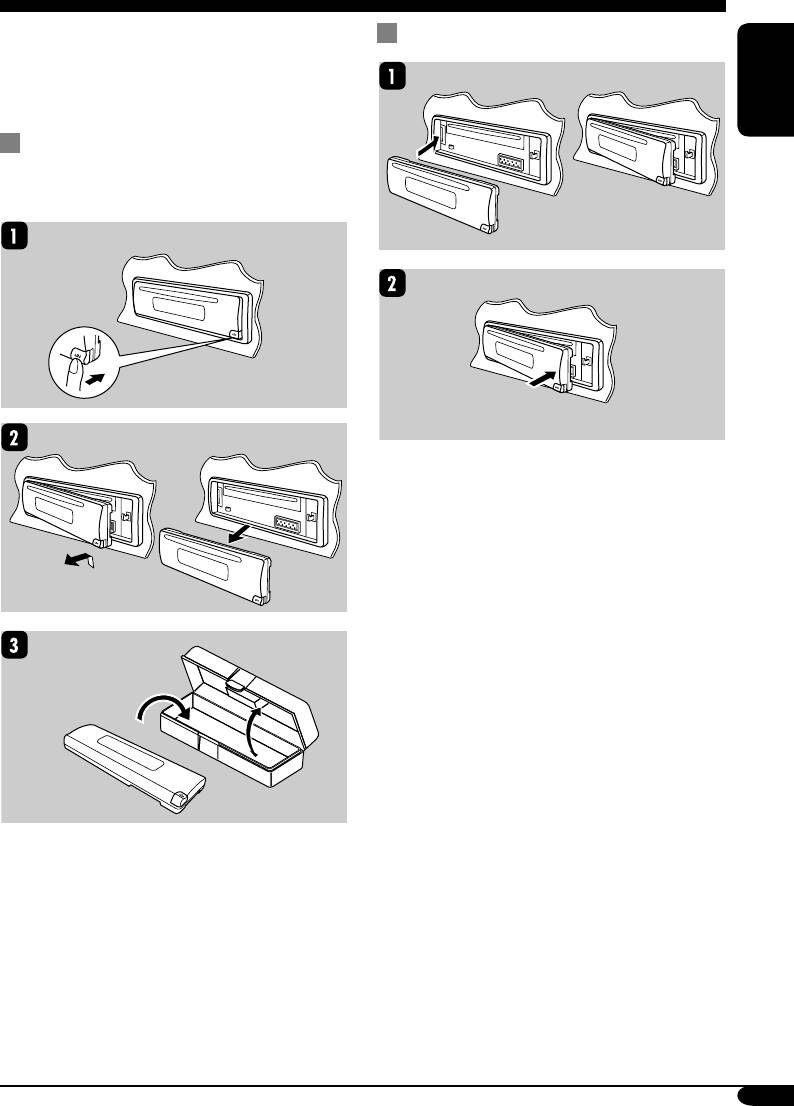
Detaching the control panel
When detaching or attaching the control panel,
Attaching the control panel
be careful not to damage the connectors on
the back of the control panel and on the panel
holder.
ENGLISH
Detaching the control panel
Before detaching the control panel, be sure to
turn off the power.
25
EN20-26_KD-DB711[EY]f.indd 25EN20-26_KD-DB711[EY]f.indd 25 1/13/05 1:12:17 PM1/13/05 1:12:17 PM
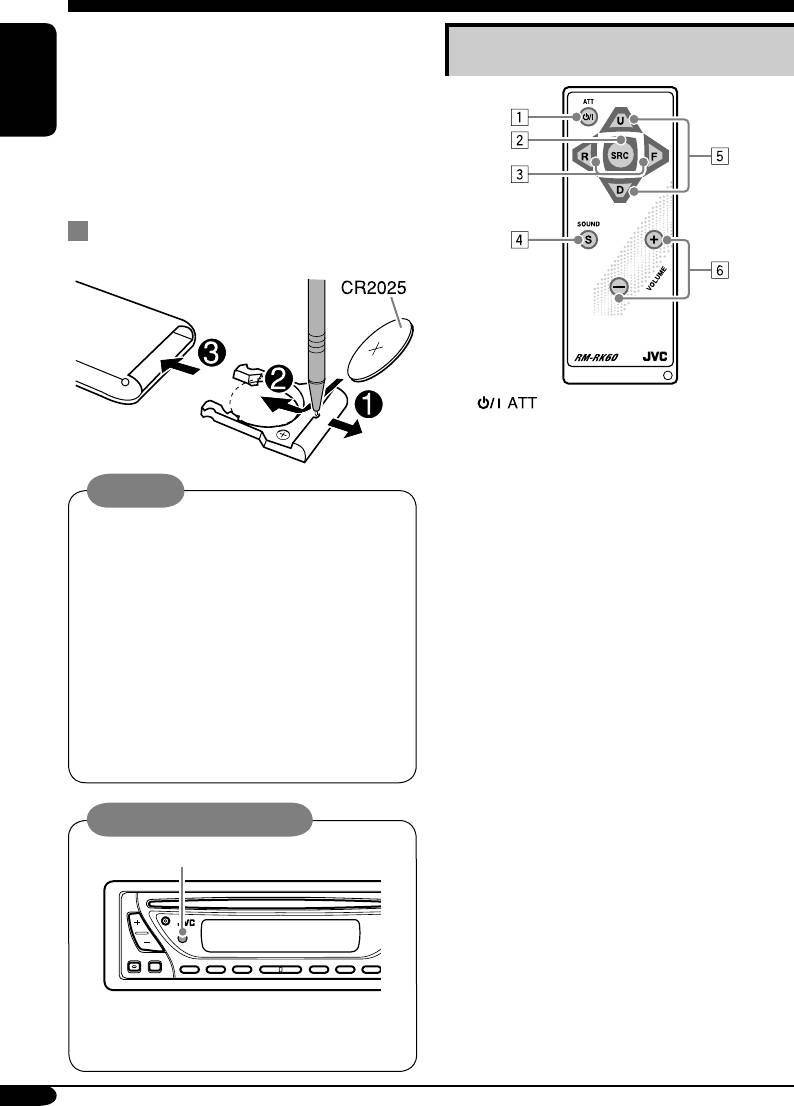
Using the remote controller — RM-RK60
This receiver can be remotely controlled as
instructed here (with an optionally purchased
Main elements and features
remote controller). We recommend that you use
remote controller RM-RK60 with your receiver.
ENGLISH
• When operating, aim the remote controller
directly at the remote sensor on the
receiver. Make sure there is no obstacle in
between.
Installing the lithium coin battery
(CR2025)
1 (standby/on attenuator) button
• Turns on and off the power and also
attenuates the sound.
2 SRC (source) button
Warning:
• Selects the source.
3 R (reverse) / F (forward) buttons
• Store the battery in a place where children
• Searches for stations or DAB services if
cannot reach to avoid risk of accident.
pressed briefly.
• To prevent the battery from over-heating,
• Searches for ensembles if pressed and
cracking, or starting a fire:
held.
– Do not recharge, short, disassemble, or
• Fast-forwards or reverses the track if
heat the battery or dispose of it in a fire.
pressed and held.
– Do not leave the battery with other
• Changes the tracks of the disc.
metallic materials.
4 SOUND button
– Do not poke the battery with tweezers or
• Selects the sound mode (C-EQ: custom
similar tools.
equalizer).
– Wrap the battery with tape and insulate
5 U (up) / D (down) buttons
when throwing away or saving it.
• U (up): Changes the FM/AM/DAB bands.
• D (down): Changes the preset stations or
Caution on remote sensor:
DAB services.
• Changes the folder of the MP3/WMA
Remote sensor
discs.
6 VOLUME +/– buttons
• Adjusts the volume level.
The receiver is equipped with the steering
• DO NOT expose the remote sensor to
wheel remote control function.
strong light (direct sunlight or artificial
• See the Installation/Connection Manual
lighting).
(separate volume) for connection.
26
EN20-26_KD-DB711[EY]f.indd 26EN20-26_KD-DB711[EY]f.indd 26 1/13/05 1:12:17 PM1/13/05 1:12:17 PM
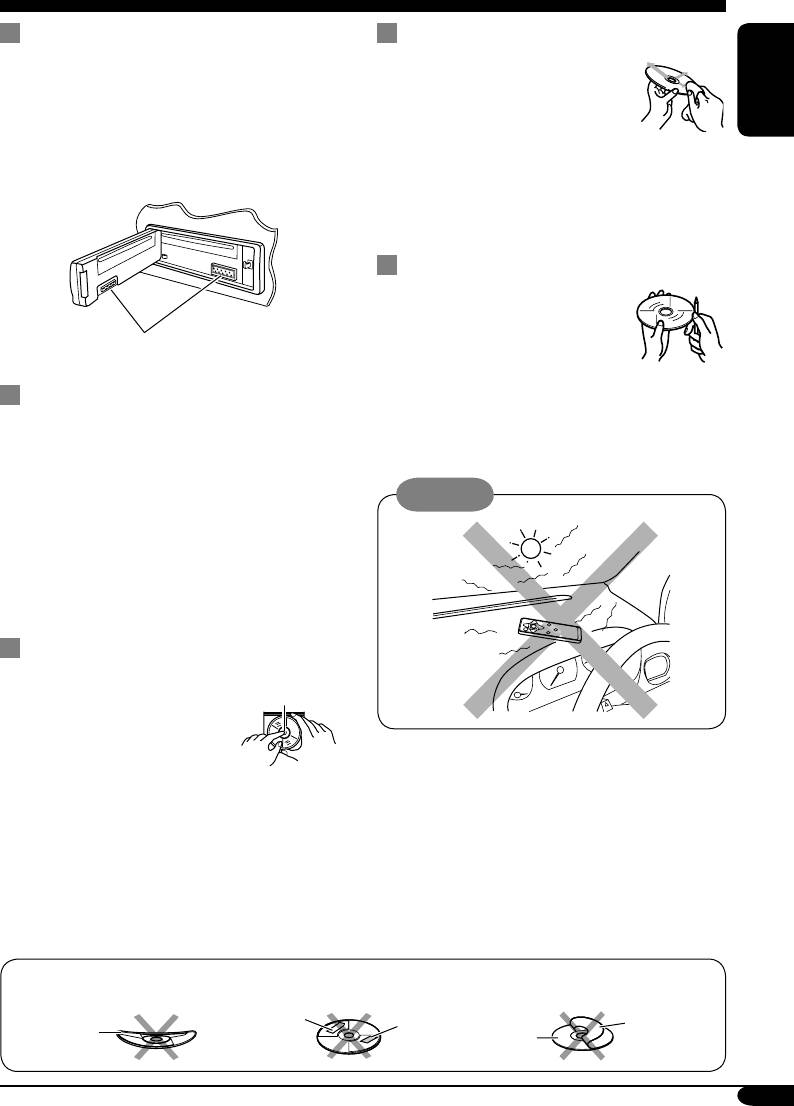
Maintenance
How to clean the connectors
To keep discs clean
Frequent detachment will deteriorate the
A dirty disc may not play correctly.
connectors.
If a disc does become dirty, wipe
To minimize this possibility, periodically wipe
it with a soft cloth in a straight line
ENGLISH
the connectors with a cotton swab or cloth
from center to edge.
moistened with alcohol, being careful not to
• Do not use any solvent (for example,
damage the connectors.
conventional record cleaner, spray, thinner,
benzine, etc.) to clean discs.
To play new discs
New discs may have some rough
spots around the inner and outer
edges. If such a disc is used, this
Connector
receiver may reject the disc.
To remove these rough spots, rub the edges
Moisture condensation
with a pencil or ball-point pen, etc.
Moisture may condense on the lens inside the
CD player in the following cases:
• After starting the heater in the car.
• If it becomes very humid inside the car.
Caution:
Should this occur, the CD player may
malfunction. In this case, eject the disc and
leave the receiver turned on for a few hours
until the moisture evaporates.
How to handle discs
When removing a disc from
Center holder
its case, press down the center
holder of the case and lift the
disc out, holding it by the
edges.
• Always hold the disc by the edges. Do not
touch its recording surface.
When storing a disc into its case, gently insert
the disc around the center holder (with the
printed surface facing up).
• Make sure to store discs into the cases after
use.
Do not use the following discs:
Sticker
Sticker
Stick-on
Warped
residue
Disc
label
disc
27
EN27-33_KD-DB711[EY]f.indd 27EN27-33_KD-DB711[EY]f.indd 27 1/13/05 1:12:40 PM1/13/05 1:12:40 PM

More about this receiver
Basic operations
FM RDS operations
• If you want to know more about RDS, visit
Turning on the power
«http://www.rds.org.uk».
• By pressing SOURCE on the receiver, you
• Network-Tracking Reception requires two
can also turn on the power.
ENGLISH
types of RDS signals—PI (Programme
Identification) and AF (Alternative
Turning off the power
Frequency) to work correctly. Without
• If you turn off the power while listening to a
receiving these data correctly, Network-
disc, disc play will start from where playback
Tracking Reception will not operate.
has been stopped previously, next time you
• If a Traffic Announcement is received, the
turn on the power.
volume level (TA Volume) automatically
changes to the preset level.
Selecting the sources
• If Alternative Frequency Reception for DAB
services (DAB AF) is activated, Network-
• When no disc is loaded in the receiver, “CD”
Tracking Reception (AF-REG) is also
cannot be selected.
activated automatically. On the other hand,
Network-Tracking Reception cannot be
Radio operations
deactivated without deactivating Alternative
Storing stations in memory
Frequency Reception.
• During SSM search...
– All previously stored stations are erased and
DAB tuner operations
stations are stored newly.
General
– Received stations are preset in No. 1 (lowest
• Only primary DAB services can be presetted
frequency) to No. 6 (highest frequency).
even you store a secondary service.
– When SSM is over, the station stored in
• A previously preset DAB service is erased
No. 1 will be automatically tuned in.
when a new DAB service is stored in the
• When storing a station manually, a previously
same preset number.
preset station is erased when a new station is
• “NO TEXT” will be shown for the service
stored in the same preset number.
without DLS if you press and hold DISP.
28
EN27-33_KD-DB711[EY]f.indd 28EN27-33_KD-DB711[EY]f.indd 28 1/13/05 1:12:41 PM1/13/05 1:12:41 PM

Disc operations
Playing a CD-R or CD-RW
• Use only “finalized” CD-Rs or CD-RWs.
Caution for DualDisc playback
• This receiver can play back only the files of
• The Non-DVD side of a “DualDisc” does
the same type which is first detected if a disc
not comply with the “Compact Disc Digital
ENGLISH
includes both audio CD (CD-DA) files and
Audio” standard. Therefore, the use of Non-
MP3/WMA files.
DVD side of a DualDisc on this product may
• This receiver can play back multi-session
not be recommended.
discs; however, unclosed sessions will be
skipped while playing.
General
• Some CD-Rs or CD-RWs may not play
• This receiver has been designed to reproduce
back on this receiver because of their disc
CDs/CD Texts, and CD-Rs (Recordable)/
characteristics, and for the following causes:
CD-RWs (Rewritable) in audio CD (CD-DA),
– Discs are dirty or scratched.
MP3 and WMA format.
– Moisture condensation occurs on the lens
• When a disc has been loaded, selecting “CD”
inside the receiver.
for the playback source starts disc play.
– The pickup lens inside the receiver is dirty.
– CD-R/CD-RW on which the files are
Inserting a disc
written with “Packet Write” method.
– There are improper recording conditions
• When a disc is inserted upside down, the disc
(missing data, etc.) or media conditions
automatically ejects.
(stain, scratch, warp, etc.).
• Do not insert 8 cm discs (single CD) and
• CD-RWs may require a longer readout time
unusual shape discs (heart, flower, etc.) into
since the reflectance of CD-RWs is lower
the loading slot.
than that of regular CDs.
• Do not use the following CD-Rs or CD-RWs:
Playing a disc
– Discs with stickers, labels, or protective seal
• While fast-forwarding or reversing on an MP3
stuck to the surface.
or WMA disc, you can only hear intermittent
– Discs on which labels can be directly
sounds.
printed by an ink jet printer.
Using these discs under high temperatures or
high humidities may cause malfunctions or
damages to discs.
29
EN27-33_KD-DB711[EY]f.indd 29EN27-33_KD-DB711[EY]f.indd 29 1/13/05 1:12:41 PM1/13/05 1:12:41 PM

Playing an MP3/WMA disc
• This receiver cannot play back the following
files:
• This receiver can play back MP3/WMA files
– MP3 files encoded with MP3i and MP3
with the extension code <.mp3> or <.wma>
PRO format.
(regardless of the letter case—upper/lower).
ENGLISH
– MP3 files encoded in an unappropriated
• This receiver can show the names of albums,
format.
artists (performer), and ID3 Tag (Version 1.0,
– MP3 files encoded with Layer 1/2.
1.1, 2.2, 2.3, or 2.4) for MP3 files and for
– WMA files encoded with lossless,
WMA files.
professional, and voice format.
• This receiver can handle only one-byte
– WMA files which are not based upon
characters. No other characters can be
®
Windows Media
Audio.
correctly displayed.
– WMA files copy-protected with DRM.
• This receiver can play back MP3/WMA files
– Files which have the data such as WAVE,
meeting the conditions below:
ATRAC3, etc.
– Bit rate: 8 kbps — 320 kbps
• The search function works but search speed is
– Sampling frequency:
not constant.
48 kHz, 44.1 kHz, 32 kHz (for MPEG-1)
24 kHz, 22.05 kHz, 16 kHz (for MPEG-2)
Changing the source
48 kHz, 44.1 kHz, 32 kHz (for WMA)
– Disc format: ISO 9660 Level 1/ Level 2,
• If you change the source, playback also stops
Romeo, Joliet, Windows long file name
(without ejecting the disc).
• The maximum number of characters for file/
Next time you select “CD” for the playback
folder names vary among the disc format used
source, disc play starts from where it has been
(includes 4 extension characters—<.mp3> or
stopped previously.
<.wma>).
– ISO 9660 Level 1: up to 12 characters
Ejecting a disc
– ISO 9660 Level 2: up to 31 characters
• If the ejected disc is not removed within
– Romeo*: up to 128 (72) characters
15 seconds, the disc is automatically inserted
– Joliet*: up to 64 (36) characters
again into the loading slot to prevent it from
– Windows long file name*: up to 128 (72)
dust. (Disc will not play this time.)
characters
* The parenthetic figure is the maximum
General settings—PSM
number of characters for file/folder names
in case the total number of files and folders
• If you change the “AMP GAIN” setting from
is 313 or more.
“HIGH PWR” to “LOW PWR” while the
• This receiver can recognize the total of 512
volume level is set higher than “VOL 30,” the
files, of 200 folders, and of 8 hierarchies.
receiver automatically changes the volume
• This receiver can play back the files recorded
level to “VOL 30.”
in VBR (variable bit rate).
The files recorded in VBR have a discrepancy
in elapsed time display, and do not show
the actual elapsed time. Especially, after
performing the search function, this difference
becomes noticeable.
30
EN27-33_KD-DB711[EY]f.indd 30EN27-33_KD-DB711[EY]f.indd 30 1/13/05 1:12:41 PM1/13/05 1:12:41 PM

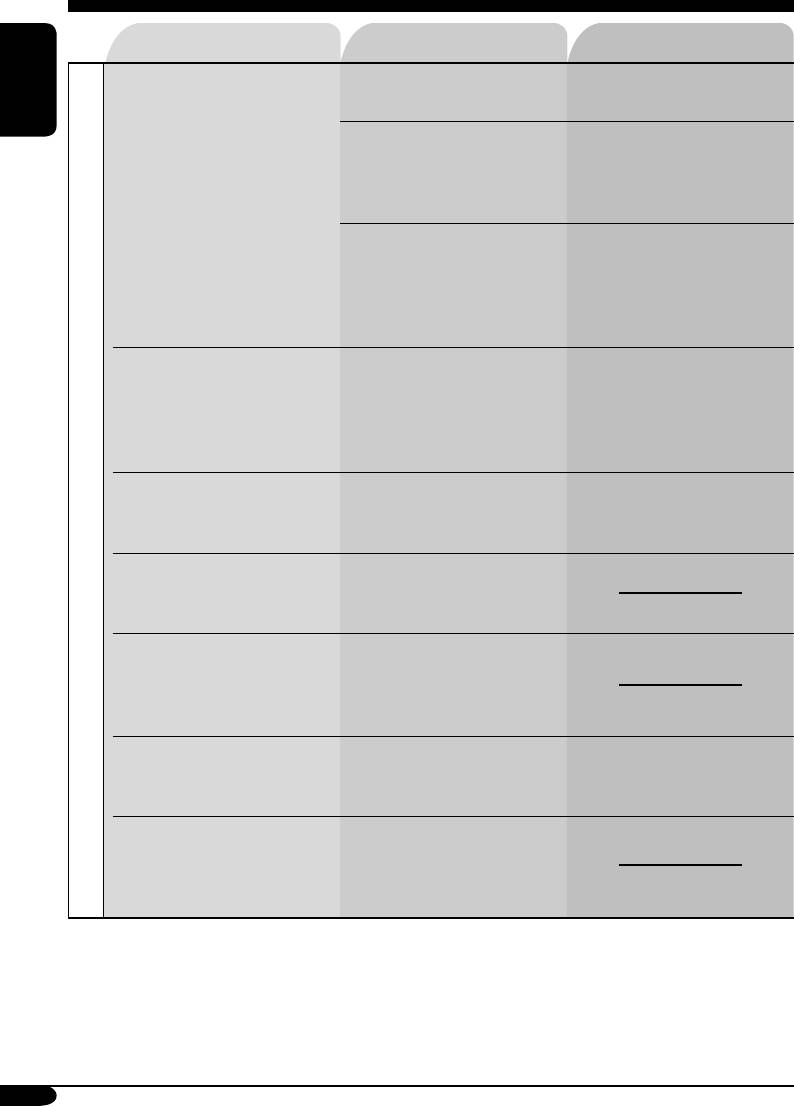
Troubleshooting
What appears to be trouble is not always serious. Check the following points before calling a service
center.
Symptoms Causes Remedies
ENGLISH
• Sound cannot be heard
The volume level is set to
Adjust it to the optimum
from the speakers.
the minimum level.
level.
Connections are incorrect.
Check the cords and
connections.
General
• The receiver does not
The built-in microcomputer
Reset the receiver (see page
work at all.
may have functioned
2).
incorrectly due to noise, etc.
• SSM automatic presetting
Signals are too weak.
Store stations manually.
does not work.
FM/AM
• Static noise while listening
The aerial is not connected
Connect the aerial firmly.
to the radio.
firmly.
• Disc automatically ejects.
Disc is inserted upside
Insert the disc correctly.
down.
• CD-R/CD-RW cannot be
CD-R/CD-RW is not
• Insert a finalized CD-R/
played back.
finalized.
CD-RW.
• Tracks on the CD-R/
• Finalize the CD-R/
CD-RW cannot be
CD-RW with the
skipped.
component which you
used for recording.
• Disc can be neither played
Disc is locked.
Unlock the disc (see page
back nor ejected.
17).
Disc playback
The CD player may have
Eject the disc forcibly (see
functioned incorrectly.
page 2).
• Disc sound is sometimes
You are driving on rough
Stop playback while driving
interrupted.
roads.
on rough roads.
Disc is scratched.
Change the disc.
Connections are incorrect.
Check the cords and
connections.
31
EN27-33_KD-DB711[EY]f.indd 31EN27-33_KD-DB711[EY]f.indd 31 1/13/05 1:12:42 PM1/13/05 1:12:42 PM
Symptoms Causes Remedies
• Disc cannot be played
No MP3/WMA tracks are
Change the disc.
back.
recorded on the disc.
ENGLISH
MP3/WMA tracks do not
Add the extension code
have the extension code
<.mp3> or <.wma> to their
<.mp3> or <.wma> in their
file names.
file names.
MP3/WMA tracks are not
Change the disc.
recorded in the format
(Record MP3/WMA
compliant with ISO 9660
tracks using a compliant
Level 1, Level 2, Romeo, or
application.)
Joliet.
• Noise is generated. The track played back
Skip to another track or
is not an MP3/WMA
change the disc. (Do not add
track (although it has the
the extension code <.mp3>
extension code <.mp3> or
or <.wma> to non-MP3 or
<.wma>).
WMA tracks.)
• A longer readout time is
Readout time varies due to
Do not use too many
required (“CHECK” keeps
the complexity of the folder/
hierarchies and folders.
flashing on the display).
file configuration.
MP3/WMA playback
• Tracks cannot be played
Playback order is determined
back as you have intended
when the files are recorded.
them to play.
• Elapsed playing time is not
This sometimes occurs
correct.
during play. This is caused
by how the tracks are
recorded on the disc.
• “NO FILES” appears on
The current disc does not
Insert a disc that contains
the display.
contain any MP3/WMA
MP3/WMA tracks.
tracks.
• Correct characters are
This receiver can only
not displayed (e.g. album
display alphabets (capital:
name).
A – Z), numbers, and a
limited number of symbols.
32
EN27-33_KD-DB711[EY]f.indd 32EN27-33_KD-DB711[EY]f.indd 32 1/13/05 1:12:42 PM1/13/05 1:12:42 PM

Specifications
AUDIO AMPLIFIER SECTION
CD PLAYER SECTION
Maximum Power Output:
Type: Compact disc player
Front: 50 W per channel
Signal Detection System: Non-contact optical
Rear: 50 W per channel
pickup (semiconductor laser)
ENGLISH
Continuous Power Output (RMS):
Number of Channels: 2 channels (stereo)
Front: 19 W per channel into 4 Ω, 40 Hz
Frequency Response: 5 Hz to 20 000 Hz
to 20 000 Hz at no more than 0.8%
Dynamic Range: 96 dB
total harmonic distortion.
Signal-to-Noise Ratio: 98 dB
Rear: 19 W per channel into 4 Ω, 40 Hz
Wow and Flutter: Less than measurable limit
to 20 000 Hz at no more than 0.8%
MP3 Decoding Format:
total harmonic distortion.
MPEG1/2 Audio Layer 3
Load Impedance: 4 Ω (4 Ω to 8 Ω allowance)
Max. Bit Rate: 320 kbps
®
Tone Control Range:
WMA (Windows Media
Audio) Decoding
Bass: ±10 dB at 100 Hz
Format:
Treble: ±10 dB at 10 kHz
Max. Bit Rate: 192 kbps
Frequency Response: 40 Hz to 20 000 Hz
Signal-to-Noise Ratio: 70 dB
Line-Out Level/Impedance:
GENERAL
2 V/20 kΩ load (full scale)
Power Requirement:
Output Impedance: 1 kΩ
Operating Voltage:
Other Terminal: Steering wheel remote input
DC 14.4 V (11 V to 16 V allowance)
Grounding System: Negative ground
TUNER SECTION
Allowable Operating Temperature:
Frequency Range:
0°C to +40°C
FM: 87.5 MHz to 108.0 MHz
Dimensions (W × H × D):
AM: (MW) 522 kHz to 1 620 kHz
Installation Size (approx.):
(LW) 144 kHz to 279 kHz
182 mm × 52 mm × 150 mm
Panel Size (approx.):
[FM Tuner]
188 mm × 58 mm × 11 mm
Usable Sensitivity: 11.2 dBf (1.0 µV/75 Ω)
Mass (approx.):
50 dB Quieting Sensitivity:
1.4 kg (excluding accessories)
16.3 dBf (1.8 µV/75 Ω)
Alternate Channel Selectivity (400 kHz): 65 dB
Frequency Response: 40 Hz to 15 000 Hz
Stereo Separation: 30 dB
Design and specifications are subject to change
Capture Ratio: 1.5 dB
without notice.
[MW Tuner]
Sensitivity: 20 µV
Selectivity: 35 dB
[LW Tuner]
Sensitivity: 50 µV
• Microsoft and Windows Media are either
[DAB Tuner]
registered trademarks or trademarks of
Sensitivity: (Band III) −98 dBm
Microsoft Corporation in the United States
(L-Band) −96 dBm
and/or other countries.
Selectivity: 40 dB
33
EN27-33_KD-DB711[EY]f.indd 33EN27-33_KD-DB711[EY]f.indd 33 1/13/05 1:12:42 PM1/13/05 1:12:42 PM
Wir danken Ihnen für den Kauf eines JVC Produkts.
Bitte lesen Sie die Anleitung vollständig durch, bevor Sie das Gerät in Betrieb nehmen, um
sicherzustellen, daß Sie alles vollständig verstehen und die bestmögliche Leistung des Geräts
erhalten.
WICHTIG FÜR LASER-PRODUKTE
1. LASER-PRODUKT DER KLASSE 1
2. ACHTUNG:
Die obere Abdeckung nicht öffnen. Das Gerät enthält keine Teile, die vom Benutzer
gewartet werden können. Wartungen nur von qualifziertem Fachpersonal durchführen lassen.
DEUTSCH
3. ACHTUNG: Sichtbare und unsichtbare Laserstrahlung bei offenem Gerät und Defekt oder
Umgehen der Verriegelung. Setzen Sie sich dem Strahl nicht direkt aus.
4. ANBRINGEN DES ETIKETTS: WARNHINWEIS-ETIKETT, AUSSEN AM GERÄT
ANGEBRACHT.
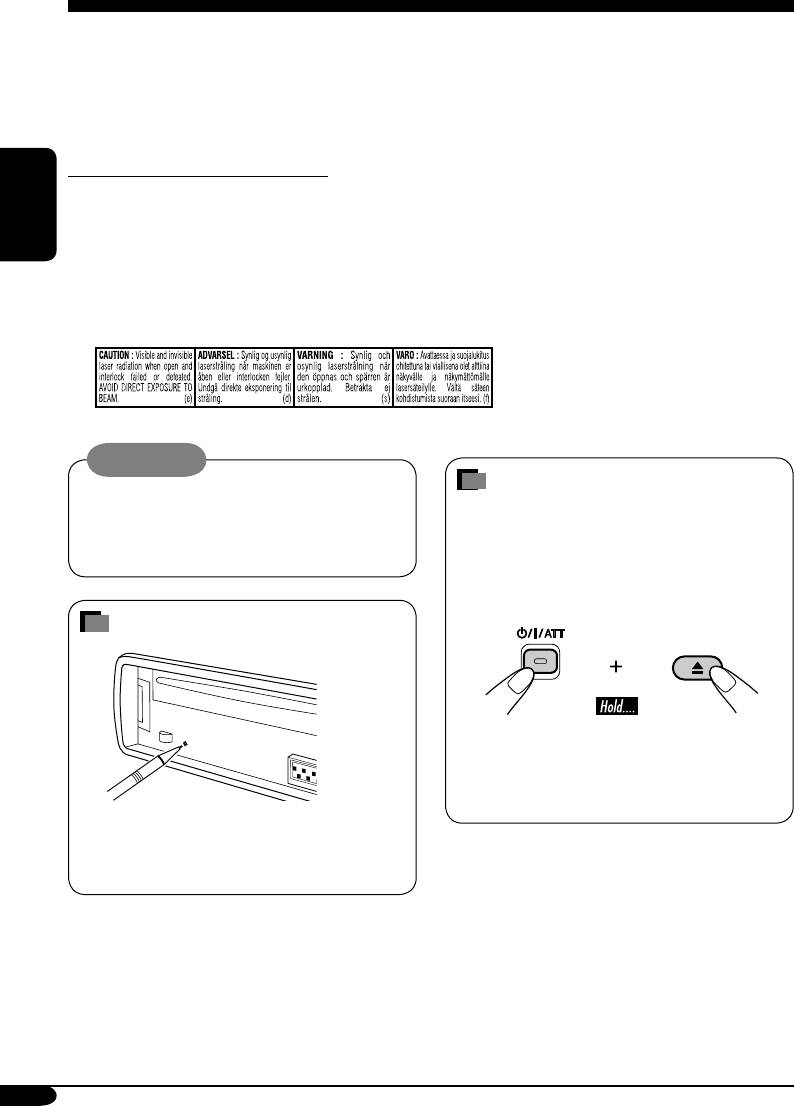
Warnung:
Zwangsweises Ausschieben
Wenn Sie den Receiver beim Fahren
bedienen müssen, dürfen Sie nicht den Blick
einer Disk
von der Straße nehmen, da sonst die Gefahr
Wenn eine Disk vom Receiver nicht erkannt
von Verkehrsunfällen besteht.
wird oder nicht ausgeschoben kann, können
Sie zwangsweisen Ausschub wie folgt
ausführen.
Zurücksetzen des Geräts
• Wenn das nicht funktioniert, führen Sie
einen Reset am Receiver aus.
• Achten Sie darauf, die ausgeschobene Disk
nicht fallen zu lassen.
Dadurch wird der Mikrocomputer
zurückgesetzt. Ihre vorgegebenen
Einstellungen werden ebenfalls gelöscht.
Aus Sicherheitsgründen wird eine nummerierte ID-Karte mit diesem Receiver mitgeliefert, und die
gleiche ID-Nummer ist auf dem Chassis des Receivers aufgedruckt. Die Karte muss an sicherer
Stelle aufbewahrt werden, da sie den Behörden bei der Identifikation des Receivers im Falle eines
Diebstahls helfen kann.
2
GE02-05_KD-DB711[E]3.indd 2GE02-05_KD-DB711[E]3.indd 2 2005.1.12 6:23:44 PM2005.1.12 6:23:44 PM

Inhalt
Zurücksetzen des Geräts ........................ 2
Bedienung der Disk ................ 16
Zwangsweises Ausschieben einer Disk
... 2
Wiedergabe einer Disk ........................ 16
Wie Sie diese Anleitung lesen ............... 4
Ändern der Displayinformation ............. 18
Wie Sie die MODE-Taste verwenden ... 4
Auswählen von Wiedergabemodi .......... 19
Bedienfeld — KD-DB711 ............ 5
Klangeinstellungen ................ 20
Beschreibung der Teile .......................... 5
Wählen der vorgegebenen Klangmodi
(C-EQ: Spezieller Equalizer) .............. 20
Erste Schritte .......................... 6
Einstellen des Klangs ............................. 21
Grundlegende Bedienung ...................... 6
Abbrechen der
Allgemeine Einstellungen
DEUTSCH
Display-Demonstrationen .................. 7
— PSM ................................. 22
Einstellung der Uhr ................................ 7
Grundlegendes Verfahren ...................... 22
Bedienung des Tuners ............ 8
Abnehmen des Bedienfelds .... 25
Rundfunkempfang ............................... 8
Speichern von Sendern .......................... 9
Verwenden der Fernbedienung
Hören eines Festsenders ........................ 10
— RM-RK60 ............................ 26
Hauptelemente und Merkmale ............... 26
UKW-RDS-Funktionen ............. 11
Suche nach bevorzugten UKW-RDS
Wartung ................................ 27
-Sendungen
....................................... 11
Speichern Ihrer Lieblingsprogramme .... 12
Weitere Informationen zu Ihrem
Verwenden des Standbyempfangs ......... 12
Receiver .............................. 28
Verfolgen des gleichen Programms
—Network-Tracking-Empfang ......... 13
Störungssuche ........................ 31
Bedienung des DAB-Tuners
......... 14
Technische Daten ................... 33
DAB-Tuner-Empfang ............................ 14
Speichern von DAB-Diensten ............... 15
Abstimmen eines vorgewählten DAB-
Dienstes .............................................. 15
Verfolgen des gleichen Programms
—Alternativfrequenz-Empfang
.......... 15
Andere DAB-Hauptmerkmale ............... 15
*Für die Sicherheit....
*Temperatur im Auto....
• Die Lautstärke nicht zu laut stellen, da
Wenn Sie das Auto für lange Zeit in heißem
dadurch Außengeräusche überdeckt und das
oder kaltem Wetter parken, bitte warten, bis
Autofahren gefährlich wird.
sich die Temperatur im Auto sich normalisiert
• Das Auto vor dem Durchführen von
hat, bevor Sie das Gerät einschalten.
komplizierten Bedienschritten anhalten.
3
GE02-05_KD-DB711[E]3.indd 3GE02-05_KD-DB711[E]3.indd 3 2005.1.12 6:23:45 PM2005.1.12 6:23:45 PM
Wie Sie diese Anleitung lesen
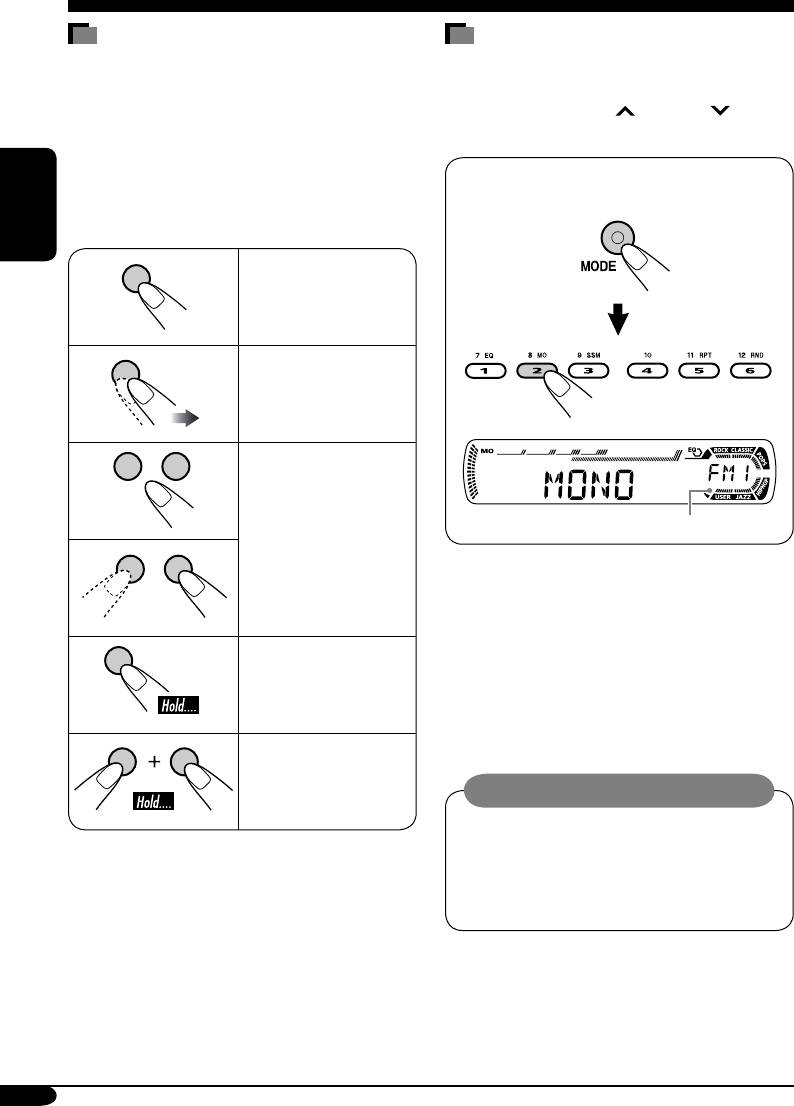
Wie Sie die MODE-Taste verwenden
Die folgenden Methoden werden eingesetzt, um
Wenn Sie MODE drücken, schaltet der
die Erklärungen einfach und leichtverständlich
Receiver auf Funktion-Modus, und die
zu gestalten:
Zifferntasten sowie die
¢/4 Tasten
• Einige zugehörige Tipps und Hinweise
arbeiten als andere Funktionstasten.
werden unter „Weitere Informationen zu
Ihrem Receiver“ gegeben (siehe Seite 28−30).
Beisp.: Wenn die Zifferntaste 2 als
• Tastenfunktionen werden im Wesentlichen
MO (Mono)-Taste fungiert.
mit den folgenden Abbildungen erläutert:
DEUTSCH
Kurz drücken.
Wiederholt drücken.
Zeit-Countdown-Anzeige
Eine davon drücken.
Um diese Tasten wieder für die
ursprünglichen Funktionen zu verwenden,
nachdem MODE gedrückt wurde, warten Sie
5 Sekunden, ohne eine dieser Tasten zu
drücken, bis der Funktion-Modus wieder
Gedrückt halten,
aufgehoben ist.
bis die gewünschte
• Durch erneutes Drücken von MODE wird der
Reaktion beginnt.
Funktion-Modus ebenfalls aufgehoben.
Halten Sie die beide
Tasten gleichzeitig
Achtung bei der Lautstärkeeinstellung:
gedrückt.
Disks erzeugen im Vergleich zu anderen
Tonträgern sehr wenig Rauschen. Senken
Sie die Lautstärke vor dem Abspielen einer
Disk, um Beschädigung der Lautsprecher
durch plötzliche Tonspitzen zu vermeiden.
4
GE02-05_KD-DB711[E]3.indd 4GE02-05_KD-DB711[E]3.indd 4 2005.1.12 6:23:45 PM2005.1.12 6:23:45 PM
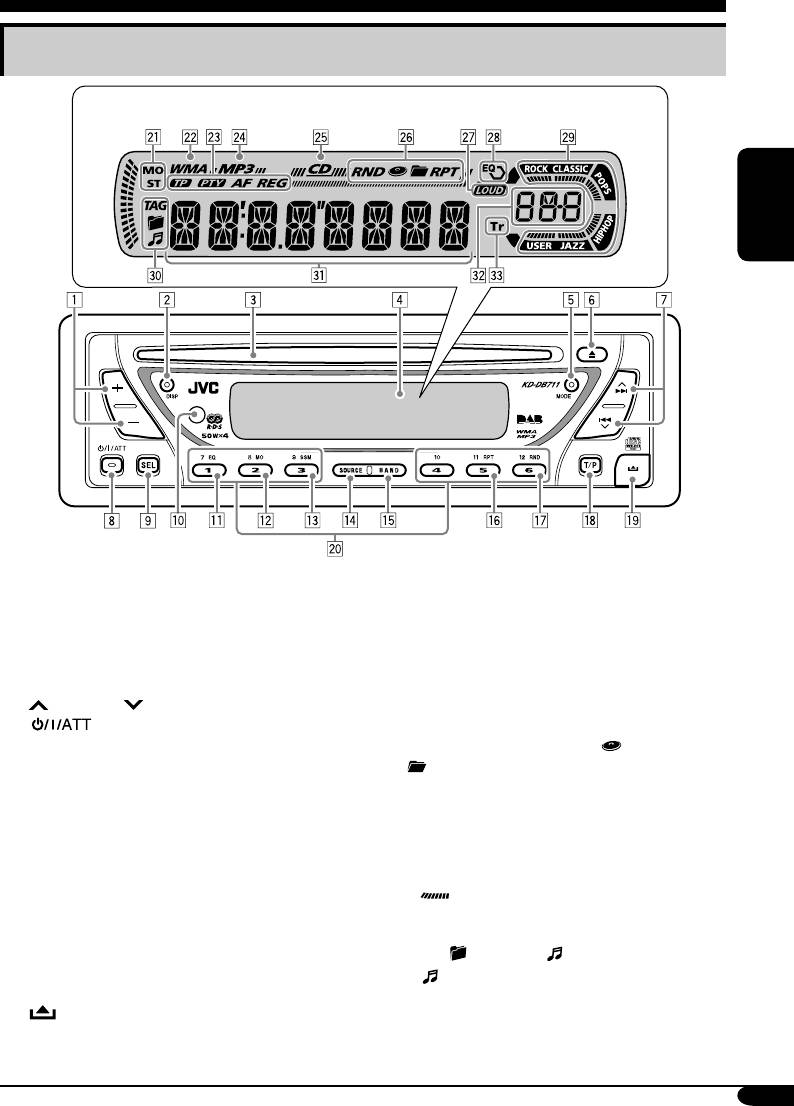
Bedienfeld — KD-DB711
Beschreibung der Teile
Displayfenster
DEUTSCH
1 +/– -Tasten
Displayfenster
2 DISP (Display)-Taste
a Tuner-Empfangsanzeigen—MO (Mono),
3 Ladeschlitz
ST (Stereo)
4 Displayfenster
s WMA-Anzeige
5 MODE-Taste
d RDS-Anzeigen—TP, PTY, AF, REG
6 0 (Auswurf)-Taste
f MP3-Anzeige
7
¢/4 -Tasten
g CD-Anzeige
8
(Standby/Ein/Dämpfung)-Taste
h Wiedergabemodus / Gegenstand-
9 SEL (Wählen)-Taste
Anzeigen—RND (Zufall),
(Disk),
p Fernbedienungssensor
(Ordner), RPT (Wiederholung)
j LOUD (Loudness)-Anzeige
• Siehe Seite 26.
k EQ (Equalizer)-Anzeige
q EQ (Equalizer)-Taste
l Sound-Modus (C-EQ: Spezieller
w MO (Mono)-Taste
Equalizer)-Anzeigen—ROCK, CLASSIC,
e SSM (Sequentieller Speicher für starke
POPS, HIP HOP, JAZZ, USER
Sender)-Taste
•
fungiert auch als Zeit-Countdown-
r SOURCE-Taste
Anzeige.
t BAND-Taste
/ Disk-Information-Anzeigen—TAG (ID3-
y RPT (Wiederholung)-Taste
Tag),
(Ordner), (Titel/Datei)
u RND (Zufall)-Taste
•
leuchtet auch auf, wenn DLS für einen
i
T/P (Verkehrsprogramm/Programmtyp)-Taste
DAB-Dienst angezeigt wird.
o (Bedienfeld-Freigabe)-Taste
z Hauptdisplay
; Zifferntasten
x Quellenanzeige / Lautstärkepegelanzeige
c Tr (Titel)-Anzeige
5
GE02-05_KD-DB711[E]3.indd 5GE02-05_KD-DB711[E]3.indd 5 2005.1.12 7:04:02 PM2005.1.12 7:04:02 PM


