JVC KD-AVX2: Ÿ Select a disc.
Ÿ Select a disc.: JVC KD-AVX2
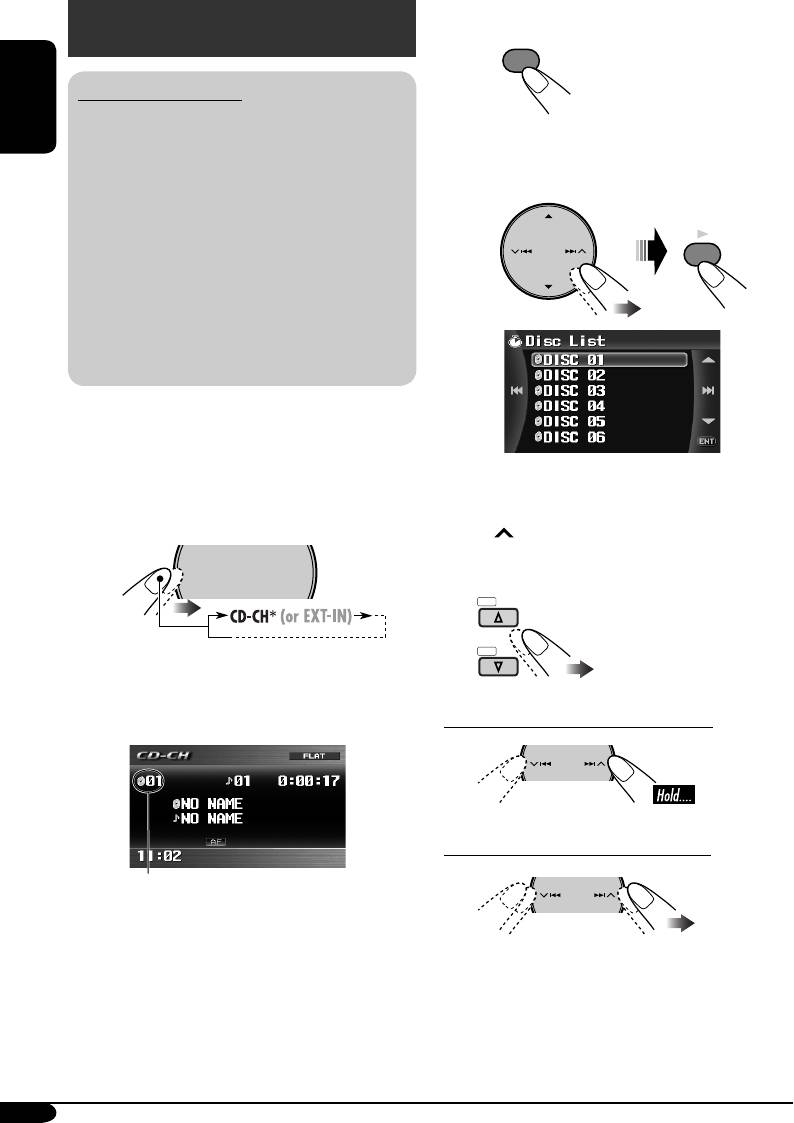
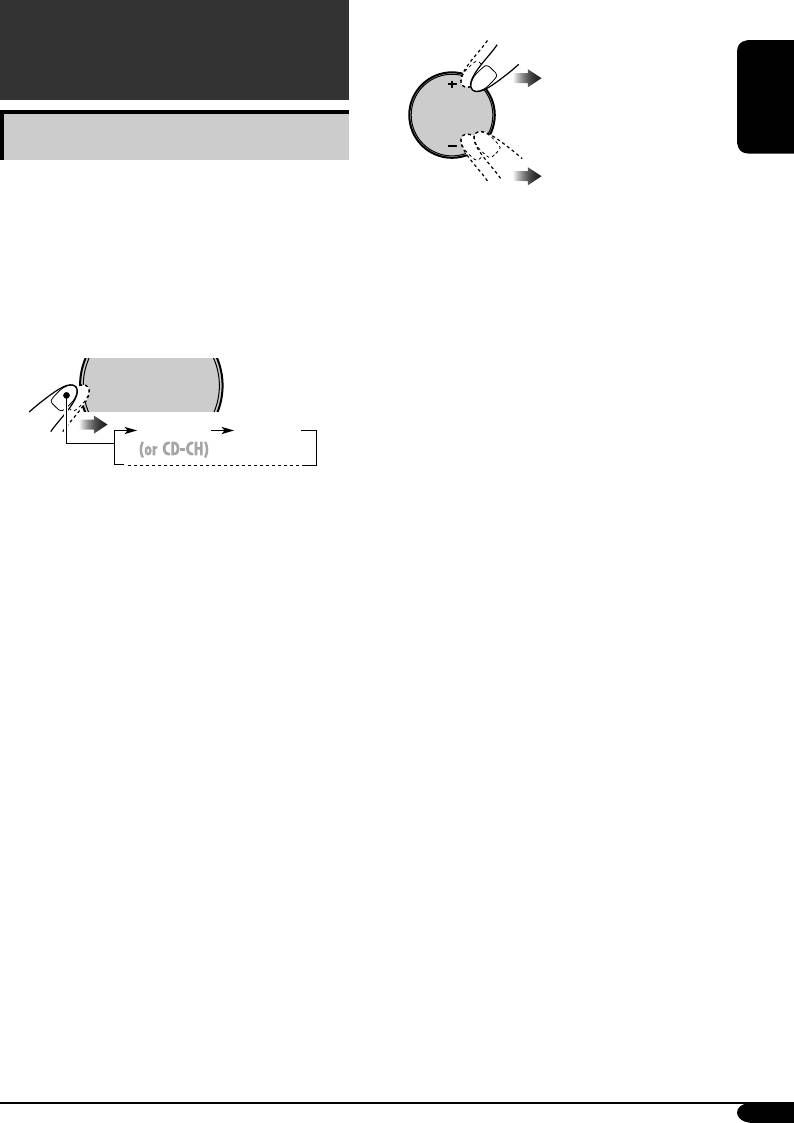
CD changer operations
Ÿ Select a disc.
1
MENU
About the CD changer
It is recommended to use the JVC MP3-
ENGLISH
compatible CD changer with your unit.
2
Select “List”, then the disc you want to
• Disc text information recorded in the CD
play back.
Text can be displayed when a JVC CD
Text compatible CD changer is connected.
Before operating your CD changer:
ENT
• Refer also to the Instructions supplied
with your CD changer.
• You cannot control and play any DVD
Video/Audio, VCD, WMA, WAV, MPEG,
or JPEG disc in the CD changer.
All tracks of the inserted discs in the magazine
will be played repeatedly until you change
the source or eject the magazine from the CD
• When the current disc is an MP3 disc, you
changer.
can move to FOLDER LIST by pressing
¢
.
~
SRC
D
DISP
When using the remote controller....
DISC
+
DISC
–
*
If you have changed “External Input”
setting to “External Input” (see page
41), you cannot select the CD changer.
To fast-forward or reverse the track
To go to the next or previous tracks
Selected disc number
46
AVX2EE.indb 46AVX2EE.indb 46 06.2.9 1:10:18 PM06.2.9 1:10:18 PM

To go to the next or previous folders (only for
Selectable modes
MP3 discs)
Off
Deactivates Intro/Repeat/Random playback.
Intro
ENGLISH
Mode Plays the first 15 seconds of
Track: All tracks of the inserted discs.
•
lights up.
Folder*: First tracks of all folders in the
When using the remote controller....
current disc.
•
lights up.
Disc: First tracks of all the inserted
discs.
•
lights up.
Off : Cancels.
Repeat
Mode Plays repeatedly
Selecting the playback modes
Track: The current track.
You can use only one of the following playback
•
lights up.
modes at a time.
Folder*: All tracks of the current folder.
•
lights up.
1
MENU
Disc: All tracks of the current disc.
•
lights up.
Off : Cancels.
2 Select “Mode”, then your desired
Random
playback mode.
Mode Plays at random
Folder*: All tracks of the current folder,
then tracks of the next folder
and so on.
•
lights up.
Disc: All tracks of the current disc.
•
lights up.
3 Finish the procedure.
All: All tracks of the inserted discs.
•
lights up.
ENT
Off : Cancels.
* Only while playing an MP3 disc
47
AVX2EE.indb 47AVX2EE.indb 47 06.2.9 1:10:19 PM06.2.9 1:10:19 PM
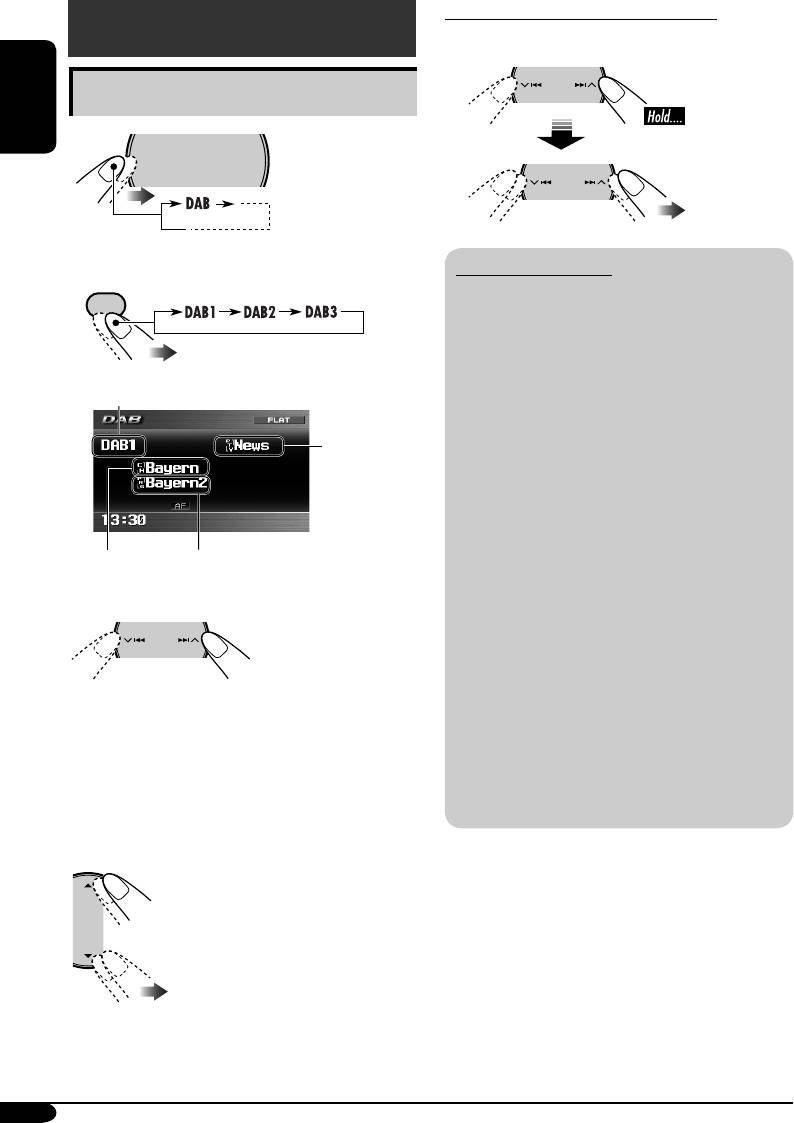
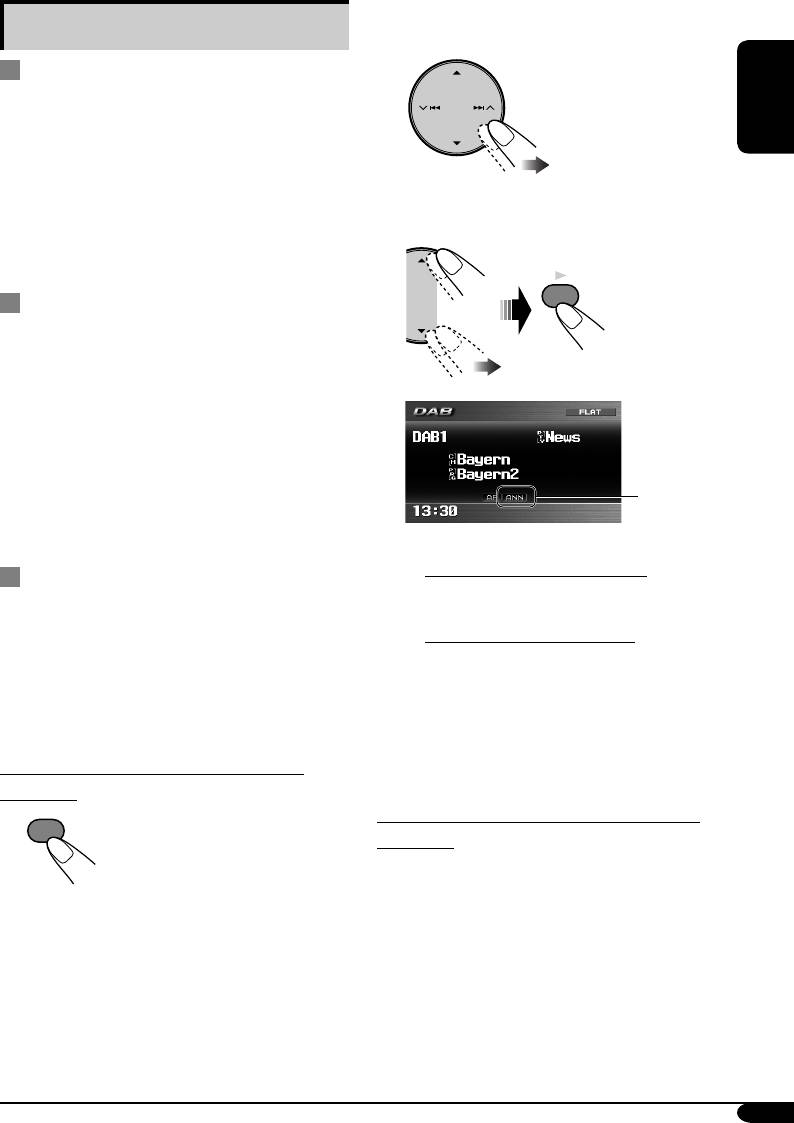
To tune in to an ensemble manually
DAB tuner operations
In step 3...
Activate “Manual
Search”
Listening to the DAB tuner
ENGLISH
1
SRC
D
DISP
Select ensemble
frequencies
2
What is DAB system?
7
/ BACK
DAB can deliver digital quality sound
BAND
without any annoying interference and
signal distortion. Furthermore, it can carry
text, pictures, and data. When transmitting,
DAB combines several programmes (called
Current band
“services”) to form one “ensemble”. In
addition, each “service”—called “primary
Programme type
service”—can also be divided into its
components (called “secondary service”).
A typical ensemble has six or more
programmes (services) broadcast at the same
time.
Ensemble label
Service label
By connecting the DAB tuner, this receiver
can do the following:
3 Start searching for an ensemble.
• Tracing the same programme automatically
—Alternative Frequency Reception (see
page 52).
It is recommended to use DAB (Digital
Audio Broadcasting) tuner KT-DB1000
When an ensemble is received, searching
with your receiver. If you have another
stops.
DAB tuner, consult your JVC IN-CAR
To stop searching, press the same button
ENTERTAINMENT dealer.
again.
• Refer also to the Instructions supplied for
your DAB tuner.
4 Select a service (either primary or
secondary) to listen to.
48
AVX2EE.indb 48AVX2EE.indb 48 06.2.9 1:10:20 PM06.2.9 1:10:20 PM
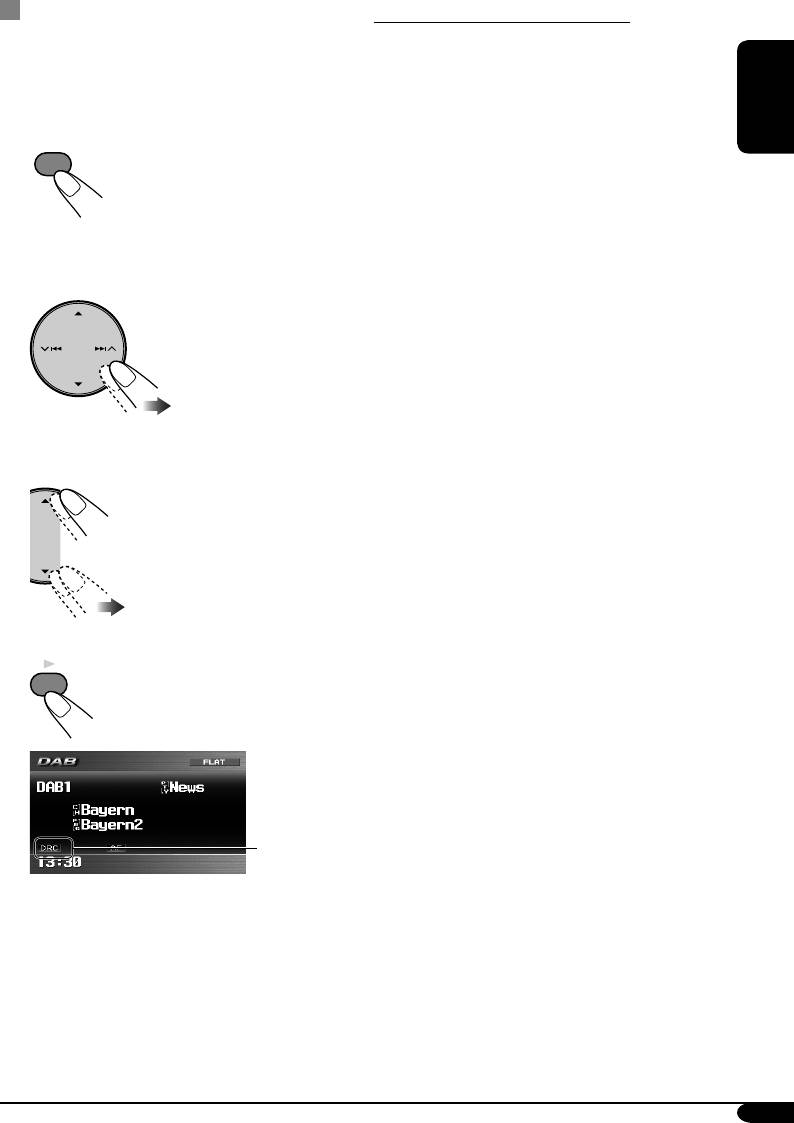
When surrounding sounds are noisy
To search for your favorite service
Some service provides Dynamic Range Control
You can search for either Dynamic or Static
(DRC) signals together with their regular
PTY codes.
programme signals. DRC will reinforce the low
• Operations are exactly the same as explained
level sounds to improve for your listening.
on page 15 for FM RDS stations.
• You cannot store PTY codes separately for the
ENGLISH
DAB tuner and the FM tuner.
1
MENU
• Search will be performed on the DAB tuner
only.
2 Select “MODE”, then “D. Range
Control”.
3 Select one of the DRC signal level
(DRC 1/2/3).
4 Finish the procedure.
ENT
DRC indicator
appears.
• The DRC indicator will be highlighted
only when receiving DRC signals from the
tuned service.
49
AVX2EE.indb 49AVX2EE.indb 49 06.2.9 1:10:21 PM06.2.9 1:10:21 PM
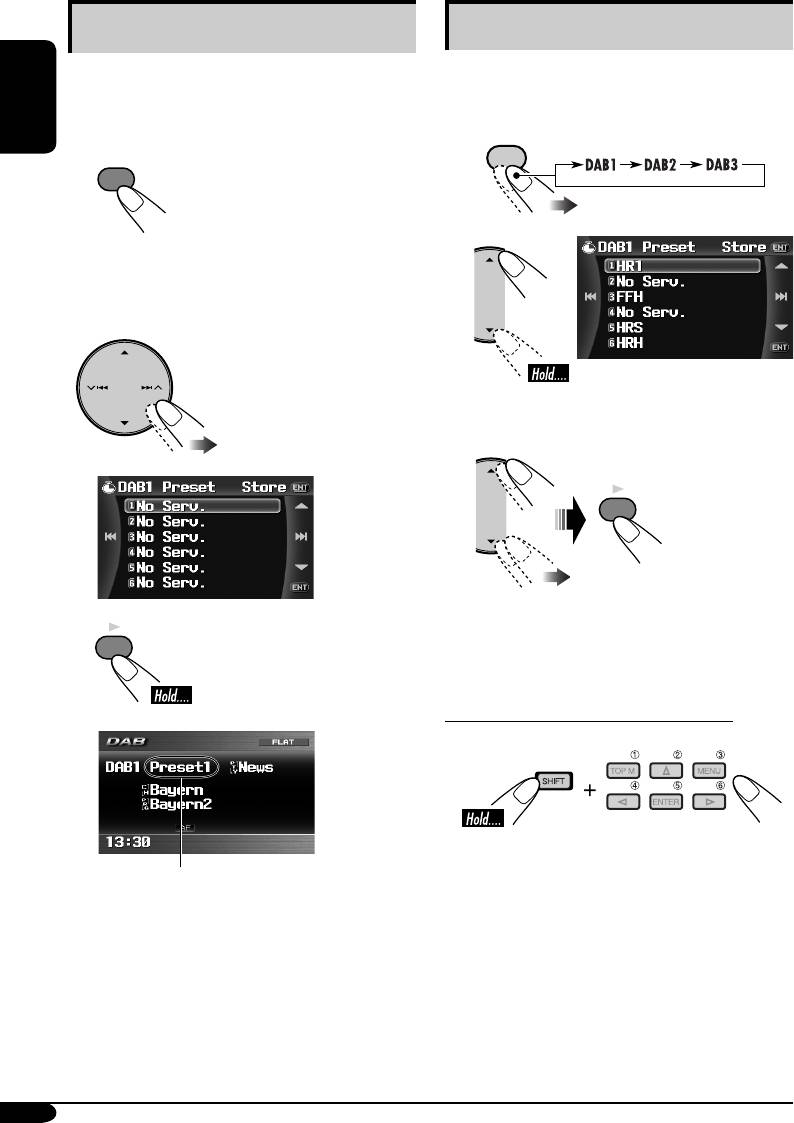
Storing DAB services in memory
Tuning in to a preset DAB service
You can preset six DAB services (primary) for
When the source is DAB...
each band.
After tuning in the ensemble (primary service)
1
ENGLISH
7
/ BACK
you want to preset...
BAND
1
MENU
2
2 Select “List”, then a preset number
(1-6) you want to store the ensemble
into.
or
3 Select a preset number you want.
ENT
• You can also access the preset list by
3
ENT
pressing “MENU” on the unit and
selecting “List”.
When using the remote controller...
Preset number flashes.
50
AVX2EE.indb 50AVX2EE.indb 50 06.2.9 1:10:21 PM06.2.9 1:10:21 PM
2 Select “Mode”, then “Announce
Using the standby receptions
Standby”.
TA (Road Traffic News) Standby
Reception
• Operations are exactly the same as explained
ENGLISH
on page 16 for FM RDS stations.
• You cannot activate TA Standby Reception
separately for the DAB tuner and for FM
3 Select an announcement type you
tuner.
want to preset.
• The volume changes to the preset TA volume
level (see page 40).
ENT
PTY Standby Reception
• Operations are exactly the same as explained
on page 17 for FM RDS stations.
• PTY Standby Reception for DAB tuner works
only using a dynamic PTY code.
• You can neither store your favorite PTY nor
activate PTY Standby Reception separately for
the DAB tuner and for the FM tuner.
• You can activate and deactivate PTY Standby
ANN indicator
Reception when the source is either “FM” or
appears.
“DAB”.
• If the ANN indicator lights up,
Announcement Standby Reception
Announcement Standby Reception is
Announcement Standby Reception allows the
activated.
receiver to switch temporarily to your favorite
• If the ANN indicator flashes,
service (announcement type).
Announcement Standby Reception is not
yet activated.
To select your favorite announcement type,
To activate, tune in to another service
see page 44.
providing these signals. The ANN
indicator will stop flashing and remain
To activate the Announcement Standby
lit.
Reception
To deactivate the Announcement Standby
1
MENU
Reception
Select “Off” in step 3 above.
The ANN indicator goes off.
51
AVX2EE.indb 51AVX2EE.indb 51 06.2.9 1:10:22 PM06.2.9 1:10:22 PM
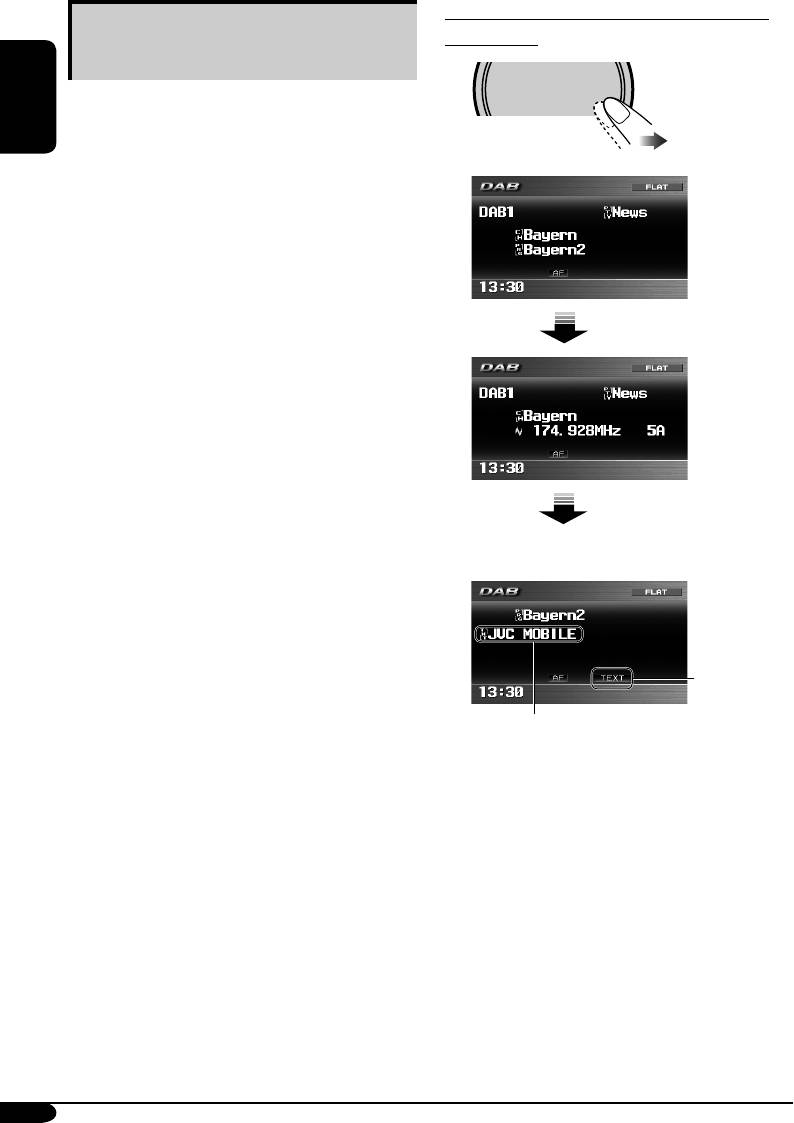
To show the Dynamic Label Segment (DLS)
Tracing the same programme—
information
Alternative Frequency Reception
SRC
D
DISP
You can keep listening to the same programme
by activating the Alternative Frequency
ENGLISH
Reception.
• While receiving a DAB service:
When driving in an area where a DAB service
cannot be received, this receiver automatically
tunes in to another ensemble or FM RDS
station, broadcasting the same programme.
• While receiving an FM RDS station:
When driving in an area where a DAB service
is broadcasting the same programme as the
FM RDS station is broadcasting, this receiver
automatically tunes in to the DAB service.
Service
When shipped from the factory, Alternative
frequency is
Frequency Reception is activated.
displayed.
To deactivate the Alternative Frequency
Reception, see page 40.
While listening to an ensemble that
supports DLS....
*
Dynamic Label Segment
(DLS—DAB radio text
information) is displayed.
*
Lights up when receiving a service providing
Dynamic Label Segment (DLS)—DAB radio
text information.
52
AVX2EE.indb 52AVX2EE.indb 52 06.2.9 1:10:23 PM06.2.9 1:10:23 PM
3 Adjust the volume.
External component
operations
SRC
D
ENGLISH
Playing an external component
You can connect an external component to
LINE IN plug and VIDEO IN plug on the rear,
4 Adjust the equalizer as you want. (See
or to the CD changer jack on the rear using the
KS-U57 Line Input Adapter (not supplied) or
pages 42.)
KS-U58 AUX Input Adapter (not supplied).
• For connection, see Installation/Connection
Manual (separate volume).
1
SRC
D
DISP
EXT-IN AV-IN
AV-IN: For selecting the external
component connected to the LINE
IN and/or VIDEO IN.
• To change the setting of AV INPUT, see
page 41.
EXT-IN: For selecting the external
component connected to the CD
changer jack on the rear.
• If “EXT-IN” does not appear, see page 41
and select the external input (EXT-IN).
2 Turn on the connected component
and start playing the source.
53
AVX2EE.indb 53AVX2EE.indb 53 06.2.9 1:10:24 PM06.2.9 1:10:24 PM

! Adjust the volume.
iPod®/D. player operations
This unit is ready for operating an Apple iPod
or a JVC D. player from the control panel.
SRC
D
• You can also use the equivalent buttons on
ENGLISH
the remote controller in the operations below.
Before operating your iPod or D. player:
Connect either one of the following (separately
⁄ Adjust the equalizer as you want.
purchased) to the CD changer jack on the rear
(See pages 42.)
of this unit.
• Make sure the equalizer on the iPod or
• Interface adapter for iPod—KS-PD100 for
D. player is deactivated.
controlling an iPod.
• D. player interface adapter—KS-PD500 for
controlling a D. player.
To pause (iPod) or stop (D. player) playback
• For connection, see Installation/Connection
Manual (separate volume).
• For details, refer also to the manual supplied
with the interface adapter.
To resume playback, press it again.
Cautions:
To fast-forward or reverse the track
Make sure to turn off this unit or turn off the
vehicle’s ignition switch before connecting
or disconnecting the iPod or D. player.
To go to the next or previous tracks
Preparations:
Make sure “Changer/iPod/D. player” is selected
for the external input setting, see page 41.
~
Ÿ
SRC
D
DISP
Playback starts automatically from
where it has been paused (iPod) or
stopped (D. player) previously.
54
AVX2EE.indb 54AVX2EE.indb 54 06.2.9 1:10:24 PM06.2.9 1:10:24 PM
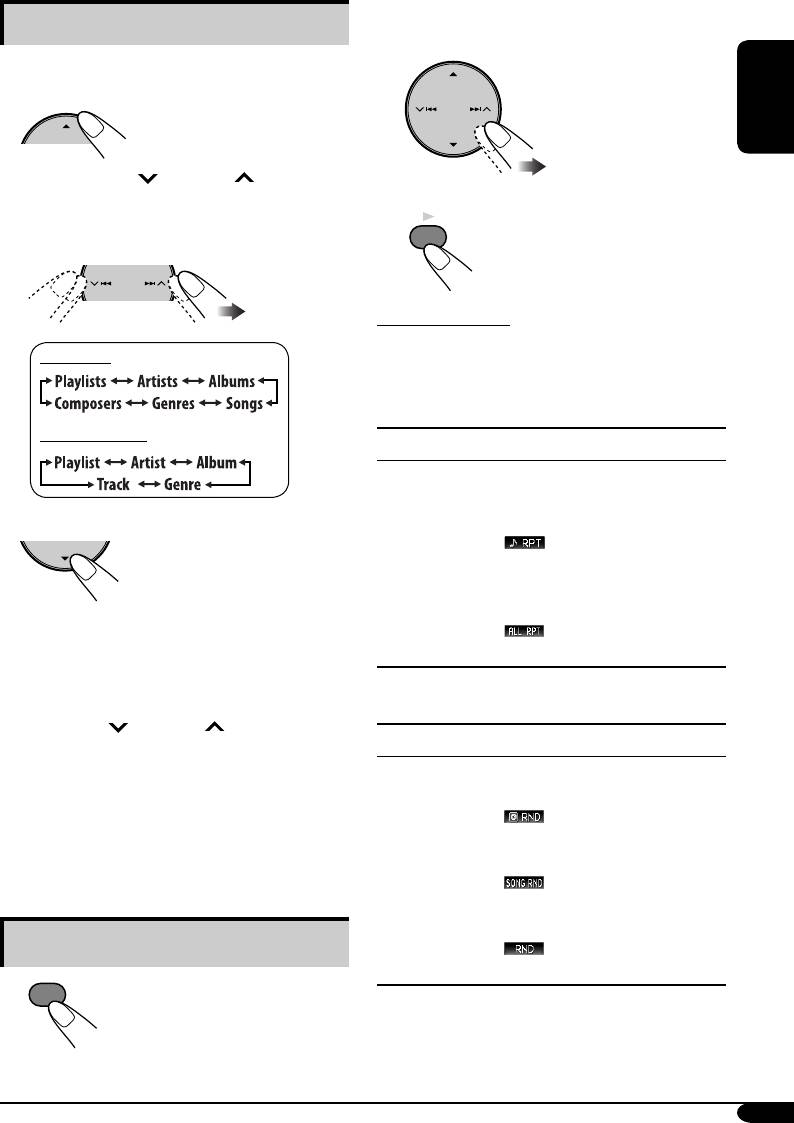
2 Select “Mode”, then your desired
Selecting a track from the menu
playback mode.
1 Enter the main menu of the iPod or
D. player.
ENGLISH
Now the 5/∞/ 4/¢ buttons
1
3 Finish the procedure.
work as the menu selecting buttons*
.
ENT
2 Select the desired menu.
Selectable modes
Off
For iPod:
Deactivates Repeat/Random playback.
Repeat
For D. player:
Mode Plays repeatedly
One: Functions the same as “Repeat
One” of the iPod or “Repeat
3 Confirm the selection.
Mode One” for the D. player.
•
lights up.
To move back to the previous
All: Functions the same as “Repeat
menu, press 5.
All” of the iPod or “Repeat
Mode All” for the D. player.
• If a track is selected, playback starts
•
lights up.
automatically.
Off : Cancels.
• If the selected item has another layer, you
will enter the layer. Repeat steps 2 and 3
Random
until the desired track is confirmed.
• Holding
4/¢ can skip 10
Mode Plays at random
items at a time.
Album: Functions the same as “Shuffle
1
*
The menu selecting mode will be canceled:
Album” of the iPod
– If no operations are done for about
•
lights up.
5 seconds.
Song: Functions the same as “Shuffle
– When you confirm the selection of a
Songs” of the iPod.
track.
•
lights up.
On: Functions the same as “Random
Play On” of the D. player.
Selecting the playback modes
•
lights up.
Off : Cancels.
1
MENU
55
AVX2EE.indb 55AVX2EE.indb 55 06.2.9 1:10:25 PM06.2.9 1:10:25 PM
To keep discs clean
Maintenance
A dirty disc may not play correctly.
If a disc does become dirty, wipe it
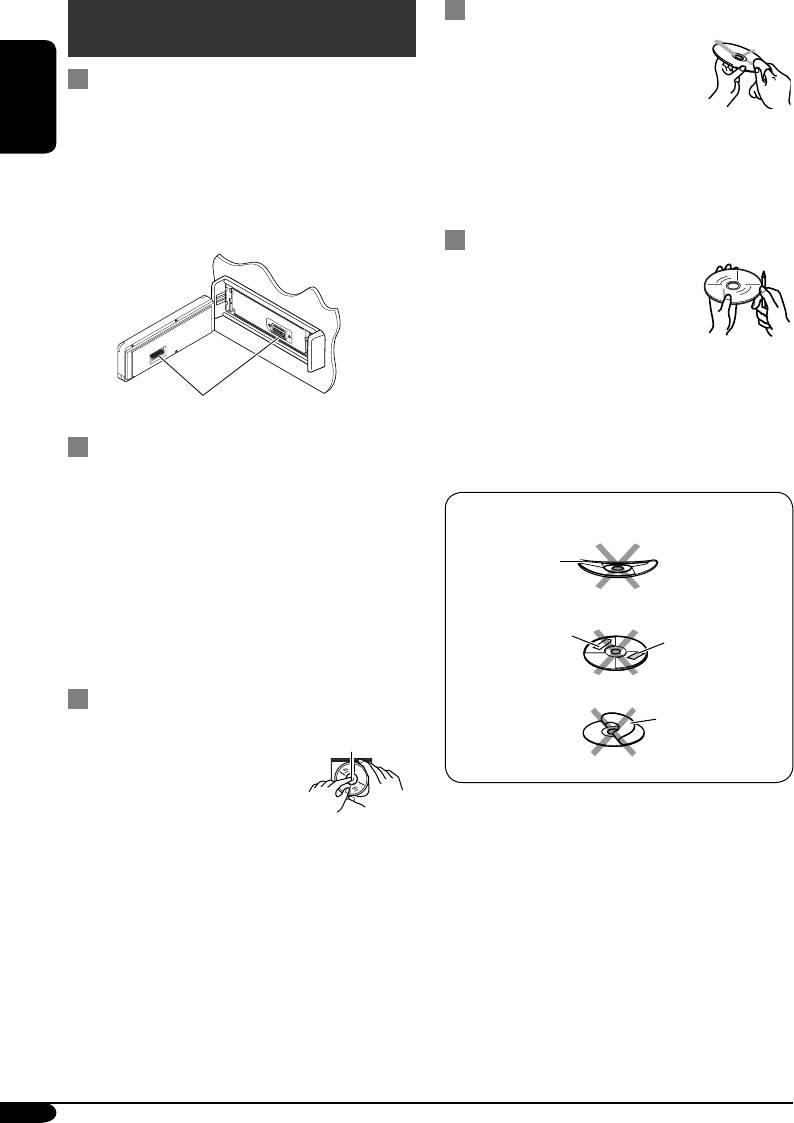
How to clean the connectors
with a soft cloth in a straight line
Frequent detachment will deteriorate the
from center to edge.
• Do not use any solvent (for example,
ENGLISH
connectors.
To minimize this possibility, periodically wipe
conventional record cleaner, spray, thinner,
the connectors with a cotton swab or cloth
benzine, etc.) to clean discs.
moistened with alcohol, being careful not to
damage the connectors.
To play new discs
New discs may have some rough
spots around the inner and outer
edges. If such a disc is used, this
receiver may reject the disc.
To remove these rough spots, rub the edges
with a pencil or ball-point pen, etc.
Connectors
Moisture condensation
Moisture may condense on the lens inside the
DVD/CD player in the following cases:
Do not use the following discs:
• After starting the heater in the car.
• If it becomes very humid inside the car.
Warped disc
Should this occur, the DVD/CD player may
malfunction. In this case, eject the disc and
leave the receiver turned on for a few hours
until the moisture evaporates.
Sticker
Sticker
residue
How to handle discs
Stick-on label
When removing a disc from
Center holder
its case, press down the center
holder of the case and lift the
disc out, holding it by the edges.
• Always hold the disc by the
edges. Do not touch its recording surface.
When storing a disc into its case, gently insert
the disc around the center holder (with the
printed surface facing up).
• Make sure to store discs into the cases after
use.
56
AVX2EE.indb 56AVX2EE.indb 56 06.2.9 1:10:26 PM06.2.9 1:10:26 PM

Language codes
Code Language Code Language Code Language
AA
Afar
IK
Inupiak
RN
Kirundi
ENGLISH
AB
Abkhazian
IN
Indonesian
RO
Rumanian
AF
Afrikaans
IS
Icelandic
RW
Kinyarwanda
AM
Ameharic
IW
Hebrew
SA
Sanskrit
AR
Arabic
JI
Yiddish
SD
Sindhi
AS
Assamese
JW
Javanese
SG
Sangho
AY
Aymara
KA
Georgian
SH
Serbo-Croatian
AZ
Azerbaijani
KK
Kazakh
SI
Singhalese
BA
Bashkir
KL
Greenlandic
SK
Slovak
BE
Byelorussian
KM
Cambodian
SL
Slovenian
BG
Bulgarian
KN
Kannada
SM
Samoan
BH
Bihari
KO
Korean (KOR)
SN
Shona
BI
Bislama
KS
Kashmiri
SO
Somali
BN
Bengali, Bangla
KU
Kurdish
SQ
Albanian
BO
Tibetan
KY
Kirghiz
SR
Serbian
BR
Breton
LA
Latin
SS
Siswati
CA
Catalan
LN
Lingala
ST
Sesotho
CO
Corsican
LO
Laothian
SU
Sundanese
CS
Czech
LT
Lithuanian
SW
Swahili
CY
Welsh
LV
Latvian, Lettish
TA
Tamil
DZ
Bhutani
MG
Malagasy
TE
Telugu
EL
Greek
MI
Maori
TG
Tajik
EO
Esperanto
MK
Macedonian
TH
Thai
ET
Estonian
ML
Malayalam
TI
Tigrinya
EU
Basque
MN
Mongolian
TK
Turkmen
FA
Persian
MO
Moldavian
TL
Tagalog
FI
Finnish
MR
Marathi
TN
Setswana
FJ
Fiji
MS
Malay (MAY)
TO
Tonga
FO
Faroese
MT
Maltese
TR
Turkish
FY
Frisian
MY
Burmese
TS
Tsonga
GA
Irish
NA
Nauru
TT
Tatar
GD
Scots Gaelic
NE
Nepali
TW
Twi
GL
Galician
NO
Norwegian
UK
Ukrainian
GN
Guarani
OC
Occitan
UR
Urdu
GU
Gujarati
OM
(Afan) Oromo
UZ
Uzbek
HA
Hausa
OR
Oriya
VI
Vietnamese
HI
Hindi
PA
Panjabi
VO
Volapuk
HR
Croatian
PL
Polish
WO
Wolof
HU
Hungarian
PS
Pashto, Pushto
XH
Xhosa
HY
Armenian
PT
Portuguese
YO
Yoruba
IA
Interlingua
QU
Quechua
ZU
Zulu
IE
Interlingue
RM
Rhaeto-Romance
57
AVX2EE.indb 57AVX2EE.indb 57 06.2.9 1:10:26 PM06.2.9 1:10:26 PM

More about this receiver
• If a DAB tuner is connected and Alternative
Basic operations
Frequency Reception for DAB services
Turning on the power
(DAB AF) is activated, Network-Tracking
ENGLISH
• By pressing SRC on the receiver, you can also
Reception (AF Regional) is also activated
turn on the power.
automatically. On the other hand, Network-
Tracking Reception cannot be deactivated
Selecting the sources
without deactivating Alternative Frequency
Reception. (See pages 17, 40, 44, 52.)
• When no disc is loaded in the receiver and
• TA Standby Reception and PTY Standby
Dual Zone is off, “DISC” cannot be selected.
Reception will be temporarily canceled while
• Without connecting to the CD changer or the
listening to an AM station.
DAB tuner, “CD-CH” or “DAB” cannot be
selected.
Disc operations
Turning off the power
General
• If you turn off the power while listening to a
• In this manual, words “track” and “file” are
disc, disc play will start automatically, next
interchangeably used when referring to the
time you turn on the power.
music/picture/movie files and their file names.
• This receiver can also play back 8 cm discs.
• This receiver can only play back audio CD
Tuner operations
(CD-DA) files if different type of files are
recorded in the same disc.
Storing stations in memory
– The first track will be skipped if a different
• During SSM search...
type of file is detected first.
– All previously stored stations are erased and
• When a disc has been loaded, selecting
stations are stored newly.
“DISC” for the playback source starts disc
– Received stations are preset in No. 1 (lowest
play.
frequency) to No. 6 (highest frequency).
– When SSM is over, the station stored in
Changing the source
No. 1 will be automatically tuned in.
• When storing a station manually, a previously
• If you change the source, playback also stops
preset station is erased when a new station is
(without ejecting the disc).
stored in the same preset number.
Next time you select “DISC” for the playback
source (without activating Dual Zone), disc
play starts automatically.
FM RDS operations
• Network-Tracking Reception requires
Ejecting a disc
two types of RDS signals—PI (Programme
• If the ejected disc is not removed within
Identification) and AF (Alternative
15 seconds, the disc is automatically inserted
Frequency) to work correctly. Without
again into the loading slot to prevent it from
receiving these data correctly, Network-
dust. (Disc will not play this time.)
Tracking Reception will not operate.
58
AVX2EE.indb 58AVX2EE.indb 58 06.2.9 1:10:27 PM06.2.9 1:10:27 PM

Playing a Recordable/Rewritable disc
Playing an MP3/WMA/WAV disc
• Use only “finalized” discs.
• This receiver can play back MP3/WMA/WAV
• This receiver can play back either MP3/
files with the extension code <.mp3>, <.wma>
WMA/WAV files, JPEG files, or MPEG/DivX
or <.wav> (regardless of the letter case—
files if a disc includes any of the files. Set the
upper/lower).
playback file type on AV Menu (page 37)
• This receiver can show the names of albums,
ENGLISH
before playing back a disc containing files of
artists (performer), and Tag (Version 1.0, 1.1,
different kinds.
2.2, 2.3, or 2.4) for MP3/WMA/WAV files.
• Only for CD-R/CD-RW: This receiver can
• This receiver can display only one-byte
play back multi-session discs; however,
characters. No other characters can be
unclosed sessions will be skipped while
correctly displayed.
playing.
• This receiver can play back MP3/WMA/WAV
• Some Recordable/Rewritable discs may not
files meeting the conditions below:
play back on this receiver because of their disc
– Bit rate: MP3: 32 kbps — 320 kbps
characteristics, and for the following causes:
WMA: 32 kbps — 320 kbps
– Discs are dirty or scratched.
– Sampling frequency:
– Moisture condensation occurs on the lens
48 kHz, 44.1 kHz, 32 kHz (for MPEG-1)
inside the receiver.
24 kHz, 22.05 kHz, 16 kHz (for MPEG-2)
– The pickup lens inside the receiver is dirty.
48 kHz, 44.1 kHz, 32 kHz (for WMA)
– Discs on which the files are written with
44.1 kHz (for WAV)
“Packet Write” method.
– Disc format: ISO 9660 Level 1/ Level 2,
– Discs which are not written in UDF-Bridge
Romeo, Joliet, Windows long file name
Format (eg. UDF format or ISO format).
• The maximum number of characters for file/
– There are improper recording conditions
folder names vary among the disc format used
(missing data, etc.) or media conditions
(includes 4 extension characters—<.mp3>,
(stain, scratch, warp, etc.).
<.wma>, or <.wav>).
• Rewritable discs may require a longer readout
– ISO 9660 Level 1: up to 12 characters
time.
– ISO 9660 Level 2: up to 31 characters
• Do not use the following discs:
– Romeo: up to 128 characters
– Discs with stickers, labels, or protective seal
– Joliet: up to 64 characters
stuck to the surface.
– Windows long file name: up to 128
– Discs on which labels can be directly
characters
printed by an ink jet printer.
• This receiver can recognize the total of
Using these discs under high temperatures or
3500 files, 250 folders (maximum of 999 files
high humidities may cause malfunctions or
per folder).
damages to discs.
59
AVX2EE.indb 59AVX2EE.indb 59 06.2.9 1:10:28 PM06.2.9 1:10:28 PM

• This receiver can play back the files recorded
Playing an MPEG disc
in VBR (variable bit rate).
• This receiver can play back MPEG 1/2 files
The files recorded in VBR have a discrepancy
with the extension code <.mpg>.
in elapsed time display, and do not show
• Audio stream should conform to MPEG1
the actual elapsed time. Especially, after
Audio Layer 2.
performing the search function, this
ENGLISH
difference becomes noticeable.
Playing an DivX disc
• This receiver cannot play back the following
files:
• This receiver can play back DivX files with
–
MP3 files encoded with MP3i and MP3 PRO
the extension code <.divx>, <.div>, or <.avi>
format.
(regardless of the letter case—upper or lower).
– MP3 files encoded in an unappropriated
• When making a disc, use the UDF bridge
format.
format.
– MP3 files encoded with Layer 1/2.
• This unit supports DivX 6.x, 5.x, 4.x, and 3.11.
– WMA files encoded with lossless,
• This unit supports the DivX files whose
professional, and voice format.
resolution is 720x480 pixels or less (30 fps)
– WMA files which are not based upon
and 720x576 pixels or less (25 fps).
Windows Media® Audio.
• Audio stream should conform to MP3 or
– WMA files copy-protected with DRM.
Dolby Digital.
– WMA files recorded with MBR (Multiple
• This unit does not support GMC (Global
Bit Rate) format.
Motion Compression).
– Files which have the data such as AIFF,
• The file encoded in the interlaced scanning
ATRAC3, etc.
mode may not be played back correctly.
• This receiver can recognize a total 25
characters for file/folder names.
Playing a JPEG disc
• It is recommended that you record a file
AV Menu
at 640 x 480 resolution. (If a file has been
• When the language you have selected is not
recorded at a resolution of more than 640 x
recorded on a disc, the original language is
480, it will take a long time to be shown.)
automatically used as the initial language. In
• This System can play only baseline JPEG files.
addition, for some discs, the initial languages
Progressive JPEG files or lossless JPEG files
settings will not work as you set due to their
cannot be played.
internal disc programming.
Baseline JPEG format: Used for digital
After you change any of these language
cameras, web, etc.
settings, eject the disc and insert it (or another
Progressive JPEG format: Used for web.
disc) again so that your setting takes effect.
Lossless JPEG format: An old type and rarely
• When you select “16:9” for a picture whose
used now.
aspect ratio is 4:3, the picture slightly changes
• If progressive or lossless JPEG files are played
due to the process for converting the picture
back, a black screen appears. In this case, stop
width.
playback and select a baseline JPEG file. Note
that it may take a long time to select another
file.
60
AVX2EE.indb 60AVX2EE.indb 60 06.2.9 1:10:28 PM06.2.9 1:10:28 PM

• Even if “4:3PS [PAN SCAN]” is selected, the
iPod® or D. player operations
screen size may become
• When you turn on this unit, the iPod or
“4:3LB [LETTER BOX]” with some DVDs.
D. player is charged through this unit.
This depends on how they are recorded.
• While the iPod or D. player is connected, all
• If you change the “Amplifier Gain” setting
operations from the iPod or D. player are
from “High Power” to “Low Power” while the
disabled. Perform all operations from this
ENGLISH
volume level is set higher than “VOL 30”, the
unit.
receiver automatically changes the volume
• The text information may not be displayed
level to “VOL 30”.
correctly.
– Some characters such as accented letters
Other main functions
cannot be shown correctly on the display.
• If you try to assign a title to a 31st station or
– Depends on the condition of
31st disc, “Name Full” flashes on the monitor.
communication between the iPod or
Delete unwanted titles before assignment.
D. player and the unit.
• Titles assigned to discs in the CD changer can
• If the text information includes more than
also be shown if you play back the disc on the
18 characters, it scrolls on the display (see
receiver.
also page 35). This unit can display up to 40
characters.
DAB tuner operations
• PTY Standby Reception works for the DAB
Notice:
tuner only using a Dynamic PTY, but not a
When operating an iPod or a D. player,
Static PTY.
some operations may not be performed
• TA Standby Reception for FM RDS station
correctly or as intended. In this case, visit the
and Road Traffic News Standby Reception for
following JVC web site:
DAB cannot be set separately. The T/P button
For iPod users: <http://www.jvc.co.jp/
always work for the both Standby Reception
english/car/support/ks-pd100/index.html>
modes when the DAB tuner is connected.
For D. player users: <http://www.jvc.co.jp/
english/car/support/ks-pd500/index.html>
61
AVX2EE.indb 61AVX2EE.indb 61 06.2.9 1:10:29 PM06.2.9 1:10:29 PM
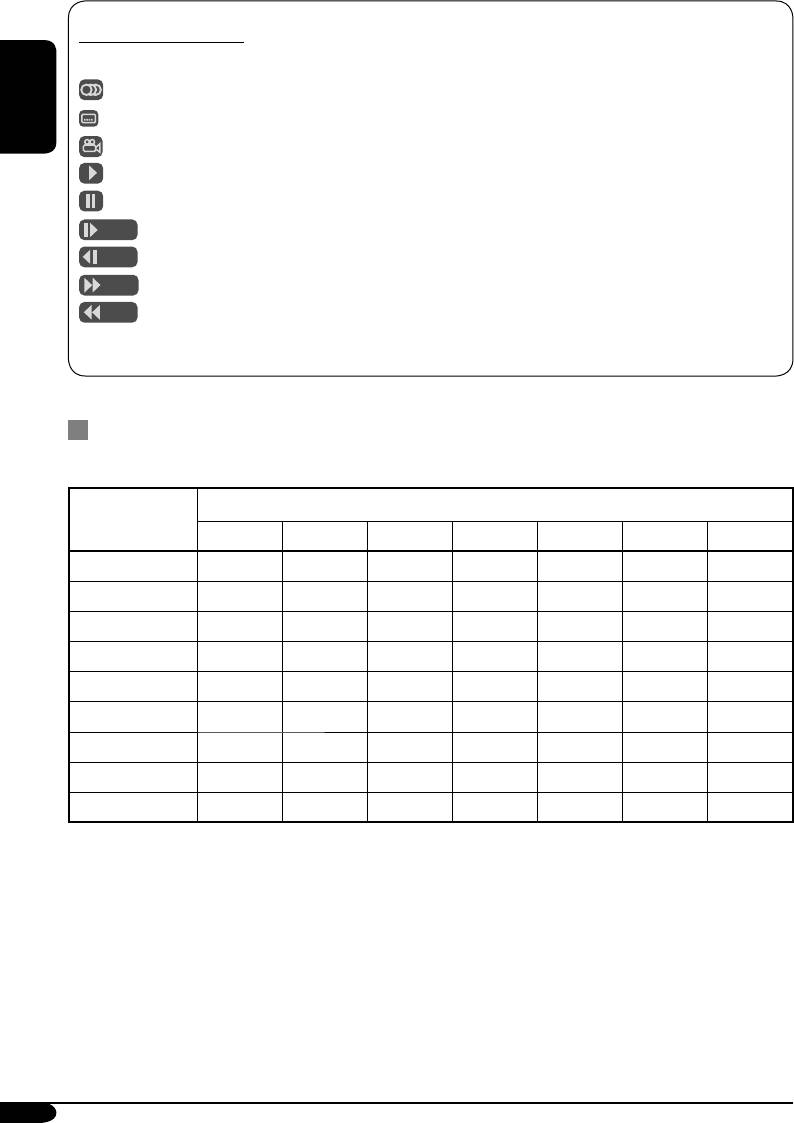
On-screen guide icons
During play, the following guide icons may appear for a while on the monitor.
: Appears at the beginning of a scene containing multi-audio languages.
: Appears at the beginning of a scene containing multi-subtitle languages.
ENGLISH
: Appears at the beginning of a scene containing multi-angle views.
: Playback
: Pause
: Forward Slow Motion Playback
: Reverse Slow Motion Playback
: Forward search
: Reverse search
Sound modes (preset frequency level settings)
The list below shows the preset frequency level settings for each sound mode (see page 42).
Preset equalizing values
Sound mode
60 Hz 150 Hz 400 Hz 1 kHz 2.5 kHz 6.3 kHz 15 kHz
Flat 00 00 00 00 00 00 00
Hard Rock +03 +03 +01 00 00 +02 +01
R&B +03 +02 +02 00 +01 +01 +03
Pop 00 +02 00 00 +01 +01 +02
Jazz +03 +02 +01 +01 +01 +03 +02
Dance +04 +02 00 –02 –01 +01 +01
Country +02 +01 00 00 00 +01 +02
Reggae +03 00 00 +01 +02 +02 +03
Classic +02 +03 +01 00 00 +02 00
62
AVX2EE.indb 62AVX2EE.indb 62 06.2.9 1:10:29 PM06.2.9 1:10:29 PM

Troubleshooting
What appears to be trouble is not always serious. Check the following points before calling a service
center.
Symptoms Remedies/Causes
ENGLISH
• Sound cannot be heard from the
• Adjust the volume to the optimum level.
speakers.
• Check the cords and connections.
Check the cords and connections.
• The receiver does not work at all. Reset the receiver
(see page 2).
• Remote controller does not work. Dual Zone is activated (see page 33).
While Dual Zone is activated, remote controller
General
only functions for operating the DVD/CD player.
• “No Signal” appears on the monitor. • Change the source.
•
Starts playback on the external component
connected to the VIDEO IN plug.
• Check the cords and connections.
• Signal input is too weak.
• SSM automatic presetting does not
Store stations manually.
work.
FM/AM
• Static noise while listening to the
Connect the antenna firmly.
radio.
• Disc cannot be played back. Insert the disc correctly.
• Recordable/Rewritable discs cannot
• Insert a finalized disc.
be played back.
•
Finalize the
disc
with the component which you
• Tracks on the Recordable/Rewritable
used for recording.
disc cannot be skipped.
• Disc cannot be recognized. Eject the disc forcibly (see page 2).
• “No Disc” appears on the monitor. Insert the disc correctly.
• “Not Support” appears on the
Use a file format the unit supports (see page 4).
Disc playback
monitor.
• “Disc Error” appears on the monitor. • Insert the disc correctly.
• Insert a disc recorded and finalized.
• “No Files” appears on the monitor. The disc does not have playable files. Insert a disc
containing playable files.
63
AVX2EE.indb 63AVX2EE.indb 63 06.2.9 1:10:30 PM06.2.9 1:10:30 PM

Symptoms Remedies/Causes
• Sound and picture are sometimes
• Stop playback while driving on rough roads.
interrupted or distorted.
• Check the cords and connections.
• No playback picture appears on the
Parking brake wire is not connected properly. See
monitor.
Installation/Connection Manual.
ENGLISH
• No picture appears on the external
• Connect the video cord correctly.
monitor at all.
• Select a correct input on the monitor.
Disc playback
• The edges of the picture are missing
• Select an aspect other than “Zoom”. (See page
on the screen.
36)
• Select “4:3LB [LETTER BOX]”. (See page 37.)
• Disc cannot be played back. • Use a disc with tracks recorded in the compliant
format. (See page 4.)
• Add the extension code <.mp3>, <.wma> or
<.wav> to their file names.
• Noise is generated. Skip to another track or change the disc. (Do
not add the extension code <.mp3>, <.wma> or
<.wav> to files of different types.)
• A longer readout time is required. Do not use too many hierarchies and folders.
• Tracks cannot be played back as you
Playback order is determined when the files are
have intended them to play.
recorded.
• Elapsed playing time is not correct. This sometimes occurs during play. This is
MP3/WMA /WAV playback
caused by how the tracks are recorded on the
disc.
• Correct characters are not
This receiver can only display alphabets
displayed (e.g. album name).
(A – Z, a – z), numbers, and a limited number of
symbols.
• Disc cannot be played back. • Use a disc with JPEG/MPEG/DivX files
recorded in the compliant format. (See page 4.)
• Add the extension code <.jpg>, <.mpg>, <.div>
to their file names.
JPEG/MPEG/DivX playback
64
AVX2EE.indb 64AVX2EE.indb 64 06.2.9 1:10:31 PM06.2.9 1:10:31 PM

Symptoms Remedies/Causes
• “No Disc” appears on the monitor. • Insert a disc into the magazine.
• Insert disc correctly.
• “No Magazine” appears on the
Insert the magazine.
monitor.
ENGLISH
• “Reset08” appears on the monitor. Connect this receiver and the CD changer
correctly and press the reset button of the CD
CD changer
changer.
• “Reset01” – “Reset07” appears on the
Press the reset button of the CD changer.
monitor.
• The CD changer does not work at all. Reset the receiver (see page 2).
• “No DAB signal” appears on the
Move to an area with stronger signals.
monitor.
• “Reset08” appears on the monitor. Connect this receiver and the DAB tuner
correctly and reset the receiver (see page 2).
• The DAB tuner does not work at all. Reconnect this receiver and the DAB tuner
DAB tuner
correctly and reset the receiver (see page 2).
• “Antenna Power NG” appears on the
Check the cords and connections.
monitor.
65
AVX2EE.indb 65AVX2EE.indb 65 06.2.9 1:10:31 PM06.2.9 1:10:31 PM

Symptoms Remedies/Causes
• The iPod or D. player does not turn
• Check the connecting cable and its connection.
on or does not work.
• Update the firmware version of the D. player.
•
Charge the battery of the iPod/D. player.
ENGLISH
• The sound is distorted.
Deactivate the equalizer either on the unit or the
iPod/D. player.
• “Disconnect” appears on the
Check the connecting cable and its connection.
monitor.
• Playback stops while playing back
The headphones are disconnected from iPod
iPod.
during playback. Restart the playback operation.
• No sound can be heard when
Disconnect the headphones from the iPod nano.
connecting an iPod nano.
• No sound can be heard.
Disconnect the adapter from the D. player. Then,
• “Error 01” appears on the monitor
connect it again.
when connecting a D. player.
iPod/D. Player playback
• “No Files” or “No Track” appears on
No tracks are stored. Import tracks to the iPod or
the display.
D. player.
• “Reset 1” – “Reset 7” appears on the
Disconnect the adapter from both the unit and
monitor.
iPod/D. player. Then, connect it again.
• “Reset 8” appears on the monitor. Check the connection between the adapter and
this unit.
• The iPod’s or D. player’s controls do
Reset the iPod or D. player.
not work after disconnecting from
this unit.
• Microsoft and Windows Media are either registered trademarks or trademarks of Microsoft
Corporation in the United States and/or other countries.
• iPod is a trademark of Apple Computer, Inc., registered in the U.S. and other countries.
66
AVX2EE.indb 66AVX2EE.indb 66 06.2.9 1:10:31 PM06.2.9 1:10:31 PM

Specifications
[MW Tuner]
AUDIO AMPLIFIER SECTION
Sensitivity: 20 μV
Maximum Power Output:
Selectivity: 35 dB
Front: 50 W per channel
ENGLISH
[LW Tuner]
Rear: 50 W per channel
Sensitivity: 50 μV
Continuous Power Output (RMS):
Front: 20 W per channel into 4 Ω, 40 Hz
to 20 000 Hz at no more than 0.8%
DVD/CD PLAYER SECTION
total harmonic distortion.
Signal Detection System: Non-contact optical
Rear: 20 W per channel into 4 Ω, 40 Hz
pickup (semiconductor laser)
to 20 000 Hz at no more than 0.8%
Number of Channels: 2 channels (stereo)
total harmonic distortion.
Frequency Response:
Load Impedance: 4 Ω (4 Ω to 8 Ω allowance)
DVD fs=48 kHz: 16 Hz to 22 000 Hz
Equalizer Control Range:
fs=192 kHz: 16 Hz to 88 000 Hz
Frequencies: 60 Hz, 150 Hz, 400 Hz, 1 kHz,
VCD, CD: 16 Hz to 20 000 Hz
2.5 kHz, 6.3 kHz, 15 kHz
Dynamic Range: 93 dB
Level: ±10 dB
Signal-to-Noise Ratio: 95 dB
Signal-to-Noise Ratio: 70 dB
Wow and Flutter: Less than measurable limit
Line-In Level/Impedance:
MP3 : Max. Bit Rate: 320 kbps
1.5 V/20 kΩ load
WMA: Max. Bit Rate: 320 kbps
Line-Out Level/Impedance:
Center-Out Level/Impedance:
MONITOR SECTION
Subwoofer-Out Level/Impedance:
Screen: 3.5-inch wide liquid crystal panel
2.5 V/20 kΩ load (full scale)
Number of Pixels: 224 640 pixels
Color System: PAL
Drive Method:
Video Input (composite): 1 Vp-p/75 Ω
TFT (Thin Film Transistor) active matrix
Video Output (composite): 1 Vp-p/75 Ω
format
Other Terminals:
Color System: PAL
2nd AUDIO OUT, CD changer, Steering
wheel remote input (OE REMOTE)
GENERAL
Power Requirement:
TUNER SECTION
Operating Voltage:
Frequency Range:
DC 14.4 V (11 V to 16 V allowance)
FM: 87.5 MHz to 108.0 MHz
Grounding System: Negative ground
AM: (MW) 522 kHz to 1 620 kHz
Allowable Operating Temperature:
(LW) 144 kHz to 279 kHz
0°C to +40°C
[FM Tuner]
Dimensions (W × H × D):
Usable Sensitivity: 11.3 dBf (1.0 μV/75 Ω)
Installation Size (approx.):
50 dB Quieting Sensitivity:
182 mm × 52 mm × 160 mm
16.3 dBf (1.8 μV/75 Ω)
Panel Size (approx.):
Alternate Channel Selectivity (400 kHz): 65 dB
188 mm × 58 mm × 12 mm
Frequency Response: 40 Hz to 15 000 Hz
Mass (approx.):
Stereo Separation: 35 dB
1.9 kg (excluding accessories)
Capture Ratio: 1.5 dB
Design and specifications are subject to change
without notice.
67
AVX2EE.indb 67AVX2EE.indb 67 06.2.9 1:10:32 PM06.2.9 1:10:32 PM
Благодарим Вас за приобретение изделия JVC.
Перед тем, как приступать к эксплуатации, пожалуйста, внимательно прочитайте все инструкции с
тем, чтобы полностью изучить и обеспечить оптимальную работу этого устройства.
ВАЖНО ДЛЯ ЛАЗЕРНОЙ АППАРАТУРЫ
1. ЛАЗЕРНАЯ АППАРАТУРА КЛАССА 1
2. ПРЕДУПРЕЖДЕНИЕ: Не открывайте верхнюю крышку. Внутри устройства нет частей, которые
пользователь может отремонтировать. Ремонт должен осуществляться квалифицированным
обслуживающим персоналом.
3. ПРЕДУПРЕЖДЕНИЕ: Видимое и невидимое лазерное излучение при открытом устройстве,
отказе или нарушении блокировки. Избегайте прямого воздействия излучения.
4. ЭТИКЕТКА: ПРЕДУПРЕЖДАЮЩАЯ ЭТИКЕТКА, РАЗМЕЩЕННАЯ НА НАРУЖНОЙ
СТОРОНЕ УСТРОЙСТВА.
РУCCKИЙ
Для Вашей безопасности....
Как перенастроить Ваше
• Не повышайте слишком сильно громкость,
устройство
поскольку в результате этого заглушаются
При этом перезапустится
внешние звуки, что делает опасным
микропроцессор.
управление автомобилем.
Запрограммированные
• Остановите автомобиль перед тем, как
настройки будут также
выполнять любые сложные операции.
удалены.
Температура внутри автомобиля....
Если Вы припарковали Ваш автомобиль на
длительное время в жаркую или холодную
погоду, перед тем, как включать это
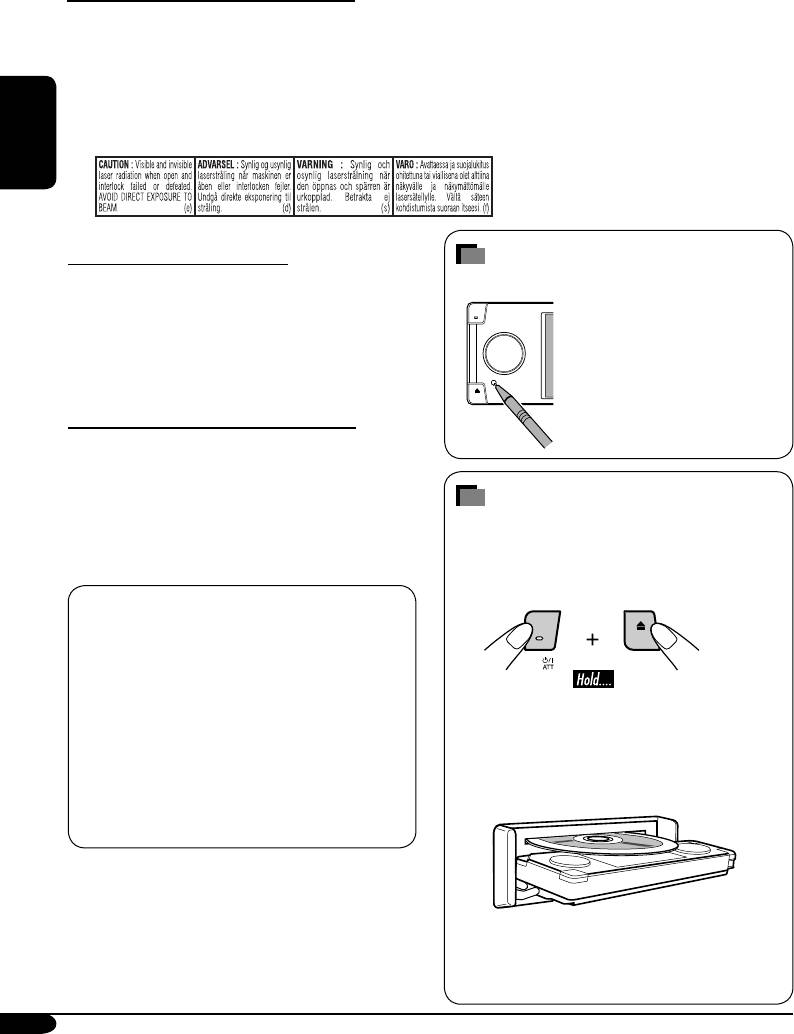
Принудительное извлечение
устройство, подождите до тех пор, пока
температура в автомобиле не придет в
диска
норму.
Если диск не распознается приемником
или не извлекается, извлеките диск
следующим образом.
Это устройство оборудовано системой
защиты авторских прав, методы которой
защищены патентами США, права на
котоpые принадлежат Macrovision и
другим владельцам авторских прав.
Использование атой технологии
На дисплее появляются надписи
защиты авторских прав должно быть
“NO EJECT?” (или “EJECT OK?”) и
санкциониpовано Macrovision и
“EMERGENCY EJECT?”.
предназначается для домашнего и другого
Несколько раз нажмите 5 / ∞ для выбора
ограниченного использования, кpоме
параметра “EMERGENCY EJECT?”, затем
случаев, когда Macrovision санкциониpует
нажмите ENT.
обратное. Разборка системы запрещена.
• Если это не поможет, попробуйте
перенастроить приемник.
• Будьте осторожны, не уроните диск
при извлечении.
2
RU02-09_KD-AVX2[EE]f.indd 2RU02-09_KD-AVX2[EE]f.indd 2 2/9/06 9:37:46 AM2/9/06 9:37:46 AM
ПРЕДУПРЕЖДЕНИЯ:
Предостережения (монитор):
• НЕ устанавливайте устройство в местах,
• Встроенный в приемник монитор
где:
изготовлен с высокой точностью,
– возникает препятствие для
однако, он может иметь нерабочие
функционирования руля и рычага
точки. Их появление неизбежно и не
переключения скоростей, так как это
является неисправностью.
может привести к аварии;
• Не подвергайте монитор воздействию
– возникает препятствие срабатыванию
прямых солнечных лучей.
устройств безопасности, например,
пневмоподушки, что может привести
к несчастному случаю со смертельным
исходом;
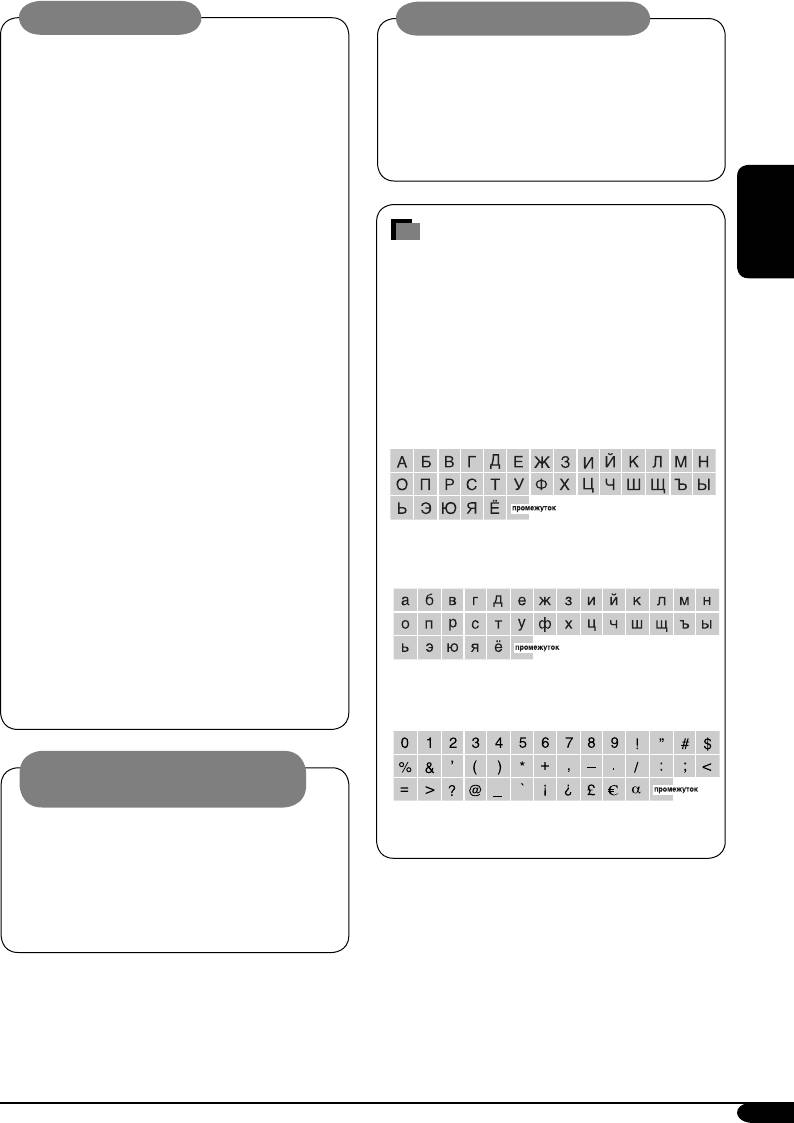
Символы, отображаемые на
– может ухудшиться обзор.
монитор
РУCCKИЙ
• НЕ используйте устройство, когда
При отображении различной
управляете рулем; это может привести к
информации на мониторе, кроме букв
аварии.
латинского алфавита (A – Z, a – z), могут
• Водителю не следует смотреть на монитор
использоваться следующие символы.
во время вождения.
Это может отвлечь и привести к аварии.
• Эти символы можно также
• Водителю не следует надевать наушники
использовать при присвоении
во время вождения. Во время вождения
названий (см. стр. 45).
опасно изолироваться от внешних шумов.
• Если необходимо использовать
устройство во время вождения,
внимательно смотрите вперед, иначе
может произойти дорожно-транспортное
происшествие.
• Если стояночный тормоз не включен,
Символы верхнего регистра (Кириллица)
на мониторе мигает сообщение “Parking
Brake”, и изображение воспроизведения
не отображается.
– Это предупреждение появляется только
в том случае, если провод стояночного
тормоза подключен к стояночной
тормозной системе автомобиля
Символы нижнего регистра (Кириллица)
(см. Pуководство по установке и
подключению).
Предостережение, касающееся
настройки громкости:
По сравнению с другими источниками
Цифры и знаки
звука диски создают незначительный
шум. Уменьшите громкость перед
воспроизведением диска, чтобы
предотвратить повреждение динамиков из-
за внезапного повышения уровня громкости
на выходе.
3
RU02-09_KD-AVX2[EE]f.indd 3RU02-09_KD-AVX2[EE]f.indd 3 2/9/06 3:39:47 PM2/9/06 3:39:47 PM
Введение—поддерживаемые диски
Типы воспроизводимых дисков
Неподдерживаемые диски
На данном приемнике можно воспроизводить
DVD-ROM (данные), диски DVD-RAM, DVD-
диски—12 см и 8 см—следующих типов:
R/DVD-RW, записанные в формате DVD-VR,
• Видео DVD-диск: Запись в системе
компакт-диски формата CD-ROM, CD-I (CD-I
кодирования цвета PAL с кодом региона “5”
Ready), Photo CD и т.д.
(см. ниже).
• При воспроизведении этих дисков будут
– Также могут быть воспроизведены диски
слышны шумы, что может привести к
DVD-R/DVD-RW, записанные в формате
повреждению динамиков.
DVD-Video.
• Звуковые DVD-диски
Предостережение для воспроизведения
• Видео компакт-диск (VCD) или звуковой
РУCCKИЙ
компакт-диск
дисков DualDisc
• MP3/WMA/WAV/JPEG/MPEG1,2/DivX:
• Сторона диска “DualDisc”, отличная от DVD,
Записанные либо на компакт-дисках формата
не совместима со стандартом “Compact Disc
CD-R/CD-RW, либо на DVD-дисках формата
Digital Audio”. Поэтому не рекомендуется
DVD-R/DVD-RW/+R/+RW/DVD-ROM.
использовать сторону диска DualDisc,
– Диски CD-R и CD-RW: совместимые со
отличную от DVD, на данном устройстве.
стандартами ISO 9660 Level 1, Level 2,
Romeo и Joliet.
– Диски DVD-R/DVD-RW/+R/+RW/DVD-
1
*
Разнородная файловая система,
ROM: совместимые с форматом UDF-
используемая для обеспечения
1
Bridge
*
.
совместимости с ISO 9660 для доступа к
• Можно воспроизводить только
любым файлам на диске. (UDF означает
завершенные диски +R/+RW (только в
Universal Disk Format—универсальный
формате DVD-Video). Однако использование
дисковый формат.)
двухслойных дисков +R на этом устройстве
не рекомендуется.
“DVD Logo” является товарным знаком
• Диски DVD-R, записанные в формате
DVD Format/Logo Licensing Corporation,
“multi-border”, тоже воспроизводятся (кроме
зарегистрированным в США, Японии и других
двухслойных дисков).
странах.
Правила использования некоторых дисков
могут отличаться от инструкций, приведенных
в данном руководстве.
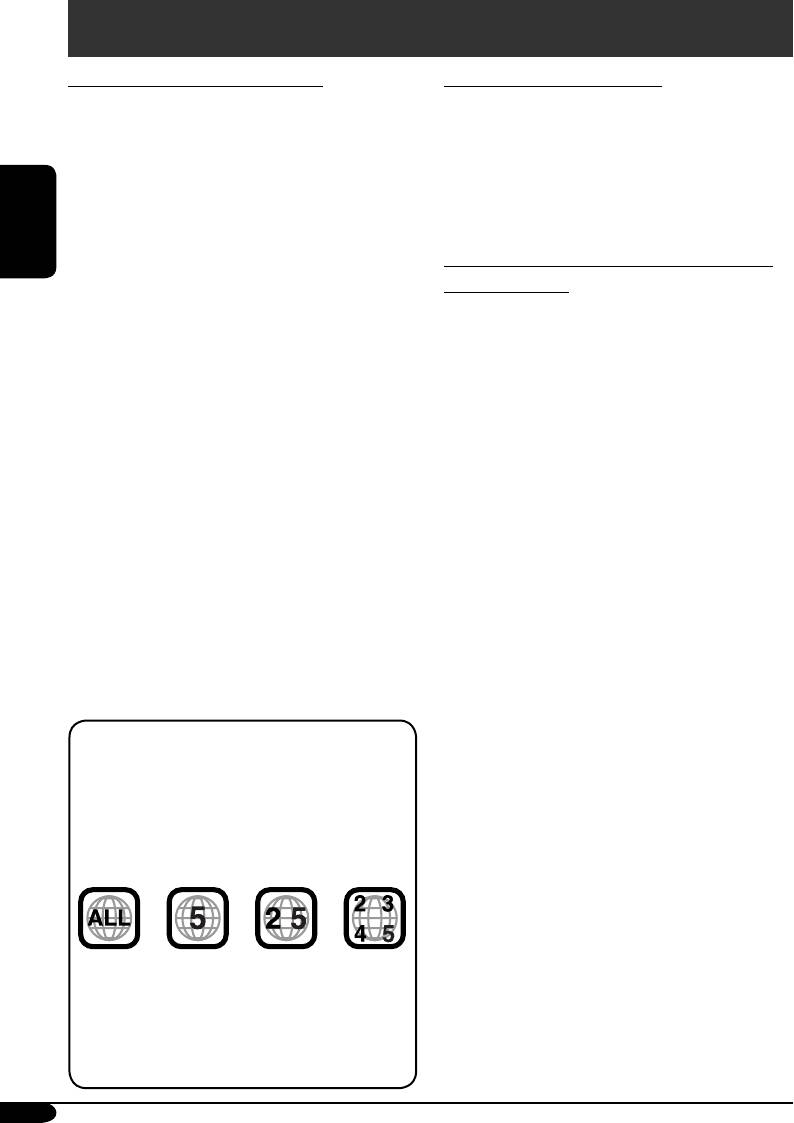
Примечание к коду региона:
Коды регионов указаны на проигрывателях
DVD и видео DVD-дисках. Данный
приемник рассчитан на воспроизведение
только тех DVD-дисков, код региона
которых содержит цифру “5”.
Пример:
Если вставить в устройство видео DVD-
диск с неверным кодом региона,
На мониторе устройства появляется
надпись “Region Error”, и диск извлекается.
На внешнем мониторе также отображается
надпись “REGION CODE ERROR”.
4
RU02-09_KD-AVX2[EE]f.indd 4RU02-09_KD-AVX2[EE]f.indd 4 2/9/06 9:37:51 AM2/9/06 9:37:51 AM
Содержание
Как пользоваться данным
руководством
Панель управления .................... 6
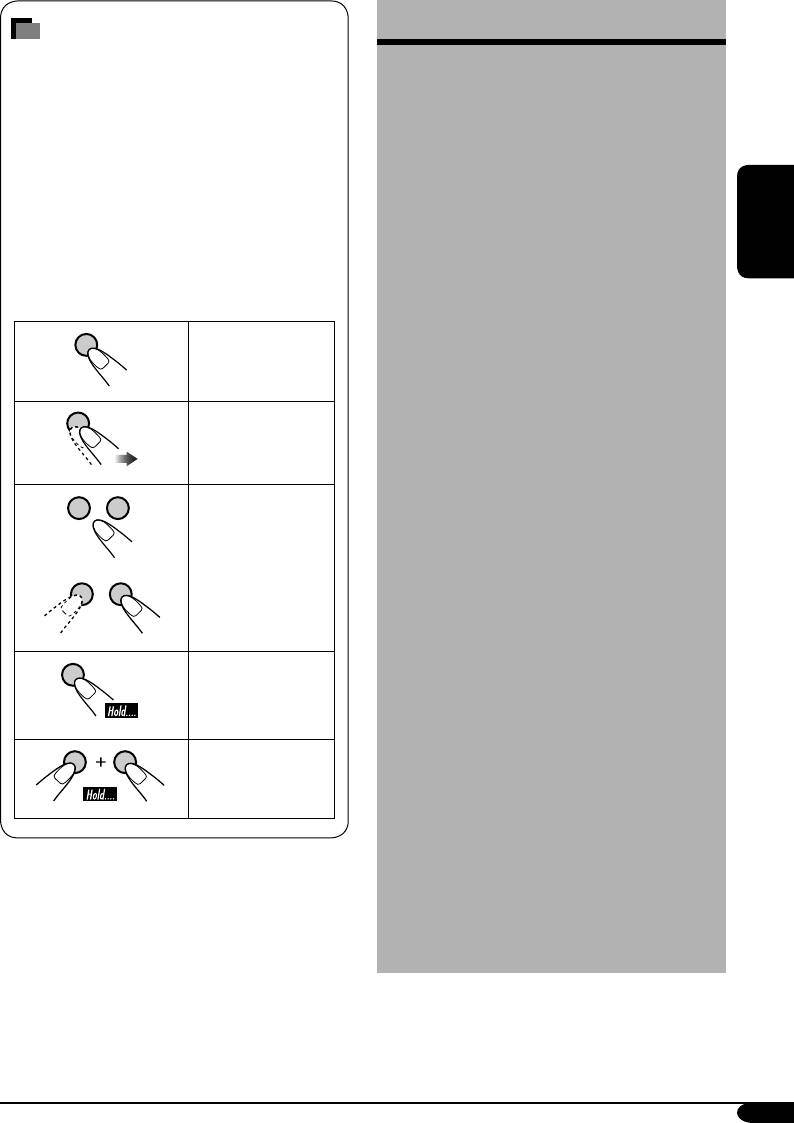
Для того, чтобы сделать объяснения
Пульт дистанционного управления
простыми и понятными, используются
следующие методы:
—
RM-RK240
.............................. 7
• Некоторые советы и примечания
Начало работы ............................ 10
приведены в разделе “Дополнительная
информация о приемнике” (см. стр. 58
Операции с радиоприемником ... 12
до 62).
Операции с FM RDS ...................... 15
• Операции, выполняемые с
использованием кнопок, в основном,
Операции с дисками .................... 18
описаны с помощью иллюстраций,
РУCCKИЙ
Уникальные дисковые функции
... 23
например:
Воспроизведение диска в режиме
Нажать
окружающего звучания
.......... 25
кратковременно.
Операции с диском с помощью
строки состояния ..................... 27
Нажать неоднократно.
Другие операции с диском .......... 31
Операции в режиме “Dual Zone”
... 33
Настройки меню AV ..................... 34
Нажать любую из
указанных.
Другие основные функции .......... 45
Операции с устройством
автоматической смены
компакт-дисков ...................... 46
Операции с тюнером DAB ............ 48
Нажать и удерживать
Операции с внешними
до получения
устройствами .......................... 53
необходимого
результата.
Операции iPod®/
Нажмите и удерживайте
проигрывателя D. ................... 54
нажатыми обе кнопки
Обслуживание ............................. 56
одновременно.
Коды Языков .............................. 57
Дополнительная информация о
приемнике .............................. 58
Устранение проблем ................... 63
Технические характеристики ...... 67
5
RU02-09_KD-AVX2[EE]f.indd 5RU02-09_KD-AVX2[EE]f.indd 5 2/9/06 9:37:53 AM2/9/06 9:37:53 AM
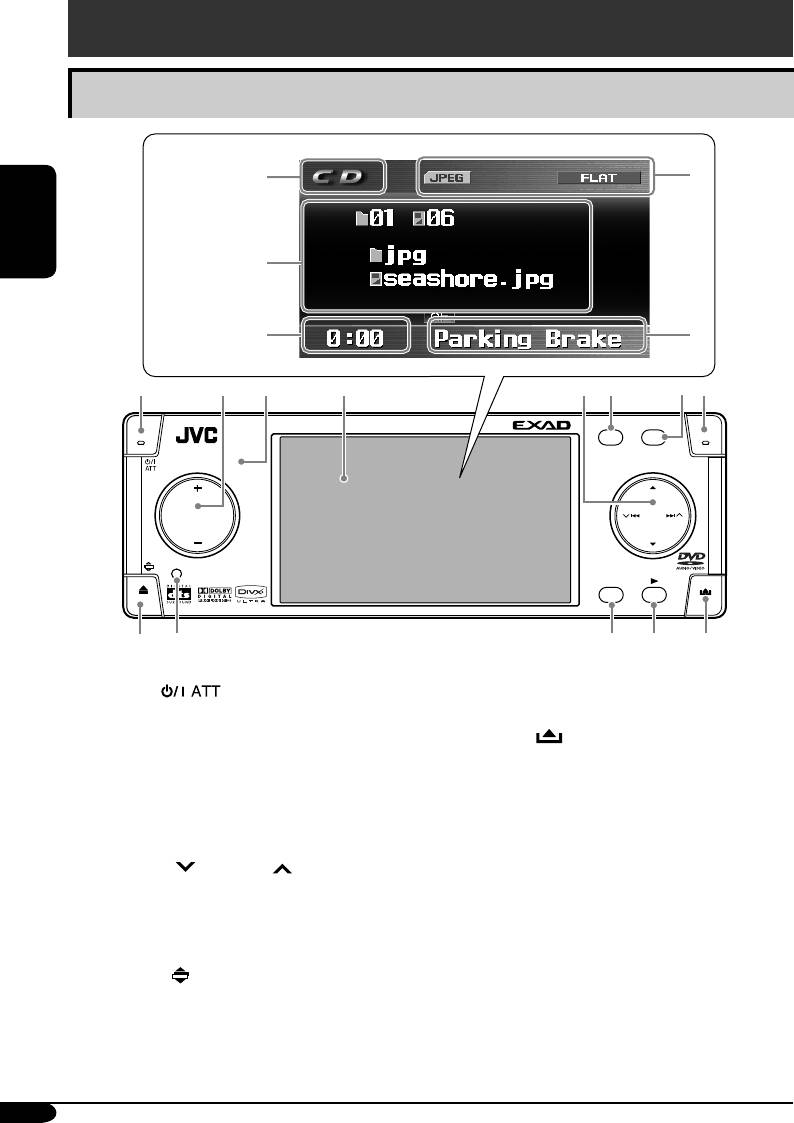
Панель управления
Расположение кнопок
Индикация
u
монитора
r
t
РУCCKИЙ
Пример:
Экран
источника для
воспроизведения
y
i
JPEG
1
2
3
4
58
6
7
KD-AVX2
ASPECT
MENU
A
T/P
SRC
D
DISP
7
/ BACK
ENTBAND
9
p
q
w
e
1 Кнопка (резервный/
w • Кнопка ENT (ввод)
работающий аттенюатор)
• Кнопка 3 (воспроизведение)
2 • Кнопка +/– (громкость +/–)
e Кнопка
(снятие панели управления)
• Кнопка SRC (источник звука)
• Кнопка DISP (D: дисплей)
Индикация монитора
3 Телеметрический датчик
r Индикатор источника
4 Монитор
t Основной дисплей
5 • Кнопки 5 (вверх) / ∞ (вниз)
y Часы
• Кнопки
4/¢
Отображает также уровень громкости
6 Кнопка MENU
при настройке громкости.
7 Кнопка ASPECT (A)
u Индикаторы состояния
8 Кнопка T/P
i Область информации о сигнале тревоги
9 • Кнопка 0 (извлечение)
Отображает также полосу уровня
• Кнопка
(угол)
громкости при настройке громкости.
p Кнопка сброса
q • Кнопка BAND
• Кнопка BACK
• Кнопка 7 (стоп)
6
RU02-09_KD-AVX2[EE]f.indd 6RU02-09_KD-AVX2[EE]f.indd 6 2/9/06 9:37:54 AM2/9/06 9:37:54 AM
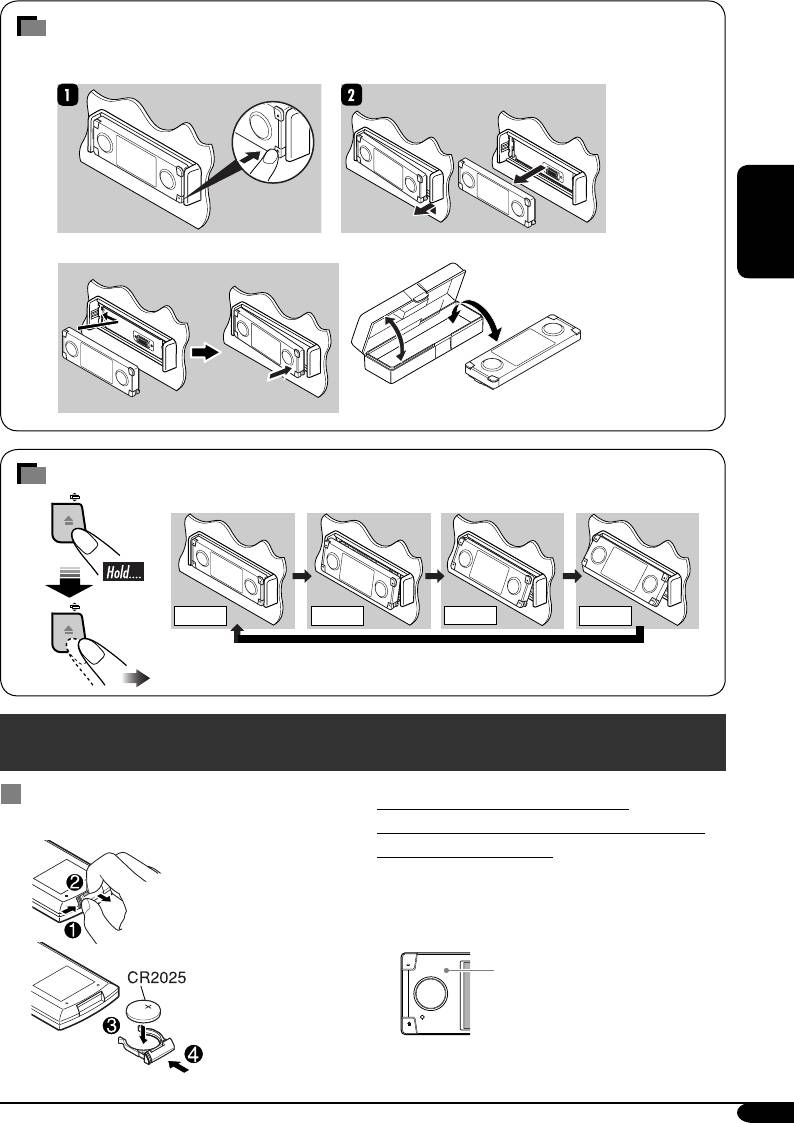
Отсоединение и подключение панели управления
Отсоединение...
Подключение...
РУCCKИЙ
Смена угла наклона панели управления
Angle 1 Angle 2
Angle 3
Angle 4
Внимание: Не помещайте свои пальцы за панель управления.
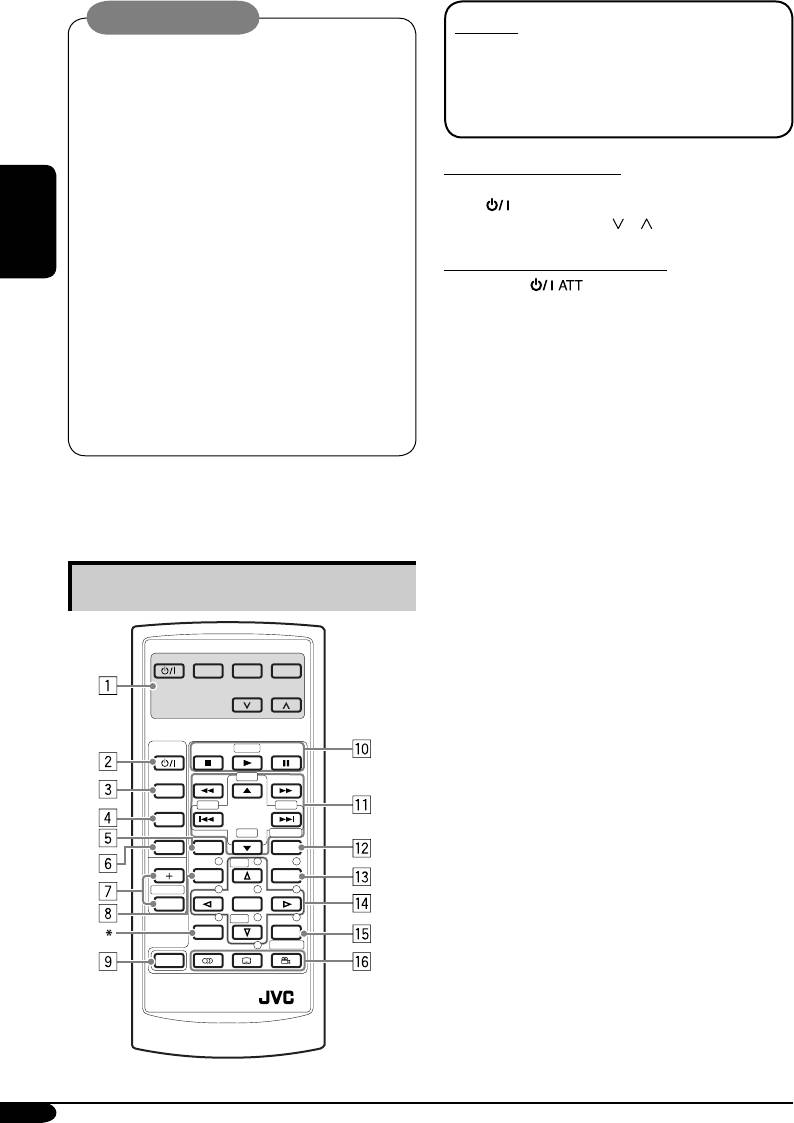
Пульт дистанционного управления — RM-RK240
Установка литиевой батареи-
Перед использованием пульта
таблетки (CR2025)
дистанционного управления выполните
следующие действия:
•
Направьте пульт дистанционного управления
непосредственно на телеметрический датчик
приемника. Убедитесь в том, что между ними
нет никаких препятствий.
Телеметрический
датчик
•
Не подвергайте телеметрический датчик
воздействию яркого света (прямых солнечных
лучей или искусственного освещения).
7
RU02-09_KD-AVX2[EE]f.indd 7RU02-09_KD-AVX2[EE]f.indd 7 2/9/06 9:37:55 AM2/9/06 9:37:55 AM
Предупреждение:
ВАЖНО:
•
Не устанавливайте никаких аккумуляторных
Если включен режим “Dual Zone” (см. стр.
батарей, кроме CR2025 или эквивалентных,
33) пульт дистанционного управления
в противном случае может произойти взрыв.
используется только для управления
• Во избежание несчастных случаев храните
проигрывателем компакт-дисков или DVD-
аккумуляторную батарею в недоступном
дисков.
для детей месте.
•
Во избежание перегрева или растрескивания
батареи, а также риска возникновения
MONITOR CONTROL
1
пожара соблюдайте следующие указания:
1
Кнопки управления монитором*
– Не перезаряжайте, не укорачивайте, не
• (резервный/работающий), MODE,
разбирайте и не нагревайте батарею, а
ASPECT, MENU,
и .
также не подвергайте ее воздействию
огня.
DVD/RECEIVER CONTROL
РУCCKИЙ
– Не оставляйте аккумуляторную батарею
2
Кнопка (резервный/работающий
рядом с другими металлическими
аттенюатор)
материалами.
• Включение и отключение питания, а
– Не разбирайте аккумуляторную батарею
также ослабление звука.
с помощью пинцета или аналогичного
3 Кнопка SOURCE
инструмента.
• Осуществляет выбор источника звука.
– При утилизации батареи или
помещении ее на хранение оберните
4 Кнопка BAND
батарею изоляционной лентой и
• Выбор диапазонов FM/AM/DAB.
изолируйте ее полюса.
5 Кнопка ASPECT
• Изменение формата экрана монитора на
Приемник поставляется с функцией рулевого
устройстве при воспроизведении дисков
пульта дистанционного управления.
DVD, VCD и т.п.
• Для получения информации о подключении
6 Кнопка DUAL
монитора см. Руководство по установке/
• Включение и отключение “Dual Zone”.
подключению (отдельное руководство).
7 Кнопки VOL + / –
• Настройка уровня звука.
Основные элементы и функции
• Также используются в качестве кнопок
2nd VOL +/–, если нажата кнопка SHIFT.
2
8 Кнопка TOP M (меню)*
EXTRA MONITOR CONTROL
• Отображение меню дисков DVD, DVD
MODE MENU
ASPECT
3
Audio, DivX и VCD
*
.
9 Кнопка SHIFT
4
p Кнопки основных операций с диском*
:
DVD / RECEIVER CONTROL
7 (стоп), 3 (воспроизведение), 8 (пауза)
ATT
ZOOM
• При нажатой кнопке SHIFT кнопка 3
(воспроизведение) также работает в
+10
SOURCE
качестве кнопки ZOOM.
–100
+100
q Кнопки дополнительных операций с
BAND
5
диском или операций с тюнером
*
–10
DIRECT
DUAL
ASPECT
OSD
Для дополнительных операций с диском:
VOL
123
DISC
+
• 5 / ∞
MENUTOP M
2nd VOL
456
– Выбор названий (для DVD), групп
ENTER
(для DVD Audio) или папок (для MP3/
78
DISC
–
9
WMA/WAV/JPEG/MPEG/DivX).
SETUP
RETURN
0
SURROUND
• 4 / ¢ (прокрутка назад/прокрутка
SHIFT
вперед)
6
• 1 / ¡ (поиск назад/поиск вперед)
*
RM-RK240
* Не используется в качестве кнопки SETUP
для данной модели.
8
RU02-09_KD-AVX2[EE]f.indd 8RU02-09_KD-AVX2[EE]f.indd 8 2/9/06 9:37:56 AM2/9/06 9:37:56 AM
Для операций с тюнером FM/AM:
y Кнопки специальных функций
• 5 / ∞
• DVD/VCD/DivX:
(аудио)
– Смена запрограммированных
• DVD/DivX:
(субтитры)
радиостанций.
• DVD:
(угол)
• 4 / ¢
•
Также работает в качестве кнопки
– Поиск радиостанций.
SURROUND при нажатии с кнопкой
Нажать кратковременно:
SHIFT.
автоматический поиск
– Можно изменить режим окружающего
Нажать и удерживать: поиск вручную
звучания (см. стр. 26).
Для операций с тюнером DAB:
1
• 5 / ∞
*
Кнопки работают только при
– Смена запрограммированных каналов.
использовании одного из мониторов JVC
• 4 / ¢
— KV-MR9010 или KV-MH6510.
2
– Смена служб при кратковременном
*
В сочетании с кнопкой SHIFT эти кнопки
РУCCKИЙ
нажатии.
выполняют функции нумерованных кнопок.
3
– Смена каналов при нажатии и
*
Только когда не используется функция PBC.
4
удерживании нажатыми.
*
Кнопки не используются для выполнения
операций с устройством автоматической
Операции с iPod или проигрывателем D.:
смены компакт-дисков.
• 5 / ∞
5
*
В сочетании с кнопкой SHIFT эти кнопки
∞: Пауза/останов или возобновление
выполняют функции кнопок +10/–10 и
воспроизведения.
+100/–100.
5: Вход в главное меню iPod или
6
*
Не используется для операций с JPEG. Звук
проигрывателя D. (Теперь кнопки
не слышен (DVD/VCD/MPEG/DivX).
5 / ∞/ 4 / ¢ работают как
7
7
*
5: Возврат к предыдущему меню.
кнопки выбора меню)
*
∞: Подтверждение выбора.
• 4 / ¢ (в режиме выбора меню для
воспроизведения)
– Выбор элемента при кратковременном
нажатии.
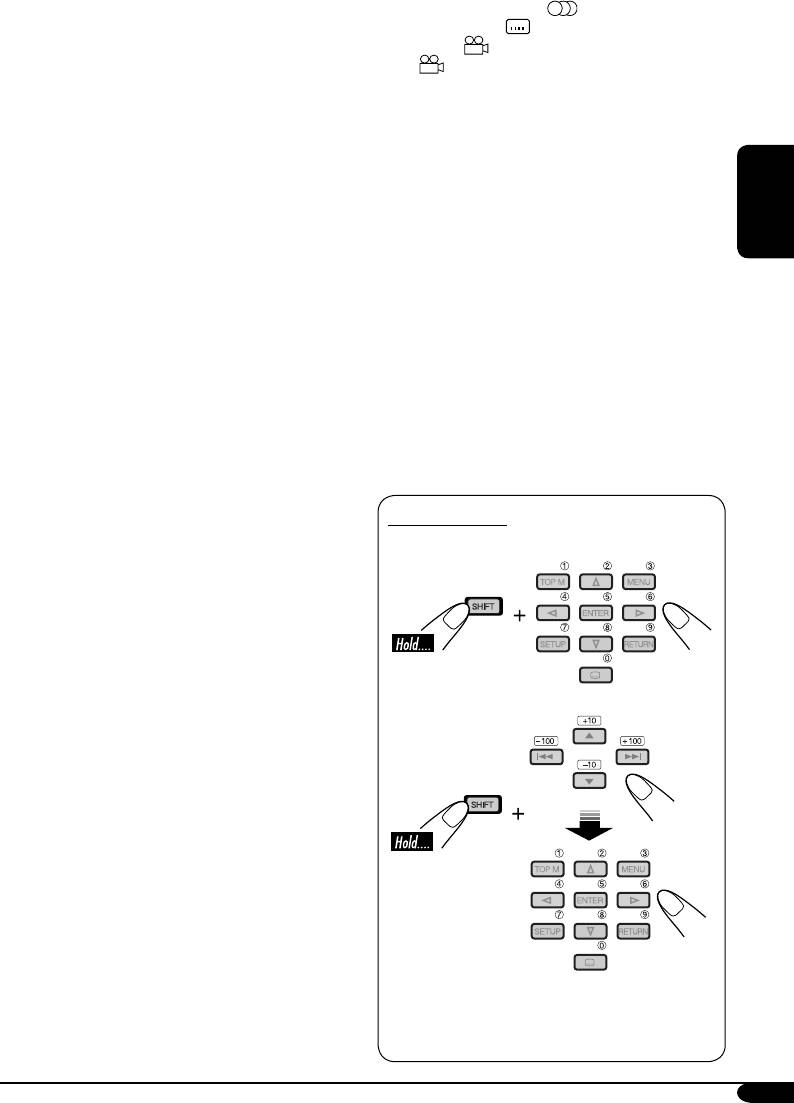
Выбор номера
(Затем нажмите ∞ для подтверждения
выбора.)
Выбор номеров 0 – 9:
– Пропуск сразу 10 элементов при
нажатии и удерживании нажатой.
w Кнопка OSD
• Отображение строки состояния.
• В сочетании с кнопкой SHIFT работает в
качестве кнопки DIRECT.
– Можно непосредственно выбирать
названия (для DVD), группы (для DVD
Выбор номеров больше 9:
Audio) или папки (для MP3/WMA/
WAV/MPEG/DivX) с использованием
нумерованных кнопок (см. правую
колонку и стр. 22).
2
e Кнопка MENU*
• Отображение меню диска DVD, DivX
2
и VCD
*
(Не работает для дисков DVD
Audio.)
2
r Кнопки операций в меню*
• Управление курсором (% , fi , @ , #), и
ENTER
• % / fi : При использовании источника
“CD-CH” функционируют в
качестве кнопок DISC + / –.
2
t Кнопка RETURN*
• Кнопки +100/–100 используются для
поиска номеров дорожек, больших 99
(недоступно для дисков CD/VCD/DVD/
DVD Audio).
9
RU02-09_KD-AVX2[EE]f.indd 9RU02-09_KD-AVX2[EE]f.indd 9 2/9/06 9:37:57 AM2/9/06 9:37:57 AM


