JVC KD-AVX1 – страница 2
Инструкция к Автомагнитоле JVC KD-AVX1
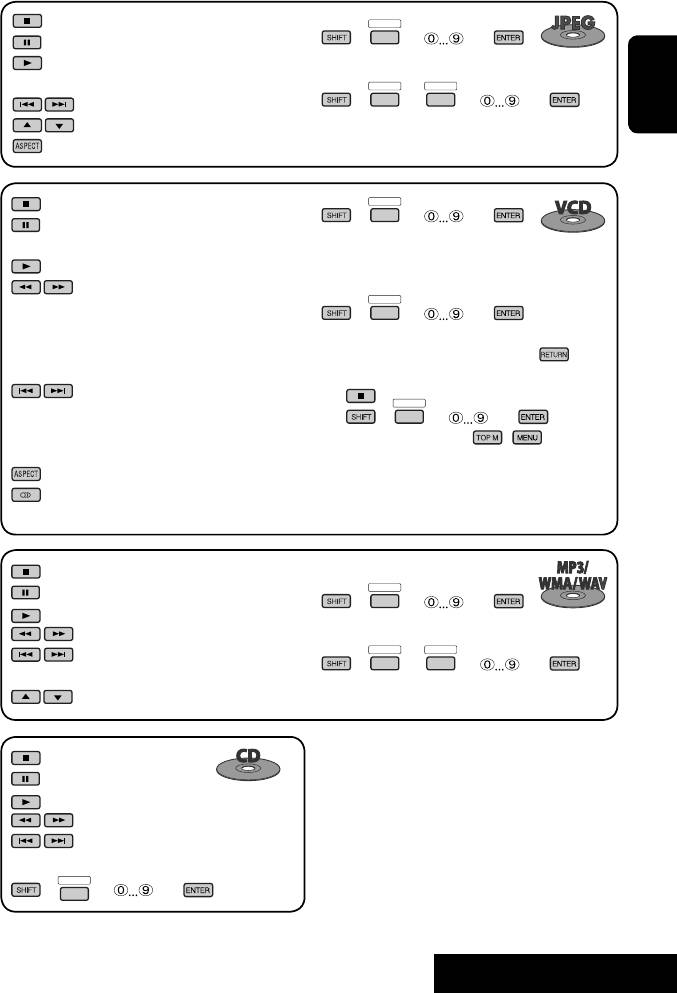
: Stop playback.
DIRECT
OSD
+(
= ) = :
: Shows the current file until you change it.
Select track (within the same folder).
: Start playback (Slide show: each file is shown
for a few seconds.).
DIRECT
DIRECT
OSD
OSD
+(
=
= ) = :
: Select track.
ENGLISH
Select folder.
: Select folder.
: Select aspect ratio.
DIRECT
: Stop playback.
OSD
+(
= ) = :
: Pause (Frame by frame playback if pressed
Select track.
during pause).
: Start playback.
During PBC playback...
:
DIRECT
1
Reverse/forward search*
. (Forward slow
OSD
+(
= ) = :
2
motion*
during pause. No sound can be
Select an item on the menu.
heard.)
• To return to the previous menus, press .
• Reverse slow motion does not work.
To cancel PBC playback
:
1
DIRECT
Press: Select track.
OSD
2 +(
= ) =
3
Hold: Reverse/forward search*
. (No sound
• To resume PBC, press / .
can be heard.)
: Select aspect ratio.
: Select audio channel (ST: stereo, L: left,
R: Right).
: Stop playback.
DIRECT
: Pause.
OSD
+(
= ) = :
: Start playback.
Select track (within the same folder).
1
: Reverse/forward search*
.
DIRECT
DIRECT
: Press: Select tracks.
OSD
OSD
+(
=
= ) = :
3
Hold: Reverse/forward search*
.
Select folder.
: Select folder.
1
*
Search speed: x2 ] x5 ] x10 ] x20 ] x60
: Stop playback.
2
*
Slow motion speed: 1/32 ] 1/16 ] 1/8 ] 1/4 ] 1/2
: Pause.
3
*
Search speed: x2 ] x10
: Start playback.
4
1
*
Search speed: ¡1 ] ¡2 ] ¡3
: Reverse/forward search*
.
5
*
Search speed: ¡1 ] ¡2
: Press: Select track.
3
Hold: Reverse/forward search*
.
DIRECT
+(
OSD
= ) = : Select track.
21
OPERATIONS
EN_KD-AVX11EE-f.indb 21EN_KD-AVX11EE-f.indb 21 07.1.12 5:17:45 PM07.1.12 5:17:45 PM
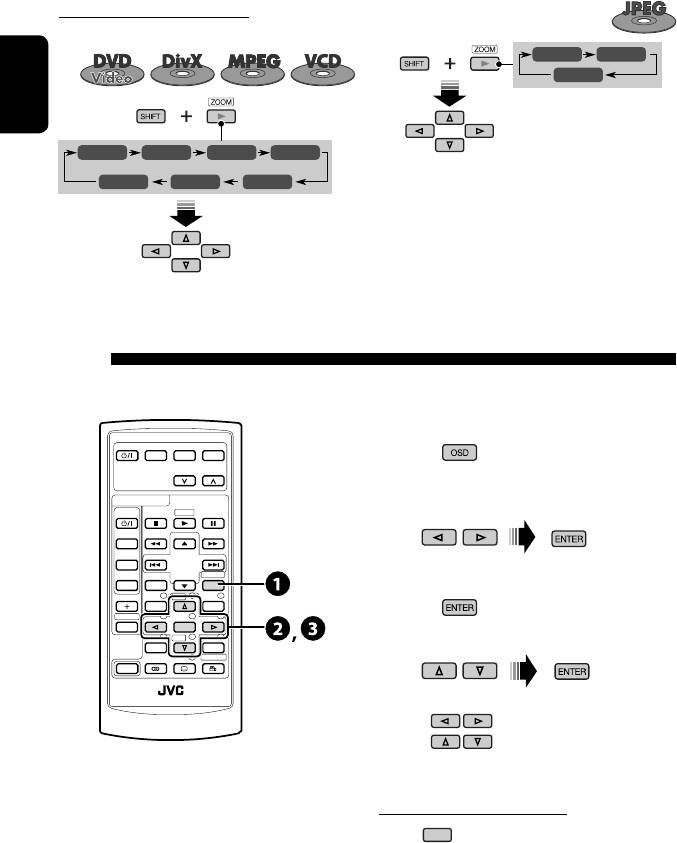
Enlarging the view (Zoom in)
While pausing...
During moving picture playback...
ZOOM 1 ZOOM 2
ZOOM OFF
ENGLISH
ZOOM 1 ZOOM 2 ZOOM 3 ZOOM 4
ZOOM OFF
ZOOM 5ZOOM 6
To cancel zoom, select “ZOOM OFF.”
Move the enlarged
portion.
Operations using the on-screen bar (DVD/VCD/DivX/MPEG1/MPEG2/
JPEG)
These operations are possible on the monitor using the remote controller.
~ Display the on-screen bar. (☞ page 23)
EXTRA MONITOR
MODE MENU
ASPECT
(twice)
DVD / RECEIVER
Ÿ Select an item.
AT T
ZOOM
SOURCE
BAND
DIRECT
! Make a selection.
DUAL
ASPECT
OSD
VOL
123
DISC
+
MENUTOP M
2nd VOL
456
ENTER
78
DISC
–
9
If a pop-up menu appears...
SETUP
RETURN
0
SURROUND
SHIFT
RM-RK241
• For entering time/numbers...
: Move the entry position
: Select a number
To remove the on-screen bar
OSD
22
EN_KD-AVX11EE-f.indb 22EN_KD-AVX11EE-f.indb 22 07.1.12 5:17:50 PM07.1.12 5:17:50 PM
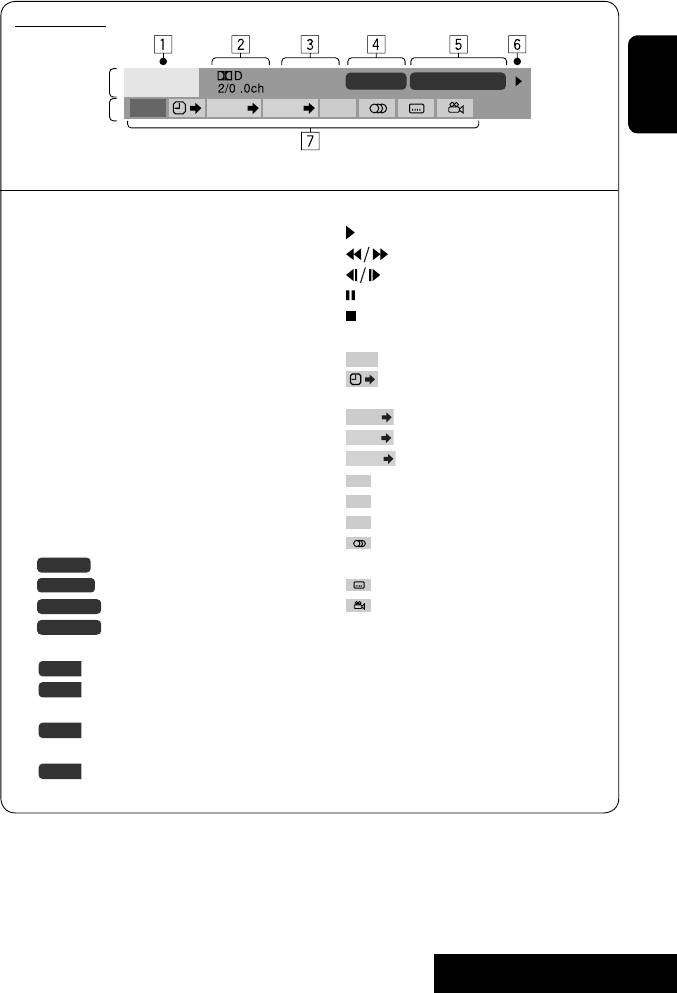
On-screen bar
Information
C. RPT
T02-C03 TOTAL 1:25:58
DVD -V
Operation
TIME TITLE CHAP
RPT
ENGLISH
Above example is of DVD Video. Items shown on the bar vary due to the disc type.
1 Disc type
6 Playback status
2 • DVD: Audio signal format
Play
• VCD: PBC
Reverse/forward search
3 Playback mode*
Reverse/forward slow-motion
DVD Video:
Pause
T. RPT: Title repeat
Stop
C. RPT: Chapter repeat
7 Operation icons
DivX/MPEG:
TIME
Change time indication (see 5)
T. RPT: Track repeat
Time Search (Specify a certain scene
F. RPT: Folder repeat
by entering time.)
TITLE
JPEG:
Title Search (by its number)
CHAP
F. RPT: Folder repeat
Chapter Search (by its number)
TRACK
VCD:
Track Search (by its number)
T. RPT: Track repeat
RPT
Repeat play*
D. RND: Disc random
INT
Intro play*
T. INT: Track intro
RND
Random play*
4 Playback information
Change the audio language or audio
T02-C03
Current title/chapter
channel
TRACK 01
Current track
Change the subtitle language
F001-T001
Current folder/track
Change the view angle
F001-F002
Current folder/file
5 Time indication
*
☞ page 18
TOTAL
Elapsed playing time of the disc
T. REM
Remaining title time (for DVD)
Remaining disc time (for others)
TIME
Elapsed playing time of the current
chapter/track
REM
Remaining time of the current
chapter/track
23
OPERATIONS
EN_KD-AVX11EE-f.indb 23EN_KD-AVX11EE-f.indb 23 07.1.12 5:17:52 PM07.1.12 5:17:52 PM
Using the Bluetooth® devices — Cellular phone/audio player
For Bluetooth operations, it is required to connect the Bluetooth Adapter (KS-BTA200) to the CD changer jack on the
rear.
• Refer also to the instructions supplied with the Bluetooth Adapter and the Bluetooth device.
ENGLISH
• Refer to the list (included in the box) to see the countries where you may use the Bluetooth® function.
Preparation: Operate the device to turn on its Bluetooth function.
To use a Bluetooth device through the unit (“Bluetooth Phone” and “Bluetooth Audio”) for the first time, you need to
establish Bluetooth wireless connection between the unit and the device.
• Once the connection is established, it is registered in the unit even if you reset your unit. Up to five devices can be
registered in total.
• Only one device can be connected at a time for each source (“Bluetooth Phone” and “Bluetooth Audio”).
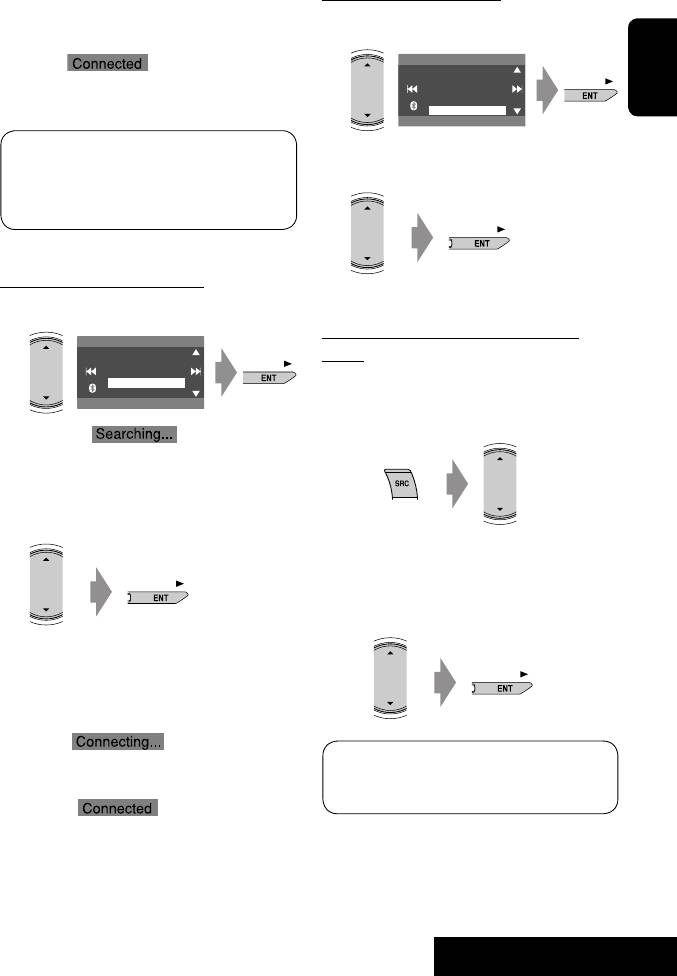
Registering a Bluetooth device
2
AV Menu
Registration (Pairing) methods
Use either of the following items in the <Bluetooth>
Setup
ENT
Enter
menu to register and establish the connection with a
3
device.
AV Menu
• Select “Bluetooth Phone” or “Bluetooth Audio” as the
source to operate the <Bluetooth> menu.
Bluetooth
ENT
Enter
<Open> Make the unit ready to establish
a new Bluetooth connection.
Bluetooth menu icon
4
Connection is established by
NEW DEVICE
Dial Menu
operating the Bluetooth device.
Message
Open
Search
<Search> Make the unit ready to establish
Special Device
a new Bluetooth connection.
Connection is established by
5
Enter a PIN (Personal Identification
operating this unit.
Number)* code to the unit.
• You can enter any number you like (1-digit to
16-digit number).
Registering using <Open>
* Some devices have their own PIN code. Enter the
1 Select “Bluetooth Phone” or “Bluetooth
specified PIN code to the unit.
Audio.”
PIN Code
Bluetooth Phone
FLAT
1234
NEW DEVICE
ENT
Enter
15: 45
• To delete an unwanted digit, select blank space.
Select “NEW DEVICE” by pressing 5 / ∞.
6
24
EN_KD-AVX11EE-f.indb 24EN_KD-AVX11EE-f.indb 24 07.1.12 5:17:54 PM07.1.12 5:17:54 PM
Connecting a special device
7 Operate the target Bluetooth device.
Enter the same PIN code (as entered in the above
Perform steps 1 to 3 on page 24, then...
step) on the device to be connected.
1
NEW DEVICE
Dial Menu
Message
Now connection is established and you can use the
Open
Search
ENGLISH
device through the unit.
Special Device
The device remains registered even after you
The unit displays the list of the preset devices.
disconnect the device. Use <Connect> (or activate
2 Select a device you want to connect.
<Auto Connect>) to connect the same device
from next time. (☞ pages 47 and 48)
Searching for available devices
3 Use <Open> (or <Search>) to connect.
Perform steps 1 to 3 on page 24, then...
1
Connecting/disconnecting a registered
NEW DEVICE
Dial Menu
device
Message
Open
Search
1 Select “Bluetooth Phone” or “Bluetooth
Special Device
Audio,” then select a registered device you
want to connect/disconnect.
The unit searches for available devices and displays
the list of them. (If no available device is detected,
“Device Unfound” appears.)
2 Select a device you want to connect.
2 Perform steps 2 and 3 on page 24, then...
• Select <Connect> to connect the selected
device.
• Select <Disconnect> to disconnect the selected
device.
3 Enter the specific PIN code of the device to
the unit.
• Refer to the instructions supplied with the device
to check the PIN code.
You can set the unit to connect a Bluetooth device
4 Use the Bluetooth device to connect.
automatically when the unit is turned on. (☞ page
48)
Now connection is established and you can use the
device through the unit.
25
EXTERNAL DEVICES
EN_KD-AVX11EE-f.indb 25EN_KD-AVX11EE-f.indb 25 07.1.12 5:17:55 PM07.1.12 5:17:55 PM
Deleting a registered device
2 Perform steps 2 and 3 on page 24, then...
• Select <Delete Pair>, then <Yes>.
1 Select “Bluetooth Phone” or “Bluetooth
Audio,” then select a registered device you
want to delete.
ENGLISH
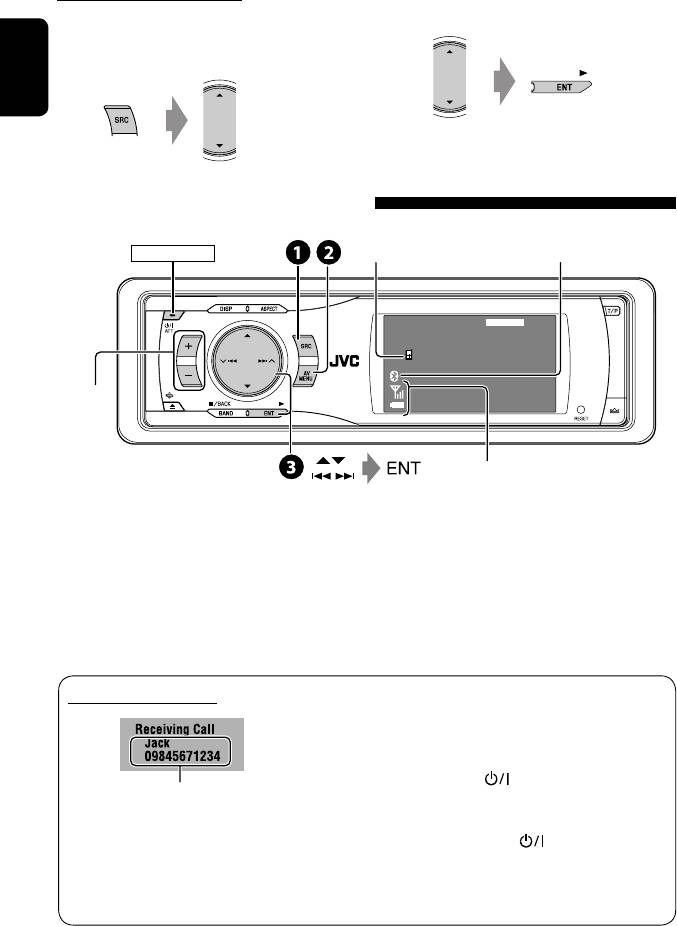
Using the Bluetooth cellular phone
Connected device
Bluetooth icon
1
POWER]ON
name
*
lights up when the adapter is connected.
Bluetooth Phone
FLAT
Connected Device Name
Adjust the
15: 45
3
volume
*
2
Status of the device
*
Signal strength/Battery remainder
~ Select “Bluetooth Phone.”
1
*
Each time you press 5 ∞, the registered device name
(and “NEW DEVICE” when a new device can be registered)
Ÿ Enter the <Bluetooth> menu.
appear in turn.
2
! Establish the connection with a device,
*
Appears only when the information comes from the
then make a call (or settings using the
device.
3
<Bluetooth> menu).
*
You can adjust the volume level for “Bluetooth Phone”
without affecting the volume level for other sources.
☞ pages 39, 46 – 48
When a call comes in...
When <Auto Answer> is activated...
The unit answers the incoming calls automatically.
(☞ page 48)
• When <Auto Answer> is deactivated, press any
button (except ATT or +/–) to answer the
Name and phone number (if acquired)
incoming call.
To end the call
• The source is automatically changed to
Hold any button (except ATT or +/–).
“Bluetooth Phone.”
• You can adjust the microphone volume level. (☞
page 48)
26
EN_KD-AVX11EE-f.indb 26EN_KD-AVX11EE-f.indb 26 07.1.12 5:17:57 PM07.1.12 5:17:57 PM
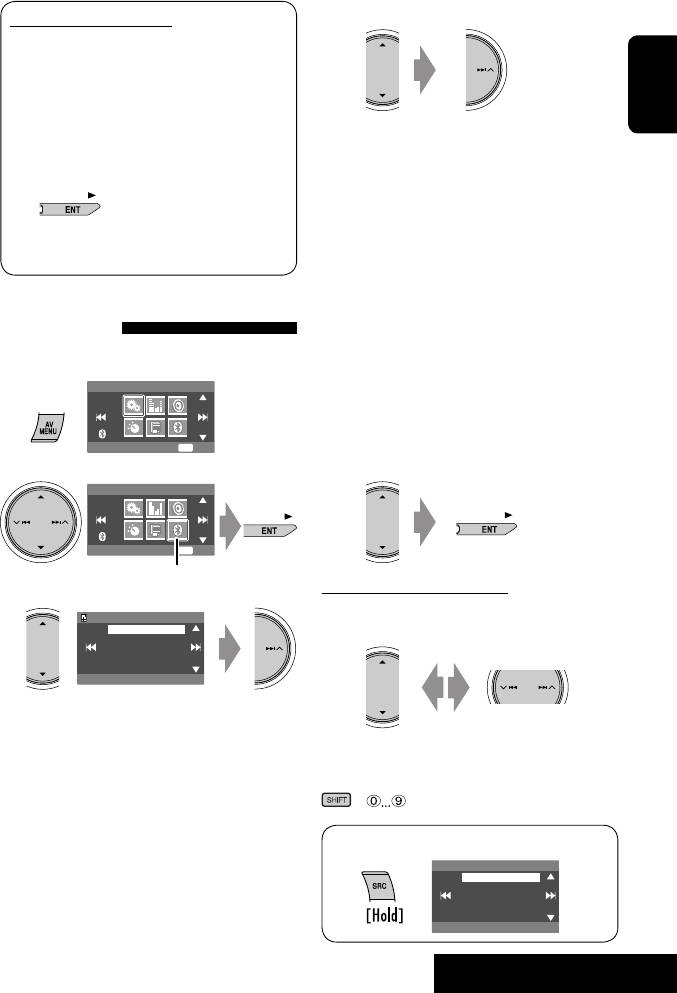
4 Select the method to make a call.
When an SMS comes in...
If the cellular phone is compatible with SMS
(Short Message Service) and <Message Info> is
set to <Auto> (☞ page 48), the unit rings and
“Receiving Message” appears on the monitor to
ENGLISH
inform you of the arrival of the message.
• Redial : Shows the list of the phone numbers
you have dialed. Go to the following step.
To read the message
• Received Calls : Shows the list of the received
While “Receiving Message” is displayed...
calls. Go to the following step.
• Phonebook : Shows the phone book of the
connected cellular phone. Go to the following
• You cannot edit or send a message through the
step.
unit.
• Missed Calls : Shows the list of the missed calls.
Go to the following step.
• Phone Number : Shows the phone number
Making a call
entry screen. ☞ “How to enter phone number”
You can make a call using one of <Dial Menu> items.
below.
• Voice Dialing (Only when the connected
1
AV Menu
cellular phone has the voice recognition system):
Speak the name you want to call.
Setup
ENT
Enter
5 Select the name/phone number you want to
call.
2
AV Menu
Bluetooth
ENT
Enter
Bluetooth menu icon
How to enter phone number
3
On the unit:
P902i
Dial Menu
Select a number. Move the entry position.
Message
Open
Search
Special Device
Redial
• To delete an unwanted digit, select blank space.
On the remote:
+
• <Dial Menu> can also be accessed by...
Dial Menu
Redial
Received Calls
Phonebook
Missed Calls
Phone Number
09845671234
27
EXTERNAL DEVICES
EN_KD-AVX11EE-f.indb 27EN_KD-AVX11EE-f.indb 27 07.1.12 5:17:58 PM07.1.12 5:17:58 PM
Presetting the phone numbers
• Preset List can also be accessed through <AV
You can preset up to six phone numbers.
Menu> = <List>.
1 Display the phone number you want to
AV Menu
preset by using one of <Dial Menu> items.
ENGLISH
Jack
ENT
Store
12312341234
Setup
ENT
Enter
09898765432
09845671234
AV Menu
ENT
Dial
Ex.: “Jack” is selected from the phone book
List
ENT
Enter
2 Select a preset number.
List menu icon
Preset Memory
1
11122223333
2
22233336666
3
44455556666
4
11133334444
5
99988887777
You can use the following buttons on the remote
6
55566668888
ENT
controller for the Bluetooth phone operations.
The phone number selected in step 1 is now stored
: Answer the incoming call.
in preset number 4.
: End the call.
: Adjust the volume.
+ : Enter the phone number/PIN code.
To call a preset number
On the remote:
123
DISC
+
MENUTOP M
SHIFT
456
ENTER
On the unit:
1
Preset List
1
11122223333
2
22233336666
3
44455556666
4
09845671234
5
99988887777
6
55566668888
ENT
2
Preset List
1
11122223333
2
22233336666
3
44455556666
4
09845671234
5
99988887777
6
55566668888
ENT
28
EN_KD-AVX11EE-f.indb 28EN_KD-AVX11EE-f.indb 28 07.1.12 5:18:00 PM07.1.12 5:18:00 PM
Using the Bluetooth audio player
Reverse/forward skip
Bluetooth icon
1
Connected device name
*
lights up when the adapter is connected.
POWER]ON
ENGLISH
Bluetooth Audio
FLAT
Connected Device Name
15: 45
2
Pause
Status of the device*
Signal strength/Battery remainder
1
*
Each time you press 5 ∞, the registered device names
~ Select “Bluetooth Audio.”
(and “NEW DEVICE” when a new device can be registered)
appear in turn.
Ÿ Start playback.
2
*
Appears only when the information comes from the
device.
• See page 24 for connecting a new device.
• See pages 25 for connecting/disconnecting a
registered device.
You can use the following buttons on the remote
• See page 26 for deleting a registered device.
controller for the Bluetooth audio operations.
: Start playback/pause.
: Reverse/forward skip
: Adjust the volume.
+ : Enter the PIN code.
Bluetooth Information:
If you wish to receive more information about Bluetooth, visit our JVC web site.
• The Bluetooth word mark and logos are owned by the Bluetooth SIG, Inc. and any use of such marks by Victor
Company of Japan, Limited (JVC) is under license. Other trademarks and trade names are those of their respective
owners.
29
EXTERNAL DEVICES
EN24-29_KD-AVX11EE.indd 29EN24-29_KD-AVX11EE.indd 29 07.1.12 8:08:33 PM07.1.12 8:08:33 PM
Listening to the CD changer
POWER]ON
Disc no./Track no./Playing time
ENGLISH
CD-CH
FLAT
01 01 0:02:38
Disc Title
Artist Name
Current Track Title
15: 45
“No Name” appears for conventional CDs
4 ¢ Press: Select track
Hold: Reverse/forward search
5 ∞ Press: Select folder (MP3 only)
Hold: Display Disc List
It is recommended to use a JVC MP3-compatible CD
• While playing an MP3 disc, you can select and
changer with your unit.
start playing a track in the disc using the Lists:
• You can play only CDs (CD-DA) and MP3 discs.
Disc List (select the current disc) = Folder List
= File List, then start playing a track you want.
Preparation:
Make sure <Changer> is selected for the external
Disc List
input setting. (☞ page 44)
MP3 DISC
DISC 02
DISC 03
DISC 04
DISC 05
~ Select “CD-CH.”
Off
DISC 06
ENT
Ÿ Display the Disc List.
Folder List
Disc List
My Best
MP3 DISC
Cinema
DISC 02
Pops
DISC 03
My Best2
DISC 04
Favorite Song
DISC 05
Off
Cinema2
ENT
Off
DISC 06
ENT
File List
Song011.mp3
• Each time you hold the button, you can
Song012.mp3
Song013.mp3
display the other list of the remaining discs.
Song014.mp3
Song015.mp3
Off
Song016.mp3
ENT
! Select a disc to start playing.
Disc List
MP3 DISC
DISC 02
DISC 03
DISC 04
DISC 05
Off
DISC 06
ENT
30
EN_KD-AVX11EE-f.indb 30EN_KD-AVX11EE-f.indb 30 07.1.12 5:18:03 PM07.1.12 5:18:03 PM
Selecting playback modes
You can use only one of the following playback
3
Mode
modes—Intro/Repeat/Random.
All Off
Intro
Ex. To select Track Repeat
Repeat
Random
1
AV Menu
Off
ENGLISH
4
Repeat
Setup
ENT
Enter
Off
Track
Disc
2
AV Menu
ENT
Set
When one of the playback modes is selected, the
Mode
ENT
Enter
corresponding indicator lights up on the monitor.
Mode menu icon
To cancel, select <All Off> in step 3 or <Off> in
step 4.
Disc type Intro Repeat Random
Track: Plays the first 15
Track: Repeats current track
Disc: Randomly plays all tracks
seconds of each track
Disc: Repeats all tracks of the
of the current disc
Disc: Plays the first 15 seconds
current disc
All: Randomly plays all tracks
of the first track of all
of all loaded discs
loaded discs
Track: Plays the first 15
Track: Repeats current track
Folder: Randomly plays all
seconds of each track
Folder: Repeats all tracks of
tracks of current folder,
Folder: Plays the first 15
the current folder
then tracks of next folders
seconds of the first track of
Disc: Repeats all tracks of the
Disc: Randomly plays all tracks
each folder
current disc
All: Randomly plays all tracks
Disc: Plays the first 15 seconds
of all loaded discs
of the first track of all
loaded discs
You can use the following buttons on the remote
To use <Mode> menu
☞ above.
controller to operate the CD changer.
☞ page 30.
DISC
–
DISC
+
To use <List> menu
Disc List = Folder List =
: Select disc.
File List
: Select folder (MP3 only).
: Select track.
31
EXTERNAL DEVICES
EN_KD-AVX11EE-f.indb 31EN_KD-AVX11EE-f.indb 31 07.1.12 5:18:04 PM07.1.12 5:18:04 PM
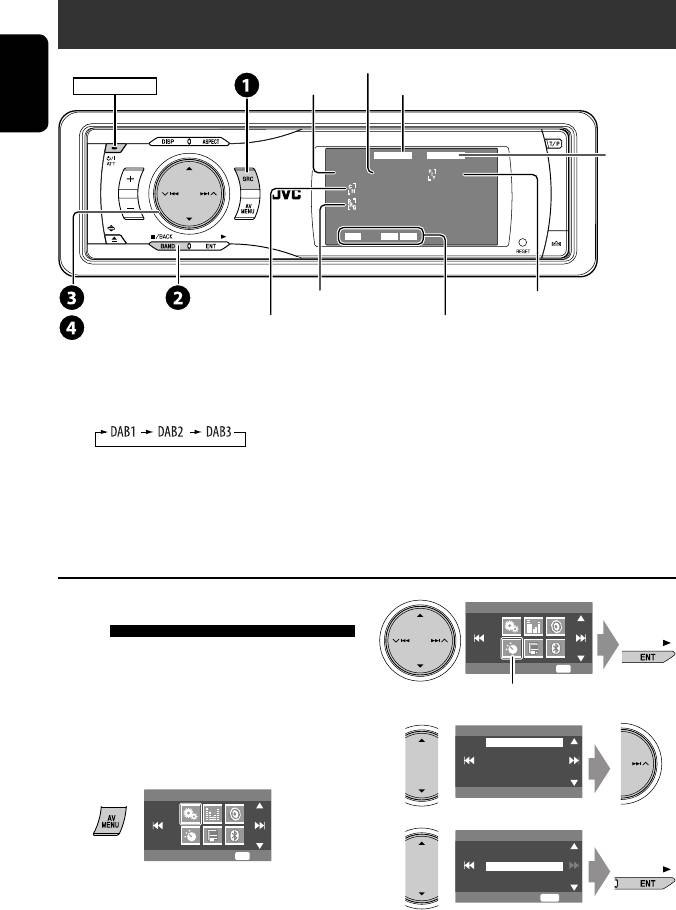
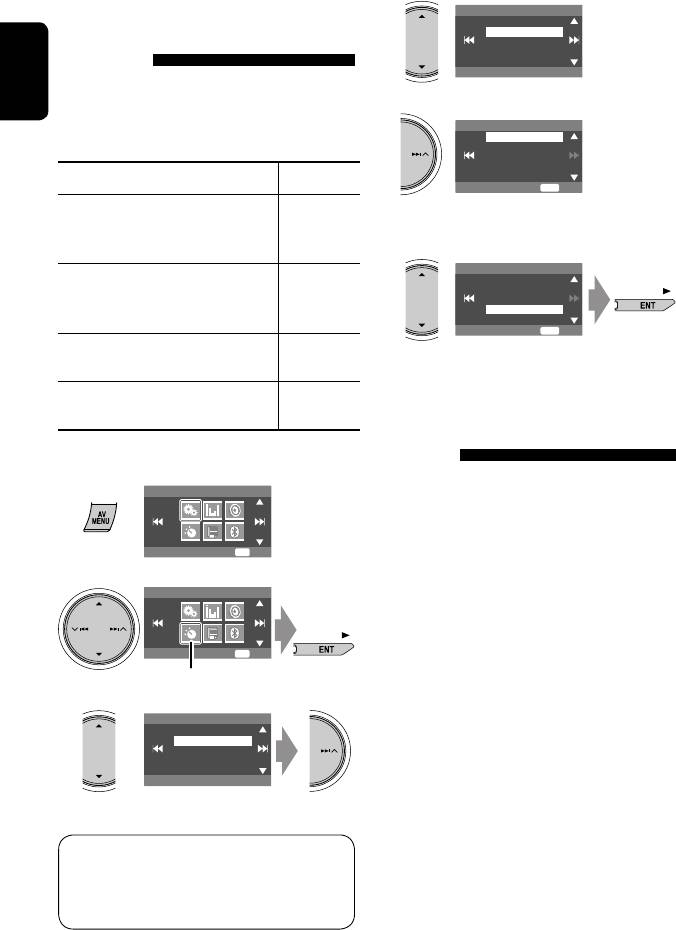
Listening to the DAB tuner
Preset No.
Band
TEXT indicator
POWER]ON
ENGLISH
DAB
FLATTEXT
☞ page 37
DAB1 Preset1
News
Bayern
Bayern2
AFDRC ANN
15: 45
¢ 4
Frequency/Service label
PTY code
Channel (or Ensemble
DAB indicators/Standby Reception indicators
5∞
label*)
* Information changes when you press DISP. While tuning in a
~
Select “DAB.”
service with DLS (Dynamic Label Segment), the TEXT indicator
Ÿ Select the bands.
lights up.
! Searching for an ensemble.
• Manual Search: Hold either 4 or ¢ until “Manual Search” appears on the display, then press it
repeatedly.
⁄ Select a service (either primary or secondary) to listen to.
When surrounding sounds are
2
AV Menu
noisy
Some services provide Dynamic Range Control (DRC)
Mode
ENT
Enter
signals together with their regular programme signals.
DRC will reinforce the low level sounds to improve your
Mode menu icon
listening.
3
Mode
• The DRC indicator will light up while tuning in a
D. Range Control
Announce Standby
service with the DRC signals.
Pty Standby
1
AV Menu
Off
4
D. Range Control
Off
Setup
ENT
Enter
DRC1
DRC2
DRC3
ENT
Exit
• As the number increases, the effect becomes
stronger.
32
EN_KD-AVX11EE-f.indb 32EN_KD-AVX11EE-f.indb 32 07.1.12 5:18:06 PM07.1.12 5:18:06 PM
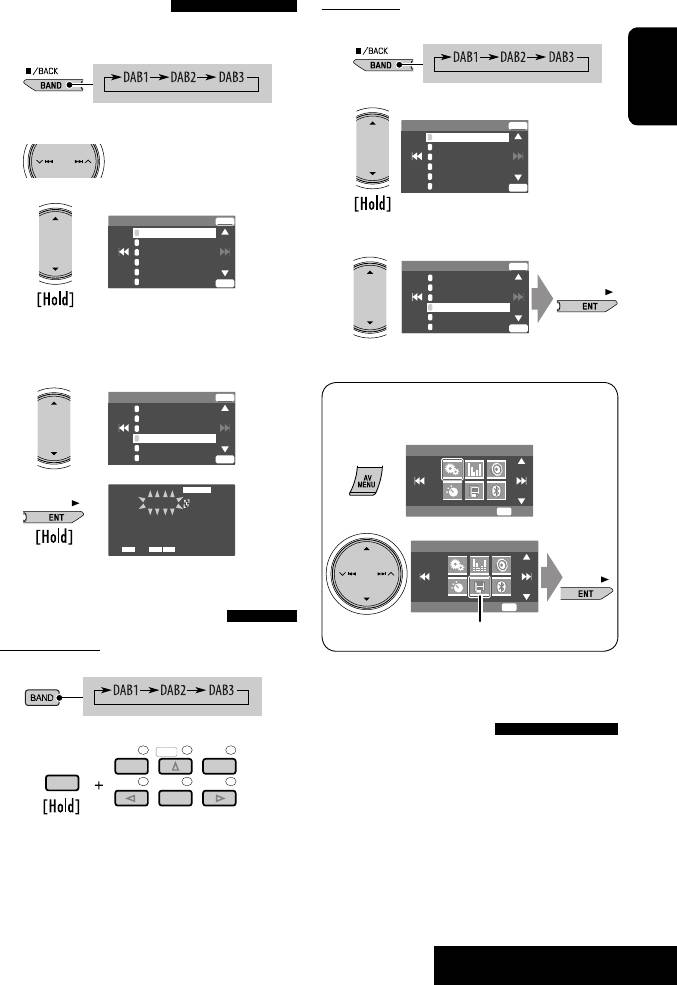
On the unit:
Manual presetting
You can preset six DAB services (primary) for each band.
1
1
2
ENGLISH
DAB1 Store
ENT
2 Search for a service you want to preset.
1
Service Label
2
No Serv.
3
FFH
4
Bayern
5
HRS
6
HRH
ENT
3
DAB1
Store
ENT
1
Service Label
3 Select a preset service.
2
No Serv.
3
FFH
4
No Serv.
DAB1 Store
ENT
5
HRS
1
6
Service Label
HRH
ENT
2
No Serv.
3
FFH
4
Bayern
5
HRS
• Preset List can also be accessed through <AV
6
HRH
ENT
Menu> = <List> (☞ right).
4 Select a preset number.
DAB1 Store
ENT
• Preset List can also be accessed through <AV
1
Service Label
2
No Serv.
Menu> = <List>.
3
FFH
4
No Serv.
5
HRS
AV Menu
6
HRH
ENT
5
DAB
FLAT
DAB1 Preset4
Setup
ENT
Enter
Bayern
211.648MHz 10B
AF ANNDRC
15: 45
AV Menu
List
ENT
Enter
Selecting preset stations
List menu icon
On the remote:
1
Activating/deactivating TA/PTY
Standby Reception
2
123
DISC
+
• Operations are exactly the same as explained on page
MENUTOP M
13 for FM RDS stations.
SHIFT
456
ENTER
• You cannot store PTY codes separately for the DAB
tuner and for the FM tuner.
33
EXTERNAL DEVICES
EN_KD-AVX11EE-f.indb 33EN_KD-AVX11EE-f.indb 33 07.1.12 5:18:07 PM07.1.12 5:18:07 PM
Activating/deactivating
4
Announce Standby
Off
Announcement Standby
Transport News
Reception
Announcement Standby Reception allows the
ENGLISH
unit to switch temporarily to your favorite service
5
Announce Standby
(announcement type).
Transport News
Warning
News
Weather
Event
Announcement Standby Reception Indicator
ENT
Exit
Activate <AV Menu>, then select
6 Select an announcement type for
<Mode>, <Announce Standby>
ANN
Announcement Standby Reception.
(☞ below).
Announce Standby
The unit will temporarily switch to your
Lights up
Transport News
Warning
favorite service from any source other
News
Weather
than FM/AM.
Event
ENT
Exit
Not yet activated. Tune in to another
Flashes
service providing the related signals.
To deactivate, select <Off> in step 4,
Goes off
Tracing the same programme—
then press ENT once (☞ below).
Alternative Frequency Reception
(DAB AF)
Activating Announcement Standby Reception
• While receiving a DAB service:
1
AV Menu
When driving in an area where a service cannot be
received, this unit automatically tunes in to another
ensemble or FM RDS station, broadcasting the same
Setup
ENT
Enter
programme.
2
• While receiving an FM RDS station:
AV Menu
When driving in an area where a DAB service is
broadcasting the same programme as the FM RDS
station, this unit automatically tunes in to the DAB
Mode
ENT
Enter
service.
Mode menu icon
3
When shipped from the factory, Alternative Frequency
Mode
D. Range Control
Reception is activated.
Announce Standby
Pty Standby
To deactivate the Alternative Frequency
Reception, ☞ pages 39 and 43.
Off
Available announcement types:
Transport News, Warning, News, Weather, Event,
Special Event, Radio Info, Sports News, Financial
News.
34
EN_KD-AVX11EE-f.indb 34EN_KD-AVX11EE-f.indb 34 07.1.12 5:18:09 PM07.1.12 5:18:09 PM

Listening to the iPod/D. player
Track no./Playing time
POWER]ON
☞ page 37
ENGLISH
¢ 4 :
D.PLAYER
FLAT
Press: Select track
01 0:45:38
Hold: Reverse/forward search
Album Name
Artist Name
Track Title
15: 45
5 ∞
5 : Enter player’s menu
∞ : Pause/stop playback
• To resume, press again.
It is required to connect the interface adapter (KS-
3 Confirm the selection.
PD100 for Apple iPod or KS-PD500 for JVC D. player) to
the CD changer jack on the rear.
4 Repeat steps 2 and 3 to select a track.
Preparation:
• When a track is selected finally, playback starts.
Make sure <iPod> or <D. Player> is selected for the
• To return to the previous menu...
external input setting. (☞ page 44)
Selecting playback modes
~ Select “iPod” or “D. PLAYER.”
Playback starts automatically.
1 Display <AV Menu>, then select <Mode>
menu icon.
Ÿ Select a track.
2 Enter <Mode>, then select <Repeat> or
<Random>.
Selecting a track from the
3 Select an appropriate option.
player’s menu
Repeat One: Functions the same as “Repeat
1 Enter the player’s menu.
One” or “Repeat Mode
= One.”
• This mode will be canceled if no
All: Functions the same as “Repeat
operations are done for about 5 seconds.
All” or “Repeat Mode = All.”
2 Select the desired item.
Random Album: Functions the same as
Press: Select an item
“Shuffle Albums” of the iPod.
Hold: Skip 10 items at a time
Song/On: Functions the same as
“Shuffle Songs” or “Random Play
For iPod:
= On.”
Playlists Ô Artists Ô Albums Ô Songs
• When one of the playback modes is selected, the
Ô Genres Ô Composers Ô (back to the
corresponding indicator lights up on the monitor.
beginning)
To cancel, select <All Off> in step 2 or <Off> in
For D. player:
step 3.
Playlist Ô Artist Ô Album Ô Genre Ô
• iPod is a trademark of Apple Computer, Inc., registered in
Track Ô (back to the beginning)
the U.S. and other countries.
35
EXTERNAL DEVICES
EN_KD-AVX11EE-f.indb 35EN_KD-AVX11EE-f.indb 35 07.1.12 5:18:10 PM07.1.12 5:18:10 PM
Listening to other external components
AV-INPUT
You can connect an external component to the LINE IN/VIDEO IN plugs.
ENGLISH
DISP: Press if no playback picture appears, but source information (this) screen is displayed.
Assigned title (☞ page 38) ☞ page 37
POWER]ON
AV-IN
FLAT
AV-INPUT
15: 45
~ Select “AV-IN.”
Ÿ Turn on the connected component and start playing the source.
If you select <Camera Mirror> for <AV Input> (☞ page 44), some status messages such as volume level
change will not appear on the monitor while viewing the picture.
EXT-INPUT
You can connect an external component to the CD changer jack on the rear using the Line Input Adapter—KS-U57
(not supplied) or AUX Input Adapter—KS-U58 (not supplied).
Assigned title (
☞ page 38) ☞ page 37
POWER]ON
EXT-IN
FLAT
EXT-INPUT
15: 45
Preparation:
Make sure <External Input> is selected for the external input setting. (☞ page 44)
~ Select “EXT-IN.”
Ÿ Turn on the connected component and start playing the source.
36
EN_KD-AVX11EE-f.indb 36EN_KD-AVX11EE-f.indb 36 07.1.12 5:18:12 PM07.1.12 5:18:12 PM
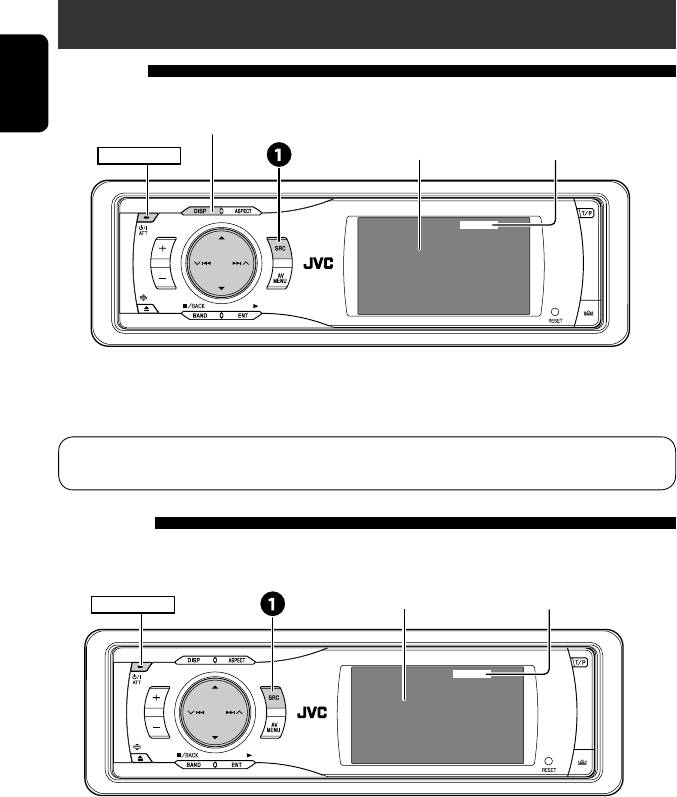
Sound equalization
POWER]ON
ENGLISH
Edit
+03
60.0 Hz
ENT
Store
Selecting sound mode
Storing your own adjustment
You can store your adjustment into User1, User2, and
~
AV Menu
User3.
1 Repeat steps ~ and Ÿ, then...
Setup
ENT
Enter
Equalizer
Flat
Hard Rock
R&B
Pop
Ÿ
Equalizer menu icon
Jazz
ENT
Exit
AV Menu
Edit
+03
Equalizer
ENT
Enter
60.0 Hz
ENT
Store
!
Select a sound mode.
2 Adjust.
Equalizer
Flat
Hard Rock
R&B
Pop
Jazz
ENT
Exit
• For preset values of each sound mode, ☞ page
3 Store.
54.
User Store
User1
User2
User3
ENT
Store
37
SETTINGS
EN_KD-AVX11EE-f.indb 37EN_KD-AVX11EE-f.indb 37 07.1.12 5:18:13 PM07.1.12 5:18:13 PM
Assigning titles to the sources
Press: Change character set
Hold: Erase title
POWER]ON
ENGLISH
Title Entry
AV-In Name
MY BEST
DISP
ENT
Store
You can assign titles to “AV-IN” and “EXT-IN.”
! Assign a title.
Ex.: Assigning title to “AV-IN”
1 Select a character, then move the entering
position.
~ Select “AV-IN.”
Ÿ Display the title entry screen.
1
AV Menu
• To change the character set, press DISP.
Setup
ENT
Enter
(For available characters, ☞ page 53.)
2
2 Repeat step 1 until you finish entering the
title.
AV Menu
• The maximum number of characters is
16.
Mode
ENT
Enter
⁄ Finish the procedure.
Mode menu icon
Mode
Title Entry
Title Entry
AV-In Name
AV-INPUT
DISP
ENT
Store
38
EN_KD-AVX11EE-f.indb 38EN_KD-AVX11EE-f.indb 38 07.1.12 5:18:14 PM07.1.12 5:18:14 PM
Menu operations
Setup Equalizer Sound
POWER]ON
ENGLISH
AV Menu
Setup
ENT
Enter
Mode List Bluetooth
Ex. Changing the <High Pass Filter> setting
!
Sound
Fader/Balance
~
AV Menu
Volume Adjust
Subwoofer
High Pass Filter
Crossover
Through
Setup
ENT
Enter
• For some items, repeat this steps to set the
Non-available items will be displayed being
sub-items.
shaded.
⁄
Ÿ
Sound menu icon
High Pass Filter
Through
On
AV Menu
ENT
Exit
Sound
ENT
Enter
Menu items
Display
Setup
Clock
Equalizer
AV Menu
Disc Setup 1
Sound
Disc Setup 2
Bluetooth
Tuner
Setup
ENT
Enter
List
Input
Mode
Others
• The display indications may change according to change of the specifications.
39
SETTINGS
EN_KD-AVX11EE-f.indb 39EN_KD-AVX11EE-f.indb 39 07.1.12 5:18:15 PM07.1.12 5:18:15 PM

Initial: Underlined
Setup
Menu items Selectable settings, [reference page]
Demonstration Off : Cancels.
ENGLISH
On : Activates the demonstration on the monitor.
Wall Paper You can select the background picture of the monitor.
Crystal-Blue
,
Crystal-Pink, Crystal-Green, Wave-Yellow,
Wave-Green, Metal-A, Metal-B, Ball-A, Ball-B, Ball-C, Clown Fish,
Simple-Red, Simple-Orange, Simple-Bluegreen, Simple-Blue
Scroll Off : Cancels.
Once : Scrolls the disc information once.
Auto : Repeats scrolling (5-second intervals).
• Holding DISP scrolls the information regardless of this setting.
Tag Display Off : Cancels.
On : Shows the Tag data while playing MP3/WMA/WAV tracks.
Dimmer Off : Cancels.
On : Activates dimmer.
Display
1
Auto : Dims the monitor when you turn on the headlights.*
Time Set : Press ENT (or ¢) to display the time setting screen, then
set the Dimmer On/Off times.
Bright You can adjust brightness of the monitor.
–15 (darkest) to +15 (brightest); Initial 00
2
Picture Adjust*
You can adjust the following to make the monitor clear and legible for
watching the playback picture. The setting will be stored separately for
“DISC” and “AV-IN.”
–15 to +15; Initial 0
Bright : Adjust if the picture is too bright or too dark.
Contrast : Adjust the contrast.
Color : Adjust the color of the picture—lighter or darker.
Tint : Adjust the tint if the human skin color is unnatural (not adjustable
for PAL signals).
1
*
The ILLUMINATION CONTROL lead connection is required. (☞ Installation/Connection Manual)
2
*
Adjustable only when the source is a disc containing pictures or movies, or “AV-IN.”
40
EN_KD-AVX11EE-f.indb 40EN_KD-AVX11EE-f.indb 40 07.1.12 5:18:16 PM07.1.12 5:18:16 PM


