Beurer MC 2000: инструкция
Раздел: Товары для здоровья
Тип:
Инструкция к Beurer MC 2000
Оглавление
- Комплект поставки 1. Использование по назначению 2. Указания по технике безопасности Удар электрическим током
- Ремонт прибора Опасность пожара Обслуживание
- 3. Для ознакомления
- 4. Описание прибора Части прибора Пульт управления
- Функции кнопок на пульте управления Области массажа Функция подогрева
- Место установки прибора 5. Подготовка к работе Распаковка и установка
- Перед включением 6. Обслуживание Выключение офисного кресла с массажем шиацу Запуск массажа После массажа
- 7. Уход и хранение 8. Что делать при возникновении каких-либо проблем?
- 9. Технические характеристики 10. Гарантия
BEURER GmbH • Söflinger Str. 218 • 89077 Ulm (Germany)
Tel.: +49 (0)731 / 39 89-144 • Fax: +49 (0)731 / 39 89-255
www.beurer.de • Mail: kd@beurer.de
MC2000
D
Bürostuhl mit Shiatsu-Massage
Gebrauchsanleitung
2-10
G
Shiatsu office chair
Instructions for use
11-19
F
Chaise de bureau avec
massage shiatsu
Mode d’emploi
20-28
E
Silla de oficina con masaje Shiatsu
Instrucciones de uso
29-37
I
Sedia da ufficio con
massaggio shiatsu
Istruzioni per l'uso
38-46
T
Shiatsu masajlı büro sandalyesi
Kullanım kılavuzu
47-55
r
Офисное кресло
с массажем шиацу
Инструкция по применению
56-64
Q
Krzesło biurowe z funkcją
masażu shiatsu
Instrukcja obsługi
65-73
2
Sehr geehrte Kundin, sehr geehrter Kunde,
wir freuen uns, dass Sie sich für ein Produkt unseres
Sortimentes entschieden haben. Unser Name
steht für hochwertige und eingehend geprüfte
Qualitätsprodukte aus den Bereichen Beauty, Wärme,
Sanfte Therapie, Blutdruck/Diagnose, Gewicht,
Massage und Luft.
Bitte lesen Sie diese Gebrauchsanleitung aufmerksam
durch, und beachten Sie die Hinweise.
Mit freundlicher Empfehlung,
Ihr Beurer-Team
Zeichenerklärung
Folgende Symbole werden in der Gebrauchsanleitung
und/oder auf dem Typenschild verwendet.
Warnung!
Warnhinweis auf Verletzungsgefahren
oder Gefahren für Ihre Gesundheit.
Achtung!
Sicherheitshinweis auf mögliche Schäden
an Gerät/Zubehör.
Wichtig!
Hinweis auf wichtige Informationen.
Nur in geschlossenen Räumen verwenden.
Keine Nadeln hineinstechen!
w
Querverweis auf einen anderen Absatz.
Lieferumfang
• Bürostuhl mit Shiatsu-Massage;
Einzelteile siehe Aufbauanleitung
Der Bürostuhl mit Shiatsu-Massage ist zur
Rückenmassage vorgesehen.
Befolgen Sie die Sicherheitshinweise in dieser
Gebrauchsanleitung.
Verwenden Sie das Gerät nur in der beschriebenen
Weise.
Das Gerät ist nur zur
Eigenanwendung
, nicht für
den medizinischen oder kommerziellen Gebrauch
vorgesehen.
1. Bestimmungsgemäßer Gebrauch 2. Sicherheitshinweise
• Lesen Sie diese Gebrauchsanleitung sorgfältig! Ein
Nichtbeachten der nachfolgenden Hinweise kann
Personen- oder Sachschäden verursachen.
• Bewahren Sie die Gebrauchsanleitung auf und
machen Sie diese allen Anwendern zugänglich.
• Übergeben Sie diese Anleitung bei Weitergabe des
Geräts.
1. Bestimmungsgemäßer Gebrauch ...................................
2
2. Sicherheitshinweise .........................................................
2
3. Zum Kennen lernen .........................................................
4
4. Gerätebeschreibung ........................................................
5
5. Inbetriebnahme ...............................................................
7
6. Bedienung .......................................................................
8
7. Pflege und Aufbewahrung ...............................................
9
8. Was tun bei Problemen? .................................................
9
9. Technische Daten ..........................................................
10
10. Entsorgung ....................................................................
10
11. Garantie und Service ....................................................
10
DEUTSCH
Warnung!
• Wie jedes elektrische Gerät ist dieser Bürostuhl
mit Shiatsu-Massage vorsichtig und umsichtig
zu gebrauchen, um Gefahren durch elektrische
Schläge zu vermeiden.
• Benutzen Sie das Gerät nur mit der auf dem Gerät
notierten Netzspannung.
• Benutzen Sie das Gerät nie, wenn das Gerät oder
das Zubehör sichtbare Schäden aufweisen.
• Benutzen Sie das Gerät nicht, wenn es
versehentlich mit Wasser bespritzt wurde.
• Benutzen Sie das Gerät nicht während eines
Gewitters.
Stromschlag
Warnung!
Stolpergefahr! Unfallgefahr!
Schalten Sie den Bürostuhl mit Shiatsu-Massage sofort nach der Massage aus, ziehen Sie den Netzstecker aus
der Steckdose und ziehen Sie das Kabel ein.

3
• Schalten Sie das Gerät im Falle von Defekten oder
Betriebsstörungen sofort aus. Ziehen Sie den
Netzstecker aus der Steckdose.
• Ziehen Sie nicht am Netzkabel um den Netzstecker
aus der Steckdose zu ziehen.
• Klemmen Sie das Netzkabel nicht ein.
• Halten Sie Abstand zwischen dem Netzkabel und
warmen Oberflächen.
• Stellen Sie sicher, dass das Gerät, der Schalter,
und das Kabel nicht mit Wasser, Dampf oder
anderen Flüssigkeiten in Berührung kommen.
• Benutzen/bedienen Sie das Gerät nur mit
trockenen Händen.
• Setzen Sie das Gerät keinen Stößen aus und lassen
Sie es nicht fallen.
Reparatur
Warnung!
• Das Gerät darf nicht geöffnet werden.
• Reparaturen an Elektrogeräten dürfen nur
von Fachkräften durchgeführt werden. Durch
unsachgemäße Reparaturen können erhebliche
Gefahren für den Benutzer entstehen. Wenden Sie
sich bei Reparaturen an den Kundenservice oder
an einen autorisierten Händler, ansonsten erlischt
der Garantieanspruch.
• Wenn der Netzstecker oder das Netzkabel des
Gerätes beschädigt sind, müssen diese durch den
Hersteller oder eine autorisierte Kundendienststelle
ersetzt werden.
• Der Reißverschluss des Bürostuhls mit
Shiatsu-Massage darf nicht geöffnet werden. Er
wird nur aus produktionstechnischen Gründen
verwendet.
Brandgefahr
Warnung!
Bei nicht bestimmungsgemäßem Gebrauch bzw.
Missachtung der Gebrauchsanleitung besteht unter
Umständen Brandgefahr!
• Benutzen Sie das Gerät nicht zusammen mit
anderen elektrischen Geräten (z.B. Heizdecke).
• Betreiben Sie das Gerät nie in der Nähe von Benzin
oder anderen leicht entflammbaren Stoffen.
• Betreiben Sie das Gerät nie unter einer Abdeckung
(z.B. Decke, Kissen, ...).
Bedienung
Warnung!
• Keine Nadeln oder spitze Gegenstände in den
Bürostuhl stecken.
• Klemmen oder zwingen Sie kein Teil Ihres Körpers,
insbesondere Finger, zwischen die rotierenden
Massageköpfe und deren Halterungen im Gerät
Dieses Gerät ist ausschließlich zur Massage des
Rückens von Menschen bestimmt. Es kann keine
ärztliche Behandlung ersetzen. Benutzen Sie das
Massage-Gerät nicht, wenn einer oder mehrere der
folgenden Warnhinweise auf Sie zutreffen.
Verwenden Sie das Massage-Gerät
• nicht bei einer krankhaften Veränderungen
oder Verletzung im Bereich des Rückens
(z.B. Bandscheibenvorfall),
• nicht bei Kindern,
• nicht während der Schwangerschaft,
• nie während Sie schlafen,
• nicht bei Tieren,
• nicht bei Tätigkeiten, bei denen eine
unvorhergesehene Reaktion gefährlich werden
kann,
• nicht nach der Einnahme von Substanzen, die zu
einer eingeschränkten Wahrnehmungsfähigkeit
führen (z.B. schmerzlindernde Medikamente,
Alkohol),
• Massieren Sie niemals Bereiche die Schwellungen,
Entzündungen oder Ekzeme aufweisen.
• Benutzen Sie das Gerät nicht bei unerklärlichen
Magenschmerzen.
• Das Gerät verfügt über eine zuschaltbare
Wärmefunktion in den Massageköpfen. Personen,
die gegen Hitze unempfindlich sind, müssen bei
Gebrauch dieser Funktion vorsichtig sein.
Falls Sie unsicher sind, ob das Massage-Gerät für Sie
geeignet ist, befragen Sie Ihren Arzt.
Befragen Sie vor der Benutzung des
Massage-Gerätes Ihren Arzt, vor allem
• wenn Sie an einer schweren Krankheit leiden oder
eine Operation am Oberkörper hinter sich haben,
• wenn Sie einen Herzschrittmacher, Implantate oder
andere Hilfsmittel tragen,
• Thrombosen,
• Diabetes,
• bei Schmerzen ungeklärter Ursache.
• Das Gerät ist nur für den in dieser
Gebrauchsanleitung beschriebenen Zweck
vorgesehen. Der Hersteller kann nicht für
Schäden haftbar gemacht werden, die durch
unsachgemäßen oder leichtsinnigen Gebrauch
entstehen.

4
Mit dem Beurer MC2000 Bürostuhl mit
Shiatsu-Massage können Sie Ihre eigene Massage zu
Hause und im Büro genießen.
Der Bürostuhl mit Shiatsu-Massage bietet eine
wohltuende und entspannende Massage.
3. Zum Kennen lernen
• Dieses Gerät ist nicht dafür bestimmt,
durch Personen (einschließlich Kinder) mit
eingeschränkten physischen, sensorischen oder
geistigen Fähigkeiten oder mangels Erfahrung und/
oder mangels Wissen benutzt zu werden, es sei
denn, sie werden durch eine für ihre Sicherheit
zuständige Person beaufsichtigt oder erhielten von
ihr Anweisungen, wie das Gerät zu benutzen ist.
• Keine Gegenstände in Geräteöffnungen stecken
und nichts in die rotierenden Teile stecken. Achten
Sie darauf, dass die beweglichen Teile sich immer
frei bewegen können.
• Kinder sollten beaufsichtigt werden, damit sie nicht
mit dem Gerät spielen.
• Schalten Sie das Gerät nach jedem Gebrauch am
Handschalter aus.
• Den Bürostuhl niemals mit eingestecktem Kabel um
mehr als 360° drehen. Das Netzkabel wickelt sich
sonst um die Feder und kann beschädigt werden.
• Verlegen Sie das Netzkabel stolpersicher.
• Stehen Sie niemals auf das Gerät und stellen Sie
keine Gegenstände auf dem Gerät ab.
• Die Benutzung des Bürostuhls mit
Shiatsu-Massage darf nur durch jeweils 1 Person
erfolgen.
• Setzen Sie sich niemals auf eine Armlehne.
• Das Gerät mit maximal 130 kg belasten.
Achtung!
• Schützen Sie das Gerät vor direkter
Sonneneinstrahlung.
• Verwenden Sie das Gerät nicht bei über 40 Grad.
• Prüfen Sie nach längerer Betriebspause die
ordnungsgemäße Funktion des Geräts.
5
1
Rückenkissen
5
Sitzkissen
9
Rückenlehneneinstellung
2
Rückenlehne
6
Netzkabel
10
Wippfunktionseinstellung
3
Kabeleinzug
7
Handschalter in Aufbewahrungstasche
4
Armlehne
8
Höheneinstellung
4. Gerätebeschreibung
Geräteteile
Handschalter
4
5
2
3
1
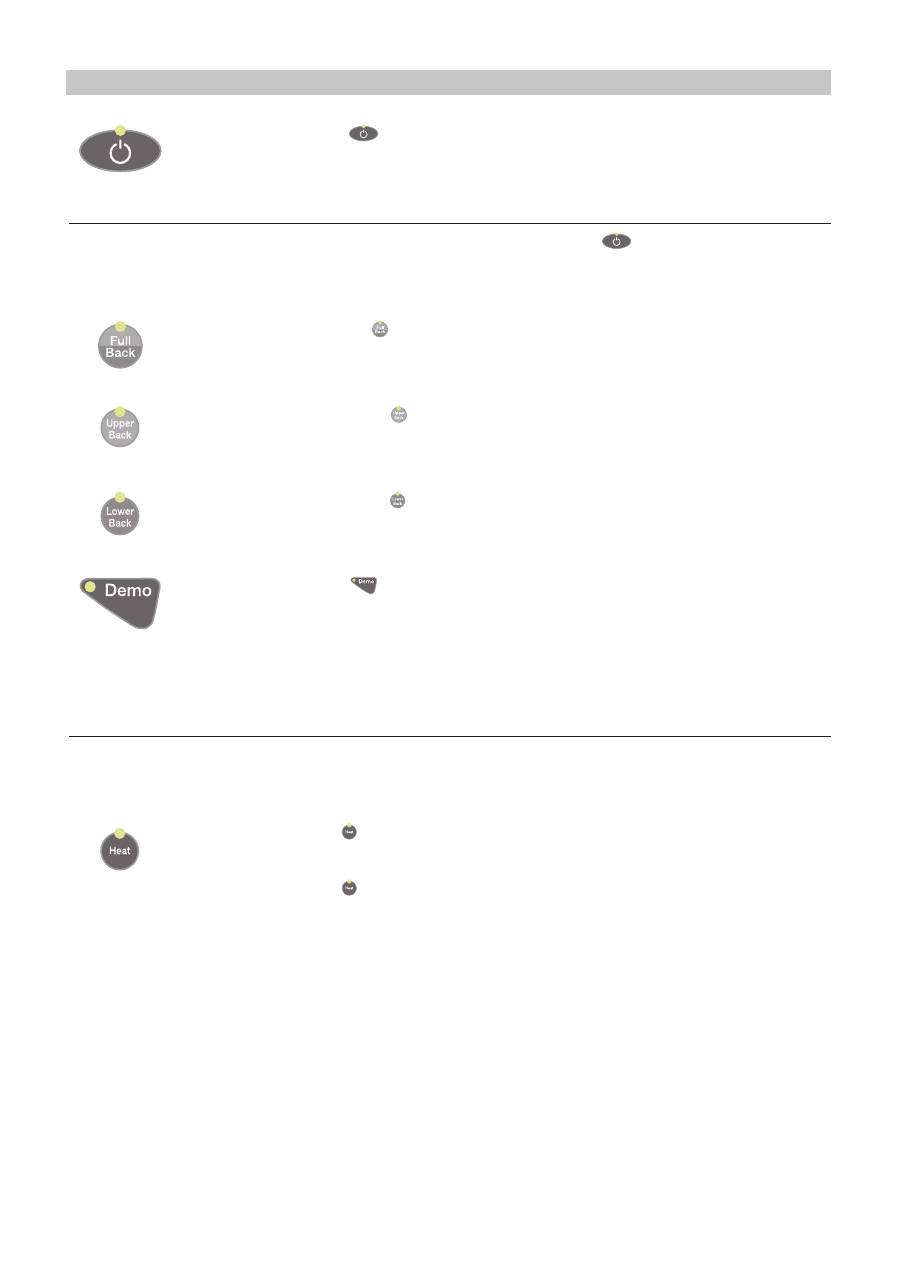
1
Ein/Aus-Taste
2
Full Back (Gesamter Rückenbereich)
3
Upper Back (Oberer Rückenbereich)
4
Lower Back (Unterer Rückenbereich)
5
Heat (Licht- und Wärmefunktion)
6
Demo
5
6
1
3
4
2
10
9
7
8
6
6
Handschalter Tastenfunktionen
Ein/Aus-Taste
>
Die Ein/Aus-Taste
drücken
Der Bürostuhl mit Shiatsu-Massage ist betriebsbereit.
Massagebereiche
• Die Massage kann jederzeit gestoppt werden. Hierzu die Ein/Aus Taste
drücken.
• Der Massagemechanismus fährt dann in die Ausgangsstellung zurück und schaltet sich ab.
Der aktuell gewählte Massagebereich wird durch die zugehörige Tasten-LED angezeigt.
Full Back - Gesamter Rückenbereich
>
Die Full Back-Taste drücken
Die Shiatsu-Massage für den gesamten Rücken startet. Gesamtdauer 15 Minuten.
Danach fährt der Massagemechanismus in die Ausgangsstellung zurück und schaltet sich ab.
Upper Back - Oberer Rückenbereich
>
Die Upper Back-Taste drücken
Die Shiatsu-Massage für den oberen Rücken startet. Gesamtdauer 15 Minuten.
Danach fährt der Massagemechanismus in die Ausgangsstellung zurück und schaltet sich ab.
Lower Back - Unterer Rückenbereich
>
Die Lower Back-Taste drücken
Die Shiatsu-Massage für den unteren Rücken startet. Gesamtdauer 15 Minuten.
Danach fährt der Massagemechanismus in die Ausgangsstellung zurück und schaltet sich ab.
Demo
>
Die Demo-Taste
drücken
Das Demo Massageprogramm startet.
Das Programm durchläuft alle Bereiche in Kurzform. Auch die Wärmefunktion wird in einem
Abschnitt zugeschaltet.
Auf dem Handschalter leuchten dabei jeweils die zugehörigen Tasten-LED und zeigen an, welche
Funktionen aktuell ablaufen.
Gesamtdauer 5 Minuten. Danach schaltet sich die Massagefunktion ab.
Wärmefunktion
Die Massageköpfe können beheizt werden.
Die Wärmefunktion kann nur bei laufendem Massageprogramm zugeschaltet werden.
Heat
>
Die Heat-Taste drücken
Die Massageköpfe werden beheizt.
Die Tasten-LED leuchtet.
>
Die Heat-Taste nochmals drücken
Die Wärmefunktion wird abgeschaltet. Die Tasten-LED erlischt.
Mit Ablauf des laufenden Massageprogramms, wird die Wärmefunktion automatisch mit
abgeschaltet.
7
Warnung!
• Halten Sie Kinder von Verpackungsmaterial fern.
Es besteht Erstickungsgefahr.
• Lesen Sie, bevor Sie das Gerät in Betrieb nehmen,
die Sicherheitshinweise im Kapitel Sicherheit.
w
Sicherheit Seite 2 bis 3
Achtung!
• Der Bürostuhl mit Shiatsu-Massage könnte
Ihren Bodenbelag beschädigen. Legen Sie
eine geeignete rutschfeste Unterlage unter den
Bürostuhl mit Shiatsu-Massage.
Achtung!
Vermeiden Sie scharfe und spitze Werkzeuge
(Teppichmesser) um die Verpackung zu entfernen.
Aufstellort
• Stellen Sie den Bürostuhl mit Shiatsu-Massage auf
einem stabilen und ebenen Untergrund auf.
Achtung!
Überprüfen Sie regelmäßig die Schraubverbindungen
auf Festigkeit. Gelockerte Schraubverbindungen
nachziehen.
5. Inbetriebnahme
Der Bürostuhl mit Shiatsu-Massage MC2000 wird im
Karton angeliefert.
Aufbau MC2000
w
Aufbauanleitung MC2000
Auspacken und Aufbau
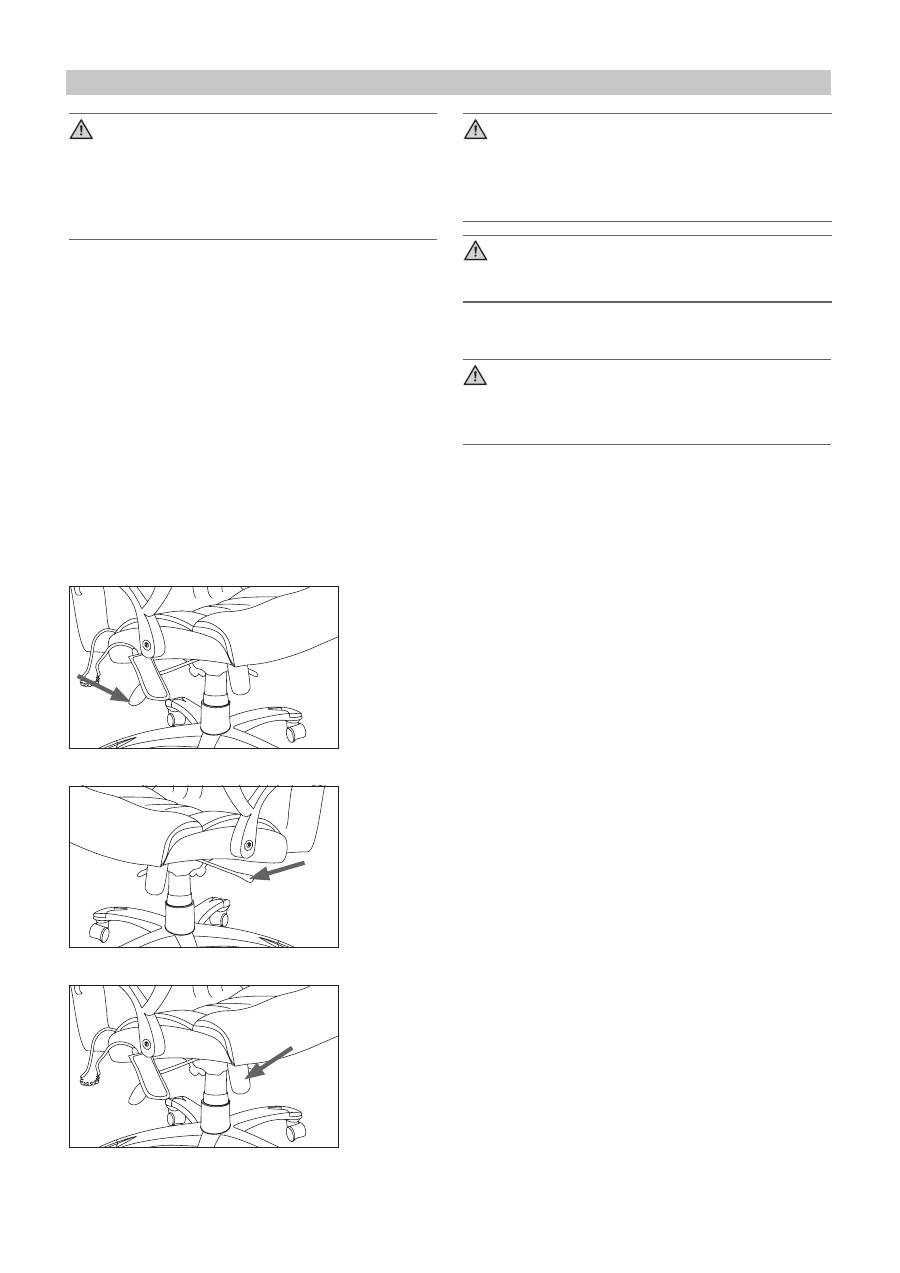
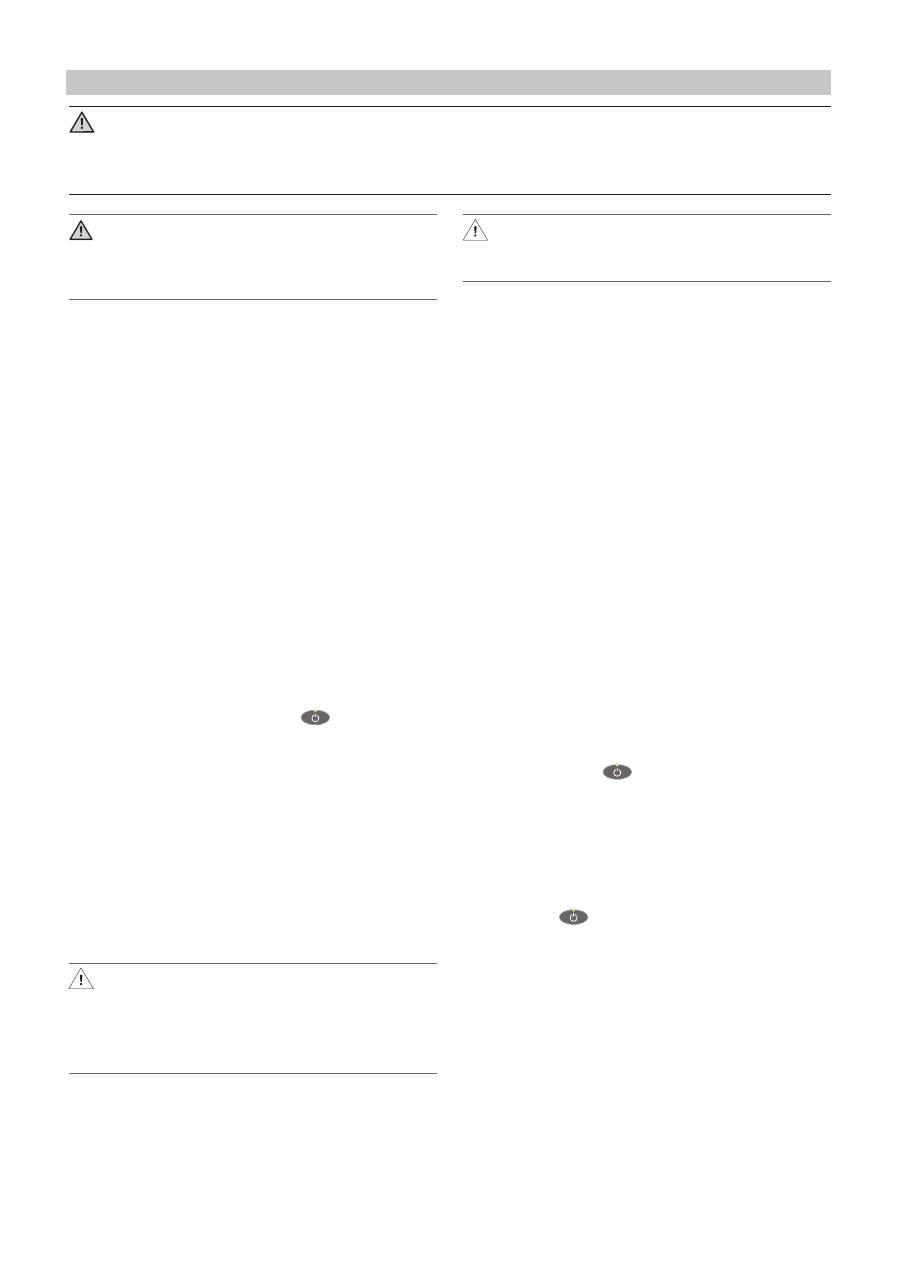
Höheneinstellung
>
Auf den Bürostuhl sitzen
>
Den Sitz entlasten und dabei den Hebel nach oben ziehen
>
Den Bürostuhl durch Belasten oder Entlasten in die gewünschte
Höhe bringen
>
Den Hebel loslassen
Die Position ist fixiert.
Rückenlehne einstellen
>
Auf den Bürostuhl sitzen
>
Den Hebel auf der linken Seite nach oben ziehen
>
Rückenlehne in die gewünschte Position bringen
>
Hebel nach unten drücken
Die Position ist fixiert.
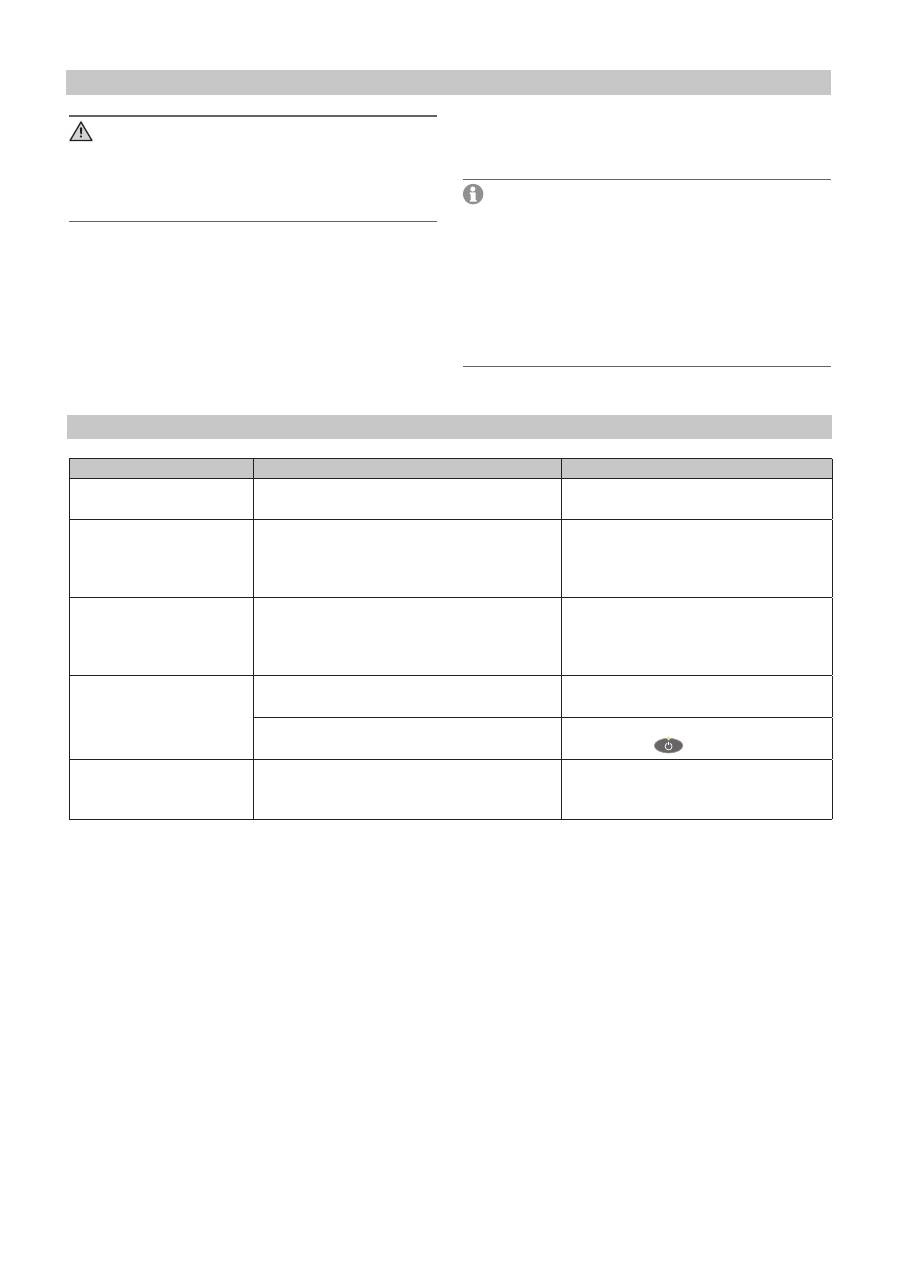
Wippfunktion einstellen
>
Den Drehkopf nach rechts oder links drehen, bis der
Wippwiderstand wie gewünscht eingestellt ist.
8
• Während der Massage bequeme Kleidung tragen.
• Entfernen Sie alle Gegenstände aus Ihren
Hosentaschen (z.B. Schlüssel, Taschenmesser,
Mobilfunkgeräte).
• Eine bequeme, entspannte Körperlage einnehmen.
• Immer mittig auf den Bürostuhl sitzen, so dass die
Wirbelsäule genau zwischen den Massageköpfe
liegt.
• Das Rückenkissen kann während der Massage
nach hinten geklappt werden.
• Die Massage sollte zu jeder Zeit als angenehm und
entspannend empfunden werden. Brechen Sie
die Massage ab oder ändern Sie ihre Sitzposition,
wenn Sie die Massage als schmerzhaft oder
unangenehm empfinden.
• Wird das Gerät längere Zeit nicht verwendet,
vor dem erneuten Gebrauch zunächst den
ordnungsgemäßen Zustand prüfen.
• Den Rücken vorsichtig an die Rückenlehne
pressen. Zunächst prüfen, ob die Massage
angenehm ist.
• Das Gewicht langsam stärker nach hinten
verlagern, solange dies angenehm ist.
Vor dem Einschalten
>
Das Netzkabel in der benötigten Länge ausziehen.
>
Den Netzstecker in die Steckdose stecken.
>
Massage mit der Ein/Aus-Taste
starten.
Die Tasten-LED leuchtet.
>
Auf den gewünschten Massagebereich drücken.
Die Tasten-LED leuchtet.
Das Programm läuft 15 Minuten und die
Massagefunktion schaltet danach ab.
Bitte beachten: Nach neuer Auswahl eines
Massagebereichs, läuft die Massage erneut
15 Minuten.
Programm unterbrechen
>
Die Ein/Aus Taste
drücken.
Danach fährt der Massagemechanismus in die
Ausgangsstellung zurück und schaltet sich ab.
Warnung!
• Lesen Sie, bevor Sie das Gerät in Betrieb nehmen,
die Sicherheitshinweise im Kapitel Sicherheit.
w
Sicherheit Seite 2 bis 3
Achtung!
• Treten Irritationen jeglicher Art auf, dann brechen
Sie die Behandlung sofort ab.
6. Bedienung
Nachdem das Massageprogramm abgelaufen ist,
schaltet die Massagefunktion automatisch ab.
Nach neuer Auswahl eines Massagebereichs, läuft die
Massage erneut 15 Minuten.
Achtung!
Benutzen Sie das Gerät höchstens 15 Minuten am
Stück, es besteht sonst Überhitzungsgefahr. Lassen
Sie das Gerät vor erneuter Benutzung mindestens
30 Minuten abkühlen.
Während der Massage können Sie das Gerät mit der
Ein/Aus Taste
jederzeit ausschalten.
Den Bürostuhl mit Shiatsu-Massage ausschalten
Warnung!
Stolpergefahr! Unfallgefahr!
Schalten Sie den Bürostuhl mit Shiatsu-Massage sofort nach der Massage aus, ziehen Sie den Netzstecker aus
der Steckdose und ziehen Sie das Kabel ein.
Die Massage starten Nach der Massage
>
Ziehen Sie den Netzstecker aus der Steckdose.
>
Drücken Sie auf den Kabeleinzug.
Das Kabel wird eingezogen.
9
Warnung!
• Schalten Sie das Gerät nach jedem Gebrauch und
vor jeder Reinigung am Handschalter aus.
• Ziehen Sie den Netzstecker aus der Steckdose.
• Ziehen Sie das Netzkabel ein.
>
Wischen Sie den Bürostuhl mit Shiatsu-Massage
hin und wieder mit einem fusselfreien, trockenen
oder einem leicht feuchten Tuch ab.
>
Verwenden Sie alle 2-3 Monate ein sauberes Tuch,
das leicht mit Kunstleder-Pflegemittel benetzt
wurde und reiben sie den Bürostuhl damit ab.
>
Trocknen Sie danach den Bürostuhl mit einem
sauberen, trockenen Tuch.
Kunstleder ist fettempfindlich. Reinigen Sie
den Bürostuhl mit Shiatsu-Massage nur mit
ausgewiesenen Kunstleder-Pflegemitteln.
Wichtig!
• Reinigen Sie das Gerät nur in der angegebenen
Weise.
• Es darf keinesfalls Flüssigkeit in das Gerät
eindringen.
• Verwenden Sie keine lösungsmittelhaltigen
Reiniger.
• Keine aggressiven Reinigungsmittel verwenden.
Diese können die Oberfläche beschädigen.
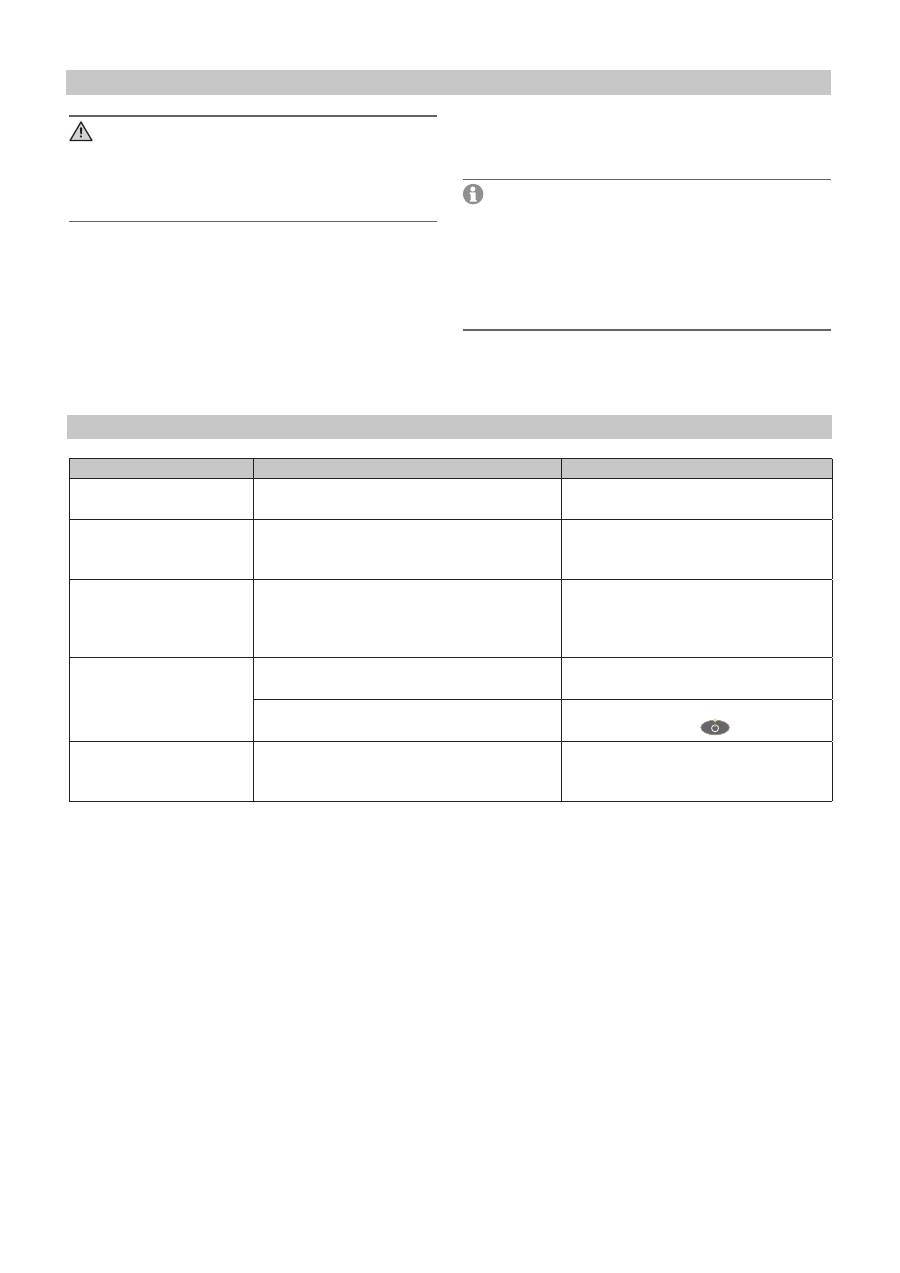
7. Pflege und Aufbewahrung 8. Was tun bei Problemen?
Problem
Ursache
Behebung
Massageköpfe bewegen
sich verlangsamt.
Massageköpfe werden zu stark belastet.
>
Anpressdruck des Körpers
verringern.
Massageköpfe bewegen
sich nur im oberen oder
unteren Bereich.
Die Massage wurde für den begrenzten
Bereich aktiviert.
>
Drücken Sie die FULL BACK,
UPPER BACK, LOWER BACK-Taste
um den Bereich zu ändern/
erweitern.
Reibegeräusche beim
Betrieb.
Die Geräusche sind normal und kommen
vom arbeitenden Motor oder von den
Massageköpfen, die gegen das Polster
reiben.
Es ist kein Eingreifen nötig.
Die Massage kann nicht
gestartet werden.
Der Netzstecker ist nicht mit der Steckdose
verbunden.
>
Den Netzstecker in die Steckdose
stecken.
Die Shiatsu-Massage wurde nicht am
Handschalter eingeschaltet.
>
Die Shiatsu-Massage mit der Ein/
Aus-Taste
einschalten.
Die Massagefunktion
stoppt im Betrieb.
Die maximale Betriebsdauer wurde erreicht
>
Den Bürostuhl mit Shiatsu-Massage
abschalten und 30 min. abkühlen
lassen, danach erneut einschalten.
10
9. Technische Daten
Produktbezeichnung
Bürostuhl mit Shiatsu-Massage MC2000
Netzspannung/-Frequenz
220-240 V ~ 50 Hz
Energieverbrauch
38 W
Abmessung
Länge 77 cm, Breite 71 cm, Höhe 120 cm
Gewicht
netto 22,8 kg, mit Verpackung 26,5 kg
Maximale Tragfähigkeit
130 kg
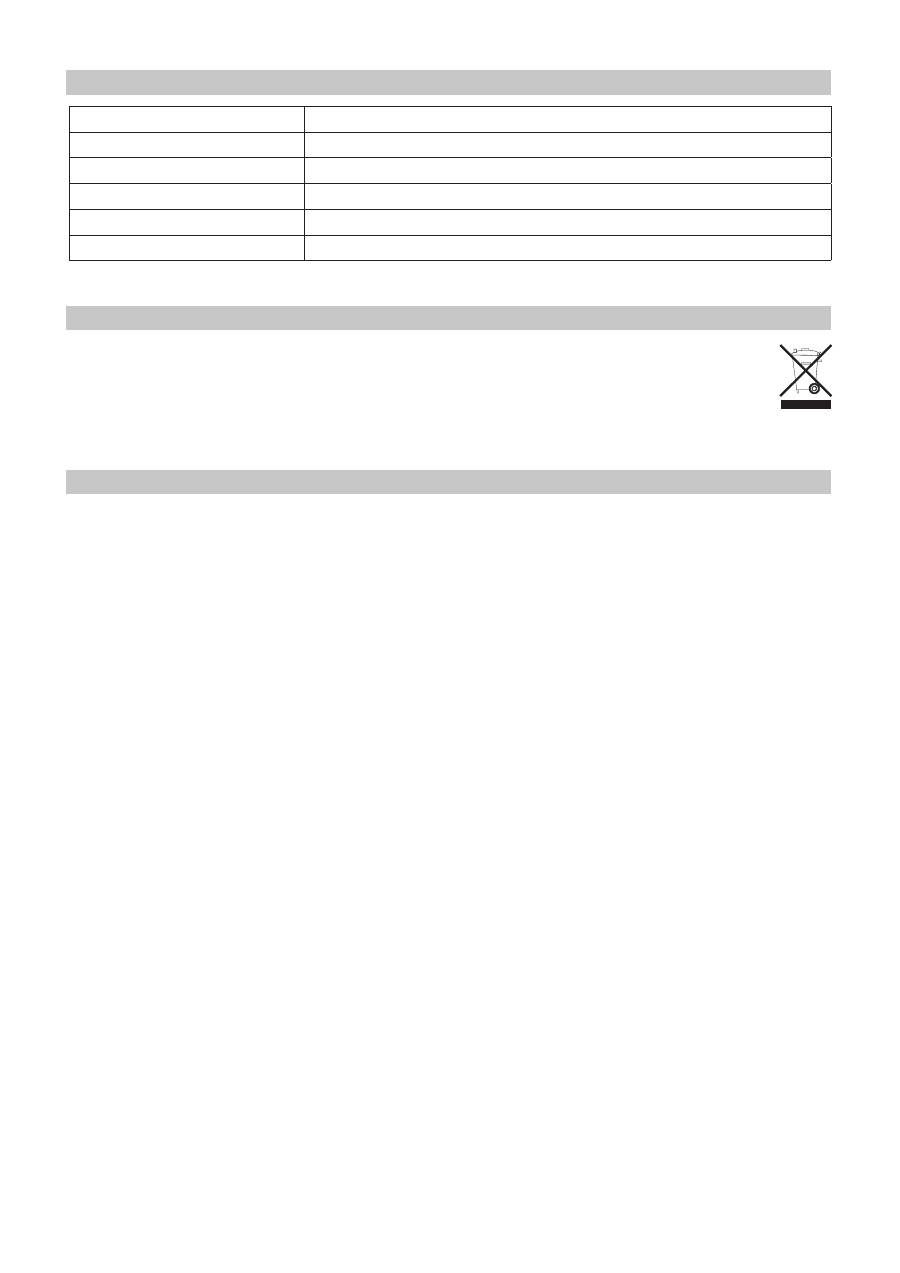
10. Entsorgung
Befolgen Sie die örtlichen Vorschriften bei der
Entsorgung der Materialien. Entsorgen Sie das
Gerät gemäß der Elektro- und Elektronik Altgeräte
Verordnung 2002/96/EC – WEEE (Waste Electrical
and Electronic Equipment).
Bei Rückfragen wenden Sie sich an die für
die Entsorgung zuständige kommunale
Behörde.
11. Garantie und Service
Wir leisten 2 Jahre Garantie für Material- und
Fabrikationsfehler des Produktes.
Die Garantie gilt nicht:
• im Falle von Schäden, die auf unsachgemäßer
Bedienung beruhen,
• für Verschleißteile, (z.B. Sitzkissen),
• für Mängel, die dem Kunden bereits beim Kauf
bekannt waren,
• bei Eigenverschulden des Kunden.
Die gesetzlichen Gewährleistungen des Kunden
bleiben durch die Garantie unberührt.
Für Geltendmachung eines Garantiefalles innerhalb
der Garantiezeit ist durch den Kunden der Nachweis
des Kaufes zu führen. Die Garantie ist innerhalb eines
Zeitraumes von 2 Jahren ab Kaufdatum gegenüber
der Beurer GmbH, Söflinger Straße 218, 89077 Ulm,
Germany
geltend zu machen. Der Kunde hat im Garantiefall das
Recht zur Reparatur der Ware bei unseren eigenen
oder bei von uns autorisierten Werkstätten. Weiter
gehende Rechte werden dem Kunden (auf Grund der
Garantie) nicht eingeräumt.

11
Dear customer,
Thank you for choosing one of our products. Our
name stands for high-quality, thoroughly tested
products for applications in the areas of beauty, heat,
gentle therapy, blood pressure/diagnosis, weight,
massage and air.
Please read these instructions for use carefully and
observe the information they contain.
Kind regards,
Your Beurer team
Signs and symbols
The following symbols are used in the instructions for
use and/or on the type plate.
Warning!
Warning instruction indicating a risk of injury
or damage to health
Caution!
Safety note regarding potential for damage
to the device/accessories
Important!
Note on important information
Only use indoors
Do not insert needles!
w
Cross-reference to another section.
Included in delivery
• Shiatsu office chair;
see assembly instructions for individual parts
The Shiatsu office chair is designed to provide a back
massage.
Please observe the safety notes in these instructions
for use.
Use the device only according to the methods
specified.
The device is suitable only for
private use
, and not
for medical or commercial purposes.
1. Intended use 2. Safety notes
• Read these instructions for use carefully.
Non-observance of the following information may
result in personal injury or material damage.
• Store these instructions for use in a safe place and
make them accessible to all users.
• Make sure you include these instructions for use
when handing over the device to third parties.
1. Intended use ..................................................................
11
2. Safety notes ...................................................................
11
3. Getting to know your device .........................................
13
4. Unit description .............................................................
14
5. Initial use ........................................................................
16
6. Operation .......................................................................
17
7. Maintenance and storage .............................................
18
8. What if there are problems? ..........................................
18
9. Technical Data ...............................................................
19
10. Disposal .........................................................................
19
11. Warranty and service ...................................................
19
ENGLISH
Warning!
• As with every electrical device, use this Shiatsu
office chair carefully and cautiously in order to
avoid hazards resulting from electric shock.
• Use the device only with the mains voltage
specified on the device.
• Never use the device if it or any of the accessories
show visible damage.
• Do not use the device if it was accidentally
splashed with water.
• Do not use the device during a storm.
Electric shock
Warning!
Trip hazard! Danger of accidents!
Switch off the Shiatsu office chair immediately after finishing a massage, pull the mains plug out of the socket
and retract the cable.

12
• In the event of defects or operational faults, switch
off the device immediately. Pull the mains plug out
of the socket.
• Never pull on the mains cable to remove the mains
plug from the socket.
• Do not clamp or pinch the mains cable.
• Keep the mains cable away from hot surfaces.
• Ensure that the device, switch and cable do not
come into contact with water, steam or other
liquids.
• Use/operate the device only with dry hands.
• Do not subject the device to any impacts or drop
the device.
Repairs
Warning!
• Do not open the device.
• Only specialist personnel may perform repairs on
electrical devices. Improper repairs may subject
users to considerable danger. For repairs, please
contact Customer Services or an authorised
retailer. Failure to do so will invalidate the warranty.
• If the mains plug or mains cable of the device
are damaged, they must be replaced by the
manufacturer or at an authorised customer service
point.
• The zip fastening of the Shiatsu office chair
must not be opened. It is only used for technical
production reasons.
Risk of fire
Warning!
There may be a risk of fire if the device is used
improperly or these instructions for use are ignored!
• Do not use the device together with other electrical
devices (e.g. electric blanket).
• Never use the device near petrol or other highly
flammable substances.
• Never use the device underneath a cover (such as a
blanket, pillow, etc.)
Operation
Warning!
• Do not insert needles or other sharp objects into
the chair.
• Do not force or jam any part of your body, in
particular your fingers, between the rotating
massage heads or their holders in the device.
This device is exclusively intended to massage
the backs of humans. It cannot replace medical
treatment. Do not use the massager if one or several
of the following warnings applies to you.
Do not use the massager
• If you suffer from a medical abnormality or injury to
your back (e.g. slipped disc)
• On children
• During pregnancy
• While sleeping
• On animals
• Whilst undertaking any activity where an
unexpected reaction could be dangerous
• After the consumption of substances that lead
to limited cognitive ability (e.g. pain medication,
alcohol)
• Never massage areas that exhibit swellings,
infections or eczema.
• Do not use the device in the event of inexplicable
stomach ache.
• The device features a switch-on heat function in the
massage heads. Persons sensitive to heat must be
careful when using this function.
If you are unsure whether the massager is suitable for
you, please consult your doctor.
You should consult your doctor before using the
massager
• If you suffer from a severe illness or have recently
had surgery on your upper body
• If you have a pacemaker, implant or other aids
• If you suffer from thromboses
• If you suffer from diabetes
• If you are suffering pain and the cause of which is
unknown.
• The device is only intended for the purpose
described in these instructions for use. The
manufacturer is not liable for damage resulting from
improper or careless use.

13
You can enjoy your own massage at home and in the
office with the Beurer MC2000 Shiatsu office chair.
The Shiatsu office chair provides a soothing and
relaxing massage.
3. Getting to know your device
• This device is not intended for use by people
(including children) with restricted physical, sensory
or mental skills or a lack of experience and/or a
lack of knowledge, unless they are supervised by a
person who has responsibility for their safety or are
instructed by him in how to use the device.
• Do not insert any objects into the device apertures
or the rotating parts. Ensure that the moving parts
can move freely at all times.
• Children should be supervised around the device to
ensure they do not play with it.
• Always switch off the device at the hand switch
after use.
• Never rotate the office chair by more than 360°
when the cable is inserted. Doing so will cause the
mains cable to wrap around the spring and may
become damaged.
• Ensure that the mains cable does not pose a trip
hazard.
• Never stand on the device or place any objects on
the device.
• Only one person may use the Shiatsu office chair at
any given time.
• Never sit on the arm rest.
• Never load the device with more than 130 kg.
Important!
• Do not expose the device to direct sunlight.
• Do not use the device at temperatures above 40°C.
• Check the function of the device if it has not been
used for a long period of time.

14
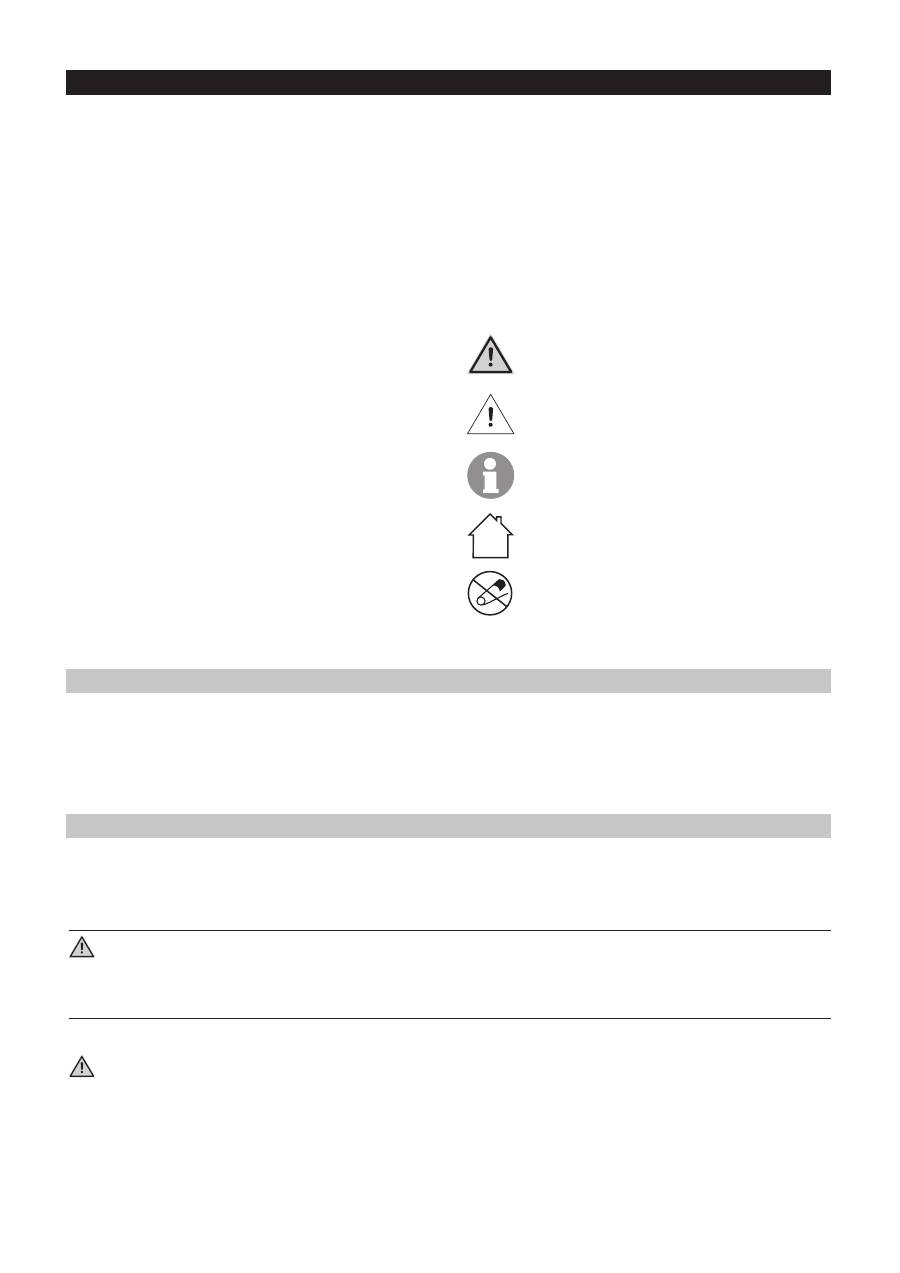
1
Back cushion
5
Seat cushion
9
Back rest adjustment
2
Back rest
6
Mains cable
10
Rocker mechanism adjustment
3
Cable rewinder
7
Hand switch in storage pouch
4
Arm rest
8
Height adjustment
4. Unit description
Device parts
Hand switch
4
5
2
3
1
1
On/off button
2
Full back
3
Upper back
4
Lower back
5
Heat (light and heat function)
6
Demo
5
6
1
3
4
2
10
9
7
8
6
15
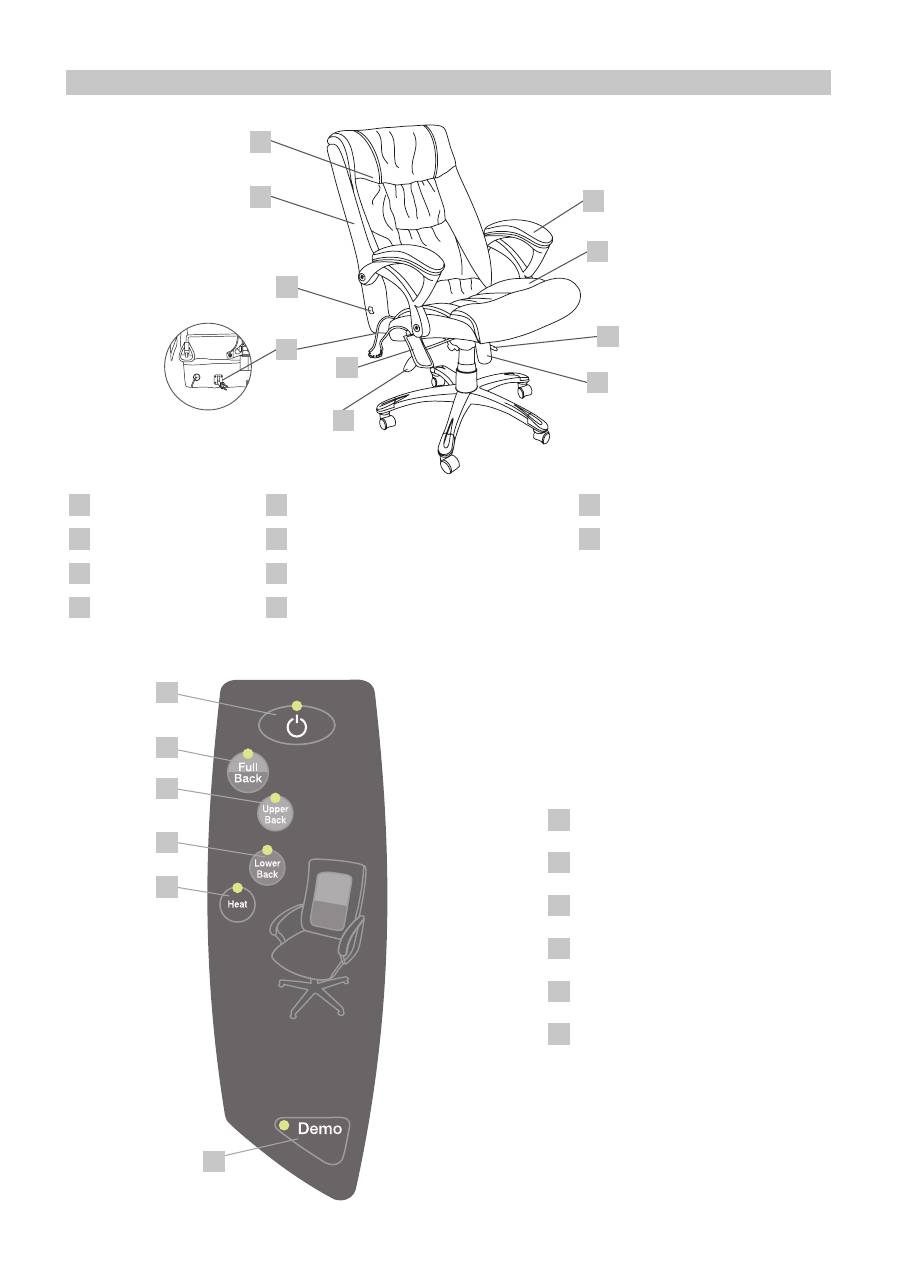
Hand switch button functions
On/off button
>
Press the on/off button
The Shiatsu office chair is ready for use.
Massage areas
• The massage can be stopped at any time. To do so, press the on/off button
.
• The massage mechanism then returns to the start position and switches off.
The currently selected massage area is indicated by the associated LED buttons.
Full back
>
Press the Full Back button
The Shiatsu massage starts up for the entire back. Total duration: 15 minutes.
The massage mechanism then returns to the start position and switches off.
Upper back
>
Press the Upper Back button
The Shiatsu massage starts up for the upper back. Total duration: 15 minutes.
The massage mechanism then returns to the start position and switches off.
Lower back
>
Press the Lower Back button
The Shiatsu massage starts up for the lower back. Total duration: 15 minutes.
The massage mechanism then returns to the start position and switches off.
Demo
>
Press the Demo button
The demo massage programme starts up.
The programme quickly moves through all the different areas of the back. The heat function is
also switched on briefly.
The individual LED buttons on the hand switch light up to indicate when each function is in use.
Total duration: 5 minutes. Subsequently, the massage function switches off.
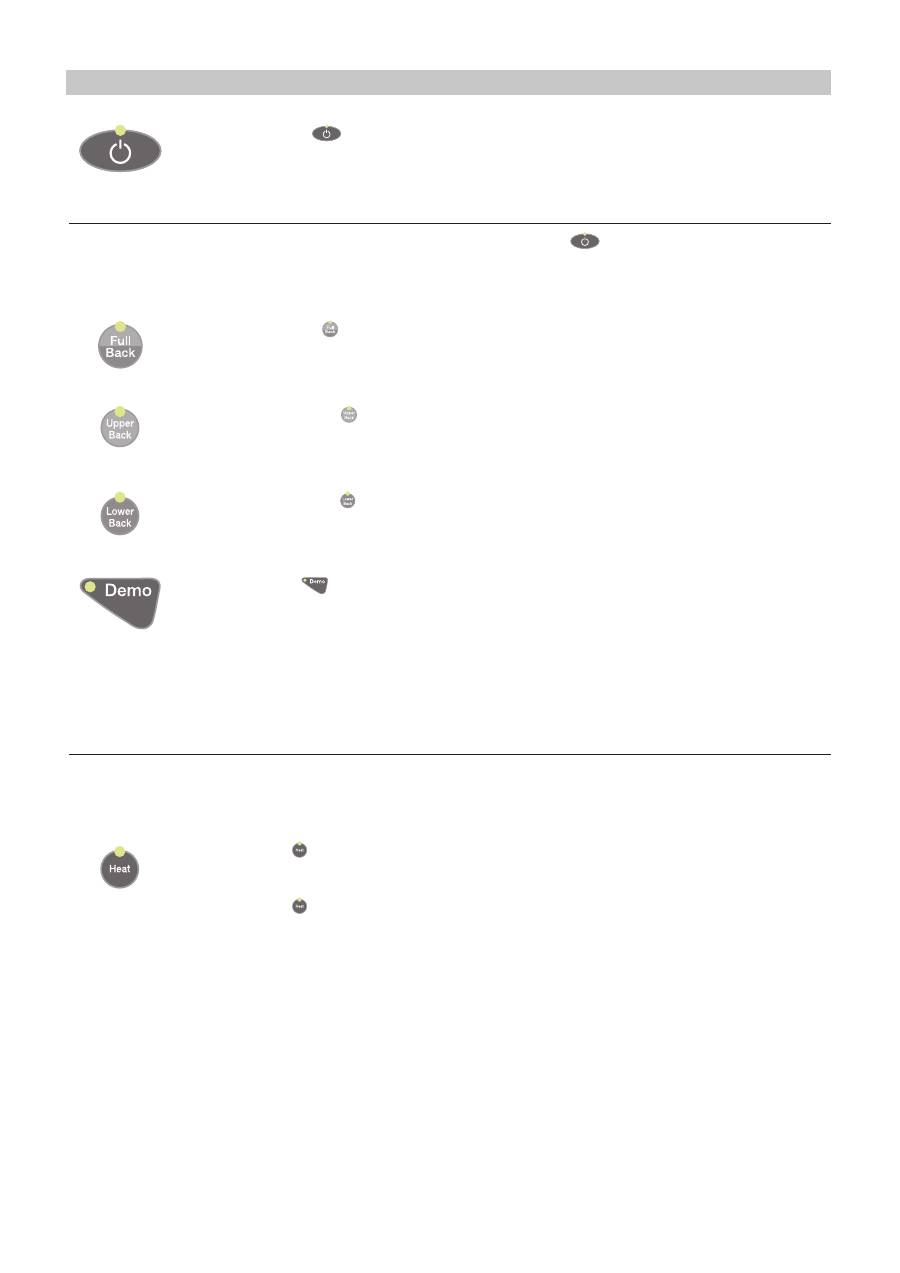
Heat function
The massage heads can be heated.
The heat function can only be switched on when the massage programme is running.
Heat
>
Press the Heat button
The massage heads are heated.
The LED button lights up.
>
Press the Heat button again
The heat function is switched off. The LED button light extinguishes.
When the current massage programme is complete, the heat function automatically switches off.

16
Warning!
• Keep packaging material away from children!
Choking hazard.
• Before using the device for the first time, read the
‘Safety notes’ section.
w
Safety notes, pages 2 and 3
Caution!
• The Shiatsu office chair could damage your
flooring. Place a suitable, non-slip underlay under
the Shiatsu office chair.
Important!
Do not use sharp or pointed tools (e.g. a Stanley knife)
to remove the packaging.
Installation location
• Install the Shiatsu office chair on a sturdy and even
surface.
Important!
Regularly check the screwed joints to ensure they are
correctly tightened. Tighten any loose screw joints.
5. Initial use
The MC2000 Shiatsu office chair is delivered in a
cardboard box.
Assembly MC2000
w
MC2000 assembly instructions
Unpacking and assembly
Height adjustment
>
Sit on the office chair
>
Take your weight off the seat and pull the lever
>
Set the office chair to the desired height by placing your weight on
it or taking your weight off it, as required
>
Release the lever
The position is fixed.
Back rest adjustment
>
Sit on the office chair
>
Pull the lever on the left-hand side upwards
>
Move back rest to the desired position
>
Press lever downwards
The position is fixed.
Rocker function adjustment
>
The rotary knob must be turned to the left or right until the rocker
resistance is set as desired.
17
• Wear comfortable clothes during the massage.
• Remove all objects from your trouser pockets (e.g.
keys, pocket knife, mobile phone).
• Assume a comfortable, relaxed position.
• Always sit in the middle of the seat so that your
backbone is positioned precisely between the
massage heads.
• The back cushion can be folded back during the
massage.
• The massage should feel pleasant and relaxing
at all times. If the massage is painful or
uncomfortable, stop the massage or change your
sitting position.
• If the device has not been used for a longer period
of time, check that the device is functioning
correctly before use.
• Gently press your back against the back rest. Now
check whether the massage is comfortable.
• Press your weight harder against the back of the
chair if this still feels comfortable.
Before switching on
>
Pull out the required length of mains cable.
>
Plug the mains plug into the socket.
>
Start the massage using the on/off button
.
The LED button lights up.
>
Press on the required massage area.
The LED button lights up.
The programme runs for 15 minutes and the massage
function then switches off.
Please note: Following selection of a new massage
area, the massage runs for another 15 minutes.
Interrupting the programme
>
Press the on/off button
.
The massage mechanism then returns to the start
position and switches off.
Warning!
• Before using the device for the first time, read the
‘Safety notes’ section.
w
Safety notes, pages 2 and 3
Important!
• If you experience irritation of any kind, stop
treatment immediately.
6. Operation
Once the massage programme is complete, the
massage function switches off automatically.
Following selection of a new massage area, the
massage runs for another 15 minutes.
Important!
Do not use the device for longer than 15 minutes at a
time otherwise the device could overheat. Allow the
device to cool for at least 30 minutes before using it
again.
During the massage, you can switch off the device at
any time using the on/off button
.
Switching off the Shiatsu office chair
Warning!
Trip hazard! Danger of accidents!
Switch off the Shiatsu office chair immediately after finishing a massage, pull the mains plug out of the socket
and retract the cable.
Starting the massage After the massage
>
Pull the mains plug out of the socket.
>
Press the cable rewinder.
The cable will be wound back in.
18
Warning!
• The device must be switched off using the hand
switch after every use and before cleaning.
• Pull the mains plug out of the socket.
• Retract the mains cable.
>
Wipe the Shiatsu office chair from time to time with
a dry, lint-free or slightly damp cloth.
>
Every two to three months, wipe the office chair
using a clean cloth with a small amount of care
product for artificial leather.
>
Afterwards, dry the office chair with a clean, dry
cloth.
Artificial leather is sensitive to grease. Clean the
Shiatsu office chair only using care products suitable
for artificial leather.
Important!
• Clean the device using only the methods specified.
• Under no circumstances may liquid enter the
device.
• Do not use any solvent-based cleaning products.
• Do not use any harsh cleaning products.
These can damage the surface.
7. Maintenance and storage 8. What if there are problems?
Problem
Cause
Solution
Massage heads are
moving slowly.
The load on the massage heads is too
great.
>
Reduce the contact pressure from
your body.
Massage heads are
moving in the upper or
lower area only.
The massage was only activated for the
limited area in question.
>
Press the FULL BACK, UPPER
BACK or LOWER BACK button to
change or extend the area.
Grinding noises during
operation.
These sounds are normal and are caused
by the operation of the motor or from the
massage heads that are rubbing against
the cushion.
No action is necessary.
The massage cannot be
started.
The mains plug is not connected to the
socket.
>
Plug the mains plug into the socket.
The Shiatsu massage was not switched on
at the hand switch.
>
Start the Shiatsu massage using
the on/off button
.
The massage function
stops when the chair is in
operation.
The maximum operation period was
reached.
>
Switch off the Shiatsu office chair
and allow to cool down for 30
minutes before switching on again.
19
9. Technical Data
Product description
MC2000 Shiatsu office chair
Mains voltage/frequency
220–240 V ~ 50 Hz
Energy consumption
38 W
Dimensions
Length 77 cm, width 71 cm, height 120 cm
Weight
Net: 22.8 kg, with packaging 26.5 kg
Maximum load capacity
130 kg
10. Disposal
Observe the local regulations for material disposal.
Dispose of the unit in accordance with EC Directive
2002/96/EC – WEEE (Waste Electrical and Electronic
Equipment).
If you have any questions, please contact
the local authorities responsible
for waste disposal.
11. Warranty and service
In the event of a warranty claim or service case,
please contact Customer Services in your respective
country.
You can find the address in the enclosed address list.
20
Chère cliente, cher client,
Nous vous remercions d'avoir choisi l'un de nos
produits. Notre société est réputée pour l'excellence
de ses produits et les contrôles de qualité
approfondis auxquels ils sont soumis, dans les
domaines suivants : beauté, chaleur, thérapie douce,
diagnostic de pression artérielle, contrôle de poids,
massage et purification d'air.
Lisez attentivement ce mode d'emploi et respectez
les instructions d'utilisation.
Sincères salutations,
Votre équipe Beurer
Symboles utilisés
Les pictogrammes suivants sont employés dans le
mode d'emploi et/ou sur la plaque signalétique.
Avertissement !
Ce symbole vous avertit des risques de
blessures ou des dangers pour votre santé.
Attention !
Ce symbole vous avertit des éventuels
dommages au niveau de l’appareil ou d’un
accessoire.
Important !
Ce symbole indique des informations
importantes.
Utiliser uniquement dans des pièces
fermées.
Ne pas enfoncer d'aiguilles !
w
Renvoi à un autre paragraphe.
Contenu de la livraison
• Chaise de bureau avec massage shiatsu ;
voir notice de montage pour les différentes pièces
La chaise de bureau avec massage shiatsu est prévue
pour le massage du dos.
Suivez les consignes de sécurité de ce mode
d’emploi.
N'utilisez l'appareil que conformément aux
instructions.
L’appareil est prévu pour un
usage strictement
personnel
et non pour une utilisation à des fins
médicales ou commerciales.
1. Utilisation conforme aux recommandations 2. Consignes de sécurité
• Lisez attentivement ce mode d'emploi ! Le
non-respect des instructions suivantes est
susceptible d'entraîner des dommages corporels
ou matériels.
• Conservez ce mode d'emploi et tenez-le à la
disposition de tous les utilisateurs.
• Si vous transmettez l'appareil à quelqu'un,
remettez-lui également ces instructions.
1. Utilisation conforme aux recommandations .................
20
2. Consignes de sécurité ...................................................
20
3. Présentation ..................................................................
22
4. Description de l'appareil ...............................................
23
5. Mise en service .............................................................
25
6. Utilisation .......................................................................
26
7. Entretien et rangement ..................................................
27
8. Que faire en cas de problèmes ? ..................................
27
9. Données techniques .....................................................
28
10. Élimination des déchets ................................................
28
11. Garantie et maintenance ..............................................
28
FRANÇAIS
Avertissement !
• Comme tout appareil électrique, cette chaise de
bureau avec massage shiatsu doit être utilisée avec
précaution et prudence afin d'éviter les dangers
dus aux chocs électriques.
• Utilisez uniquement l'appareil avec la tension
indiquée sur l'appareil.
• N'utilisez jamais l'appareil si ce dernier ou ses
accessoires sont visiblement endommagés.
• N'utilisez pas l'appareil s'il a été éclaboussé d'eau
par accident.
• N'utilisez pas l'appareil pendant un orage.
Choc électrique
Avertissement !
Risque de trébuchement ! Risque d'accident !
Éteignez la chaise de bureau avec massage shiatsu immédiatement après le massage, retirez l'adaptateur
secteur de la prise et rentrez le câble.
