Yamaha ns-f700: SUPPLIED ACCESSORIES
SUPPLIED ACCESSORIES: Yamaha ns-f700
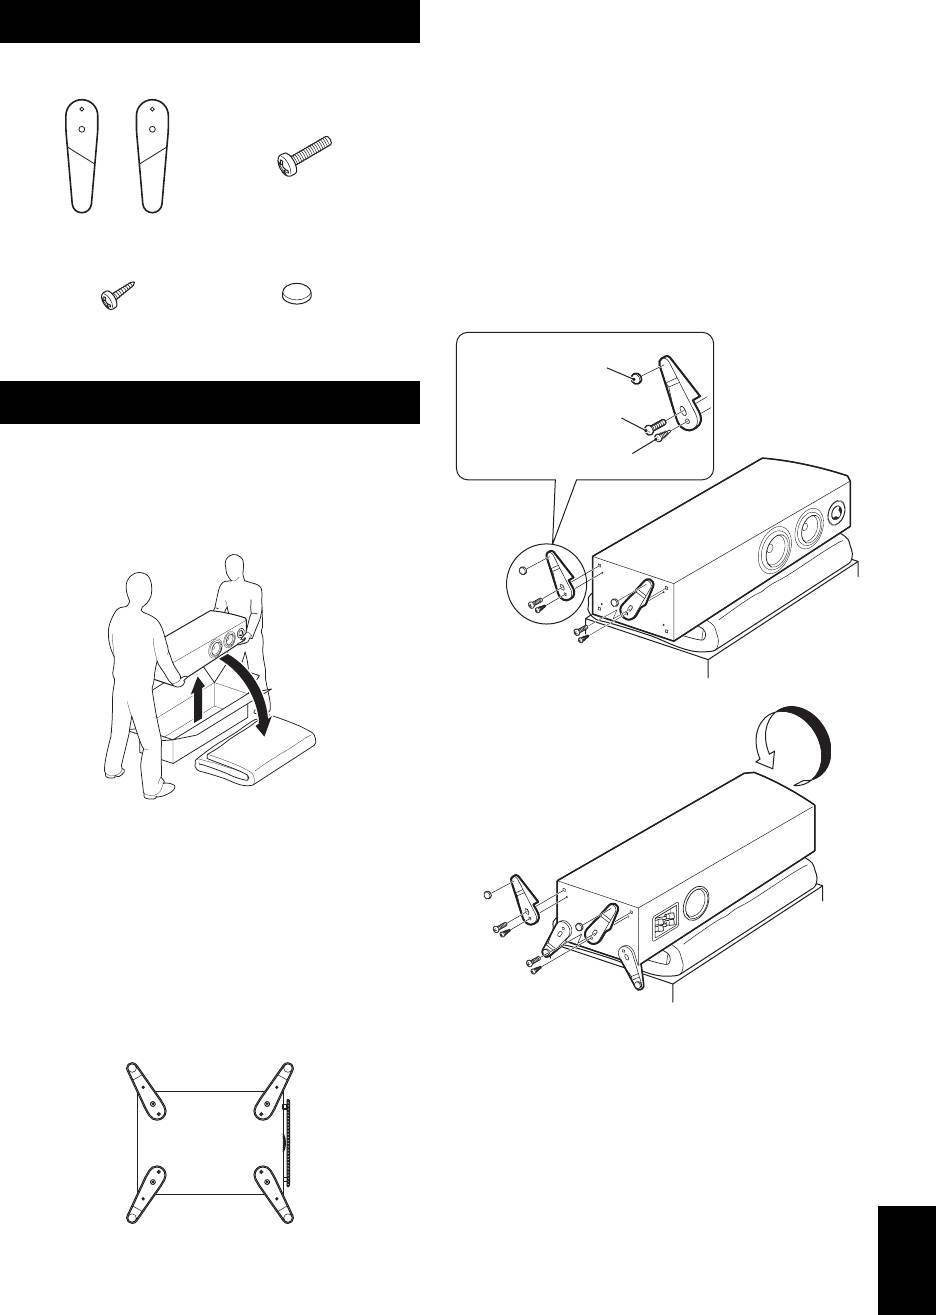
■Procedure
SUPPLIED ACCESSORIES
1 Put the 6 mm (1/4”) screw through the large hole in the stand,
and screw it into the speaker at one of the outside holes in the
After unpacking, check that the following parts are contained.
base of the speaker.
At this time, screw it in loosely so that the stand can still be
moved.
2 Put the 4 mm (3/16”) wood screw through the other hole in the
stand, and screw it into the other hole in the base of the
speaker.
3 Tighten both of the screws firmly.
(L) Screw
(R)
(6mm (1/4”)) × 4
4 Attach a pad to the bottom of the end portion of the stand.
Stand (R × 2, L × 2)
5 Attach the other stands to the other corners of the base of the
speaker in the same way and confirm that all 4 stands have
been firmly attached.
Wood screw
Pad × 4
(4mm (3/16”)) × 4
Pad
ATTACHING THE STANDS
Screw (6mm (1/4”))
When placing the speakers, be sure to use the stands to increase
Wood screw (4mm (3/16”))
stability.
Notes
• Make sure to have another person support it.
• Pay extra attention to avoid scratching on the speaker’s
surface.
• Place the speaker on a supporting surface (height of 7 cm
(2-3/4”) or more). Use a blanket or a cushion on it to avoid
scratching.
• The provided stands are in two types. Two stands are for the
right side and others are for the left side. Attach each stand
to the proper position on the bottom of the speaker by
following the figure below.
• To attach the stands to the speaker, be sure to lay down the
speaker with the side facing up.
Note
(L)(R)
Be carefully not to apply force to the side of the speaker,
otherwise the speaker may fall causing damage to the speaker
or personal injury.
Back
Front
English
(L) (R)
View from the bottom of the speaker
Use the 8 specified holes located on the base of the speaker.
1 En
Оглавление
- PRECAUTIONS
- SUPPLIED ACCESSORIES
- PLACING THE CONNECTIONS TO YOUR SPEAKERS AMPLIFIER
- ATTACHING THE FRONT SPECIFICATIONS COVER
- PRÉCAUTIONS
- ACCESSOIRES
- DISPOSITION DES CONNEXIONS À VOTRE ENCEINTES AMPLIFICATEUR
- FIXATION DU PANNEAU CARACTÉRISTIQUES AVANT TECHNIQUES
- VORSICHTSMASSNAHMEN VORSICHTSHINWEISE
- ZUBEHÖR
- AUFSTELLEN DER LAUTSPRECHER
- ANBRINGEN DER TECHNISCHE DATEN VORDEREN ABDECKUNG
- PRECAUCIÓN
- ACCESORIOS
- SITUACIÓN DE LOS CONEXIONES CON EL ALTAVOCES AMPLIFICADOR
- COLOCACIÓN DE LA ESPECIFICACIONES CUBIERTA FRONTAL
- 注意事项 安放时的注意事项
- 附带的零部件
- 放置扬声器 连接到放大器
- 安装前盖 规格
- МЕРЫ ПРЕДОСТОРОЖНОСТИ МЕРЫ ПРЕДОСТОРОЖНОСТИ
- ПРИЛАГАЕМЫЕ
- РАСПОЛОЖЕНИЕ ПОДКЛЮЧЕНИЕ К АКУСТИЧЕСКОЙ УСИЛИТЕЛЮ СИСТЕМЫ
- УСТАНОВКА ПЕРЕДНЕЙ ТЕХНИЧЕСКИЕ КРЫШКИ ХАРАКТЕРИСТИКИ


