Yamaha BD-S671 Black: CONTROLS AND FUNCTIONS
CONTROLS AND FUNCTIONS: Yamaha BD-S671 Black
CONTROLS AND FUNCTIONS
1
INTRODUCTION
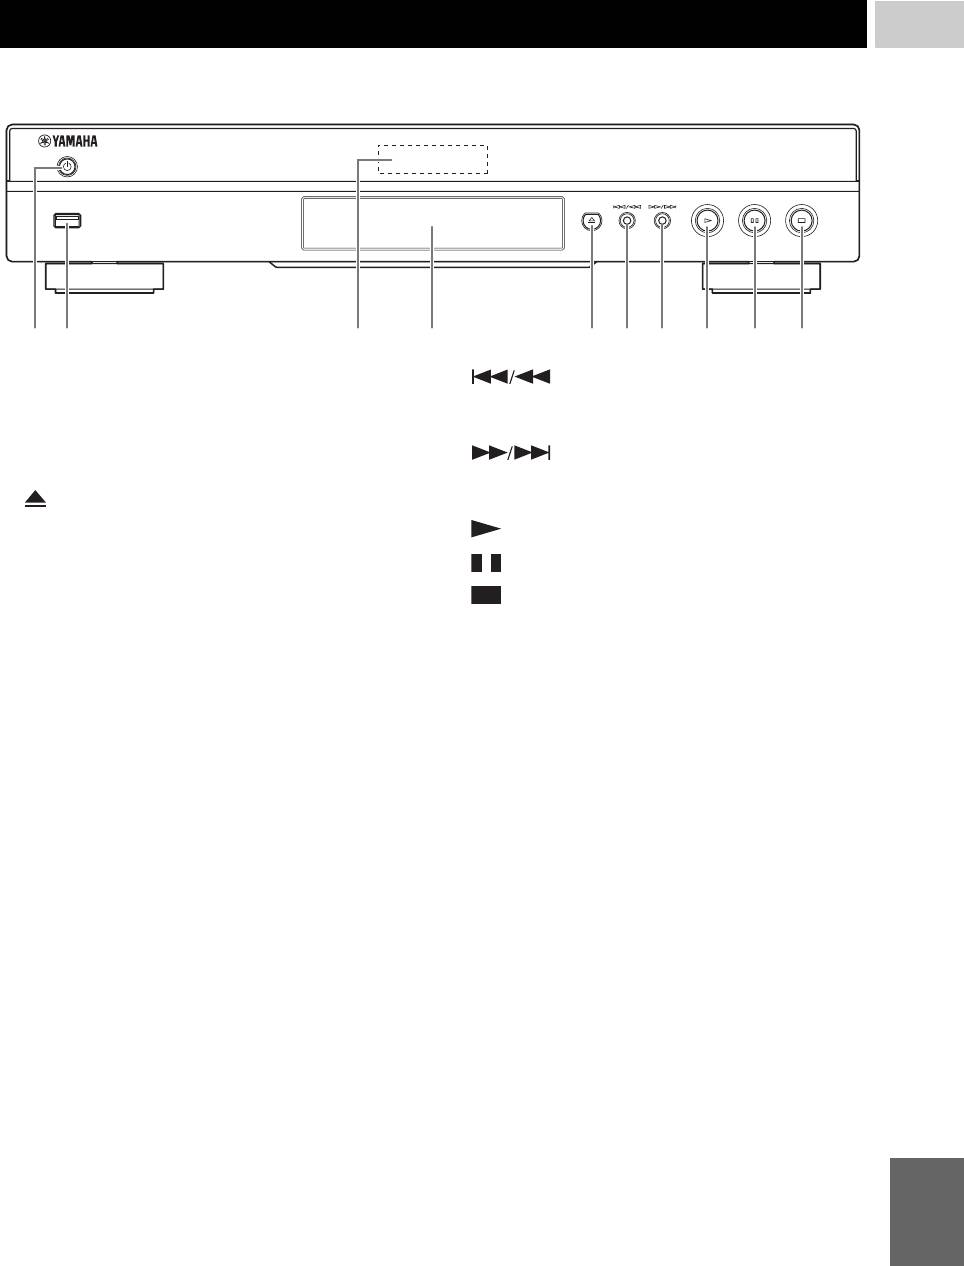
■ Front panel
USB
2 4 51 3 6 7 8 9 0
1 p (On/Standby)
6 (Search backward/Skip backward):
2 USB port (p. 16)
Press to skip backward, and press and hold to search
backward.
3 Front panel display
7 (Search forward/Skip forward):
4 Disc tray (p. 4)
Press to skip forward, and press and hold to search
5 (Eject) (p. 4)
forward.
8 (Play)
9 (Pause)
0 (Stop)
English
5 En
CONTROLS AND FUNCTIONS
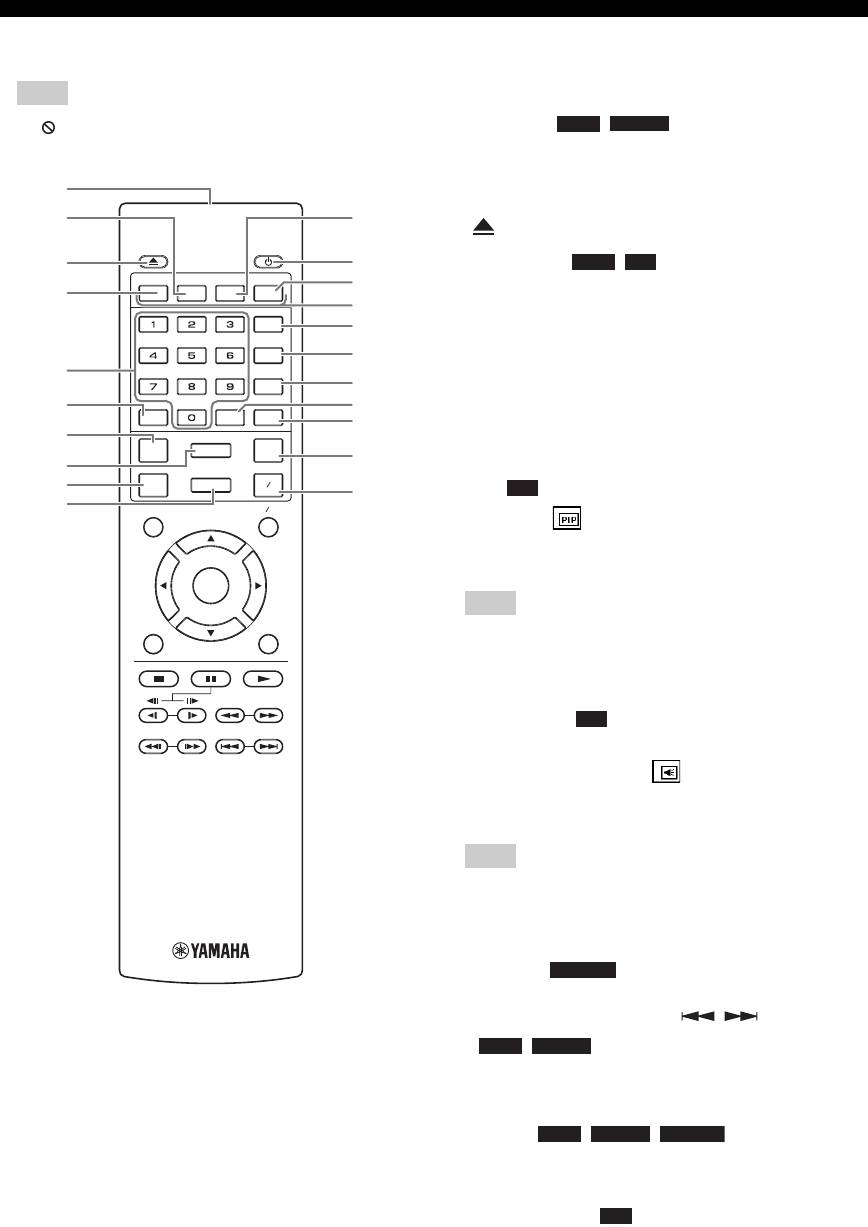
■ Remote control
1 Infrared signal transmitter: Outputs infrared
signal. Aim this window to the remote control sensor
Note
(p. 9).
– will appear on the top left corner of the screen
2 MARKER : Sets Bookmark (p. 25) at
DVD
VIDEO
when the pressed button is not available.
a specified point of a movie. After Bookmark is set, to
select the set point you want to jump to, press
1
DIGEST. You can set up to 12 Bookmarks.
2
A
3 : Opens/closes the disc tray.
3
B
4 PROGRAM : Sets the order of playback
DVD CD
PROGRAM MARKER DIGEST ZOOM
C
(p. 25). You can set up to 15 tracks (for an audio disc)
4
D
or titles/chapters (DVD-Video).
STATUS
E
5 Number buttons: Enters numbers, or during
SUBTITLE
F
playback, jumps to the track/chapter corresponding to
5
ANGLE
G
the number you input. These buttons may not be
6
H
available depending on the disc type and playback
AUDIOSEARCHCLEAR
I
condition.
7
SETUPPIP
REPEAT
J
6 CLEAR: Clears entered number/set item.
8
9
2ND
AUDIO
HOME
A B
K
7 PIP : Turns on/off the Picture in Picture (p. 26).
BD
0
TOP MENU
POP-UP MENU
PIP Mark ( ) is displayed on the screen when this
function is available. You can also select this item from
On Screen menu (p. 23).
ENTER
Note
RETURN ON SCREEN
– PIP Mark is displayed only when the PIP Mark is set
to on (p. 31).
8 SETUP: Displays SETUP menu screen (p. 27).
9 2ND AUDIO : Selects the secondary audio of the
BD
Picture in Picture (p. 26) or audio commentaries. The
Secondary Audio Mark ( ) is displayed on the
screen when this function is available (p. 34). You can
also select this item from On Screen menu (p. 23).
Note
– Secondary Audio Mark is displayed only when
Secondary Audio Mark is set to on (p. 31).
0 HOME: Displays the HOME menu screen (p. 19).
A DIGEST : Shows 12 photo thumbnails.
PHOTO
When thumbnails are displayed, you can proceed to
the next/previous page with / .
DVD VIDEO
: Displays Bookmark select bar
(p. 25).
B p: Turns this Player on or sets it to the standby mode.
C ZOOM : Zooms in/out.
DVD VIDEO PHOTO
The size of the screen will change each time you press
the button (zoom in/out: 3 steps each).
D Color buttons : Use these buttons according to
BD
on-screen instructions.
E STATUS: Displays the playback information (p. 24).
6 En

CONTROLS AND FUNCTIONS
F SUBTITLE : Changes subtitle
BD DVD VIDEO
languages (p. 42) if available . You can also select this
1
item from On Screen menu (p. 23).
INTRODUCTION
G ANGLE : Changes the camera angle if
BD DVD
video is recorded with multiple angles. The Angle
Mark ( ) is displayed on the screen when this
function is available. You can also select this item
from On Screen menu (p. 23).
Note
– Angle Mark is displayed only when the Angle Mark
is set to on (p. 31).
H SEARCH :
BD DVD CD VIDEO MUSIC
Jumps to a specified point during playback. For details
on this function, refer to “Using search” (p. 25). You
can also select this item from status menu (p. 24).
I AUDIO : Changes the audio language or
BD DVD
format. You can also select this item from On Screen
menu (p. 23).
J REPEAT
BD DVD CD VIDEO MUSIC
PHOTO
: Changes repeat mode. Repeat mode shown
below will change each time you press the button.
: Repeats the title being played back.
: Repeats the chapter being played back.
: Repeats the folder being played back.
: Repeats all tracks/files on the disc.
: Repeats the track/file being played back.
Shuffle All: Plays back all the tracks/files on the disc
randomly.
K A/B : Plays back
BD DVD CD VIDEO MUSIC
a specific part you want to repeat.
1 Press A/B at the scene where you want to set the
start point. “A-” is displayed on the screen.
2 Press A/B again at the scene where you want to set
the end point. “A-B” is displayed on the screen.
Repeat playback starts.
3 To cancel the repeat playback, press A/B. “A-B”
disappears and the repeat playback is finished.
Note
– This function cannot be performed depending on the
specifications of the disc.
Continued to the next page.
English
7 En
\
CONTROLS AND FUNCTIONS
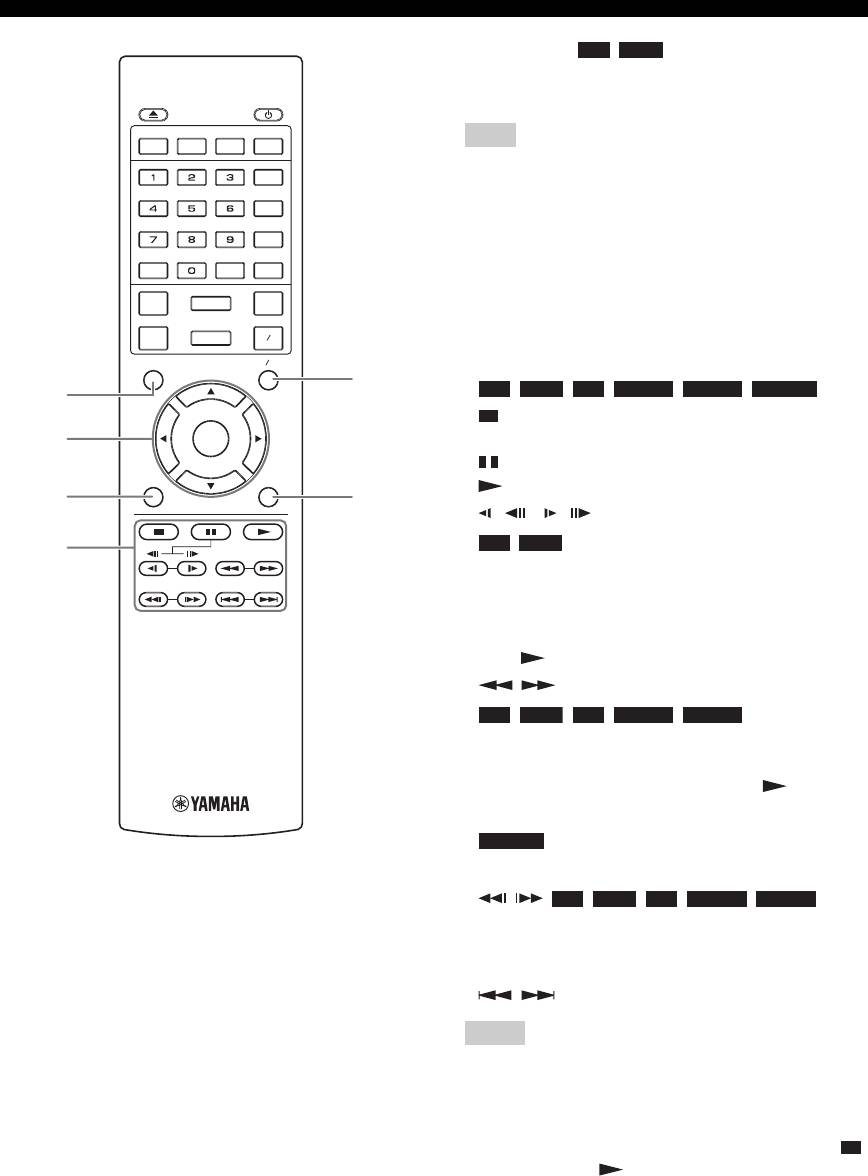
L TOP MENU : Displays the top menu
BD DVD
screen (p. 42) if the disc contains a menu. Select the
desired item using 5/a /2/3 and ENTER.
PROGRAM MARKER DIGEST ZOOM
Note
– Specific operations may be different depending on
STATUS
the disc. Follow the instructions of each menu
SUBTITLE
screen.
ANGLE
M Cursor buttons (5/a /2 /3): Moves the focus in
the menu screen.
AUDIOSEARCHCLEAR
ENTER: Selects the focused menu/item.
SETUPPIP
REPEAT
N RETURN: Returns to the previous menu or screen,
2ND
AUDIO
HOME
A B
etc.
TOP MENU
POP-UP MENU
O Control buttons
P
BD DVD CD VIDEO MUSIC PHOTO
L
: Stops playback. To stop playback completely,
M
ENTER
press this button twice.
: Pauses playback.
RETURN ON SCREEN
: Plays back contents.
N
Q
()/ ()
O
BD DVD
: Performs slow backward/forward. Slow
playback speed will change each time you press the
button (slow backward/forward: 4 steps each).
These buttons also perform frame advance/reverse
playback during pause.
Press to resume normal playback.
/
BD DVD CD VIDEO MUSIC
:
Searches backward/forward. The search speed will
change each time you press the button (search
backward/forward: 5 steps each). Press to resume
normal playback.
PHOTO
: Changes the speed of a slide show (slower/
faster: 3 steps).
/ :
BD DVD CD VIDEO MUSIC
Press for instant search/replay. Instant search skips the
content 30 seconds. Instant replay replays the content
from 10 seconds before.
/: Skips backward/forward.
Notes
– Some BD/DVD discs are not compatible with frame
advance/reverse playback.
– Depending on the disc, this Player resumes playback
from the point that where the Player was previously
stopped. To play back from the beginning, press
twice and then .
8 En
CONTROLS AND FUNCTIONS
P POP-UP/MENU : Displays pop-up
BD DVD
menu. The menu contents displayed vary depending
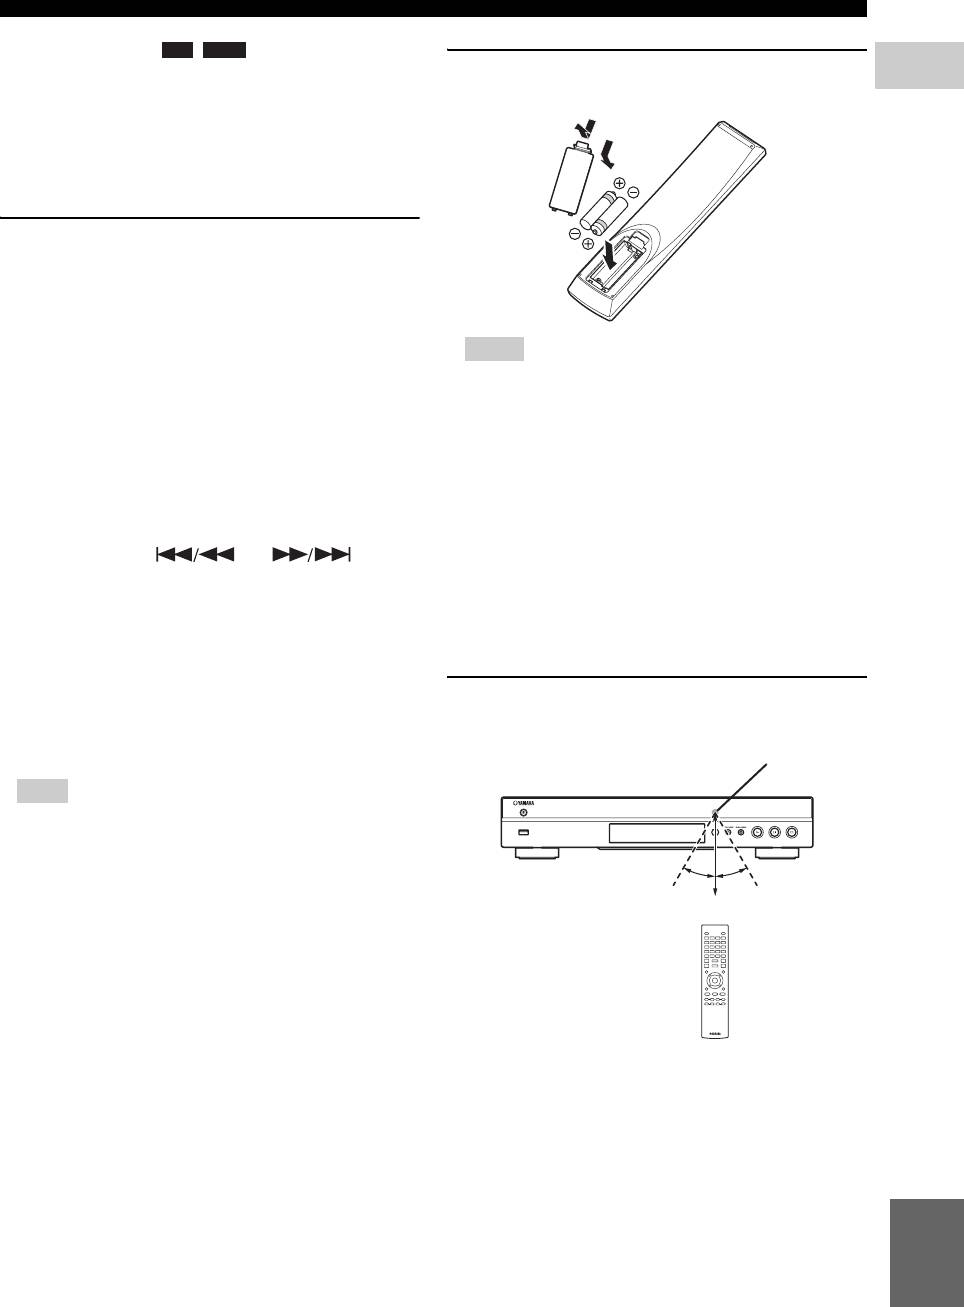
Loading the batteries in the remote
1
on the disc. For details on how to see and operate the
control
INTRODUCTION
pop-up menu, refer to the manual for the disc.
1
The top menu screen may be displayed by pressing
3
POP-UP/MENU depending on the DVD.
Q ON SCREEN: Displays On Screen menu (p. 23).
ID function
You can change the remote control ID to prevent
unwanted operation of the other Yamaha player such as
DVD player. If you have changed the remote control ID,
make sure that you select the same ID for the main unit.
The default setting is ID1.
Notes
1 Remote control setting
– Do not subject the remote control unit to shock,
To change the ID from ID1 to ID2, press and hold
water or excessive humidity.
the red color button and 2 of number button
– The remote control unit may not function if the
simultaneously for 7 seconds. To change the ID
Player’s remote sensor is in direct sunlight or any
from ID2 to ID1, press and hold the red color button
other strong light.
and 1 of number button simultaneously for 7
– Incorrect use of batteries may cause them to leak or
seconds.
burst. Read the battery warnings and use the
batteries properly.
2 Main unit setting
– Do not mix old and new batteries, or mix different
Press and hold and on the
brands.
front panel simultaneously for 2 seconds to display
– Remove the batteries if you will not use the remote
current ID when:
control unit for an extended period of time.
– No disc is inserted in this Player.
– Dispose of batteries according to your regional
regulations.
– The disc tray is closed.
– Playback is stopped.
– “NO DISC” is displayed on the front panel
Approximate operating range of
display.
remote control
Keep pressing and holding the keys for another 2
seconds to change the ID between ID1 and ID2.
Note
– If the remote control is without batteries for a few
minutes or if exhausted batteries remain in the
remote control, the remote control ID is
automatically set to ID1. If you want to use the
remote control in ID2 setting, install new batteries
and set the remote control ID again.
English
9 En
2
2
Remote control sensor
USB
30˚30˚
6 m (20 ft)
Оглавление
- ПРЕДУПРЕЖДЕНИЕ: ВНИМАТЕЛЬНО ПРОЧИТАЙТЕ ЭТО ПЕРЕД ИСПОЛЬЗОВАНИЕМ АППАРАТА.
- СОДЕРЖАНИЕ
- ВОЗМОЖНОСТИ ЭТОГО ПРОИГРЫВАТЕЛЯ
- О ДИСКАХ И ФАЙЛАХ
- ОРГАНЫ УПРАВЛЕНИЯ И ФУНКЦИИ
- ВВЕДЕНИЕ ПЕРЕД ВЫПОЛНЕНИЕМ ПОДКЛЮЧЕНИЙ
- HDMI ПОДКЛЮЧЕНИЕ
- ПОДКЛЮЧЕНИЕ ВИДЕО
- ПОДКЛЮЧЕНИЕ АУДИО
- СЕТЕВОЕ И USB-ПОДКЛЮЧЕНИЕ
- ДРУГИЕ ПОДКЛЮЧЕНИЯ
- НАЧАЛЬНЫЕ УСТАНОВКИ/ПРОСТАЯ УСТАНОВКА
- МЕНЮ HOME/MEDIA
- ИСПОЛЬЗОВАНИЕ СЕТЕВЫХ СЛУЖБ
- РАСШИРЕННЫЕ ОПЕРАЦИИ ВОСПРОИЗВЕДЕНИЯ
- МЕНЮ УСТАНОВКИ
- ОБНОВЛЕНИЕ ПРОГРАММНОГО ОБЕСПЕЧЕНИЯ
- УСТРАНЕНИЕ НЕИСПРАВНОСТЕЙ
- ГЛОССАРИЙ
- ТЕХНИЧЕСКИЕ ХАРАКТЕРИСТИКИ
- CAUTION: READ THIS BEFORE OPERATING YOUR UNIT.
- CONTENTS
- WHAT YOU CAN DO WITH THIS PLAYER
- ABOUT DISCS AND FILES
- CONTROLS AND FUNCTIONS
- INTRODUCTION TO CONNECTIONS
- HDMI CONNECTION
- VIDEO CONNECTIONS
- AUDIO CONNECTIONS
- NETWORK AND USB CONNECTION
- OTHER CONNECTIONS
- INITIAL WIZARD/EASY SETUP
- HOME/MEDIA MENU
- USING NETWORK SERVICES
- ADVANCED PLAYBACK OPERATION
- SETUP MENU
- SOFTWARE UPGRADE
- TROUBLESHOOTING
- GLOSSARY
- SPECIFICATIONS


