JVC KD-G617: ~
~ : JVC KD-G617
Sound adjustments
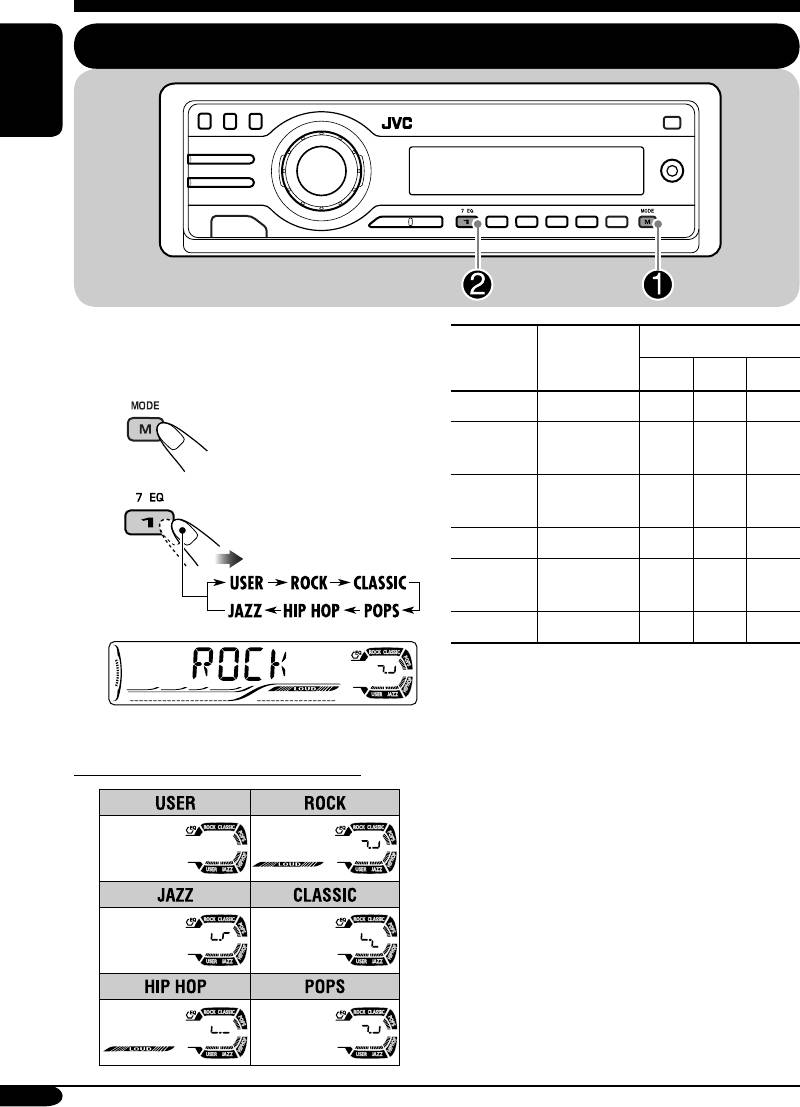
Selecting preset sound modes (C-EQ: custom equalizer)
ENGLISH
You can select a preset sound mode suitable to
Preset values
the music genre.
Indication For:
1
2
3
BAS
*
TRE
*
LOUD
*
USER (Flat sound) 00 00 OFF
~
ROCK Rock or
+03 +01 ON
disco music
CLASSIC Classical
+01 –02 OFF
Ÿ
music
POPS Light music +04 +01 OFF
HIP HOP Funk or rap
+02 00 ON
music
JAZZ Jazz music +02 +03 OFF
1
*
BAS: Bass
2
*
TRE: Treble
3
*
LOUD: Loudness
Ex.: When “ROCK” is selected
Indication pattern for each sound mode:
20
EN18-23_G617[EE]f.indd 20EN18-23_G617[EE]f.indd 20 1/11/05 5:27:30 PM1/11/05 5:27:30 PM
Indication To do: Range
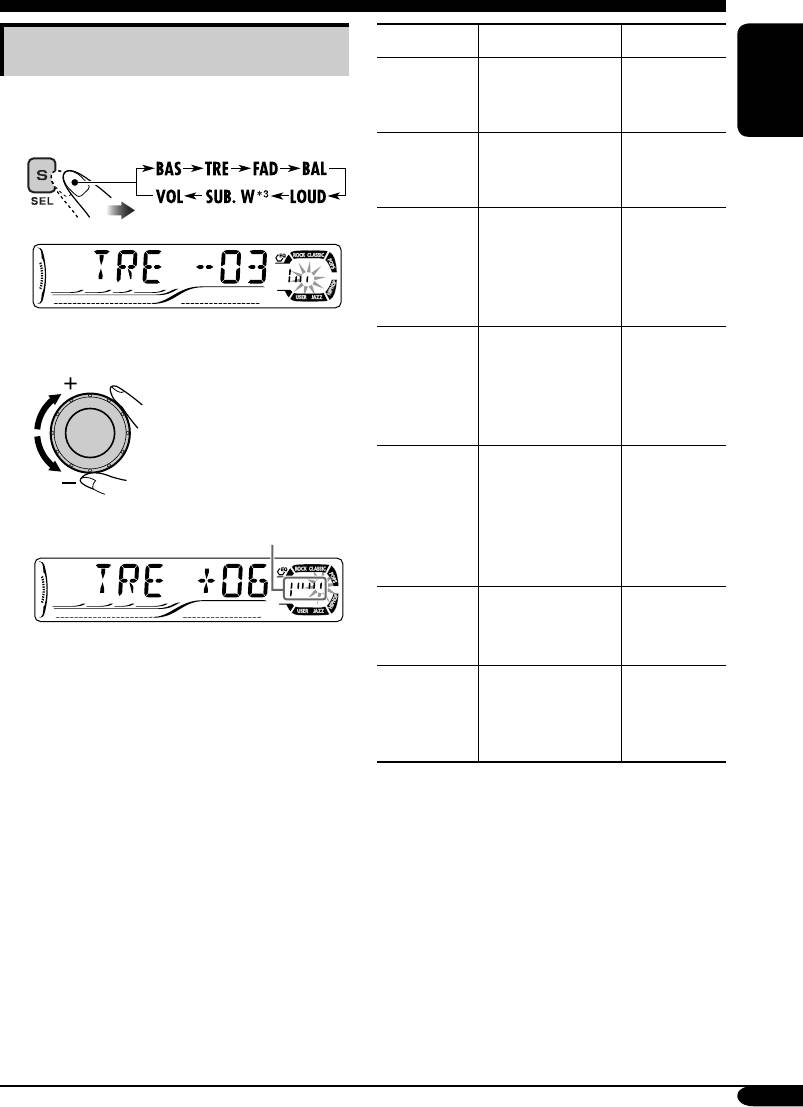
Adjusting the sound
1
BAS*
Adjust the bass. –06 (min.)
You can adjust the sound characteristics to your
(bass)
to
preference.
+06 (max.)
ENGLISH
1
TRE*
Adjust the treble. –06 (min.)
1
(treble)
to
+06 (max.)
2
FAD*
Adjust the front
R06
(fader)
and rear speaker
(Rear only)
balance.
to
F06
(Front only)
Ex.: When “TRE” is selected
BAL
Adjust the left
L06
(balance)
and right speaker
(Left only)
2
balance.
to
R06
(Right only)
1
LOUD*
Boost low and
LOUD ON
(loudness)
high frequencies
J
Indication pattern changes as
to produce a
LOUD OFF
you adjust the level.
well-balanced
sound at low
volume level.
3
SUB. W*
Adjust the
00 (min.)
(subwoofer)
subwoofer output
to
level.
08 (max.)
4
VOL*
Adjust the
00 (min.)
(volume)
volume.
to
30 or 50
5
(max.)*
1
*
When you adjust the bass, treble, or
loudness, the adjustment you have made is
stored for the currently selected sound mode
(C-EQ) including “USER.”
2
*
If you are using a two-speaker system, set
the fader level to “00.”
3
*
This takes effect only when a subwoofer is
connected.
4
*
Normally the control dial works as the
volume control. So you do not have to select
“VOL” to adjust the volume level.
5
*
Depending on the amplifier gain control
setting. (See page 24 for details.)
21
EN18-23_G617[EE]f.indd 21EN18-23_G617[EE]f.indd 21 1/11/05 5:27:30 PM1/11/05 5:27:30 PM
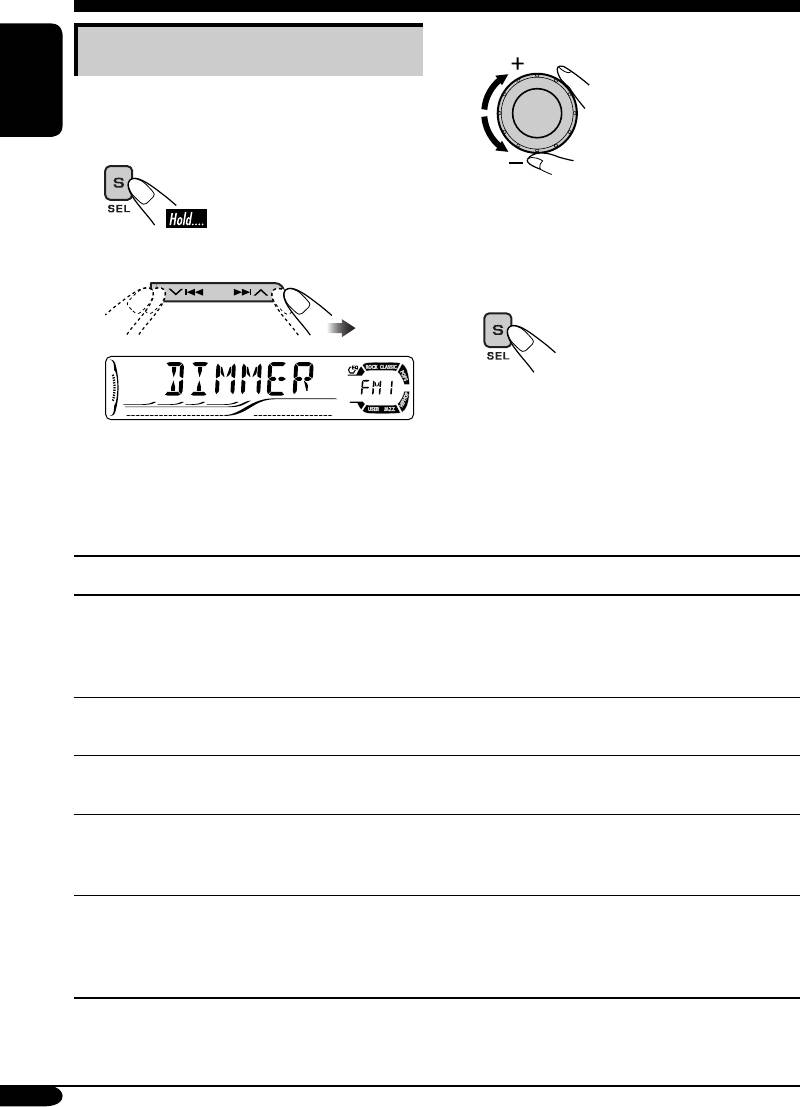
General settings — PSM
3 Adjust the PSM item selected.
Basic procedure
You can change PSM (Preferred Setting Mode)
items listed in the table that follows.
ENGLISH
1
4 Repeat steps 2 and 3 to adjust the
other PSM items if necessary.
2 Select a PSM item.
5 Finish the procedure.
Ex.: When you select “DIMMER”
Indications Selectable settings, [reference page]
DEMO
DEMO ON : [Initial]; Display demonstration will be activated
Display demonstration
automatically if no operation is done for about
20 seconds, [8].
DEMO OFF : Cancels.
CLOCK H
0 – 23 (1 – 12), [8]
Hour adjustment
[Initial: 0 (0:00)]
CLOCK M
00 – 59, [8]
Minute adjustment
[Initial: 00 (0:00)]
24H/12H
12H O 24H, [8]
24 hours or 12 hours time
[Initial: 24H]
display
CLK ADJ
AUTO : [Initial]; The built-in clock is automatically
Clock adjustment
adjusted using the CT (clock time) data in the
RDS signal.
OFF : Cancels.
22
EN18-23_G617[EE]f.indd 22EN18-23_G617[EE]f.indd 22 1/11/05 5:27:30 PM1/11/05 5:27:30 PM

Indications Selectable settings, [reference page]
AF-REG
When the received signals from the current station become weak...
Alternative frequency/
AF : [Initial]; Switches to another station (the
regionalization reception
programme may differ from the one currently
ENGLISH
received), [13].
• The AF indicator lights up.
AF REG : Switches to another station broadcasting the
same programme.
• The AF and REG indicators light up.
OFF : Cancels (not selectable when “DAB AF” is set to
“AF ON”).
PTY-STBY
Activates PTY Standby Reception with one of the 29 PTY codes,
PTY standby
[13].
OFF [Initial]
=
29 PTY codes, [11]
=
(back to the beginning)
1
TA VOL
[Initial: VOL 20]; VOL 00 — VOL 30 or 50*
, [12]
Traffic announcement
volume
P-SEARCH
ON : Using the AF data, the receiver tunes in to
Programme search
another frequency broadcasting the same
programme as the original preset RDS station is
if the preset station signals are not sufficient.
OFF : [Initial]; Cancels.
2
DAB AF*
AF ON : [Initial]; Traces the programme among DAB
Alternative frequency
services and FM RDS stations, [29].
reception
AF OFF : Cancels.
2
DAB VOL*
You can adjust the volume level (VOL –12 — VOL +12) of DAB
DAB volume adjustment
tuner to match the FM sound level and store it in memory.
[Initial: VOL 00]
LEVEL
ON : [Initial]; Activates the audio level indicator.
Audio level meter
OFF : Cancels; sound mode indicator is shown, [20].
DIMMER
AUTO : [Initial]; Dims the display when you turn on the
Dimmer
headlights.
ON : Activates dimmer.
OFF : Cancels.
1
*
Depends on the amplifier gain control.
2
*
Displayed only when DAB tuner is connected.
To be continued...
23
EN18-23_G617[EE]f.indd 23EN18-23_G617[EE]f.indd 23 1/11/05 5:27:31 PM1/11/05 5:27:31 PM

Indications Selectable settings, [reference page]
TEL
MUTING 1/MUTING 2: Select either one which mutes the sounds
Telephone muting
while using the cellular phone.
ENGLISH
OFF : [Initial]; Cancels.
1
SCROLL*
ONCE : [Initial]; Scrolls the disc information once.
Scroll
AUTO :
Repeats scrolling (5-second intervals in between).
OFF : Cancels.
• Pressing D DISP for more than one second can scroll the display
regardless of the setting.
WOOFER
LOW : Frequencies lower than 55 Hz are send to the
Subwoofer cutoff
subwoofer.
frequency
MID : [Initial]; Frequencies lower than 85 Hz are send to
the subwoofer.
HIGH : Frequencies lower than 115 Hz are send to the
subwoofer.
2
EXT IN*
CHANGER :
[Initial]; To use a JVC CD changer, [15] or DAB
External input
tuner, [28].
EXT IN : To use another external component, [27].
AUX ADJ
A.ADJ 00 – A.ADJ 05: Adjust the auxiliary input level
Auxiliary input level
accordingly, to avoid the sudden increase of
adjustment
the output level when changing the source from
external component connected to the AUX input
jack on the control panel.
[Initial: A.ADJ 00]
TAG D IS P
TAG O N : [Initial]; Shows the ID3 tag while playing MP3/
Tag display
WMA tracks, [18].
TAG OF F : Cancels.
AMP GAIN
You can change the maximum volume level of this receiver.
Amplifier gain control
LOW PWR : VOL 00 – VOL 30 (Select this if the maximum
power of the speaker is less than 50 W to prevent
them from damaging the speaker.)
HIGH PWR : [Initial]; VOL 00 – VOL 50
1
*
Some characters or symbols will not be shown (and will be blanked) on the display
(Ex. “AБBЁ б ! ” ]“AБBE Б ”).
2
*
Displayed only when one of the following sources is selected—FM, AM, CD, or AUX IN.
24
EN24-29_G617[EE]f.indd 24EN24-29_G617[EE]f.indd 24 1/11/05 5:27:43 PM1/11/05 5:27:43 PM
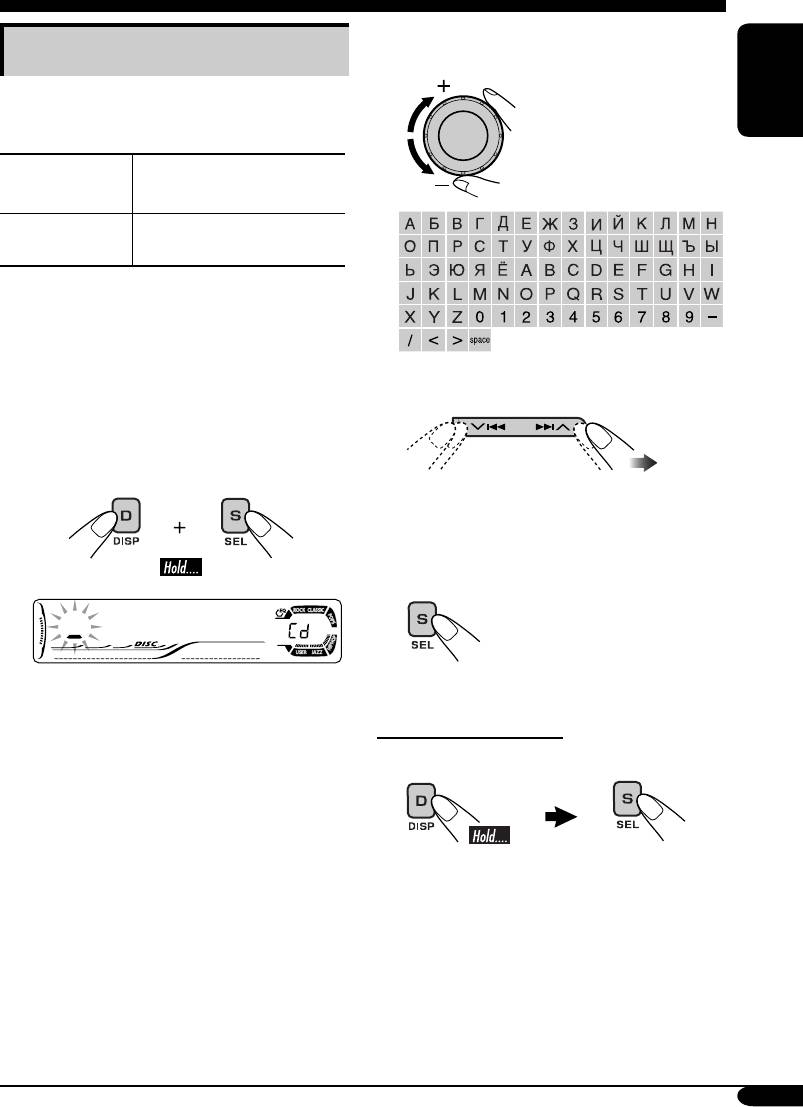
Other main functions
3 Assign a title.
Assigning titles to the sources
1 Select a character.
You can assign titles to CDs (both in this
receiver and in the CD changer).
ENGLISH
Maximum number of
Sources
characters
CDs/CD-CH Up to 32 characters (up to
30 discs)
*
You cannot assign a title to a CD Text or an
MP3/WMA disc.
1 Select the sources.
• For a CD in this receiver: Insert a CD.
2 Move to the next (or previous)
• For CDs in the CD changer: Select
character position.
“CD-CH,” then select a disc number.
2 Enter the title assignment mode.
3 Repeat steps 1 and 2 until you
finish entering the title.
4 Finish the procedure.
Ex.: When you select CD as the source
To erase the entire title
In step 2 on the left...
25
EN24-29_G617[EE]f.indd 25EN24-29_G617[EE]f.indd 25 1/11/05 5:27:45 PM1/11/05 5:27:45 PM
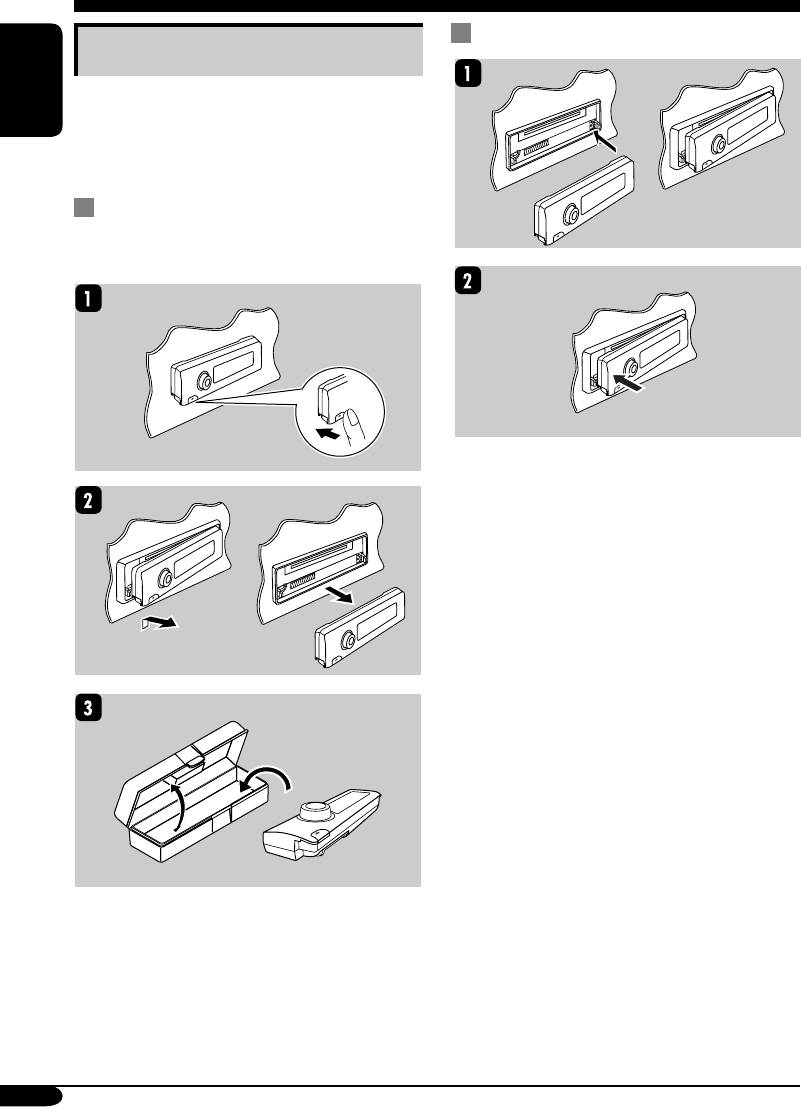
Attaching the control panel
Detaching the control panel
When detaching or attaching the control panel,
be careful not to damage the connectors on
ENGLISH
the back of the control panel and on the panel
holder.
Detaching the control panel
Before detaching the control panel, be sure to
turn off the power.
26
EN24-29_G617[EE]f.indd 26EN24-29_G617[EE]f.indd 26 1/11/05 5:27:45 PM1/11/05 5:27:45 PM


