JVC GR-PD1 – страница 3
Инструкция к Видеокамере JVC GR-PD1
Master Page: Right-Heading0
GR-PD1PAL.book Page 41 Tuesday, June 17, 2003 7:31 PM
FEATURES FOR RECORDING
EN 41
NOTE:
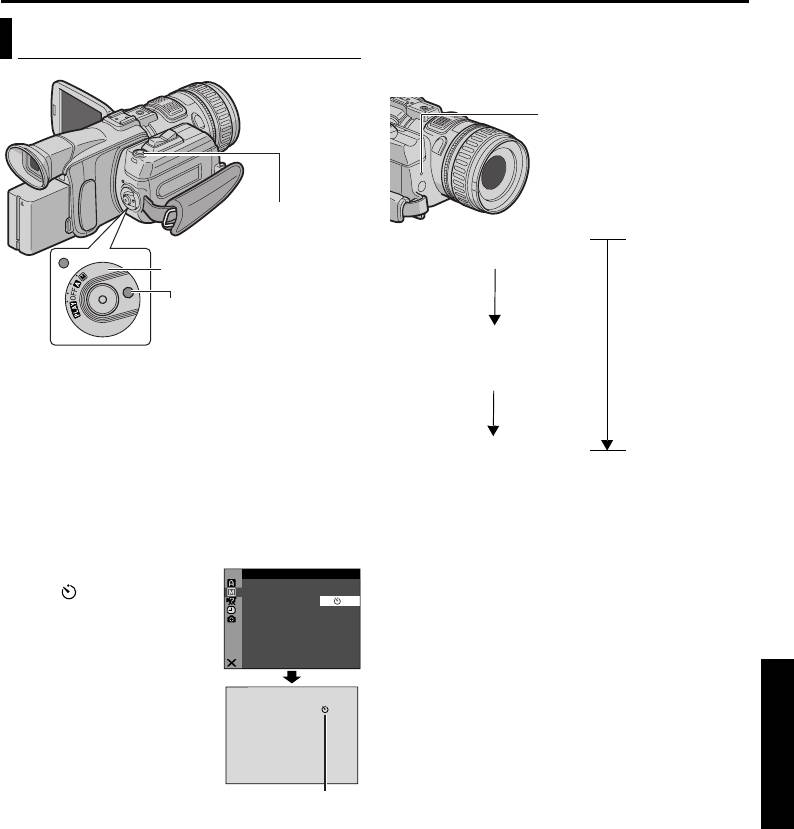
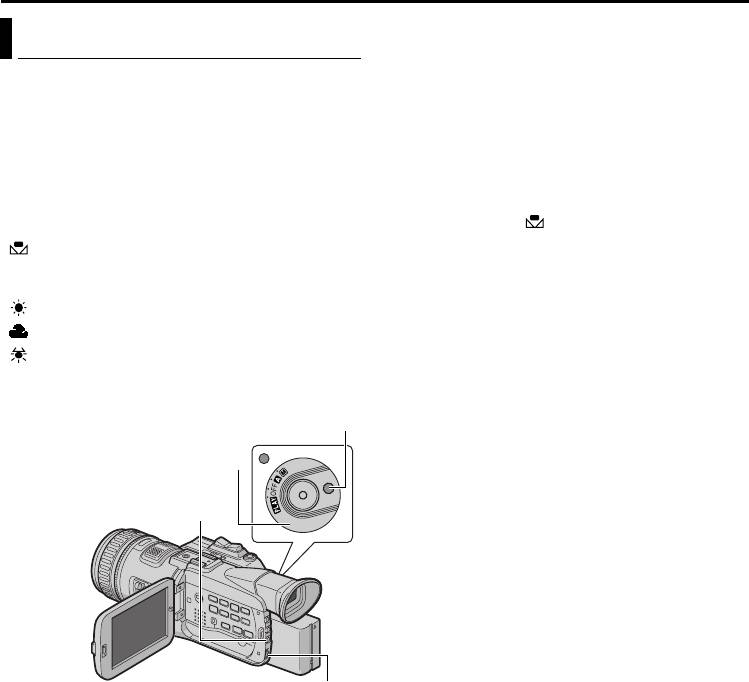
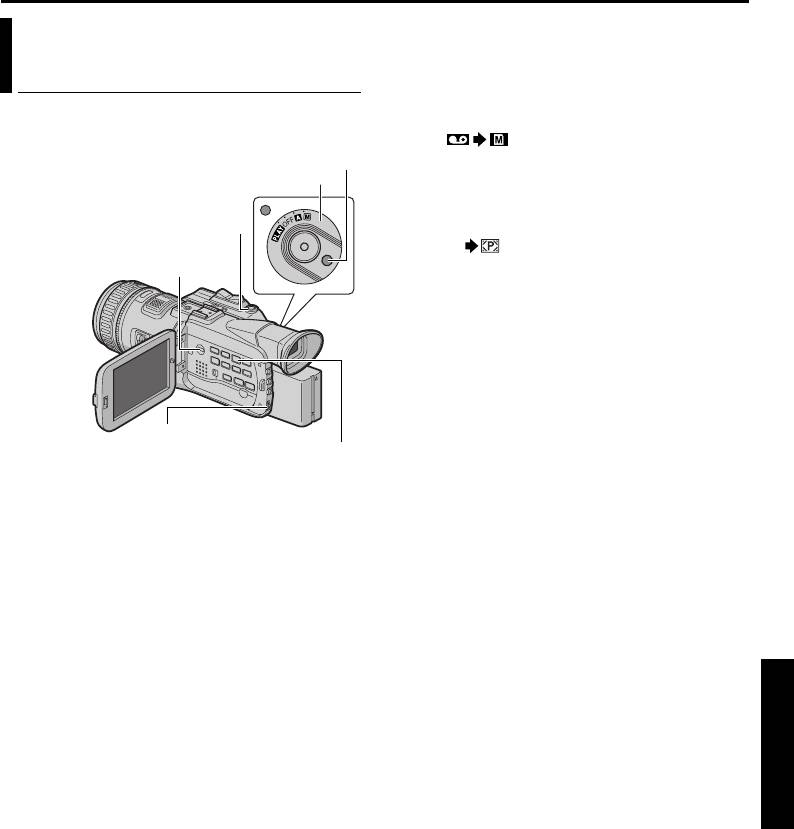
Self-Timer
If “BEEP” and “TALLY” are set to “OFF” (墌 pg. 36),
the beep does not sound and the tally lamp does not
light.
When the Recording Start/
Stop Button or SNAPSHOT is
pressed, the tally lamp
changes as shown:
SNAPSHOT Button
Begins blinking
(Self-Timer starts)
Power Switch
Lock Button
Blinks quickly
Once the camcorder is set, the camcorder operator
(Self-Timer shooting starts
soon)
can become part of the scene in a more natural way,
adding the final touch to a memorable picture.
1 Set the Power Switch to “M” while pressing down
the Lock Button located on the switch.
Stops blinking and stays on
After approx.
2 Open the LCD monitor fully, or pull out the
(Self-Timer video recording
15 sec.
viewfinder fully.
starts)
● You can tilt the LCD monitor upward to 180°
OR
so that it faces forward and view yourself while
Turns off
self-recording with the viewfinder pushed
(Self-Timer snapshot
back.
recording occurs)
3 Set “SELF-TIMER” to
L MA A
NU
“ON ”. (墌 pg. 33, 35)
OMEL –TI SE F R FF–
O
N
4 To engage the Self-Timer
for video recording, press
ADVANCED FEATURES
the Recording Start/Stop
NRETUR
Button.
● After 15 seconds, the
beep sounds and video
recording starts.
To stop Self-Timer
recording, press the
Recording Start/Stop
Button again.
Self-Timer indication
● The camcorder re-enters
Record-Standby mode.
OR
4 Press SNAPSHOT.
● After 15 seconds, the beep sounds and
snapshot recording starts. After that, the
camcorder re-enters Record-Standby mode.
5 To end Self-Timer recording, select “OFF” in
step 3.
Master Page: Left
GR-PD1PAL_07Advanced.fm Page 42 Thursday, June 19, 2003 2:03 PM
42 EN
FEATURES FOR RECORDING (cont.)
● During Snapshot recording, the image displayed
Lock Button
in the viewfinder may be partially missing.
However, there is no effect in the recorded image.
● When a cable is connected to the AV connector,
the shutter sound is not heard from the speaker,
however it is recorded onto the tape.
Power Switch
SNAPSHOT Button
Motor Drive Mode
Keeping SNAPSHOT pressed in step 4 provides an
effect similar to serial photography. (Interval
between still images: approx. 1 second)
The Motor Drive mode is disabled when “REC
SELECT” is set to “ / ”. (墌 pg. 38)
Recording
Mode Switch
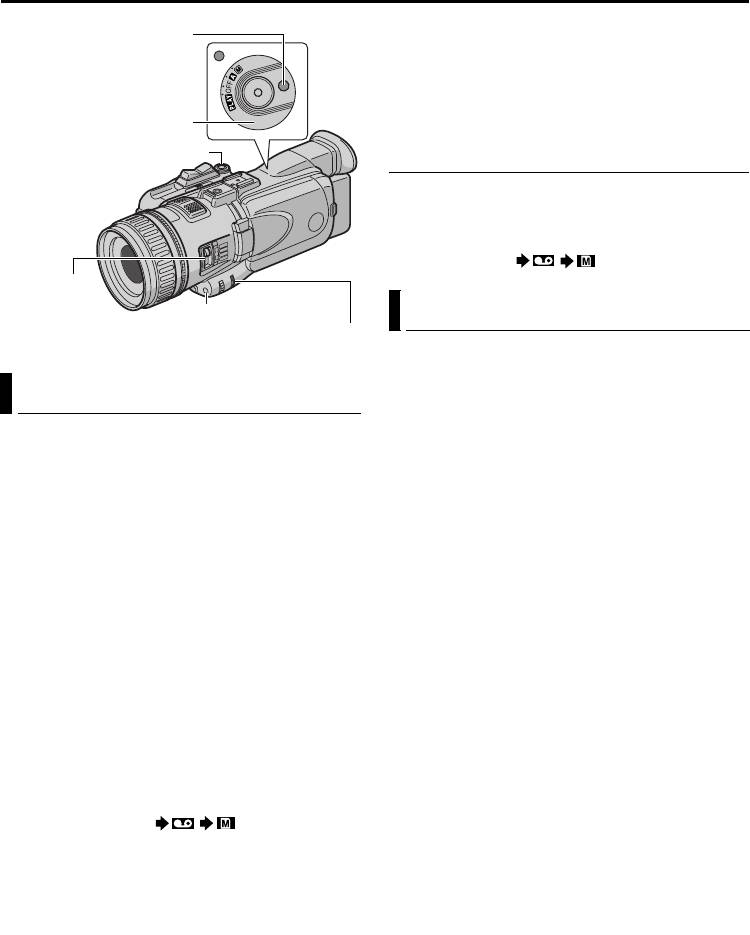
BACK LIGHT Button
Exposure Control
EXPOSURE Wheel
Manual exposure control is recommended in the
following situations:
● When shooting using reverse lighting or when the
Snapshot (For Video Recording)
background is too bright.
● When shooting on a reflective natural background
This feature lets you record still images that look like
such as at the beach or when skiing.
photographs onto a tape.
● When the background is overly dark or the subject
1 Set the Recording Mode Switch to “HI-RES”,
is bright.
“PS50” or “DV”.
1 Set the Power Switch to “M” while pressing down
2 Set the Power Switch to “A” or “M” while
the Lock Button located on the switch.
pressing down the Lock Button located on the
2 Open the LCD monitor fully, or pull out the
switch.
viewfinder fully.
3 Open the LCD monitor fully, or pull out the
3 Press the EXPOSURE Wheel in.
viewfinder fully.
● The exposure control indicator appears.
4 Press SNAPSHOT.
4 To brighten the image, rotate the EXPOSURE
● The “O” indication appears and a still
Wheel towards R. To darken the image, rotate
image will be recorded for approx. 6 seconds,
the EXPOSURE Wheel towards T. (maximum
then the camcorder re-enters the Record-
±10)
Standby mode.
● +3 exposure has the same effect as the
● You can perform Snapshot also during
backlight compensation. (墌 pg. 43)
recording. A still image will be recorded for
● –3 exposure has the same effect as when “r”
approx. 6 seconds, then the normal recording
is set to “SPOTLIGHT”. (墌 pg. 48)
resumes.
To return to automatic exposure control...
To record still images not only on the tape but also
Press the EXPOSURE Wheel in. Or, set the Power
in the memory card
Switch to “A”.
Set “REC SELECT” to “ / ”. (墌 pg. 38)
•The image size recorded in the memory card
NOTE:
differs depending on the recording mode; 640 x
You cannot use the manual exposure control at the
480 (DV), 848 x 480 (PS50) or 1280 x 720 (HI-
same time when “r” is set to “SPOTLIGHT” or
RES).
“SNOW” (墌 pg. 48), or with the backlight
compensation. (墌 pg. 43)
NOTES:
● To remove the shutter sound, refer to “BEEP” on
page 36.
● Certain modes of Program AE (墌 pg. 48) are
disabled during Snapshot recording. In such a
case, the icon blinks.
● If SNAPSHOT is pressed when “OIS” is set to
“ON” (墌 pg. 35), the Stabiliser will be disabled.

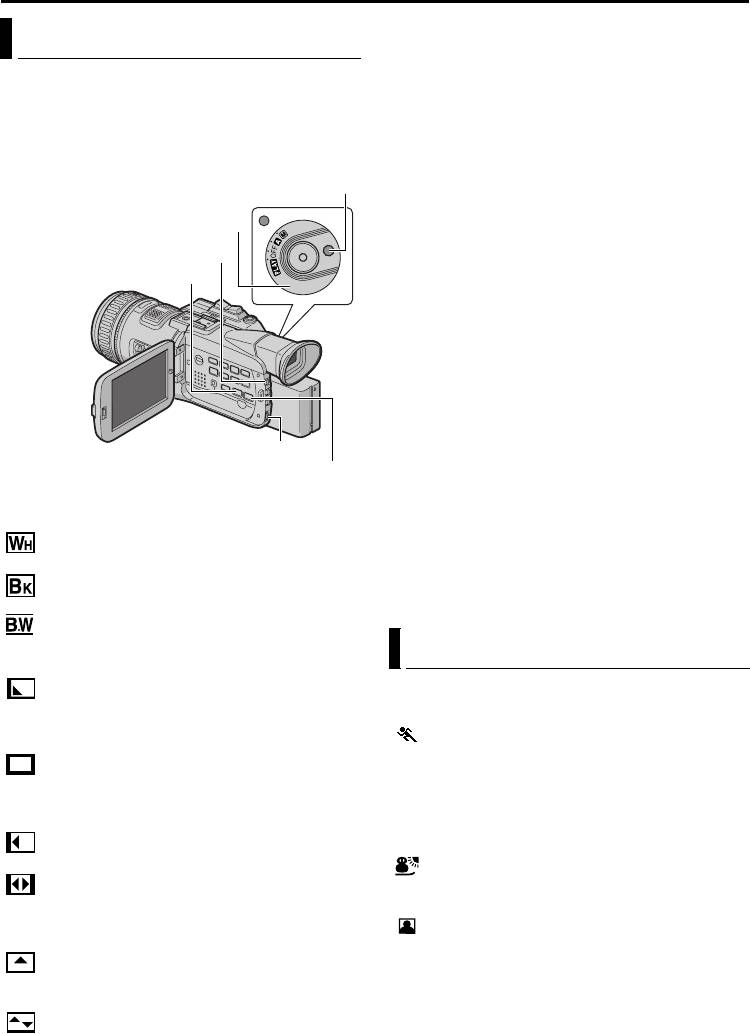
Master Page: Right
EN 43
Iris Lock
Like the pupil of the human eye, the iris contracts in
Backlight compensation brightens the subject
well-lit environments to keep too much light from
quickly.
entering, and dilates in dim environments to allow
Press BACK LIGHT. The indicator is displayed
in more light.
and the subject is brightened. If pressed again,
Use this function in the following situations:
disappears and the brightness returns to the previous
● When shooting a moving subject.
level.
● When the distance to the subject changes (so its
● Using the BACK LIGHT Button may cause the light
size in the LCD monitor or the viewfinder
around the subject to become too bright and the
changes), such as when the subject is backing
subject to become white.
away.
● Backlight compensations is also available when
● When shooting on a reflective natural background
the Power Switch is set to “A”.
such as at the beach or when skiing.
● When shooting objects under a spotlight.
● When zooming.
When the subject is close, keep the iris locked. Even
when the subject moves away from you, the image
will not darken or brighten.
1 Perform steps 1 to 3 of “Exposure Control”.
● The exposure control indicator appears.
2 Adjust zoom so that the
subject fills the LCD
monitor or the viewfinder,
then press and hold the
EXPOSURE Wheel for over
2 seconds. The exposure
control indicator and the
“ ” indication appear.
To return to automatic iris
control...
Press the EXPOSURE Wheel in. Or, set the Power
Switch to “A”.
● The exposure control indicator and “ ”
disappear.
To lock the exposure control and the iris…
Adjust the exposure by rotating the EXPOSURE
Wheel in step 4 of “Exposure Control”. Then lock
the iris in step 2 of “Iris Lock”.
3
GR-PD1PAL.book Page 43 Tuesday, June 17, 2003 7:31 PM
Backlight Compensation
Iris Lock Indicator
ADVANCED FEATURES
Master Page: Left
GR-PD1PAL_07Advanced.fm Page 44 Thursday, June 19, 2003 2:02 PM
44 EN
FEATURES FOR RECORDING (cont.)
To return to automatic iris adjustment...
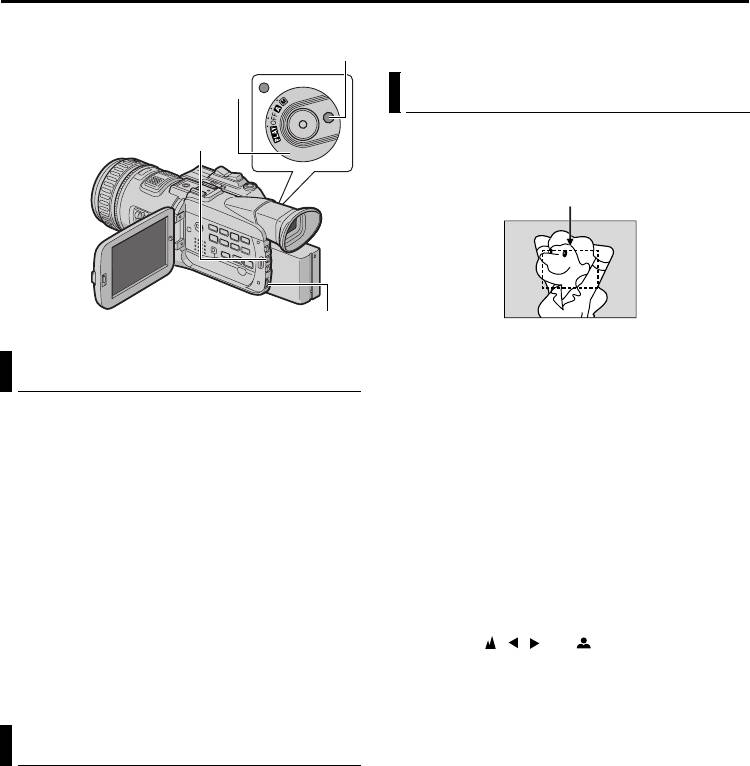
Lock Button
Press S/A. Or, set the Power Switch to “A”.
Power Switch
Auto Focus
The camcorder’s Full Range AF system offers
S/A Button
continuous shooting ability from close-up (as close
as approx. 5 cm to the subject) to infinity.
Focus detection zone
MENU Wheel
However, correct focus may not be obtainable in the
situations listed below (in these cases perform
Manual Shutter Speed Adjustment
“Manual Focus”):
● When two subjects overlap in the same scene.
Changing the shutter speed manually allows a fast-
● When illumination is low.*
moving subject to be shot as if it is stationary, or to
● When the subject has no contrast (difference in
be intentionally blurred for vivid playback.
brightness and darkness), such as a flat, one-
colour wall, or a clear, blue sky.*
1 Set the Power Switch to “M” while pressing down
● When a dark object is barely visible in the LCD
the Lock Button located on the Switch.
monitor or the viewfinder.*
2 Open the LCD monitor fully, or pull out the
● When the scene contains minute patterns or
viewfinder fully.
identical patterns that are regularly repeated.
3 Press S/A.
● When the scene is affected by sunbeams or light
● The shutter speed level indicator appears.
reflecting off the surface of a body of water.
● When shooting a scene with a high-contrast
4 For the fast shutter speed, rotate the MENU
background.
Wheel toward R (fastest 1/1000 sec.).
* The following low-contrast warnings appear
For the slow shutter speed, rotate the MENU
blinking: , , and
Wheel toward T (slowest 1/12 sec.).
NOTES:
To return to automatic shutter speed adjustment...
● If the lens is smeared or blurred, accurate focusing
Press S/A twice. Or, set the Power Switch to “A”.
is not possible. Keep the lens clean. (墌 pg. 79)
When condensation occurs, wipe with a soft cloth
or wait for it to dry naturally.
Manual Iris Adjustment
● When shooting a subject close to the lens, zoom
out first. (墌 pg. 20) If zoomed-in in the auto focus
Adjusting the iris manually provides an image
mode, the camcorder may automatically zoom
special effect by changing the range of focusing.
out depending on the distance between the
1 Set the Power Switch to “M” while pressing down
camcorder and the subject. This will not occur
the Lock Button located on the Switch.
when “TELE MACRO” is set to “ON”. (墌 pg. 35)
2 Open the LCD monitor fully, or pull out the
viewfinder fully.
3 Press S/A twice.
● The iris level indicator appears.
4 To close the iris, rotate the MENU Wheel toward
R (maximum F 22.0). To open the iris, rotate the
MENU Wheel towards T (minimum F 1.8).
● Closing the iris (increasing the value) enables
focusing on both a subject and background.
● Opening the iris (decreasing the value) allows
appropriate brightness in poor lighting
conditions, while the range of focusing will
decrease.
Master Page: Right
GR-PD1PAL.book Page 45 Tuesday, June 17, 2003 7:31 PM
EN 45
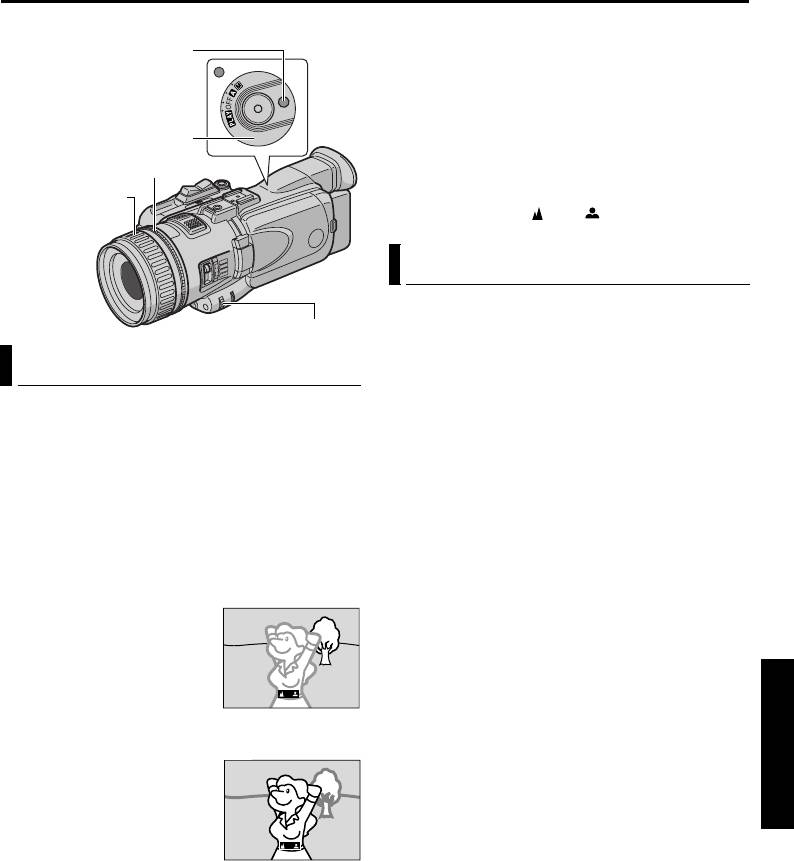
To reset to Auto Focus...
Press FOCUS or set the Power Switch to “A”.
Lock Button
NOTES:
● Be sure to focus the lens in the maximum
telephoto position when you use the Manual
Focus mode. If you focus in on a subject in the
Power Switch
wide-angle position, sharply focused images
cannot be obtained when zoomed up because the
Zoom Ring
depth-of-field is reduced at longer focal lengths.
Manual Focus
● When the focus level cannot be adjusted any
Ring
further or closer, “ ” or “ ” will blink.
Manual Zooming
Zooming manually using the Zoom Ring enables
controlling the shooting angle or zooming speed to
FOCUS Button
your preference.
Manual Focus
1 Set the Power Switch to “M” while pressing down
the Lock Button located on the switch.
NOTE:
2 Zoom In
If you are using the viewfinder, you should already
Rotate the Zoom Ring counterclockwise.
have performed “Viewfinder Adjustment”
Zoom Out
(墌 pg. 13).
Rotate the Zoom Ring clockwise.
1 Set the Power Switch to “M” while pressing down
NOTE:
the Lock Button located on the switch.
Digital zoom cannot be used when the Recording
2 Press FOCUS. The manual focus indicator
Mode Switch is set to “HI-RES” or “MEMORY”.
appears.
(墌 pg. 14)
3 To focus on a further subject, rotate the Manual
Focus Ring counterclockwise.
While focusing on a
further subject
ADVANCED FEATURES
To focus on a nearer subject, rotate the Manual
Focus Ring clockwise.
While focusing on a nearer
subject
Master Page: Left
GR-PD1PAL.book Page 46 Tuesday, June 17, 2003 7:31 PM
46 EN
FEATURES FOR RECORDING (cont.)
1 Set the Power Switch to “M” while pressing down
White Balance Adjustment
the Lock Button located on the Switch.
2 Open the LCD monitor fully, or pull out the
The white balance that refers to the correctness of
viewfinder fully.
colour reproduction under various lighting. If the
3 Press W.B. The WHITE BALANCE screen
white balance is correct, all other colours will be
appears.
accurately reproduced.
The white balance is usually adjusted automatically.
4 Rotate the MENU Wheel to select the desired
However, more advanced camcorder operators
mode, and press it.
control this function manually to achieve a more
● The selected mode indicator except “AUTO”
professional colour/tint reproduction.
appears.
● If you select “ MWB”, refer to “Manual
AUTO: White balance is adjusted automatically.
White Balance Adjustment”.
MWB: Adjust the white balance manually
5 Press the MENU Wheel in. The white balance
when shooting under various types of lighting.
adjustment is complete.
(墌 “Manual White Balance Adjustment”, pg. 47)
● The selected mode indicator except “AUTO”
FINE: Outdoors on a sunny day.
appears.
CLOUD: Outdoors on a cloudy day.
To return to automatic white balance…
HALOGEN: A video light or similar type of
Select “AUTO” in step 4. Or, set the Power Switch to
lighting is used.
“A”.
NOTE:
Lock Button
White balance cannot be used when “Special
Effects” is set to “SEPIA” or “MONOTONE”.
Power Switch
(墌 pg. 49)
W.B Button
MENU Wheel
Master Page: Right
GR-PD1PAL.book Page 47 Tuesday, June 17, 2003 7:31 PM
EN 47
NOTES:
Manual White Balance Adjustment
● In step 5, it may be difficult to focus on the white
paper. In such a case, adjust focus manually.
Adjust the white balance manually when shooting
(墌 pg. 45)
under various types of lighting.
● A subject can be shot under various types of
lighting conditions indoors (natural, fluorescent,
Lock Button
candlelight, etc.). Because the colour temperature
is different depending on the light source, the
Power Switch
subject tint will differ depending on the white
balance settings. Use this function for a more
natural result.
White paper
W.B Button
● Once you adjust white balance manually, the
setting is retained even if the power is turned off or
the battery removed.
MENU Wheel
1 Set the Power Switch to “M” while pressing down
the Lock Button located on the switch.
2 Open the LCD monitor fully, or pull out the
viewfinder fully.
3 Press W.B. The WHITE BALANCE screen
appears.
4 Rotate the MENU Wheel to select “MWB”, and
press it.
5 Hold a sheet of plain white paper in front of the
subject. Adjust zoom or position yourself so that
the white paper fills the screen.
6 Press the MENU Wheel in until begins
ADVANCED FEATURES
blinking rapidly.
When the setting is completed, resumes
normal blinking.
7 Press the MENU Wheel in. The Menu Screen
closes and the Manual White Balance indicator
is displayed.
Master Page: Left
GR-PD1PAL.book Page 48 Tuesday, June 17, 2003 7:31 PM
48 EN
FEATURES FOR RECORDING (cont.)
1 Set the Power Switch to “M” while pressing down
Wipe Or Fader Effects
the Lock Button located on the switch.
2 Open the LCD monitor fully, or pull out the
Wipe/Fader effects let you make pro-style scene
viewfinder fully.
transitions. Use them to spice up the transition from
3 Press FADE/WIPE. The WIPE/FADER screen
one scene to the next.
appears.
Wipe or Fader works when video recording is started
4 To activate the Fade-in or Wipe-in:
or stopped.
Rotate the MENU Wheel to select the desired
Lock Button
effect and press it during Record-Standby mode.
● The selected effect indicator appears.
Power Switch
To activate the Fade-out or Wipe-out:
Rotate the MENU Wheel to select the desired
P.AE B u t t o n
effect and press it during recording.
FADE/WIPE Button
● The selected effect indicator appears.
5 Press the Recording Start/Stop Button to activate
the Fade-in/out or Wipe-in/out.
To deactivate the selected effect…
Select “OFF” in step 4. Or, set the Power Switch to
“A”.
NOTES:
● You can extend the length of a Wipe or Fader by
pressing and holding the Recording Start/Stop
MENU Wheel
Button.
EFFECT Button
● Wipe Effects is not activated when the recording
There are 9 types of Fader/Wipe Effects for scene
mode is set to “HI-RES”.
transition.
IMPORTANT:
FADER–WHITE: Fade in or out with a white
Some Wipe/Fader Effects cannot be used with
screen.
certain modes of Program AE or Special Effects. If an
unusable Wipe/Fader Effect is selected, its indicator
FADER–BLACK: Fade in or out with a black
blinks in blue or goes out.
screen.
FADER–B.W: Fade in to a colour screen from a
black and white screen, or fade out from colour to
Program AE
black and white.
WIPE–CORNER: Wipe in on a black screen
Program AE allows you to shoot images according to
from the upper right to the lower left corner, or wipe
various situations.
out from lower left to upper right, leaving a black
SPORTS
screen.
(Variable Shutter Speed: 1/250 – 1/1000)
WIPE–WINDOW: The scene starts in the
This setting allows fast-moving images to be
centre of a black screen and wipes in toward the
captured one frame at a time, for vivid, stable slow-
corners, or comes in from the corners, gradually
motion playback. The faster the shutter speed, the
wiping out to the centre.
darker the picture becomes. Use the shutter function
WIPE–SLIDE: Wipe in from right to left, or
under good lighting conditions.
wipe out from left to right.
SNOW: Compensates for subjects that may
WIPE – DOOR: Wipe in as the two halves of a
otherwise appear too dark when shooting in
black screen open to the left and right, revealing the
extremely bright surroundings such as in the snow.
scene, or wipe out and the black screen reappears
SPOTLIGHT: Compensates for subjects that
from left and right to cover the scene.
may otherwise appear too bright when shooting
WIPE–SCROLL: The scene wipes in from the
under extremely strong direct lighting such as
bottom to the top of a black screen, or wipes out
spotlights.
from top to bottom, leaving a black screen.
NOTE:
WIPE – SHUTTER: Wipe in from the centre of
“SPOTLIGHT” has the same effect as –3 with the
a black screen toward the top and bottom, or wipe
exposure control. (墌 pg. 42)
out from the top and bottom toward the centre
leaving a black screen.

Master Page: Right
GR-PD1PAL.book Page 49 Tuesday, June 17, 2003 7:31 PM
EN 49
TWILIGHT: Makes evening scenes look more
natural. White Balance (墌 pg. 46) is automatically
Special Effects
set to “ ”, but can be changed to your desired
setting. When Twilight is chosen, the camcorder
Using the following 4 Effect Modes allows you to
automatically adjusts the focus from approx. 10 m
provide special effects for your shooting.
to infinity. From less than 10 m, adjust the focus
SEPIA: Recorded scenes have a brownish tint
manually.
like old photos. Using this effect with “DV WIDE”
set to ”SQUEEZE” (墌 pg. 36) provides “classic film”
1 Set the Recording Mode Switch to “HI-RES”,
effect.
“PS50” or “DV”.
MONOTONE: Like classic black and white
● Some modes of Program AE cannot be used
films, your footage is shot in B/W. Using this effect
with the Switch set to “MEMORY”.
with “DV WIDE” set to ”SQUEEZE” (墌 pg. 36)
2 Set the Power Switch to “M” while pressing down
provides “classic film” effect.
the Lock Button located on the switch.
CLASSIC FILM: Gives recorded scenes a
3 Open the LCD monitor fully, or pull out the
strobe effect.
viewfinder fully.
STROBE: Your recording looks like a series of
4 Press P. A E . The PROGRAM AE screen appears.
consecutive snapshots.
5 Rotate the MENU Wheel to select the desired
NOTES:
mode, and press it.
● When the Recording Mode Switch is set to “HI-
6 Press the MENU Wheel in to activate the selected
RES” or “MEMORY”, “MONOTONE” is only
effect.
available.
● The selected effect indicator appears.
● “SEPIA”, “CLASSIC FILM” and ”STROBE” are not
To deactivate the selected effect…
activated when the recording mode is set to “HI-
Select “OFF” in step 5. Or, set the Power Switch to
RES”.
“A”.
1 Set the Recording Mode Switch to “PS50” or
NOTE:
“DV”.
Program AE can be changed during recording or
● Some modes of Special Effects cannot be used
during Record-Standby.
in “HI-RES” or “MEMORY” mode.
2 Set the Power Switch to “M” while pressing down
IMPORTANT:
the Lock Button located on the Switch.
Some modes of Program AE cannot be used with
certain Wipe/Fader effects. If an unusable mode is
3 Open the LCD monitor fully, or pull out the
selected, the indicator of Wipe/Fader effects blinks
viewfinder fully.
ADVANCED FEATURES
or goes out.
4 Press EFFECT. The EFFECT screen appears.
5 Rotate the MENU Wheel to select the desired
mode, and press it.
6 Press the MENU Wheel in to activate the selected
effect.
● The selected effect indicator appears.
To deactivate the selected effect...
Select “OFF” in step 5. Or, set the Power Switch to
“A”.
IMPORTANT:
Some modes of Special Effects cannot be used with
certain Wipe/Fader effects. If an unusable mode is
selected, the indicator of Wipe/Fader effects blinks.
Master Page: Left
50 EN
To make thumbnail images after video recording
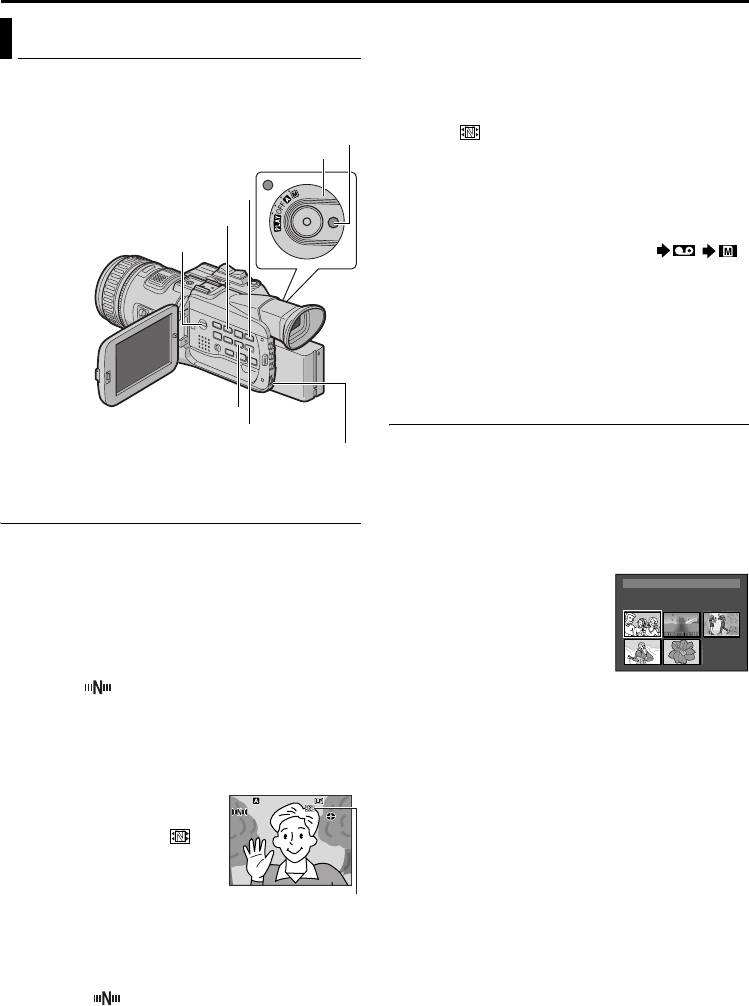
NAVIGATION Function
manually...
1) Perform steps 1 to 3 above.
The Navigation Function helps you check tape
2) Set “NAVIGATION” to “MANUAL”.
contents by making thumbnail images on a memory
(墌 pg. 33, 34)
card.
3) After the recording, press NAVI STORE.
Lock Button
•The “ ” indicator appears briefly and the
Power Switch
captured image is stored in the memory card as
a thumbnail image.
Fast-Forward Button (5)
NOTES:
Rewind Button (3)
● The remaining number of storable thumbnail
images also appears on the screen when it reaches
Playback Mode Switch
10 or less. If “REC SELECT” is set to “ / ”
in DSC Menu, the number shows how many
640 x 480 pixel images can be stored.
● If “5S” is set to “5S” or “Anim.” in MANUAL
Menu, the NAVIGATION function will not work
properly.
To find scenes on tape using thumbnail images
(NAVIGATION Search)
NAVI Button
NAVI STORE Button
1
Load a cassette. (墌 pg. 16)
MENU Wheel
2 Load a memory card. (墌 pg. 17)
To make thumbnail images during video
3 Set the Playback Mode switch to “VIDEO”.
recording automatically
4 Set the Power Switch to “P” while pressing
down the Lock Button located on the switch.
1
Load a cassette. (墌 pg. 16)
5 Press NAVI during video playback or stop mode.
2 Load a memory card. (墌 pg. 17)
● The loaded cassette’s
3 Set the Power Switch to “A” or “M” while
NAVIGATION thumbnail
pressing down the Lock Button located on the
image screen appears.
switch.
● Press 3 to display the
4 Set “NAVIGATION” to the desired navigation
previous page. Press 5
storing time. (墌 pg. 33, 34)
to display the next page.
● If the “ ” indicator appears blinking on the
6 Rotate the MENU Wheel to select the desired
screen, wait until it stops blinking. If it does not
image, and press it.
stop blinking after a while, check if a memory
● The “NAVIGATION SEARCH” indication
card is loaded.
appears blinking and the camcorder starts
5 Press the Recording Start/Stop Button to start
searching the tape for the relevant point of the
recording.
selected thumbnail image.
● When the recording time
To cancel NAVIGATION search midway...
PAUSE
is over the navigation
Press 8 or 4·9.
time set in step 5, “ ”
appears briefly, then the
image of the point where
recording is started is
captured and stored in
the memory card as a
thumbnail image.
● If the Recording Start/
Stop button is pressed
before “ ” stops
blinking, the image of the point where the
loaded memory card is recognised is captured.
6 Press the Recording Start/Stop Button to stop
recording.
PAUSE
GR-PD1PAL.book Page 50 Tuesday, June 17, 2003 7:31 PM
FEATURES FOR RECORDING (cont.)
ONITNAV I GA
35 2.4DAT E : 2 :’30:329
TC : 13 : 2 3 : 15
1 2 3
4 5 0 06
1h m1
hm
100
PAUSE
Displayed while the
captured image is
being stored in the
memory card.

Master Page: Right
GR-PD1PAL.book Page 51 Tuesday, June 17, 2003 7:31 PM
EN 51
be corrupted if the battery becomes exhausted
To add thumbnail images during video
during deletion. If the memory card becomes
playback
corrupted, initialise it.
1
Perform steps 1 to 4 in “To find scenes on tape
NOTE:
using thumbnail images (NAVIGATION Search)”.
Once images are deleted, they cannot be restored.
Check images before deleting.
2 Press 4·9 to start video playback.
3 Press NAVI STORE at the desired point.
IMPORTANT:
● The “ ” indicator appears briefly and the
● Be sure to always use the same tape and memory
image of the point where NAVI STORE is
card together as they were during recording;
pressed is stored in the memory card as a
otherwise, the camcorder cannot recognise Tape
thumbnail image.
and Memory Card IDs to perform NAVIGATION
● If you use the tape recorded in PS50 or HI-RES
function properly.
mode, it will enter the playback pause mode.
● Check if an appropriate tape and memory card are
To play, press 4·9.
loaded when the following messages appear: “NO
ID ON TAPE OR CARD”, “UNABLE TO USE
NAVIGATION”, “THIS MEMORY CARD IS NOT
To delete thumbnail images
COMPATIBLE”.
● If you change the memory card while shooting on
1
Load a memory card. (墌 pg. 17)
one tape, two memory cards will share the tape’s
2 Set the Playback Mode switch to “VIDEO”.
thumbnail images. We recommend that you use
3 Set the Power Switch to “P” while pressing
one memory card for one tape.
down the Lock Button located on the switch.
● NAVIGATION Search does not work if the current
position is at a blank portion on the tape. Also, do
4 Press the MENU Wheel in. The Menu Screen
not leave a blank portion partway through the tape
appears.
when shooting; otherwise, NAVIGATION function
5 Rotate the MENU Wheel to select “t VIDEO”,
does not work properly.
and press it. The VIDEO Menu appears.
● Before shooting newly over a recorded tape, be
6 Rotate the MENU Wheel to
O V E
ID
sure to delete all thumbnail images of the previous
DMSO N EO
DU
ST– ERE O
select “NAVI.DEL.”, and
OF. –ARR DV N F
recording from the relevant memory card.
±0 N–HRO SY C
.
0
press it. The Sub Menu
E C–MOD RE
● If you copy thumbnail images from one memory
OFCO Y P F–
appears.
L.V.DENA I
card to another via a PC, NAVIGATION Search
A
IN S/ V T
OFPU
F–
does not work with the copied memory card.
7 By rotating the MENU
NRETUR
Wheel...
ADVANCED FEATURES
Select “IMAGE SEL.” to delete the currently
displayed thumbnail image.
Select “TAPE SEL.” to delete all thumbnail images
for the tape which contains the currently
displayed image.
Select “ALL” to delete all thumbnail images
stored in the memory card at once.
8 Press the MENU Wheel in.
IG NANAV T I O
The NAVIGATION screen
ETEDEL CURRENT ?
appears.
9 Rotate the MENU Wheel to
1 .625 1:20.0 03
EXECUTE
select “EXECUTE”, and
RETURN
press it.
● Press 3 to display the previous page. Press
5 to display the next page.
● To cancel deletion, select “RETURN”.
● Thumbnail images cannot be deleted during
video playback.
CAUTION:
Do not remove the memory card or perform any
other operation (such as turning off the camcorder)
during deletion. Also, be sure to use the provided
AC Power Adapter/Charger, as the memory card may
Master Page: Left-Heading0
GR-PD1PAL_07Advanced.fm Page 52 Thursday, June 19, 2003 2:29 PM
52 EN
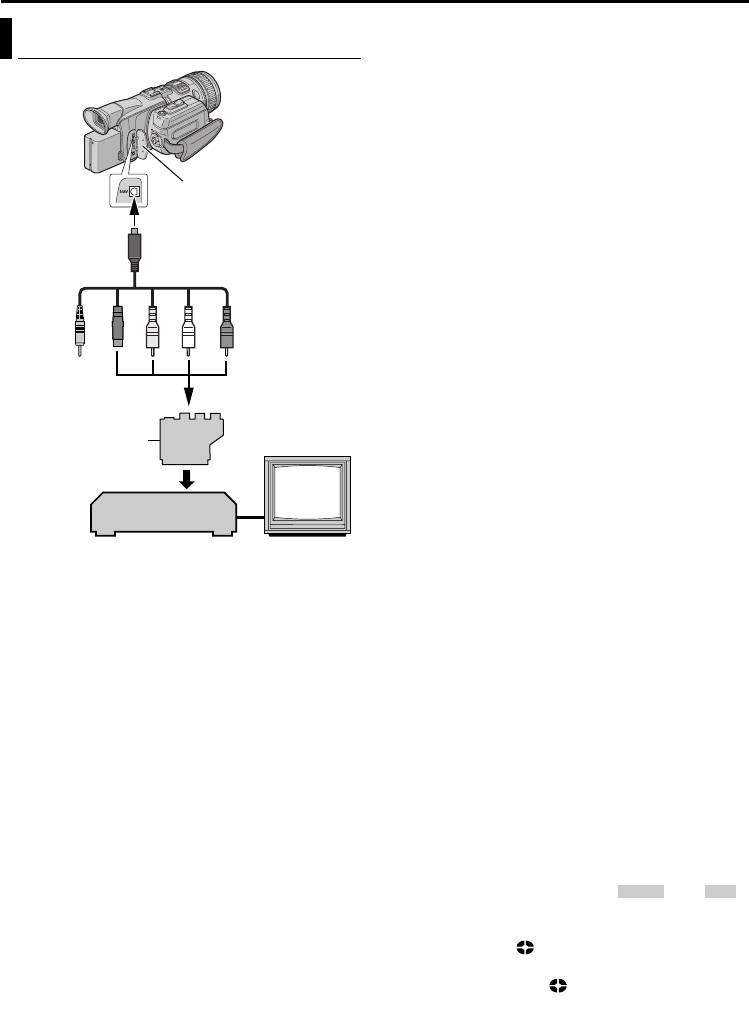
DUBBING
5 Insert the source cassette in the camcorder.
Dubbing To Or From A VCR
6 Insert the recording cassette in the VCR.
7 Engage the VCR’s AUX and Record-Pause modes.
● Refer to the instruction manual for the VCR.
8 Press 4·9 on the camcorder to start playback of
the source tape.
9 At the point you want to start dubbing, engage
the VCR’s Record mode.
Connector Cover***
10 To pause dubbing, engage the VCR’s Record-
To AV
Pause mode and press 4·9 on the camcorder.
11 Repeat steps 8 – 10 for additional editing. Stop
S/AV/Editing cable
the VCR and camcorder.
(provided)
NOTES:
● It is recommended to use the AC Power Adapter/
Charger as the power supply instead of the
battery pack. (墌 pg. 11)
1234 5
●
As the camcorder starts to play your footage, it will
appear on your TV. This will confirm the connections
and the AUX channel for dubbing purposes.
● Before you start dubbing, make sure that the
“Y/C”/“CVBS” Video
Cable Adapter*
indications do not appear on the connected TV. If
Out Select Switch
they do, they are being recorded onto the new tape.
To choose whether or not the following displays
appear on the connected TV...
TV
• Date/time
VCR
Set “DATE/TIME” to “AUTO”, “ON” or “OFF”.
(墌 pg. 33, 40) Or, press DISPLAY on the remote
A Not required for connection.
control to turn on/off the date indication.
B To S-VIDEO** IN or OUT
• Time code
C Yellow to VIDEO IN or OUT
Set “TIME CODE” to “OFF” or “ON”.
D White to AUDIO L IN or OUT
(墌 pg. 33, 40)
E Red to AUDIO R IN or OUT
• Indications other than date/time and time code
Set “ON SCREEN” to “OFF”, “LCD” or “LCD/
* If your VCR has a SCART connector, use the
TV”. (墌 pg. 33, 40)
provided cable adapter.
● Playback images recorded in HI-RES or PS50
** Connect when your TV/VCR has an S-VIDEO
mode with this camcorder will be converted to DV
IN/OUT connector. In this case, it is not
format (576i) image.
necessary to connect the yellow video cable.
To use this camcorder as a recorder
*** When connecting the cable, open the cover.
1) Perform steps 1 to 3 in the left column.
NOTE:
2) Set “S/AV INPUT” to “A/V IN”. (墌 pg. 33, 39)
Set the video out select switch of the cable adapter
● If your VCR has an S-VIDEO OUT connector,
as required:
set “S/AV INPUT” to “S IN”.
Y/C:
When connecting to a TV or VCR which accepts
3) Set “REC MODE” to “SP” or “LP”. (墌 pg. 33, 34)
Y/C signals and uses an S-Video cable.
4) Insert the recording cassette in this camcorder.
CVBS:
When connecting to a TV or VCR which does
5) Press the Recording Start/Stop Button to engage
not accept Y/C signals and uses an audio/video cable.
the Record-Pause mode. The “ ” or “ ”
A/V IN
S IN
indication appears on the screen.
To use this camcorder as a player
6) Press the Recording Start/Stop Button to start
1 Following the illustrations, connect the
recording. The indication rotates.
camcorder and the VCR. Also refer to page 24.
7) Press the Recording Start/Stop Button again to
2 Set the camcorder’s Playback Mode Switch to
stop recording. The indication stops rotating.
“VIDEO”.
NOTES:
3 Set the camcorder’s Power Switch to “P”
● After dubbing, set “S/AV INPUT” back to “OFF”.
while pressing down the Lock Button located on
● Analogue signals can be converted to digital
the switch.
signals with this procedure.
4 Turn on the VCR’s power.
● It is also possible to dub from another camcorder.
Master Page: Right
GR-PD1PAL.book Page 53 Tuesday, June 17, 2003 7:31 PM
EN 53
● Depending on the tape source input, images may
NOTES:
appear with horizontal jitter on the camcorder’s
● It is recommended to use the AC Power Adapter/
LCD monitor and viewfinder during dubbing. This
Charger as the power supply instead of the
does not affect the actual recording.
battery pack. (墌 pg. 11)
● When using an i.LINK cable, be sure to use the
optional JVC VC-VDV204U i.LINK cable.
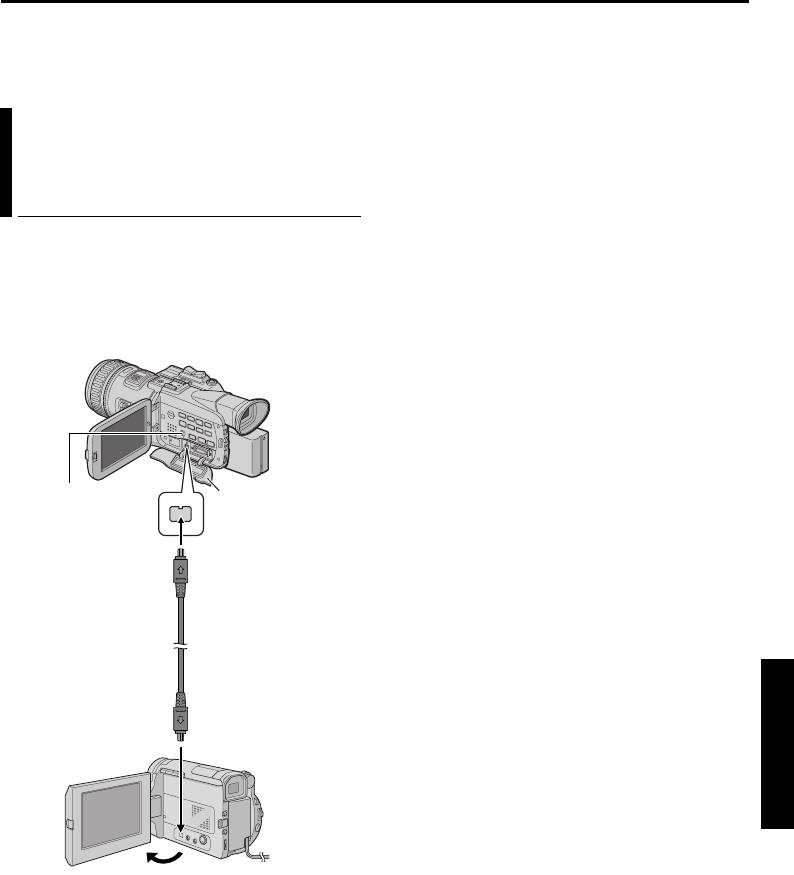
Dubbing To Or From A Video Unit
● If the remote control is used when both the player
and recorder are JVC video units, both units will
Equipped With An i.LINK
perform the same operation. To prevent this from
happening, press the buttons on both units.
Connector (Digital Dubbing)
To use this camcorder as a player
Using an i.LINK cable (optional), it is possible to dub
1 Make sure all units are turned off.
recorded scenes in DV format from the camcorder
2 Connect this camcorder to a video unit equipped
onto another video unit equipped with i.LINK
with an i.LINK input connector using an i.LINK
connector. Since a digital signal is sent, there is little
cable as shown in the illustration.
if any image or sound deterioration.
Scenes recorded in PS50 or HI-RES mode can be
3 Set this camcorder’s Playback Mode Switch to
dubbed only to another same model of this unit.
“VIDEO”.
4 Set this camcorder’s Power Switch to “P”
while pressing down the Lock Button located on
the switch.
5 Set “i.LINK OUT” to “SW”. (墌 pg. 33, 37)
● If, in future, the connected video unit
automatically detects the DV and MPEG2
formats, set “i.LINK OUT” to “AUTO”. In this
i.LINK Output Select
Connector Cover*
case, proceed to step 7.
Switch
6 Set the i.LINK Output Select Switch on this
camcorder to “DV” to output scenes recorded in
To i.LINK IN/OUT
DV mode, or “MPEG2” to output scenes
recorded in HI-RES or PS50 mode.
7 Turn on the video unit’s power.
8 Insert the source cassette in this camcorder.
i.LINK cable
ADVANCED FEATURES
9 Insert the recording cassette in the video unit.
(optional)
10 Press 4·9 on this camcorder to start playback
of the source cassette.
11 At the point you want to start dubbing, engage
the video unit’s Record mode.
To i.LINK IN/OUT
12 To pause dubbing, engage the video unit’s
Record-Pause mode and press 4·9 on this
camcorder.
13 Repeat steps 10 – 12 for additional editing.
Stop the video unit and camcorder.
NOTES:
Video unit equipped with
● If a blank portion or disturbed image is played
i.LINK connector
back on the player during dubbing, unusual
images may be dubbed or the dubbing may stop.
* When connecting the cable, open the cover.
● If a scene which has been paused during
recording is dubbed to other devices, playback
may stop at the point.
● If “Wipe Or Fader Effects” (墌 pg. 48), “Special
Effects” (墌 pg. 49), “Playback Zoom (DV only)”
(墌 pg. 57) or “TIME CODE” (墌 pg. 37) is set,
only the original playback image is output from
the i.LINK IN/OUT connector.
CONTINUED ON NEXT PAGE

Master Page: Left
GR-PD1PAL.book Page 54 Tuesday, June 17, 2003 7:31 PM
54 EN
DUBBING (cont.)
To use this camcorder as a recorder
NOTES:
Dubbing from other devices in MPEG2 format is
DV to DV dubbing
possible if the connected device is another same
● If a blank portion or disturbed image is played
model of this unit.
back on the player during dubbing, unusual
images may be dubbed or the dubbing may stop.
1 Perform step 1 to 4 of “To use this camcorder as a
player” (墌 pg. 53).
MPEG2 to MPEG2 dubbing
● It is not possible to dub signals in MPEG2 format
2 Set “REC MODE” to “SP” or “LP”. (墌 pg. 33, 34)
from devices other than another same model of
3 Turn on the video unit’s power.
this camcorder.
4 Insert the source cassette in the video unit.
● MPEG2 signals that are copy-guarded may not be
recorded with this camcorder.
5 Insert the recording cassette in this camcorder.
● When dubbing MPEG2 video to the camcorder,
6 Press the Recording Start/Stop Button to engage
image may not appear on the LCD monitor or
the Record-Pause mode.
viewfinder. However, the recording is performed
● The “ ” indication appears on the
i.LINK IN
properly.
screen.
7 Press the Recording Start/Stop Button to start
recording.
● The indication rotates.
8 Press the Recording Start/Stop Button again to
engage the Record-Pause mode.
● The indication stops rotating.
9 Repeat steps 7 – 8 for additional editing. Stop the
video unit and camcorder.
Master Page: Right
GR-PD1PAL.book Page 55 Tuesday, June 17, 2003 7:31 PM
EN 55
1 Load a cassette. (墌 pg. 16)
Dubbing Still Images Recorded On
2 Load a memory card. (墌 pg. 17)
A Tape To A Memory Card
3 Set the Playback Mode Switch to “VIDEO”.
4 Set the Power Switch to “P” while pressing
Still images can be dubbed from a tape to a memory
down the Lock Button located on the switch.
card.
5 Set “ COPY” to “ON”. (墌 pg. 33, 39)
Lock Button
6 Press 4·9 to start playback.
Power Switch
7 At the point you want to dub, press 4·9 again to
engage Still Playback.
SNAPSHOT Button
8 To dub the image, press SNAPSHOT.
● The “ ” indication appears during
Playback Mode Switch
dubbing.
● The selected image is stored in the memory
card.
NOTES:
● If SNAPSHOT is pressed in step 8 when a memory
card is not loaded, the message “COPYING
FAILED” is displayed.
● If an image recorded on the tape using “DV
WIDE” (墌 pg. 36) is dubbed to a memory card,
MENU Wheel
the WIDE mode identifying signal is not dubbed
Play/Pause Button (4·9)
with it.
● To use Playback Special effects with a video image
you wish to dub, perform up to step 8 using the
remote control (provided). (墌 pg. 58)
● Images are dubbed in the following image sizes:
Scenes recorded in HI-RES mode: 1280 x 720
pixels
Scenes recorded in PS50 mode: 848 x 480 pixels
Scenes recorded in DV mode: 640 x 480 pixels
ADVANCED FEATURES
Master Page: Left-Heading0
GR-PD1PAL.book Page 56 Tuesday, June 17, 2003 7:31 PM
56 EN
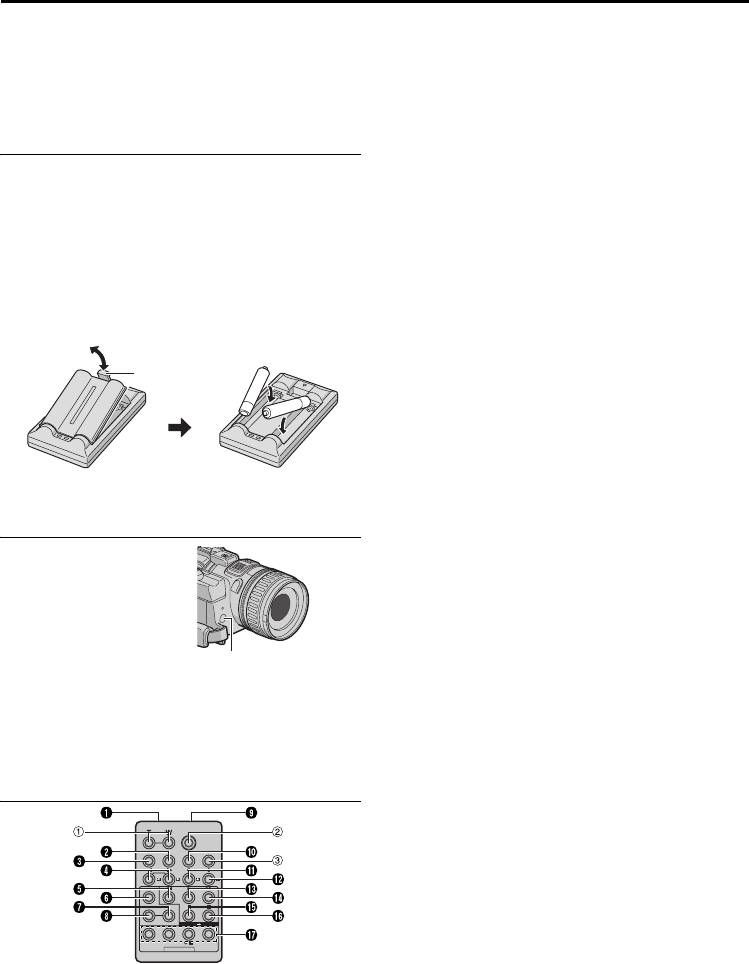
USING THE REMOTE CONTROL UNIT
The Full-Function Remote Control Unit can operate
A Infrared beam transmitting window
this camcorder from a distance as well as the basic
Transmits the beam signal.
operations (Playback, Stop, Pause, Fast-Forward and
The following buttons are available only when the
Rewind) of your VCR. It also makes additional
camcorder’s Power Switch is set to “P”.
playback functions possible. (墌 pg. 57)
B DISPLAY Button (墌 pg. 25, 52, 61)
C SHIFT Button (墌 pg. 57, 60)
Installing The Batteries
D SLOW Rewind/Forward Buttons (墌 pg. 57)
Left/Right Buttons (墌 pg. 57)
The remote control uses two “AAA (R03)” size
E REW Button
batteries. Refer to “General Battery Precautions”
•Rewind/Reverse Shuttle Search on a tape
(墌 pg. 76).
(墌 pg. 23)
1 Remove the battery compartment cover while
•Displays previous file in a memory card
pushing up the tab as illustrated.
(墌 pg. 27)
F FADE/WIPE Button (墌 pg. 62)
2 Insert two “AAA (R03)” size batteries in the
G EFFECT ON/OFF Button (墌 pg. 58)
correct direction.
H EFFECT Button (墌 pg. 58)
3 Re-attach the battery compartment cover.
I PAUSE IN Connector (墌 pg. 61)
J MBR SET Button (墌 pg. 60)
1
K Up Button (墌 pg. 57)
3
Tab
2
+
INSERT Button (墌 pg. 59)
L Down Button (墌 pg. 57)
–
–
+
A. DUB Button (墌 pg. 58)
M PLAY Button
•Starts Playback of a tape (墌 pg. 22)
•Starts Auto Playback of images in a memory
Insert the minus (–) end first.
card (墌 pg. 27)
N FF Button
•Forward/Forward Shuttle Search on a tape
Beam Effective Area (indoor use)
(墌 pg. 23)
When using the remote
•Displays next file in a memory card
control, be sure to point it at
(墌 pg. 27)
the remote sensor. The
O STOP Button
transmitted beam’s
•Stops the tape (墌 pg. 22)
approximate effective
•Stops Auto Playback (墌 pg. 27)
distance for indoor use is
P PAUSE Button
Remote sensor
5m.
Pauses the tape (墌 pg. 57)
Q R.A.EDIT Buttons (墌 pg. 60 – 64)
NOTE:
The transmitted beam may not be effective or may
The following buttons are available when the
cause incorrect operation when the remote sensor is
camcorder’s Power Switch is set to “A” or “M”.
directly exposed to sunlight or powerful lighting.
a Zoom (T/W) Buttons
Zoom in/out (墌 pg. 20, 57)
(Also available with the Power Switch set to
Buttons And Functions
“P”)
b START/STOP Button
Functions the same as the Recording Start/Stop
Button on the camcorder.
c SNAPSHOT Button
Functions the same as SNAPSHOT on the
camcorder.
Master Page: Right
GR-PD1PAL.book Page 57 Tuesday, June 17, 2003 7:31 PM
EN 57
.
Playback Zoom (DV only)
Zoom Buttons
Up Button
Magnifies the recorded image up to 20X at any time
SHIFT
Down Button
during video playback and D.S.C. playback.
Left or SLOW
1) Press PLAY (U) to start video
Rewind Button
playback. Or perform normal
PLAY
playback of images.
PAUSE
Right or SLOW
STOP
Forward Button
2) At the point you want to zoom
in, press the Zoom Button (T).
● To zoom out, press the Zoom
Button (W).
Slow-Motion Playback (DV only)
3) You can move the image on the
Allows slow-speed search in either direction during
screen around to find a particular
video playback.
portion of the picture. While
During normal video playback, press SLOW (YI or
holding down SHIFT, press L
IU) more than approx. 2 seconds.
(Left), (Right), U (Up) and E
● After approx. 5 minutes (approx. 20 seconds with
(Down).
an 80-minute cassette) in Slow Rewind or approx.
● To end zoom, press and hold W until
5 minutes in Slow Forward, normal playback
magnification returns to normal. Or, press
resumes.
STOP (8) and then press PLAY (U) during video
● To pause Slow-Motion playback, press PAUSE (9).
playback.
● To stop Slow-Motion playback, press PLAY (U).
NOTES:
NOTES:
● Zoom can also be used during slow-motion and
● You can also engage Slow-Motion Playback from
still playback.
Still Playback by pressing SLOW (YI or IU) more
● Due to digital image processing, the quality of the
than approx. 2 seconds.
image may suffer.
● During Slow-Motion Playback, due to digital
image processing, the picture may take on a
mosaic effect.
● After SLOW (YI or IU) is pressed and held, the still
image may be displayed for a few seconds,
followed by a blue screen for a few seconds. This
ADVANCED FEATURES
is not a malfunction.
● There may be a small margin between the slow-
motion playback start point you chose and the
actual start point for Slow-Motion Playback.
● During Slow-Motion Playback, there will be
disturbances in video and the picture may seem
unstable, especially with steady images. This is not
a malfunction.
Frame-By-Frame Playback (DV only)
Allows frame-by-frame search during video
playback.
During normal or still playback, press SLOW (IU)
repeatedly for forward or SLOW (YI) repeatedly for
reverse. Each time SLOW (YI or IU) is pressed, the
frame is played back.
CONTINUED ON NEXT PAGE
Master Page: Left
GR-PD1PAL.book Page 58 Tuesday, June 17, 2003 7:31 PM
58 EN
USING THE REMOTE CONTROL UNIT (cont.)
Playback Special Effects (DV only)
Audio Dubbing (DV only)
Allows you to add creative effects to the video
playback image that was recorded in DV mode.
The audio track of a tape recorded in DV format can
The effects that can be used during playback are
be customized only when recorded in the 12-bit and
CLASSIC FILM, MONOTONE, SEPIA and STROBE.
SP modes. (墌 pg. 34)
The effects work the same in playback as they did in
Stereo Microphone
recording. (墌 pg. 48)
CLASSIC FILM: Gives recorded scenes a
Headphone Connector
strobe effect. Using this effect with “DV WIDE” set
to ”SQUEEZE” (墌 pg. 36) provides “classic film”
effect.
MONOTONE: Like classic black and white
A.DUB
films, your footage is shot in B/W. Used together
PLAY
with the Cinema mode, it enhances the “classic
PAUSE
film” effect. Using this effect with “DV WIDE” set to
”SQUEEZE” (墌 pg. 36) provides “classic film”
STOP
effect.
Speaker
SEPIA: Recorded scenes have a brownish tint
like old photos. Combine this with the Cinema
1 Play back the tape to locate the point where
mode for a classic look.
editing will start, then press PAUSE (9).
STROBE: Your recording looks like a series of
2 While holding A. DUB (D) on the remote
consecutive snapshots.
control, press PAUSE (9). The “9D” and “MIC”
1) To start playback, press PLAY (U).
indicators appear.
2) Press EFFECT. The PLAYBACK EFFECT Select
3 Press PLAY (U), then begin “narrating”. Speak
Menu appears.
into the microphone.
3) Press EFFECT repeatedly to move the highlight
● To pause dubbing, press PAUSE (9).
bar to the desired effect.
4 To end Audio Dubbing, press PAUSE (9), then
● The selected function is activated and after
STOP (8).
2 seconds the menu disappears.
● To deactivate the selected effect, press EFFECT
To hear the sound during Audio Dubbing...
ON/OFF. To reactivate the selected effect press
Connect optional headphones to the headphone
EFFECT ON/OFF again.
connector or use the S/AV connector, and set “DV
● To change the selected effect, repeat from
NARR.” to the desired mode;
step 2 above.
•“OFF” for the playback sound.
•“ON” for the dubbed sound.
•“MIX” for the playback and dubbed sound.
To hear the dubbed sound during playback…
Set “DV NARR.” to “ON” or “MIX”. (墌 pg. 33, 39)
Master Page: Right
GR-PD1PAL.book Page 59 Tuesday, June 17, 2003 7:31 PM
EN 59
NOTES:
indicator and the Time Code (min.:sec.) appear
● When editing onto a tape that was recorded at
and the camcorder enters Insert-Pause mode.
12-bit, the old and new soundtracks are recorded
4 Press START/STOP to begin editing.
separately.
● Confirm the insert at the time code you
● If you dub onto a blank space on the tape, the
checked in step 1.
sound may be disrupted. Make sure you only edit
● To pause editing, press START/STOP. Press it
recorded areas.
again to resume editing.
● If feedback or howling occurs during TV playback,
5 To end Insert Editing, press START/STOP, then
move the camcorder’s microphone away from the
STOP (8).
TV, or turn down the TV’s volume.
● If you change from 12-bit to 16-bit in mid-
NOTES:
recording and then use the tape for Audio
● During Insert Editing, set the Recording Mode
Dubbing, it is not effective from the point where
Switch to “DV”.
16-bit recording began.
● Special Effects (墌 pg. 49) can be used to spice up
● During Audio Dubbing, when the tape moves to
the scenes being edited during Insert Editing.
scenes recorded in the LP mode, scenes recorded
● During Insert Editing, the date and time
in 16-bit audio or a blank portion, Audio Dubbing
information changes.
stops.
● If you perform Insert Editing onto a blank space on
● To perform Audio Dubbing while watching on the
the tape, the audio and video may be disrupted.
television, make connections. (墌 pg. 24)
Make sure you only edit recorded areas.
● To perform Audio Dubbing with a video unit
● During Insert Editing, when the tape moves to
connected to the camcorder’s S/AV connector, first
scenes recorded in the LP mode or a blank
set “S/AV INPUT” to “A/V IN” or “S IN” in VIDEO
portion, Insert Editing stops. (墌 pg. 74)
Menu. (墌 pg. 33, 39)
● If a memory card is loaded and “NAVIGATION” is
The “AUX” indication appears instead of “MIC”.
set to other than “MANUAL”, a NAVIGATION
thumbnail image is stored in the memory card.
(墌 pg. 50)
Insert Editing (DV only)
You can record a new scene into a previously
recorded tape, replacing a section of the original
recording with minimal picture distortion at the in
and outpoints. The original audio remains
unchanged.
A tape that was recorded in HI-RES or PS50 mode
ADVANCED FEATURES
cannot be used for Insert Editing.
START/STOP
INSERT
REW
PLAY
PAUSE
STOP
NOTES:
● Before performing the following steps, make sure
that “TIME CODE” is set to “ON”. (墌 pg. 33, 40)
● Insert Editing is not possible on a tape recorded in
the LP mode or on a blank portion of a tape.
● To perform Insert Editing while watching in the
television, make connections. (墌 pg. 24)
1 Play back the tape, locate the Edit-Out point and
press PAUSE (9). Confirm the time code at this
point. (墌 pg. 40)
2 Press REW (
3
) until the Edit-In point is located,
then press PAUSE (9).
3 Press and hold INSERT (I) on the remote
control, then press PAUSE (9). The “9I”
Master Page: Left
GR-PD1PAL.book Page 60 Tuesday, June 17, 2003 7:31 PM
60 EN
USING THE REMOTE CONTROL UNIT (cont.)
● When the remote control’s batteries run out, the
Random Assemble Editing
VCR brand you have set will be erased. In that
case, replace the old battery with a new one to
[R.A.Edit] (DV only)
reset the VCR brand.
Create edited videos easily using your camcorder as
VCR CODE LIST
the source player. You can select up to 8 “cuts” for
automatic editing, in any order you like. R.A.Edit is
VCR BRAND
CODE
VCR BRAND
CODE
more easily performed when the MBR (Multi-Brand
NAME
NAME
Remote) is set to operate with your brand of VCR
AKAI F
B
PHILIPS A
I
(see “VCR CODE LIST”), but can also be performed
F
D
I
E
by operating the VCR manually.
G
G
A
A
Before operation, make sure the batteries are
I
D
installed in the remote control. (墌 pg. 56)
BLAUPUNKT AC
I
A
NOTE:
DAEWOO AH
I
F
Random Assemble Editing is not possible with a tape
A
B
recorded in HI-RES or PS50 mode.
FERGUSON I
G
C
C
I
H
G
B
C
B
SAMSUNG ID
SHIFT
MBR SET
GRUNDIG A
D
C
D
SANYO C
F
C
E
HITACHI F
F
F
C
SELECO, REX I
A
I
F
JVC A
I
A
B
I
F
SHARP A
E
C
I
C
A
LG/GOLDSTAR
AA
SONY F
E
F
MITSUBISHI F
G
C
I
Set Remote/VCR Code
F
H
C
A
1 Turn off the power to the VCR and point the
NEC C
G
remote towards the VCR’s infrared sensor. Then,
THOMSON,
I
A
C
H
referring to the VCR CODE LIST, press and hold
TELEFUNKEN,
I
F
MBR SET, and enter the brand code.
SABA,
I
G
PANASONIC A
C
The code is automatically set once you release
NORDMENDE
C
B
A
G
MBR SET, and the VCR’s power comes on.
A
A
TOSHIBA F
I
I
D
2 Make sure the VCR’s power is on. Then, while
F
A
A
H
holding SHIFT, press the button on the remote
for the desired function. The functions the remote
can control are PLAY, STOP, PAUSE, FF, REW
and VCR REC STBY (you do not need to press
SHIFT for this one).
You are now ready to try Random Assemble
Editing.
IMPORTANT:
Although the MBR is compatible with JVC VCRs
and those of many other makers, it may not work
with yours or may offer limited functions.
NOTES:
● If the VCR’s power does not come on in step 1, try
another code from the VCR CODE LIST.
● Some brands of VCR do not come on
automatically. In this case, turn the power on
manually and try step 2.
● If the remote control is not able to control the
VCR, use the controls on the VCR.


