JVC GR-PD1 – страница 2
Инструкция к Видеокамере JVC GR-PD1
Master Page: Right
GR-PD1PAL.book Page 21 Tuesday, June 17, 2003 7:31 PM
EN 21
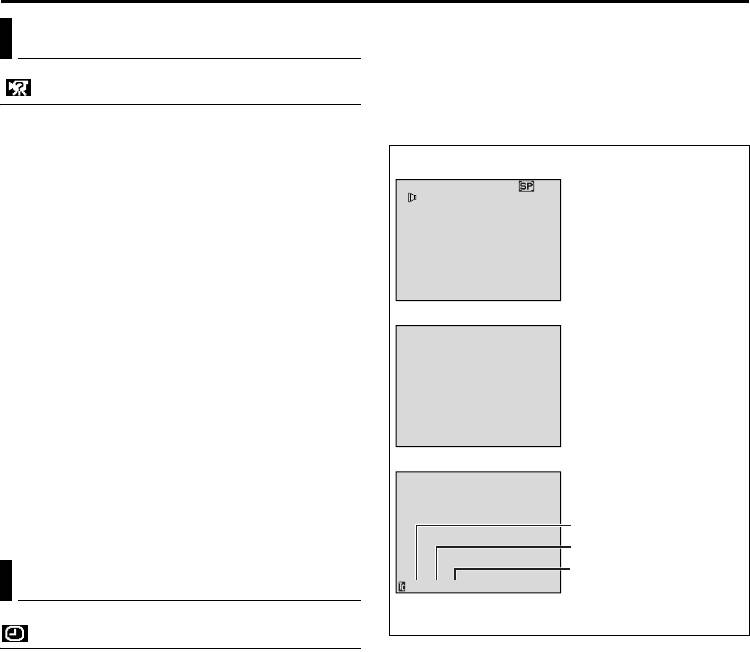
Time Code
Recording From The Middle Of A Tape
During recording, a time code is recorded on the
1) Play back a tape or use Blank Search (墌 pg. 23)
tape. This code is to confirm the location of the
to find the spot at which you want to start
recorded scene on the tape during playback.
recording, then engage the Still Playback mode.
If recording starts from a blank portion, the time
(墌 pg. 22)
code begins counting from “00:00:00”
2) Set the Power Switch to “A” or “M” while
(minute:second:frame). If recording starts from the
pressing down the Lock Button located on the
end of a previously recorded scene, the time code
switch, then start recording.
continues from the last time code number.
NOTES:
To perform Random Assemble Editing (墌 pg. 60 –
● The time code cannot be reset.
64), time code is necessary. If during recording a
● During fast-forwarding and rewinding, the time
blank portion is left partway through the tape, the
code indication does not move smoothly.
time code is interrupted. When recording is
● The time code is displayed only when “TIME
resumed, the time code starts counting up again
CODE” is set to “ON”. (墌 pg. 37)
from “00:00:00”. This means the camcorder may
record the same time codes as those existing in a
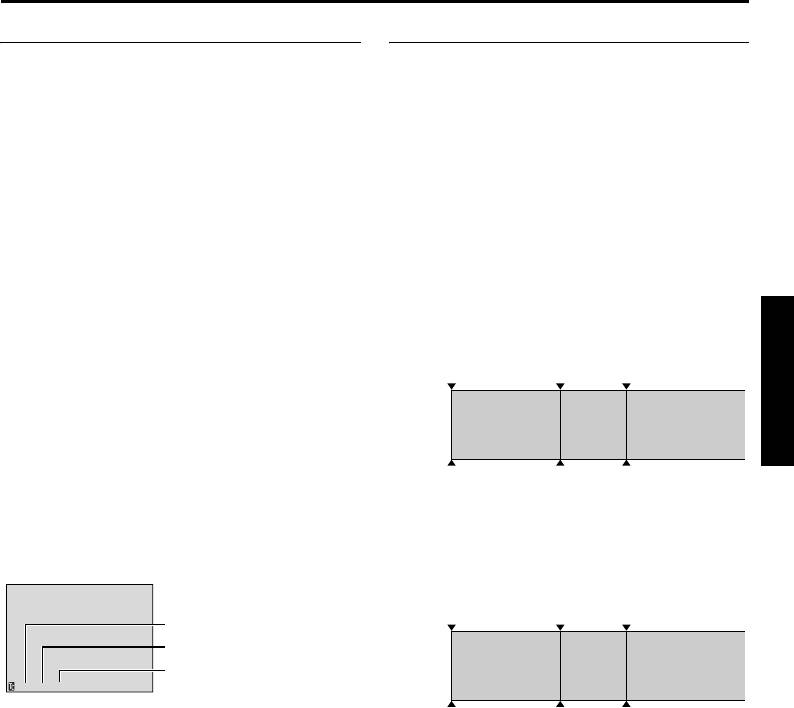
When a blank portion is recorded on a tape
previously recorded scene. To prevent this, perform
“Recording From The Middle Of A Tape” in the
Time code
Time code
Time code
following cases;
00:00:00
05:43:21
00:00:00
● When shooting again after playing back a
recorded tape.
● When power shuts off during shooting.
Already
Newly recorded
Tape
Blank
recorded scene
● When a tape is removed and re-inserted during
scene
shooting.
● When shooting using a partially recorded tape.
Shooting start
Shooting stop
Shooting start
● When shooting on a blank portion located
point
point
point
partway through the tape.
● When shooting again after shooting a scene then
opening/closing the cassette holder cover.
Display
Frames are not displayed
Proper recording
during recording.
Time code
Time code
Time code
00:00:00
05:43:21
05:44:00
Minutes
Seconds
Already
New
Tape
Latest scene
Frames
recorded scene
scene
12:34:24
(25 frames = 1 second)
Shooting start
Shooting start
Shooting start
point
point
point
VIDEO RECORDING & PLAYBACK
Master Page: Left-Heading0
GR-PD1PAL.book Page 22 Tuesday, June 17, 2003 7:31 PM
22 EN
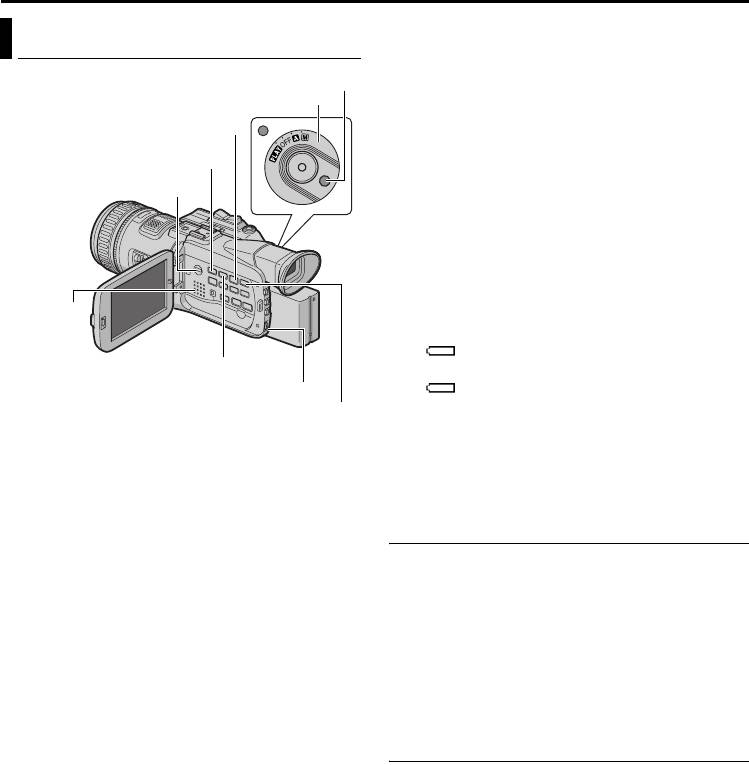
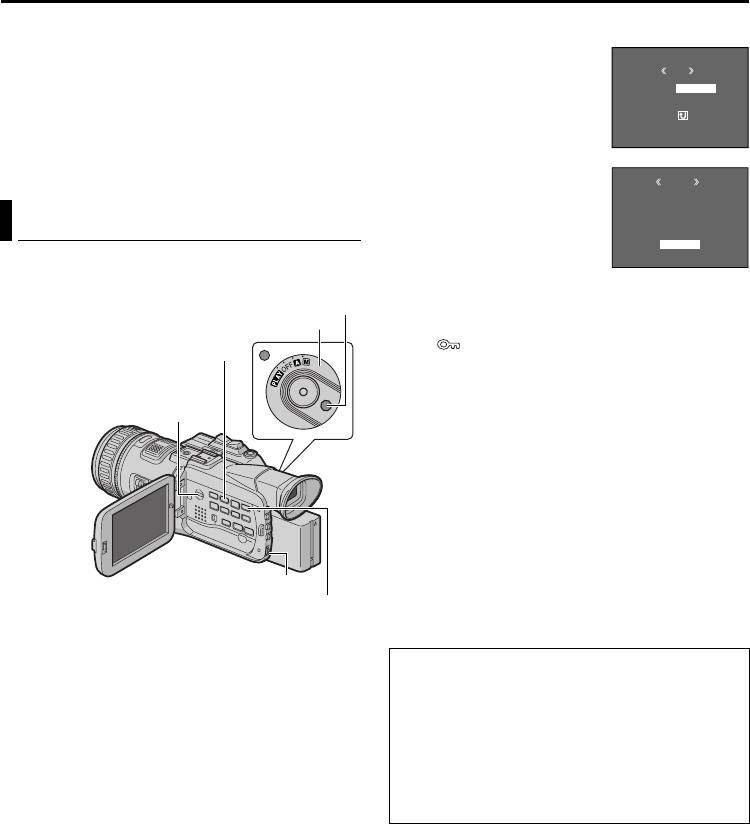
VIDEO PLAYBACK
NOTES:
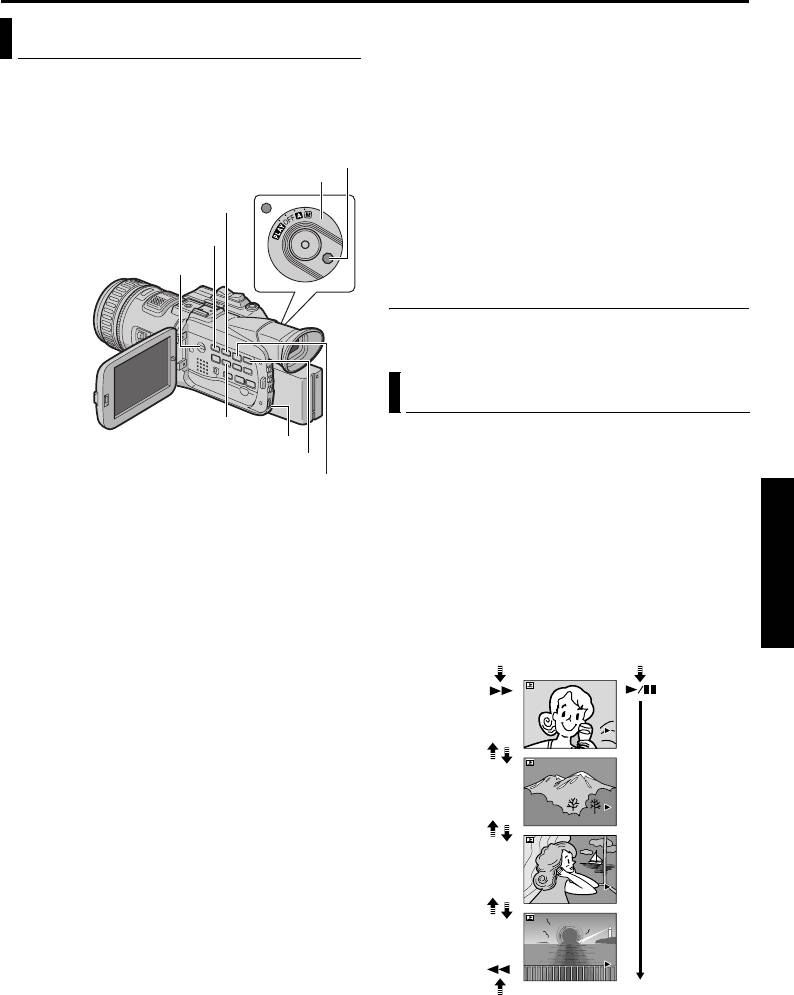
Normal Playback
● Clean the video heads using an optional dry
cleaning cassette when:
Lock Button
• No picture during playback.
Power Switch
• Blocks of noise appear during playback.
For details, 墌 pg. 78.
Play/Pause Button (4·9)
● If Stop mode continues for 5 minutes when power
is supplied from a battery, the camcorder shuts off
Stop Button (8)
automatically. To turn on again, set the Power
Playback Mode Switch
Switch to “OFF”, then to “P”.
● The playback picture can be viewed in the LCD
monitor, viewfinder or on a connected TV.
(墌 pg. 24)
● You can also view the playback picture on the
LCD monitor with it flipped over and pushed
against the camcorder body.
Speaker
● LCD monitor/viewfinder indications:
• When power is supplied from a battery: the
“ ” battery indicator is displayed. (墌 pg. 73)
Rewind Button (3)
• When power is supplied from an AC outlet: the
MENU Wheel (VOLUME)
“ ” battery indicator does not appear.
● When a cable is connected to the AV connector,
Fast-Forward Button (5)
the sound is not heard from the speaker.
1 Load a cassette. (墌 pg. 16)
To control the speaker volume…
Rotate the MENU Wheel towards R to turn up the
2 Set the Playback Mode Switch to “VIDEO”.
volume, or towards T to turn down the volume.
3 Set the Power Switch to “P” while pressing
down the Lock Button located on the switch.
Still Playback
4 To start playback, press 4·9.
Pauses during video playback.
5 To stop playback, press 8.
1) Press 4·9 during playback.
● During Stop mode, press 3 to rewind, or
2) To resume normal playback, press 4·9 again.
5 to fast-forward the tape.
● If still playback continues for more than about
3 minutes, the camcorder’s Stop mode is
automatically engaged.
● When 4·9 is pressed, the image may not
pause immediately while the camcorder
stabilises the still image.
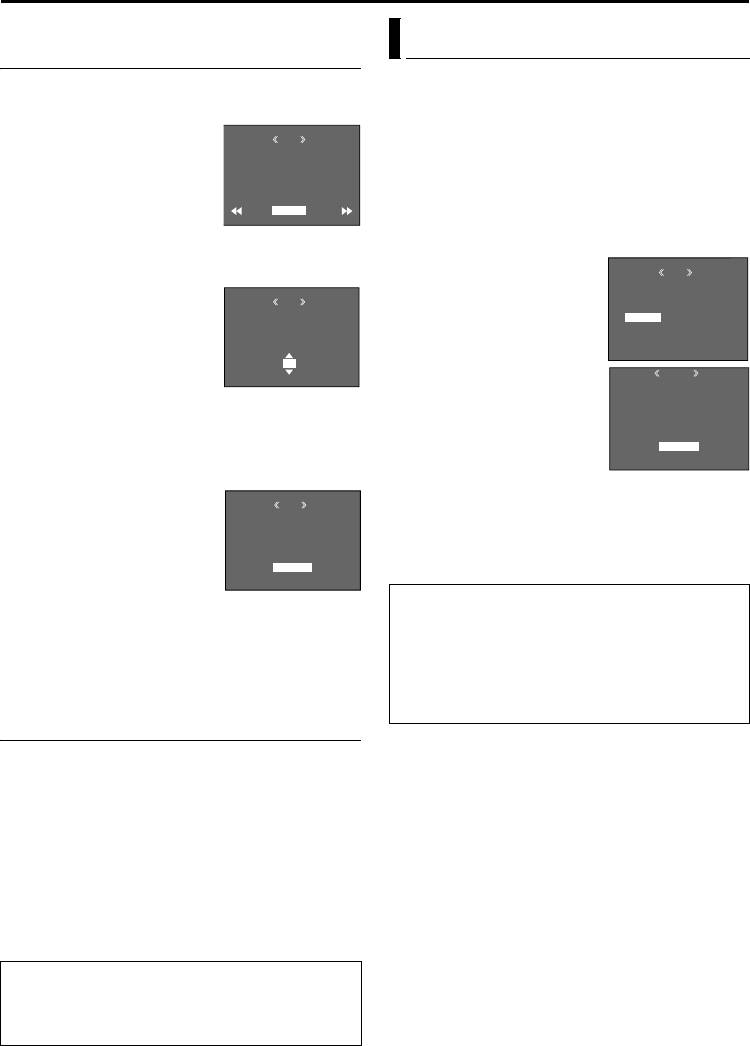
Frame-By-Frame Playback
Allows frame-by-frame search during video
playback. This feature is available only with a tape
recorded in DV recording mode.
1) Press 4·9 during playback.
2) Rotate the MENU Wheel toward R for forward
and T for reverse.
Master Page: Right
EN 23
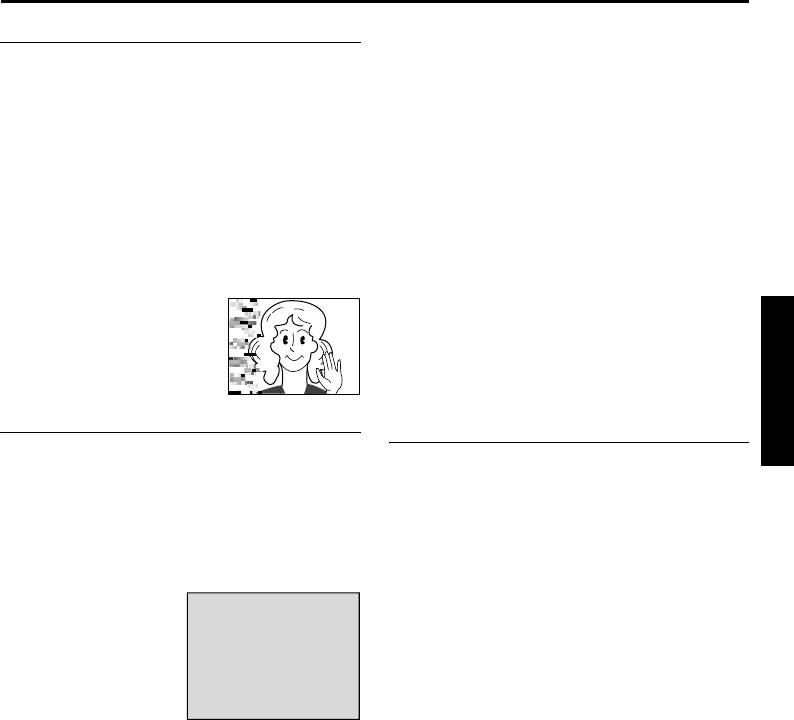
Shuttle Search
Allows high-speed search in either direction during
video playback.
1) During playback, press 5 for forward search,
or 3 for reverse search.
2) To resume normal playback, press 4·9.
● During playback, press and hold 5 or 3.
The search continues as long as you hold the
button. Once you release the button, normal
playback resumes.
● A slight mosaic effect appears on the display
during Shuttle Search. This is not a
malfunction.
A
GR-PD1PAL.book Page 23 Tuesday, June 17, 2003 7:31 PM
NOTES:
● Before starting Blank Search, if the current position
is at a blank portion, the camcorder searches in
the reverse direction. If the current position is at a
recorded portion, the camcorder searches in the
forward direction.
● Blank Search does not work if “HEAD CLEANING
REQUIRED. USE CLEANING CASSETTE” has
appeared with the tape.
● If the beginning or end of the tape is reached
during Blank Search, the camcorder stops
automatically.
● A blank portion which is shorter than 5 seconds of
tape may not be detected.
● The detected blank portion may be located
TTENTION:
between recorded scenes. Before you start
(DV mode only)
recording, make sure there is no recorded scene
During Shuttle Search, parts of
after the blank portion.
the picture may not be clearly
visible, particularly on the left
side of the screen.
Slow-Motion Playback
Playback Zoom
Blank Search
Playback Special Effects
Helps you find where you should start recording in
Available only with the remote control (provided).
the middle of a tape to avoid time code interruption.
(墌 pg. 57, 58)
(墌 pg. 21)
1 Load a cassette. (墌 pg. 16)
2 Set the Playback Mode Switch to “VIDEO”.
3 Set the Power Switch to “P” while pressing
down the Lock Button located on the switch.
4 During Stop mode,
press BLANK
SEARCH.
BLANK SEARCH
PUSH "STOP" BUTTON
● The “BLANK
TO CANCEL
SEARCH”
indication appears
and the camcorder
automatically starts
VIDEO RECORDING & PLAYBACK
reverse or forward search, then stops at the
spot which is about 3 seconds of tape before
the beginning of the detected blank portion.
● To cancel Blank Search midway, press 8.
Master Page: Left
GR-PD1PAL.book Page 24 Tuesday, June 17, 2003 7:31 PM
24 EN
VIDEO PLAYBACK (cont.)
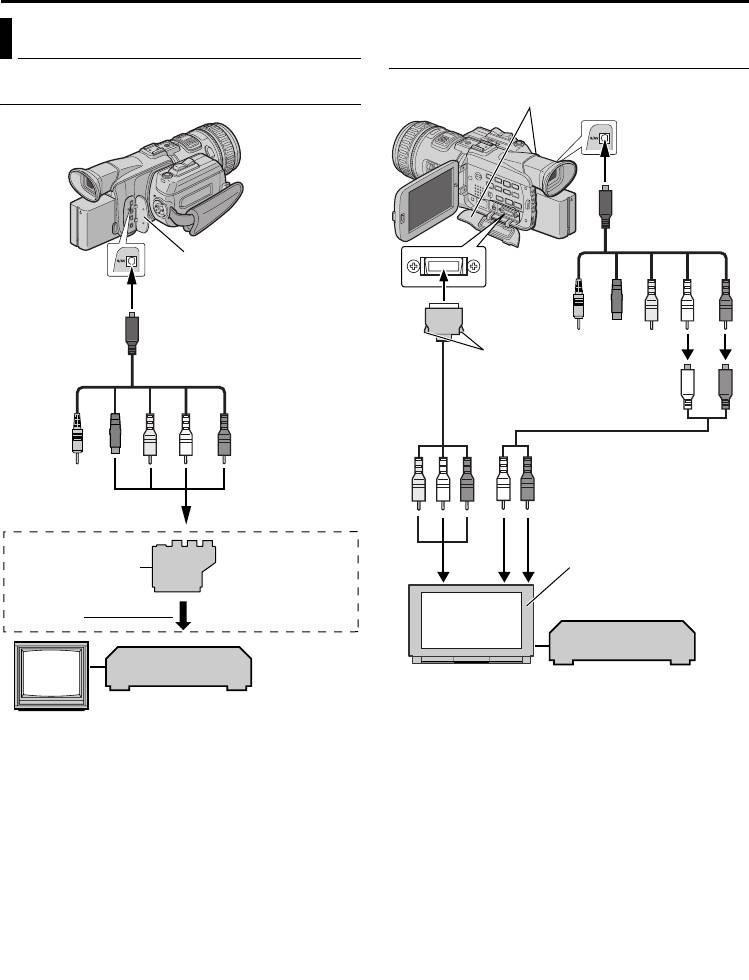
To Connect To A TV or VCR Equipped With The
Connections To A TV Or VCR
Component Video Connectors
To Connect A Conventional TV or VCR
Connector Cover**
To S/ AV
S/AV/Editing cable
(provided)
Connector
Cover****
To S/ AV
To Y/PB/PR
456
23
S/AV/Editing cable
Push to connect or
(provided)
disconnect
Component video cable
(provided)
Audio extension cable
(provided)
1234 5
“Y/C”/“CVBS”
Cable Adapter*
Wide-screen TV
Video Out Select
123
Switch
To TV or VCR
VCR
VCR
TV
A To component video connectors
B White to AUDIO L IN*
C Red to AUDIO R IN*
A Not required for connection.
D Not required for connection.
B Black to S-VIDEO IN**
E Not required for connection.
C Yellow to VIDEO IN
F Not required for connection.
D White to AUDIO L IN***
E Red to AUDIO R IN***
* Not required for watching still images only.
** When connecting the cable, open the cover.
* If your VCR has a SCART connector, use the
provided cable adapter.
** Connect when your TV/VCR has S-VIDEO IN
and A/V input connectors. In this case, it is not
necessary to connect the yellow video cable.
*** Not required for watching still images only.
**** When connecting the cable, open the cover.
NOTE:
Set the video out select switch of the cable adapter
as required:
Y/C: When connecting to a TV or VCR which
accepts Y/C signals and uses an S-Video cable.
CVBS: When connecting to a TV or VCR which does
not accept Y/C signals and uses an audio/video
cable.

Master Page: Right
GR-PD1PAL_05Start-Video.fm Page 25 Thursday, June 19, 2003 1:56 PM
EN 25
1 Make sure all units are turned off.
NOTES:
● It is recommended to use the AC Power Adapter/
2 Connect the camcorder to a TV or VCR as shown
Charger as the power supply instead of the
in the illustration.
battery pack. (墌 pg. 11)
If using a VCR, go to step 3.
● To monitor the picture and sound from the
If not, go to step 4.
camcorder without inserting a tape or memory
card, set the camcorder’s Power Switch to “A” or
3 Connect the VCR output to the TV input,
“M”, then set your TV to the appropriate input
referring to your VCR’s instruction manual.
mode.
4 For S-video or video connection
● Make sure you adjust the TV sound volume to its
Set “S/VIDEO” to “16:9 TV” or “4:3 TV”
minimum level to avoid a sudden burst of sound
depending on the aspect ratio of the TV you are
when the camcorder is turned on.
connecting. (墌 pg. 33, 37)
● If you have a TV or speakers that are not specially
For component video connection
shielded, do not place the speakers adjacent to the
Set “Y/Pb/Pr” to any picture size depending on
TV as interference will occur in the camcorder
the TV to which you are connecting.
playback picture.
(墌 pg. 33, 37)
● During playback in HI-RES mode, the images may
not appear on the camcorder’s LCD monitor or
5 Turn on the VCR and the TV.
viewfinder if the component video cable is
6 Set the VCR to its AUX input mode, and set the
connected.
TV to appropriate input mode.
● When a cable is connected to the S/AV or
To choose whether or not the following displays
headphone connector, sound cannot be heard
appear on the connected TV…
from the speaker.
● Date/Time
● According to the type of the connected TV and the
Set “DATE/TIME” to “AUTO”, “ON” or “OFF”.
recording mode, the playback picture may be
(墌 pg. 33, 40)
squeezed vertically or horizontally. For details,
Or, press DISPLAY on the remote control to turn
refer to the Instructions of the TV.
on/off the date indication.
● Time Code
Set “TIME CODE” to “ON” or “OFF”.
(墌 pg. 33, 40)
● Indications other than date/time and time code
Set “ON SCREEN” to “OFF”, “LCD” or “LCD/TV”.
(墌 pg. 33, 40)
VIDEO RECORDING & PLAYBACK
Master Page: Left-start
GR-PD1PAL_06DSC.fm Page 26 Wednesday, June 18, 2003 9:16 AM
26 EN
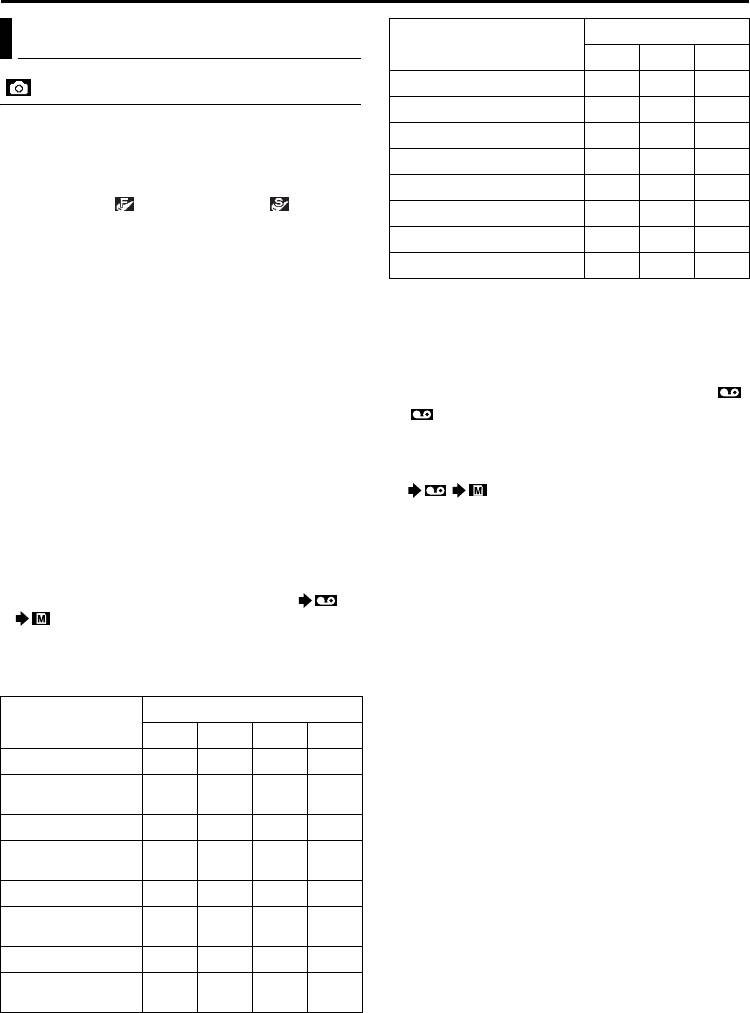
D.S.C. RECORDING
DIGITAL STILL CAMERA (D.S.C.) RECORDING & PLAYBACK
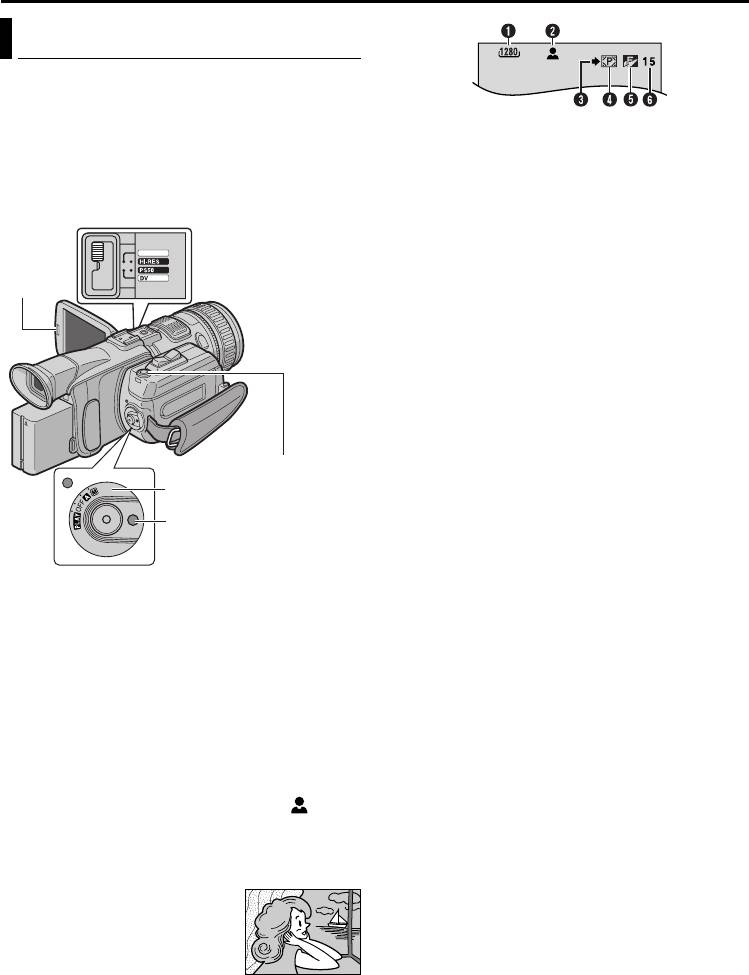
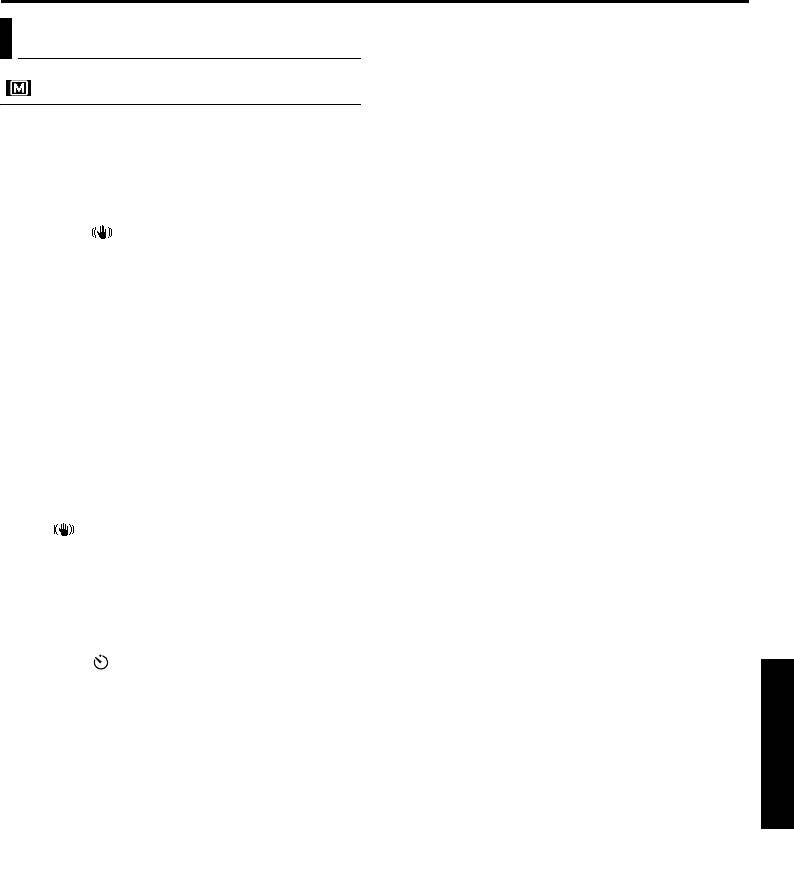
Basic Shooting (D.S.C. Snapshot)
You can use your camcorder as a Digital Still
Camera for taking snapshots. Still images are stored
in the memory card.
A Image Size (墌 pg. 38, 84)
NOTE:
B Focus Icon (墌 pg. 84)
Before continuing, perform the procedures listed
C Shooting Icon (墌 pg. 84)
below:
D Card Icon (墌 pg. 84)
● Power (墌 pg. 10)
E Picture Quality (墌 pg. 38, 84)
● Loading A Memory Card (墌 pg. 17)
F Remaining Number Of Shots (墌 pg. 84)
Recording Mode
NOTES:
MEMORY
Switch
● Even if “OIS” is set to “ON” (墌 pg. 35), the
PUSH
Stabiliser will be disabled.
OPEN
● If Special Effects (墌 pg. 49) is engaged, certain
modes are disabled during Snapshot recording. In
such a case, the icon blinks.
● If shooting is not performed for approx. 5 minutes
when the Power Switch is set to “A” or “M” and
power is supplied from the battery pack, the
camcorder shuts off automatically to save power.
To perform shooting again, push back and pull out
the viewfinder again or close and re-open the LCD
monitor.
SNAPSHOT Button
● The Motor Drive mode (墌 pg. 42) is disabled
Power Switch
when the Recording Mode Switch is set to
“MEMORY”.
Lock Button
● When a cable is connected to the AV connector,
the shutter sound is not heard from the speaker,
however it is recorded onto the tape.
1 Remove the lens cap.
● Still images taken are compliant to DCF (Design
rule for Camera File system). They do not have any
2 Press PUSH OPEN and open the LCD monitor
compatibility with devices which are not
fully, or pull out the viewfinder fully.
compliant to DCF.
3 Set the Recording Mode Switch to “MEMORY”.
4 Set the Power Switch to “A” or “M” while
pressing down the Lock Button located on the
switch.
5 Press SNAPSHOT. The “O” indication
appears while the snapshot is being taken.
● To check how the image looks before
recording it in the memory card, press
SNAPSHOT halfway and hold. The “ ”
indicator appears and stops blinking when the
captured image is focused. To cancel the
recording, release SNAPSHOT. To record it in
the memory card, press SNAPSHOT fully.
● Still images are recorded in
the snapshot mode with no
frame. There is the sound of
a shutter closing.
● To delete unwanted still
images, refer to “Deleting
Files” (墌 pg. 30).
● When you do not want to hear the shutter
sound, set “BEEP” to “OFF”. (墌 pg. 33, 36)
● To change the Image Size and/or Picture
Quality, 墌 pg. 33, 38.
Master Page: Right-Heading0
GR-PD1PAL.book Page 27 Tuesday, June 17, 2003 7:31 PM
D.S.C. PLAYBACK
EN 27
NOTES:
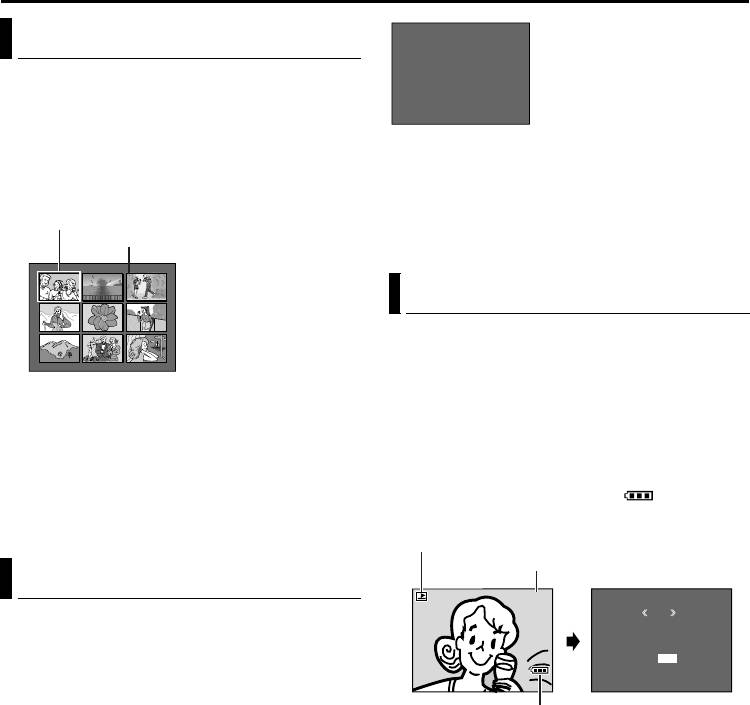
Normal Playback Of Images
● Even if you shoot a new image after playing back a
low-numbered one, this will not overwrite an
Images shot with the camcorder are automatically
existing image, because new images are
numbered, then stored in numerical order in the
automatically stored after the last-recorded one.
memory card. You can view the stored images, one
● Images shot in a file size other than “640 x 480”,
at a time, much like flipping through a photo album.
“848 x 480”, “1280 x 720” and “1280 x 960”
Lock Button
with another devices will be displayed thumbnail
Power Switch
images. These thumbnail images cannot be
transferred to a PC.
Rewind Button (3)
● Images shot with devices (such as JVC GR-DVX7)
that are not compatible with DCF cannot be
Stop Button (8)
viewed with this camcorder; “UNSUPPORTED
Playback Mode Switch
FILE!” will be displayed.
Playback Zoom
Available only with the remote control (provided).
(墌 pg. 57)
Auto Playback Of Images
INFO Button
You can run through all the images stored in
MENU Wheel
memory card automatically.
Fast-Forward Button (5)
1 Perform steps 1 – 4 in “Normal Playback Of
Play/Pause Button (4·9)
Images”.
1 Load a memory card. (墌 pg. 17)
2 Press 4·9 to start Auto Playback. Files are
2 Set the Playback Mode Switch to “MEMORY”.
displayed in descending order.
● If you press 3 during Auto Playback, files
3 Set the Power Switch to “P” while pressing
are displayed in ascending order.
down the Lock Button located on the switch.
3 To end Auto Playback, press 8.
4 Open the LCD monitor fully, or pull out the
viewfinder fully.
[For Normal Playback]
[For Auto Playback]
To display the next image
● The still image which has been played back at
the last time is displayed.
Image playback screen (IMAGE)
5 Press 3 to display the previous file. Press 5
100-0013
to display the next file.
● Pressing INFO gives you details on the
displayed file. (墌 pg. 28)
● You can also look for the desired file using
100-0014
Index Screen. (墌 pg. 28)
● You can turn off the on-screen playback
display. (墌 pg. 28)
100-0015
100-0016
DIGITAL STILL CAMERA (D.S.C.) RECORDING & PLAYBACK
To display the previous image
Master Page: Left
GR-PD1PAL.book Page 28 Tuesday, June 17, 2003 7:31 PM
28 EN
D.S.C. PLAYBACK (cont.)
Information Screen
Index Playback Of Files
F
O
L
D
E
R
:
1
0
0
J
V
C
G
R
F
I
L
E
:
D
V
C
0
0
0
1
0
D
A
T
E
:
2 7 . 1 0
. 0 3
S
I
Z
E
:
1
2
8
0
X
9
6
0
You can view several different files stored in the
Q
U
A
L
I
T
Y
:
F
I
N
E
P
R
O
T
E
C
T
:
O
F
F
memory card at a time. This browsing capability
makes it easy to locate a particular file you want.
1 Perform steps 1 – 4 in “Normal Playback Of
Images” (墌 pg. 27).
● Press the INFO Button again to close the
2 Press INDEX. The Index Screen of the image files
Information Screen.
appears.
NOTE:
Selected file
With images shot with other devices or processed on
Index number
a PC, “QUALITY: – – –” will be displayed.
Index Screen
1
2
3
Removing On-Screen Display
4
5
6
7
8 9
1 Perform steps 1 – 4 in “Normal Playback Of
Images” (墌 pg. 27).
2 Press the MENU Wheel in. The Menu Screen
3 Rotate the MENU Wheel to move the frame to
appears.
the desired file.
3 Rotate the MENU Wheel to select “DISPLAY”,
● Press 3 to display the previous page. Press
and press it. The Sub Menu appears.
5 to display the next page.
4 Rotate the MENU Wheel to select “OFF”, and
4 Press the MENU Wheel in. The selected file is
press it. The operation mode indicator, folder/file
displayed.
number and battery indicator ( ) disappear.
● Pressing INFO gives you details on the
● To display the indicators again, select “ON”.
displayed file. (See below.)
Operation mode indicator
Folder/file number
Viewing File Information
100-0013
M
E
NU
You can get the relevant file information by pressing
the INFO Button during normal playback or Index
Playback.
DISPLAY
OFF
ON
RETURN
FOLDER : Folder name (墌 pg. 31)
FILE : File name (墌 pg. 31)
Battery indicator
DATE : Date the file was made
SIZE : Image size
QUALITY : Picture quality
PROTECT : When set to “ON”, the file is
protected from accidental erasure.
(墌 pg. 29)
Master Page: Right
GR-PD1PAL.book Page 29 Tuesday, June 17, 2003 7:31 PM
EN 29
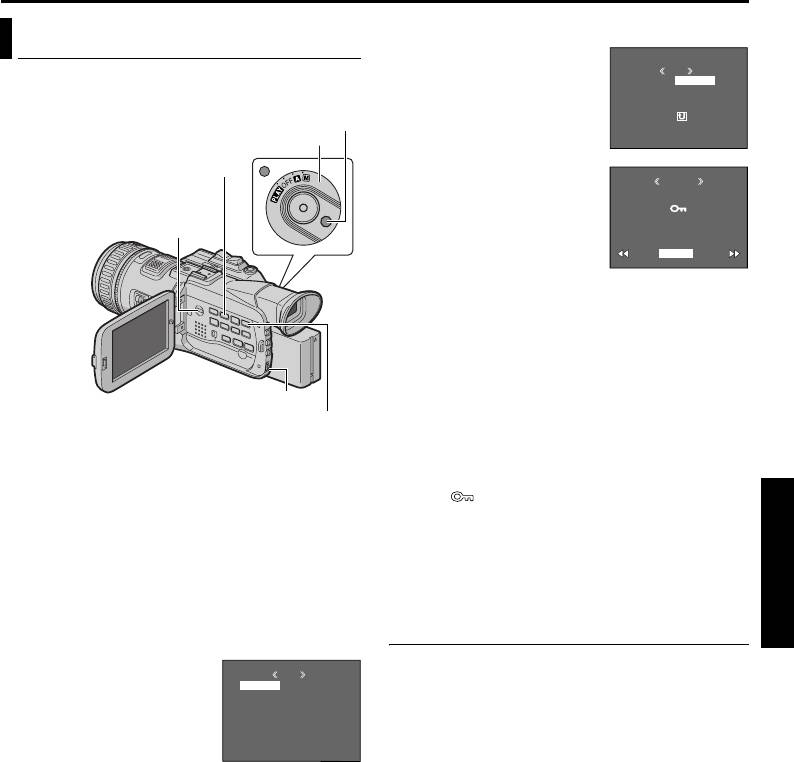
To protect the currently displayed file
Protecting Files
7 Rotate the MENU Wheel
to select “CURRENT”, and
M
E
NU
The Protect mode helps prevent the accidental
PROTECT
CUR
RENT
press it. The PROTECT
PROT.ALL
erasure of files.
CANC.ALL
screen appears.
Lock Button
RETURN
8 Press 3 or 5 to
Power Switch
select the desired file.
Rewind Button (3)
9 Rotate the MENU Wheel
ROTEC TP
to select “EXECUTE”, and
press it.
Playback Mode Switch
● To cancel protection,
PROTECTED
select “RETURN”.
RETURN
● Repeat steps 8 and 9 for
all files you want to
protect.
To protect all files stored in the memory
card
7 Rotate the MENU Wheel to select “PROT.ALL”,
and press it. The PROTECT screen appears.
MENU Wheel
8 Rotate the MENU Wheel to select “EXECUTE”,
Fast-Forward Button (5)
and press it.
● To cancel protection, select “RETURN”.
1 Load a memory card. (墌 pg. 17)
2 Set the Playback Mode Switch to “MEMORY”.
NOTES:
● If the “ ” mark appears, the currently displayed
3 Set the Power Switch to “P” while pressing
file is protected.
down the Lock Button located on the switch.
● When the memory card is initialised or corrupted,
4 Open the LCD monitor fully, or pull out the
even protected files are deleted. If you do not want
viewfinder fully.
to lose important files, transfer them to a PC and
● The still image which has been played back at
save them.
the last time is displayed.
5 Press the MENU Wheel in. The Menu Screen
To Remove Protection
appears.
Before doing the following, perform steps 1 – 6 in
6 Rotate the MENU Wheel
MENU
“Protecting Files” in the left column.
to select “PROTECT”, and
PROTECT
DELETE
press it. The Sub Menu
DPOF
To remove protection from the currently
NO . RESET
appears.
FORMAT
DISPLAY
displayed file
BR I HT
G
END
7 Rotate the MENU Wheel to select “CURRENT”,
and press it. The PROTECT screen appears.
8 Press 3 or 5 to select the desired file.
9 Rotate the MENU Wheel to select “EXECUTE”,
and press it.
● To cancel selection, select “RETURN”.
● Repeat steps 8 and 9 for all files you want to
remove protection.
DIGITAL STILL CAMERA (D.S.C.) RECORDING & PLAYBACK
CONTINUED ON NEXT PAGE
Master Page: Left
GR-PD1PAL.book Page 30 Tuesday, June 17, 2003 7:31 PM
30 EN
D.S.C. PLAYBACK (cont.)
To remove protection from all files stored
To delete the currently displayed file
in the memory card
7 Rotate the MENU Wheel
to select “CURRENT”, and
M
E
NU
7 Rotate the MENU Wheel to select “CANC.ALL”,
press it. The DELETE
DELETE
CUR
RENT
and press it. The PROTECT screen appears.
ALL
screen appears.
8 Rotate the MENU Wheel to select “EXECUTE”,
RETURN
8 Press 3 or 5 to
and press it.
select the desired file.
● To cancel selection, select “RETURN”.
9 Rotate the MENU Wheel
ELETED
to select “EXECUTE”, and
press it.
Deleting Files
● To cancel deletion,
DELETE?
select “RETURN”.
EXECUTE
RETURN
Previously stored files can be deleted either one at a
● Repeat steps 8 and 9 for
time or all at once.
all files you want to
Lock Button
delete.
Power Switch
NOTE:
Rewind Button (3)
If the “ ” mark appears, the selected file is
protected and cannot be deleted.
To delete all files stored in the memory
Playback Mode Switch
card
7 Rotate the MENU Wheel to select “ALL”, and
press it. The DELETE screen appears.
8 Rotate the MENU Wheel to select “EXECUTE”,
and press it.
● To cancel deletion, select “RETURN”.
NOTES:
● Protected files (墌 pg. 29) cannot be deleted. To
delete them, remove protection first.
MENU Wheel
● Once files are deleted, they cannot be restored.
Fast-Forward Button (5)
Check files before deleting.
1 Load a memory card. (墌 pg. 17)
2 Set the Playback Mode Switch to “MEMORY”.
CAUTION:
Do not remove the memory card or perform any
3 Set the Power Switch to “P” while pressing
other operation (such as turning off the
down the Lock Button located on the switch.
camcorder) during deletion. Also, be sure to use
4 Open the LCD monitor fully, or pull out the
the provided AC Power Adapter/Charger, as the
viewfinder fully.
memory card may be corrupted if the battery
● The still image which has been played back at
becomes exhausted during deletion. If the
the last time is displayed.
memory card becomes corrupted, initialise it.
5 Press the MENU Wheel in. The Menu Screen
(墌 pg. 32)
appears.
6 Rotate the MENU Wheel to select “DELETE”, and
press it. The Sub Menu appears.

Master Page: Right
GR-PD1PAL.book Page 31 Tuesday, June 17, 2003 7:31 PM
EN 31
Resetting The File Name Setting Print Information (DPOF
By resetting the file name, a new folder will be
Setting)
made. The new files you are going to make will be
stored in the new folder. It is convenient to separate
This camcorder is compatible with the DPOF
the new files from previously made files.
(Digital Print Order Format) standard in order to
support future systems such as automatic printing.
1 Load a memory card. (墌 pg. 17)
You can select one of the 2 print information settings
2 Set the Playback Mode Switch to “MEMORY”.
for images stored in the memory card: “To Print All
3 Set the Power Switch to “P” while pressing
Still Images (One Print For Each)” or “To Print By
down the Lock Button located on the switch.
Selecting Still Images And Number Of Prints”.
4 Open the LCD monitor fully, or pull out the
NOTES:
viewfinder fully.
● If you load a memory card already set as shown
● The still image which has been played back at
below in a printer compatible with DPOF, it will
the last time is displayed.
make prints of the selected still images
automatically.
5 Press the MENU Wheel in. The Menu Screen
● To print images recorded on a tape, first dub them
appears.
to a memory card. (墌 pg. 55)
6 Rotate the MENU Wheel to select “NO. RESET”,
and press it. The NO. RESET screen appears.
To Print All Still Images (One Print For Each)
7 Rotate the MENU Wheel to select “EXECUTE”,
and press it. The new folder (such as
1
Load a memory card. (墌 pg. 17)
“101JVCGR”) will be made and the file made of
2 Set the Playback Mode Switch to “MEMORY”.
the next shot starts from DVC00001.
3 Set the Power Switch to “P” while pressing
Folder and File names
down the Lock Button located on the switch.
Each time shooting takes place, a file name is made
using a number which is larger by one than the
4 Open the LCD monitor fully, or pull out the
largest number of the file names which are in use.
viewfinder fully. The still image which has been
Even if you delete an image file with a number in the
played back at the last time is displayed.
middle of range, the number will not be used for a
5 Press the MENU Wheel in. The Menu Screen
new shot; a gap will remain in the numerical
appears.
sequence. If the file name reaches DVC09999, a
6 Rotate the MENU Wheel
new folder (such as “101JVCGR”) will be made and
to select “DPOF”, and
M
E
NU
the file name will start again from DVC00001.
press it. The Sub Menu
DPOF
CUR
RENT
ALL 1
appears.
RESET
RETURN
7 Rotate the MENU Wheel
to select “ALL 1”, and
press it. The DPOF screen
appears.
8 Rotate the MENU Wheel
DPOF
to select “EXECUTE”, and
press it. The normal
playback screen appears.
ALL1?
● To cancel selection,
EXECUTE
RETURN
select “RETURN”.
DIGITAL STILL CAMERA (D.S.C.) RECORDING & PLAYBACK
CONTINUED ON NEXT PAGE
Master Page: Left
GR-PD1PAL.book Page 32 Tuesday, June 17, 2003 7:31 PM
32 EN
D.S.C. PLAYBACK (cont.)
To Print By Selecting Still Images And Number
Initialising A Memory Card
Of Prints
You can initialise a memory card any time.
1
Perform steps 1 – 6 in “To Print All Still Images
After initialising, all files and data stored in the
(One Print For Each)” (墌 pg. 31).
memory card, including those which have been
2 Rotate the MENU Wheel
protected, are cleared.
DPOF
to select “CURRENT”, and
1 Set the Playback Mode Switch to “MEMORY”.
press it. The DPOF screen
2 Set the Power Switch to “P” while pressing
appears.
SHEETS
down the Lock Button located on the switch.
00
3 Press 3 or 5 to
RETURN
3 Open the LCD monitor fully, or pull out the
select the desired file.
viewfinder fully.
4 Rotate the MENU Wheel to select the number
4 Press the MENU Wheel in.
indication (00), and press it.
MENU
The Menu Screen appears.
PROTECT
5 Select the number of prints
DELETE
DPOF
DPOF
by rotating the MENU
NO . RE SE T
FORMAT
Wheel towards “R” to
DISPLAY
BR I GHT
increase number, or
SHEETS
END
towards “T” to decrease
05
5 Rotate the MENU Wheel
ORMA TF
the number, and press it.
to select “FORMAT”, and
● Repeat steps 3 through 5
ERASE ALL
press it. The FORMAT
DATA?EX I ST I NG
for the desired number of prints.
screen appears.
● The number of prints can be set up to 15.
EXECUTE
● To correct the number of prints, select the
6 Rotate the MENU Wheel
RETURN
image again and change the number.
to select “EXECUTE”, and
press it. The memory card
6 Rotate the MENU Wheel
DPOF
is initialised.
to select “RETURN”, and
● When initialisation is finished, “NO IMAGES
press it. The “SAVE?”
STORED” appears.
appears.
SAVE?
● To cancel initialisation, select “RETURN”.
● If you did not change
EXECUTE
CANCE L
any settings in step 3
through 5, the Menu
CAUTION:
Screen reappears.
Do not perform any other operation (such as
turning off the camcorder) during initialisation.
7 Rotate the MENU Wheel to select “EXECUTE” to
Also, be sure to use the provided AC Power
save the setting you have just made, and press it.
Adapter/Charger, as the memory card may be
● To cancel selection, select “CANCEL”.
corrupted if the battery becomes exhausted during
initialisation.
To Reset The Number Of Prints
1
Perform steps 1 – 6 in “To Print All Still Images
(One Print For Each)” (墌 pg. 31).
2 Rotate the MENU Wheel to select “RESET”, and
press it. The DPOF screen appears.
3 Rotate the MENU Wheel to select “EXECUTE”,
and press it. The normal playback screen
appears.
● To cancel selection, select “RETURN”.
● The number of prints is reset to 0 for all still
images.
CAUTION:
While performing the above, never disconnect
power, as this may cause the memory card to be
corrupted.
Master Page: Right-start
GR-PD1PAL.book Page 33 Tuesday, June 17, 2003 7:31 PM
MENUS FOR DETAILED ADJUSTMENT
EN 33
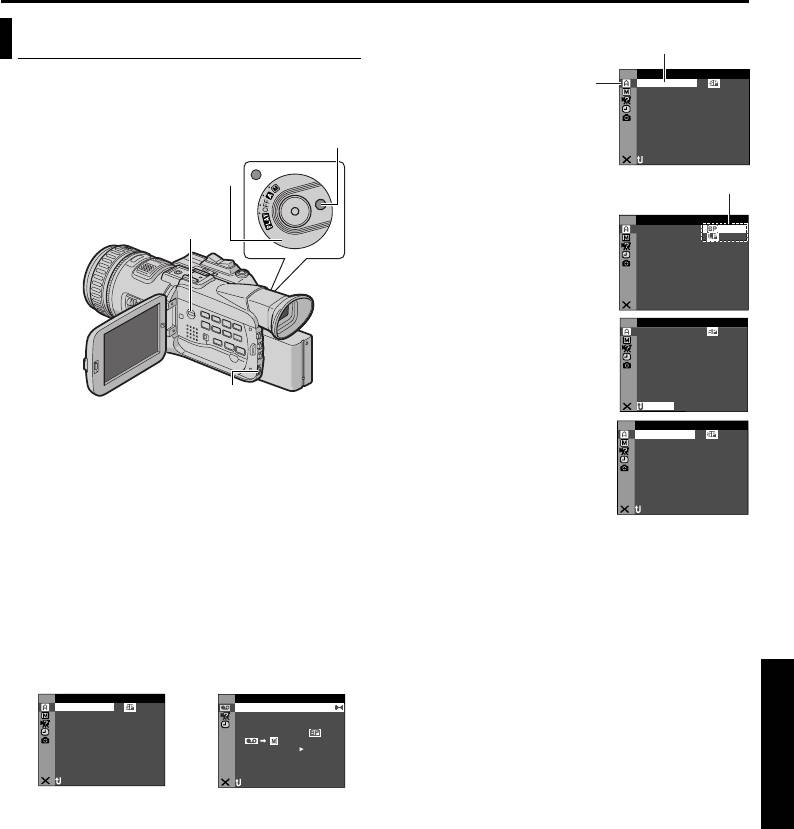
Example: m CAMERA Menu
Changing The Menu Settings
Selected function
This camcorder is equipped with an easy-to-use, on-
A CA R
ME
Selected menu icon blinks.
C
MODRE
E
–
12D –OUN DV S tib
screen menu system that simplifies many of the
O
– ZO M
40
x
GA N
I
C
– UP
AG
more detailed camcorder settings. (墌 pg. 34 – 40)
NA I N AUN L
MAIOV–GAT
4:5– PS 0 3
Lock Button
NRETUR
Power Switch
6 Rotate the MENU Wheel to
Sub Menu
select the desired
parameter.
A CA R
ME
Playback Mode Switch
C
MODRE
E
–
NRETUR
7 Press the MENU Wheel in.
A CA R
ME
C
MODRE
E
–
Selection is complete.
12D –OUN DV S tib
O
– ZO M
40
x
I
C
– UP GA N
AG
● Repeat the procedure if
MAIOV–GAT NA I N AUN L
4:5– PS 0 3
you wish to set other
MENU Wheel
function menus.
NRETUR
1 For Video and D.S.C. Recording Menus:
8 Press the MENU Wheel in.
A CA R
ME
C
MODRE
E
–
Set the Power Switch to “M” while pressing down
The Menu Screen returns.
12D –OUN DV S tib
O
– ZO M
40
x
the Lock Button located on the switch.
I
C
– UP GA N
AG
● Repeat the procedure if
MAIOV–GAT NA I N AUN L
4:5– PS 0 3
For Video Playback Menus:
you wish to set other
1) Set the Playback Mode Switch to “VIDEO”.
function menus.
NRETUR
2) Set the Power Switch to “P” while pressing
9 Press the MENU Wheel in
down the Lock Button located on the switch.
again. The Menu Screen closes.
For D.S.C. Playback Menus:
NOTES:
For details, refer to “D.S.C. PLAYBACK”
● The “m” settings are effective when the Power
(墌 pg. 27).
Switch is set to both “A” and “M”. However, the
2 Open the LCD monitor fully, or pull out the
menu settings can be changed only when the
viewfinder fully.
Power Switch is set to “M”.
ADVANCED FEATURES
3 Press the MENU Wheel in. The Menu Screen
● The “q” settings are effective only when the
appears.
Power Switch is set to “M”.
A CA R
ME
O V E
ID
● The “s ” functions which are set when the Power
MODRE
E
C
–
DMSO N EO
DU
ST RE–EO
12D –OUN DV S tib
OF. –ARR DV N F
Switch is set to “M” are also applied when the
O
– ZO M
40
x
±0 N–HRO SY C
.
0
I
C
– UP GA N
AG
E C–MOD RE
Power Switch is set to “P”.
MAIOV–GAT NA I N AUN L
OFCO Y P F–
4:5– PS 0 3
L.V.DENA I
● The “n” (CAMERA DISPLAY) settings are
A
IN S/ V T F–
OFPU
effective even when the Power Switch is set to
NRETUR
NRETUR
“A”. However, the menu settings can be changed
Menu Screen for Video
Menu Screen for Video
only when the Power Switch is set to “M”.
and D.S.C. Recording
Playback Menu
● The “n” (CAMERA DISPLAY) settings are
Menu
effective only for shooting except “BRIGHT”.
● The “n” (VIDEO DISPLAY) settings are effective
only for video playback except “BRIGHT”.
4 Rotate the MENU Wheel to select the desired
● The date indication can also be turned on/off by
function, and press it. The selected function
pressing the DISPLAY Button on the remote
menu appears.
control (provided). (墌 pg. 25, 52, 61)
5 Rotate the MENU Wheel to select the desired
function, and press it. The Sub Menu appears.

Master Page: Left-Heading0
GR-PD1PAL.book Page 34 Tuesday, June 17, 2003 7:31 PM
34 EN
RECORDING MENUS
Zooming
Camera Menu
ZOOM (Factory-preset: 40X)
10X: When set to “10X”, only the optical zoom
CAMERA
magnification is engaged.
40X*: Allows you to use the Digital Zoom. By
digitally processing and magnifying images,
Recording mode
zooming is possible from 10X (the optical zoom
Allows you to set the recording mode (SP or LP)
limit), to a maximum of 40X digital magnification.
depending on your preference.
200X*: Allows you to use the Digital Zoom. By
REC MODE (Factory-preset: SP)
digitally processing and magnifying images,
SP: Standard Play
zooming is possible from 10X (the optical zoom
limit), to a maximum of 200X digital
LP: Long Play—more economical, providing 1.5
magnification.
times the recording time.
* Not available when the Recording Mode Switch
NOTES:
is set to “HI-RES” or “MEMORY”.
● Audio Dubbing (墌 pg. 58) and Insert Editing
(墌 pg. 59) are possible on tapes recorded in the
Gain up
SP mode.
● If the recording mode is switched during
GAIN UP (Factory-preset: AGC)
recording, the playback picture will be blurred at
OFF: Allows you to shoot dark scenes with no
the switching point.
picture brightness adjustment.
● It is recommended that tapes recorded in the LP
AGC: The overall appearance may be grainy, but
mode on this camcorder be played back on this
the image is bright.
camcorder.
● During playback of a tape recorded on another
camcorder, blocks of noise may appear or there
Navigation time
may be momentary pauses in the sound.
NAVIGATION (Factory-preset: MANUAL)
5SEC / 15SEC / 30SEC / 60SEC:
Sound mode
The captured image is stored in the memory card
DV SOUND (Factory-preset: 12 bit)
as a thumbnail image when the recording time is
over the navigation time.
12 bit: Enables video recording of stereo sound
on four separate channels, and is recommended
For example, “5SEC” is suitable to record short
for use when performing Audio Dubbing.
scenes with the thumbnail images. (墌 pg. 50)
(Equivalent to the 32 kHz mode of previous
However, the stored thumbnail images may take
models)
up a lot of memory. In this case, using the
memory card with large capacity is
16 bit: Enables video recording of stereo sound
recommended.
on two separate channels. (Equivalent to the 48
kHz mode of previous models)
MANUAL: Enables thumbnail images to be made
manually. (墌 pg. 50)
Aspect ratio
Allows you to select the aspect ratio when recording
in PS50 mode.
PS50 (Factory-preset: 4:3)
4:3: Image is recorded in 4:3 aspect ratio.
16:9: Image is recorded in 16:9 aspect ratio.
NOTE:
When playing back on a TV, set the corresponding
aspect ratio manually on the connected TV.
Master Page: Right
GR-PD1PAL.book Page 35 Tuesday, June 17, 2003 7:31 PM
EN 35
5-Second Recording
Manual Menu
Record a vacation or an important event in 5-second
clips to keep the action moving. This function is
MANUAL
available only when the Recording Mode Switch is
set to “DV”.
1 Set “5S” to “5S”. (墌 pg. 33)
Optical Image Stabilisation
● “5S” appears.
To compensate for unstable images caused by
2 Press the Recording Start/Stop Button to start
camera-shake, particularly at high magnification.
recording, and after 5 seconds the camcorder
OIS (Factory-preset: ON)
enters Record-Standby mode automatically.
● Even if you press the Recording Start/Stop
OFF / ON
Button again within 5 seconds after recording
NOTES:
starts, Record-Standby mode is not engaged.
● Accurate stabilisation may not be possible if hand
3 To exit the 5S mode, select “OFF” in step 1.
shake is excessive, or under the following
conditions:
To take a snapshot in the 5-second recording
• When shooting subjects with vertical or
mode…
horizontal stripes.
Instead of pressing the Recording Start/Stop Button
• When shooting dark or dim subjects.
in step 2, press SNAPSHOT. The camcorder records
• When shooting subjects with excessive
a 5-second still. When “5S” is set to “Anim.”, this
backlighting.
function is not available.
• When shooting scenes with movement in
5S (Factory-preset: OFF)
various directions.
OFF: Disables 5-Second Recording.
• When shooting scenes with low-contrast
5S: Enables 5-Second Recording.
backgrounds.
● Switch off this mode when recording with the
Anim.: Allows you to record a few frames only. By
camcorder on a tripod.
using an inanimate object and changing its
● The “ ” indicator blinks or goes out if the
position between shots, you can record the
Stabiliser cannot be used.
subject as though it is moving.
NOTE:
Self-Timer
When “5S” is set to “Anim.”, the 5-Second
Recording mode is not available. Animation
For details, refer to “Self-Timer” (墌 pg. 41).
recording of a few frames only is taken instead.
SELF-TIMER (Factory-preset: OFF)
ADVANCED FEATURES
OFF / ON
Maximum telephoto setting
Usually the distance to a subject where the lens is in
focus depends on the zoom magnification. Unless
there is a distance more than 1 m to the subject, the
lens is out of focus at the maximum telephoto
setting.
TELE MACRO (Factory-preset: OFF)
OFF: Disables the function.
ON: When set to “ON”, you can shoot a subject
as large as possible at a distance of approx. 60 cm.
NOTE:
Depending on the zoom position, the lens may go
out of focus.
Master Page: Left
GR-PD1PAL.book Page 36 Tuesday, June 17, 2003 7:31 PM
36 EN
RECORDING MENUS (cont.)
Wide mode
System Menu
DV WIDE (Factory-preset: OFF)
OFF: Records with no change in the screen ratio.
SYSTEM
For playback on a TV with a normal screen ratio.
SQUEEZE* : For playback on TVs with an
aspect ratio of 16:9. Naturally expands the image
Beep, melody and shutter sound
to fit the screen without distortion. The
indicator appears. When using this mode, refer to
BEEP (Factory-preset: OFF)
your wide-screen TV’s instruction manual. During
OFF: Even though not heard while shooting,
playback/recording on 4:3 TVs/LCD monitor/
shutter sound is recorded on the tape.
viewfinder, the image is elongated vertically.
BEEP: The beep sounds when the power is turned
* Not available when the Recording Mode Switch
on or off, and at the beginning and end of
is set to “HI-RES” or “MEMORY”.
recording. It also activates the shutter sound
effect. (墌 pg. 26, 42)
Wind cut
MELODY: Instead of a beep, a melody sounds
when any operation is performed. It also activates
WIND CUT (Factory-preset: OFF)
the shutter sound effect. (墌 pg. 26, 42)
OFF: Disengages the function.
ON : Helps cut down on noise created by
Tally lamp setting
wind. The “ ” indicator appears. The quality of
the sound will change. This is normal.
TALLY (Factory-preset: ON)
OFF: The tally lamp remains off at all times.
ON: The tally lamp comes on to signal the start of
recording.
Remote control setting
For details, refer to “USING THE REMOTE
CONTROL UNIT” (墌 pg. 56).
REMOTE (Factory-preset: ON)
OFF: Disables the remote control operations.
ON: Enables the remote control operations.
Priority setting
When the viewfinder is pulled out while the LCD
monitor is opened, you can select which one to use.
PRIORITY (Factory-preset: LCD)
LCD: Allows you to use the LCD monitor.
FINDER: Allows you to use the viewfinder.
BOTH: Allows you to use both the LCD and
viewfinder.
Master Page: Right
GR-PD1PAL.book Page 37 Tuesday, June 17, 2003 7:31 PM
EN 37
Component video output setting
Display Menu
When connecting the camcorder to a TV or video
unit equipped with component video inputs
(墌 pg. 24), select the output picture size depending
CAMERA DISPLAY
on the connected TV or video unit.
Y/Pb/Pr (Factory-preset: 576/50P)
Brightness adjustment of the display
576/50P: Signals are output in progressive scan
mode.
BRIGHT
576/50i: Signals are output in interlace scan
For details, refer to “Brightness Adjustment Of The
mode.
Display” (墌 pg. 13).
S-Video output setting
Display setting
When connecting the camcorder to a 4:3 TV or
ON SCREEN (Factory-preset: LCD/TV)
wide-screen TV using the S/AV/Editing cable
LCD: Keeps the camcorder’s display (except the
(墌 pg. 24), select the aspect ratio of the connected
date, time and time code) from appearing on the
TV.
connected TV screen.
S/VIDEO (Factory-preset: 4:3 TV)
LCD/TV: Makes the camcorder’s display appear
16:9 TV: For a TV which has an aspect ratio of
on screen when the camcorder is connected to a
16:9.
TV.
4:3 TV: For a TV which has an aspect ratio of 4:3.
Date and time display setting
i.LINK output setting
DATE/TIME (Factory-preset: AUTO)
During digital tape dubbing, select whether the
OFF: The date/time does not appear.
video signal outputs according to the Switch setting.
AUTO: Displays the date/time for approx.
i.LINK OUT (Factory-preset: SW)
5 seconds when the Power Switch is set from
SW: Normally, set to this position. Outputs the DV
“OFF” to “A” or “M”.
or MPEG2 format signal selected with the i.LINK
ON: The date/time is always displayed.
OUT Switch.
AUTO: For future use. If the connected video unit
Time code setting
automatically detects the input signal via an
i.LINK connector, set to “AUTO”.
TIME CODE (Factory-preset: OFF)
ADVANCED FEATURES
OFF: Time code is not displayed.
Resetting menu settings
ON: Time code is displayed on the camcorder
and on the connected TV. Frame numbers are not
CAM RESET
displayed during recording.
EXECUTE: Resets all settings to the factory-preset.
RETURN: Does not reset all settings to the factory-
Clock adjustment
preset.
CLOCK ADJ.
Allows you to set the current date and time.
(墌 pg. 15)
Master Page: Left
GR-PD1PAL.book Page 38 Tuesday, June 17, 2003 7:31 PM
38 EN
RECORDING MENUS (cont.)
MultiMediaCard
DSC Menu
Image Size/Picture Quality
8 MB* 16 MB* 32 MB*
640 x 480/FINE 36 74 149
DSC
640 x 480/STANDARD 95 192 388
848 x 480/FINE 29 60 121
Picture quality
848 x 480/STANDARD 79 160 323
The Picture Quality mode can be selected to best
match your needs. Two Picture Quality modes are
1280 x 720/FINE 12 24 49
available: FINE ( ) and STANDARD ( ) (in order
1280 x 720/STANDARD 31 64 129
of quality).
1280 x 960/FINE 9 18 37
QUALITY (Factory-preset: FINE)
FINE / STANDARD
1280 x 960/STANDARD 23 48 97
NOTE:
* Optional
The number of storable images depends on the
** Provided
selected picture quality as well as the composition
of the subjects in the images and the type of memory
Recording media selection
card being used. (墌 pg. 42)
REC SELECT (Factory-preset: )
Image size
: When Snapshot recording is performed with
the Recording Mode Switch set to “HI-RES”,
The Image Size mode can be selected to best match
“PS50” or “DV”, still images are recorded only
your needs.
onto the tape.
IMAGE SIZE (Factory-preset: 1280 x 960)
/ : When Snapshot recording is
640 x 480 / 1280 x 960
performed with the Recording Mode Switch set to
NOTES:
“HI-RES”, “PS50” or “DV”, still images are
● The settings can be changed only when the
recorded not only onto the tape but also in the
Recording Mode Switch is set to “MEMORY”.
memory card (1280 x 720 pixels in HI-RES mode,
● To shoot still images in 848 x 480 pixels or
848 x 480 pixels in PS50 mode, 640 x 480 pixels
1280 x 780 pixels, set “REC SELECT” to " /
in DV mode).
" (墌 “Recording media selection”), set the
Recording Mode Switch to “PS50” or “HI-RES”.
(墌 “Snapshot (For Video Recording)”, pg. 42)
Approximate Number of Storable Images
Image Size/Picture
SD Memory Card
Quality
8 MB** 16 MB* 32 MB* 64 MB*
640 x 480/FINE 30 68 144 297
640 x 480/
80 178 376 772
STANDARD
848 x 480/FINE 25 55 117 241
848 x 480/
66 148 313 643
STANDARD
1280 x 720/FINE 10 22 48 99
1280 x 720/
26 59 125 257
STANDARD
1280 x 960/FINE 7 17 36 74
1280 x 960/
20 44 94 193
STANDARD
Master Page: Right-Heading0
GR-PD1PAL.book Page 39 Tuesday, June 17, 2003 7:31 PM
PLAYBACK MENUS
EN 39
Synchro adjustment
Video Menu
For details, refer to “For More Accurate Editing”
(墌 pg. 64).
VIDEO
SYNCHRO (Factory-preset: ±0.0)
Recording mode
Playback sound
Allows you to set the video recording mode (SP or
During tape playback, the camcorder detects the
LP) depending on your preference. It is
sound mode in which the recording was made, and
recommended you use “REC MODE” in VIDEO
plays the sound back. Select the type of sound to
Menu when using this camcorder as a recorder
accompany your playback picture. According to the
during dubbing. (墌 pg. 52, 54)
menu access explanation on page 33, select
“SOUND MODE” or “DV NARR.” from the Menu
REC MODE (Factory-preset: SP)
Screen and set it to the desired parameter.
SP / LP
SOUND MODE (Factory-preset: STEREO )
NOTE:
STEREO : Sound is output on both “L” and “R”
“REC MODE” can be set when the Power Switch is
channels in stereo.
set to “P” or “M”.
SOUND L : Sound from the “L” channel is
output.
Dubbing from tape to memory card
SOUND R : Sound from the “R” channel is
output.
COPY (Factory-preset: OFF)
OFF: When the SNAPSHOT button is pressed
DV NARR. (Factory-preset: OFF)
during tape playback, the playback image pauses
OFF: Original sound is output on both “L” and
and normal playback will resume after
“R” channels in stereo.
approximately 6 seconds. (The still image is not
ON: Dubbed sound is output on both “L” and “R”
recorded.)
channels in stereo.
ON: Enables dubbing of images recorded on a
MIX: Original and dubbed sounds are combined
tape to a memory card. (墌 pg. 55)
and output in stereo on both “L” and “R”
channels.
Deleting thumbnail images
NOTES:
For details, refer to “To delete thumbnail images”
● The “SOUND MODE” setting is available for both
(墌 pg. 51).
12-bit and 16-bit sound. (In previous models’
ADVANCED FEATURES
functions, “12-bit” is called “32 kHz” and “16-bit”
NAVI.DEL.
is called “48 kHz”.)
IMAGE SEL. / TAPE SEL. / ALL / RETURN
● The camcorder cannot detect the sound mode in
which the recording was made during fast-forward
S-Video/AV input
or rewind. During playback the sound mode is
displayed in the upper left corner.
S/AV INPUT (Factory-preset: OFF)
OFF: Enables audio/video signal output to a TV,
VCR, etc. via the S/AV connector. (墌 pg. 24, 52)
A/V IN: Enables audio and video signal input
from the S/AV connector. (墌 pg. 52)
S IN: Enables audio and S-video signal input from
the S/AV connector.
Master Page: Left
GR-PD1PAL_07Advanced.fm Page 40 Thursday, June 19, 2003 2:28 PM
40 EN
PLAYBACK MENUS (cont.)
TIME CODE (Factory-preset: OFF)
System Menu
OFF / ON
NOTE:
SYSTEM
The date indication can also be turned on/off by
pressing the DISPLAY Button on the remote control
Each setting is linked with “s”, which appears
(provided). (墌 pg. 25, 52, 61)
when the Power Switch is set to “M”. (墌 pg. 33) The
parameters are the same as in the description on
Display
page 36.
ON SCREEN Setting:
DV 2
1
bi t /DV NARR.
4
BEEP (Factory-preset: OFF)
L
For playback mode,
playback sound, tape
OFF / BEEP / MELODY
speed and tape running
TALLY (Factory-preset: ON)
during video playback.
OFF / ON
REMOTE (Factory-preset: ON)
OFF / ON
DATE/TIME Setting:
PRIORITY (Factory-preset: LCD)
For date/time.
LCD / FINDER / BOTH
Y/Pb/Pr (Factory-preset: 576/50P)
576/50P / 576/50i
S/VIDEO (Factory-preset: 4:3 TV)
52
30..21
16:9 TV / 4:3 TV
1:
7
03
i.LINK OUT (Factory-preset: SW)
TIME CODE Setting:
SW / AUTO
For time code.
CAM RESET
EXECUTE / RETURN
Minutes
Seconds
Frames*
Display Menu
12 : 34 : 24
* 25 frames = 1 second
VIDEO DISPLAY
The parameters (except “OFF” in ON SCREEN
settings) are the same as in the description on
page 37.
Brightness adjustment of the display
BRIGHT
For details, refer to “Brightness Adjustment Of The
Display” (墌 pg. 13).
ON SCREEN (Factory-preset: LCD)
OFF / LCD / LCD/TV
When set to “OFF”, the camcorder’s display
disappears.
DATE/TIME (Factory-preset: OFF)
OFF / AUTO / ON
When set to “AUTO”, the date/time are displayed
in the following cases:
•When playback starts. The camcorder displays
the date/time when scenes are recorded.
•When the date is changed during playback.


