Ariston CE6VM3 R/HA: S t a rt - up a n d u s e
S t a rt - up a n d u s e: Ariston CE6VM3 R/HA

GB
1
7
S t a rt - up a n d u s e
The first time you use your appliance, heat the
empty oven with its door closed at its ma
x
imum
temperature for at least half an hour. Ensure that the
room is well ventilated before switching the oven off
and opening the oven door. The appliance may emit
a slightly unpleasant odour caused by protective
substances used during the manufacturing process
burning away.
B
efore operating the product, remove all plastic film
from the sides of the appliance.
S
t
a
r
t
i
n
g
t
h
e
o
v
en
1. Select the desired cooking mode by turning the
SELECT
O
R knob.
2. Select the recommended temperature for the
cooking mode or the desired temperature by turning
the T
H
ERM
O
STAT knob.
A list detailing cooking modes and suggested
cooking temperatures can be found in the relevant
table (
see Oven cooking advice table
).
D
uring cooking it is always possible to:
Change the cooking mode by turning the
SELECT
O
R knob.
Change the temperature by turning the
T
H
ERM
O
STAT knob.
Set the total cooking time and the cooking end
time (
see below
).
Stop cooking by turning the SELECT
O
R knob to
the 0 position.
N
ever put objects directly on the bottom of the
oven; this will prevent the enamel coating from being
damaged.
O
nly use position 1 in the oven when
cooking with the rotisserie spit.
Always place cookware on the rack(s) provided.
T
H
ERM
O
ST
A
T
in
d
icator
li
gh
t
W
hen this is illuminated, the oven is generating
heat. It switches off when the inside of the oven
reaches the selected temperature. At this point the
light illuminates and switches off alternately,
indicating that the thermostat is working and is
maintaining the temperature at a constant level.
O
v
en
li
gh
t
This is switched on by turning the SELECT
O
R knob
to any position other than 0. It remains lit as long
as the oven is operating.
B
y selecting
&
with the
knob, the light is switched on without any of the
heating elements being activated.
C
oolin
g
v
entilation
In order to cool down the e
x
ternal temperature of the oven,
a cooling fan blows a jet of air between the control panel
and the oven door.
O
nce cooking has been completed, the cooling fan
continues to operate until the oven has cooled down
sufficiently.
*
O
nly available in certain models.

1
8
GB
Coo
k
ing
modes
A temperature value can be set for all cooking
modes
between 60°C and Ma
x
, e
x
cept for the following
modes
T
O
P
O
VE
N
and GRILL (recommended: set only to
MAX power level).
GRATI
N
(recommended: do not e
x
ceed 200°C).
TRADITIONAL
OVEN
mode
B
oth the top and bottom heating elements will come
on.
W
hen using this traditional cooking mode, it is
best to use one cooking rack only. If more than one
rack is used, the heat will be distributed in an
uneven manner.
MULTILEVEL
mode
All the heating elements (top, bottom and circular)
switch on and the fan begins to operate. Since the
heat remains constant throughout the oven, the air
cooks and browns food in a uniform manner. A
ma
x
imum of two racks may be used at the same
time.
TOP
OVEN
mode
The central part of the top heating element is
switched on. The high and direct temperature of the
grill is recommended for food that requires a high
surface temperature (veal and beef steaks, fillet
steak and entrecôte). This cooking mode uses a
limited amount of energy and is ideal for grilling
small dishes. Place the food in the centre of the
rack, as it will not be cooked properly if it is placed
in the corners.
GRILL
mode
The central part of the top heating element is
switched on. The high and direct temperature of the
grill is recommended for food that requires a high
surface temperature (veal and beef steaks, fillet
steak and entrecôte). This cooking mode uses a
limited amount of energy and is ideal for grilling
small dishes. Place the food in the centre of the
rack, as it will not be cooked properly if it is placed
in the corners.
GRATIN
mode
The top heating element and the fan will begin to
operate. This combination of features increases the
effectiveness of the unidirectional thermal radiation
provided by the heating elements through forced
circulation of the air throughout the oven. This helps
prevent food from burning on the surface and allows
the heat to penetrate right into the food.
The T
O
P
O
VE
N
, GRILL and GRATI
N
cooking
modes must be performed with the oven door shut.
W
hen using the T
O
P
O
VE
N
and GRILL cooking
modes, place the rack in position 5 and the dripping
pan in position 1 to collect cooking residues (fat
and
/
or grease).
W
hen using the GRATI
N
cooking
mode, place the rack in position 2 or 3 and the
dripping pan in position 1 to collect cooking
residues.
C
oo
k
in
g
on
se
v
e
ral
s
h
e
lv
es
sim
ulta
neo
u
s
ly
If it is necessary to use two racks, use the
MULTILEVEL cooking mode, as this is the only
cooking mode suited to this type of cooking.
W
e
also recommend that:
Positions 1 and 5 are not used. This is because
e
x
cessive direct heat can burn temperature
sensitive foods.
Positions 2 and 4 are used and that food that
requires more heat is placed on the rack in
position 2.
W
hen cooking foods that require different cooking
times and temperatures, set a temperature that is
halfway between the two recommended
temperatures (
see Oven cooking advice table
)
and place the more delicate food on the rack in
position 4. Remove the food that requires a
shorter cooking time first.
W
hen cooking pizzas on several racks with the
temperature set to 220°C, the oven is preheated
for 15 minutes. Generally speaking, cooking on
the rack in position 4 takes longer: we
recommend that the pizza cooked on the lowest
rack position is removed first, followed by the
pizza cooked in position 4 a few minutes later.
Place the dripping pan on the bottom and the rack
on top.
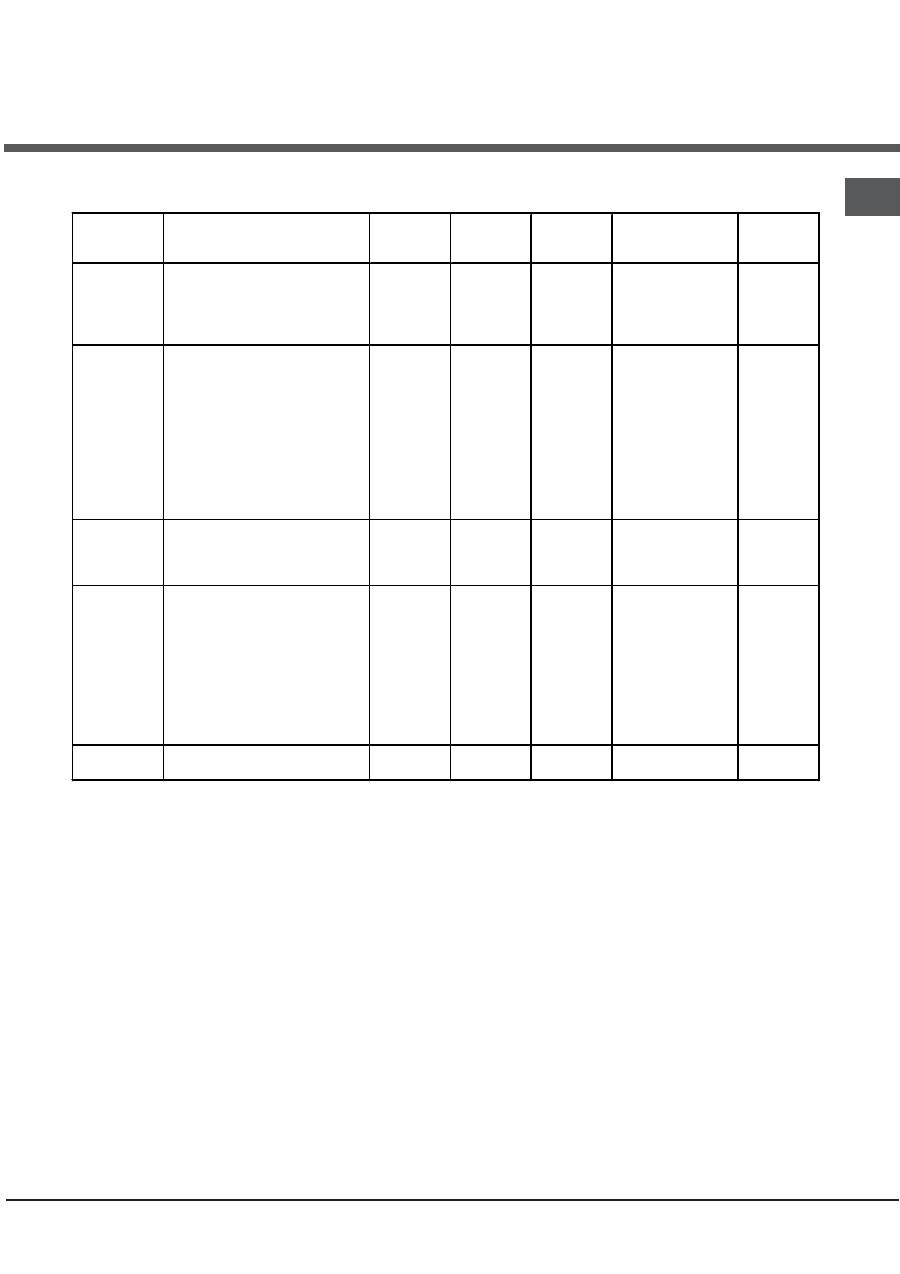
G
B
19
O
v
en
c
oo
k
i
n
g
a
dv
i
c
e
t
a
b
le
Cooking
modes
Foods
Weight
(in kg)
Rack
position
Preheating
time
(minutes)
Recommended
temperature
Cooking
duration
(minutes)
Traditional
Oven
Duck
Roast veal or beef
Roast pork
Biscuits (shortcrust pastry)
Pies / Tarts
1
1
1
-
1
3
3
3
3
3
15
15
15
15
15
200
200
200
180
180
65-75
70-75
70-80
15-20
30-35
Multilevel
Pizza (on 2 racks)
Lasagne
Lamb
Roast chicken + potatoes
Mackerel
Sponge cake made with yoghurt
Cream puffs (on 2 racks)
Biscuits (on 2 racks)
Sponge cake (on 1 rack)
Sponge cake (on 2 racks)
Savoury pies
1
1
1
1+1
1
1
0.5
0.5
0.5
1
1.5
2 and 4
3
2
2 and 4
2
2
2 and 4
2 and 4
2
2 and 4
3
15
10
10
15
10
10
10
10
10
10
15
230
180
180
200
180
170
190
180
170
170
200
15-20
30-35
40-45
60-70
30-35
40-50
20-25
10-15
15-20
20-25
25-30
Top oven
Sole and cuttlefish
Squid and prawn kebabs
Cod fillet
Grilled vegetables
1
1
1
1
4
4
4
3/4
5
5
5
5
Max
Max
Max
Max
8-10
6-8
10
10-15
Grill
Sole and cuttlefish
Squid and prawn kebabs
Cuttlefish
Cod fillet
Grilled vegetables
Veal steak
Sausages
Hamburgers
Mackerel
Toasted sandwiches (or toast)
0.7
0.6
0.6
0.8
0.4
0.8
0.6
0.6
1
4 and 6
4
4
4
4
3 or 4
4
4
4
4
4
-
-
-
-
-
-
-
-
-
-
Max
Max
Max
Max
Max
Max
Max
Max
Max
Max
10-12
8-10
10-15
10-15
15-20
15-20
15-20
10-12
15-20
3-5
Gratin
Grilled chicken
Cuttlefish
1.5
1.5
2
2
10
10
200
200
55-60
30-35
Оглавление
- I n s t allazione
- D escrizione dellapparecchio
- Avv io e u t ilizzo
- T i m e r a n a lo g i c o
- U t ilizzo d el piano c o tt u r a v e tr o c e r a mica
- P reca u zioni e consigli
- Ma n u t enz i one e c u r a
- A ssistenza
- Op e r a t i n g I n s tr uc t i on s
- I n s t a ll a t i on
- D escri p tion o f t h e a pp liance
- S t a rt - up a n d u s e
- A n a lo gu e t i m e r
- U s i n g t h e g l a ss c e r ami c h o b
- P r e ca u t ions a nd t ips
- C a r e a n d mai n t en a n c e
- Ð óê îâîäñòâî ïî ýêñïëóàòàöèè
- Ì îí ò à æ
- Î ï èñàíè å èçäåëèÿ
- Âêëþ÷åíèå è ýêñïëóàòàöèÿ
- À íàë î ã î âûé òàé ì åð
- Ñ òåêë î êåðà ì è÷åñêàÿ âàð î ÷íàÿ ïàíåëü
- Ïðåä î ñò î ð î æí î ñòè è ðåê î ì åíäàöèè
- Ò å õ íè÷åñê î å î áñëóæèâàíèå è ó õ î ä
- H asználati ú tm u tató
- Ü ze mb e h el y ezés
- A k ész ü lé k le í r á sa
- B e k a pc s o l á s és h asz n á lat
- An al ó g i d õ z í tés
- A z ü v eg k er á m i a fõ z õ la p h asz n á lata
- Óv in téz k e d ése k és ta n á c s ok
- K ar b a n tart á s és á p o l á s
- Instrukcja obs∏ugi
- Instalacja
- Opis kuchni
- Uruchomienie i obs∏uga kuchni
- Analogowy minutnik
- Uruchomienie i obs∏ugap∏yty ceramicznej
- Ârodki ostro˝noÊci i porady
- Konserwacja i czyszczeniekuchni serwis
- Ïäçãßåò ÷ñÞóçò
- ÅãêáôÜóôáóç
- ÐåñéãñáöÞ ôçò óõóêåõÞò
- Åêêßíçóç êáé ÷ñÞóç
- Timer áíáëïãéêü
- ×ñÞóç ôçò õáëïêåñáìéêÞòåðéöÜíåéáò ìáãåéñÝìáôïò
- ÐñïöõëÜîåéò êáéóõìâïõëÝò
- ÓõíôÞñçóç êáé öñïíôßäá
