Sony Bravia KDL-32D3010: Sockets Input symbol on Description screen
Sockets Input symbol on Description screen: Sony Bravia KDL-32D3010
Table of contents
- Introduction Notice for Digital TV function Disposal of the TV set
- Start-up Guide 1: Checking the 2: Connecting an aerial/ accessories cable/VCR
- 3: Preventing the TV 5: Performing the initial from toppling over setup 4: Bundling the cables Selecting the language and country/ region
- To tune the TV for digital cable connection Auto-tuning the TV Detaching the Table- Top Stand from the TV
- Safety information
- Prohibited Usage Precautions Broken pieces: When not in use For children If the following problems occur...
- Overview of the remote
- Overview of the TV buttons and indicators
- Watching TV Additional operations
- To change the screen format manually to suit the broadcast Using the Tools menu
- Checking the Digital Electronic Programme Guide (EPG) * To Do this
- To Do this
- Using the Digital Favourite list *
- Connecting optional equipment
- Sockets Input symbol on Description screen
- Viewing pictures from the connected equipment
- Using HDMI control
- Navigating through menus
- Picture menu
- Colour Temperature
- Sound menu
- Dual Sound
- Screen menu
- Set-up menu
- AV Set-up
- HDMI Set-up
- All Reset
- PC Settings menu
- Analogue Set-up menu
- Manual Programme Preset
- Skip
- Digital Set-up menu
- Digital Set-up
- Specifications
- PC Input Signal Reference Chart
- Troubleshooting
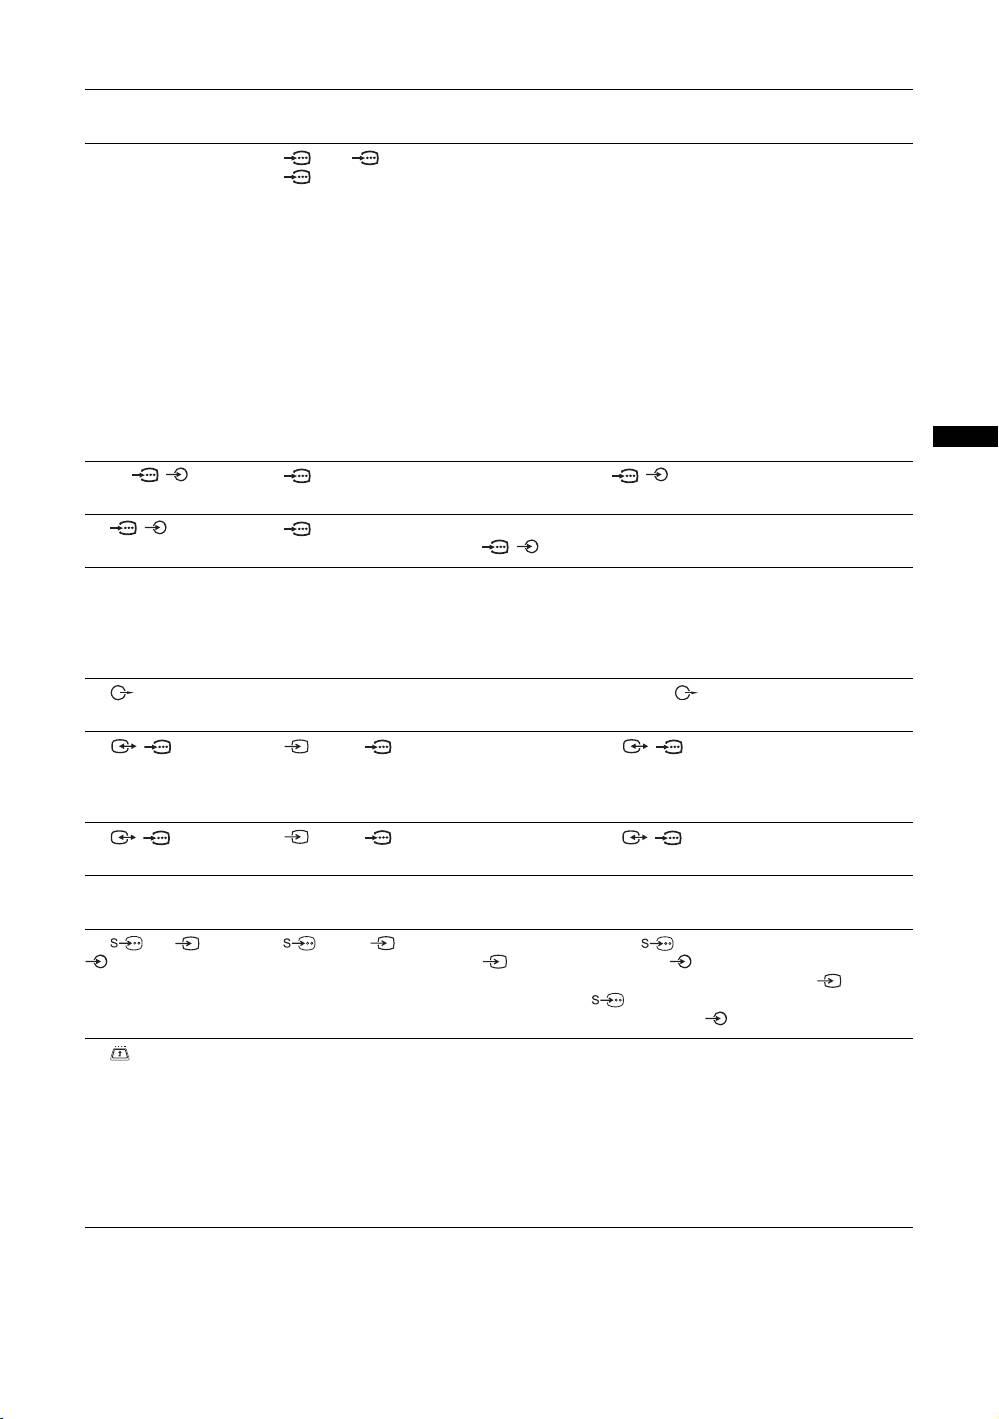
Sockets Input symbol on
Description
screen
A HDMI IN 4 or 5
AV4, AV5 or
Connect to the HDMI IN 4, 5 or 7 socket if the equipment has a
J HDMI IN 7
AV 7
HDMI socket. The digital video and audio signals are input
from the equipment. In addition, when HDMI control
compatible equipment is connected, communication with the
connected equipment is supported. Refer to page 28 to set up
this communication. If the equipment has a DVI socket,
connect the DVI socket to the HDMI IN 5 socket through a
DVI - HDMI adaptor interface (not supplied), and connect the
equipment’s audio out sockets to the audio in the HDMI IN 5
sockets.
~
• The HDMI sockets only support the following video inputs: 480i,
480p, 576i, 576p, 720p, 1080i, 1080p and 1080/24p.
• Be sure to use only an HDMI cable that bears the HDMI logo.
• When connecting an audio system with HDMI socket, be sure to
also connect to the DIGITAL OUT socket.
Using Optional Equipment
B PC / PC Connect to the PC / socket. It is recommended to use a
PC cable with ferrites.
C / 3 AV3 Connect to the component video sockets and the audio sockets
/3.
D DIGITAL OUT
Connect to the DIGITAL OUT socket using the Optical audio
(OPTICAL)
cable.
~
Super Audio CD and DVD Audio sound may not be output
depending on the model.
E Connect to the audio output sockets to listen to the sound
from the TV on Hi-Fi audio equipment.
F / 1 AV1 or AV1 Connect to the scart / 1 socket. When you connect the
decoder, the scrambled signal from the TV tuner is output to
the decoder, then the unscrambled signal is output from the
decoder.
G / 2 AV2 or AV2 Connect to the scart / 2 socket. SmartLink is a direct
link between the TV and a VCR/DVD recorder.
H Headphones Connect to the i socket to listen to sound from the TV on
headphones.
I 6 or 6, and
AV6 or AV6 Connect to the S video 6 socket or the composite video
6
6 socket, and the audio 6 sockets. To avoid picture
noise, do not connect the camcorder to the video 6 socket
and the S video 6 socket at the same time. If you connect
mono equipment, connect to the 6 L socket.
K CAM
To use pay TV services. For details, refer to the instruction
(Conditional Access
manual supplied with your CAM.
Module)
To use the CAM, remove the “dummy” card from the CAM
slot. Turn off the TV when inserting your CAM into the CAM
slot. When you do not use the CAM, we recommend that the
“dummy” card be inserted and kept in the CAM slot.
~
CAM is not supported in some countries/regions. Check with your
authorized dealer.
GB
17
