Sony MZ-B100 – page 2
Manual for Sony MZ-B100
Table of contents
3 Press zREC.
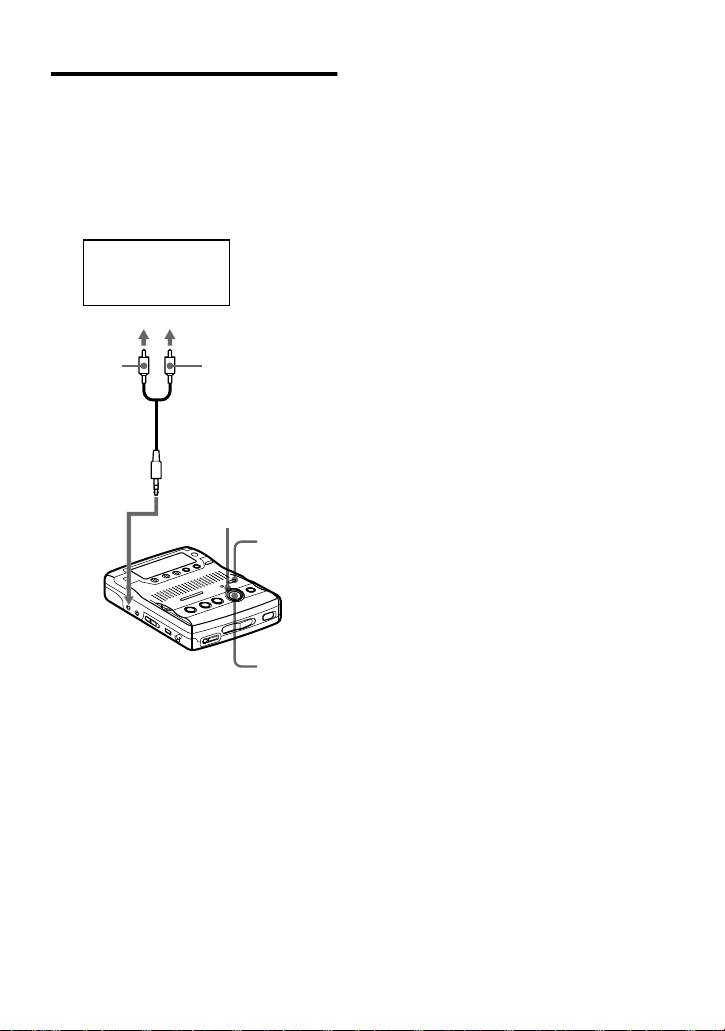
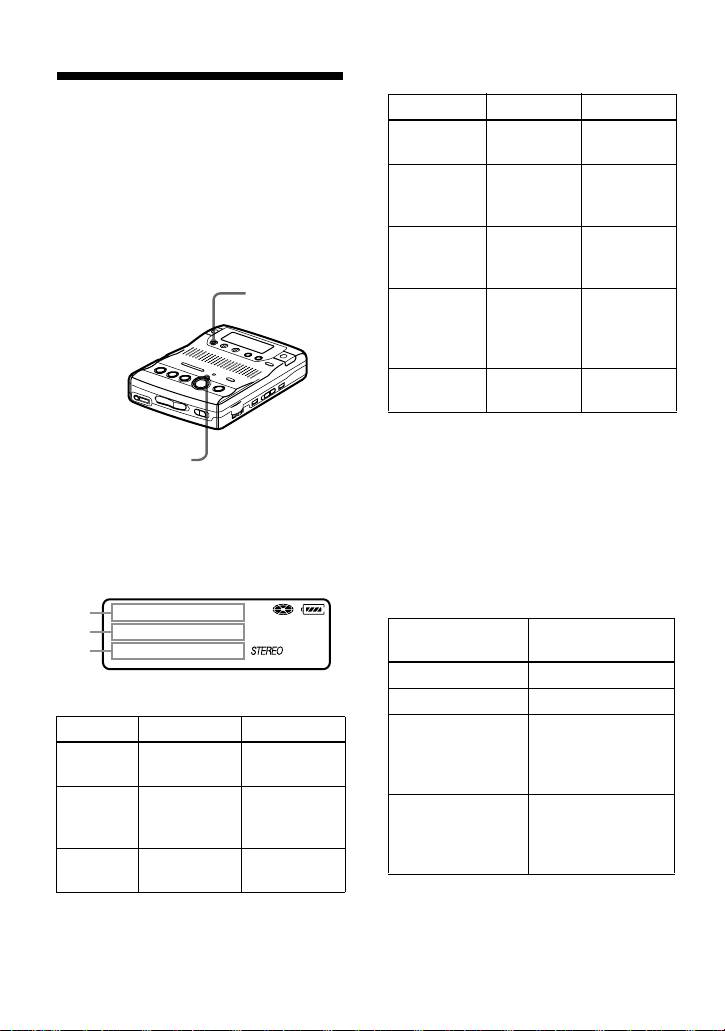
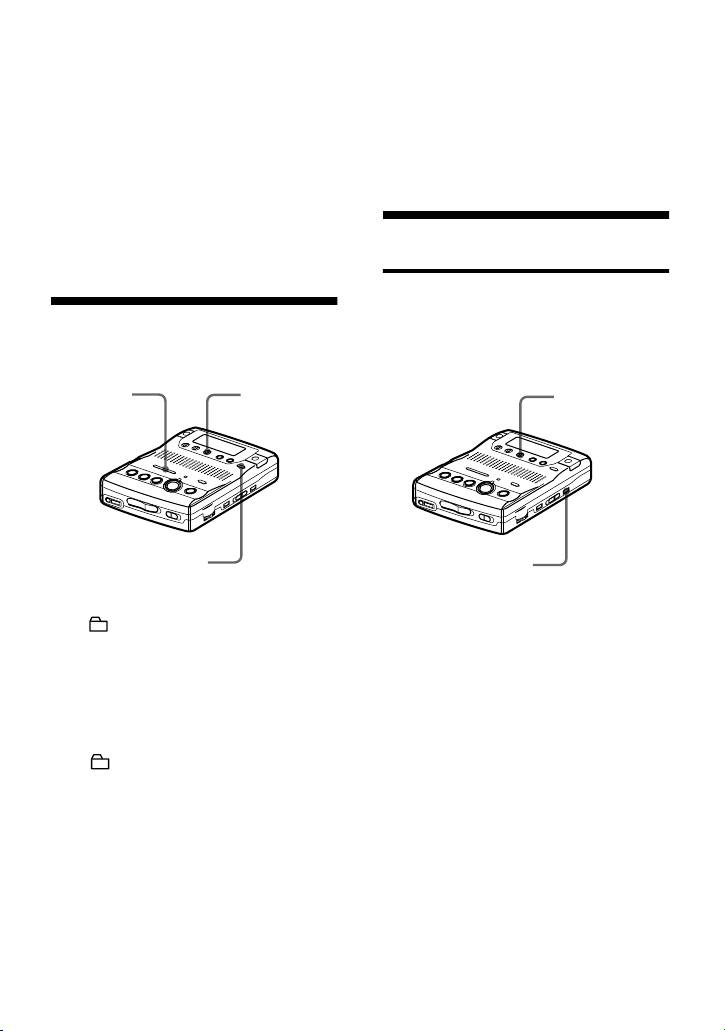
Recording with analog (line)
“REC” appears in the display, the
input (line cable required)
REC indicator lights up, and the
recording starts.
Connect the recorder with a line cable
(not supplied) to make analog recording.
4 Play the source sound.
The sound will be sent from the
For other operations on recording, see
connected equipment as analog signal but
“Recording an MD right away!”
will be sent recorded digitally on the disc.
(page 11).
CD player,
Note
cassette recorder,
A track mark is added at the point where you
etc.(source)
press the XPAUSE button again to resume
recording while pausing recording; thus the
to LINE OUT
remainder of the track will be counted as a new
track.
L (white)
R (red)
Line cable (RK-G129HG,
not supplied)*
REC
indicator
REC
MODE
to LINE IN
(OPTICAL)
zREC
∗ Use the connecting cords without an
attenuator. To connect to a portable CD
player having a stereo mini-jack, use the
RK-G136HG connecting cord (not
supplied).
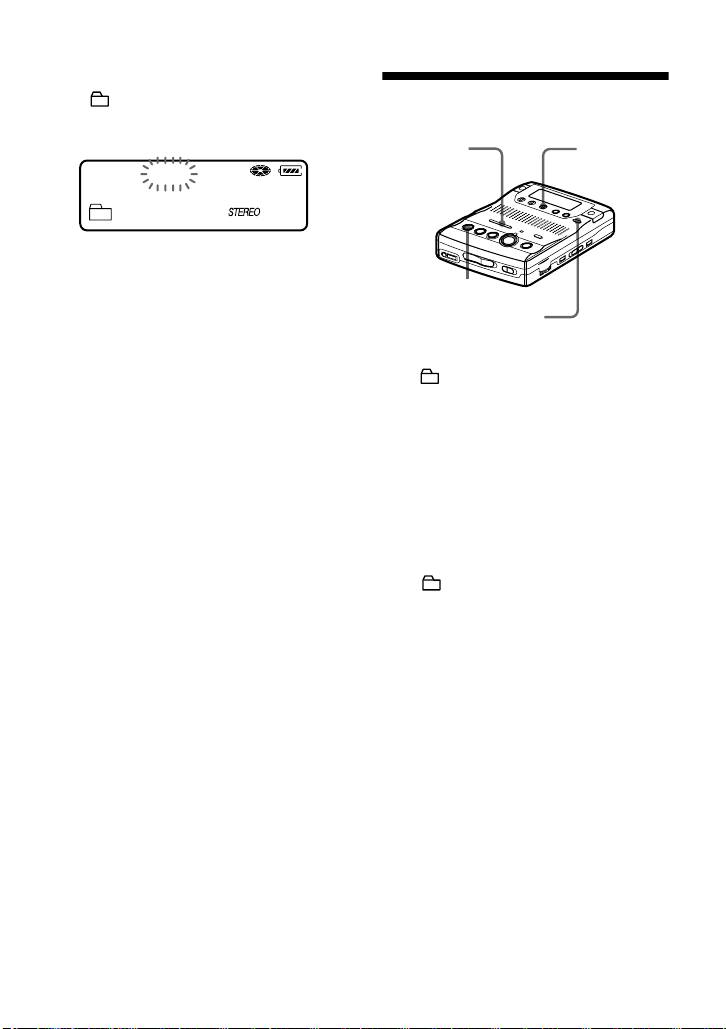
1 Insert a recordable disc.
2 Press REC MODE repeatedly until
“STEREO”, “LP2”, “LP4”, or
“MONO” lights up in the display.
For details on the recording mode, see
“Recording for long times” (page 16).
21-GB
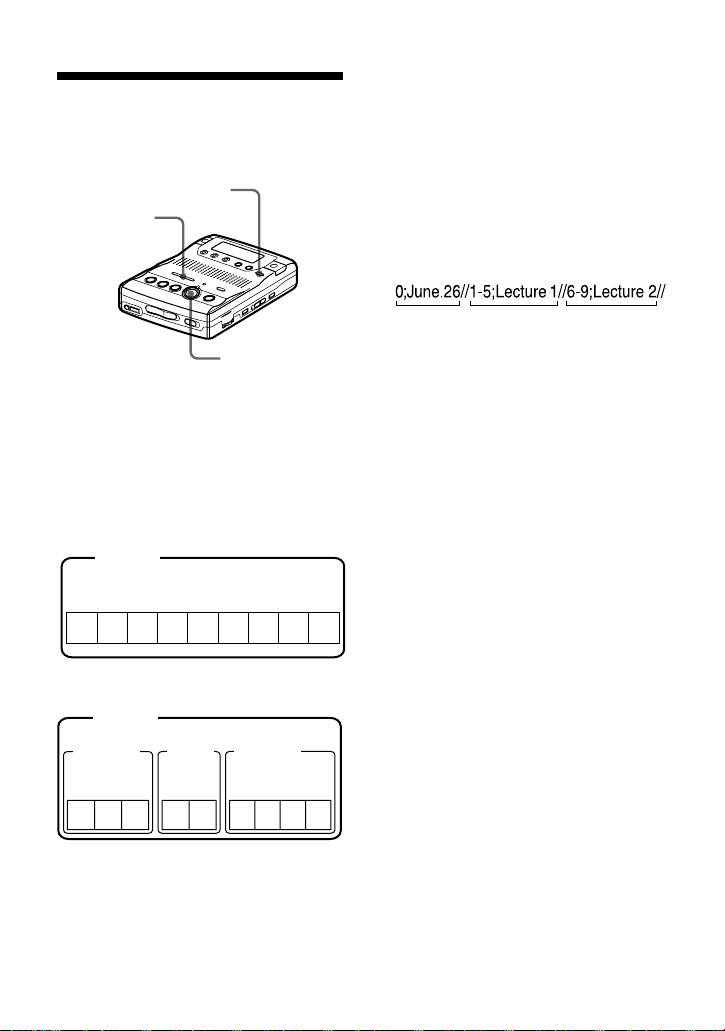
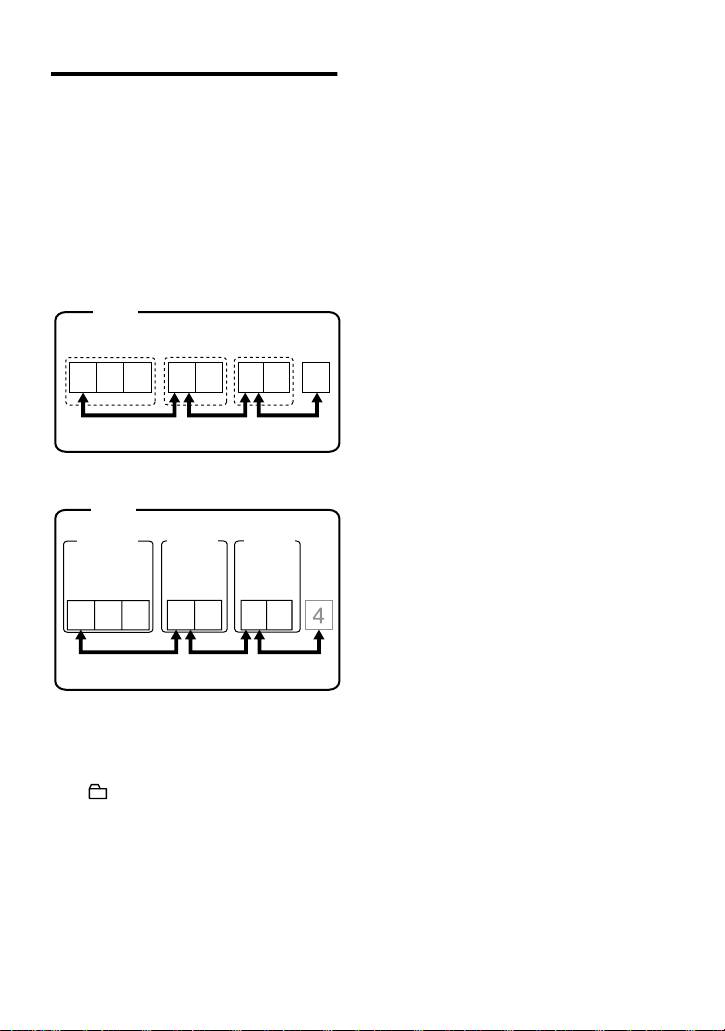
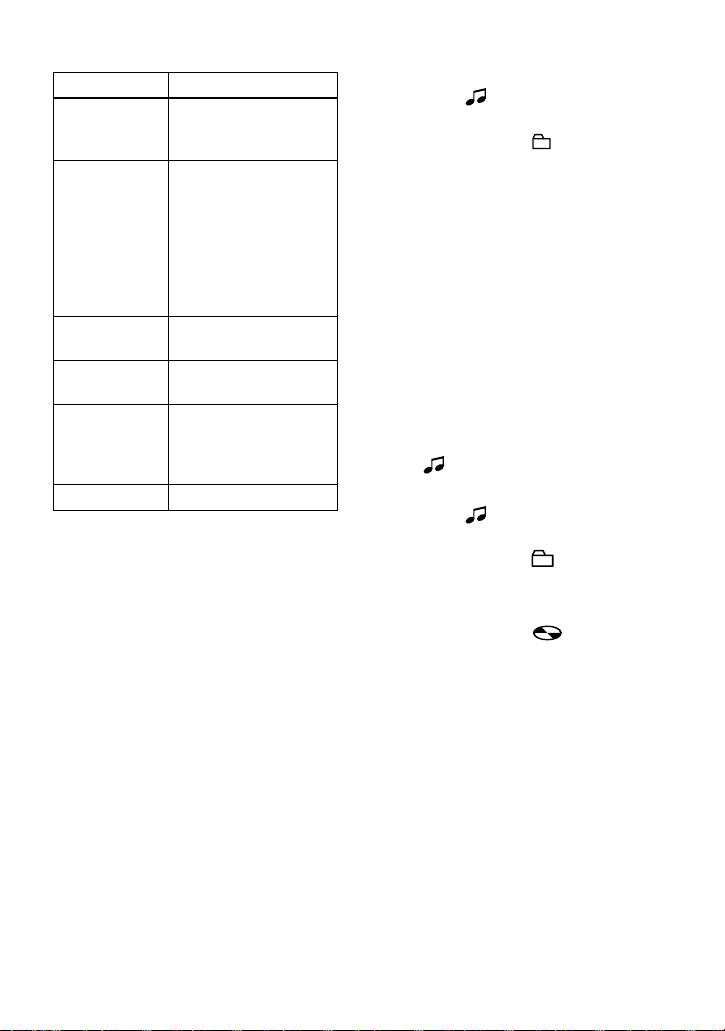
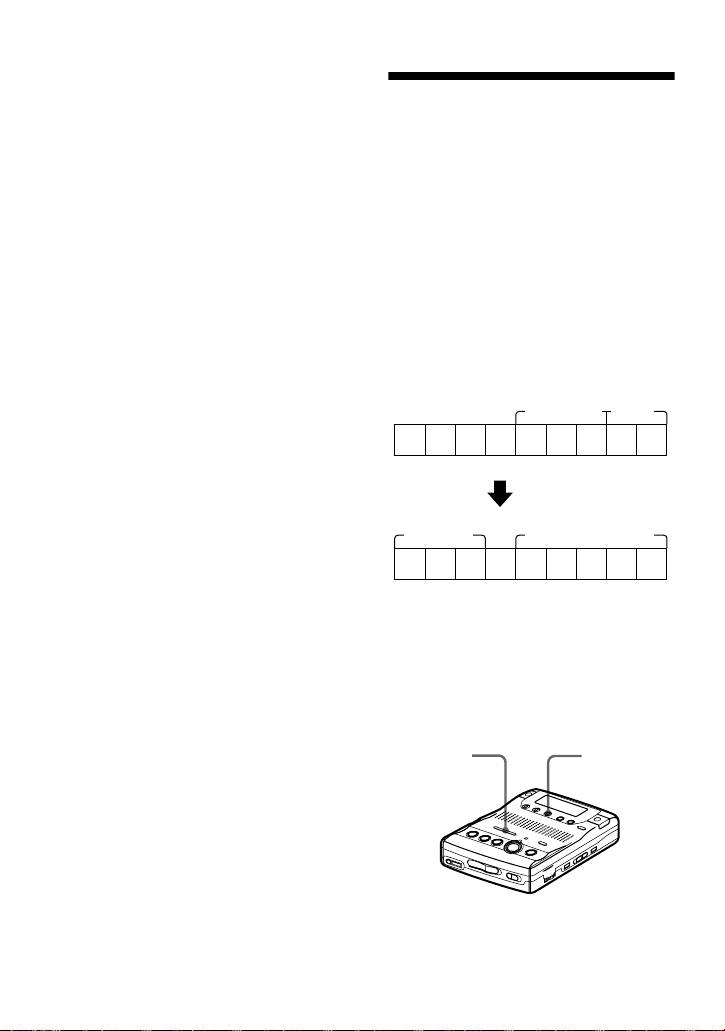
How is group information
Recording tracks using
recorded?
the Group Function
When recording in group mode, the group
(Group mode recording)
information is written to the disc name
recording area.
This information consists of text strings
GROUP
that are written as shown in the following
./>
example.
Disc name recording area
Example
123
1 Disc name: “June.26”
zREC
2 Group name for tracks 1 to 5:
“Lecture 1”
What is the group function
3 Group name for tracks 6 to 9:
(group mode)?
“Lecture 2”
It is a function that allows you to separate
Therefore, the above character string is
tracks on a disc into different groups for
displayed in its entirety as the disc name
playback, recording and editing.
if you load an MD recorded in group
mode into a system that does not support
When the Group mode is OFF.
group mode, or if you try to edit the
Disc
contents of a disc on this recorder with the
group mode turned off.
Track number
Note that if you perform the
123456
7
89
procedure for “To relabel
recordings” of “Labeling
recordings” (page 35) and rewrite
When the Group mode is ON.
this character string by mistake,
Disc
you may be unable to use the
group function of that MD.
Group 1
Group 2
Group 3
Note
Track
Track
Track
number
number
number
In group mode, the recorder treats all tracks
without group settings as belonging to the last
123
12
1234
group on the disc. The last group is indicated in
the display window on the recorder as “Group -
-”. Within a group, the tracks appear in their
order on the disc, not their order within the
It is convenient for managing multiple
group.
CD albums recorded in MDLP (LP2
stereo/LP4 stereo) mode onto a single
MD.
22-GB

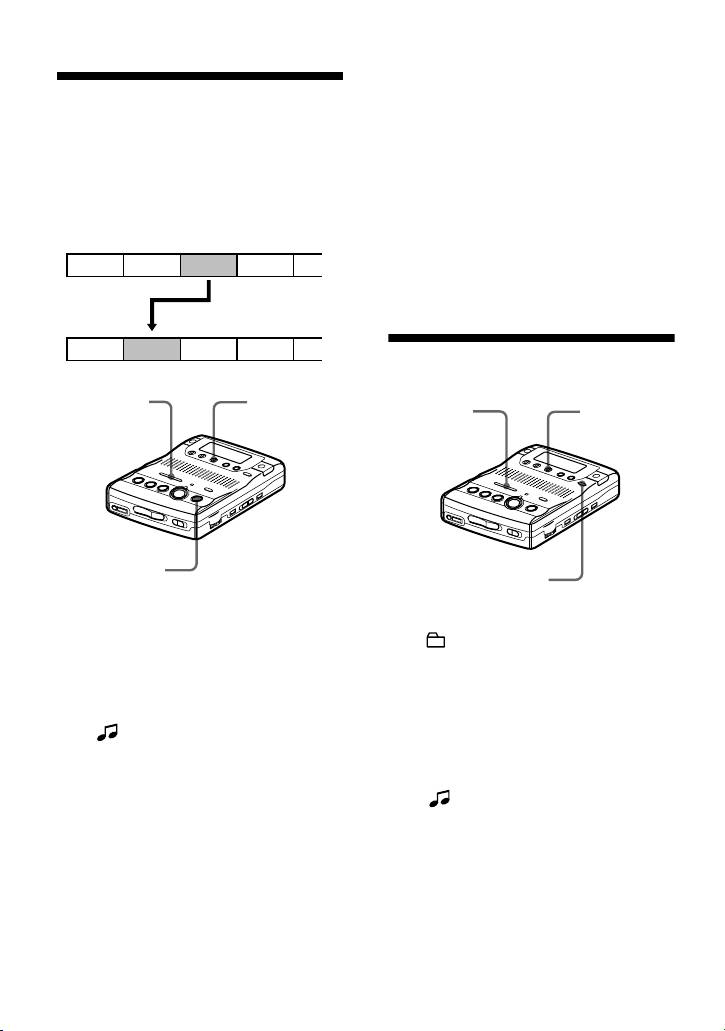
To activate the group mode
Recording a track into an
(Group mode recording)
existing group
To record tracks in group mode, you must
1 While the recorder is stopped, press
first turn the group mode on before the
GROUP for 2 seconds or more.
start of recording.
“” lights up in the display and the
group mode turns on.
1 Press GROUP for 2 seconds or more.
“” lights up in the display and the
2 Press GROUP slightly.
group mode turns on.
“” flashes in the display and you
To cancel the group mode, press
can select a group directly (group
GROUP for 2 seconds or more again.
skip mode) (page 31).
Note
3 Within 5 seconds, press
The group function setting will be canceled
.REVIEW/AMS or >CUE/
when you eject the MD.
AMS repeatedly until the group you
want the track to belong to appears.
Recording a track into a new
4 Press zREC.
group
5 Play the source sound.
1 While the recorder is stopped, press
Note
GROUP for 2 seconds or more.
The group skip mode turns off automatically in
“” lights up in the display and the
step 3 if nothing is done within 5 seconds. To
group mode turns on.
continue the procedure, do step 2 again.
2 Press zREC.
z
• The track will be added at the end of the
3 Play the source sound.
group.
• For details on the group skip mode, see page
31.
To stop recording, press x.
• To add a track that is playing to a group, stop
The material that was recorded up until x
playing the track first, and then do the
was pressed is entered as a new group.
procedure from step 4.
• If you select “Group --” in step 2, the recorded
To record a track into another
material will be automatically stored as
new group.
“Group01”.
Turn the group mode off, and then follow
steps 1 to 3
23-GB
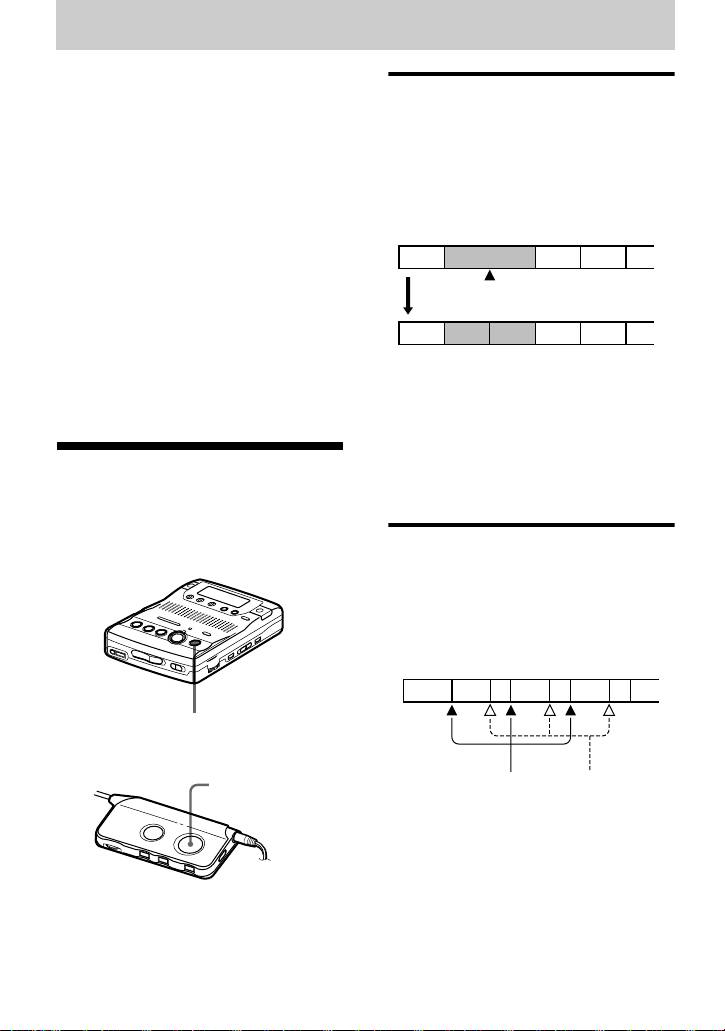
3 Press zREC.
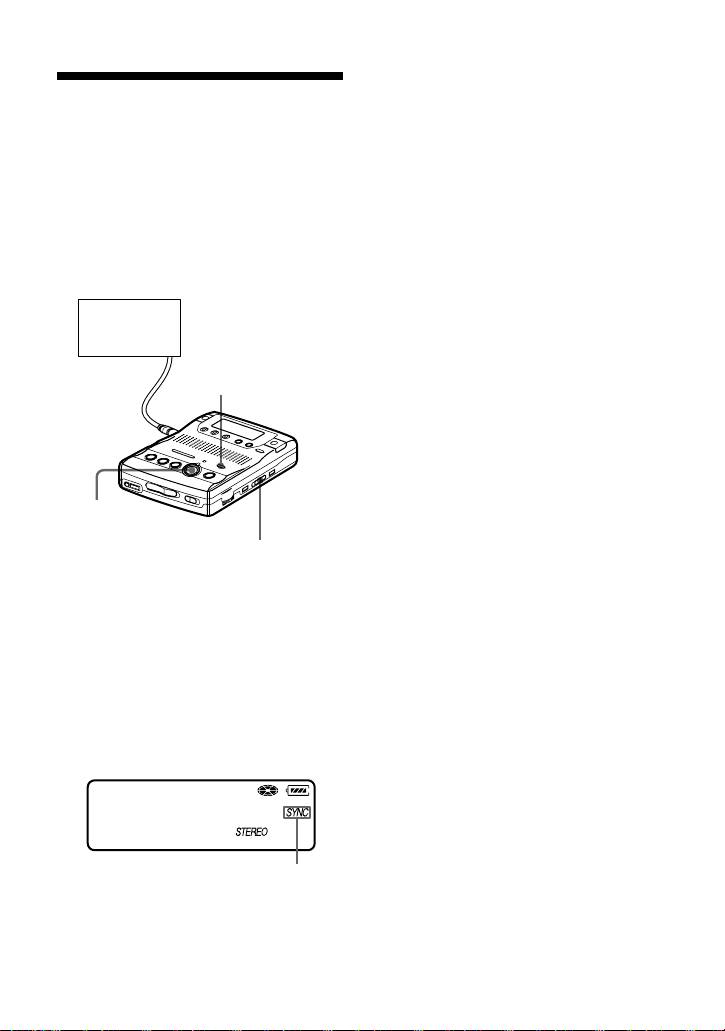
To start/stop recording
The recorder stands by for recording.
in sync with the source
4 Play the source sound.
player
The recorder starts recording when it
(Synchro-recording)
receives the playing sound.
You can easily make digital recordings of
a digital source on an MD.
To stop recording
Before synchro-recording, make
Press xSTOP.
connections to the digital source with a
z
digital cable, and insert a recordable MD.
• You cannot pause manually during synchro-
recording.
CD players,
• When there is no sound from the player for
etc.
more than 3 seconds during synchro-
recording, the recorder goes into the standby
mode automatically (page 53). When the
REC MODE
sound comes from the player again, the
recorder resumes synchro-recording. If the
recorder is kept in the standby mode for 5
minutes or longer, the recorder stops
automatically.
Notes
• Do not switch the SYNCHRO REC switch
zREC
after step 3. Recording may not be done
properly.
SYNCHRO REC
• The recording mode setting (stereo, LP2
stereo,
LP4 stereo, or monaural) cannot be
changed during synchro-recording.
1 Press REC MODE repeatedly until
• Even when there is no recorded sound on the
“STEREO”, “LP2”, “LP4”, or
sound source (page 53), there may be cases
“MONO” lights up in the display.
when recording does not pause automatically
during synchro-recording due to the noise
For details on the recording mode, see
level emitted from the sound source.
“Recording for long times” (page 16).
• If a silent portion is encountered for 2 seconds
or more during synchro-recording, a new track
2 Slide SYNCHRO REC to ON.
mark is automatically added at the point
“SYNC” appears in the display.
where the silent portion ends (page 53).
• Synchro-recording cannot be done if the
connecting cord is not an optical cable, or if
the cable is connected to the MIC (PLUG IN
007
POWER) jack.
30:03
• You cannot change the recording mode during
recording.
Synchro-recording indication
“SYNC” doesn’t appear if optical
cable is not connected to the LINE IN
(OPTICAL) jack on the recorder.
24-GB
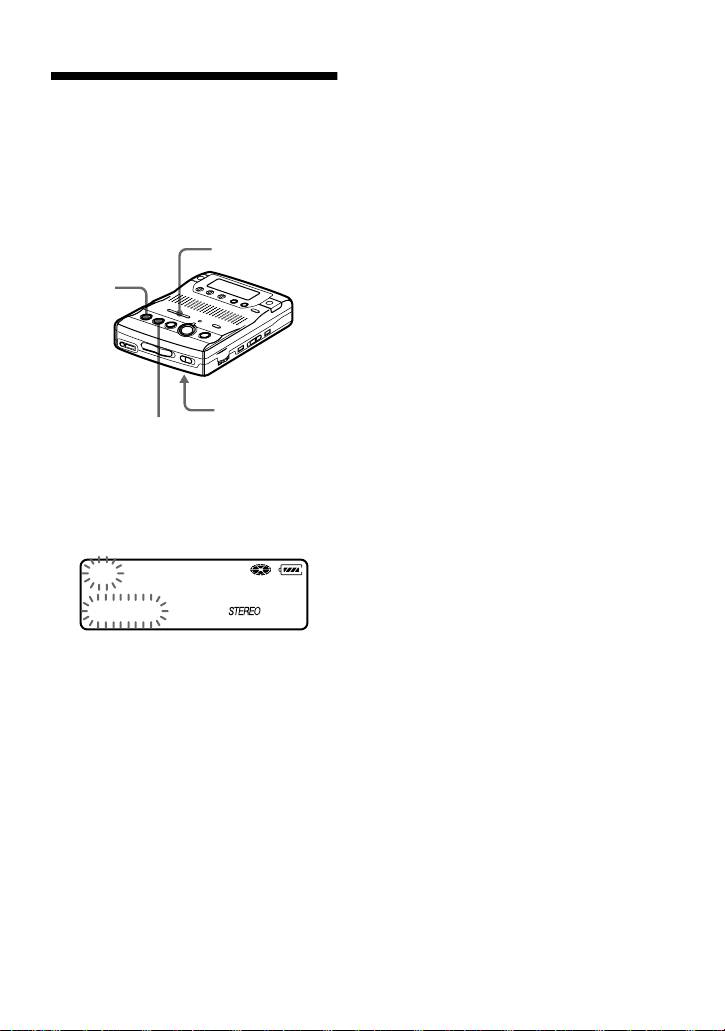
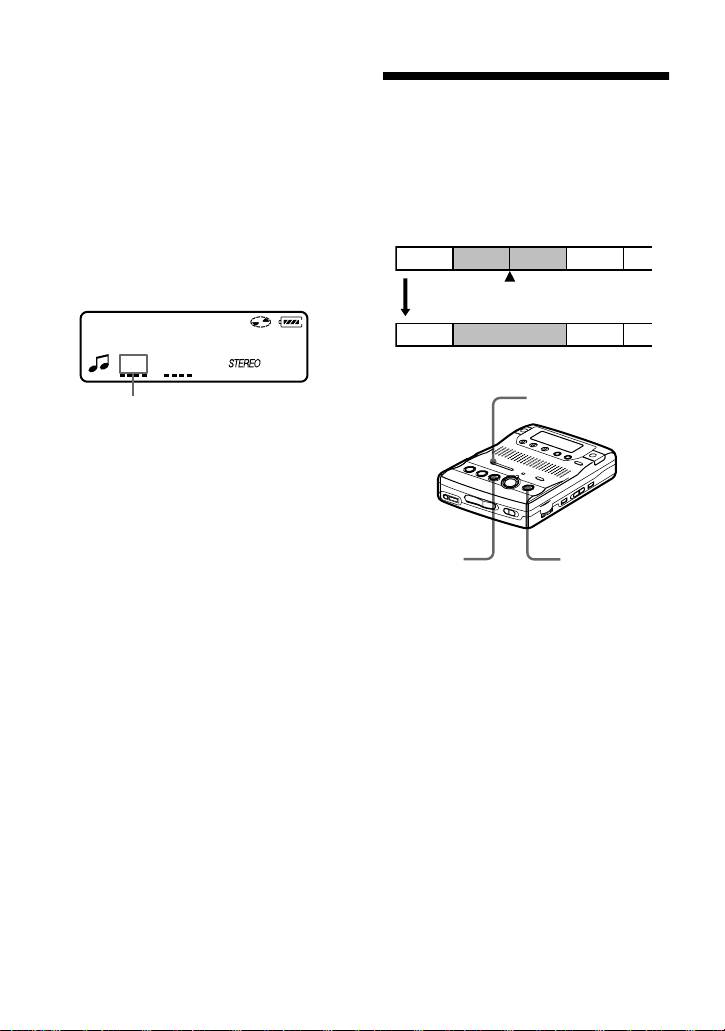
If you make a mistake while
Setting the clock to
setting the clock
stamp the recorded
Press xSTOP, and set the clock again
time
from step 1. You can skip a step by
pressing NPLAY.
To stamp the date and time on the MD
when you record, you first need to set the
To display the current time
clock.
When the recorder is not operating or
while recording, press DISPLAY
./>
repeatedly until the current time appears
in the display.
xSTOP
To display the time in the 24-
hour system
While setting the clock, press XPAUSE.
To display the time in the 12-hour system,
CLOCK SET
press XPAUSE again.
(bottom)
NPLAY
z
You can also use the SPEED CONTROL dial to
set the clock. Turn the dial instead of ./>
1 Press CLOCK SET at the button of
in step 2, and press the dial instead of NPLAY
the recorder.
in step 3.
Use a pointed object.
Notes
The digits of the year flash.
• Make sure the time is correctly set if you want
the time stamp to be accurately recorded for
01y 1m 1d
an important recording.
12:00am
• Under normal conditions, the clock may vary
Clock
by about plus or minus 2 minutes per month.
2 Change the current year by pressing
. or >.
To change the digits rapidly, keep
pressing . or >.
3 Press NPLAY to enter the year.
The digit of the month flashes.
4 Repeat step 2 and 3 to enter the
current month, date, hour, and
minute.
When you press NPLAY to enter
the minute, the clock starts operating.
25-GB
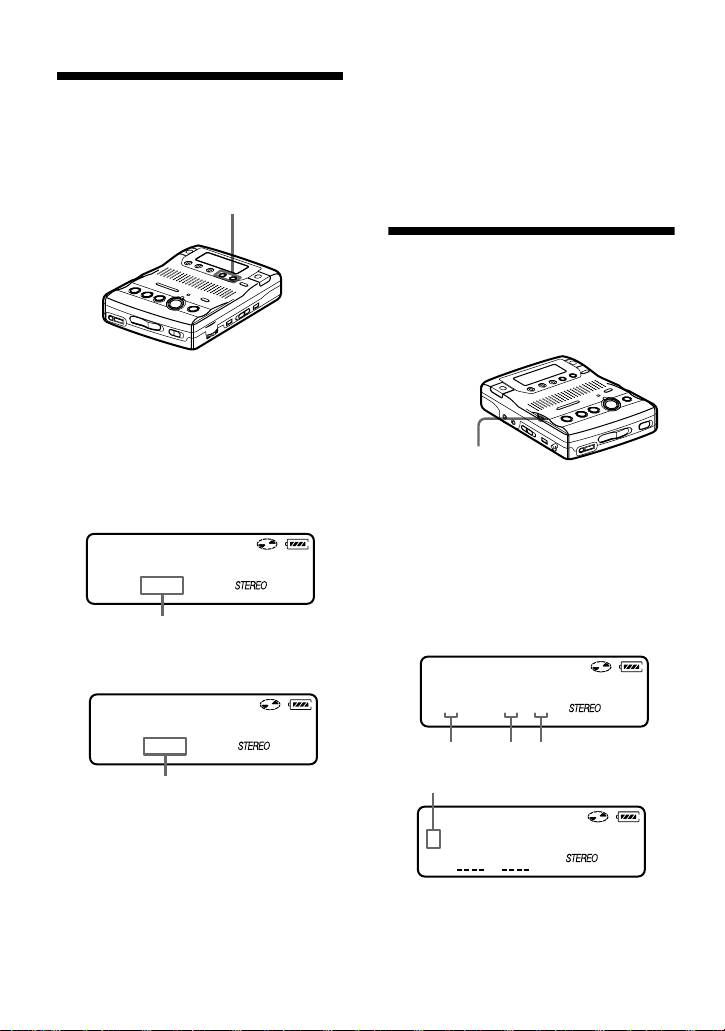
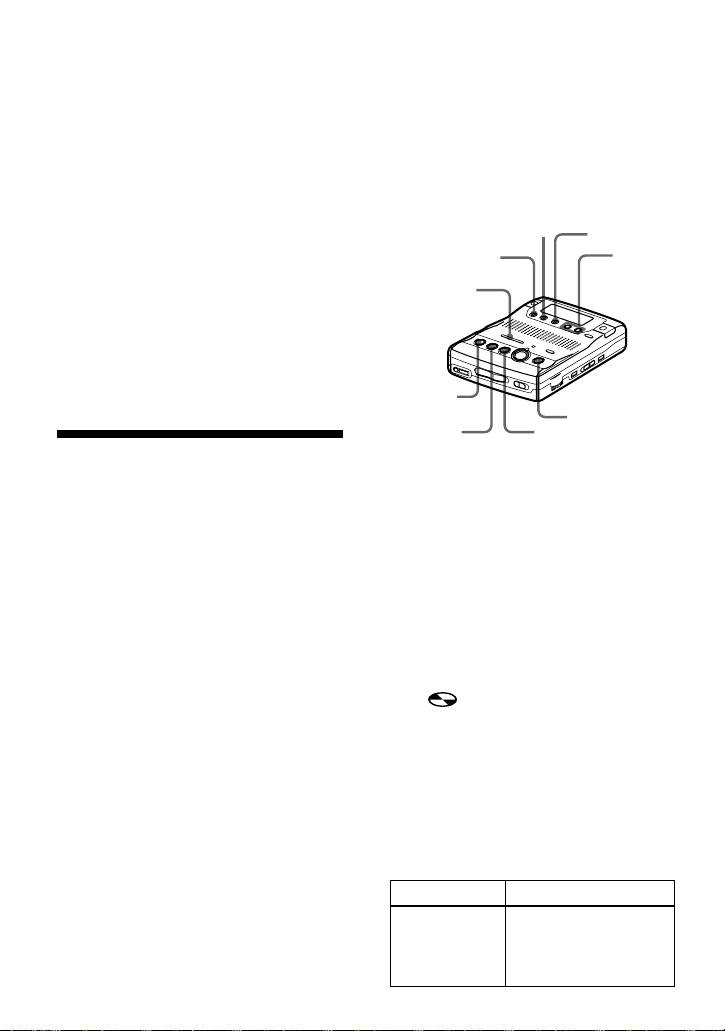
In stop mode
Checking the remaining
ABC
time or the recording
Track
Elapsed
—
position
number
time
You can check the remaining time, track
Track name Remaining
RecRemain
number, etc. when recording or during
time for
stop.
recording
Items related to the group function appear
Group name Remaining
GP Remain
when you play and then stop a track with
time in the
group settings.
group
DISPLAY
Disc name Remaining
AllRemain
time after
the current
location
Current date Current
Clock
time
Note
Items may appear differently or may not be
REC indicator
selectable, depending on the group mode’s on/
off status, the recorder’s operating status, or the
recorder settings.
1 Press DISPLAY while the recorder is
recording or stopped.
To know the recording
Each time you press the button, the
condition
display changes as follows.
The REC indicator lights up or flashes
according to the recording condition.
A
B
Recording
REC indicator
C
condition
While recording lights up
While recording
Recording standby flashes
AB C
Less than 3
flashes slowly
minutes’
Track
Elapsed time —
recording time
number
available
Track
Remaining
RecRemain
A track mark has
goes off
number
time for
been added (when
momentarily
recording
controlling by the
Current
Current time Clock
recorder only)
date
z
If you want to check the playing position or
track name while playing, see page 29.
26-GB
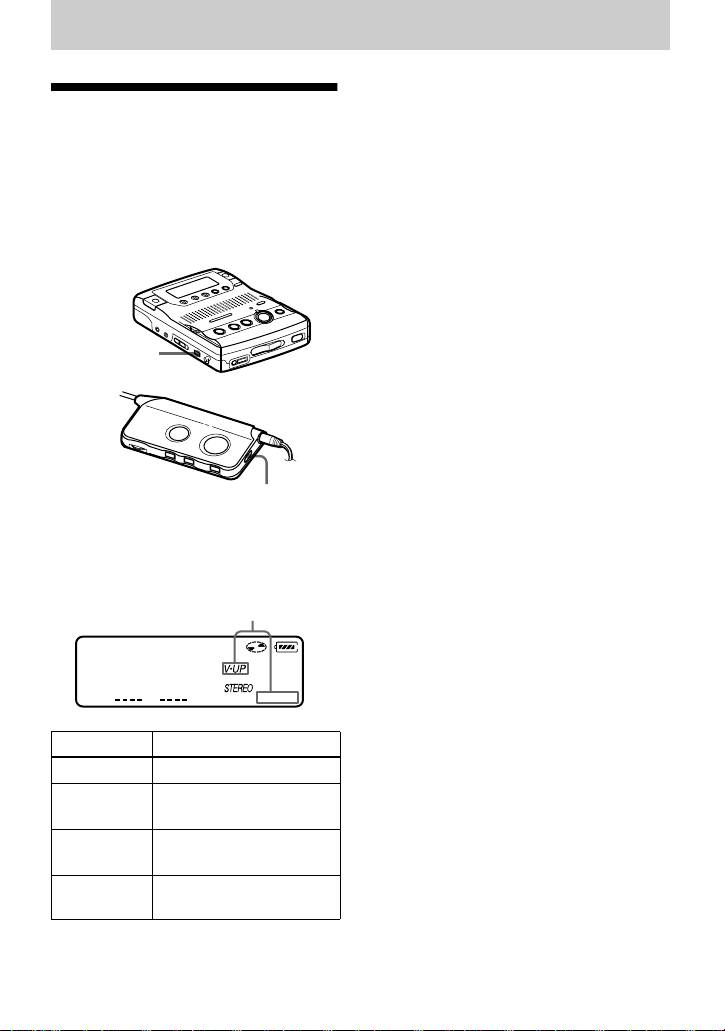
Various ways of playback
1)
During stereo playback, the Voice Up function
Changing the sound
emphasizes the left-right orientation of
setting
individual voices, making them easier to
distinguish and hear. You cannot use the Voice
You can select your desired sound when
Up function when monaural recording.
playing.
This function is effective when
To cancel the sound setting
using the supplied headphones to
Press SOUND repeatedly until nothing
listen to stereo recordings.
appears in the display
.
Notes
• The use of the Voice Up function is not
recommended when playing a music disc.
• You cannot set the Voice Up function on
monaural recording.
SOUND
• If sound distortion occurs when you turn the
volume up while “SOUND 1” or “SOUND 2”,
turn the volume down again or change the
play mode.
• The setting of “SOUND 1” or “SOUND 2”
does not affect the sound being recorded.
SOUND
1 Press SOUND repeatedly.
Each time you press the button, A
changes as follows.
A
003
20:51
A Sound setting
— (none) Factory setting
SOUND 1 Strong bass
(Digital Mega Bass 1)
SOUND 2 Stronger bass
(Digital Mega Bass 2)
1)
V-UP
Enhancing voice clarity
(Voice Up function)
27-GB
• If you reach the beginning of the disc while
using the Easy Search function, the recorder
Finding a point quickly
will start playing automatically. If you reach
(Easy Search)
the end of the disc while using the Easy
Search function, “END” will appear in the
Use the Easy Search function to find a
display. If this happens, press the xSTOP
particular point quickly.
button to stop the recorder.
EASY SEARCH +/–
Changing the playback
speed (Speed Control)
The playback speed can be adjusted in 7
steps (80%, 85%, ...100%, 105%, 110%).
1 Press EASY SEARCH + or – while
the recorder is playing or stopped.
Each press of the + button moves the
playback point ahead by about one
minute. Each press of the – button
moves the playback point back about
one minute.
1 Turn the SPEED CONTROL dial
while the recorder is playing.
003
Each turn changes the playback
02:31
speed. Select your desired speed
+01
while listening. “S” appears in the
display when playback speed is
When the + button was pressed once.
changed.
(Playback position moves one minute ahead.
003
00:31
-01
z
• The + and – buttons can be pressed up to 20
times each.
To switch to normal playback
Press the SPEED CONTROL dial.
To change the playback speed again, turn
the dial.
28-GB
)
SPEED CONTROL
SPEED
CONTROL
S----+--F
80% 100%110%
Fast Playback indication
When the – button was pressed once.
(Playback position moves one minute
behind.)
002
S 03:40

z
You can pause or find track marks pressing the
Checking the remaining
XPAUSE, .REVIEW/AMS or >CUE/
time or the playing
AMS button during Fast Playback.
position
You can check the track name, disc name,
etc. during playback.
Playing tracks
Items related to the group function appear
repeatedly
only when the recorder is playing a track
with group settings.
You can play tracks repeatedly in two
DISPLAY
ways — all repeat and single repeat.
PLAY MODE
1 Press DISPLAY while the recorder is
playing.
Each time you press the button, the
1 Press PLAY MODE while the
display changes as follows.
recorder is playing.
Each time you press the button, the
A
play mode indication changes as
B
follows.
C
Play mode indication
AB C
Track
Elapsed time — (none)
003
number
20:51
Track
Remaining
1 Remain
name
time of the
current track
Indication Play mode
Group
Remaining
GP
— All the tracks are
name
time after the
Remain
played once.
current location
in the group
All the tracks are
played repeatedly.
Disc
Remaining
AllRemain
name
time after the
1
A single track is
current location
played repeatedly.
1)
Recorded
Recorded time RecDate
z
date
You can specify the playback mode for a
selected group when the group mode is on. To
1)
The recording mode (page 16) of the track
activate the group mode, see “Selecting and
appears momentaly after “RecDate”
playing groups (Group skip mode)” (page 31).
disappears from the display.
29-GB
Note
Items may appear differently or may not be
Playback when the group mode is on:
selectable, depending on the group mode’s on/
Playback of the selected group starts with
off status, the recorder’s operating status, or the
the first track in the group, and stops with
recorder settings.
the last track in the group.
z
Disc
If you want to check the remaining time or the
Group 1
Group 2
Group 3
recording position while recording or in stop
mode, see page 26.
Track
Track
Track
number
number
number
123
12
12
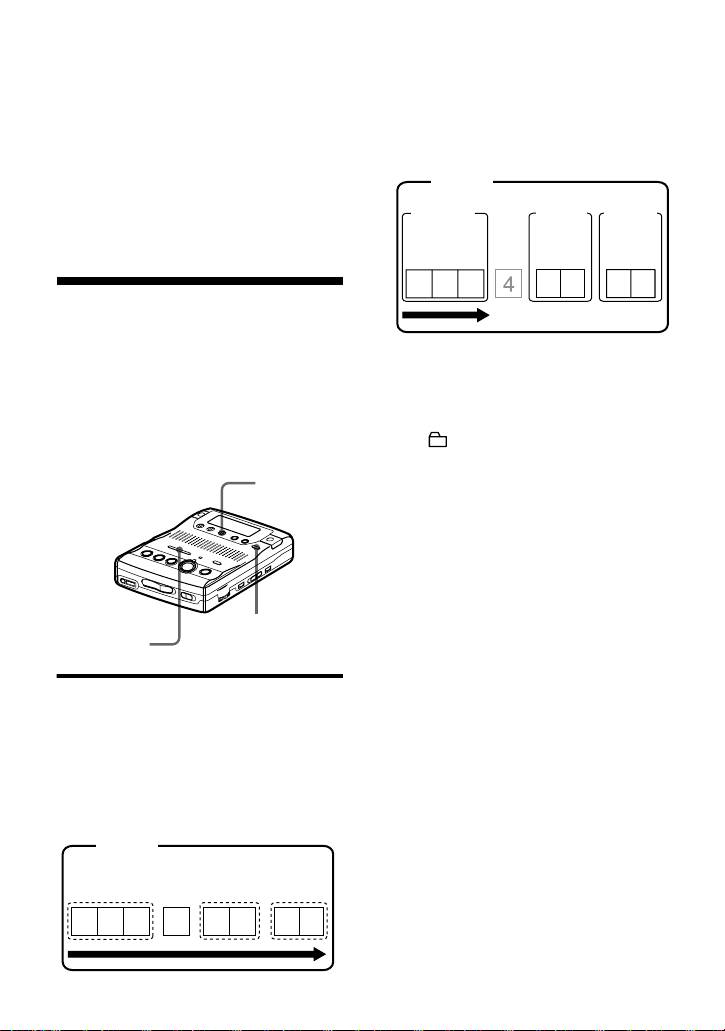
Using the Group
Function (Group mode)
The recorder can operate various
1 Insert a disc which has group settings
playback with a disc which has group
into the recorder and play the disc.
setting. For more information on the
group mode, see “Recording tracks using
2 Press GROUP for 2 seconds or more.
the Group Function (Group mode
“” and “GROUP ON” light in the
recording)” (page 22).
display up and the group mode turns
EDIT/ENTER
on.
Playback stops at the end of the last
track in the selected group.
For details on selecting another
group, see “Selecting and playing
groups (Group skip mode)”
(page 31).
z
GROUP
You can also play the tracks repeatedly in the
./>
selected group. After the procedures here,
follow the steps of “Playing tracks repeatedly”
(page 29).
Listening to tracks using the
group mode (group mode
To turn off the Group function
playback)
Press GROUP for 2 seconds or more
Playback when the group mode is off:
again.
Playback starts with the first track in the
Note
disc, and stops with the last track in the
In group mode, the recorder treats all tracks
disc.
without group settings as belonging to the last
Disc
group on the disc. The last group is indicated in
the display window on the recorder as “Group -
Track number
-”. Within a group, the tracks appear in their
order on the disc, not their order within the
group.
123
4
56
78
30-GB
z
Selecting and playing groups
The group skip mode operates regardless of
(Group skip mode)
whether the group mode is on or off.
When playing a disc with group settings,
Notes
the group skip mode allows you to jump
• If no operation is performed within 5 seconds
from the currently playing group to any
after step 1, the group skip mode will be
canceled and you will not be able to perform
other group on the MD. The group skip
step 2 thereafter. To continue with step 1 at
mode can be used at any time during
this point, repeat from the beginning of the
playback, regardless of whether the player
procedure.
is in group mode on or not.
• The group skip mode cannot be used with a
disc that has no group settings.
When the group mode is off:
Disc
Track number
123
56
78
4
Skip
Skip Skip
When the group mode is on:
Disc
Group 1
Group 2
Group 3
Track
Track
Track
number
number
number
123
12
12
Skip Skip Skip
1 Insert a disc which has group settings
into the recorder and play the disc,
and then press GROUP slightly.
“” flashes in the display and the
group skip mode turns on.
2 Within 5 seconds, press
.REVIEW/AMS/>CUE/AMS
until your desired group appears, and
then press EDIT/ENTER.
The recorder starts playing from the
first track in the group.
31-GB
Editing recorded tracks
You can edit your recordings by adding/
Track marking to divide a
erasing track marks or labeling tracks and
MDs. Premastered MDs cannot be edited.
recording
You can add track marks so that the part
Notes on editing
after the new track mark is counted as a
• You cannot edit tracks on an MD that is
record-protected. Before editing tracks, close
new track.
the tab on the side of the MD (page 54).
The track numbers will increase as
• If you perform an editing operation while
follows.
playing, be sure not to turn the power off until
“TOC Edit” disappears in the display.
1 3 42
• Do not move or jog the recorder while “TOC
Edit”* is flashing in the display.
Track marking
• The lid will not open until “TOC Edit”
disappears in the display after editing.
• When the group mode is on, editing can be
231 4 5
performed only for the tracks registered into
Track numbers increase
the selected group.
∗ TOC = Table of Contents
1 While recording, playing or pausing
an MD, press TRACK MARK at the
point you want to mark.
“MARK ON” appears in the display,
Adding a track mark
and a track mark is added. The track
You can add two kinds of track marks:
number will increase by one.
regular track marks and special track
marks. A total of 254 track marks can be
Track marking important
added on one disc.
points
While recording, not only can you add
regular track marks, you can also add
special track marks (“TT”), to mark the
position of important points.
321 4 5678
TRACK MARK
TRACK MARK
Regular track
Special track
marks
marks
1 Press TRACK MARK on the remote
for 2 seconds or more at the desired
point while recording.
A special track mark is added and the
track number will increase by one.
“!MARK ON!” appears in the display
and “TT” is automatically added at
the beginning of a track name.
32-GB
Note
Make sure to press the TRACK MARK button
Erasing a track mark
for 2 seconds or more, if not, a regular track
mark will be added.
When you erase a regular track mark or a
special track mark, the track numbers will
To locate special track marks
change as follows.
during playback
Example
While pressing down VOR, momentarily
When combining track 2 and track 3
press .REVIEW/AMS or >CUE/
AMS.
1 3 42
The track number appears after the
special track mark indication (“TT”).
Erase a track mark
002
1 32
00:40
:TT
Track numbers decrease
.REVIEW/AMS
Special track mark indication
Press .REVIEW/AMS repeatedly to
go to previous special track marks. Press
>CUE/AMS repeatedly to go to
succeeding special track marks.
To change a regular track
mark to a special track mark
TRACK MARKXPAUSE
After the completion of recording, add
“TT” at the beginning of the name of the
1 While playing the track with the track
track you want to change.
mark you want to erase, press
XPAUSE to pause.
To change a special track
To erase the third track mark, play the
mark to a regular track mark
third track and press XPAUSE.
After the completion of recording, erase
“TT” at the beginning of the track name
2 Find the track mark by pressing
or change the name of the track.
.REVIEW/AMS slightly.
Find the beginning of the third track.
“00:00” appears in the display.
“MARK” appears in the display for 2
seconds.
3 Press TRACK MARK to erase the
mark.
“MARK OFF” appears in the display.
The track mark is erased and the two
tracks are combined.
33-GB
z
• When labeling a disc which has been recorded
When you erase a track mark, the date, time,
using the group function, be sure to turn the
and name assigned to the mark are also erased.
group function on to avoid misoverwrite the
group information.
Notes
• If you enter the symbol “//” between the
• When you erase a track mark between the two
characters in disc names such as “abc//def”,
consecutive tracks that are registered to
you may be unable to use the group function.
different groups, the second track is re-
registered into the group containing the first
EDIT/
PLAY MODE
track. In addition, if you combine a track that
ENTER
is registered to a group with a track that is not
DISPLAY
EASY
(consecutive tracks), the second track takes
the same registration setting as the first track.
SEARCH
./>
For example, if the first track is registered to a
+/–
group, the second track will be registered to
the same group as the first track.
• You cannot erase track marks according to the
system limitations. For details, see “System
limitations” (page 49).
xSTOP
TRACK MARK
N
X
Labeling recordings
Labeling a disc during stop
You can name tracks during playback,
discs during stop, and both during
To label a disc that contains group
recording. Each name can be as long as
settings, you must turn the group mode on
200 letters.
before doing the labeling procedure
Each disc can hold up to 1700
(page 23).
alphanumeric letters during playback or
stop.
1 Insert a disc.
You can enter about 500 alphanumeric
When a disc is already inserted, make
characters and symbols during the
sure the recorder is stopped.
recording of each track.
2 Press EDIT/ENTER.
Available characters
“ :Name” flashes in the display.
• Capital and small letters of the English
3 Press EDIT/ENTER again.
alphabet
The disc is ready to be labeled.
• Numbers 0 to 9
• !
" # $ % & ( ) * . ; < = > ?
4 Press . or > repeatedly to
@ _ ` + – ' , / : _ (space)
select a letter and press N to enter.
The selected letter stops flashing and
Notes
the cursor moves to the next input
• “NAME FULL” appears when you try to enter
position.
more than 1,700 characters on a disc. Enter a
shorter name for the track, group, or disc, or
Press/Turn Functions
delete “LP:” from the track name recorded in
MDLP mode.
X To switch between
capital letters, small
letters, and marks /
numbers.
34-GB
3 To label a track, press EDIT/ENTER
Press/Turn Functions
while “ :Name” is flashing.
./> To change the letter to
To label a group, press . or >
the one before / next
repeatedly until “ :Name” flashes
one.
in the display, and then press EDIT/
SPEED
To move the cursor to
ENTER.
CONTROL
the right (Press
The track or group is ready to be
slightly)
labeled.
To enter the phrase
(Press 1.5 seconds or
4 Follow steps 4 to 6 of “Labeling a
more)
disc during stop”.
To select a letter
(Turn)
Labeling a track or a disc
during recording
EASY
To move the cursor to
SEARCH +/–
the left or right.
To label a group, you must first turn the
group mode on before the start of
DISPLAY To insert a blank space
recording (page 23).
to type in a new letter.
PLAY MODE To delete a letter and
1 While recording, press EDIT/
move back all
ENTER.
following letters to the
“ :Name” flashes in the display.
left.
xSTOP Cancel labeling.
2 To label a track, press EDIT/ENTER
while “ :Name” is flashing.
5 Repeat step 4 and enter all characters
To label a group, press . or >
of the label name.
repeatedly until “ :Name” flashes
6 Press EDIT/ENTER.
in the display, then press EDIT/
ENTER.
The track or disc is labeled.
To label a disc, press . or >
repeatedly until “ :Name”
Labeling a track during
flashes in the display, then press
playback
EDIT/ENTER.
The track, group, or disc is ready to
1 To label a track, insert a disc and play
be labeled.
the track you want to label.
To label a group, insert a disc, turn the
3 Follow steps 4 to 6 of “Labeling a
group mode on, and play the group
disc during stop”.
you want to label (page 30).
To cancel labeling
2 Press EDIT/ENTER.
Press xSTOP.
The recorder plays the selected track
repeatedly.
To relabel recordings
Follow the steps corresponding to the
labeling method until the track, group, or
disc is ready to be labeled. Enter a new
character over the one you want to
change, then press the EDIT/ENTER
button.
35-GB
z
You can also use the SPEED CONTROL dial to
Registering tracks or
select and then enter the menu. Turn the dial
groups as a new group
(instead of ./>) to show the menu items
(Group setting)
one by one and press the dial (instead of EDIT/
ENTER) to enter the selected menu.
Do the following procedure to register
Notes
tracks (or groups). A series of tracks (or
• “LP:” has been added at the beginning of the
groups) can be registered by selecting the
track name of the track recorded in MDLP
starting and ending tracks (or groups).
mode.
The tracks (or groups) must, however, be
• When the recording is stopped while labeling
sequential. If the desired tracks (or
a track or a disc during recording, or when the
groups) are not consecutive, you must
playback moves on to the next track while
move them to make them consecutive
labeling a track, the input at that point is
before you can register them (“Moving
entered automatically.
• When recording through the built-in
recorded tracks”, page 38). This function
microphones, the sound of the recorder
can be used at any time, whether group
operations, such as the pressing of buttons,
mode is on or off.
will also be recorded. To avoid this, it is
Group
Group
recommended to label a disc or a track after
completing the recording.
123456
7
89
• You cannot relabel parametrized MDs or label
MDs that have not been recorded.
Making a new
Making a new group
• The recorder is able to display, but cannot
group with
label using Japanese “Katakana” characters.
with 2 groups.
tracks 1 to 3.
• The recorder cannot rewrite a disc or track
name of more than 200 letters that was created
Group
Group
by another device.
123456
7
89
• Registration of non-consecutive tracks
is not possible (for example, the 1, 3, 2,
4, 3, 5, 6, 6, 8 and then 9).
• Tracks always appear according to their
order on the disc, not their order within
the group (even when group mode is
on).
./>
EDIT/
ENTER
1 While the recorder is stopped, press
EDIT/ENTER.
36-GB
filename[\\Ww001\WW001\ON GOING\MZ-
B100\3235455111\3235455111MZB100\02GB-MZB100UCE\040OPE.fm]
masterpage:Right
020REG.book Page 37 Thursday, September 13, 2001 6:36 PM
2 Press . or > repeatedly until
“ : Set” flashes in the display, and
To release a group
then press EDIT/ENTER.
setting
“001” flashes in the display.
./>
EDIT/ENTER
STR:001
END:001
:
3 Press . or > repeatedly until
the number or name of the desired
xSTOP
first track flashes in the display, and
then press EDIT/ENTER.
GROUP
This selects the first track of the new
1 Press GROUP for 2 seconds or more.
group.
Even when the group mode is on,
“ ” lights up in the display and the
track numbers appear according to
group mode turns on.
their order on the disc, not their order
2 Follow steps 1 and 2 of “Selecting
within the group.
and playing groups (Group skip
4 Press . or > repeatedly until
mode)” (page 31) and check the
the number or name of the desired
contents of the group you want to
last track flashes in the display, and
release. Then press xSTOP.
then press EDIT/ENTER.
3 Press EDIT/ENTER.
This selects the last track of the new
group.
4 Press . or > repeatedly until
“ : Release” flashes in the display,
5 Follow steps 4 to 6 of “Labeling
and press EDIT/ENTER.
recordings” (page 34) to label a
“Release?” appears and
group.
“PushENTER” flashes in the display.
z
5 Press EDIT/ENTER.
You can also use the SPEED CONTROL dial to
select and then enter the menu. Turn the dial
The group setting of the selected
(instead of ./>) to show the menu items
group is released.
one by one and press the dial (instead of EDIT/
ENTER) to enter the selected menu.
z
You can also use the SPEED CONTROL dial to
Notes
select and then enter the menu. Turn the dial
• In step 3, the first track must either be the first
(instead of ./>) to show the menu items
track of an existing group or a track that does
one by one and press the dial (instead of EDIT/
not belong to a group.
ENTER) to enter the selected menu.
• When selecting the last track in step 4, make
sure the track comes after the one selected in
step 3. The last track must either be the last
track of an existing group or a track that does
not belong to a group.
37-GB
model name1[MZ-B100] model name2[MZ------]
[3-235-455-11(1)]
5 Press EDIT/ENTER again.
Moving recorded tracks
The track moves to the selected
destination track.
You can change the order of the recorded
tracks.
To cancel moving
Example
Press xSTOP.
Move track C from the third to the second
z
track.
You can also use the SPEED CONTROL dial to
Before moving
select and then enter the menu. Turn the dial
(instead of ./>) to show the menu items
A C DB
one by one and press the dial (instead of EDIT/
ENTER) to enter the selected menu.
A B DC
Moving a track to a
After moving
different group
./>
EDIT/ENTER
./>
EDIT/ENTER
TRACK MARK
GROUP
1 Press GROUP for 2 seconds or more.
1 While playing the track you want to
move, press EDIT/ENTER.
“” lights up in the display the
group mode turns on.
The recorder plays the selected track
repeatedly.
2 While playing the track you want to
move, press EDIT/ENTER.
2 Press . or > repeatedly until
“ : Move” flashes in the display.
The recorder plays the selected track
repeatedly.
3 Press EDIT/ENTER again.
3 Press . or > repeatedly until
The selected track number or name of
“ : Move” flashes in the display,
the group that the selected track
and then press EDIT/ENTER.
belongs (when the group mode is
turned on) flashes in the display.
4 Press . or > repeatedly until
the destination group flashes in the
4 Press . or > repeatedly to
display, and then press EDIT/
select the destination track number.
ENTER.
For the example above, “MV 003 t
002” appears in the display.
38-GB
5 Press . or > repeatedly until
z
the number of the destination track
You can also use the SPEED CONTROL dial to
select and then enter the menu. Turn the dial
within the group flashes in the
(instead of ./>) to show the menu items
display, and then press EDIT/
one by one and press the dial (instead of EDIT/
ENTER.
ENTER) to enter the selected menu.
z
You can also use the SPEED CONTROL dial to
select and then enter the menu. Turn the dial
(instead of ./>) to show the menu items
Erasing tracks
one by one and press the dial (instead of EDIT/
ENTER) to enter the selected menu.
To erase a track
Note that once a recording has
Changing the order of a
been erased, you cannot retrieve it.
group on a disc (Group
Be sure to verify the contents of
move)
the track you want to erase.
./>
EDIT/ENTER
EDIT/ENTER
GROUP
ERASE
1 Press GROUP for 2 seconds or more.
1 While playing the track you want to
“” lights up in the display and the
erase, press ERASE.
group mode turns on.
“Erase OK?” and “PushENTER”
appear alternately in the display and
2 While playing a track within a group
the recorder plays the selected track
whose order you want to change,
repeatedly.
press EDIT/ENTER.
2 Press EDIT/ENTER.
3 Press . or > repeatedly until
“ : Move” flashes in the display,
The track is erased and the next track
and then press EDIT/ENTER.
starts to play. All the tracks after the
one erased are automatically
You can now move the selected
renumbered.
group.
4 Press . or > repeatedly to
To cancel erasing
select the destination point on the
Press xSTOP.
disc, and then press EDIT/ENTER.
39-GB

To erase a small section of a
To erase a group
track
Pause playback at the point where you
Note that once a recording has
want to start erasing. Then do steps 1 and
been erased, you cannot retrieve it.
2.
Be sure to check the contents of
the group before you erase it.
To erase a part of a track
Add track marks at the beginning and the
1 Press GROUP for 2 seconds or more.
end of the part you want to erase, then
“” lights up in the display and the
erase the part.
group mode turns on.
2 Follow steps 1 and 2 of the procedure
To erase the whole disc
described in “Selecting and playing
groups (Group skip mode)” (page 31)
Note that once a recording has
to check the contents of the group you
been erased, you cannot retrieve it.
want to erase. Then press xSTOP.
Be sure to verify the contents of
the disc you want to erase.
3 While the recorder is stopped, press
EDIT/ENTER, press . or >
1 Play the disc you want to erase, verify
repeatedly until “EDIT” flashes in the
its contents, and then press xSTOP.
display, and then press EDIT/ENTER
again.
2 While the recorder is stopped, press
ERASE.
4 Press . or > repeatedly until
“ :Erase” flashes in the display,
“All Erase?” and “PushENTER”
and then press EDIT/ENTER.
appear alternately in the display.
The group name and “GP Erase?”
3 Press . or > repeatedly until
appear and “PushENTER” flashes in
“ :Erase” flashes in the display,
the display. To cancel erasing, press
and then press EDIT/ENTER.
CANCEL.
Track name and “All Erase?” light up
5 Press EDIT/ENTER again.
and “PushENTER” flashes in the
display.
The group is erased.
4 Press EDIT/ENTER.
z
You can also use the SPEED CONTROL dial to
“TOC Edit” flashes in the display,
select and then enter the menu. Turn the dial
and all the tracks will be erased.
(instead of ./>) to show the menu items
When erasing is complete,
one by one and press the dial (instead of EDIT/
“BLANKDISC” appears in the
ENTER) to enter the selected menu.
display.
To cancel erasing,
Press xSTOP.
40-GB
