Dell PowerEdge R900: instruction
Class: Computer Hardware
Type:
Manual for Dell PowerEdge R900
Table of contents
- Notes, Notices, and Cautions
- System Features
- Supported Operating Systems
- Other Information You Might Need Obtaining Technical Assistance
- Installation and Configuration Unpacking the System
- Installing the Rails and System in a Rack
- Connecting the Keyboard, Mouse, and Monitor
- Connecting the Power
- Turning the System On Complete the Operating System Setup
- Technical Specifications Processor Expansion Bus Memory Drives
- Connectors Video Power
- Physical Environmental

Dell™ PowerEdge™ R900 Systems
Getting Started
With Your System
Začínáme se systémem
Guide de mise en route
Erste Schritte mit dem System
Τα πρώτα βήµατα Με το σύστηµά σας
Rozpoczęcie pracy z systemem
Начало работы с системой
Procedimientos iniciales con el sistema
תכרעמה ע הדובעה תליחת


Dell™ PowerEdge™ R900 Systems
Getting Started
With Your System

Notes, Notices, and Cautions
NOTE: A NOTE indicates important information that helps you make better use of
your computer.
NOTICE: A NOTICE indicates either potential damage to hardware or loss of data
and tells you how to avoid the problem.
CAUTION: A CAUTION indicates a potential for property damage, personal injury,
or death.
Information in this document is subject to change without notice.
© 2007 Dell Inc. All rights reserved.
Reproduction in any manner whatsoever without the written permission of Dell Inc. is strictly
forbidden.
Trademarks used in this text: Dell and the DELL logo are trademarks of Dell Inc.; Intel and Xeon are
registered trademarks of Intel Corporation; Microsoft, Windows, and Windows Server are registered
trademarks of Microsoft Corporation in the United States and/or other countries; Red Hat is a registered
trademark of Red Hat, Inc.; SUSE is a registered trademark of Novell, Inc.
Other trademarks and trade names may be used in this document to refer to either the entities claiming
the marks and names or their products. Dell Inc. disclaims any proprietary interest in trademarks
and trade names other than its own.
September 2007 P/N XK944 Rev. A00

System Features
The major hardware and software features of your system include:
®
®
• Two, or four Quad-Core Intel
Xeon
Processors 7300 Series.
• Support for symmetric multiprocessing (SMP), which is available
on systems with two or four Intel Xeon microprocessors. SMP greatly
improves overall system performance by dividing microprocessor
operations between independent microprocessors. To take advantage
of this feature, you must use an operating system that supports
multiprocessing.
NOTE: If you decide to upgrade your system by installing additional
microprocessors, you must order the microprocessor upgrade kits from Dell.
Not all versions of the Intel Xeon microprocessor will work properly as
additional microprocessors. The upgrade kit from Dell contains the correct
version of the microprocessor as well as the instructions for performing the
upgrade. All microprocessors must have the same internal operating
frequency and cache size.
• A minimum of 2 GB of 667 MHz, Fully Buffered DIMMs (FBD),
upgradable to a maximum of 128 GB by installing combinations of
512-MB, 1-GB, 2-GB, or 4-GB memory modules in the four memory risers.
• Support for up to five 3.5-inch, internal hot-pluggable SAS
(Serial Attached SCSI) hard drives or support for up to eight 2.5-inch,
internal hot-pluggable SAS hard drives.
• One slimline IDE DVD-ROM/CD-RW drive or slimline SATA
DVD-ROM/CD-RW drive (when available).
• Two hot-pluggable power supplies in a 1 + 1 redundant configuration.
• Four fan modules, each comprised of two dual-rotor fans, for a total
of eight cooling fans.
• Three x4 and four x8 PCI-Express expansion slots.
• I/O Riser card providing four Gigabit Ethernet NICs, capable of
supporting 10-Mbps, 100-Mbps, and 1000-Mbps data rates.
• Dedicated PCI slot for an integrated RAID controller card with 256 MB
of cache memory and a RAID battery.
NOTE: System boot is not supported from an external device attached to
a SAS or SCSI adapter, including SAS 5/E, PERC 5/E. See support.dell.com
for the latest support information about booting from external devices.
Getting Started With Your System 3

• Four USB 2.0-compliant connectors (two on the front and two on the
back) capable of external support for a diskette drive, a CD-ROM drive,
a keyboard, a mouse, or a USB flash drive.
• Optional remote access controller (Dell Remote Assistant Card or RAC)
for remote systems management.
• An integrated VGA-compatible video subsystem with an ATI ES1000,
33-MHz PCI video controller. This video subsystem contains a minimum
of 16MB of graphics memory with support for 2D graphics. Maximum
resolution is 1600x1200 with 65,536 colors; true-color graphics are
supported in the following resolutions: 640 x 480, 800 x 600, 1024 x 768,
1280 x 1024. When the optional RAC is installed, the maximum video
resolution is 1280x1024.
• Systems management circuitry that monitors operation of the system
fans as well as critical system voltages and temperatures. The systems
management circuitry works in conjunction with the systems management
software.
• Back-panel connectors include serial, video, two USB connectors,
and four NIC connectors.
• Front-panel connectors include a video and two USB connectors.
• Front-panel 1x5 LCD for system ID and error messaging.
For more information about specific features, see “Technical Specifications”
on page 11.
Supported Operating Systems
®
®
• Microsoft
Windows Server
2003
• Microsoft Windows Server 2003 R2 with SP2
®
•Red Hat
Enterprise Linux4 (version 4.5)
• Red Hat Enterprise Linux Server 5
®
•SUSE
Linux Enterprise Server 9 (x86_64)
• SUSE Linux Enterprise Server 10 (x86_64)
4 Getting Started With Your System
Other Information You Might Need
CAUTION: The Product Information Guide provides important safety and
regulatory information. Warranty information may be included within this
document or as a separate document.
• The
Rack Installation Guide
or
Rack Installation Instructions
included
with your rack solution describes how to install your system into a rack.
• The
Hardware Owner’s Manual
provides information about system
features and describes how to troubleshoot the system and install or
replace system components. This document may be found on the CDs
that came with your system or at
support.dell.com
.
• CDs included with your system provide documentation and tools for
configuring and managing your system.
• Updates are sometimes included with the system to describe changes
to the system, software, and/or documentation.
NOTE: Always check for updates on support.dell.com and read the updates
first because they often supersede information in other documents.
• Release notes or readme files may be included to provide last-minute
updates to the system or documentation or advanced technical reference
material intended for experienced users or technicians.
Obtaining Technical Assistance
If you do not understand a procedure in this guide or if the system
does not perform as expected, see your
Hardware Owner’s Manual
.
Dell™ Enterprise Training and Certification is available;
see
www.dell.com/training
for more information. This service may
not be offered in all locations.
Getting Started With Your System 5
Installation and Configuration
CAUTION: Before performing the following procedure, read and follow the safety
instructions and important regulatory information in your Product Information
Guide.
This section describes the steps to set up your system for the first time.
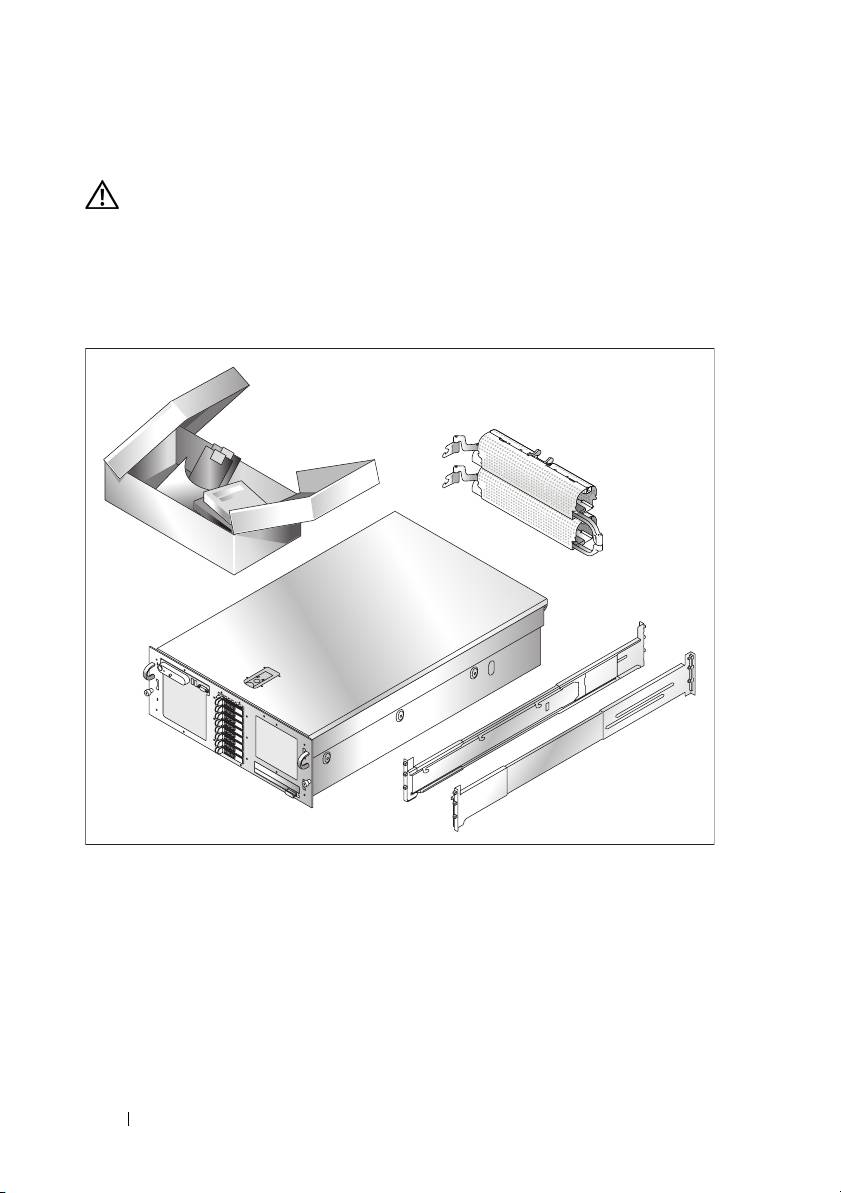
Unpacking the System
Unpack your system and identify each item. Keep all shipping materials in case
you need them later.
6 Getting Started With Your System
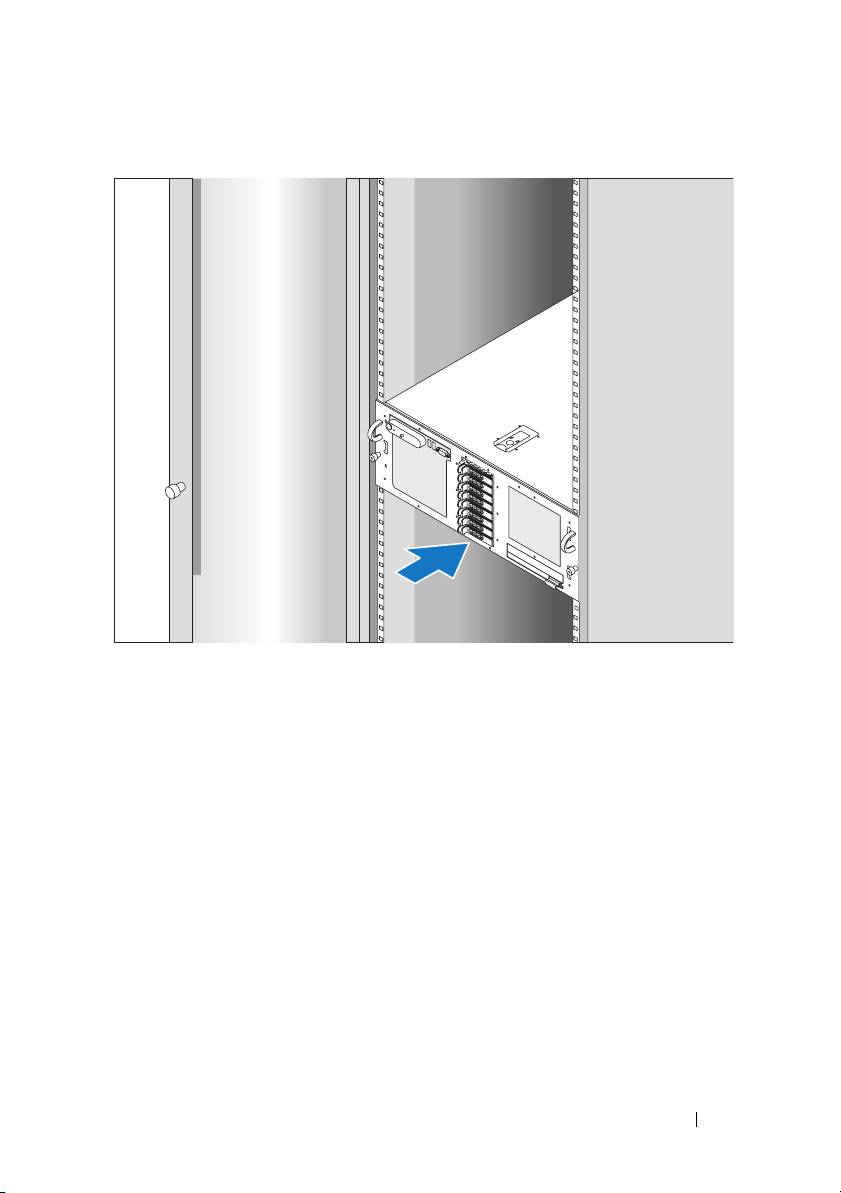
Installing the Rails and System in a Rack
Once you have read the "Safety Instructions" located in the rack installation
documentation for your system, install the rails and the system in the rack.
See your rack installation documentation for instructions on installing your
system in a rack.
Getting Started With Your System 7
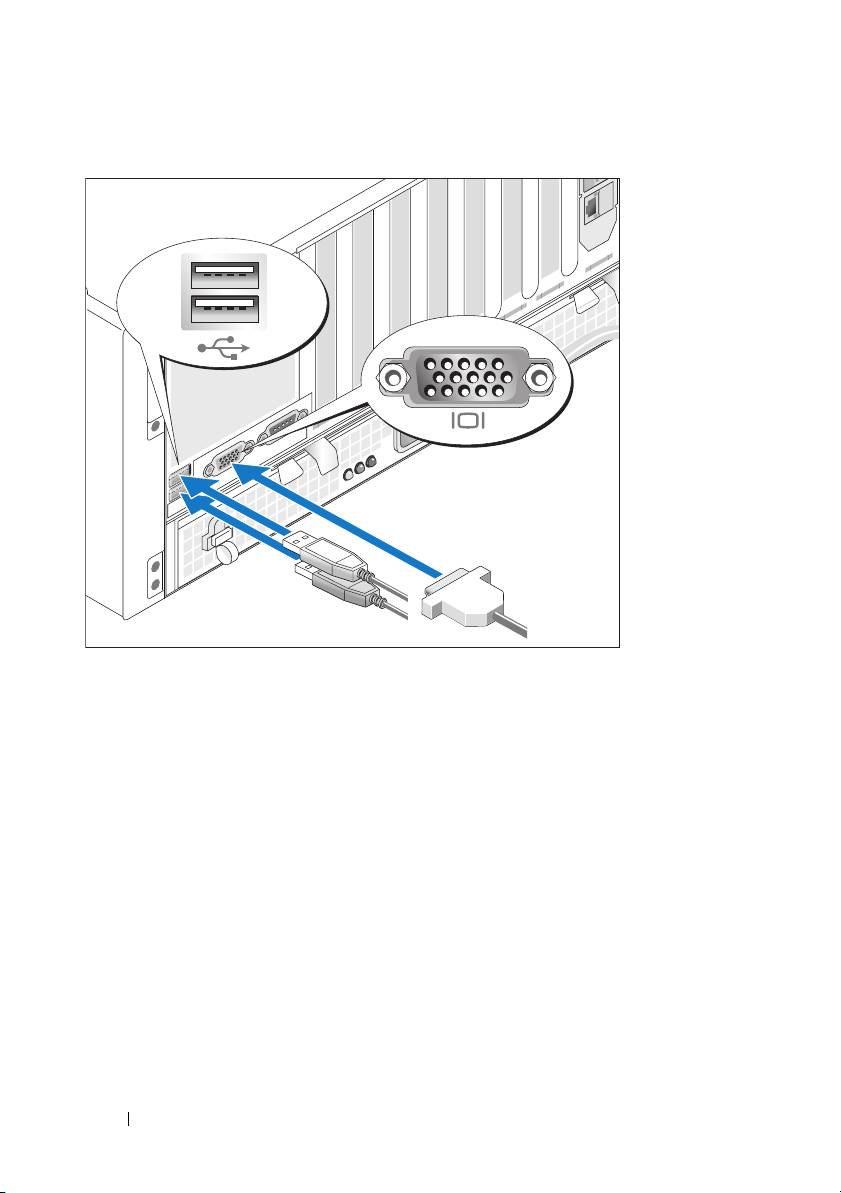
Connecting the Keyboard, Mouse, and Monitor
Connect the keyboard, mouse, and monitor (optional).
The connectors on the back of your system have icons indicating which cable to
plug into each connector. Be sure to tighten the screws (if any) on the monitor's
cable connector.
8 Getting Started With Your System
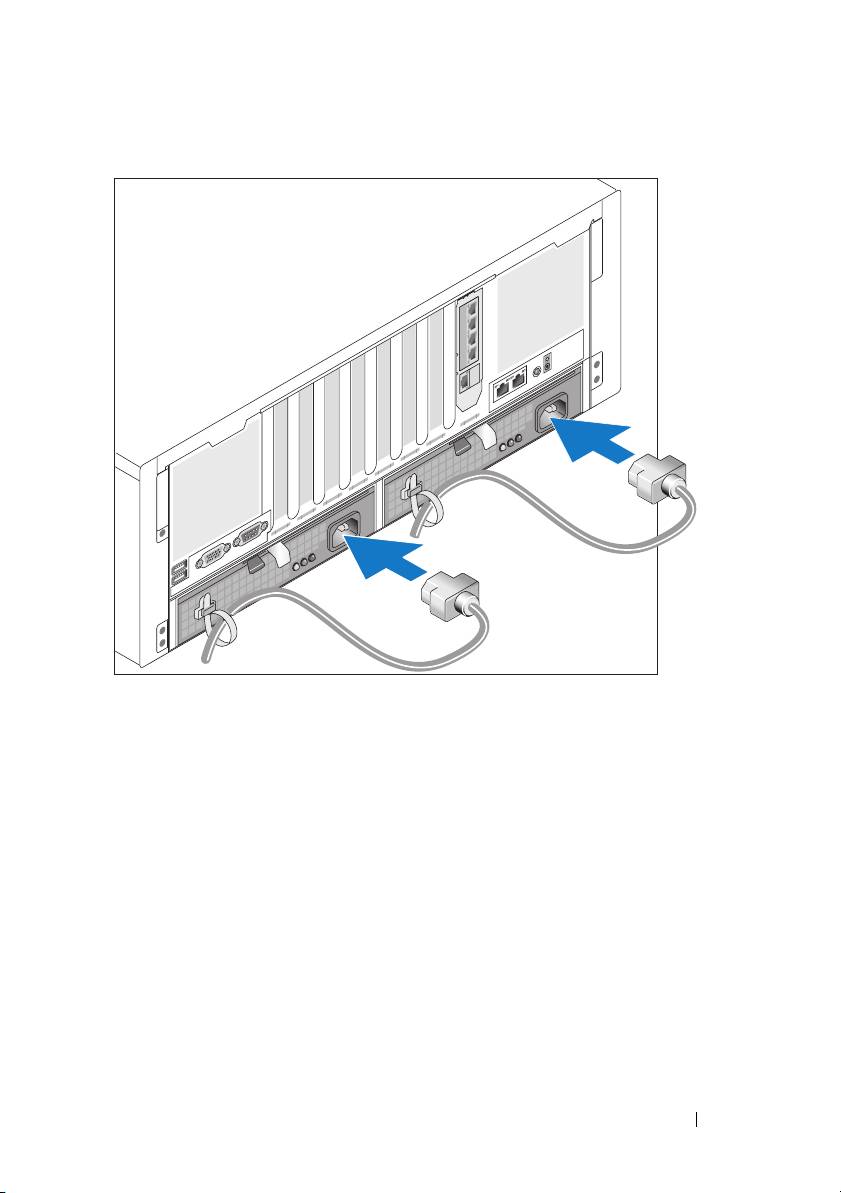
Connecting the Power
Connect the system’s power cable(s) to the system.
Secure the cables with the provided straps.
Plug the other end of the cable into a grounded electrical outlet or a separate
power source such as an uninterrupted power supply (UPS) or a power
distribution unit (PDU).
Getting Started With Your System 9
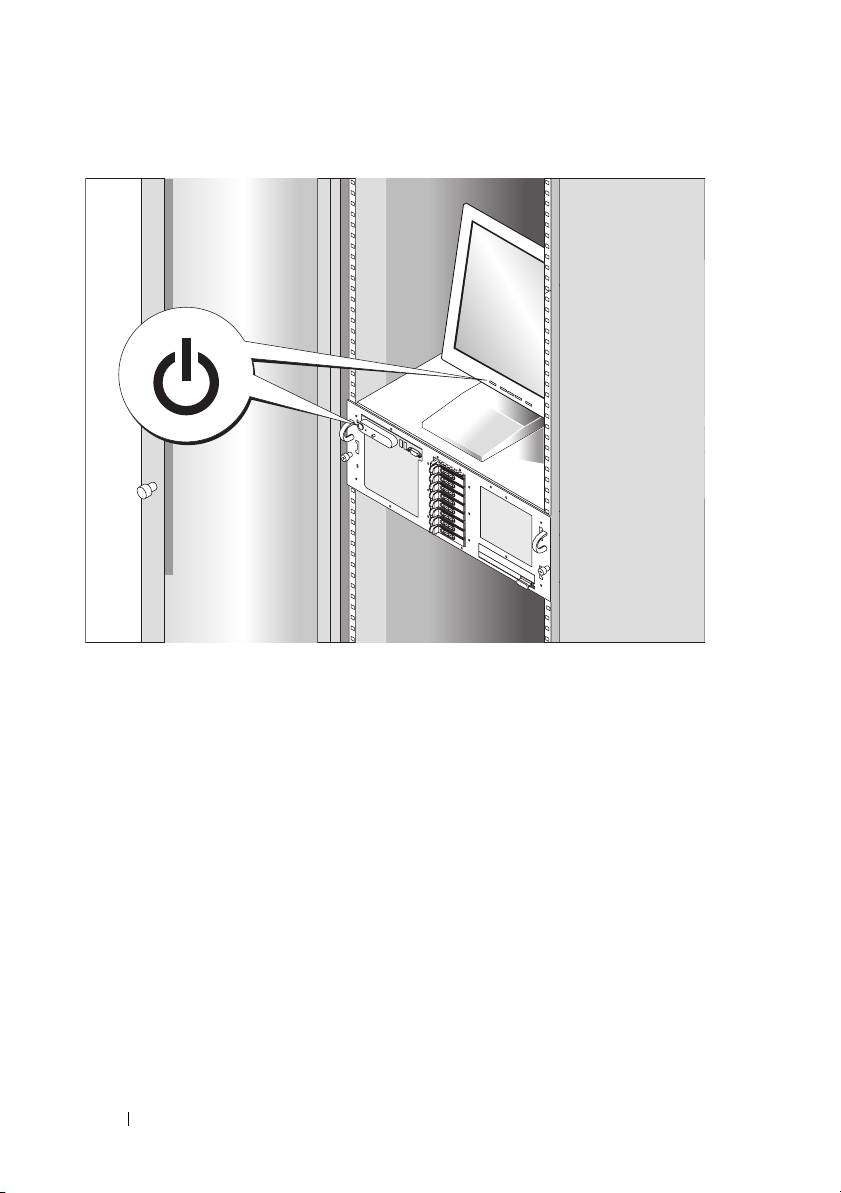
Turning the System On
Press the power button on the system and the monitor (optional) to turn on the
system. The power indicators should light. Adjust the monitor's controls until
the displayed image is satisfactory.
Complete the Operating System Setup
If you purchased a preinstalled operating system, see the operating system
documentation that ships with your system. To install an operating system for
the first time, see the
Quick Installation Guide
. Be sure the operating system is
installed before installing hardware or software not purchased with the system.
10 Getting Started With Your System

Technical Specifications
Processor
®
®
Processor type Two or four Quad-Core Intel
Xeon
processor 7300 series
Expansion Bus
Bus type PCI Express
Expansion slots Four x8 and three x4
Memory
Architecture PC2-5200 667 MHz fully-buffered
DIMMs with ECC protection and
two-way lockstep operation
Memory module sockets Thirty-two 240-pin
Memory module capacities 512 MB, 1 GB, 2 GB, 4 GB
Minimum RAM 2 GB
Maximum RAM 128 GB
Drives
SAS hard drives Up to five 3.5-inch, internal, hot-plug,
(optional) with backplane support
or
Up to eight 2.5-inch, internal, hot-plug,
(optional) with backplane support
Optical drive One slimline IDE DVD-ROM/CD-RW
drive or slimline SATA DVD-ROM/
CD-RW drive (when available)
NOTE: DVD devices are data only
Flash drive 4 pin, USB 2.0 compliant
Getting Started With Your System 11

Connectors
Back
NIC
Four RJ-45 (for integrated 1-GB NICs)
Serial
9-pin, DTE, 16550-compatible
USB
Two 4 pin, USB 2.0 compliant
Video
15-pin VGA
Front
Video
15-pin VGA
USB
Two 4 pin, USB 2.0 compliant
Video
Video type ATI ES1000 video controller; VGA
connector
Video memory 16 MB of DDR SDRAM
Power
AC power supply (per power supply)
Wattage (output)
1570W (200/240 VAC input)
1030W (100/127 VAC input)
Voltage (input)
90 - 140 VAC @ 47 - 63 HZ
180 - 264 VAC @ 47 - 63 HZ
Maximum power dissipation
350W
Maximum inrush current
55A
Batteries
System battery
CR2032 3.0-V lithium ion coin cell
RAID battery (optional)
3.7-V lithium ion
12 Getting Started With Your System

Physical
Rack
Height
6.8 inches (173 mm)
Width
17.6 inches (447 mm)
Depth
27.8 inches (706 mm)
Weight (maximum configuration)
90 lbs (40 kg)
Environmental
NOTE: For additional information about environmental measurements for specific
system configurations, see www.dell.com/environmental_datasheets.
Temperature
Operating
10 to 35°C (50 to 95°F)
Storage
-40 to 65°C (-40 to 149°F)
Relative humidity
Operating
20% to 80%
Storage
5% to 95%
Random vibration
Operating
0.26 Grms
Storage
1.54 Grms
Half sine shock
Operating
31 G +/- 5%
Storage
71 G +/- 5%
Altitude
Operating
-15.2 meters (-50 feet) to 3 048 meters
(10,000 feet)
Storage
-15.2 meters (-50 feet) to 10 668 meters
(35,000 feet)
Getting Started With Your System 13

14 Getting Started With Your System

Systémy Dell™ PowerEdge™ R900
Začínáme se systémem

Poznámky a upozornění
POZNÁMKA: POZNÁMKA označuje důležitou informaci, s jejíž pomocí
lépe využijete svůj počítač.
UPOZORNĚNÍ: UPOZORNĚNÍ poukazuje na možnost poškození
hardwaru nebo ztráty dat a poskytuje návod, jak se danému problému
vyhnout.
POZOR: POZOR označuje hrozící nebezpečí poškození majetku,
poranění nebo usmrcení osob.
Informace obsažené v tomto dokumentu podléhají změnám bez předchozího upozornění.
© 2007 Dell Inc. Všechna práva vyhrazena.
Reprodukce jakýmkoli způsobem bez písemného povolení společnosti Dell Inc. je přísně zakázána.
Ochranné známky použité v tomto textu: Dell a logo DELL jsou ochranné známky společnosti Dell Inc.
Intel a Xeon jsou registrované ochranné známky společnosti Intel Corporation. Microsoft, Windows
a Windows Server jsou registrované ochranné známky společnosti Microsoft Corporation v USA
a dalších zemích. Red Hat je registrovaná ochranná známka společnosti Red Hat, Inc. SUSE je
registrovaná ochranná známka společnosti Novell, Inc.
V tomto dokumentu mohou být použity další ochranné známky a obchodní názvy buď s odkazem na
právnické osoby a organizace, které uplatňují na dané ochranné známky a obchodní názvy nárok, nebo
s odkazem na jejich výrobky. Společnost Dell Inc. se zříká jakýchkoli vlastnických zájmů o jiné než
vlastní ochranné známky a obchodní názvy.
Září 2007 Č. dílu XK944 Rev. A00

Systémové funkce
Hlavní hardwarové a softwarové funkce systému jsou:
®
®
•
Dva nebo čtyři čtyřjádrové procesory řady Intel
Xeon
7300.
•
Podpora SMP (symmetric multiprocessing), která je k dispozici u systémů
se dvěma nebo čtyřmi mikroprocesory Intel Xeon. SMP výrazně zvyšuje
celkový výkon systému rozdělením mikroprocesorových operací mezi
nezávislé mikroprocesory. Chcete-li tuto funkci využít, je třeba použít
operační systém podporující SMP.
POZNÁMKA:
Jestliže se rozhodnete pro upgrade systému instalací
dalších mikroprocesorů, objednejte sady pro upgrade mikroprocesoru
od společnosti Dell. Ne všechny verze mikroprocesorů Intel Xeon
jsou na pozici dalších mikroprocesorů plně funkční. Sada pro upgrade
od společnosti Dell obsahuje správnou verzi mikroprocesoru spolu
s pokyny k provedení upgradu. Všechny mikroprocesory musí
mít stejnou vnitřní operační frekvenci a velikost mezipaměti.
•
Minimálně 2 GB paměti RAM v paměťových modulech FBD
(Fully Buffered DIMM) s frekvencí 667 MHz, s možností rozšíření
až na 128 GB instalací příslušných kombinací paměťových modulů
o velikostech 512 MB, 1 GB, 2 GB nebo 4 GB na čtyři paměťové
zvedací karty.
•
Podpora až pěti 3,5palcových interních pevných disků SAS
(Serial Attached SCSI) připojitelných za provozu nebo až osmi
2,5palcových interních pevných disků SAS připojitelných za provozu.
•
Jedna jednotka DVD-ROM/CD-RW IDE (slim-line) nebo
DVD-ROM/CD-RW SATA (slim-line) (je-li k dispozici).
•
Dva napájecí zdroje připojitelné za provozu v konfiguraci 1 + 1 záložní.
•
Čtyři ventilátorové moduly, každý modul sestává ze dvou ventilátorů
s duálním rotorem, celkem tedy osm chladicích ventilátorů.
•
Tři rozšiřovací sloty PCI-Express x4 a čtyři sloty x8.
•
Vstupně-výstupní zvedací karta se čtyřmi síťovými kartami Gigabit Ethernet
podporujícími datové přenosy rychlostí 10 Mb/s, 100 Mb/s a 1000 Mb/s.
Začínáme se systémem 17

•
Vyhrazený slot PCI pro integrovanou kartu řadiče RAID s 256 MB
mezipaměti a baterií RAID.
POZNÁMKA:
Spouštění systému není podporováno z externího
zařízení připojeného k adaptéru SAS nebo SCSI, včetně SAS 5/E
nebo PERC 5/E. Aktuální informace o podpoře spouštění z externích
zařízení naleznete na adrese
support.dell.com
.
•
Čtyři konektory USB 2.0 (dva na přední a dva na zadní straně) podporující
externí disketovou jednotku, jednotku CD-ROM, klávesnici, myš nebo
disk USB flash.
•
Volitelný ovladač pro vzdálený přístup (Dell Remote Assistant Card neboli
RAC) umožňující vzdálenou správu systému.
•
Integrovaný grafický subsystém VGA s grafickou kartou ATI ES1000,
33 MHz PCI. Tento grafický subsystém disponuje minimálně 16 MB
grafické paměti s podporou grafiky 2D. Maximální rozlišení je
1600 x 1200 bodů při 65 536 barvách. Zobrazení true color je podporováno
v následujících rozlišeních: 640 x 480, 800 x 600, 1024 x 768, 1280 x 1024.
Je-li nainstalována volitelná karta ovladače pro vzdálený přístup (RAC),
je maximální grafické rozlišení 1280 x 1024.
•
Okruhy systémové správy monitorující funkci systémových ventilátorů
a kritická napětí a teploty v systému. Okruhy systémové správy spolupracují
se softwarem systémové správy.
•
Konektory na zadním panelu: jeden sériový, jeden pro video, dva USB
a čtyři síťové.
•
Konektory na předním panelu: video a dva USB.
•
Displej LCD 1 x 5 palců na předním panelu pro zobrazení systémového ID
a chybových hlášení.
Další informace o specifických funkcích najdete v části „Technické specifikace“
na straně 26.
18 Začínáme se systémem
