Dell Latitude D530 (Early 2008): instruction
Class: Computer equipment, hardware, accessories
Type: Laptop/Notebook Computer
Manual for Dell Latitude D530 (Early 2008)
Table of contents
- Notes, Notices, and Cautions
- Contents
- Finding Information What Are You Looking For? Find It Here
- What Are You Looking For? Find It Here
- What Are You Looking For? Find It Here
- What Are You Looking For? Find It Here
- What Are You Looking For? Find It Here
- What Are You Looking For? Find It Here
- What Are You Looking For? Find It Here Setting Up Your Computer Transferring Information to a New Computer
- Microsoft Windows XP Running the Files and Settings Transfer Wizard With the Operating System Disc
- To copy data from the old computer: To transfer data to the new computer:
- Running the Files and Settings Transfer Wizard Without the Operating System Disc
- To transfer data to the new computer: Microsoft Windows Vista
- Turning Off Your Computer
- About Your Computer Front View
- Left Side View Right Side View
- Back View
- Bottom View
- Using a Battery Battery Performance
- Checking the Battery Charge Charge Gauge
- Check the Battery Charge Check the Battery Health Low-Battery Warning
- Conserving Battery Power Power Management Modes Standby and Sleep Mode
- Hibernate Mode
- Configuring Power Management Settings Accessing Power Options Properties Windows XP Windows Vista Charging the Battery
- Replacing the Battery
- Storing a Battery Troubleshooting
- Lockups and Software Problems
- A solid blue screen appears Other software problems
- When to Use the Dell Diagnostics Starting the Dell Diagnostics From Your Hard Drive
- Starting the Dell Diagnostics From the Optional Drivers and Utilities Disc
- Dell Diagnostics Main Menu Option Function Tab Function
- Tab Function
- Index
- 36 Index
- Index 37

Dell™ Latitude™ D530
Quick Reference Guide
Model PP17L
www.dell.com | support.dell.com

Notes, Notices, and Cautions
NOTE: A NOTE indicates important information that helps you make better use of
your computer.
NOTICE: A NOTICE indicates either potential damage to hardware or loss of data
and tells you how to avoid the problem.
CAUTION: A CAUTION indicates a potential for property damage, personal injury,
or death.
____________________
Information in this document is subject to change without notice.
© 2007 Dell Inc. All rights reserved.
Reproduction in any manner whatsoever without the written permission of Dell Inc. is strictly
forbidden.
Trademarks used in this text: Dell, the DELL logo, Latitude, ExpressCharge, and Undock & Go are
trademarks of Dell Inc.; Microsoft, Windows, Outlook, and Windows Vista are either trademarks or
registered trademarks of Microsoft Corporation in the United States and/or other countries; Bluetooth
is a registered trademark owned by Bluetooth SIG, Inc. and is used by Dell under license.
Other trademarks and trade names may be used in this document to refer to either the entities claiming
the marks and names or their products. Dell Inc. disclaims any proprietary interest in trademarks and
trade names other than its own.
Model PP17L
September 2007 P/N NM074 Rev. A00

Contents
Finding Information . . . . . . . . . . . . . . . . . . . . 5
Setting Up Your Computer
. . . . . . . . . . . . . . . . 11
Transferring Information to a New
Computer
. . . . . . . . . . . . . . . . . . . . . . 11
Turning Off Your Computer
. . . . . . . . . . . . . 16
About Your Computer . . . . . . . . . . . . . . . . . . 17
Front View
. . . . . . . . . . . . . . . . . . . . . 17
Left Side View
. . . . . . . . . . . . . . . . . . . 18
Right Side View
. . . . . . . . . . . . . . . . . . 18
Back View
. . . . . . . . . . . . . . . . . . . . . 19
Bottom View
. . . . . . . . . . . . . . . . . . . . 20
Using a Battery
. . . . . . . . . . . . . . . . . . . . . 21
Battery Performance
. . . . . . . . . . . . . . . . 21
Checking the Battery Charge
. . . . . . . . . . . 22
Power Management Modes
. . . . . . . . . . . . 24
Configuring Power Management Settings
. . . . . 26
Accessing Power Options Properties
. . . . . . . 26
Charging the Battery
. . . . . . . . . . . . . . . . 26
Replacing the Battery
. . . . . . . . . . . . . . . 27
Storing a Battery
. . . . . . . . . . . . . . . . . . 28
Troubleshooting
. . . . . . . . . . . . . . . . . . . . . 28
Lockups and Software Problems
. . . . . . . . . 29
Dell Diagnostics
. . . . . . . . . . . . . . . . . . 30
Index . . . . . . . . . . . . . . . . . . . . . . . . . . . . . . . 35
Contents 3

4 Contents
Finding Information
NOTE: Some features or media may be optional and may not ship with your
computer. Some features or media may not be available in certain countries.
NOTE: Additional information may ship with your computer.
What Are You Looking For? Find It Here
• A diagnostic program for my computer
Drivers and Utilities Disc
• Drivers for my computer
Documentation and drivers are already
installed on your computer. You can use
• My device documentation
the disc to reinstall drivers (see
• Notebook System Software (NSS)
"Reinstalling Drivers and Utilities" in
your User’s Guide) or to run the Dell
Diagnostics (see "Starting the Dell
Diagnostics From the Optional Drivers
and Utilities Disc" on page 32).
Readme files may be included on your
disc to provide last-minute updates
about technical changes to your
computer or advanced technical-
reference material for technicians or
experienced users.
NOTE: Drivers and documentation
updates can be found at support.dell.com.
NOTE: The Drivers and Utilities disc may
be optional and may not ship with your
computer.
Quick Reference Guide 5

What Are You Looking For? Find It Here
• Warranty information
Dell™ Product Information Guide
• Terms and Conditions (U.S. only)
• Safety instructions
• Regulatory information
• Ergonomics information
• End User License Agreement
• Specifications
Dell Latitude™ User’s Guide
®
®
• How to configure system settings
Microsoft
Windows
XP and Windows
Vista™ Help and Support Center
• How to troubleshoot and solve
1
Click
Start
→
Help and Support
→
problems
Dell User and System Guides
→
System Guides
.
2
Click the
User’s Guide
for your
computer.
6 Quick Reference Guide

What Are You Looking For? Find It Here
®
®
• Service Tag and Express Service Code
Service Tag and Microsoft
Windows
License
• Microsoft Windows License Label
NOTE: Your computer’s Service Tag and
Microsoft Windows License labels are
located on your computer.
Your computer’s Service Tag contains
both a Service Tag number and an
Express Service Code.
• Use the Service Tag to identify your
computer when you use
support.dell.com
or contact support.
• Enter the Express Service Code to
direct your call when contacting
support.
• Use the product key on the License
Label if you need to reinstall your
operating system.
NOTE: As an increased security measure,
the newly designed Microsoft Windows
license label incorporates a missing
portion or "hole" to discourage removal of
the label.
Quick Reference Guide 7

What Are You Looking For? Find It Here
• Solutions — Troubleshooting hints
Dell Support Website — support.dell.com
and tips, articles from technicians, and
NOTE: Select your region or business
online courses, frequently asked
segment to view the appropriate support
questions
site.
• Community — Online discussion with
other Dell customers
• Upgrades — Upgrade information for
components, such as memory, the hard
drive, and the operating system
• Customer Care — Contact
information, service call and order
status, warranty, and repair
information
• Service and support — Service call
status and support history, service
contract, online discussions with
technical support
• Dell Technical Update Service —
Proactive e-mail notification of
software and hardware updates for
your computer
• Reference — Computer
documentation, details on my
computer configuration, product
specifications, and white papers
• Downloads — Certified drivers,
patches, and software updates
8 Quick Reference Guide

What Are You Looking For? Find It Here
• Notebook System Software (NSS) —
To download Notebook System
If you reinstall the operating system
Software:
for your computer, you should also
1
Go to
support.dell.com
and click
reinstall the NSS utility. NSS provides
Drivers & Downloads
.
critical updates for your operating
2
Enter your Service Tag and click
Go
,
or
system and support for processors,
select your Product Type and Product
optical drives, USB devices, and so on.
Model and click
Confirm
.
NSS is necessary for correct operation
3
Click the plus sign (
+)
by
System
of your Dell computer. The software
Utilities
, click
Notebook System
automatically detects your computer
Software
, and click
Download Now
.
and operating system and installs the
4
Click
Run
to run the utility.
updates appropriate for your
configuration.
NOTE: The support.dell.com user
interface may vary depending on your
selections.
• Software upgrades and
Dell Support Utility
troubleshooting hints — Frequently
The Dell Support Utility is an
asked questions, hot topics, and
automated upgrade and notification
general health of your computing
system installed on your computer. This
environment
support provides real-time health scans
of your computing environment,
software updates, and relevant self-
support information. Access the Dell
Support Utility from the
icon in the
taskbar.
• How to find information about my
Windows Welcome Center
computer and its components
The Windows Welcome Center
• How to connect to the Internet
automatically appears when you use the
computer for the first tme. You can
• How to add user accounts for different
choose to have it appear every time you
people
start your PC by placing a check in the
• How to transfer files and settings from
Run at startup checkbox. Another
another computer
method of accessing the Welcome
Center is to click the Windows Vista
Start button , and then click
Welcome Center
.
Quick Reference Guide 9

What Are You Looking For? Find It Here
• How to use Microsoft Windows XP
Windows Help and Support
• How to use Microsoft Windows Vista
Microsoft Windows XP:
1
Click the
Start
button and click
Help
• How to work with programs and files
and Support
.
• How to personalize my desktop
2
Either select one of the topics listed, or
type a word or phrase that describes
your problem into the
Search
box,
click the arrow icon, and then click the
topic that describes your problem.
3
Follow the instructions on the screen.
Microsoft Windows Vista:
1
Click the Windows Vista Start button
, and then click
Help and Support
.
2
In
Search Help
, type a word or phrase
that describes your problem, and then
press <Enter> or click the magnifying
glass.
3
Click the topic that describes your
problem.
4
Follow the instructions on the screen.
• Information on network activity, the
Dell QuickSet Help
Power Management Wizard, hotkeys,
To view
Dell QuickSet Help
,
right-click
and other items controlled by Dell
the QuickSet icon in the Microsoft
QuickSet.
Windows taskbar, and select Help. The
taskbar is located in the lower-right
corner of your screen.
• How to reinstall my operating system
Operating System Disc
NOTE: The Operating System disc may be
optional and may not ship with your
computer.
NOTE: Pre-installed operating systems
include a recover partition to restore your
PC operating system.
10 Quick Reference Guide
What Are You Looking For? Find It Here
The operating system is already installed
on your computer. To reinstall your
operating system, use the Operating
System disc.
After you reinstall your operating
system, use the Drivers and Utilities disc
to reinstall drivers for the devices that
came with your computer.
Your operating system product key label
is located on your computer.
NOTE: The color of your disc varies
based on the operating system you
ordered.
Setting Up Your Computer
Transferring Information to a New Computer
You can use your operating system "wizards" to help you transfer files and
other data from one computer to another—for example, from an old
computer to a new computer. For instructions, see the following section that
corresponds to the operating system that your computer is running.
Quick Reference Guide 11

Microsoft Windows XP
The Microsoft
Windows XP operating system provides the Files and Settings
Transfer Wizard to move data from a source computer to a new computer.
You can transfer data, such as:
• E-mail messages
• Toolbar settings
• Window sizes
• Internet bookmarks
You can transfer the data to the new computer over a network or serial
connection, or you can store it on removable media, such as a writable CD,
for transfer to the new computer.
NOTE: You can transfer information from an old computer to a new computer by
directly connecting a serial cable to the input/output (I/O) ports of the two
computers. To transfer data over a serial connection, you must access the Network
Connections utility from the Control Panel and perform additional configuration
steps, such as setting up an advanced connection and designating the host
computer and the guest computer.
For instructions on setting up a direct cable connection between two computers,
see Microsoft Knowledge Base Article #305621, titled How to Set Up a Direct Cable
Connection Between Two Computers in Windows XP. This information may not be
available in certain countries.
For transferring information to a new computer, you must run the Files and
Settings Transfer Wizard. You can use the optional Operating System disc for
this process or you can create a wizard disk with the Files and Settings
Transfer Wizard.
Running the Files and Settings Transfer Wizard With the Operating System Disc
NOTE: This procedure requires the Operating System disc. This disc is optional and
may not be included with certain computers.
To prepare a new computer for the file transfer:
1
Open the Files and Settings Transfer Wizard: click
Start
→
All Programs
→
Accessories
→
System Tools
→
Files and Settings Transfer Wizard
.
2
When the
Files and Settings Transfer Wizard
welcome screen appears,
click
Next
.
12 Quick Reference Guide

3
On the
Which computer is this?
screen, click
New Computer
→
Next
.
4
On the
Do you have a Windows XP CD?
screen, click
I will use the wizard
from the Windows XP CD
→
Next
.
5
When the
Now go to your old computer
screen appears, go to your old or
source computer. Do
not
click
Next
at this time.
To copy data from the old computer:
1
On the old computer, insert the Windows XP
Operating System
disc.
2
On the
Welcome to Microsoft Windows XP
screen, click
Perform
additional tasks
.
3
Under
What do you want to do?
, click
Transfer files and settings
→
Next
.
4
On the
Which computer is this?
screen, click
Old Computer
→
Next
.
5
On the
Select a transfer method
screen, click the transfer method you
prefer.
6
On the
What do you want to transfer?
screen, select the items you want to
transfer and click
Next
.
After the information has been copied, the
Completing the Collection
Phase
screen appears.
7
Click
Finish
.
To transfer data to the new computer:
1
On the
Now go to your old computer
screen on the new computer, click
Next
.
2
On the
Where are the files and settings?
screen, select the method you
chose for transferring your settings and files and click
Next
.
The wizard reads the collected files and settings and applies them to your
new computer.
When all of the settings and files have been applied, the
Finished
screen
appears.
3
Click
Finished
and restart the new computer.
Quick Reference Guide 13

Running the Files and Settings Transfer Wizard Without the Operating System
Disc
To run the Files and Settings Transfer Wizard without the Operating System
disc, you must create a wizard disc that will allow you to create a backup
image file to removable media.
To create a wizard disk, use your new computer with Windows XP and
perform the following steps:
1
Open the Files and Settings Transfer Wizard: click
Start
→
All Programs
→
Accessories
→
System Tools
→
Files and Settings Transfer Wizard
.
2
When the
Files and Settings Transfer Wizard
welcome screen appears,
click
Next
.
3
On the
Which computer is this?
screen, click
New Computer
→
Next
.
4
On the
Do you have a Windows XP CD?
screen, click
I want to create a
Wizard Disk in the following drive
→
Next.
5
Insert the removable media, such as a writable CD, and click
OK
.
6
When the disk creation completes and the
Now go to your old
computer
message appears,
do not
click
Next
.
7
Go to the old computer.
To copy data from the old computer:
1
On the old computer, insert the wizard disk.
2
Click
Start
→
Run
.
3
In the
Open
field on the
Run
window, browse to the path for
fastwiz
(on
the appropriate removable media) and click
OK
.
4
On the
Files and Settings Transfer Wizard
welcome screen, click
Next
.
5
On the
Which computer is this?
screen, click
Old Computer
→
Next
.
6
On the
Select a transfer method
screen, click the transfer method you
prefer.
7
On the
What do you want to transfer?
screen, select the items you want to
transfer and click
Next
.
After the information has been copied, the
Completing the Collection
Phase
screen appears.
8
Click
Finish
.
14 Quick Reference Guide

To transfer data to the new computer:
1
On the
Now go to your old computer
screen on the new computer, click
Next
.
2
On the
Where are the files and settings?
screen, select the method you
chose for transferring your settings and files and click
Next
. Follow the
instructions on the screen.
The wizard reads the collected files and settings and applies them to your
new computer.
When all of the settings and files have been applied, the
Finished
screen
appears.
3
Click
Finished
and restart the new computer.
NOTE: For more information about this procedure, search support.dell.com for
document #154781 (What Are The Different Methods To Transfer Files From My Old
®
®
Computer To My New Dell™ Computer Using the Microsoft
Windows
XP
Operating System?).
NOTE: Access to the Dell Knowledge Base document may not be available in
certain countries.
Microsoft Windows Vista
1
Click the Windows Vista Start button , and then click
Transfer files
and settings
→
Start Windows Easy Transfer
.
2
In the
User Account Control
dialog box, click
Continue
.
3
Click
Start a new transfer
or
Continue a transfer in progress
.
Follow the instructions provided on the screen by the Windows Easy Transfer
wizard.
Quick Reference Guide 15

Turning Off Your Computer
NOTICE: To avoid losing data, save and close all open files and exit all open
programs before you turn off your computer.
1
Shut down the operating system:
a
Save and close all open files and exit all open programs.
b
In the Microsoft Windows XP operating system
, click
Start
→
Shut
Down
→
Shut down
.
In the Microsoft Windows Vista™ operating system,
click the Windows
Vista Start button , click the arrow in the lower-right corner of the
Start menu as shown below, and then click
Shut Down
.
The computer turns off after the operating system shutdown process
is complete.
2
Ensure that the computer and all attached devices are turned off. If your
computer and attached devices did not automatically turn off when you
shut down your operating system, press and hold the power button for
about 4 seconds to turn them off.
16 Quick Reference Guide
About Your Computer
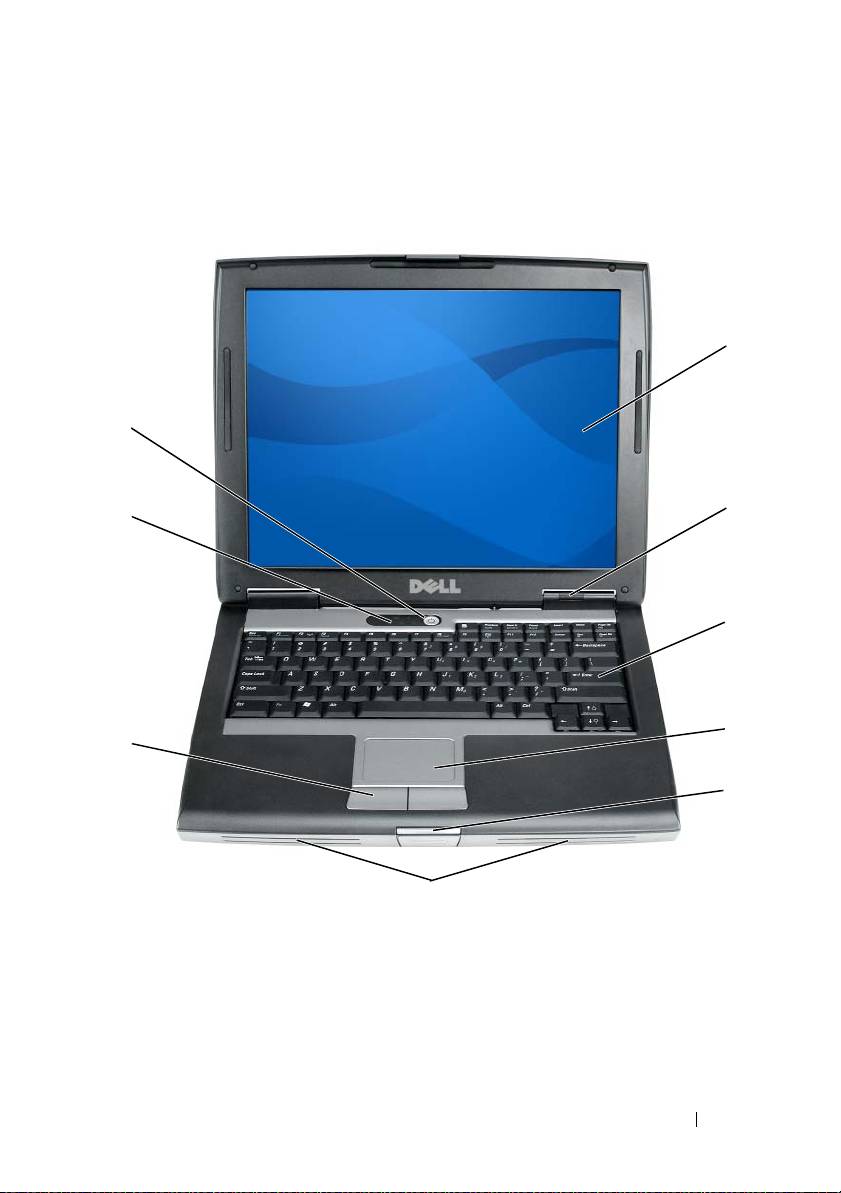
Front View
1
9
2
8
3
4
7
5
6
1 display 2 device status lights
3 keyboard 4 touch pad
5 display latch 6 speaker
7 touch pad buttons 8 keyboard status lights
9 power button
Quick Reference Guide 17
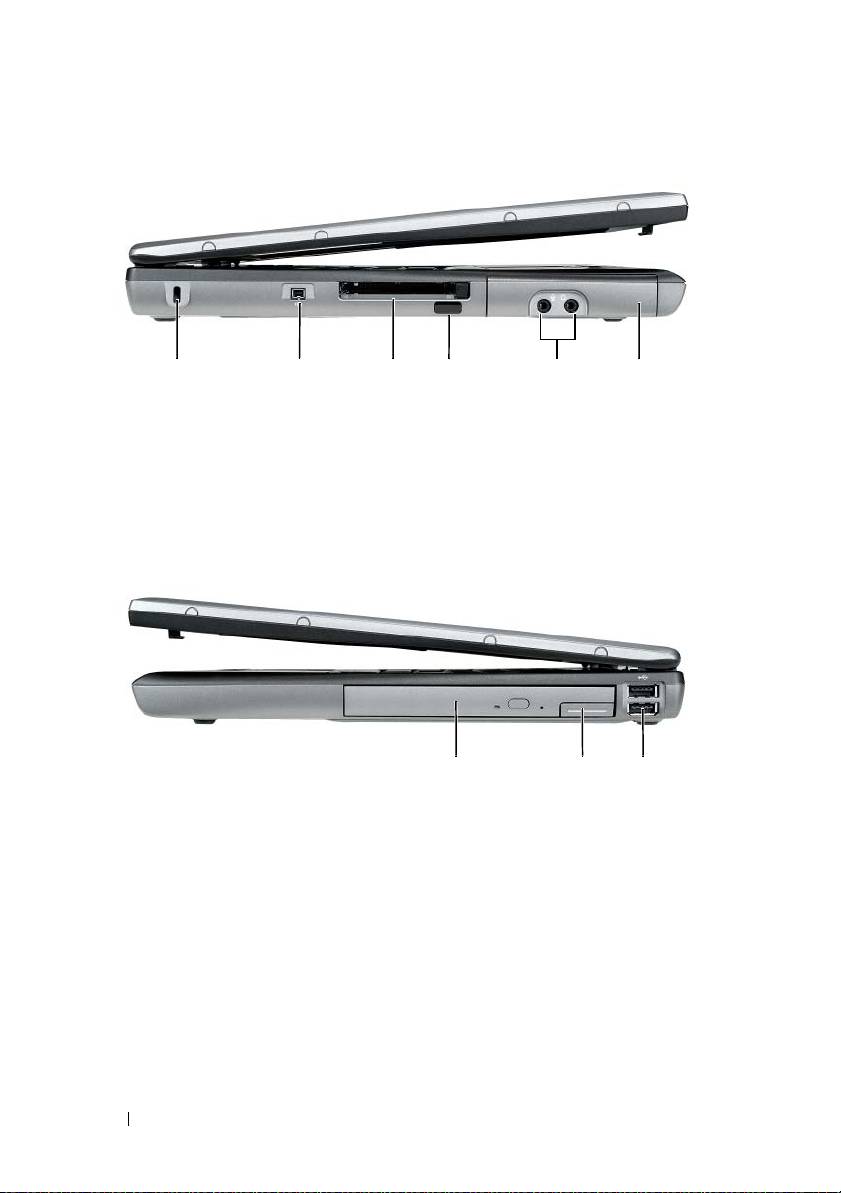
Left Side View
352 41 6
1 security cable slot 2 IEEE 1394 Connector
3 PC Card/ExpressCard slot 4 infrared sensor
5 audio connectors (2) 6 hard drive
Right Side View
1 23
1 media bay 2 device latch release
3 USB connectors (2)
18 Quick Reference Guide
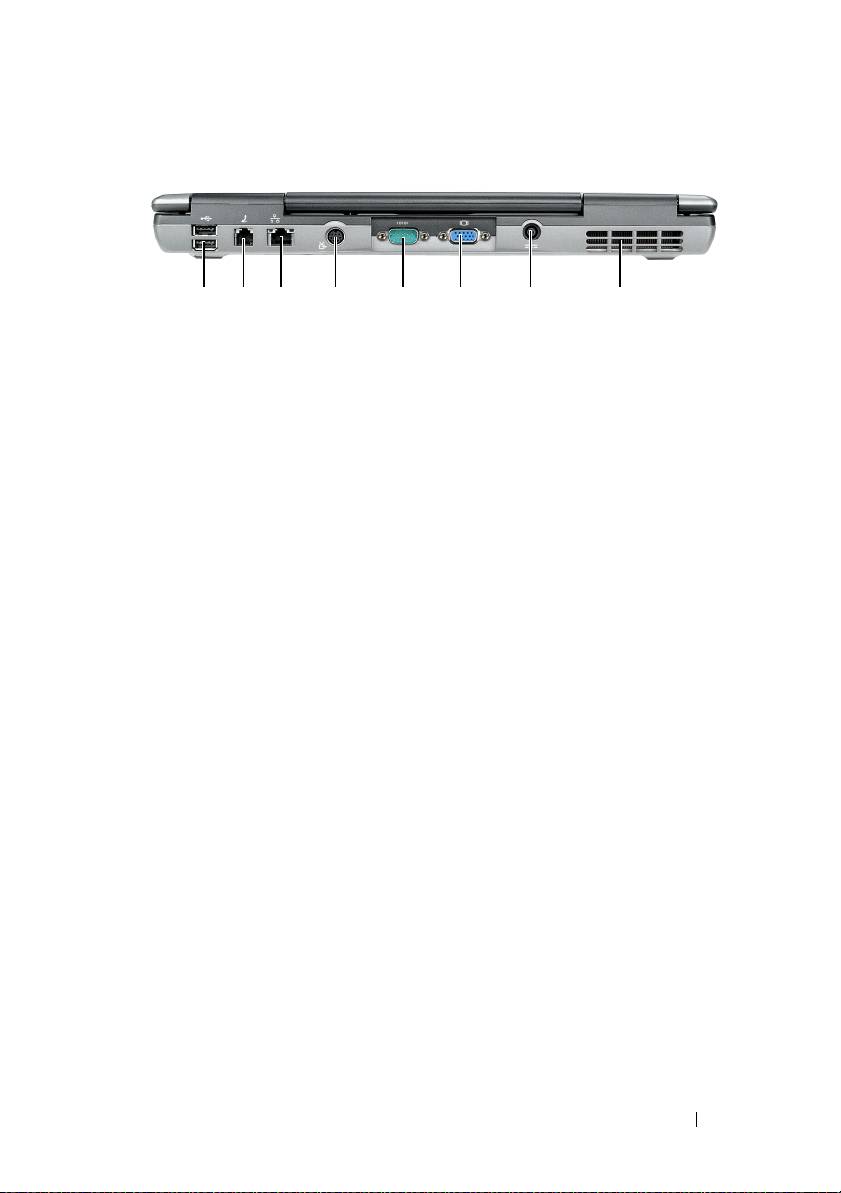
Back View
8123 4 5 6 7
1 USB connectors (2) 2 modem connector (RJ-11)
3 network connector (RJ-45) 4 S-video TV-out connector
5 serial connector 6 video connector
7 AC adapter connector 8 air vents
Quick Reference Guide 19
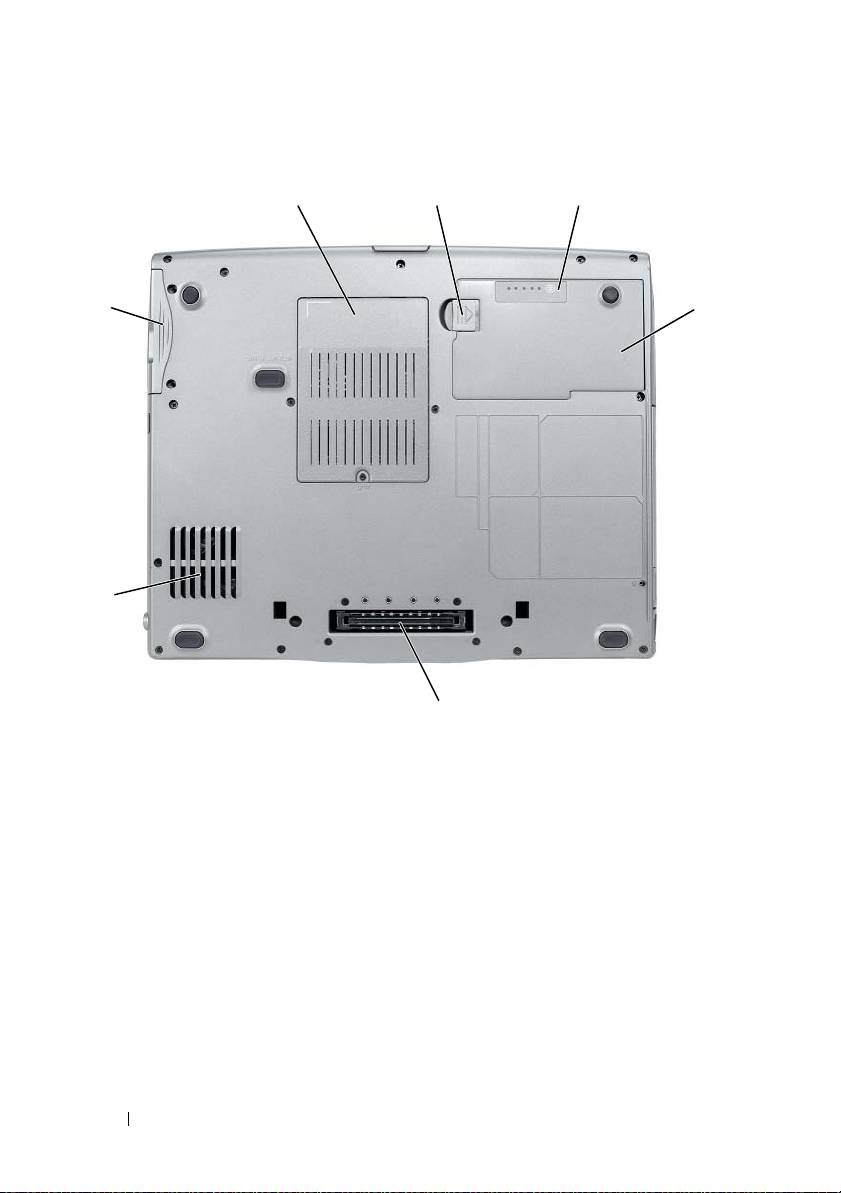
Bottom View
1
2
3
7
4
6
5
1 memory module/modem/WLAN
2 battery-bay latch release
Mini-Card/coin-cell battery
cover
3 battery charge gauge/health
4battery
gauge
5 docking-device connector 6 air vents
7 hard drive
20 Quick Reference Guide
