Dell J716N: instruction
Class: Tools, power tools and power equipment
Type:
Manual for Dell J716N
Table of contents
- Getting Started With Your System
- Notes and Warnings
- System Features
- Finding Information
- Installation and Startup Unpacking the System
- Identifying the UPS Figure 1. The Dell Tower UPS Figure 2. UPS Rear Panel (1000W, 120V Rear Panel)
- Removing the UPS Front Cover Removing the Battery Cover
- Connecting the Internal Battery Connector
- Connecting the Equipment
- Connecting the Power Cord
- Starting the UPS Completing the Startup

Dellt Tower UPS
500W, 1000W, and 1920/1500W
Getting Started With
Your System
Démarrage avec votre système
Erste Schritte Mit Ihrem System
Начало работы c вашей системой
Inicio de su sistema
系统使用 入门指南
系統使用 入門指南
사용자의 시스템 시작하기
はじめに システムについて
H900N, J715N, K788N, H914N, J716N, K789N
www.dell.com | support.dell.com


Dellt Tower UPS
500W, 1000W, and 1920/1500W
Getting Started
With Your System
Démarrage avec votre système
Erste Schritte Mit Ihrem System
Начало работы c вашей системой
Inicio de su sistema
系统使用 入门指南
系統使用 入門指南
사용자의 시스템 시작하기
はじめに システムについて
H900N, J715N, K788N, H914N, J716N, K789N
www.dell.com | support.dell.com
Notes and Warnings
NOTE: A NOTE indicates important information that helps you make better use of your software.
CAUTION: A CAUTION indicates a potentially hazardous situation w hich, if not avoided, may result in minor or
moderate injury or in property damage incidents.
WARNING: A WARNING indicates a potentially hazardous situation which, if not avoided, could result i n death or
injury.
DANGER: A DANGER indicates an imminently hazardous situation which, if not avoided, will result in death or
serious injury.
DANGER: Observe t he following instruction to help prevent an imminently hazardous situation which, if not
avoided, will result in death or s erious injury:
S This UPS contains LETHAL VOLTAGES. All repairs and service should be performed by
AUTHORIZED SERVICE PERSONNEL ONLY.ThereareNO USER SERVICEABLE PARTS
inside the UPS.
Information in this document is subject to change without notice.
E 2009 Dell Inc. All rights reserved.
Reproduction in any manner whatsoever without the written permission of Dell Inc. is strictly forbidden.
Trademarks used in this text: Dell and the DELL logo are trademarks of Dell Inc.; Phillips is a registered trademark of Phillips Screw
Company.
Other trademarks and trade names may be used in this document to refer to either the entities claiming the marks and names or their
products. Dell Inc. disclaims any proprietary interest in trademarks and trade names other than its own.
July 2009

System Features
Providing outstanding performance and reliability, the UPS's unique benefits include:
S Buck and Boost voltage regulation that ensures regulated voltage to your load by correcting voltage
fluctuations.
S Start-on-battery capability for powering up the UPS even i f utility power is not available.
S Extended runtime with an optional External Battery Module (EBM) for 1000–1920W UPS
models.
S Two standard communication ports (USB and DB-9 serial port).
S Optional Dell Network Management Card with enhanced communication capabilities for
increased power protection and control.
S Network transient protector that guards your network communications equipment from surges.
S Advanced power management with the Dell UPS Management Software for graceful shutdowns
and power monitoring.
S Sequential shutdown and load management through separate receptacle groups called load
segments.
S Firmware that is easily upgradable without a service call.
S Backed by worldwide agency approvals.
System Features
|
1
Finding Information
CAUTION: The Safety, Environmental, and Regulatory Information document provides important safety and
regulatory information.
What are You Looking For?
Find It Here
S The user's guide for my UPS
Dell UPS Disc
S The user's guide for the Dell Network Management
Card
S Dell UPS Management Software
NOTE: Documentation and software updates can be
found at
support.dell.com.
S Specifications
Dell UPS User's Guide
S How to configure UPS settings
The user's guide is available on the Dell UPS disc and
S How to troubleshoot and solve problems
on support.dell.com.
S Safety instructions
Safety, Environmental, and Regulatory Information
S Regulatory information
S Recycling information
S Warranty information
Dell Warranty and Support Information
S Terms and Conditions (U.S. only)
S End User License Agreement
S Support information Dell Support Website — support.dell.com
NOTE: Select your region or business segment to view
the appropriate support site.
2
|
Finding Information
Installation and Startup
CAUTION: Before performing the procedures in this document, read and follow the safety instructions and
important regulatory information in your Safety, Environmental, and Regulatory Information document.
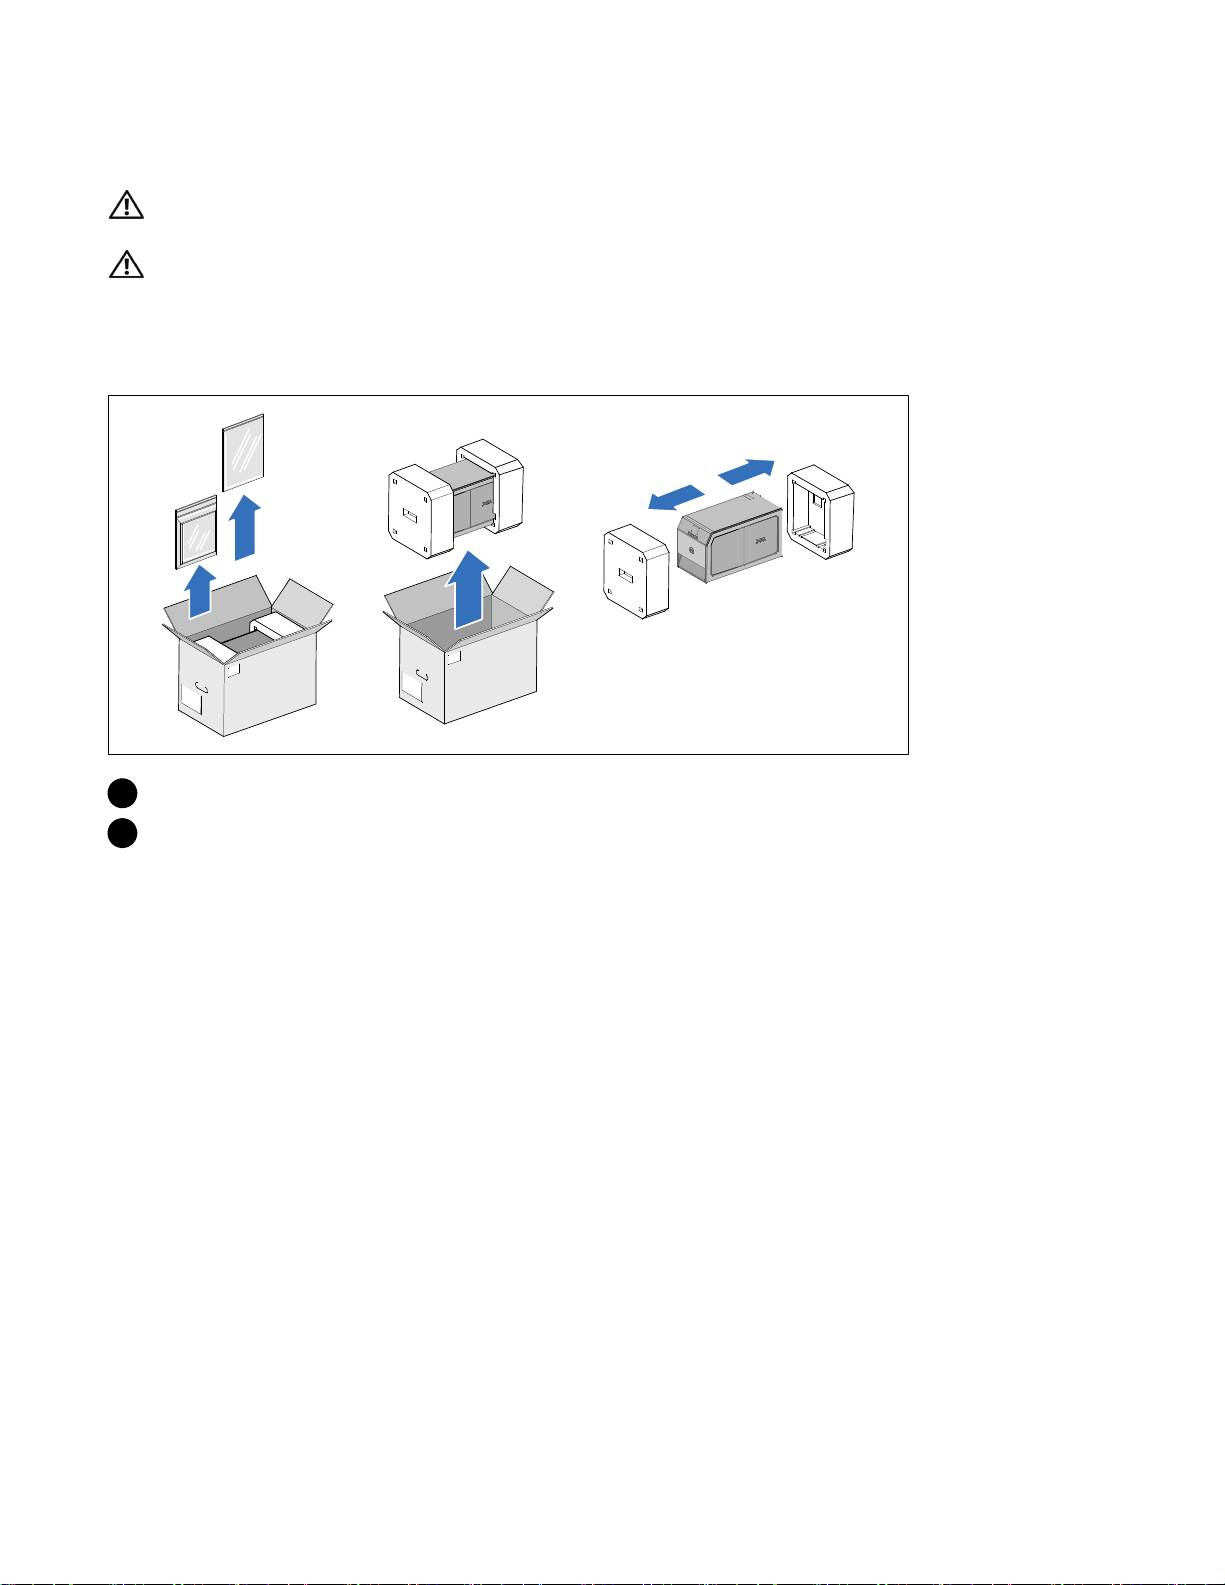
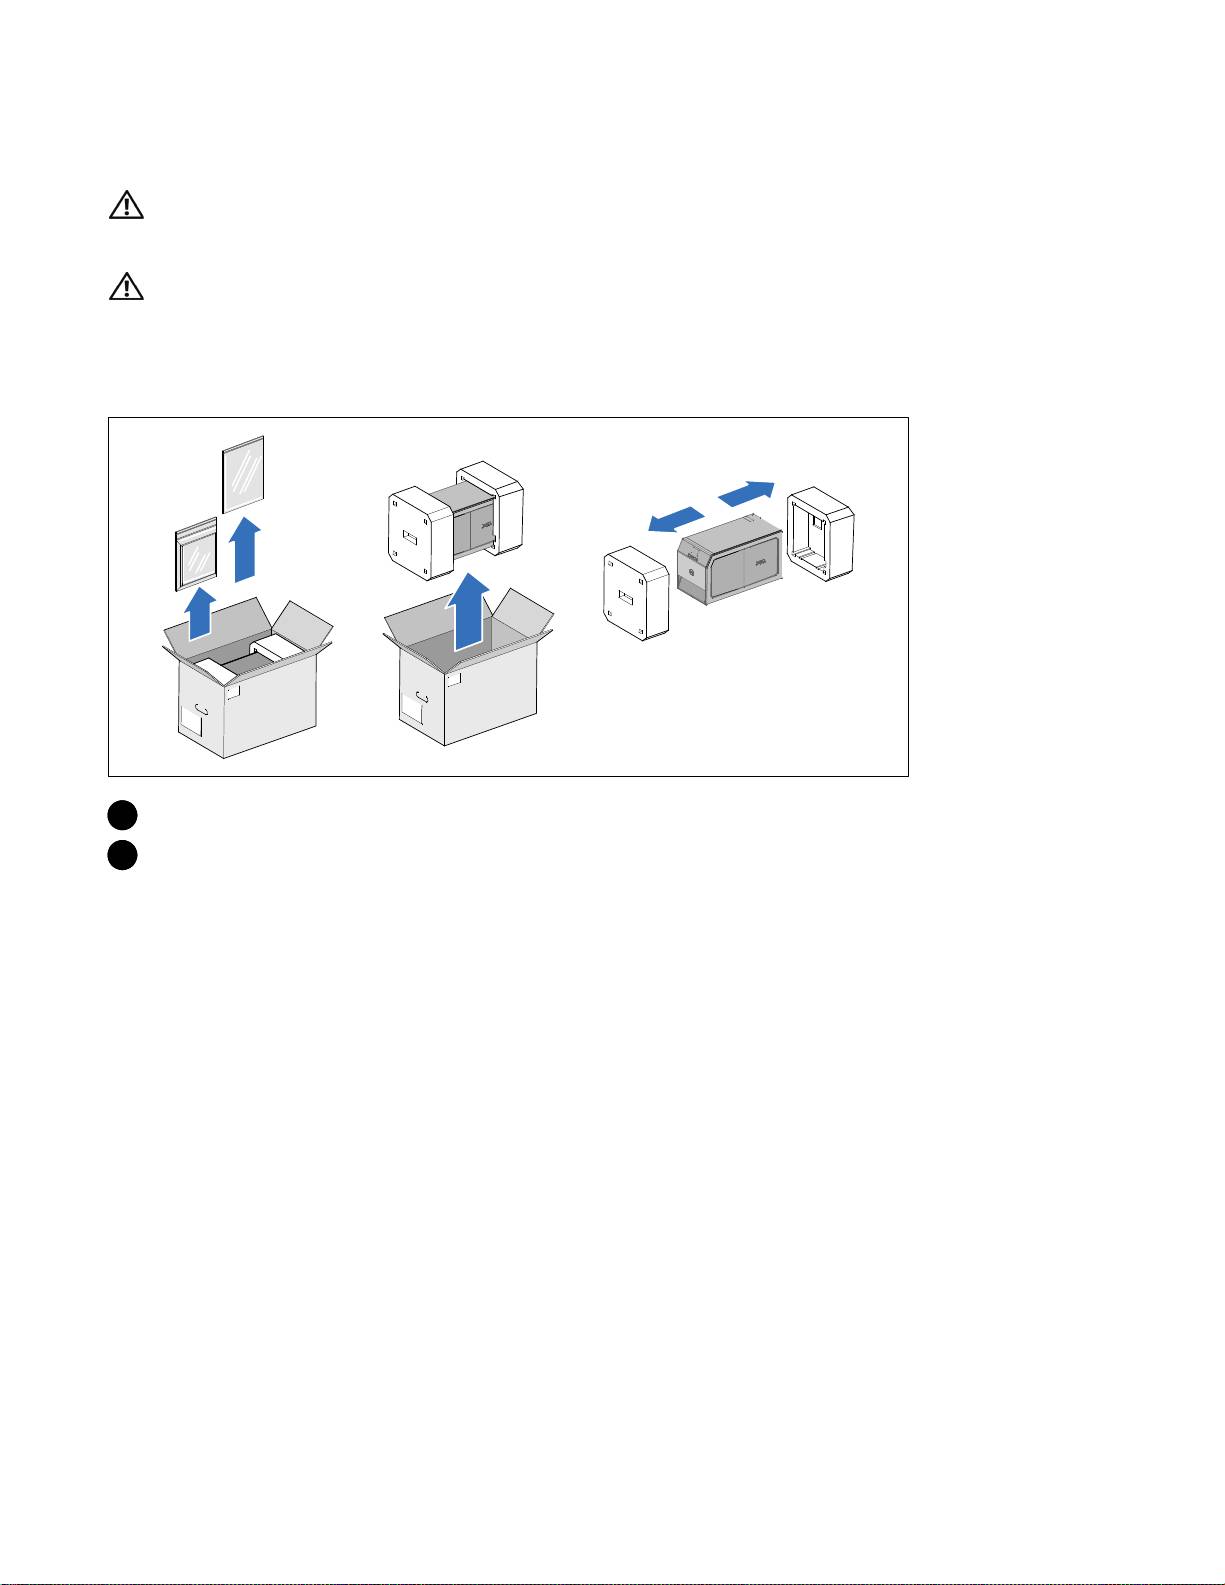
CAUTION: The cabinet is heavy [500W: 11.6 kg (25.6 lb); 1000W: 18.3 kg (40.3 lb); 1920/1500W: 30.5 kg (67.2 lb)].
Use caution to unpack and move the cabinet.
This section describes the steps to set up your system for the first time.
Unpacking the System
1 Unpack your system and identify each item.
2 Discard or recycle the packaging in a responsible manner, or store it for future use.
Installation and Startup
|
3
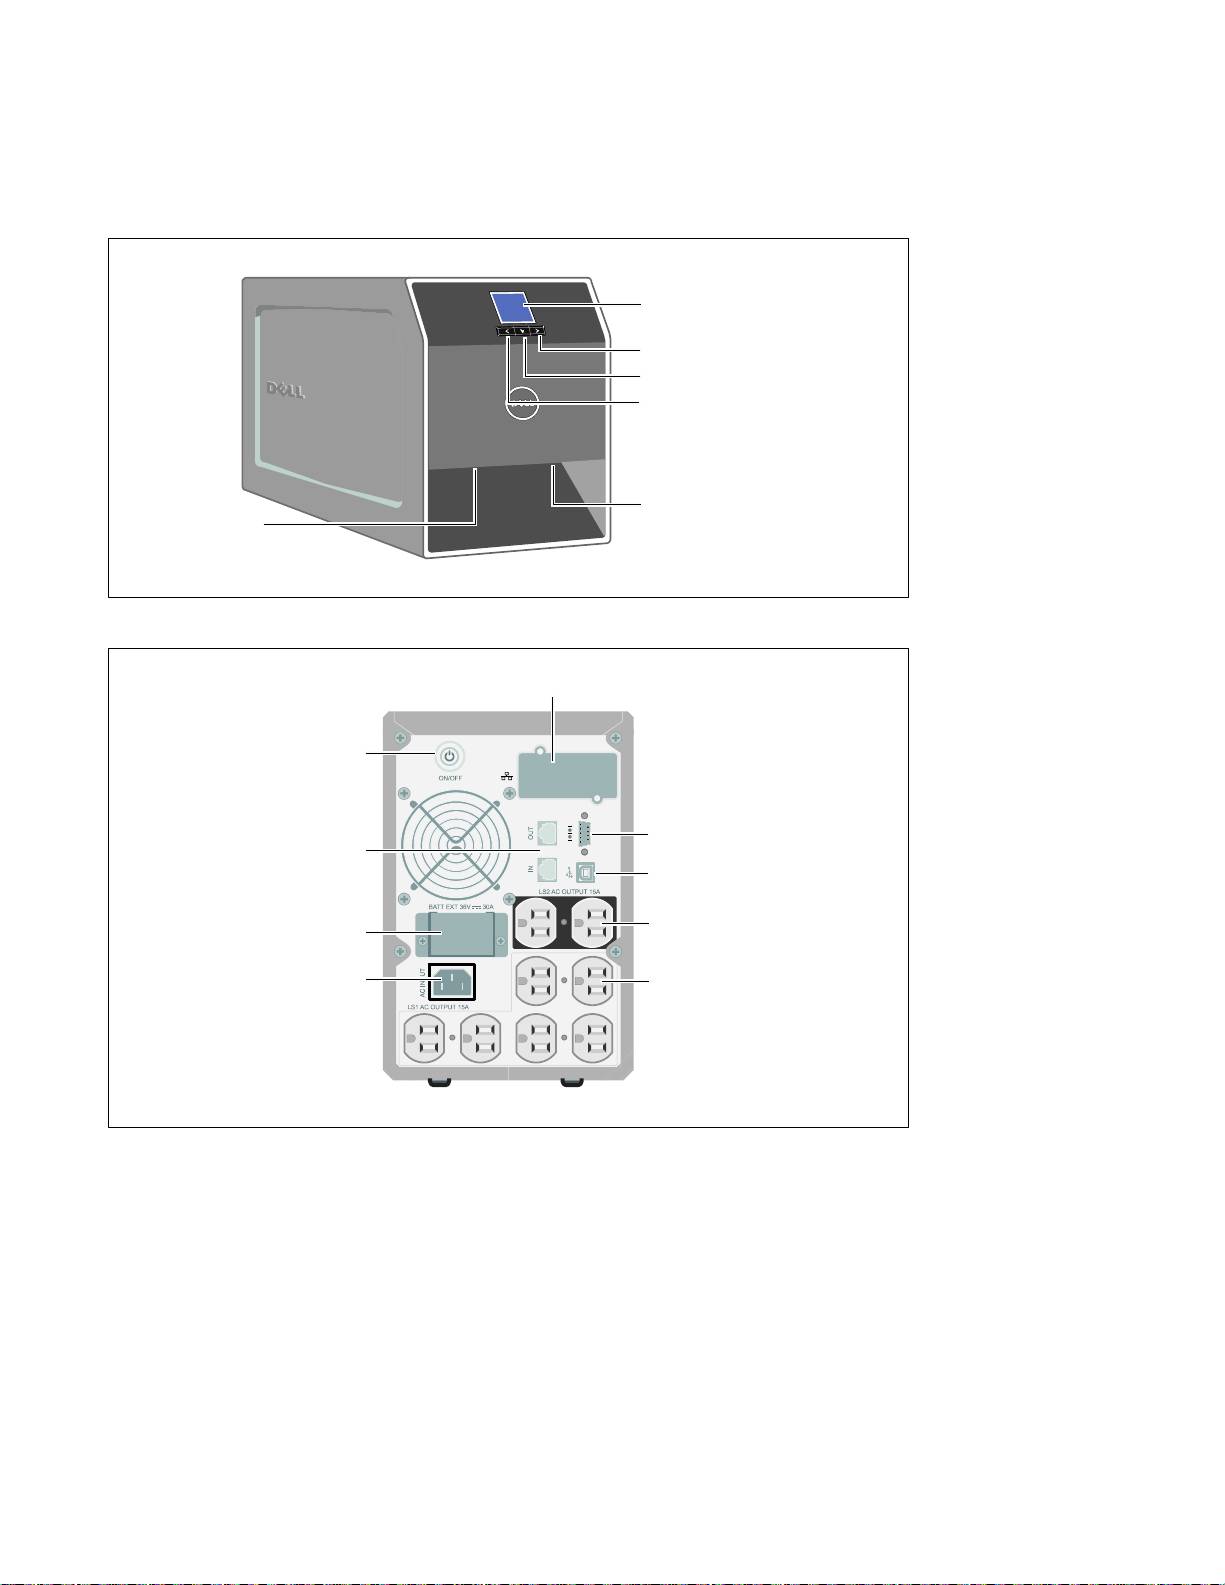
Identifying the UPS
This section shows a front and rear panel of the Dell Tower UPS. Refer to the Dell Line-Interactive
Tower UPS 500W, 1000W, and 1920/1500W User's Guide for all rear panel details.
LCD Panel
Scroll Button (Down or Forward)
Select Button
Scroll Button (Up or Back)
Cover Latch
Cover Latch
Figure 1. The Dell Tower UPS
UPS Communication Bay
On/Off Button
Network Transient
Communication Port
Protector
USB Port
Two 5-15 Receptacles
EBM Connector
(Load Segment 2)
IEC-C14 Input
Six 5-15 Receptacles
Connector
(Load Segment 1)
Figure 2. UPS Rear Panel (1000W, 120V Rear Panel)
4
|
Installation and Startup
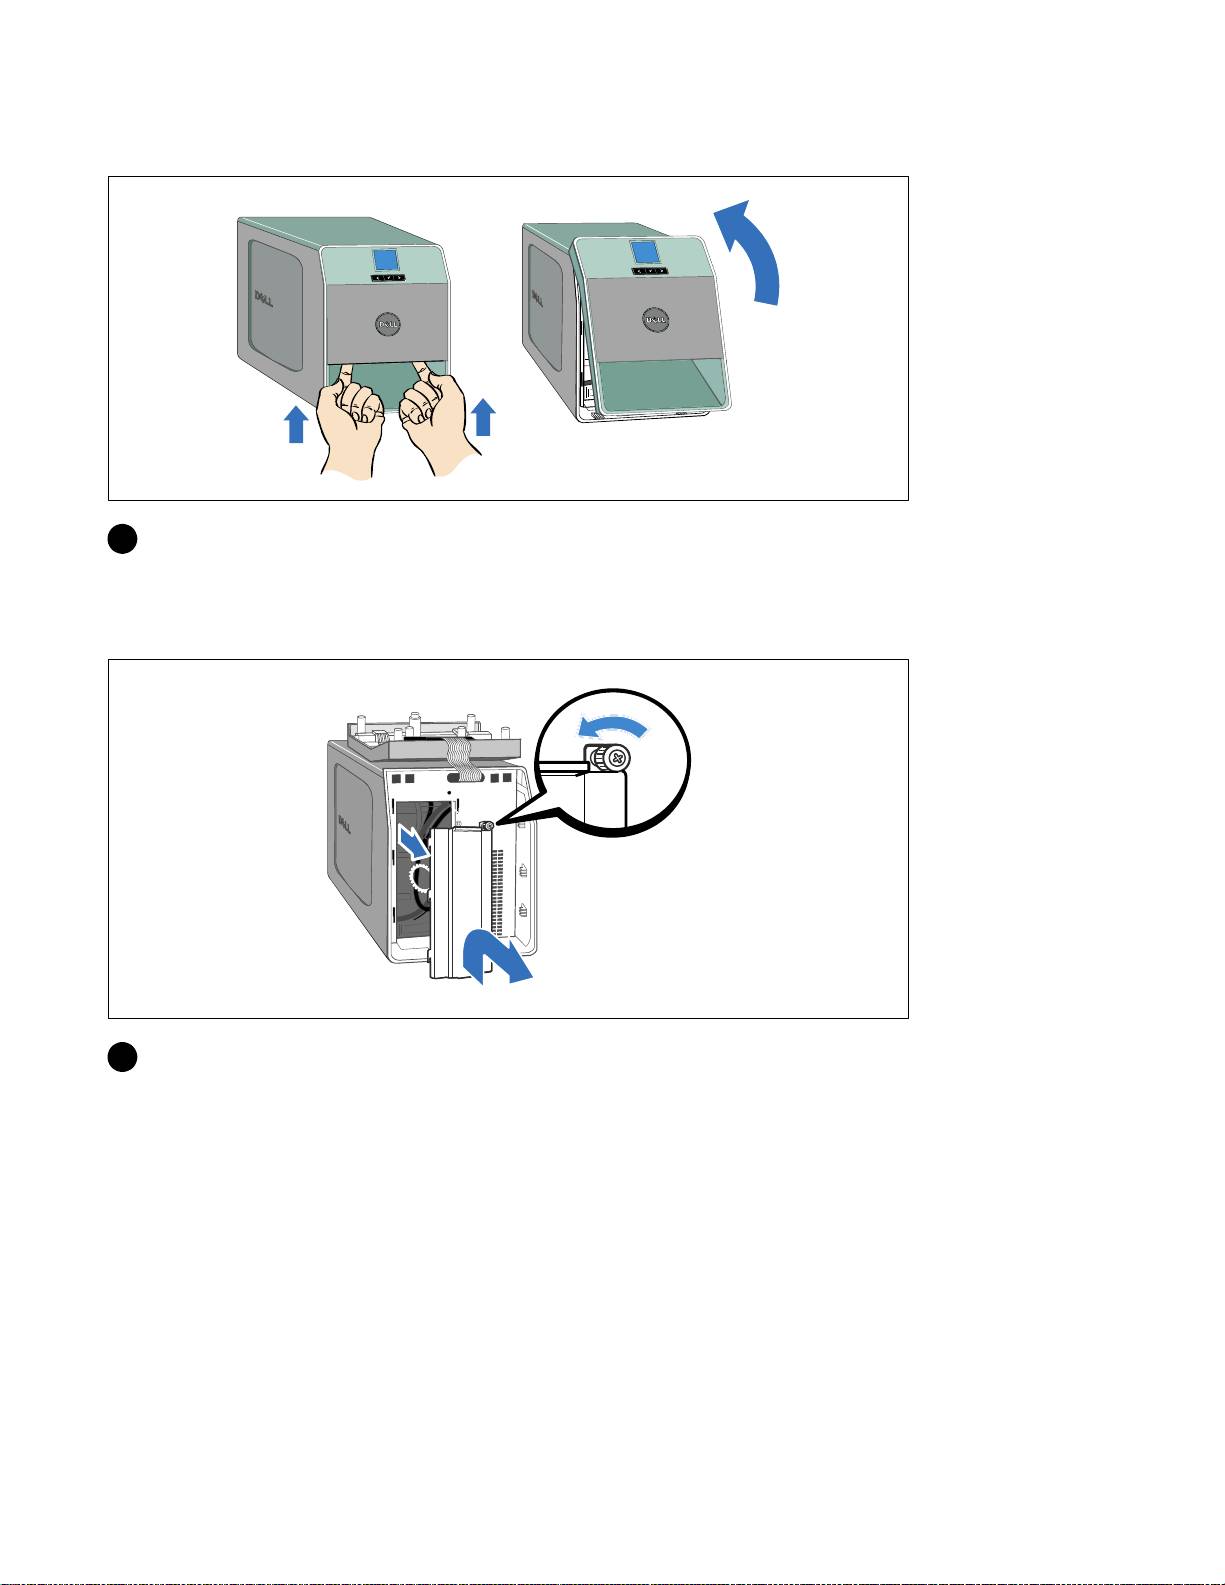
Removing the UPS Front Cover
3 Remove the UPS front cover.
Push the two cover latches to release the front cover and pull up.
Removing the Battery Cover
4 Unscrew the thumbscrew on the the metal battery cover and lift up to remove the cover.
Installation and Startup
|
5
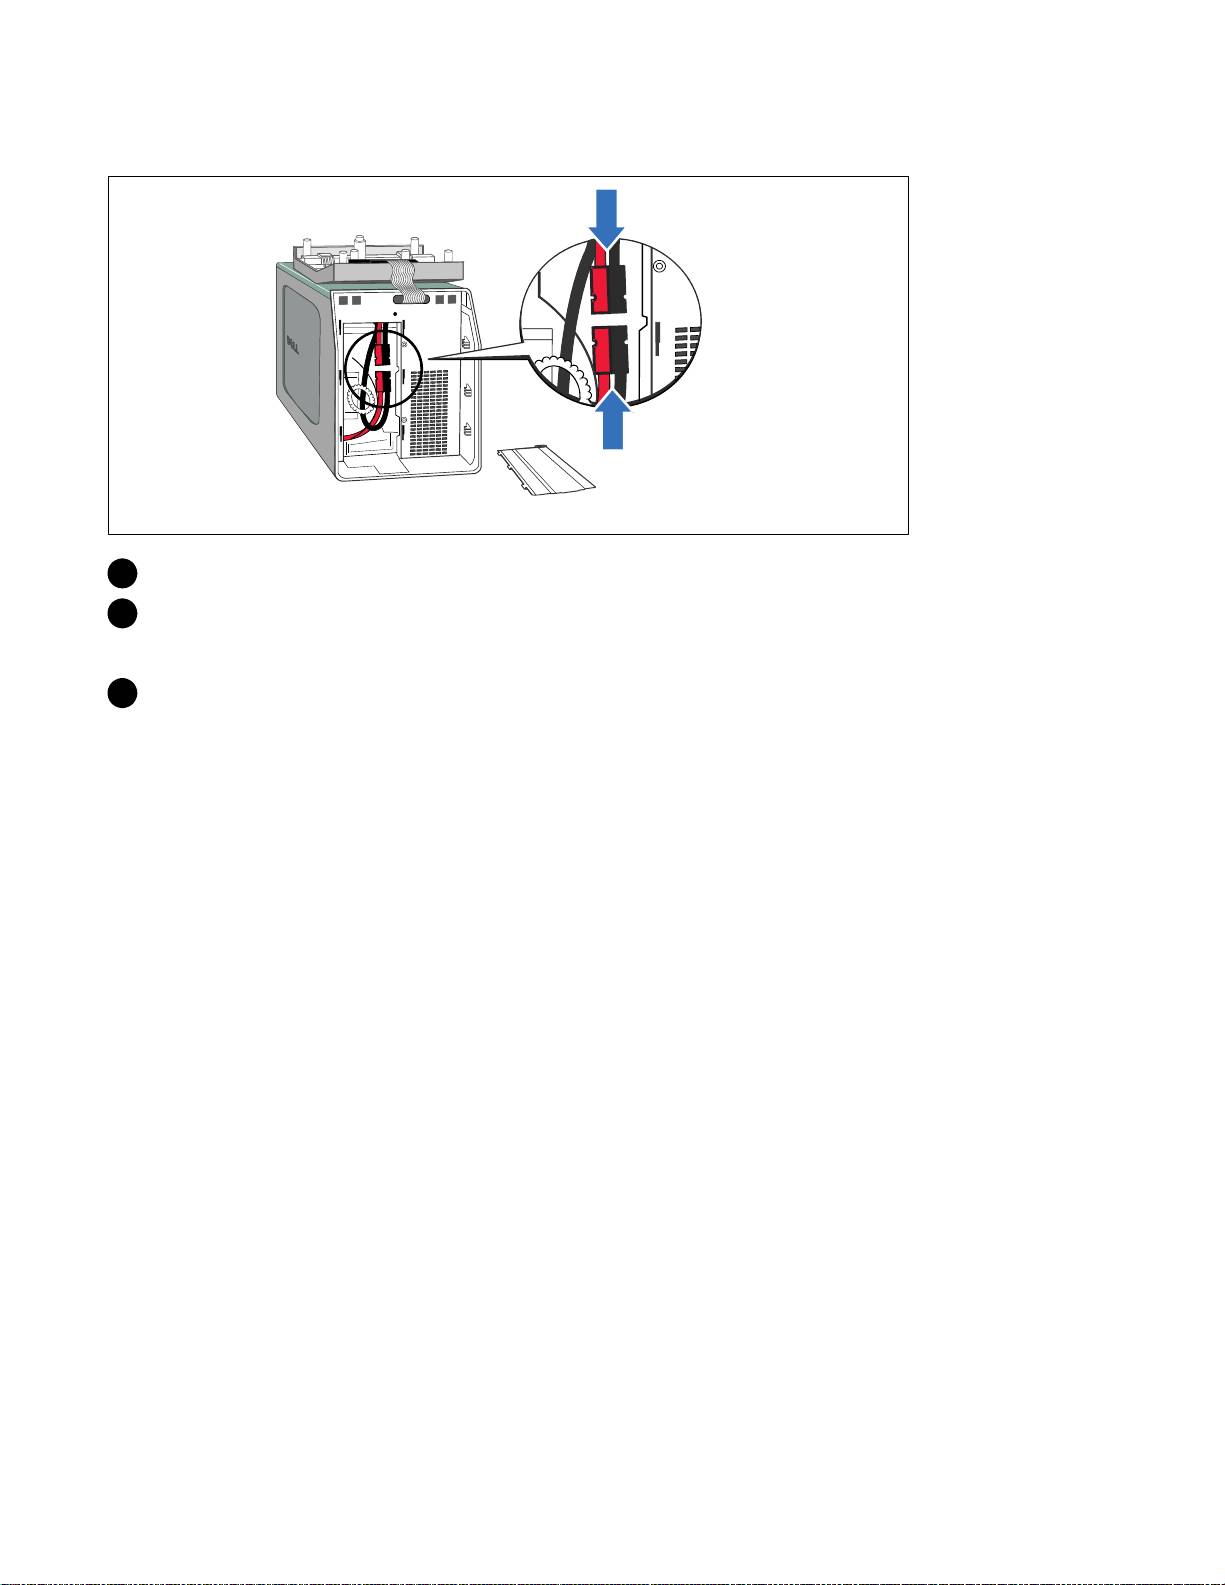
Connecting the Internal Battery Connector
5 Connect the internal battery connector.
6 Replace the metal battery cover.
Torque the screw to 0.7 Nm (6.2 lb in).
7 Replace the UPS front cover.
6
|
Installation and Startup
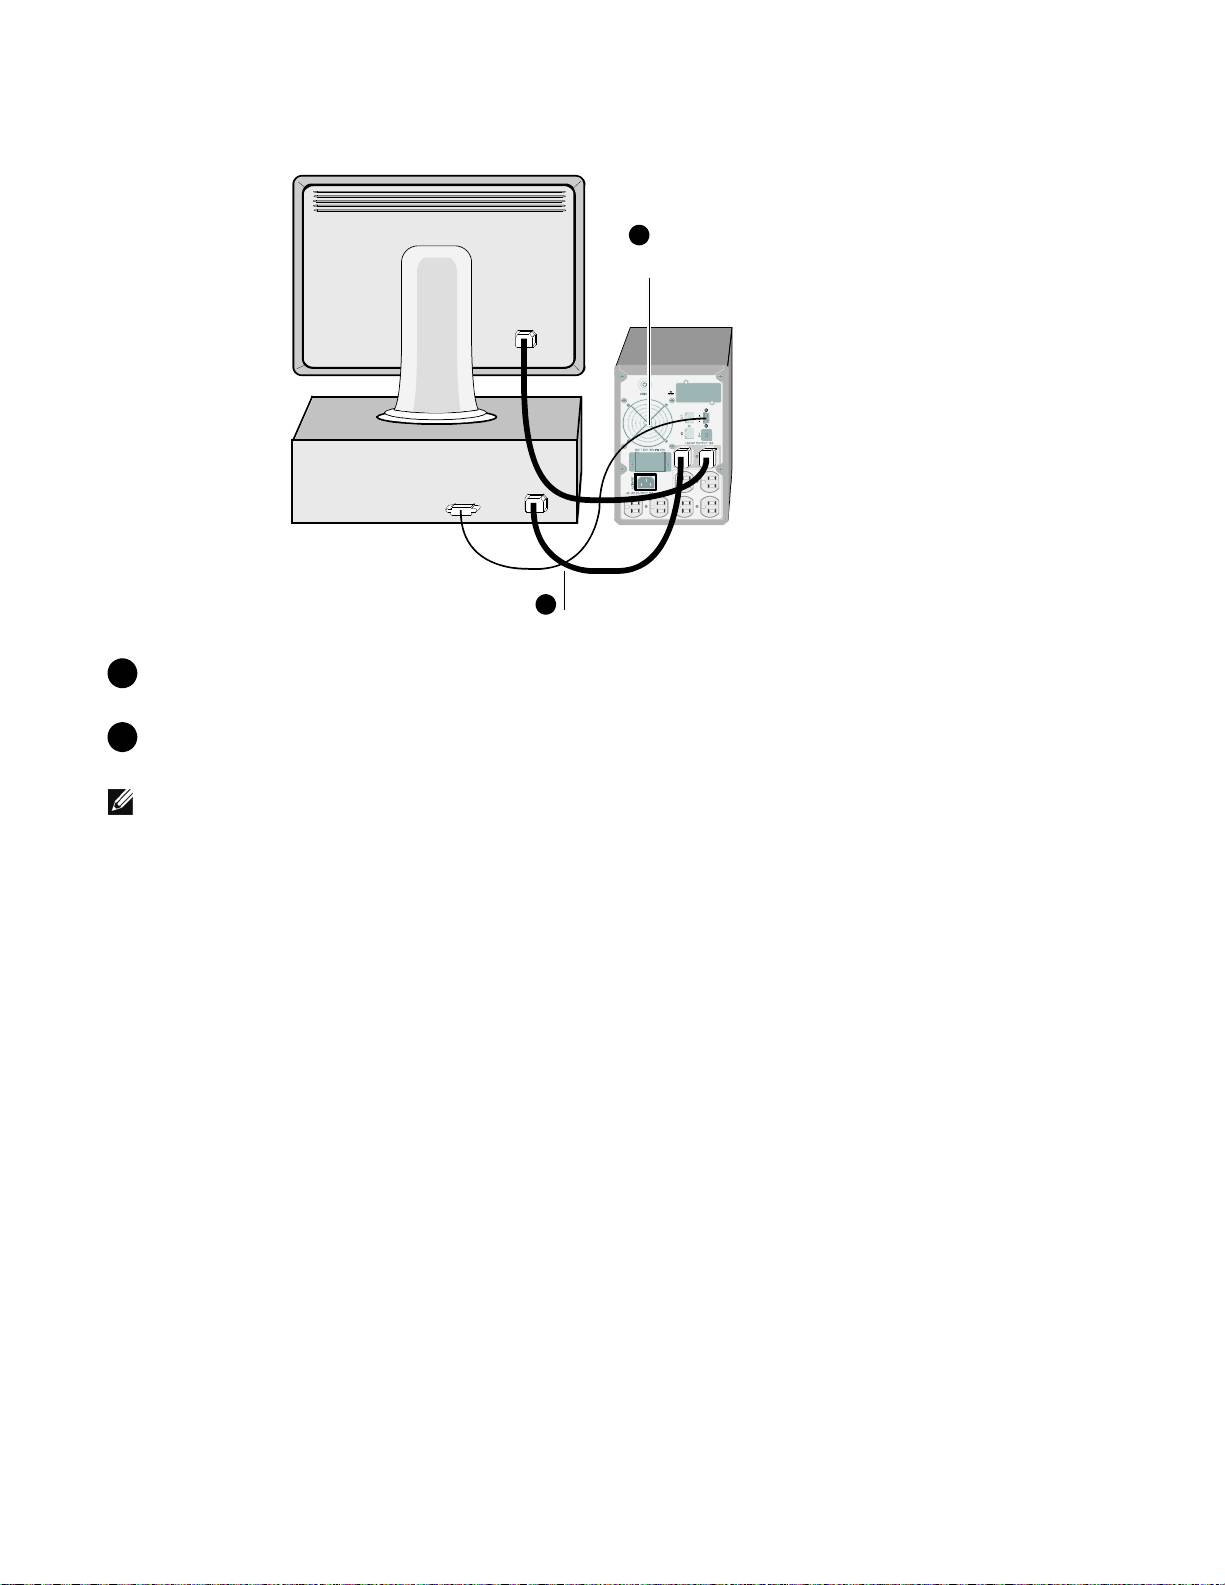
Connecting the Equipment
8
Connect communication cable from
computer to UPS (optional)
9
Connect equipment to UPS
8 If you plan to use Dell UPS Management Software, connect your computer to the USB port or
RS-232 port using the supplied cable.
9 Plug the equipment to be protected into the UPS output receptacles, but do not t urn on the
protected equipment.
NOTE:
Verify that the total equipment ratings do not exceed the UPS capacity to prevent an overload alarm.
Installation and Startup
|
7
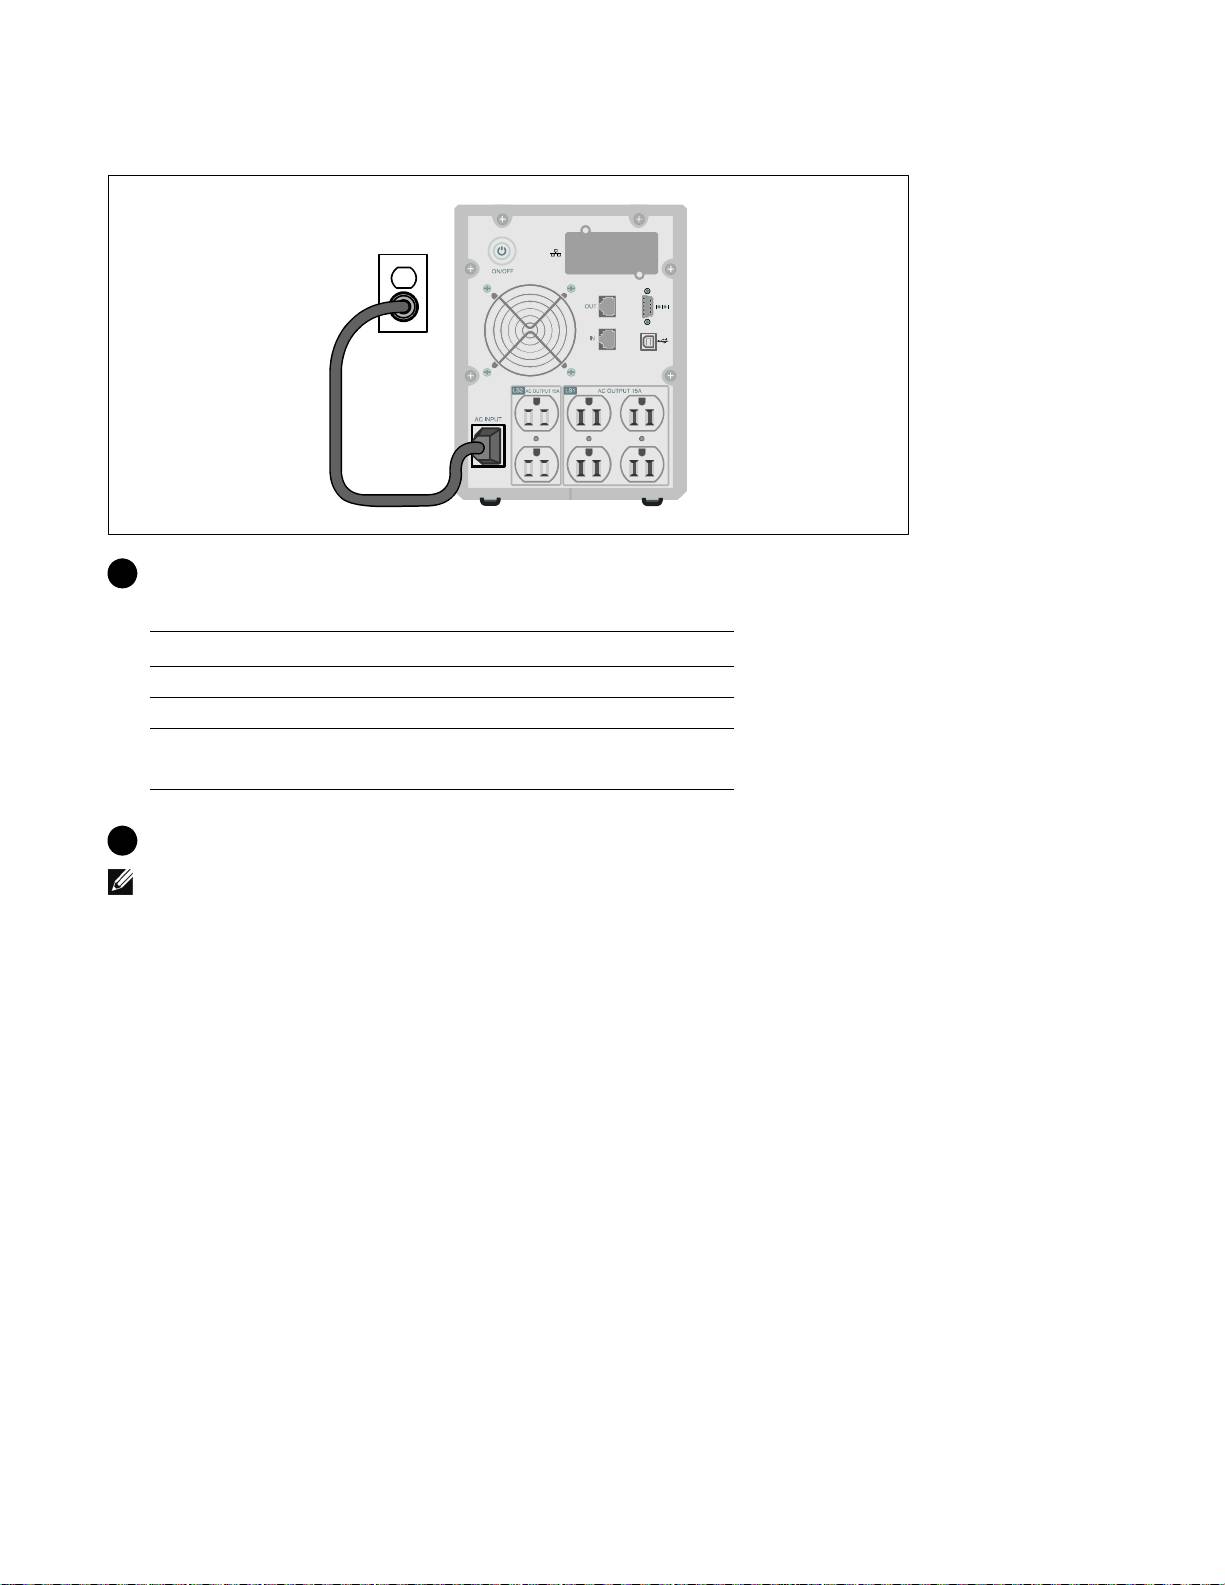
Connecting the Power Cord
10 Verify that the power input to the UPS has adequate upstream overcurrent protection:
Table 1. Minimum Upstream Circuit Breaker Rating
UPS Output Power
120V 208V 230V
500W 15A — 15A
1000W 15A — 15A
1500W (at 100V)
20A — 15A
1920W
11 Plug the UPS power cord into a power outlet.
NOTE:
For 1920/1500W models. There are two power cords in the box, one with BSMI and PSE certified
markings that can be used in Taiwan and Japan, another cord is for regions other than Taiwan and Japan.
8
|
Installation and Startup
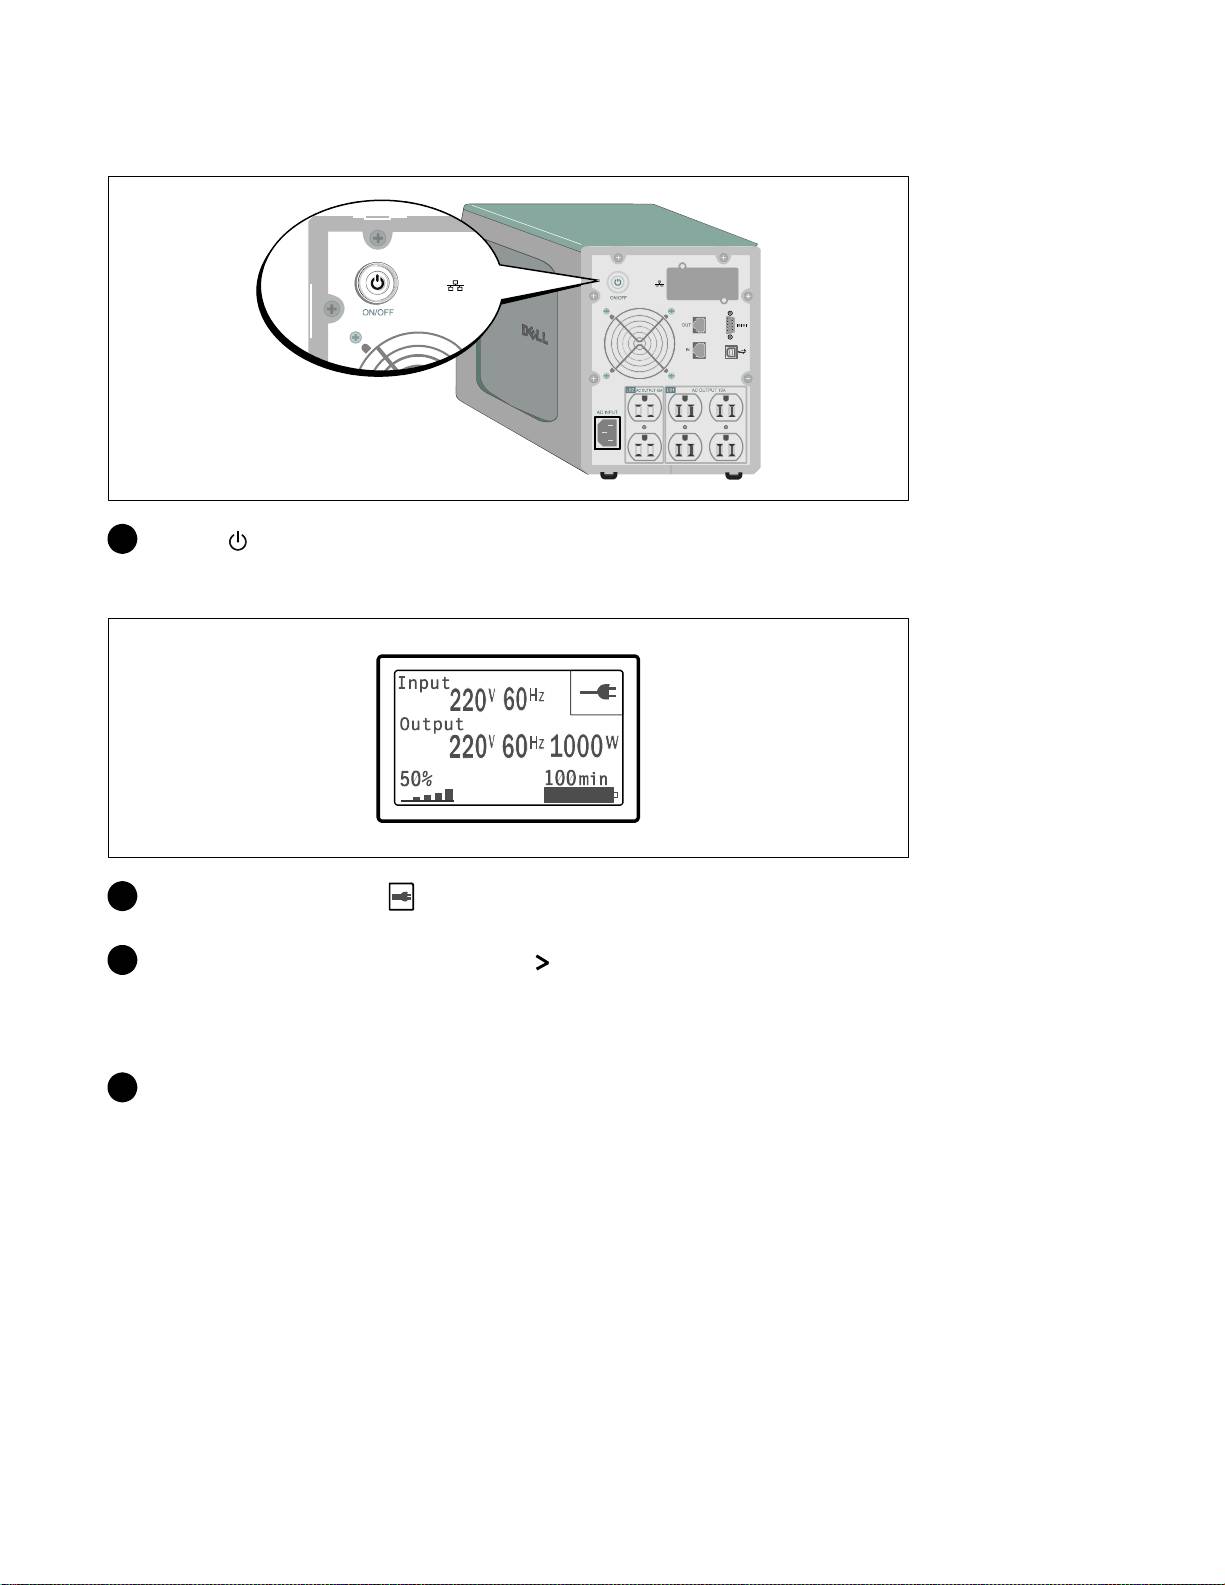
Starting the UPS
12 Press the buttonontheUPSrearpanel.
Completing the Startup
13 Verify that the Normal icon appears on the UPS status summary screen, indicating that the
UPS is o perating normally and any loads are powered.
14 On the UPS status summary screen, press the button to check for active alarms or notices.
Resolve any active alarms before continuing. See “Troubleshooting” in the Dell Line-Interactive
Tower UPS 500W, 1000W, and 1920/1500W User's Guide.
If there are no active alarms, a “No Active Alarms” message appears.
15 To change other factory-set defaults, see “Operation” in the Dell Line-Interactive Tower UPS
500W, 1000W, and 1920/1500W User's Guide.
Installation and Startup
|
9

10
|
Installation and Startup

Onduleur Tour Dellt
500 W, 1000 W et 1920/1500 W
Démarrage
avec votre système
H900N, J715N, K788N, H914N, J716N, K789N
www.dell.com | support.dell.com

Remarques et avertissements
REMARQUE : Une REMARQUE indique des informations importantes qui vous aident à mieux utiliser votre logiciel.
DANGER : Un DANGER indique une situation dangereuse imminente qui, si elle n'est pas évitée, provoquera la
mort ou une blessure grave.
AVERTISSEMENT : Un AVERTISSEMENT indique une situation dangereuse potentielle qui, si elle n'est pas évitée,
pourrait provoquer la mort ou une blessure.
ATTENTION : Une ATTENTION indique une situation dangereuse potentielle qui, si elle n'est pas évitée, peut
provoquer une blessure mineure ou légère ou des dommages matériels.
DANGER : Respectez les instructions suivantes pour aider à empêcher une situation dangereuse imminente qui, si
elle n'est pas évitée, peut provoquer la mort ou des blessures graves :
S Cet onduleur contient des TENSIONS MORTELLES. Toutes les réparations et tous
les entretiens devront être effectués UNIQUEMENT PAR UN PERSONNEL
D’ENTRETIEN AGRÉÉ. Aucune pièce à l’intérieur de cet onduleur NE PEUT
ÊTRE ENTRETENUE PAR L’UTILISATEUR.
Les informations dans ce document sont soumises à modifications sans préavis.
E 2009 Dell Inc. Tous droits réservés.
La reproduction de quelque manière que ce soit sans autorisation écrite de Dell Inc. est strictement interdite.
Marques commerciales utilisées dans ce texte : Dell et le logo DELL sont des marques commerciales de Dell Inc. ; Phillips est une marque
déposée de Phillips Screw Company.
D’autres marques commerciales et noms commerciaux peuvent être utilisés dans ce document pour se référer à des entités revendiquant les
marques et les noms ou leurs produits. Dell Inc. rejette tout intérêt propriétaire dans les marques commerciales et les noms commerciaux ne
lui appartenant pas.
Julliet 2009

Caractéristiques du système
Offrant une fiabilité et des performances remarquables, les avantages uniques de l'onduleur
comprennent :
S La régulation de tension Buck and Boost qui assure une tension régulée à votre charge en
corrigeant les fluctuations de tension.
S La capacité de démarrage-sur-batterie pour alimenter l'onduleur même si le courant du secteur
n'est pas disponible.
S Temps d'exécution prolongé avec un Module de batterie externe (EBM) en option pour les
modèles d'onduleur 1000–1920 W.
S Deux ports de communication standards (port série DB-9 et USB).
S Carte de gestion de réseau Dell optionnelle avec capacités de communication améliorées pour une
protection et un contrôle accrus de l'alimentation électrique.
S Protecteur de réseau contre les phénomènes transitoires qui protège votre équipement de
communication réseau contre les surtensions.
S Gestion avancée de l'alimentation électrique avec le Logiciel de gestion d'onduleur Dell pour des
coupures progressives et une surveillance de l'alimentation.
S Arrêt séquentiel et gestion de charge par des groupes de prises séparés appelés « segments de
charge ».
S Micrologiciel qui peut être facilement mis à niveau sans appeler le service technique.
S Soutenu par des approbations d'organismes dans le monde entier.
Caractéristiques du système
|
13

Trouver des informations
ATTENTION! Le document Informations sur la sécurité, l'environnement et la réglementation fournit des
informations importantes sur la sécurité et la réglementation.
Que recherchez-vous ?
Trouvez-le ici
S Le guide d'utilisation de mon onduleur
Disque de l'onduleur Dell
S Le guide d'utilisation de ma Carte de gestion de
réseau Dell
S Logiciel de gestion d'onduleur Dell
REMARQUE : Les mises à jour des documents et des
logiciels se trouvent sur
support.dell.com.
S Spécifications
Guide d'utilisation de l'onduleur Dell
S Comment configurer les paramètres de l'onduleur
Le guide d'utilisation est disponible sur le disque de
S Comment identifier et résoudre les problèmes
l'onduleur Dell et sur support.dell.com.
S Instructions sur la sécurit
Informations sur la sécurité, l'environnement et la
réglementation
S Informations sur la réglementation
S Informations sur le recyclage
S Informations sur la garantie
Informations sur l'assistance et la garantie Dell
S Termes et conditions (États-Unis uniquement)
S Contrat de licence de l'utilisateur final
S Informations sur l'assistance Site Internet d'assistance Dell — support.dell.com
REMARQUE : Sélectionnez votre région ou votre segment
commercial pour voir le site d'assistance approprié.
14
|
Trouver des informations
Installation et démarrage
ATTENTION! Avant de réaliser les procédures de ce document, lisez et suivez les instructions de sécurité et
les informations importantes sur la réglementation qui figurent dans votre document Informations sur la
sécurité, l'environnement et la réglementation.
ATTENTION! Le module est lourd [500 W : 11,6 kg (25,6 lb) ; 1000 W : 18,3 kg (40,3 lb) ; 1920/1500 W :
30,5 kg (67,2 lb)]. Prenez toutes les précautions nécessaires pour déballer et déplacer le module.
Cette section décrit les étapes de configuration de votre système pour la première fois.
Déballage du système
1 Déballez votre système et identifiez chaque élément.
2 Jetez ou recyclez l'emballage d'une façon responsable, ou conservez-le pour une utilisation
ultérieure.
Installation et démarrage
|
15

Identification de l'onduleur
Cette section montre un panneau avant et arrière de l'onduleur Tour Dell. Reportez-vous au Guide
d'utilisation de l'onduleur en baie Line-Interactive 500 W, 1000 W et 1920/1500 W pour tous les détails
sur le panneau arrière.
Panneau LCD
Bouton de défilement (bas ou avant)
Bouton de sélection
Bouton de défilement
(haut ou arrière)
Loquet du couvercle
Loquet du couvercle
Figure 1. Onduleur Tour Dell
Baie de communication de
l'onduleur
Bouton Marche/Arrêt
Protecteur de réseau contre les
Port de communication
phénomènes transitoires
Port USB
Deux prises 5-15
Connecteur de l'EBM
(Segment de charge 2)
Connecteur d'entrée
Sixprises5-15
CEI-C14
(Segment de charge 1)
Figure 2. Panneau arrière de l'onduleur (panneau arrière du 1000 W, 120 V)
16
|
Installation et démarrage
