Dell Latitude E4200: instruction
Class: Computer equipment, hardware, accessories
Type: Laptop/Notebook Computer
Manual for Dell Latitude E4200
Table of contents
- Notes, Notices, and Cautions
- Media Base Top View
- Side View Back View
- Docking Your Computer to the Media Base
- Undocking Your Computer From the Media Base
- Removing the Media Drive From the Media Base
- Replacing the Media Drive in the Media Base Connecting and Disconnecting External Drives Swapping External Drives While the Computer Is On
- Specifications Finding Information Document/Media/Label Contents
- Document/Media/Label Contents

fc.fm Page 1 Wednesday, August 6, 2008 10:03 AM
D e l l ™ Latitude™ E4200 | Media Base
Dell™ Latitude™ E4200 | Medijska osnova
Multimediální stanice | Dell™ Latitude™ E4200
Βάση µέσων | Dell™ Latitude™ E4200
Dell™ Latitude™ E4200 | Médiabázis
Dell™ Latitude™ E4200 | Stacja bazowa
Dell™ Latitude™ E4200 | Baza pentru suporturi optice
Стыковочная станция Dell™ Latitude™ E4200 | Media Base
Dell™ Latitude™ E4200 | Mediálna základňa
Dell™ Latitude™ E4200 | Medijska baza
Dell™ Latitude™ E4200 | Ortam Tabanı
Dell™ Latitude™ E4200 |


Dell™ Latitude™ E4200 Media Base
Model PR15S
www.dell.com | support.dell.com

Notes, Notices, and Cautions
NOTE: A NOTE indicates important information that helps you make better use of
your computer.
NOTICE: A NOTICE indicates either potential damage to hardware or loss of data
and tells you how to avoid the problem.
CAUTION: A CAUTION indicates a potential for property damage, personal injury,
or death.
____________________
Information in this document is subject to change without notice.
© 2008 Dell Inc. All rights reserved.
Reproduction of these materials in any manner whatsoever without the written permission of Dell Inc.
is strictly forbidden.
Trademarks used in this text: Dell, the DELL logo, and Latitude are trademarks of Dell Inc.; Microsoft
and Windows are registered trademarks of Microsoft Corporation in the United States and/or other
countries.
Other trademarks and trade names may be used in this document to refer to either the entities claiming
the marks and names or their products. Dell Inc. disclaims any proprietary interest in trademarks and
trade names other than its own.
Model PR15S
July 2008 P/N R962J Rev. A00
Media Base
The media base provides media capacity to your Dell™
Latitude™ E4200
.
The media base attaches to the bottom of the computer.
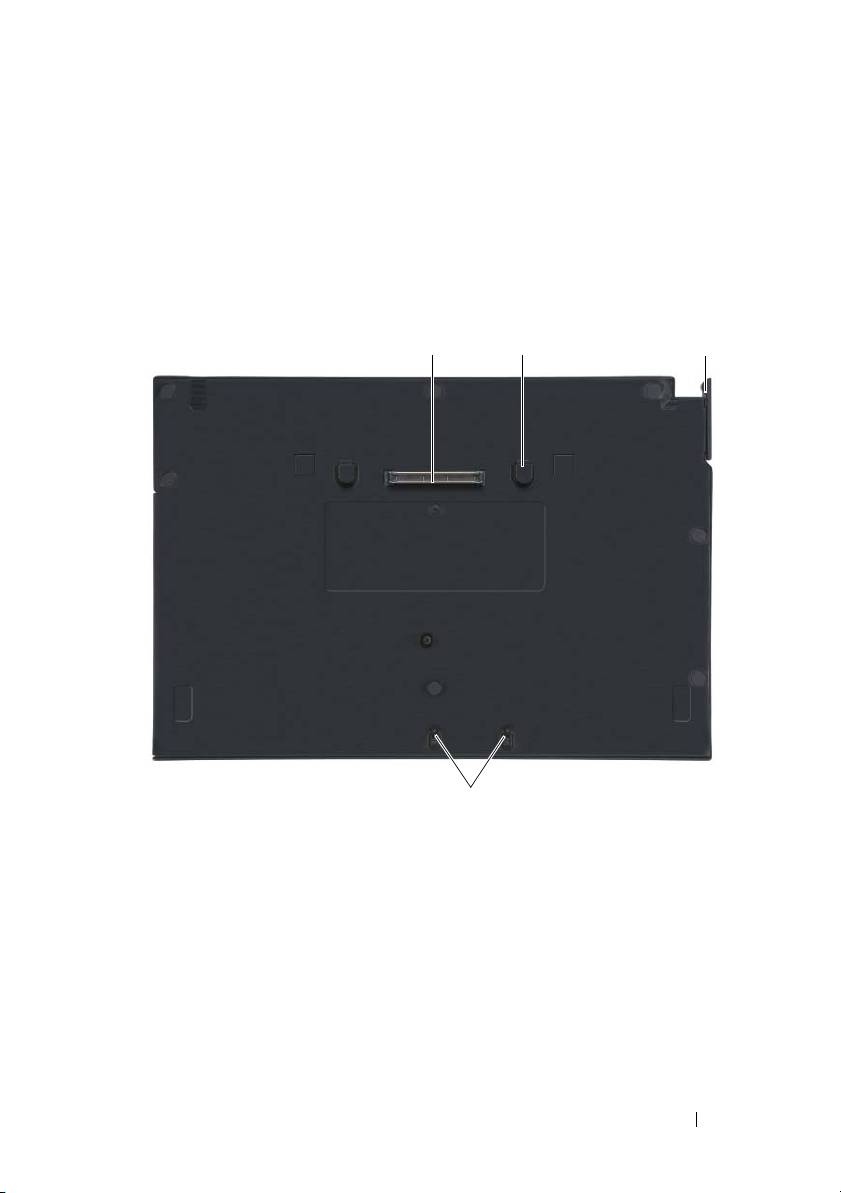
Top View
1 docking connector 2 release tabs (2)
3 release lever 4 attachment hooks
Media Base 3
1
4
2
3

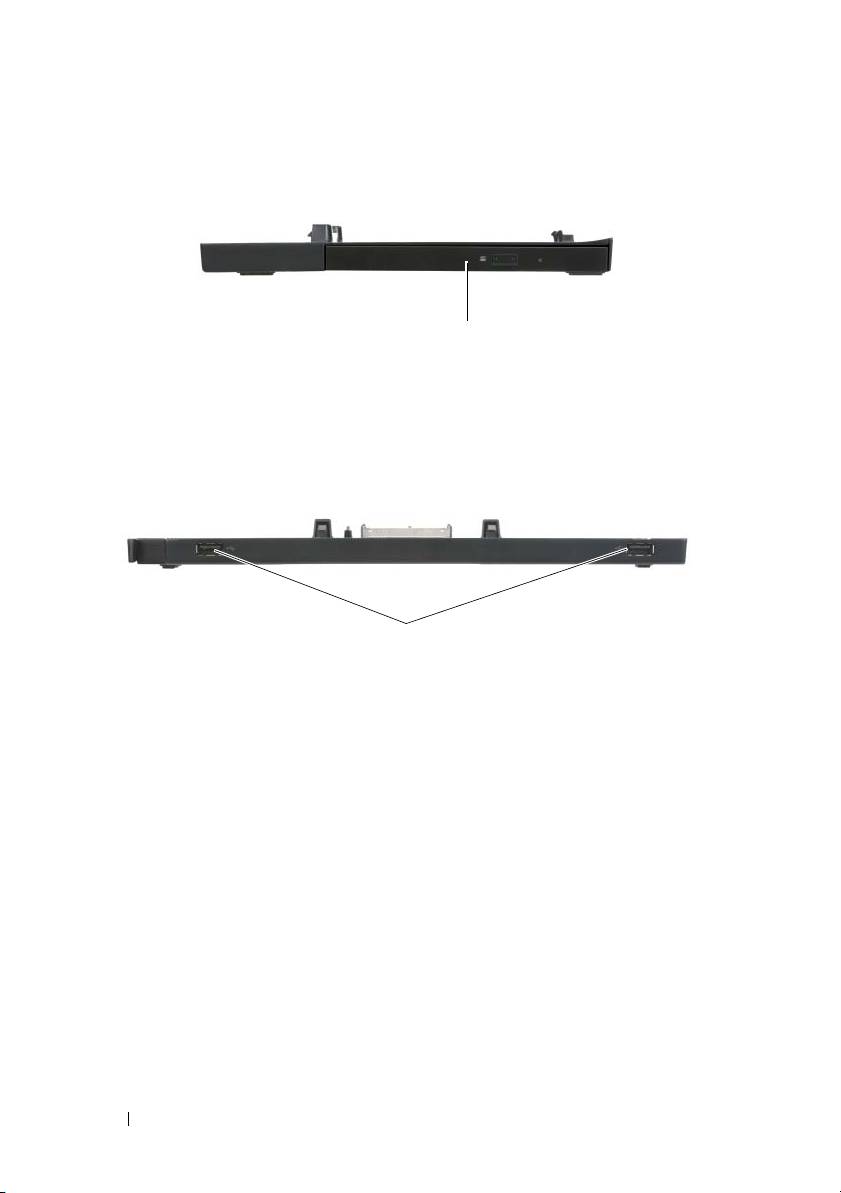
Side View
1
1 media drive
Back View
1
1USB ports (2)
4 Media Base

Docking Your Computer to the Media Base
1
Before you initially dock your computer, the operating system must
complete its setup process. To verify that the operating system setup
is complete:
a
Ensure that the computer is not connected to the media base.
b
Turn on the computer.
®
®
c
Verify that the Microsoft
Windows
desktop appears.
d
Shut down the computer through the Windows
Start
menu.
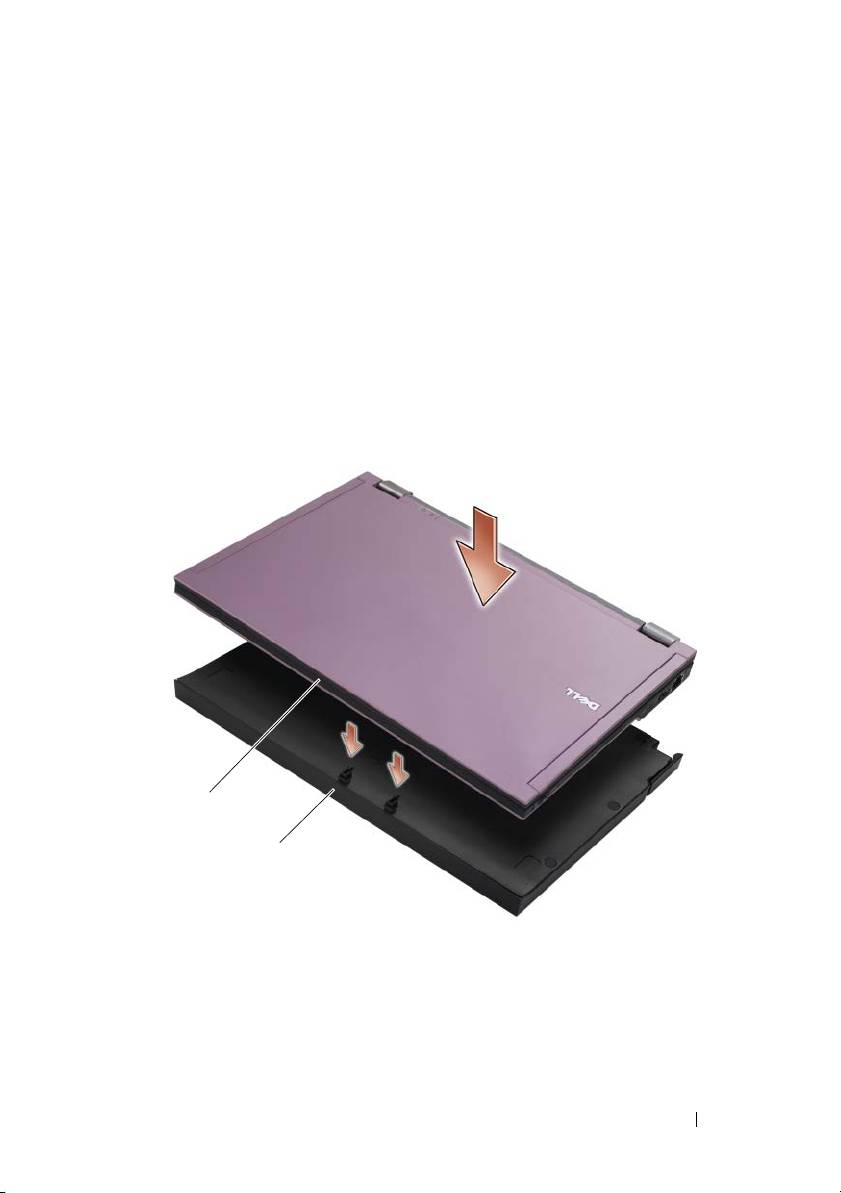
2
Align the front of the computer with the front of the media base and lower
the computer onto the media base.
1
2
1 front of computer 2 media base
Media Base 5
3
Gently press the computer into the media base until it clicks into place.
NOTE: Your computer should be turned off only when you dock your computer
for the first time.
4
Turn on the computer.
The operating system recognizes the media base.
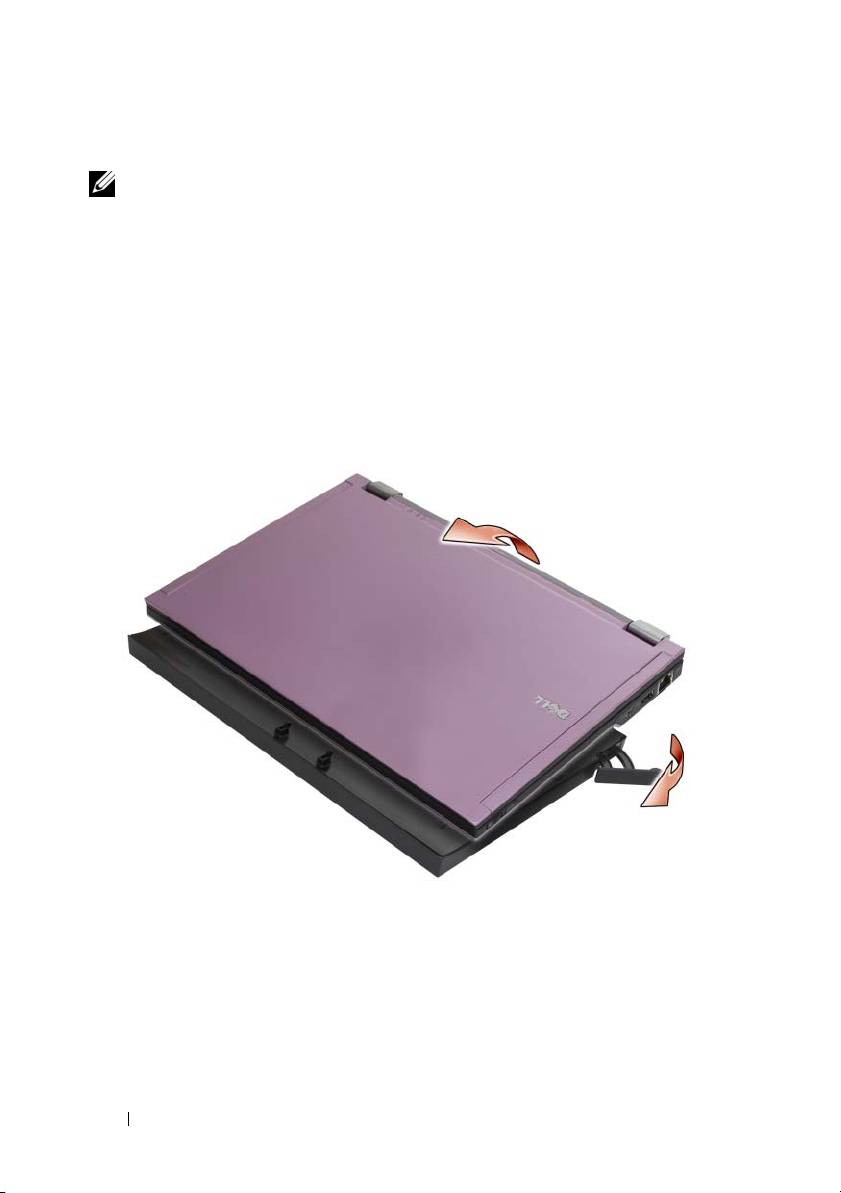
Undocking Your Computer From the Media Base
1
Before you undock your computer, save and close any open files, and exit
any open programs.
2
Pull the release lever toward the front of the computer.
3
Lift the computer out of the media base.
6 Media Base
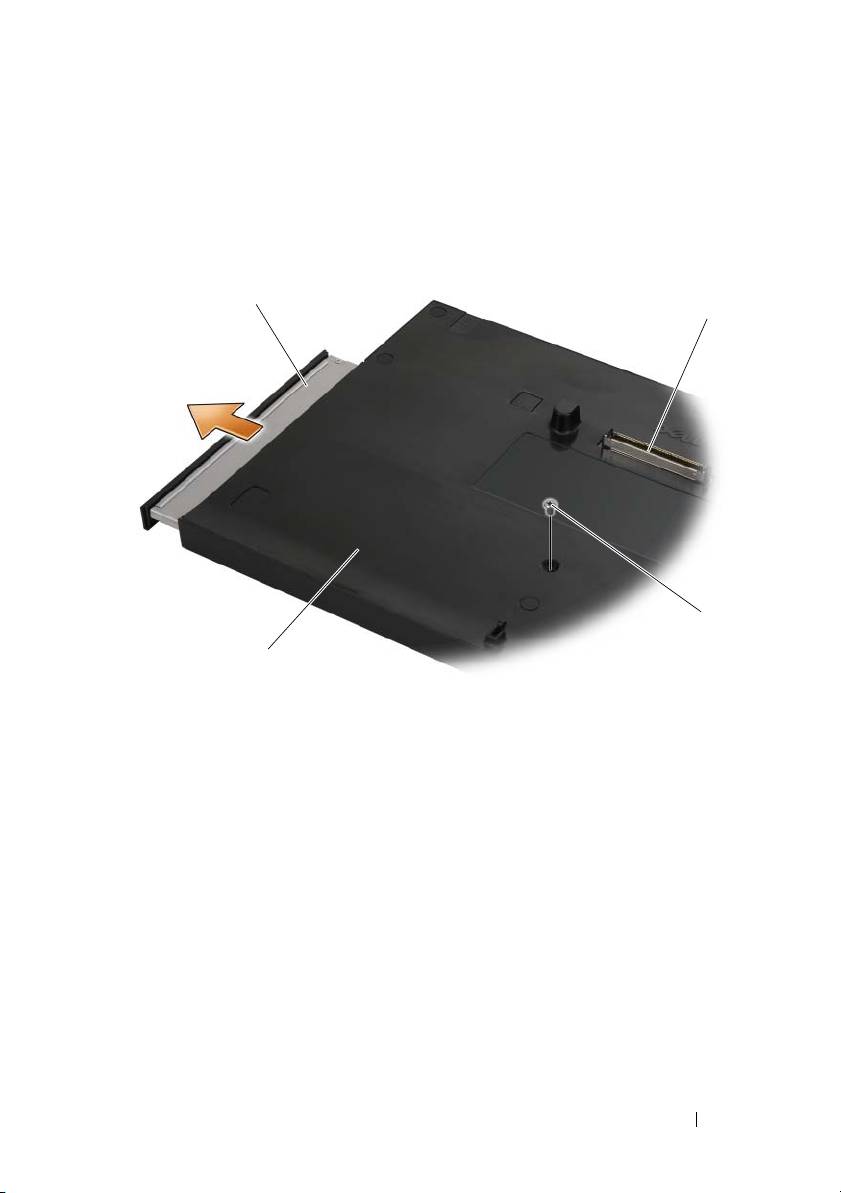
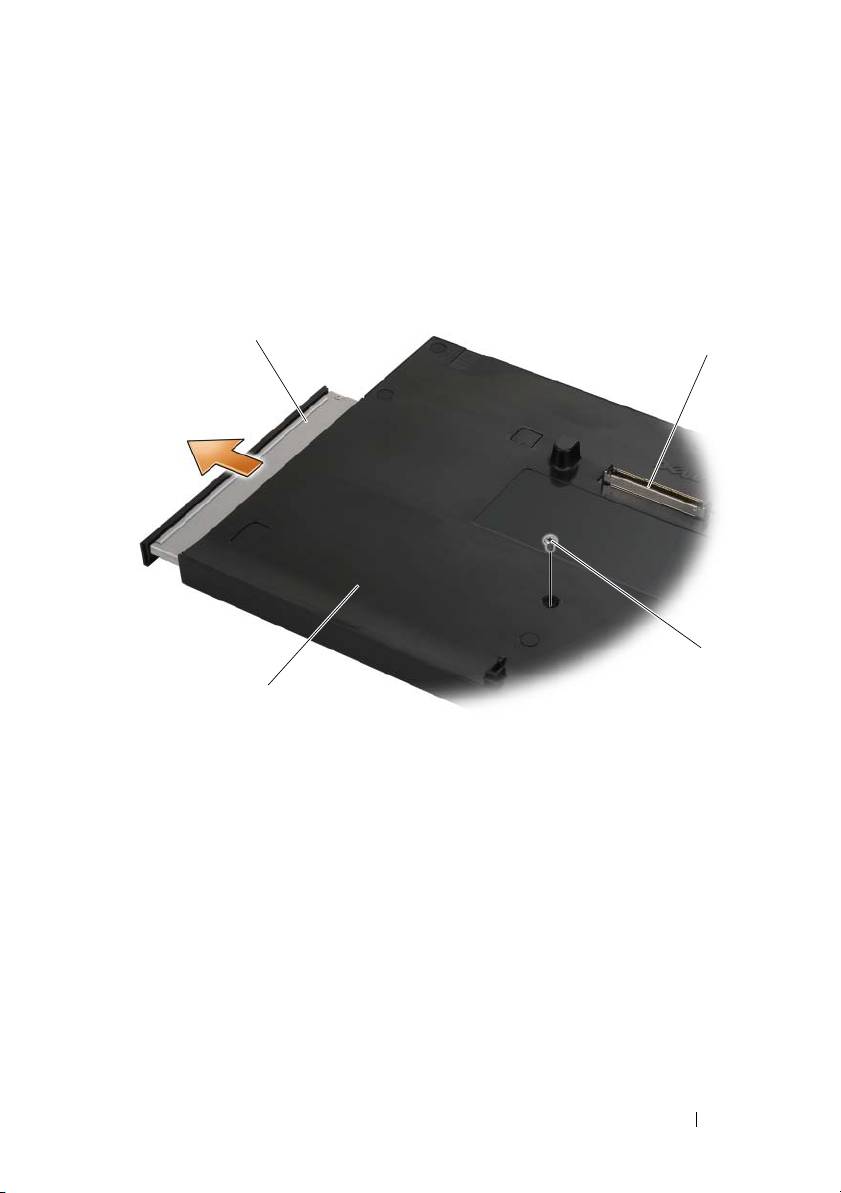
Removing the Media Drive From the Media Base
1
Locate the screw in the middle of the media base on the same side
as the docking connector, and remove the screw.
2
Slide the media drive out of the media base.
3
1 media drive 2 docking connector
3 screw 4 media base
Media Base 7
1
2
4

Replacing the Media Drive in the Media Base
1
Slide the media drive into the media base.
2
Replace the screw on the media base that holds the media drive in place.
Connecting and Disconnecting External Drives
• To connect an external drive such as a CD, CD-RW, or DVD/CD-RW
drive while the computer is off, connect the drive cable to the USB
connector on the media base (see “Back View” on page 4).
• To disconnect an external drive while the computer is turned off,
remove the drive cable from the USB connector.
• To connect and disconnect drives while the computer is on, see “Swapping
External Drives While the Computer Is On” on page 8.
NOTICE: To prevent damage to external drives, store them in a safe, dry place
when they are not connected to the computer. Avoid pressing down on them or
placing heavy objects on top of them while in storage.
Swapping External Drives While the Computer
Is On
1
Double-click the
Unplug or Eject Hardware
icon on the Windows taskbar.
2
Click the drive you want to eject.
3
Remove the drive cable from the USB connector.
4
Connect the new drive by connecting the drive cable to the USB
connector.
The operating system recognizes the new drive.
If necessary, enter your password to unlock your computer.
8 Media Base
Specifications
Physical
Height 12.5 mm (0.5 inch)
Width 278.2 mm (10.95 inches)
Depth 190.5 mm (7.5 inches)
Weight 435.8 g (0.97 lb)
Ports and Connectors
USB two 4-pin USB-compliant connectors
E-family docking 144-pin connector
Finding Information
NOTE: Some features may not be available for your media base or your computer
or in certain countries.
NOTE: Additional information may ship with your media base or your computer.
Document/Media/Label Contents
Service Tag/Express Service Code
• Use the Service Tag to identify your
computer when you use
The Service Tag/Express Service Code
support.dell.com
or contact support.
is located on your computer.
• Enter the Express Service Code to direct
your call when contacting support.
Computer Setup Instructions
• General setup instructions for your
and Quick Reference Information
computer
The Setup and Quick Reference Guide
• Technical specifications for your
may have shipped with your computer.
computer
• Troubleshooting and software
information
Media Base 9

Document/Media/Label Contents
Drivers and Utilities Media
• A diagnostic program for your computer
The Drivers and Utilities media is a CD
• Drivers for your computer
or DVD that may have shipped with your
NOTE: Drivers and documentation updates
computer.
can be found at support.dell.com.
Safety, Regulatory, Warranty, and
• Warranty information
Support Documentation
• Terms and Conditions (U.S. only)
This type of information may have
• Safety instructions
shipped with your computer. For
• Regulatory information
additional regulatory information, see the
Regulatory Compliance Homepage on
• Ergonomics information
www.dell.com at the following location:
• End User License Agreement
www.dell.com/regulatory_compliance.
10 Media Base

book.book Page 11 Friday, August 1, 2008 12:53 PM
Dell™ Latitude™ E4200
Medijska osnova
Model PR15S
www.dell.com | support.dell.com

book.book Page 12 Friday, August 1, 2008 12:53 PM
Napomene, obavijesti i oprezi
NAPOMENA: NAPOMENA ukazuje na važne informacije koje
vam pomažu da koristite svoje računalo na bolji način.
OBAVIJEST: OBAVIJEST označava moguće oštećenje hardvera
ili gubitak podataka i otkriva kako izbjeći neki problem.
OPREZ: OPREZ označava moguće oštećenje imovine, osobne
ozljede ili smrt.
____________________
Informacije u ovom dokumentu podložne su promjeni bez prethodne najave.
© 2008 Dell Inc. Sva prava pridržana.
Bilo kakvo umnožavanje bez pismene dozvole tvrtke Dell Inc. strogo je zabranjeno.
Trgovačke marke korištene u ovom tekstu: Dell, logotip DELL i Latitude su trgovačke marke Dell Inc.;
Microsoft i Windows su registrirane trgovačke marke korporacije Microsoft u Sjedinjenim Državama
i/ili drugim zemljama.
Ostali zaštitni znakovi i zaštićeni nazivi koji se koriste u ovom dokumentu označavaju ili entitete koji
su vlasnici tih znakova ili njihove proizvode. Tvrtka Dell Inc. odriče se bilo kakvih vlasničkih interesa
za navedene trgovačke znakove i zaštićene nazive, osim vlastitih.
Model PR15S
Srpanj 2008 B/D R962J Izmijenjeno izdanje A00

Medijska osnova
Medijska osnova pruža medijske mogućnosti vašem računalu Dell™
Latitude™ E4200
. Medijska osnova priključuje se na podnožje računala.
Pogled odozgora
1 priključak za spajanje 2 jezičci za otpuštanje (2)
3 poluga za otpuštanje 4 kuke za pričvršćivanje
Medijska osnova
13
1
4
2
book.book Page 13 Friday, August 1, 2008 12:53 PM
3
book.book Page 14 Friday, August 1, 2008 12:53 PM
Pogled sa strane
1
1 medijski pogon
Pogled straga
1
1 USB priključci (2)
14
Medijska osnova
book.book Page 15 Friday, August 1, 2008 12:53 PM
Postavljanje računala na medijsku osnovu
1
Prije nego što prvi puta priključite svoje računalo, operacijski sustav
mora dovršiti postupak postavljanja. Da biste provjerili je li postavljanje
operacijskog sustava završeno:
a
Uvjerite se da računalo nije spojeno na medijsku osnovu.
b
Uključite računalo.
®
®
c
Provjerite prikazuje li se radna površina Microsoft
Windows
.
d
Isključite računalo pomoću izbornika Windows
Start
.
2
Poravnajte prednji dio računala s prednjim dijelom medijske osnove
i spustite računalo u medijsku osnovu.
1
2
1 prednja strana računala 2 medijska osnova
Medijska osnova
15

book.book Page 16 Friday, August 1, 2008 12:53 PM
3
Lagano pritisnite računalo u medijsku osnovu dok ne sjedne na mjesto.
NAPOMENA:
Vaše računalo treba biti isključeno samo kada prvi puta
postavljate računalo na medijsku osnovu.
4
Uključite računalo.
Operacijski sustav prepoznaje medijsku osnovu.
Isključivanje računala s medijske osnove
1
Prije isključivanja računala, spremite i zatvorite otvorene datoteke i izađite
iz otvorenih programa.
2
Povucite polugu za otpušanje prema prednjem dijelu računala.
3
Podignite računalo iz medijske osnove.
16
Medijska osnova
Uklanjanje medijskog pogona
iz medijske osnove
1
Pronađite vijak u sredini medijske osnove na istoj strani na kojoj se nalazi
priključak za računalo i uklonite ga.
2
Povucite medijski pogon iz medijske osnove.
3
1 medijski pogon 2 priključak za spajanje
3 vijak 4 medijska osnova
Medijska osnova
17
1
book.book Page 17 Friday, August 1, 2008 12:53 PM
2
4

book.book Page 18 Friday, August 1, 2008 12:53 PM
Zamjena medijskog pogona
u medijskoj osnovi
1
Izvucite medijski pogon iz medijske osnove.
2
Vratite vijak koji drži medijski pogon na mjestu na medijsku osnovu.
Priključivanje i isključivanje vanjskih
pogona
•
Da biste priključili vanjski pogon kao što je CD, CD-RW ili DVD/CD-RW
pogon dok je računalo isključeno, priključite kabel pogona na USB
priključak na medijskoj osnovi (pogledajte „Pogled straga“ na stranici 14).
•
Da biste isključili vanjski pogon dok je računalo isključeno, isključite kabel
pogona iz USB priključka.
•
Da biste priključili i isključili pogone dok je računalo uključeno, pogledajte
„Zamjena vanjskih pogona dok je računalo Uključeno“ na stranici 18.
OBAVIJEST:
Da biste spriječili nastanak oštećenja na vanjskim pogonima,
pohranite ih na suhom mjestu kada nisu priključeni na računalo. Nemojte
ih pritiskati ili na njih stavljati teške predmete dok su odloženi.
Zamjena vanjskih pogona
dok je računalo Uključeno
1
Dvaput kliknite ikonu
Isključi ili izbaci hardver
na traci zadataka sustava
Windows.
2
Kliknite pogon koji želite izbaciti.
3
Uklonite kabel pogona iz USB priključka.
4
Priključite novi pogon tako da kabel pogona uključite u USB priključak.
Operacijski sustav prepoznaje novi pogon.
Ako je potrebno, unesite lozinku da biste otključali računalo.
18
Medijska osnova
